Avionixx SXD 1600.4 User manual

SXD
SXD
SXD
SXD
1000.1
2000.1
1100.2
1600.4
Dynamic Audio
SXD

PRACTICE SAFE SOUND
PROLONGED EXPOSURE TO SOUND PRESSURE LEVELS OVER 100dB
MAY CAUSE PERMANENT HEARING LOSS. HIGH POWERED AUTOSOUND
SYSTEMS MAY PRODUCE SOUND PRESSURE LEVELS WELL OVER
100dB. USE COMMON SENSE AND PRACTICE SAFE LISTENING.
Congratulations on the purchase of your new SXD Series amplifier. Our engineers designed your
amplifier with performance in mind, with numerous built-in features, making it user-friendly and flexible
for any elaborate system you can imagine. In addition, the highest grade materials were used in
manufacturing your amplifier to provide premium audio quality and efficiency, ensuring you, our valued
customer, the highest quality and performance that you demand deserve, without compromise.
Your SXD Series amplifier are compatible with most factory and after-market installed audio
systems. This device is high power audio amplifier. Use it responsibly. This amplifier is designed for
installation in vehicles with a 12V negative ground electrical system. Attempting to connect or operate
the amplifier in another type of electrical system may cause damage to the amplifier or the electrical
system. For optimal performance, we highly recommend that you have your SXD Series amplifier
installed by a qualified specialist. The quality of the installation greatly affects the performance and
reliability of your equipment and sound system and your warranty coverage.
To establish a safe level, start with your volume control at a low setting. Slowly increase the
volume until you can hear the music clearly without any distortion. Once you have established a
comfortable volume, try not to increase it beyond that for prolonged periods of time.
Sound Pressure Example :
30dB Library, soft whispers 90dB Subway, motorcycle, lawn mower
50dB Light traffic, normal conversation 100dB Chain saw
70dB Vacuum cleaner, hair dryer 120dB Live concert
80dB Average city traffic, garbage disposals 140dB Jet plane, gunshot
Read the instructions - Read all of the operating instructions and understand all of the safety
precautions before installing and operating the amplifier. If you feel you do not have the knowledge,
tools, and skills, we recommend that you have your SXD Series amplifier installed by a specialist.
The quality of the installation will affect the performance and reliability of your equipment and system.
Follow the instructions - The instructions are intended to help you safely obtain the best
performance from the amplifier. Carefully follow all installation and operating instructions.
Save the operating manual - Keep the manual in a safe place after installing the amplifier you may
have questions later.
1
Company Message
Product Description

Warranty Information
Please return the enclosed warranty registration card and retain your original purchase receipt and
carton should you require warranty service.
This product is guaranteed against defects in material and workmanship for a period of two(2) years
from the date of purchase or delivery to the original purchaser. During this period, Dynamic Audio
(DA) will replace or repair, at its discretion, without charge for parts or labor, any product that
exhibits such manufacturing defect. DA assumes no liability for incidental or consequent damages
or expenses related to the use or failure of this product. This warranty does not apply to any
product which has been abused or operated in or under conditions exceeding the manufacturer's
claim of serviceability. This is the sole warranty, no other warranty is expressed or implicated.
For warranty service, contact the manufacturer at the address or phone number on the back of the
manual for a return authorization. Upon receipt of authorization, return the unit, freight prepaid,
including a copy of the original purchase receipt clearly showing the date of purchase.
Serial Number: Model Number:
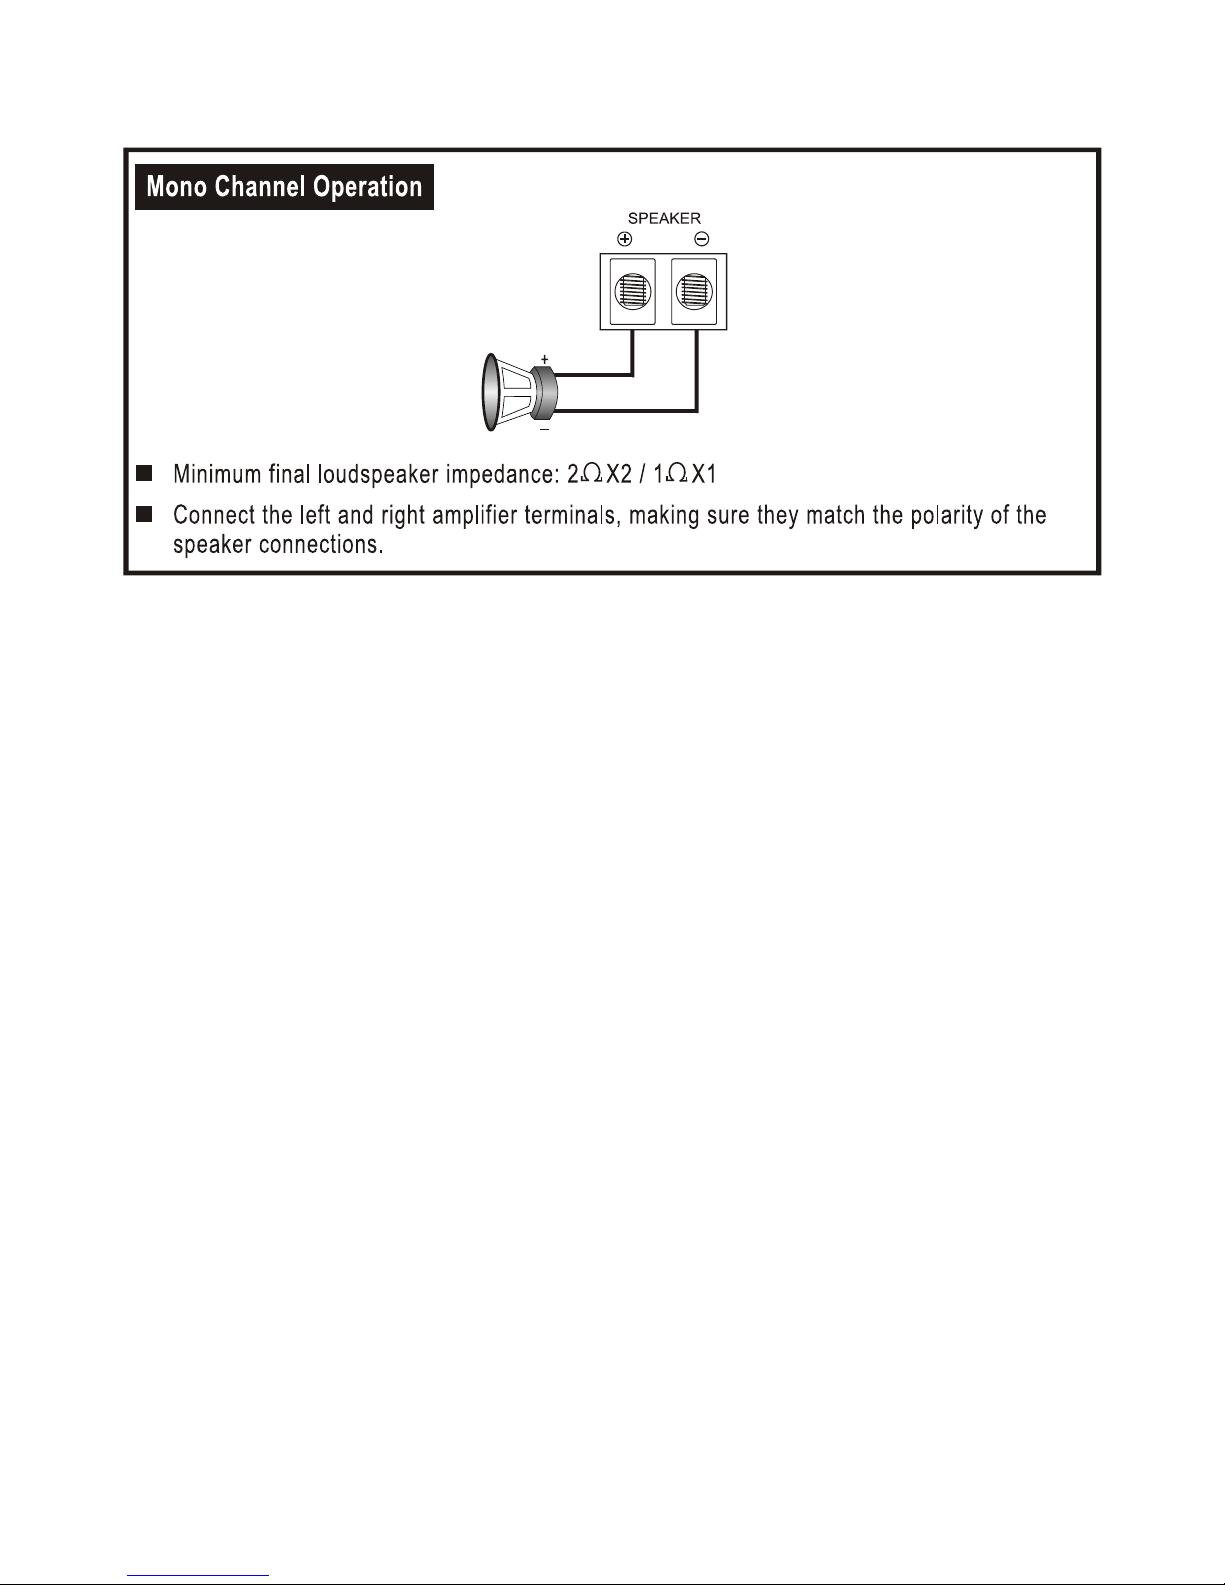
Installation and Use
Installation-Mounting the Amplifier
Step1 - Disconnect the positive(+) battery cable before mounting
the amplifier or making any connections. Check the battery
and alternator ground(-) connections. Make sure they are
properly connected and free of corrosion.
Step2 - Choose a mounting location for your amplifier. Find a
location on a flat surface away from heat and moisture.
Be sure the mounting location and the drilling of pilot holes
for mounting will not present a hazard to any wires, control
cables, fuel lines, fuel tanks, hydraulic lines, or other vehicle
systems or components. Common mounting locations are in
the trunk area, or under the front passenger seat
(min. 3 in. clearance). Choose a location with adequate air
circulation. The amplifier will dissipate heat more efficiently if
mounted vertically.
Step3 - Place the amplifier in the mounting location, and mark the
position if the holes with a marker, pen or pencil.
Carefully drill the mounting holes in the marked positions.
Step4 - Use the supplied mounting screw to securely fasten the
amplifier to the mounting surface.
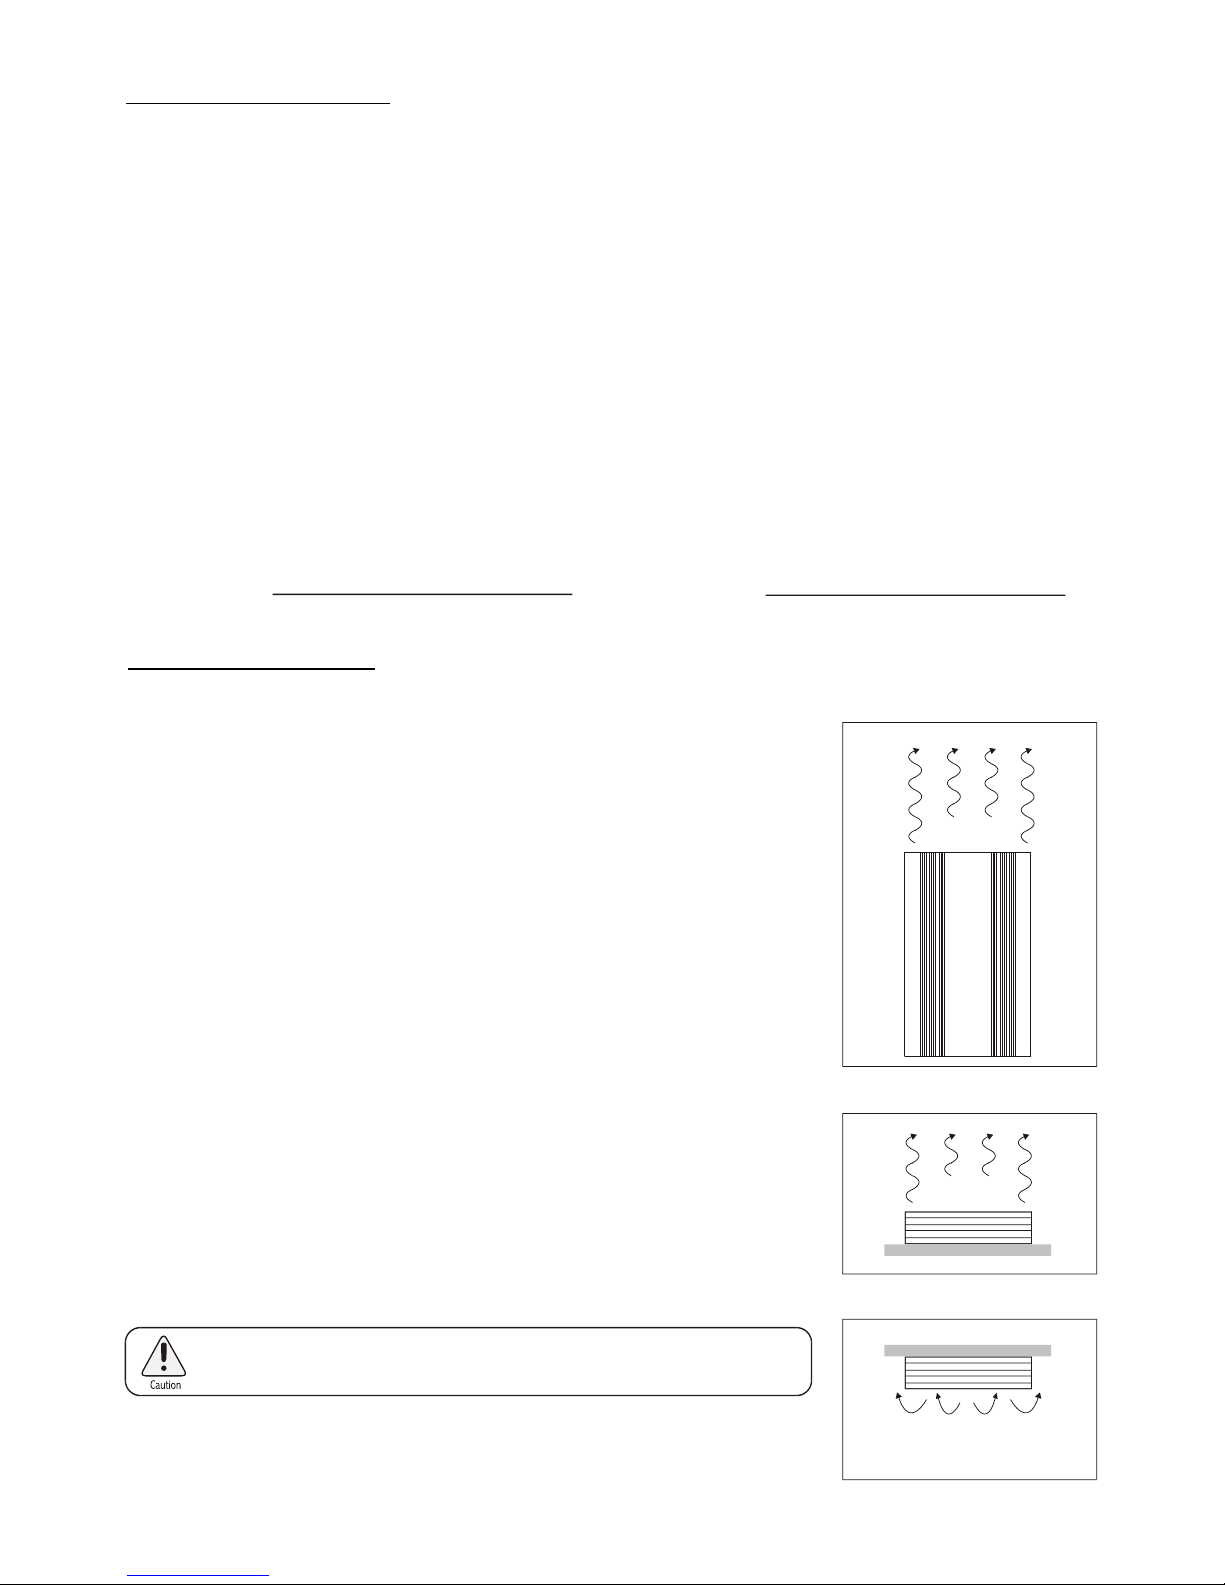
Best - Vertical Mounting
Airflow
Good - Horizontal Mounting
Never Mount Upside Down
Airflow
Check for fuel lines, fuel tanks, hydraulic lines and other
vehicle systems before drilling any pilot holes.
2

3
Installation - Power Connections
Step1- Run a power cable from the battery to the amplifier mounting location. Use rubber grommets
to protect the cable anywhere it has to go through metal. Use the following size power and
ground cable or larger for each SXD Series amplifier.
SXD 1600.4 - #4 AWG min. SXD 1000.1 - #8 AWG min.
SXD 1100.2 - #4 AWG min. SXD 2000.1 - #8AWG min.
Step2- Connect one end of a water resistant in-line fuse holder to the power cable. Connect the
other end of the water resistant fuse holder to the positive battery post with 18" (or less) of
the same cable. This fuse location will protect the system and the vehicle against the
possibility of a short circuit in the power cable. Be sure to use a fuse and fuse holder
adequate for the application. Do not place a fuse in the holder at this time. The
maximum fuse rating for each SXD Series amplifier is:
SXD 1600.4 - 60 Amp SXD 1000.1 - 30 Amp
SXD 1100.2 - 30 Amp SXD 2000.1 - 60 Amp
Step3 - Run a remote turn on cable from the switched +12V source you will be using to turn on the
system components. This may be toggle switch, a relay, or your source unit's remote trigger
wire, or power antenna trigger wire. Run this lead to the amplifier mounting location.
Use #12 AWG wire or larger.
Step4 - Locate secure grounding connection as close to the amplifier as possible. Make sure the
location is clean and free of paint and debris so it provides a direct electrical connection to
the frame of the vehicle. Connect one end of a short piece of the same size cable as the
power cable to the grounding point. Run the other end of the cable to the amplifier
mounting location.
Step5 - Connect the ground cable to the screw terminal labeled "GND"
Step6 - Connect the power cable to the amplifier at the screw terminal labeled "+12V"
Step7 - Connect the remote turn on cable to the screw terminal labeled "REM"
Warning! To protect the system and the vehicle against the possibility of a short
circuit, be sure to use a fuse and fuse holder adequate for the application.
18 in. or less
Water Resistant
In-line fuse holder

Step1 - Run #10 AWG or larger connecting wire from your speaker to the amplifier mounting
location. Use grommets anywhere, the wires have to pass through holes in the metal frame
or sheet metal. Connect to the speakers according to the type of terminals on each speaker.
Installation- Speaker Connection
Step2 - Strip 3/8" of insulation from the end of each wire and twist the wire stands together tightly.
Make sure there are no stray strands that might touch other wires or terminals and cause
a short circuit.
Step3 - Tin the ends with solder to eliminate stray strands and to provide a secure connection.
Step4 - Connect the wire ends to your amplifier as follow:
SXD 1600.4 Speaker Terminals
4
4 Channel System
SXD 1100.2 & SXD 1600.4

5
3 Channel System
2 Channel Bridged System
SXD
SXD

SXD 1100.2 Speaker Terminals
Bridged Mono
6
2 Channel Operation

SXD 1000.1 & SXD 2000.1 Amplifier Speaker Terminals
Installations - RCA Jack Connections
Low level, high impedance, gold plated RCA jacks are provided for preamp level inputs.
Use heavy duty RCA cables designed for mobile applications.
Step1 - Run the RCA cables carefully, maintaining as much as possible from power, speaker,
and accessory wiring.
Step2 - Connect the RCA plugs as follows. Make sure the RCA plugs fit tightly for a secure
connection.
7

SXD Series Input Connects
8

9
Operation
Operations-Input Level Adjustments
Adjust the input level for the marked channel(s) with a small screwdriver
through the opening marked "GAIN". Turn clockwise to increase the level,
counterclockwise to decrease. Amplifiers will run cooler and produce less
system noise at lower level settings.
Consult and experienced installation specialist for assistance in balancing the levels in multi
amplifier systems, or systems with signal processing accessories.
Operation-Built-in Crossovers
SXD1600.4, SXD1100.2 - CROSSOVER SELECTION
The SXD series amplifier have built-in low-pass and high-pass crossovers
for bi-amplifying your system. Select "FLAT or LPF or HPF" by moving the
position of the slide switch for each pair of channels. Selecting "FLAT" defeats
the crossover functions.
SXD1600.4, SXD1100.2, SXD1000.1, SXD2000.1 - FREQUENCYADJUSTMENT
After selecting the crossover functions, adjust the low pass or high pass
frequency with a small screwdriver through the opening marked "LPF" or "HPF".
Turn clockwise to set to a higher frequency, counterclockwise to set to a lower
frequency.
Operation- Protection Circuits and LED Indicators
"POWER" LED INDICATOR- Provides a visual indication that the amplifier is turned on and
functioning under normal operation.
"PROTECT" LED INDICATOR- Provides a visual indication that a problem exists and the
protection circuitry has shut down the amplifier. Turn the system off and correct the problem
before turning the system back on.
THERMAL PROTECTION- Indicated by the "Protect" LED, the amplifier will shut down if its
temperature exceeds a safe operating level. The amplifier will remain off untill it cools to safe
operating temperature. Exercise care, the exterior if the amplifier will get uncomfortably hot to
the touch before shutting down.
OVERLOAD AND SHORT CIRCUIT PROTECTION- Indicated by both the"POWER" and "
PROTECT" LEDs, the amplifier will shut down if a short circuit condition exists, or if electrical
current demands exceed safe levels.
Operation- Amplifier Accessory
Remote Control Module available for SXD1000.1, SXD2000.1
SXD 1000.1, SXD 2000.1
Gain Control - 6V to 0.2V
FLAT

10
SXD 1600.4
4
Mode
Crossover

11
SXD 1100.2
Crossover
/Output

12
SXD 1000.1, SXD2000.1
(LPF)
Subsonic Control

13
Contact the manufacturer

Specifications
Maximum power@ 4 bridged
Signal to Noise Ratio
Damping Factor
Frequency Response
Stereo Separation
Input Sensitivity
Input Impedance
High Pass Frequency
Low Pass Frequency
Dynamic Bass Boost
Remote Control Capability
RMS power @ 4 bridged
14
In pursuit of constantly improving our products, the information in this document is subject to change without prior
notice. We make no warranty of any kind regarding the material, assume no responsibility for errors, misprints,
or omissions, and assume no liability for damages resulting from the use of this information here in contained.
Maximum power@ 1 1 x 800W 1 x 1500W
RMS power @ 2 THD < 0.5%
RMS POWER@ 1 1 x 280W 1 x 580W
N/AN/A
SXD 1600.4
2 x 240 W
>- 95 dB
>- 60 dB
200mV-6V
>250
18dB
15Hz-30KHz
40-250Hz
40-250Hz
10K
N/A
4 x 120 W
N/A
2 X 700W
300 W
>- 60 dB
200mV-6V
>- 95 dB
>250
SXD 1100.2
10K
40-240Hz
40-240Hz
18dB
15Hz-30KHz
N/A
2 x 150 W
N/A
1 X 850W
N/A N/A
200mV-6V
>- 90 dB
N/A
50-250Hz
20Hz-250Hz
>200
30K
N/A
SXD 1000.1
Yes
(optional)
1 x 200 W
N/A
200mV-6V
>- 90 dB
N/A
50-250Hz
20Hz-250Hz
>200
30K
N/A
SXD 2000.1
1 x 450 W
Yes
(optional)
N/A

Dynamic Audio
7110 Motz Street
Paramount, CA 90723
P h : (562 ) 630-8755 F x : (562 ) 630-8750
www.avionixx.com
Table of contents
Other Avionixx Amplifier manuals