Avixe i-Rock User manual

AVIXE iRock Digital Music Player
User Manual
Version 1.0
By AVIXE Technology Ltd
2005/4/5

CONTENT
Introduction
Functions
Minimum System requirements
Safety precautions
Connect to PC
Packing list and appearance
Packing list
Appearance and Button layout
Basic operation
LCD display
Power on and Power off
Mode switch
Operation at Music mode
Operation at Voice mode
Operation of FM radio
Other Menu operation
Working with Computer
Card reader
Transfer files
Safety of disconnection
Other Information
Using of accessories
Using Belt Clip set
Using Neck strap
ContactAVIXE

1. Introduction
Thank you for purchasing the AVIXE Digital MP3 Player 2, a premium
digital audio player. It plays MP3 and Windows Media (WMA) files.
Your player allows you to enjoy crystal clear audio sound anywhere. You
can also obtain a larger Secure Digital Card (SD) or Multi Media Card
(MMC) to expand your player’s memory capacity.
The AVIXE Digital MP3 Player 2 is designed for your convenience. You
can record your voice into the player and transfer the voice file to your
computer.
1.1 Functions
Support MP3 and WMAdigital music format.
Customized LCD display with seven-color back light.
Standard 3.5mm Stereo sound output
Support six EQ modes: POP, Classic, Rock, Jazz, DBB, Normal.
Support multi-mode repeat playing, A-B repeat
FM radio integrated, support Auto Tuning and Manual Tuning.
Voice recording from built-in microphone.
Lock/unlock function to avoid disoperation
Support Simplified Chinese, Traditional Chinese, English, French,
German, Spanish and Italian languages.
USB SD/MMC card reader function
No driver needed for WinME/2000/XP, Mac OS X and Linux (kernel
2.4.2 and above)
Easy storage of files: managed as a removable disk in a computer.
Built-in Mini USB port.
Built-in Li-ion rechargeable battery, charging from USB port or a USB
charger.
1.2 Minimum system requirements
IBM PC Compatibles or Apple Mac with standard USB port.
• Genuine Intel® Pentium® 166 MHz or faster processor
• Microsoft® Windows® 98SE/ME/2000/XP, Mac OS X and Linux
(2.4.2 above)
• 64 MB RAM
• SVGA: 800 x 600 at 16 bit colors
• CD-ROM drive installed

1.3 Safety precautions
• Do not drop or subject the player to shock
• Do not press or put any weight on the player
• Avoid humid conditions. Do not place the player near a water source
or outlet.
• Do not clean the player with alcohol, thinner, or benzene.
• Do not disassemble the player. This may damage the player and void
the warranty.
• Allow only qualified personnel to service or repair the player, if such
is necessary.
1.4 Connect to PC
Connect the standard USB cable to the USB port of your computer and
connect the mini USB end to your iRock Digital Music Player.

2. Packing list and appearance
2.1 Packing list
AVIXE iRock package includes the following items, please check after
you purchased.
1. iRock player
2. Earphone
3. USB cable
4. Belt clip Set
5. 8cm CDROM
6. Quick Guide
7. Neck Strap
2.2 Appearance and Button layout
a. Menu/A-B: Enter the Menu Page/set A-B repeat while playing
b. On/Off/Play/Pause/Stop/Exit: Power On and Off, Play or Pause/Stop
the music, Exit from Sub-Menu, Save frequency at FM radio mode.
c. FF: Fast Forward/Next song/FM frequency increase.
d. REW: Fast Review/Previous song/FM frequency decrease

e. Vol-: Volume decrease
f. Vol+: Volume increase
g. Reset hole: Reset the player by a nail when necessary
Note: The buttons have two operation mode:
Short Press: Press and release within 2 seconds
Long Press: Press and release longer than 2 seconds.
In the following operation description, if not specified, it should be short
press.
3. Basic Operation
3.1 LCD display

a. Play/Pause
b. A-B repeat
c. Battery level
d. Music Mode on/off
e. Voice/Record Mode status
f. Song File Name
g. EQ information/Bit rate of the song/Volume indicator
h. Song Number/Playing Time/Lock and repeat indicator
3.2 Power On & Power Off
At power off state, long press On/OFF button, it will power on the player,
The LCD will display AVIXE and iRock logo then enter into the standby
mode. At the same time, the backlight will be on during the starting up.
The standby display is show below, press Play/Pause to play music files.
When playing any music files or FM radio, press “Power/Play” key to
power off the player.
The words “power off” will be displayed during the power off process.
At the state of voice recording, you have to save the recorded files(press
Mode key) first then long press the PLAY key to power off.
To saving the battery power, iRock will auto turn off if there is no any
operation within 30 seconds at the standby mode. At Pause mode, the
auto power off period is 90 seconds.

3.3 Mode switch
The iRock player has three working modes: Music mode, Voice mode and
FM radio Mode.
The mode switch operation is listed as the first selection in the MENU.
Music Mode: Play MP3 and WMAmusic files. (Default mode at power
on).
Voice Mode: Record sound by the built-in Microphone or Play the
recorded voice files.
FM radio Mode: Listen to the FM radio
3.4 Operation at Music mode
3.4.1. Play/Pause/Standby/Stop
At standby or pause state, press PLAY key to start playing, the LCD
display of playing state is here:
To pause while playing, press PLAY key again.
While at playing or pause state, long press the PLAY key to enter standby

mode. The LCD display at standby mode is shown here:
3.4.2. Previous Song/Next Song
To select previous song, please turn the MODE switch to the up direction
once. For the next song, turn the MODE switch to the down direction
once.
3.4.3. Adjust the Volume
Press Vol+ or Vol- to adjust the volume while playing music or FM radio.
The volume indicator will be displayed while doing the adjustment.
3.4.4. A-B repeat
During playing, Press MENU once to choose start point (A), then press
once again to choose the end point (B). The player will repeat playing the
part between A and B. It also will be indicated on the LCD screen.
Picture here:
Set Start Point A Set End point B

To Pause A-B repeat, press PLAY key.
To Exit A-B repeat, Press MENU once.
3.4.5. EQ selection
During the playing, long press MODE key to enter MENU, under the EQ
selection, you can choose Rock, POP, Normal, JAZZ, Classic and DBB.
It will be indicated on the left lower corner of LCD screen.
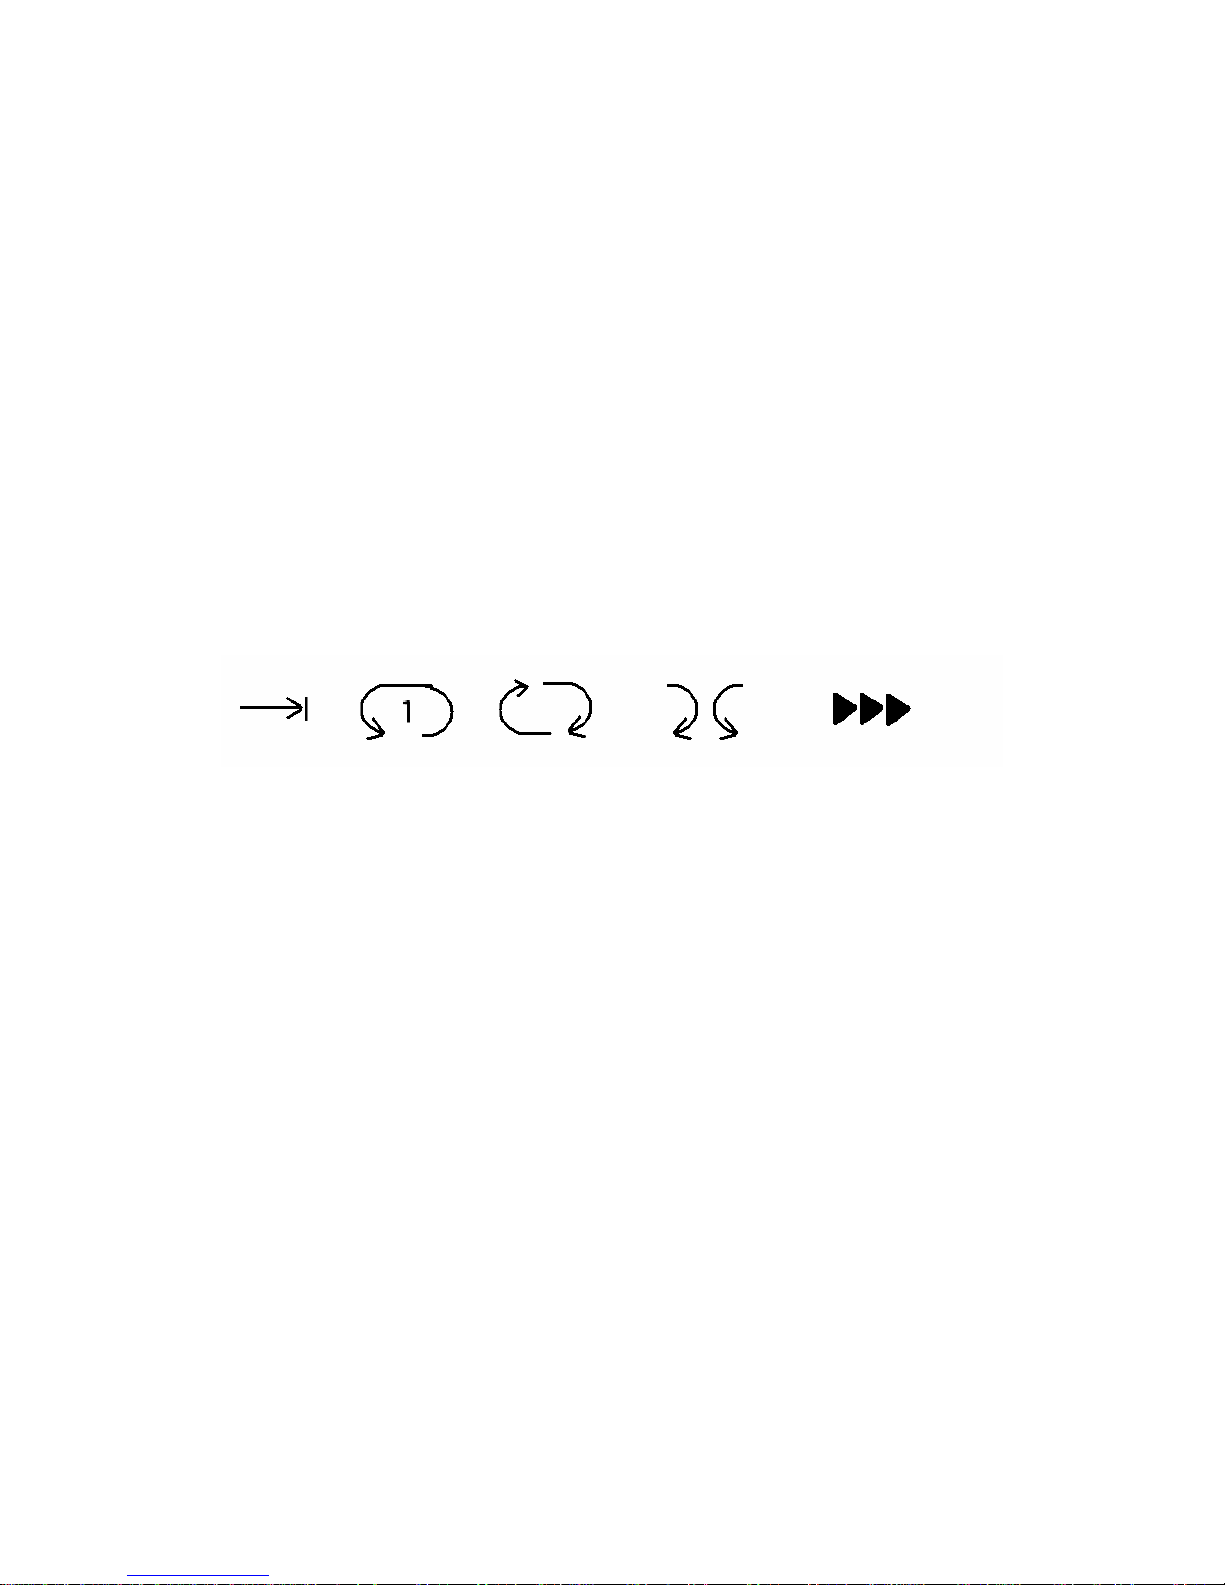
3.4.6. Repeat Mode Selection
During the playing music mode, long press MODE key to enter MENU,
under repeat option, you can choose Normal Play, repeat all songs, repeat
one song, random play and preview play (10 seconds for each song).
The Indicator of repeat mode will be display on the LCD screen as below.
From the left to the right, the repeat mode is:
Normal, Repeat one song, repeat all, random play, preview play
3.5 Operation of Voice Mode
The iRock player can record sound by the built-in microphone. Voice
recording procedure is shown below:
1. Enter MENU by press MODE key at standby status, select VOICE
icon and press MODE again to confirm.
2. If there no record file, the LCD will display “No File!”
3. Long press MODE key will enter recording mode, the LCD will
show” Rec …”, now the sound will be record by the built-in
microphone.
4. To Stop recording, press MODE once, the Record file will be
automatically saved as RECxxx.WAV.(xxx is 3 digit number
starting from 001. if you choose high quality record under setup,
the file extension name will be WAV, for the longest time recording,
the file extension name will be ASF.)
5. Press PLAY key to play recorded WAV/ASF.

3.6 Operation of FM radio
Press MODE key to enter MENU, select FM radio option. The iRock
player will become a Digital Tuning FM radio.
The default status at FM radio mode is preset stations, all 30 radio
stations are initialized at 87.5Mhz.
Long press MODE key to enter the Tuning status. The will be a “>>>”
indicator to show the Tuning status.
At Tuning status, the LCD screen will display the starting frequency:
87.5MHz. Turn the FF/MENU/PP up or down will increase or decrease
the frequency by 0.1MHz.
Turn the FF/MENU/PP down and hold for 2 seconds, it will enter the
AUTO tuning mode; the frequency will keep increasing or decreasing
until there is a Radio station.
Once the frequency is a radio station, you can press PLAY once, then use
FF/REW to select the station number you want to use. Press MODE key
to confirm the saving of the frequency.
Volume adjustment can be done while listening to the radio.
3.7 Other Menu operation:
You can access some of the other functions through the main MENU.
Under File Menu, there are three options:
1. Delete Songs: Delete MP3 or WMA file from the memory card.
2. Delete Record: Delete WAV or ASF recorded file from the memory
card
3. Format Card: Format the memory card. Caution: This action will
clear all the saved the songs, records, settings and FM stations in the card!
Please do backup if necessary.
Under Setup Menu, there are six options:
1. Record Mode: This is to set the record quality, Choose high quality
to record as WAV file, choose longest time to record asASF file.
2. LCD contrast: This is to adjust the contrast of the LCD for better
display.
3. Language: This is to set the system language.
4. Power Off Time: This is to set the power off time while the MP3
play is at idle state.

5. Backlight Color: This is to set the backlight color, from Red, Blue,
Green, Yellow, Cyan, Purple, White and 7-color in turn.
6. Hold Select: This is to enable or disable the auto hold option. Once
the auto hold option is selected, the iRock will lock its key within
30 seconds. To unhold, long press Vol+ key for more than 3
seconds.
4. Working with Computer
Connect iRock to your computer by the provided USB cable. Once
connected, the screen will display a picture to show the download or
upload with PC.
Your computer will detect a USB mass storage device, and install the
driver by itself (first time connection). There will be a removable disk
listed in My Computer once the installation finished. Now you can treat it
as a normal disk to copy files. Of course, you need to put the SD card
unlocked if you are using a SD card.
When there is a data transfer in processing, do not disconnect the USB
cable, otherwise the data will be lost.
To disconnect from computer safe, please follow windows instruction:
1. Click the USB PNP icon in the system tray.
2. Choose to disconnect the USB mass storage device.
3. When windows displays a massage to say” it is safe to remove the
device now.” You can disconnect the USB cable.
While there is no data transmission with USB link, the battery will be
charging by USB BUS power. The Battery level indicator will show the
charging process and also indicate if it is fully charged.
5 Other information
Technical specification:
LCD screen: 96*40 dots, with customized icon.
Supported music format: MP3, WMA
Record file format: WAV, ASF
Output Audio power: 15mW+15mW, 32ohm

Output frequency: 20Hz-20kHz
Signal to noise ratio: 90dB
Total distortion: 0.1%
FM Radio frequency range: 87.5 -108MHz
Voice recording sampling rate: 8kHz
6. Using of the accessories
6.1 Using Belt Clip set
The following picture shows the installation of the special designed Belt
Clip set for AVIXE iRock.
6.2 Using Neck Strap
The following picture shows the installation of the special designed Neck
Strap forAVIXE iRock.

Put one end of the neck strap with button through the triangular hole of
iRock, then press to lock the button.
The completed installation is shown in the following picture:

7ContactAVIXE:
Please check AVIXE website at the following address:
www.avixe.com
The AVIXE home page provides the overview of company and products,
other related information, and answers to common questions. Firmware
and software updates are also available as well as the most recent
information about your AVIXE product.
You may get useful information from "User's Forum" and FAQ. Register
your ID and get any appropriate online customer support. Also, you can
get newsletter such as newly announced product, firmware upgrade, and
various promotion events via email.
Warranty and other support information will be found on the website.
And also you can obtain the contact information from the website.
Thank you for reading this manual. Enjoy your life withAVIXE iRock
Digital Music Player.
Table of contents