AVLink DMB-TH8033 User manual

High Definition Terrestrial Receiver
DMB-TH8033
User Manual

32
Table of contents
1INTRODUCTION ...........................................................................................................................34
2MAIN FUNCATIONS AND FEATURE ...........................................................................................34
3THE REMOTE CONTROL .............................................................................................................35
4FRONT AND REAR PANEL...........................................................................................................37
4.1 REAR PANEL ......................................................................................................................... 37
4.2 FRONT PANEL ........................................................................................................................ 37
5INSTALLATION .............................................................................................................................38
5.1 INFORMATION BAR ................................................................................................................ 40
5.2 AUDIO LANGUAGE AND AUDIO MODE ........................................................................................... 40
5.3 SUBTITLE ................................................................................................................................... 41
5.4 RESOLUTION .......................................................................................................................... 41
5.5 ASPECT RATIO ....................................................................................................................... 42
5.6 TELETEXT ............................................................................................................................... 43
5.7 TV CHANNEL AND RADIO CHANNEL LIST ....................................................................................... 43
5.8 FAVOURITE CHANNEL ................................................................................................................. 44
6MENU INFORMATION ..................................................................................................................45
6.1 MAIN MENU STRUCTURE ...................................................................................................... 45
6.2 MAIN MENU ............................................................................................................................. 46
6.3 PROGRAM LIST ...................................................................................................................... 46
6.4 FILE MANAGER....................................................................................................................... 46
6.4.1 ALL FILE.............................................................................................................................. 47
6.4.2 PVR FILE .......................................................................................................................... 47
6.5 CHANNEL SEARCH ................................................................................................................48
6.5.1 MANUAL SEARCH ................................................................................................................ 48
6.5.2 AUTO SEARCH .................................................................................................................... 49
6.6 CHANNEL EDIT ....................................................................................................................... 49
6.6.1 DELETE CHANNEL ............................................................................................................... 50
6.6.2 LOCK CHANNEL................................................................................................................... 50
6.6.3 FAV CHANNEL .................................................................................................................... 50
6.6.4 MOVE CHANNEL .................................................................................................................. 51
7SYSTEM SETTINGS .....................................................................................................................52
7.1 AV SETTINGS.......................................................................................................................... 52
7.1.1 ASPECT RATIO .................................................................................................................... 52
7.1.2 ASPECT MODE .................................................................................................................... 53
7.1.3 VIDEO RESOLUTION............................................................................................................. 53
7.1.4 VIDEO TYPE ........................................................................................................................ 54
7.1.5 AUDIO TRACK ..................................................................................................................... 54
7.1.6 DIGITAL AUDIO OUTPUT....................................................................................................... 54
7.2 LANGUAGE SETTINGS........................................................................................................... 55
7.2.1 MENU LANGUAGE................................................................................................................ 55
7.2.2 AUDIO LANGUAGE ............................................................................................................... 55
7.2.3 SUBTITLE LANGUAGE........................................................................................................... 56
7.2.4 TELETEXT LANGUAGE .......................................................................................................... 56
7.2.5 TRANSPARENCY .................................................................................................................. 56
7.3 TIME SETTINGS ...................................................................................................................... 57
7.4 PIN SETTING ........................................................................................................................... 57
7.5 FACTORY RESET ................................................................................................................... 58
7.6 PRODUCT INFO........................................................................................................................... 58
8UPDATE THE RECEIVER BY USB2.0 INTERFACE.....................................................................59
8.1 COPY THE UPDATE FILE TO THE USB DRIVE FROM PC .................................................... 59
8.2 UPDATE THE RECEIVER BY USB INTERFACE .................................................................... 59
9SPECIFICATION ...........................................................................................................................60
33
IMPORTANT SAFETY INSTRUCTIONS
CAUTION
RISK OF ELECTRIC
SHOCK DO NOT OPEN
TO REDUCE THE RISK OF
ELECTRIC SHOCK.
DO NOT REMOVE COVER.
NO USER-SERVICEABLE PARTS
INSIDE. REFER SERVICING TO
QUALIFIED SERVICE PERSONNEL.
This symbol indicates
“dangerous voltage” inside
the product that presents
a risk of electric shock or
personal injury.
This symbol indicates
important instructions
accompanying the
product.

34
1I
I
NTRODUCTION
This user manual is intended to guide you through the operation for the DMB-TH High Definition Digital
Terrestrial Receiver.
2 MAIN FUNCATIONS AND FEATURE
This product is a high performance and cost-effective HDTV Terrestrial receiver. It fully complies with
DMB-TH receiver requirement specifications. It provides users with all digital terrestrial TV and radio
signals being broadcast in Standard Definition or High Definition.
Functions
22. Fully compatible with DMB-TH digital standard
23. Fully compatible with MPEG-4 H.264/AVC High Definition Digital TV
24. Fully compatible with MPEG-2 High Definition and Standard Definition Output
25. Fully compatible with MPEG-1 Layer I & II, Dolby Digital Audio
26. 174 MHz ~ 858 MHz VHF&UHF input and LOOP OUT
27. Multi-languages Display
28. 4000 Channels capacity
29. Fully support to Electronic Program Guide(EPG)
30. Support Picture in Graphics(PIG)
31. Support Auto search and Manual search
32. Parental control for channels
33. Plug and Play installation with an ease to use Menu System
34. Coaxial S/PDIF and optical S/PDIF Digital audio output interface
35. Support 576i, 576P, 720P, 1080I,1080pVideo Resolution supported
36. Support Auto, 4:3 and 16:9 Aspect Ratio
37. Support EBU Teletext
38. DVB or EBU selected by the system based on availability on the network
39. Various channel editing function(Group, Favorites, Move, Lock, Rename, Delete)
40. Support HDMI High Definition Multimedia Interface
41. Software upgrade via USB2.0 interface
42. DC 12V Power Supply
Feature
11. Main Processor CSM1200 (200MHz)
12. Memory 8MB
13. SDRAM 128MB
14. Base Linux operating system
15. High sensitivity, low Eb/No for receive Digital Television
16. Up to 1080P video resolution supported
17. Multi-bilingual OSD language , audio language and subtitle language supported
18. USB 2.0 interface for MP3 & JPEG playback, PVR and software upgrade
19. Record digital television FTA program to a USB Flash Drive or an external USB portable hard
disk and playback via USB2.0
20. Low Power mode

35
3 THE REMOTE CONTROL
Photograph Key Function
MUTE Disable Audio output
STB POWER Power on/off the STB
0…..9 0-9 numeral buttons, for input of numbers or for
selecting a TV channel
TV POWER This is one learning handset and use to learning the
handset of TV SET.
SWAP Recall last channel while watching digital TV or
listening to radio.
TV/R Press TV/R key to switch between TV program and
Radio program.
VOL+/VOL- Increase or decrease the audio output volume
CH+/CH- Select next/previous channel
RED Function key in different page.
GREEN Function key in different page.
YELLOW Function key in different page.
BLUE Function key in different page.
MENU Display menu, press again to exit current menu
EXIT Back to previous menu without saving
INFO. Press INFO. Key to display the information bar during
watch program.
EPG Press EPG key to display 7 days EPG information.
UP/DOWN Move selection up/down within menus and lists
LEFT/RIGHT
While watching a channel, the LEFT/RIGHT buttons
increases or decreases the audio output volume.
Within a menu, press the LEFT button to return to
previous menu and the RIGHT button to enter a
sub-menu.
OK
Call up a program list for the current channel while
watching digital/TV or listening to the radio. In a
menu, this button serves to confirm a selection.
PGUP/PGDW Page up/down in lists
FAV Display favorites channel
PVR Display PVR manager page
Record Press Record key to record the current program
during watch TV program
STOP Press STOP key to stop recording program or stop
program during watch PVR program.
PLAY/PAUSE Playing or pause the program during watch PVR
program
PIC. Press pic.key to select the picture settings
ASPECT Press ASPECT key to select suitable aspect ratio of
the video output
TELETEXT TELETEXT function key
SUBTITLE Switch between different subtitles
AUDIO Press AUDIO key to set the audio track and audio
mode
RES. Switch resolutions of video output

36
Battery Installation
Insert the batteries while observing the correct (+) and (-) polarities as illustrated below:
About the batteries
zIf the remote control unit fails to work even when it is operated near the LCD TV / monitor, please
replace the batteries.
zUse size UM-4 (AAA) batteries.
Notes:
zDo not use rechargeable (Ni-Cd) batteries.
zDo not attempt to recharge, short circuit, disassemble, heat or throw the batteries into the fire.
zDo not drop, step on or cause any impact to the remote control unit. This may damage it, resulting
malfunction.
zDo not mix old and new batteries.
zIf the remote control unit is not going to be used for a long time, remove the batteries.
Caution
Keep batteries out of children’s reach. If batteries are swallowed, contact a physician immediately.
37
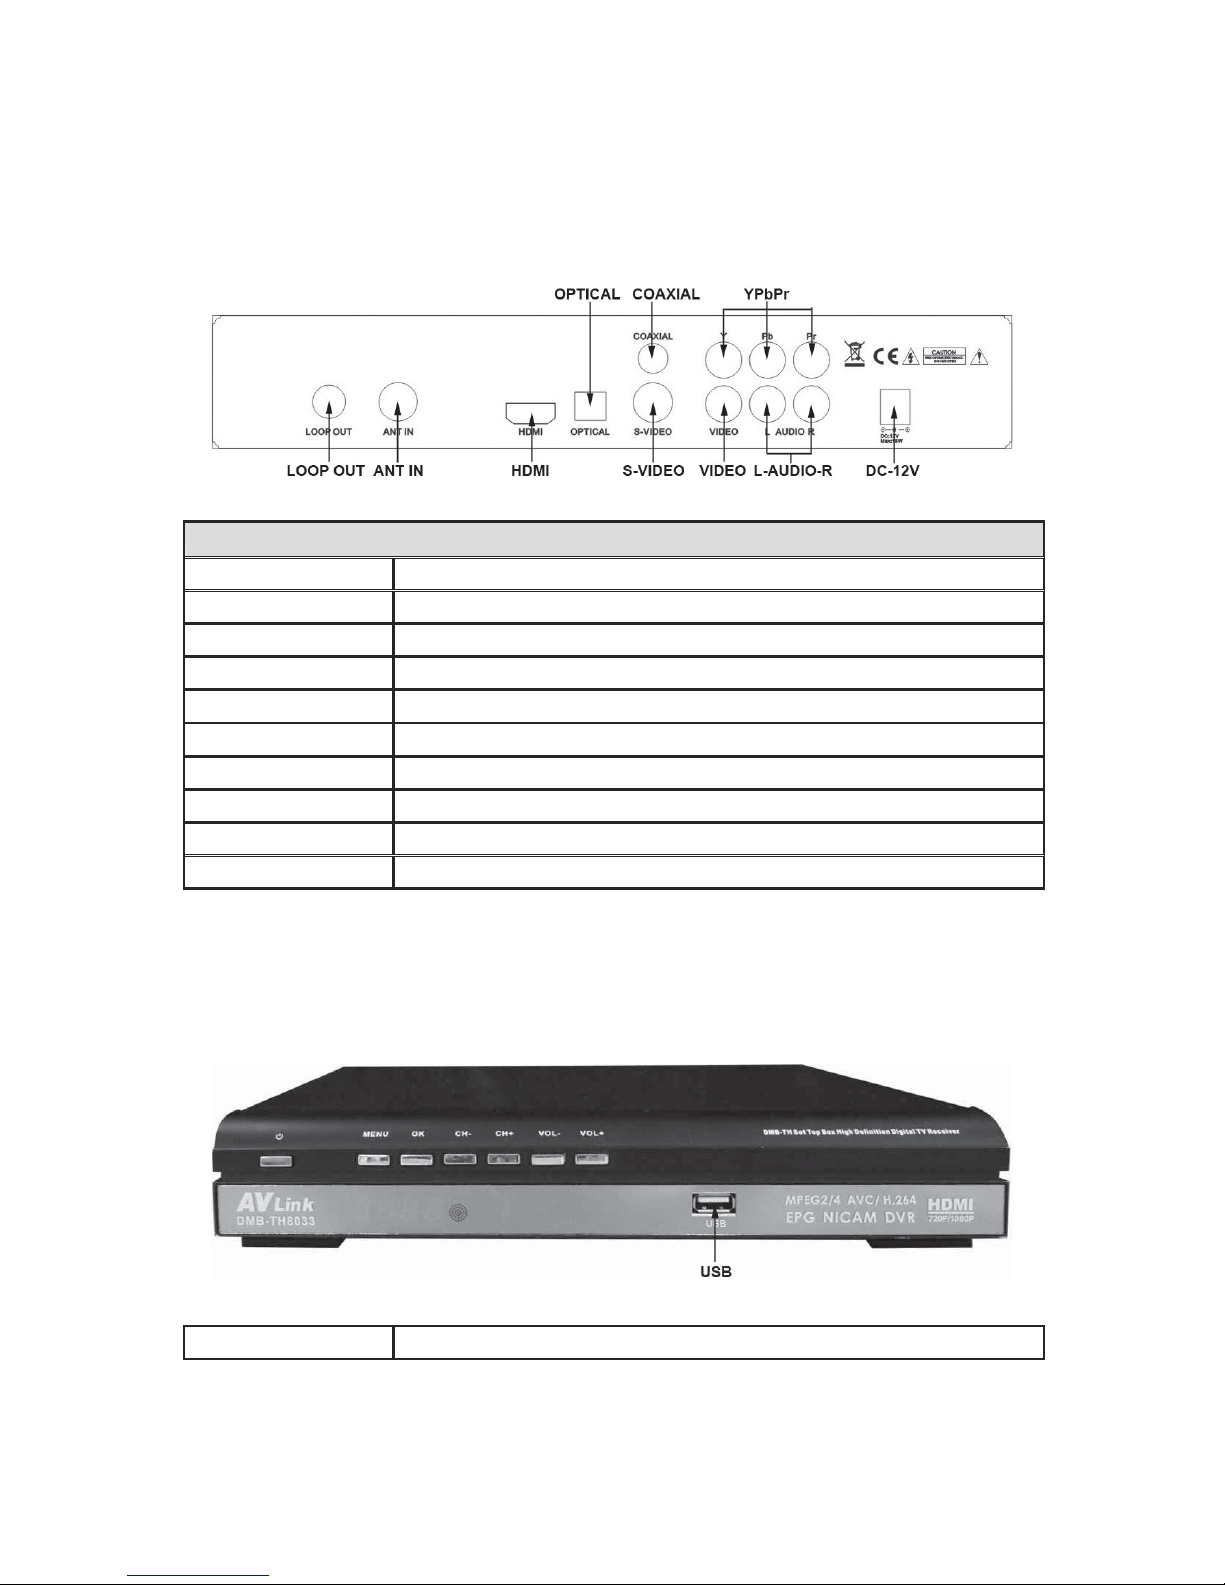
4 FRONT AND REAR PANEL
4.1 REAR PANEL
Rear Panel
ANT IN Digital Terrestrial TV Broadcast signal input
Loop OUT Output of Digital Terrestrial TV Broadcast signal
HDMI Digital HDTV video output with HDCP. HDMI version 1.1
Video Composite video signal output
YPbPr High Definition Component video output
Coaxial Digital audio output
Audio L/R Analog Audio output
Optical Digital audio output
S-video S-Video output connect to the TV SET
DC-12V DC 12V 1.5A Power input
4.2 FRONT PANEL
The red LED is a power indicator and the green LED is a signal indication.
User can access those function keys as follow: CH+/UP, CH-/DOWN, VOL+/LEFT and
VOL-/RIGHT
USB USB2.0 Port for firmware upgrade

38
5 INSTALLATION
Note: A Digital TV Antenna is used to connect to the Terrestrial Receiver. The Antenna should
be used where the user is within an area with Digital Terrestrial TV coverage but the premises in which
the user intends to use the Receiver has not yet been upgraded with Digital Terrestrial TV receiving
capability. (Please refer to “Installation” for details.) If you do not know whether the building
concerned has been upgraded with Digital Terrestrial TV receiving capability, you may make relevant
enquiries with your building management.
Please connect the Receiver to your television set (HDMI cable recommended) and connect the
antenna to the “ANT IN” input connector on the Receiver. Connect one end of the IEC Power Cable to
the Receiver and the other end to power supply. Switch on your TV set and the Receiver.
When the welcome screen is displayed, please select the preferred language for the user interface and
the country where the Receiver is used by pressing LEFT/RIGHT key.Set the antenna supply as ON to
feed the DC5V to the antenna if it is necessary. Place the cursor to the Installation item by pressing
DOWN key and press OK key to the next step.
If you decide to use the Flat Panel Antenna, please turn ‘On’ the Antenna Power.
The channel search page will display on the screen and then you can select manual search or auto
search by press LEFT/RIGHT key.
The Receiver will start to search for available channels and will take a few minutes to complete the
process. When a TV channel is detected, its corresponding Signal strength and Signal quality will be

39
displayed. A list of channels will be displayed on the screen after the searching is successfully
completed. You could press the “OK” key on the remote to exit.
Channel scanning is completed successfully, a list of channels found during the scanning
process is displayed on screen and you could press EXIT key to exit.
If no channel is found during the channel searching process, the user may adjust the antenna position
to obtain optimal TV signal.

40
5.1 INFORMATION BAR
When pressing the “INFO” key during any TV programs, the information bar will be displayed on the
bottom of the screen. The information bar contains the following details:
vChannel name and the LCN
vCurrent time and the current/next program of the channel
vSignal strength and Quality of the current channel
vYou also could find some icons such as HD, AC-3, and TTX etc on the left down of the
information bar. Those icons would highlight display when the corresponding information was
taken on the current channel.
Simply press the “EXIT” button on the remote to exit the information bar.
5.2 AUDIO LANGUAGE AND AUDIO MODE
The program might have multilingual audio language and the audio broadcast on different audio mode
such as Stereo, Left or Right. Press the Language key or AUDIO key on the handset to select the
preferred audio language and audio mode. The Audio Track window would display on the screen after
you press Language key or Audio key. The screenshot is illustrated below. All the audio languages will
display on the audio track windows. You can press UP/DOWN key to moving the cursor and press OK
key to select prefer audio language and exit the audio track window. You can press Left/Right key to
select preferable audio mode. If there is no audio output after you select the audio language, it
indicates that there is no audio on the current audio mode, so you have to select preferable audio
mode.

41
5.3 SUBTITLE
The programs have multilingual subtitle information. You may press SUBTITLE key to select the
preferred subtitle language. The subtitle information window would display on the screen after you
press SUBTITLE key. All the subtitle languages would display on the subtitle information window. The
screenshot is illustrated below. Press UP/DOWN key to move the cursor and press OK key to select
the preferable subtitle language.
5.4 RESOLUTION
The video programs may have different resolutions 720h576P, 1280h720P and 1920h1080I.
Normally the standard definition programs have 720h576P and high definition programs have 1280h
720P,1920h1080I. In order to have excellent quality on the TV screen, the user can press RES key
on the remote control to display the resolution control window. The screenshot is illustrated below. On
the remote control window you could find 576I, 576P, 720P, 1080I and 1080P. Default value is 576I.
Select your preferred resolution of the video output on the remote control window then press OK key.
You also could select the preferred resolution by pressing UP/DOWN key and then press OK key to
confirm. Please select 1080I or 1080P output to obtain good picture quality.
NOTE
The S-Video composite video output only support 576I output. When you connect the receiver to the TV SET with
S-video cable and composite cable, the resolution of the video output must set as 576I. Otherwise you could not see
any picture on the TV screen. If you set the resolution of video output as other value except 576I by mistake, you have to
use the S-video cable and composite cable connect the receiver to the TV SET. You may press RES key on the remote
control in every 30 seconds until you see the picture on the TV screen. You also could use the HDMI cable or YPbPr
cable to connect the receiver to the TV SET then set the preferred value.
42
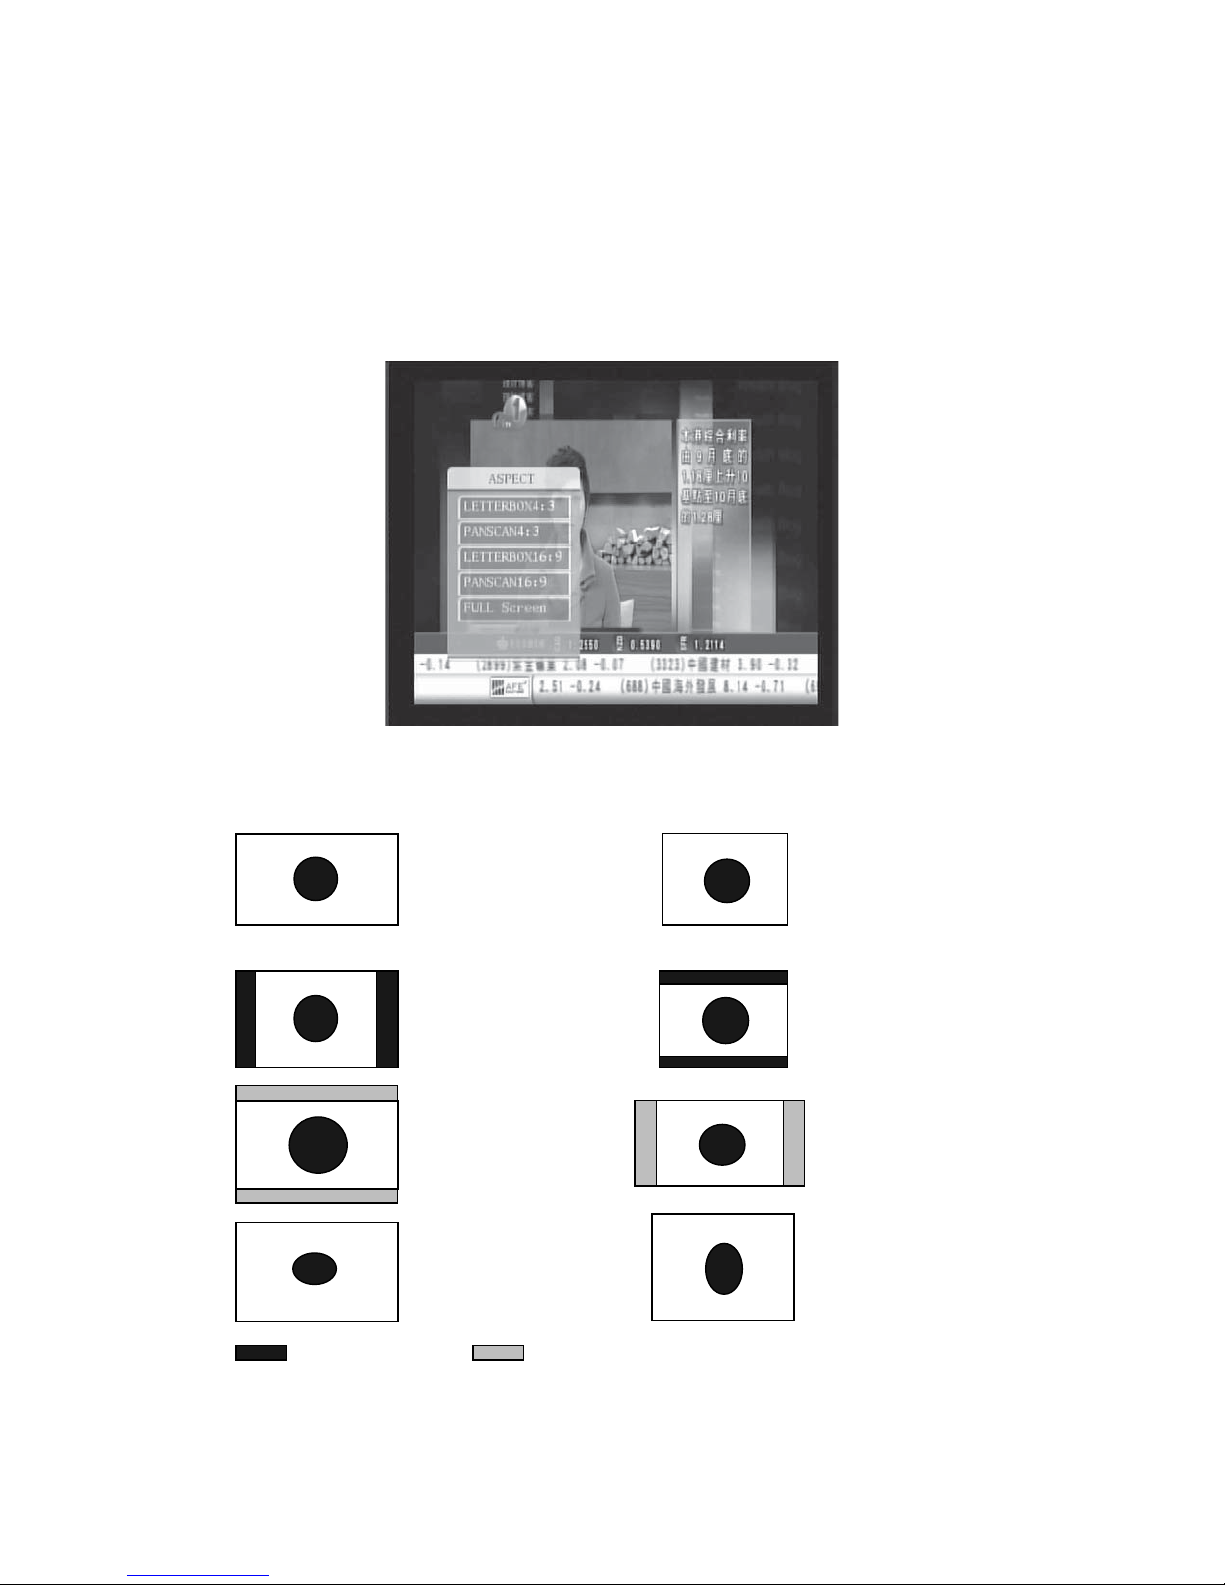
5.5 ASPECT RATIO
The aspect ratio of the video can be 4:3 (also know as Anamorphic Image) or 16:9 (also know as
widescreen TV). Normally the aspect ratio of standard definition video should be 4:3 and the high
definition video should be 16:9. In order to have excellent quality on the TV set, users have to set their
preferred aspect ratio. Press the ASPECT key to display the aspect ratio setting window. The
screenshot of the aspect ratio window is illustrated below. Press the UP/DOWN key to choose the
aspect ratio and then press OK key to confirm. You also could press ASPECT key on the aspect ratio
control window to select preferred aspect ratio and press EXIT key to watch TV program.
Here is a description of how the aspect ratio conversion mode chosen, the received stream and the
user’s television set aspect ratios.
16:9 Stream on a 16:9 TV 4:3 Stream on a 4:3 TV
4:3 Stream on a 16:9 TV 16:9 Stream on a 4:3 TV
Display black bars Not display area of the stream
edomehtrevetahWedomehtrevetahW
xob-retteLxob-retteL
nacsdnanaPnacsdnanaP
Full Screen Full Screen

43
5.6 TELETEXT
Press TELETEXT key to launch the TELETEXT window during any TV channels. The entire
TELETEXT with different language will display on the TELETEXT window. Press UP/DOWN key to
select preferred language TELETEXT and press OK key to launch TELETEXT.
5.7 TV CHANNEL AND RADIO CHANNEL LIST
Press OK key to display the entire TV or radio channel when watching any TV programs. The
screenshot is illustrated below. Press TV/R on the remote control to switch the TV channel
or radio channel. Press the UP/DOWN key on the remote control to select your preferred
channel and get the preview picture at the right of the screen. Press OK or EXIT key to go
back to the TV program. The information of the presented ware includes.
(1) The signal strength and the signal quality of the current channel.
(2) The status of the entire search as LOCK channel or favourite channel.
(3) The LCN and the channel name of the entire channel.
(4) The preview of the highlight channel.

44
5.8 FAVOURITE CHANNEL
You can add any channels to your favourite’s channel list and press FAV key on the remote
control to launch your favourite’s channel list. Press UP/DOWN key to get the preview of the
channel on the right of the screen. Press OK to confirm or press EXIT key to watch the TV.
45
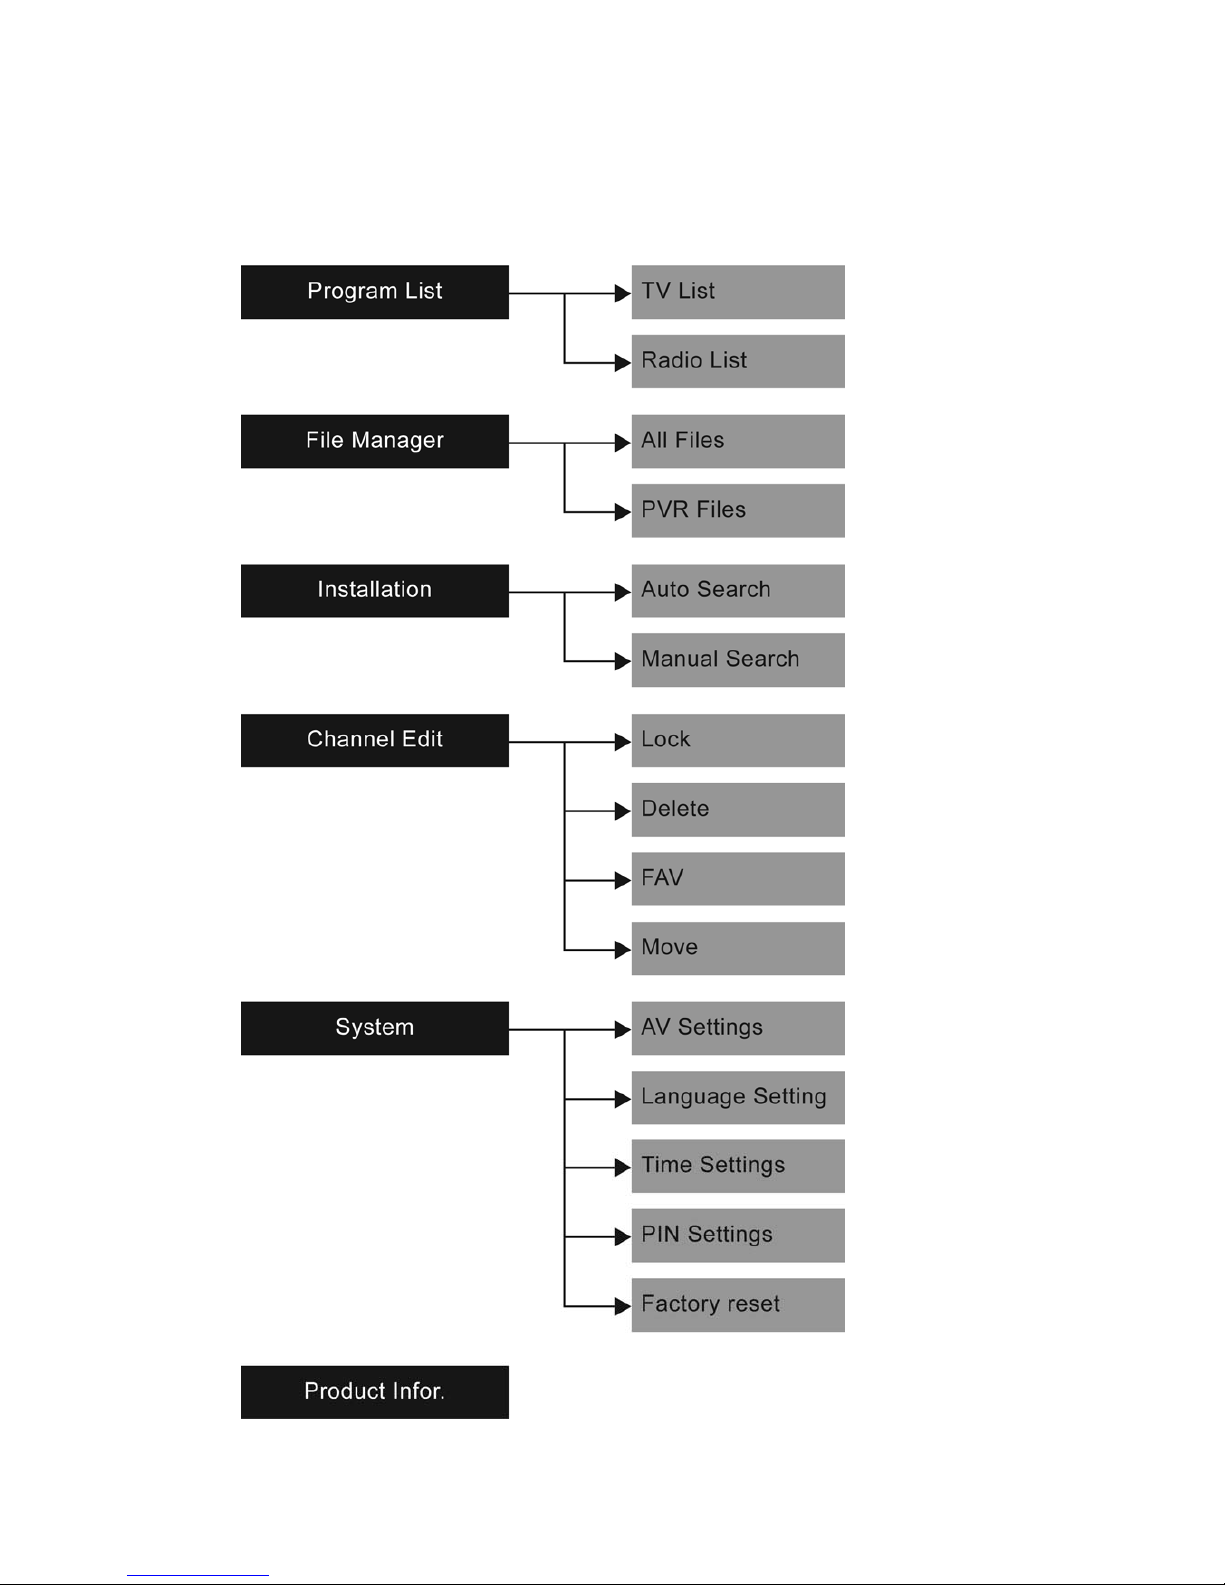
6 MENU INFORMATION
6.1 MAIN MENU STRUCTURE

46
6.2 MAIN MENU
Press MENU key on the remote control to display main menu. The screenshot is shown
below. You can find Program List, File Manager, Installation, Program Edit, System Setting
and Product Info on the main menu. Choose the option and Press EXIT or OK key to go back
the TV program.
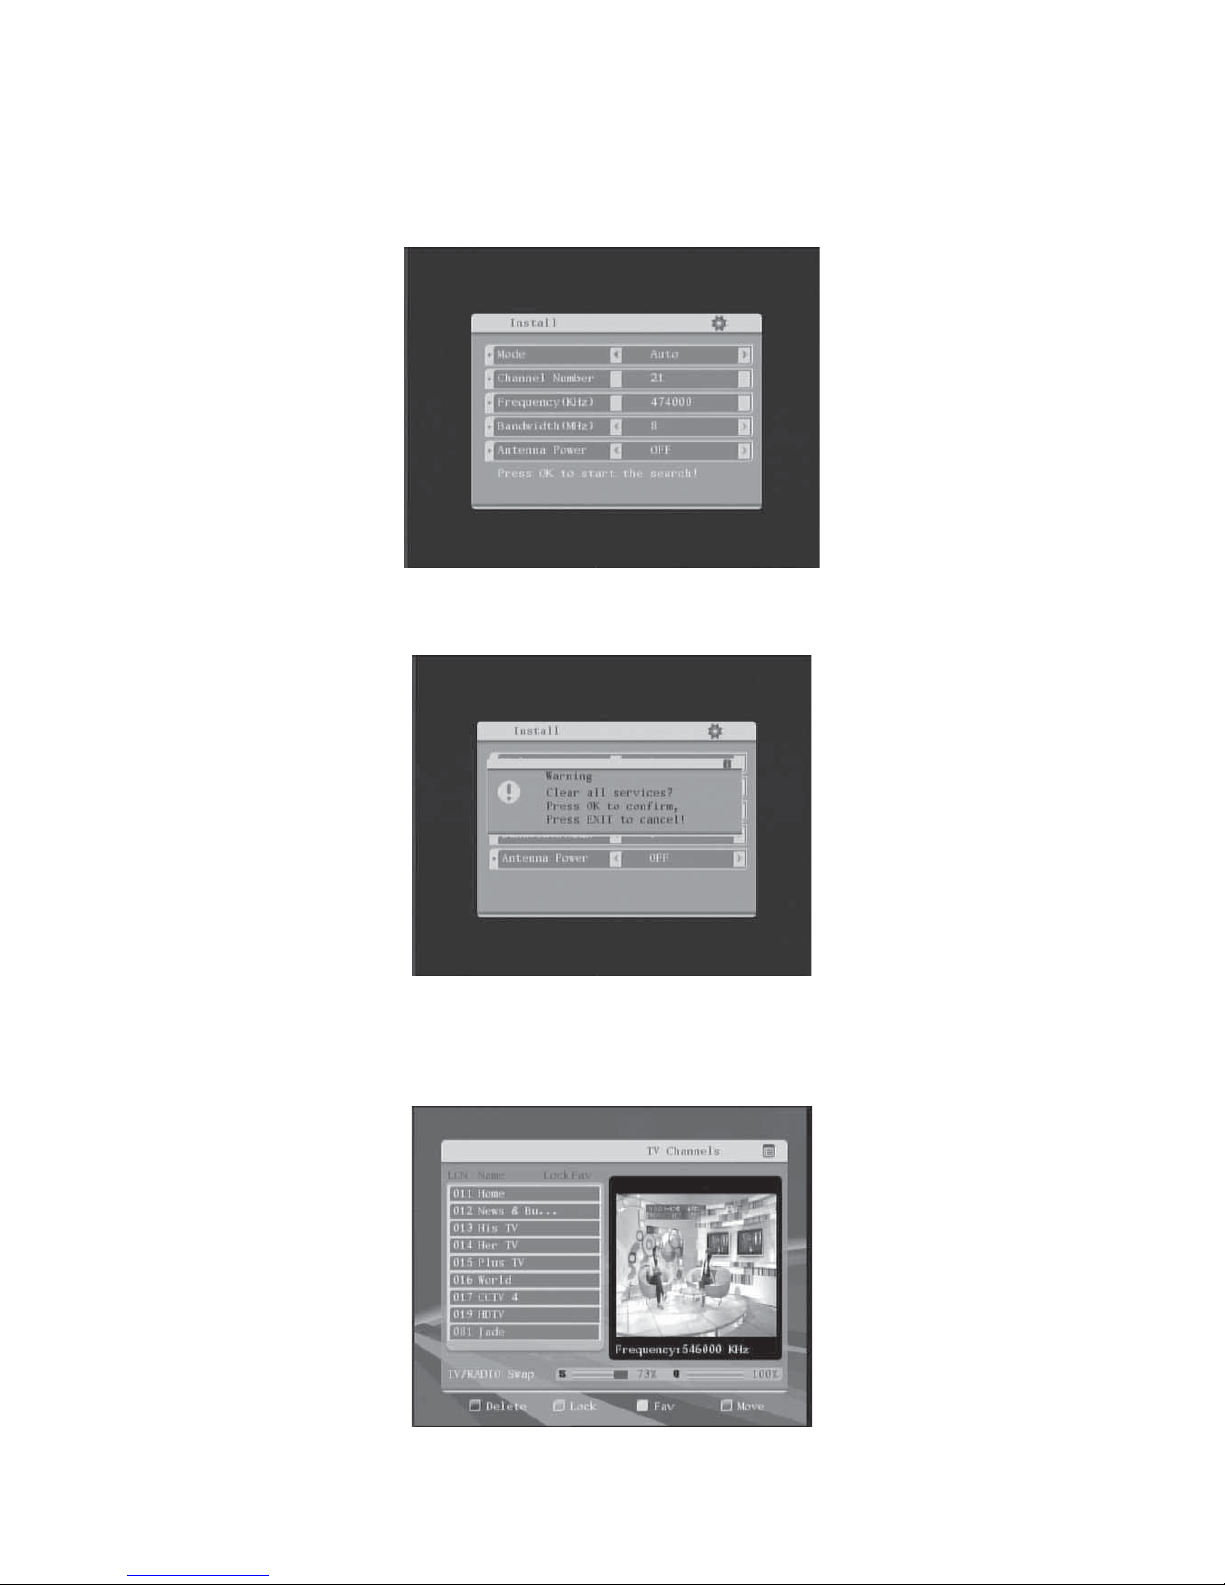
6.3 PROGRAM LIST
Choose the Program List item highlighted on the main menu. The entire TV channels or
radio channels would display on the program list. The screenshot is illustrated below. Press
TV/R on the remote control to switch the TV channel or radio channel. Select your preferred
channel and get the preview picture at the right of the screen. Press OK or EXIT key to go
back to the TV program. The information of the presented ware includes.
(1) The signal strength and the signal quality of the current channel.
(2) The status of the entire search as LOCK channel or favourite’s channel.
(3) The LCN and the channel name of the entire channel.
(4) The preview of the highlight channel.
6.4 FILE MANAGER
To enter the File Manager menu, press the MENU button on the remote control unit, then press the
DOWN button twice, followed by the OK button or press PVR key on the remote control to the File

47
Manager directly. File Manager menu allows the user to manages the file that were storage on the
extend hard disk which connect to the receiver through USB2.0 interface.
6.4.1 All file
Select All File item and the entire file on the extend hard disk will display a list of files on the screen.
Delete the highlight file by pressing RED key and then go back to the previous root by pressing BLUE
key.
6.4.2 PVR File
Move the cursor to the PVR FILE item. All the PVR file that on the extend hard disk will
display a list of files. Select your preferred PVR file. Delete the highlight file by pressing
RED key.
48
6.5 CHANNEL SEARCH
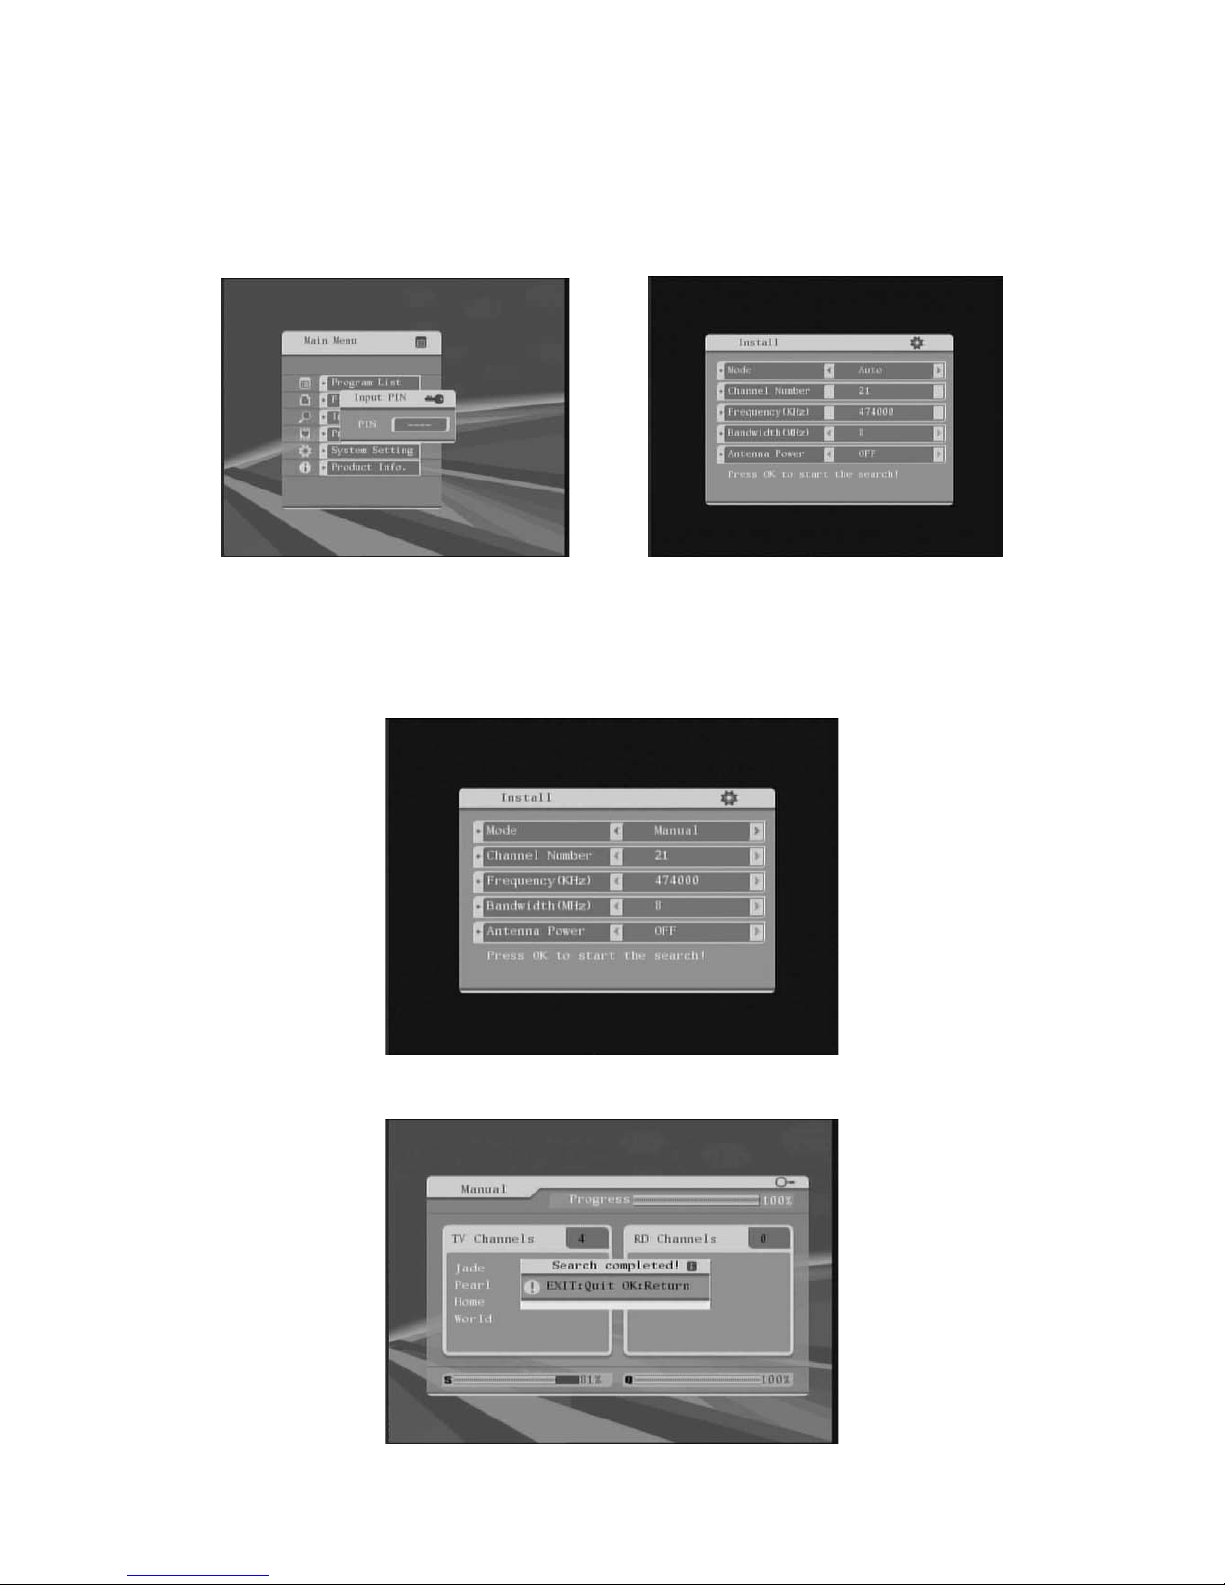
Enter the Main Menu by pressing the MENU key, press the DOWN key and move the cursor to “Install”,
press the OK key to confirm. The “Install” allows the user to search the channel. You have to input the
pin code before you enter the installation menu. The default value is “0000”.
6.5.1 Manual Search
Select Manual search mode while the installation mode item is highlight. Input the preferred frequency
by press “0…9” number key on the remote control. Press LEFT/RIGHT key to select the preferred
bandwidth after you set the frequency. You also could set the antenna power supply for the flat
antenna if it is necessary. Press OK key to start manual search after setting preferred parameters.
The entire TV program and radio program should be listed on the menu and search successful
massage also would display. Press OK key or EXIT key to exit the manual search mode.
49
6.5.2 Auto Search
Select “Auto” while the Mode item is highlighted. You also could set the antenna power supply for the
flat antenna if it is necessary. Press OK key to start auto search after setting the preferred parameters.
(Note: When there are channels already in the channel list, running auto search would clear all the
channels. A message box would pop up with the following message. Press “OK” to start auto search
or “Exit” to quit).
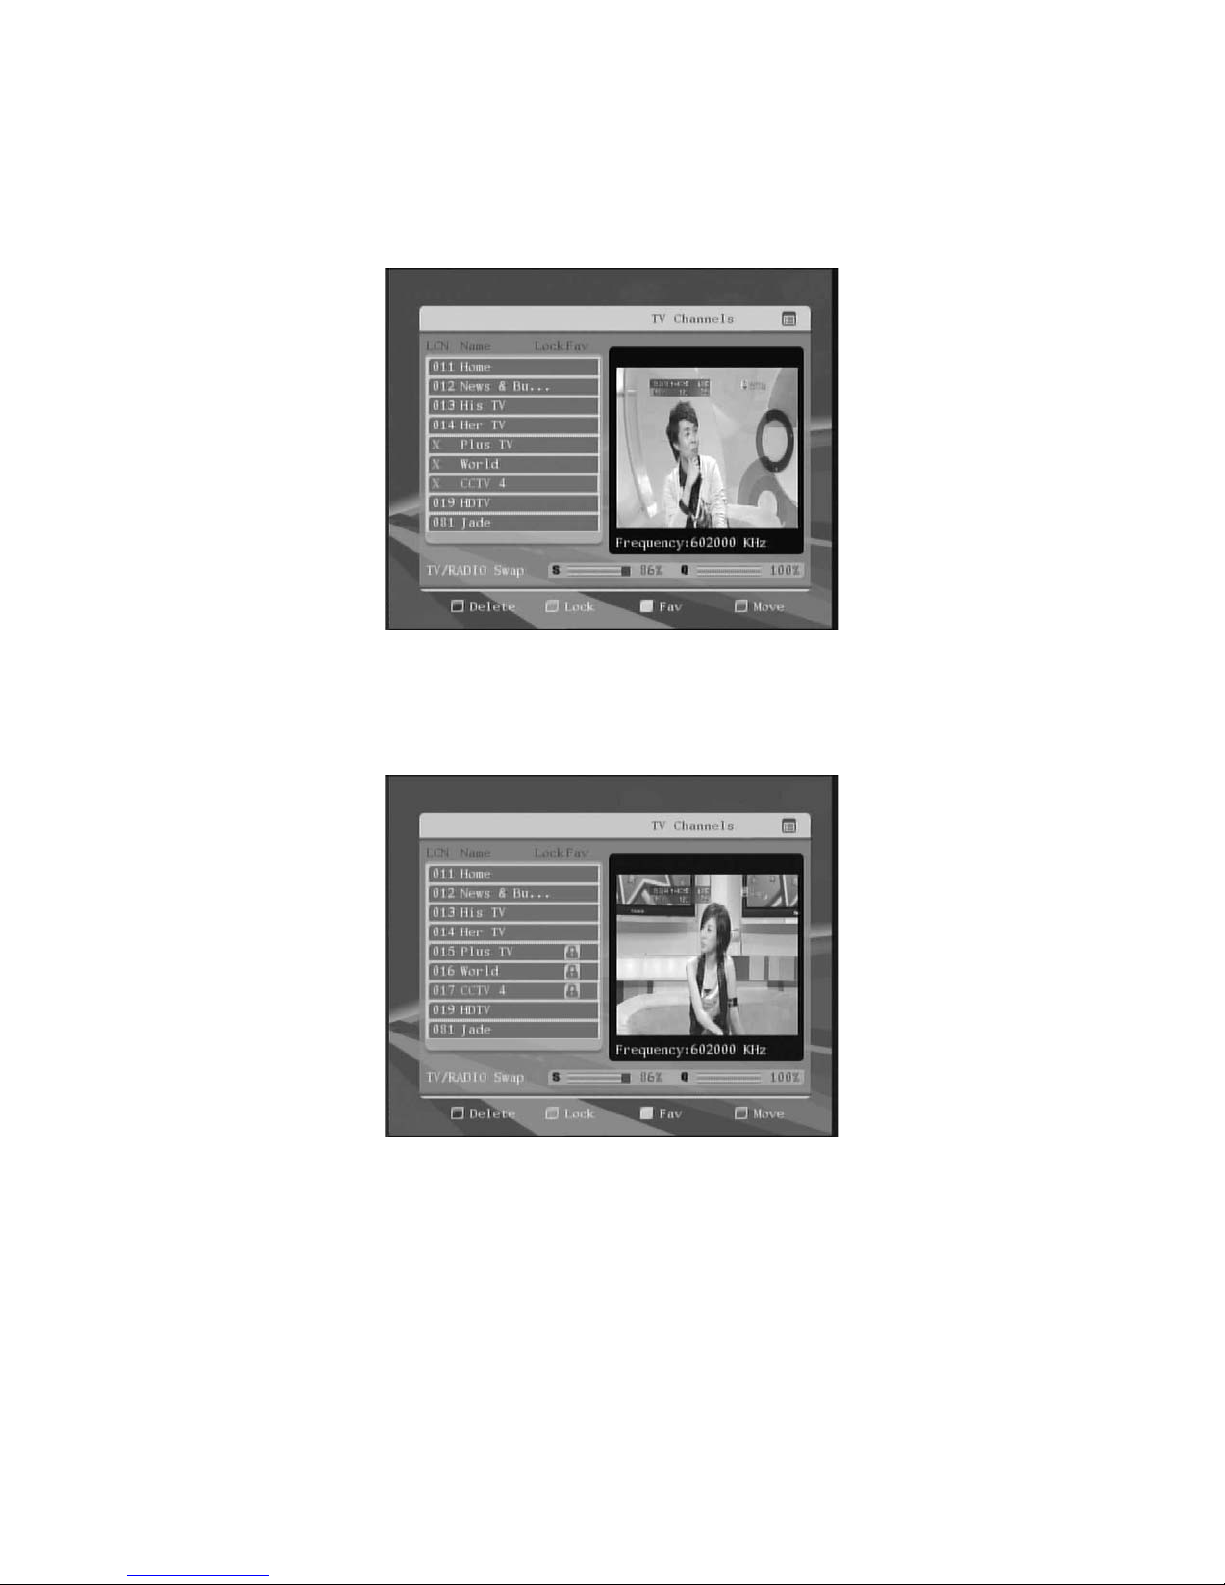
6.6 CHANNEL EDIT
Press MENU key, move the cursor to the Channel Edit then press OK key to confirm. The channel edit
menu allow users lock the preferred channel, delete the channel, sort the channel and set the channels
as favorite’s channel. Press TV/R key on the remote control to switch TV program and radio program.
50
6.6.1 Delete Channel
Press RED key to delete the highlighted channel on channel edit menu. An “X” icon would be display
on the left of the channel name after you press RED key. You may have to input the password if you
want to delete a locked channel. Press EXIT key to exit the channel edit menu and save it.
6.6.2 Lock Channel
Press GREEN key on the remote control to lock or unlock the highlighted channel. You have to input
the password if you want to lock or unlock the channel. Default value is “0000”. One lock icon will
display on the right of the channel name after you lock the channel. Press exit key to exit the channel
list menu and save.
6.6.3 FAV Channel
Add the highlighted channel to the favourite’s channel list by pressing YELLOW key on the remote
control. A Favourite icon will display on the right of the channel name after you set as favourite channel.
Press EXIT key to exit the channel edit menu.
Table of contents


