AWA Mezzo CVC 3800 User manual

USERS MANUALCYCLONIC VACUUMCLEANER
Model:CVC 3800
Cyclonic VacuumCleaner
Thankyouforchoosing topurchaseoneofour MEZZO products, weappreciateyourbusiness and believethat
wehaveprovidedyouwithaproduct that isbothreliableand valueformoney. Weencourageyouand your
friendstochoosefromourrangeof MEZZO productsagaininfuture.
PACKAGECONTENTS
1CyclonicVacuumCleaner
1TelescopicChrome Tubes
1StandardFloorBrush
1AirTurbo FloorBrush
1RemovableDust Canisterwithfilters(will befixedtounit)
1AccessoryBrushAttachment (including removableBrush)
1Long NozzleAttachment
1RearFilter(will befixedtounit)
1Instruction manual
Confirmall partsbeforedisposing ofcarton.
SAFETYINSTRUCTIONS
Carefullyreadthismanualbeforeusing thisappliance.Makesurethatyouknowhowtheappliance functionsand
howtooperateit. Maintaintheappliance inaccordance withtheinstructionstoensurethatit functionsproperly.
Keepthismanualwiththeappliance.Iftheappliance istobeusedby athirdparty,thisinstruction manualmust
besuppliedwithit. Thesafetyinstructions,by themselves,do noteliminatedangercompletely,and proper
accident prevention measuresmust alwaysbeused.
Foranycustomer queryorintheunlikelyeventofaproductfailure, pleasephoneor
email thehelplinecontactdetailsbelowforassistance.
DONOTRETURN THEPRODUCTTOTHERETAILER.
Toll Free Helpline:1300 366 144
Email: info@telefixsales.com.au
1

BEFOREINITIALUSE
Removeall packaging.Checkforany damagethatmayhaveoccurredduring transit. Donotuseiftheappliance
isdamagedinany wayorifthesupplycordisdamaged. Immediatelyreturntosupplierforreplacement orrepair.
PARTSDESCRIPTION
Thisappliance hasbeendesignedforgeneral indoorhouseholduseonly. Disconnect fromthepowersupply
whennot inuse.
2
REMOVABLE DUSTCANISTER
OPERATION
ConnectingtheVacuumHose
Uncoil theVacuumHoseand connect totheCyclonicVacuumCleanerby inserting thePlugend intothesocket,
withthesquaresideofthePlugend facing upwards(see diagramon page4).
3

ToremovetheVacuumHosefromtheCyclonicVacuumCleaner, pushthereleasebutton on thetop ofthePlug
end oftheVacuumHoseand pull gentlyawayfromtheSocket.
AttachingtheFloorBrushtotheTelescopicTubes
Extend theTelescopicChrome Tubesby pressing theblackbutton inthedirection ofthearrow, and pulling on
theend oftheTubesalsointhesame direction ofthearrowon theblackbutton. Whenyouhavereachedthe
optimal lengthfortheTubes, releasetheblackbutton and aclicknoisewill beheard. Thismeansthat theTubes
arenowlockedinthisposition.
ToshortentheTubesforstorage, press theblackbutton inthedirection ofthearrow, and pushthetwoendsof
thetubestogether.
ToattachthefloorBrushtotheextendedTubes, insert thelargerend oftheChrome Tubesovertheconnection
end oftheFloorBrushand pushtogetherfirmly.
ToseparatetheFloorBrushfromtheTubes, pull inoppositedirectionswithaslight twisting action, being
careful not todamagetheconnection end oftheFloorBrush.
4
SupplyCordConnectionand Rewind
Carefullypull thesupplycordfromthevacuumcleaner. Note. Thereisa“Yellow”indicatoron thecordthat
indicatestheoptimumlength. Warning! Donotpull thesupplycordfullyoutpastthe“Red”indicator
mark. Thismay causedamagelongtermtotherewind mechanism.
Insert thesupplyplugintoasuitable230-240V~50Hzpoweroutlet socket. TheCyclonicVacuumCleaneris
nowready foruse.
Torewind thesupplycordsimplypress therewind button whileguiding thesupplycordintotheappliance.
Rewind Button
Red
Yellow
SwitchingPower ON
Press theON / OFF button tocommence vacuuming.
ON/OFFSwitch
5

ElectronicSuctionControl
Toadjust theElectronicSuction Control, slidetheSuction Control button forwardorbackwards.
NOTE: Thereisalsoamanual suction control locatedon thehandleoftheVacuumCleanerHose. Keepthisshut
forthestrongest suction.
AccessoryBrushAttachment
Theaccessorybrushmaybeusedaseitherasmall nozzleorasmall brush. Toremovebrushsimplyslide
outwardsasindicatedbelow.
USINGTHEFLOORBRUSH
TheStandardFloorBrushhastwosettings:
BristlesUp: Inthissetting thebristlesarepushedupinsidethebrush. Thissetting shouldbeusedforcarpet
only. Donot usethissetting on polishedwoodenfloors, asit will scratchthesurface.
BristlesDown: Inthissetting thebristlesareextendedfromtheFloorBrush. Thissetting shouldbeusedforhard
floors.
TochangetheStandardFloorBrushsettings, pushdowntheleverson thetop oftheFloorBrush.
6
USINGTHEAIR TURBOBRUSH
TheAirTurbo BrushusestheVacuumCleaners’Suction tospinthebuilt-inbrushesinsidetheAirTurbo Brush.
Thiscreatesastrongersuction powertoremovemoredust and dirt fromcarpet.
TheAirTurboBrushshouldnotbeusedonWooden, orHardCoveredFloors, asitmay scratchthefloors
surface.
RemovetheFloorBrushfromtheend oftheTelescopicChrome Tubes, and attachtheAirTurbo Brushinthe
same waythat isshowntoattachtheStandardFloorBrush.
Onthetop oftheAirTurbo Brushthereisasuction control adjustment. Havethisclosedforthestrongest
suction.
Note: Thereisaremovablepanel on thebaseoftheAirTurbo Brush. IftheAirTurbo Brushbecomesjammed,
removing thispanel mayhelptocleartheblockage. Warning: AlwaysmakesuretheVacuumCleaneris
unpluggedfromthewall socket beforeattempting toclearablockage.
Note: It isadvisabletoremovetheAirTurbo Brushwhenstoring yourCyclonicVacuumCleaner, asCyclonic
VacuumCleanerwill not storeupright withtheAirTurbo Brushattached.
VACUUMSAFETY
Donot vacuumfineabrasivedust particlessuchascement dust, lime orgibboardresidueasthesemaydamage
themotor.
Donot vacuumlightedcigarettes, embers, cindersorhot ash.
Donot vacuumpins, string, largeobjectsthat mayblockthehose, sharpobjectsorliquidsofany type.
Donot useoutdoors.
Usecarewhenusing on any stairway.
Warning:Whenpickingup theVacuumCleaner, alwaysusethesilver fold-downhandle. Never pickthe
unitup bytheblueDustCanister handle, asthismay damagetheVacuumCleaner.
ELECTRICALSAFETY
Whenusing electricappliancesalwaysobservesafetyregulationswhereapplicabletoreduce theriskoffire,
electricshockand personal injury.
Alwayscheckthat thepowersupplycorrespondstothevoltageon therating plate.
7

ELECTRICALSAFETY(Continued)
Supplycordand plug.
Alwaysfullyunwind any supplycordtoavoidoverheating.Neverallowthesupplycordtocome incontactwith
hotobjects.Donotcarrytheappliance by thecordoryankthecordtodisconnectit fromthemainssupply.
Disconnectby firstswitching off theoutlet, grasping theplugand pulling it outgently.Donotletthesupplycord
hang overtheedgeofatableorcounter.
Ifthesupplycordisdamaged,it mustbereplacedbythemanufacturer,itsservice agentorasimilarlyqualified
person inordertoavoidahazard.
Children.
Thisappliance isnotintendedforuseby young childrenorinfirmpersonsYoung childrenmustbesupervisedby
aresponsibleperson toensurethattheycanoperatetheappliance safely.Young childrenmustbesupervisedto
ensurethat theydo not playwiththeappliance.
Water.
Donotimmerse. Donotimmerseanypartofthisappliance orsupplycordinwaterorotherliquid.Donotuse
withwet handsoruseindampsituations.
Handling.
Donotdrop theappliance.Donotusethisappliance ifit hasbeendamagedinany way,immersedinwater,the
supplycordisdamagedortheoperation isfaulty.Contactwithany damagedappliance couldresult inelectric
shock.
Unattended.
Donot leavetheappliance unattendedwhileinuse. Disconnect fromthepowersupply.
Consider theenvironment.
Donotuseindamporwetconditions.Donotusewithoutadequatelight. Donotusenearflammableor
hazardousmaterials. Donot useoutdoors. Donot leaveunattendedwhileconnectedtothepowersupply.
Damagedordropped.
Alwaysinspectyourvacuumbeforeuse.Donotusethisvacuumifit hasbeendamaged,dropped,leftoutdoors
ordroppedinwater.Returnit toanauthorisedservice dealerforexamination and repair.Donotattemptto
service thisappliance yourself. Referservicing toqualifiedservice personnel.
Store inasafeplace
Whennot inusestoreyourvacuumand all itsaccessoriesand instruction manual inasafeand dryplace.
Liability.
Noliabilitycanbeacceptedforany damageorpersonalinjurycausedby non-compliance withtheseinstructions
orany otherimproperuseormishandling. Thisappliance isintendedforhouseholduseonly.
8
CAREAND CLEANING
Before cleaning.
Whennot inuseorbeforecleaning, alwaysdisconnect thevacuumfromthemainssupply.
Cleaningguide.
Regularlycleantheoutsideofthevacuumwithasoftdampclothand dryit withadrytowel. Donotimmersein
water. Donot useharshsolventstocleantheplasticcomponents.
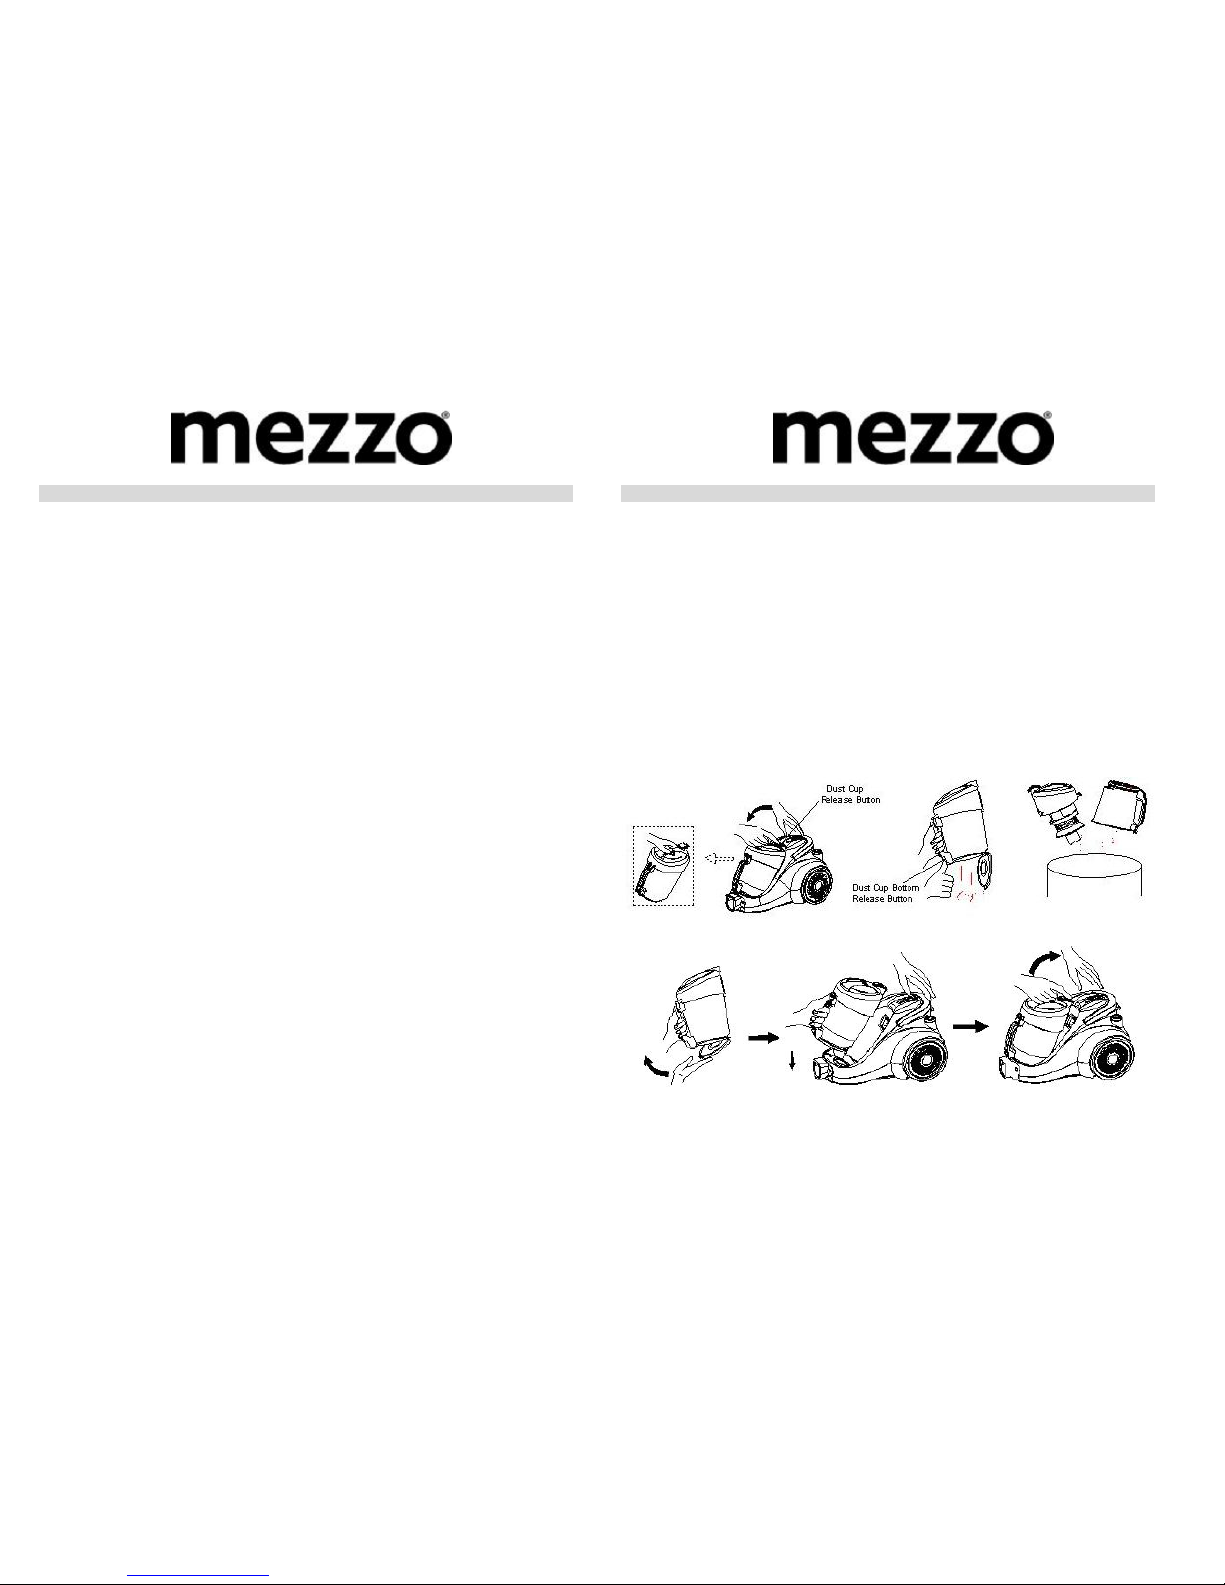
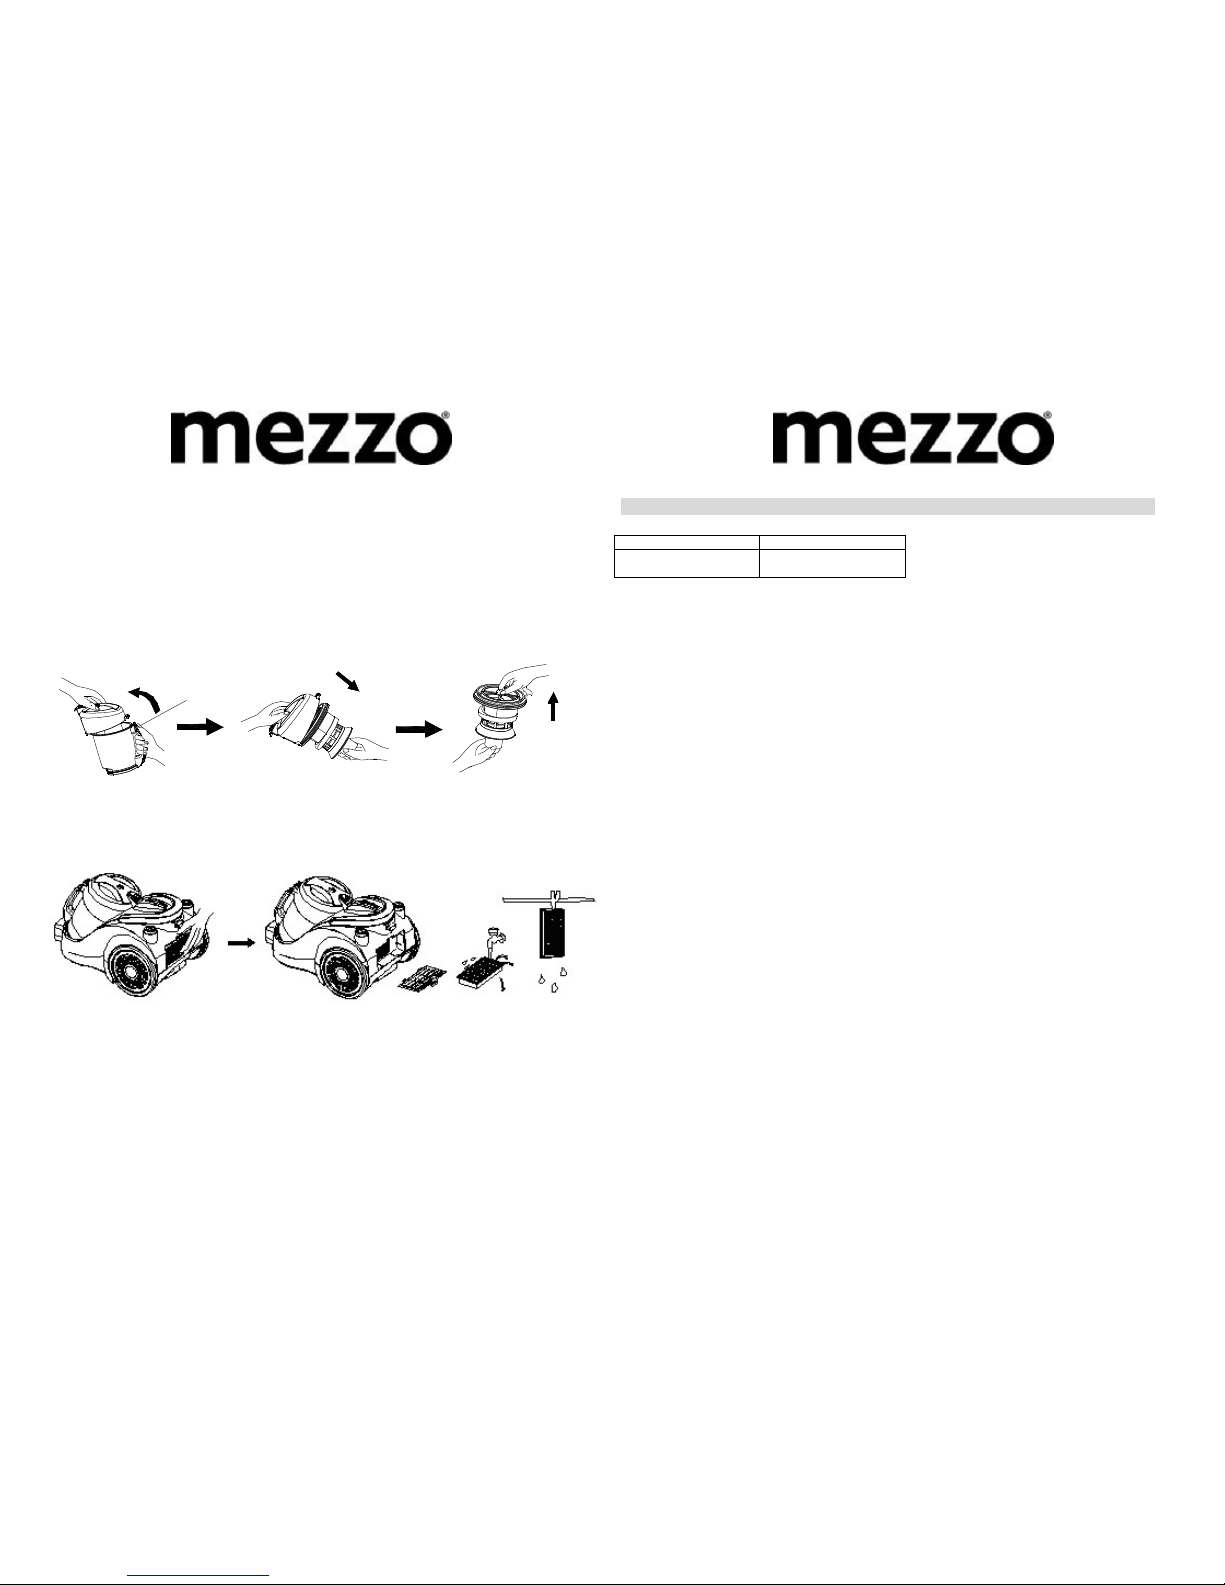
EmptyingtheDustCanister
Regularlyemptythedustcanister.Press theDustCupReleaseButton toreleasethedustcanister.Holdthedust
canisteroverasuitablewastecontainerorbag,and thepress DustCupBottomReleaseButton toopenthelower
doorofthedustcontainer.Closethelowerdoorby pushing thedoorbackupand againpressing theDustCup
BottomReleaseButton. Checkthat thelowerdoorisshut securely.
Removethelidofthedustcontainerby pushing theDustCupLidReleaseButton locatedabovethedust
containerhandle.Toreplace thelid,holddowntheDustCupLidReleaseButton,and fit thelidbackon securely,
making surethelipofthedust cupislocatedintotheslot on theoppositesidefromthehandle.
Whenyouhaveemptiedthedustcanisterand replacedthelid,reinsertit backontothemainbody oftheCyclonic
VacuumCleanermaking surethat it locksintoplace.
9

CleaningtheNylonand HepaFilters
RemovetheDustCanister(asdescribedabove).OpentheDustCanisterby pushing theDustCapReleaseButton
locatedabovetheDust Canisterhandle(asshownbelow).
RemovetheNylon Filterby simplygrasping theNylon Filterand pulling it downtheblackplastictube.The
Nylon filtercanbecleanedwithasoft brushorrinsedinrunning water.
Removethesilvercapby holding theblacktubewithonehand,and pulling thecapoff.Thenremovetheblue
HepaFilterfromit’senclosuresothatit canbecleaned.TheHepafiltercanbecleanedby rinsing inluke-warm
water. Warning! Bothfiltersmustbecompletelydrybefore installing.
Dust Cup
ReleaseButton
CleaningtheRearFilter
TheRearFilterislocatedat thebackoftheCyclonicVacuumCleaner. Removethereargridby pressing the
releasebutton locatedat thetop ofthegrid. Removethefilterand rinsecleaninwater. Dryfullybefore
installing.
Storage
Whennot inusestoretheappliance, accessoriesand theseinstructionsinadryplace.
TheCyclonicVacuumCleanercanbestoreduprightforconvenientstorageinaclosetofcupboard.Note:The
CyclonicVacuumCleanercannot bestoredupright withtheAirTurbo BrushAttached.
10
TECHNICALSPECIFICATIONS
SupplyVoltage 220-240 VAC50 Hz
PowerInput 1400 watt nominal
1600 watt maximum
11

WARRANTYCARD
Thisproduct isguaranteedagainst faultymaterialsand workmanshipforaperiod oftwelvemonthsfromthedate
ofpurchase. Thiswarrantybecomesvoidiftheproduct hasbeentamperedwith, damagedby accident, damaged
inany otherwayby improperuseorhasbeenpurchasedsecond hand. All production ordershavequality
inspections.
Foranycustomer queryorintheunlikelyeventofaproductfailure, pleasephoneor
email thehelplinecontactdetailsbelowforassistance.
DONOTRETURN THEPRODUCTTOTHERETAILER.
WARRANTYFORAPPLIANCESUSEDCOMMERCIALLYLIMITEDTO90 DAYS
Product: ______________________________________________________
ModelNo.: _____________________________________ Purchase Date:_________
Product PurchasedFrom: ________________________________________________
_________________________________________________________________________
Your Name: _____________________________________________________________
Address: ________________________________________________________________
______________________________________________ PhoneNumber: __________
IMPORTANT!
Please retainthiswarrantycardalong withyourpurchase receipt. Please do notposttothe
retailer Toll Free Helpline:1300 366 144
Email: info@telefixsales.com.au
Table of contents