B. Braun Acculan 3Ti GA677 User manual

Aesculap Power Systems
Acculan® 3Ti
Instructions for use
Acculan® 3Ti charger GA677
Gebrauchsanweisung
Acculan® 3Ti Ladegerät GA677
Mode d’emploi
Chargeur Acculan® 3Ti GA677
Instrucciones de manejo
Cargador Acculan® 3Ti GA677
Istruzioni per l’uso
Caricabatterie Acculan® 3Ti GA677
Instruções de utilização
Carregador Acculan® 3Ti GA677
Gebruiksaanwijzing
Acculan® 3Ti lader GA677
Brugsanvisning
Acculan® 3Ti opladningsapparat GA677
Bruksanvisning
Acculan® 3Ti laddningsaggregat GA677
Инструкция по примению
Зарядное устройство Acculan®3Ti GA677

6
6
245
1
3
7
7
7
8
Aesculap Power Systems
Acculan® 3Ti charger GA677
2
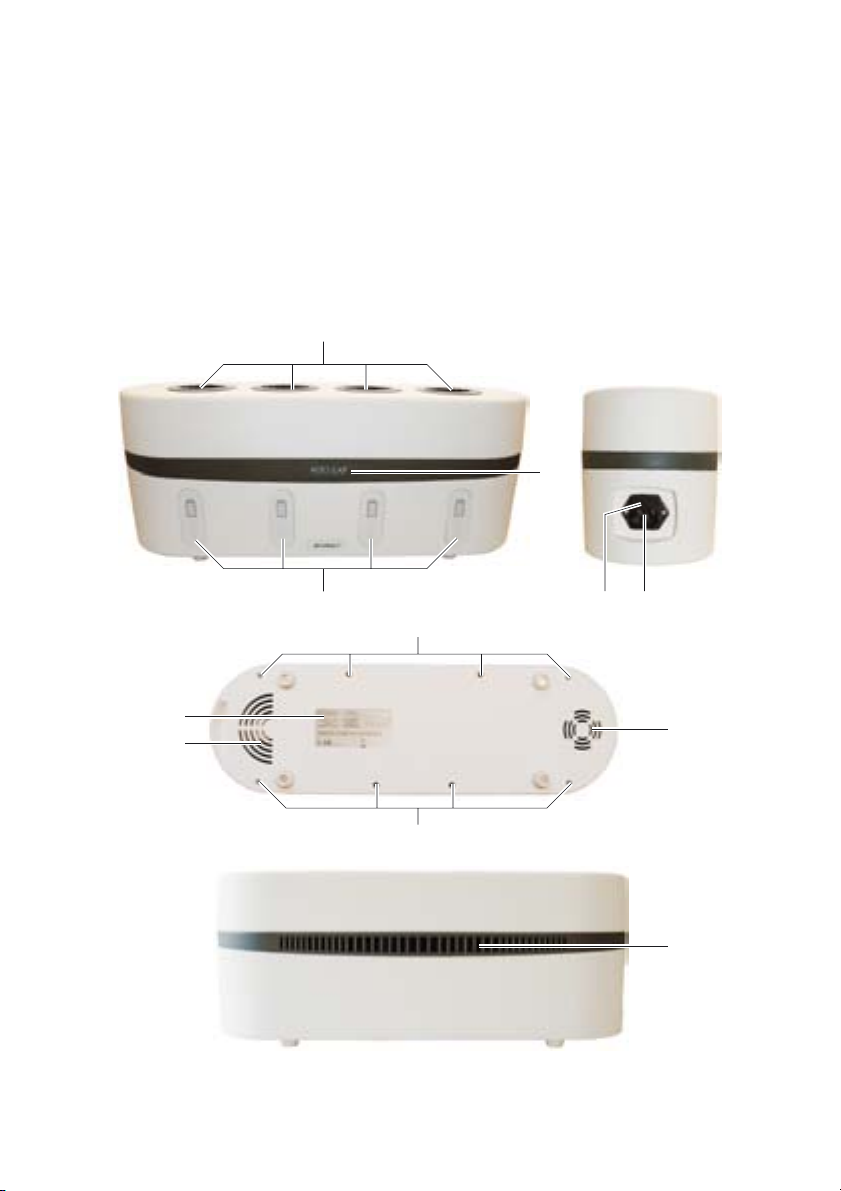
Legend
1Charging bays
2Indicator fields for charging bays
3“Power On” indicator (illuminated in blue)
4Fuse holder
5Device socket
6Screws for charging bay cover
7Ventilation slots
8Type plate
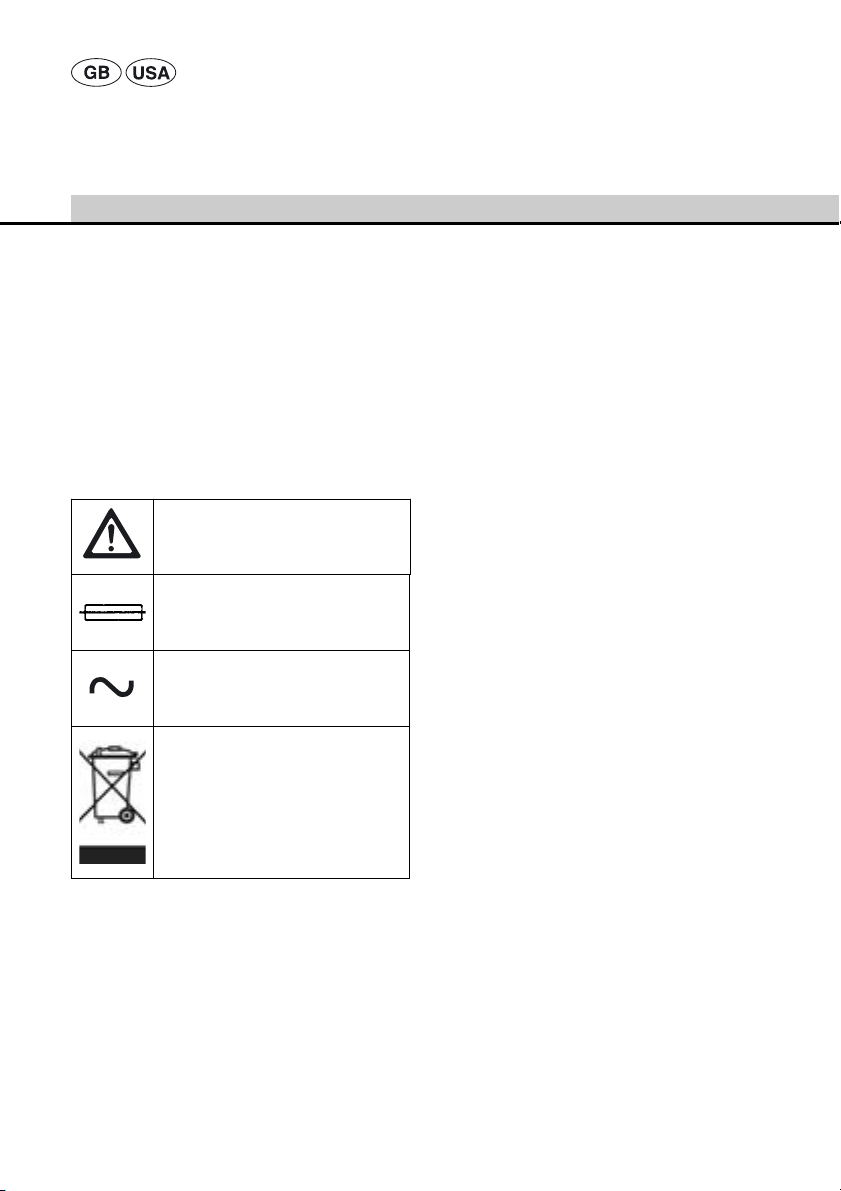
Symbols on product
Contents
1. Safe handling ........................................................... 3
2. Product description ................................................ 3
2.1 System components ............................................... 3
2.2 Components necessary for use ........................... 3
2.3 Intended use ............................................................. 4
2.4 Explanation of charging bay indicators/
symbols ...................................................................... 4
2.5 Operating principle ................................................. 4
Charging principle .................................................. 4
Battery temperature............................................... 5
Charging time .......................................................... 5
3. Preparation and setup ........................................... 5
4. Working with the Acculan® 3Ti charger .......... 6
4.1 System set-up .......................................................... 6
Connecting the power supply.............................. 6
4.2 Function checks ....................................................... 6
4.3 Operation .................................................................. 7
Charging of Acculan® 3Ti rechargeable
batteries GA666 and GA676................................ 8
Charging of Acculan® rechargeable
batteries GA646, GA626 and GA616................. 9
5. Processing ................................................................. 9
5.1 Cleaning/Disinfecting ..........................................10
6. Servicing/Inspection .............................................10
7. Troubleshooting list .............................................11
7.1 Changing fuses ......................................................12
8. Technical Service ..................................................12
9. Accessories/Spare parts ......................................13
9.1 Mains power cord .................................................13
9.2 Spare parts ..............................................................13
10. Technical specifications ......................................13
11. Disposal ...................................................................14
12. Changing a charging bay ....................................14
13. Distributor in the US/Contact in Canada
for product information and complaints .......15
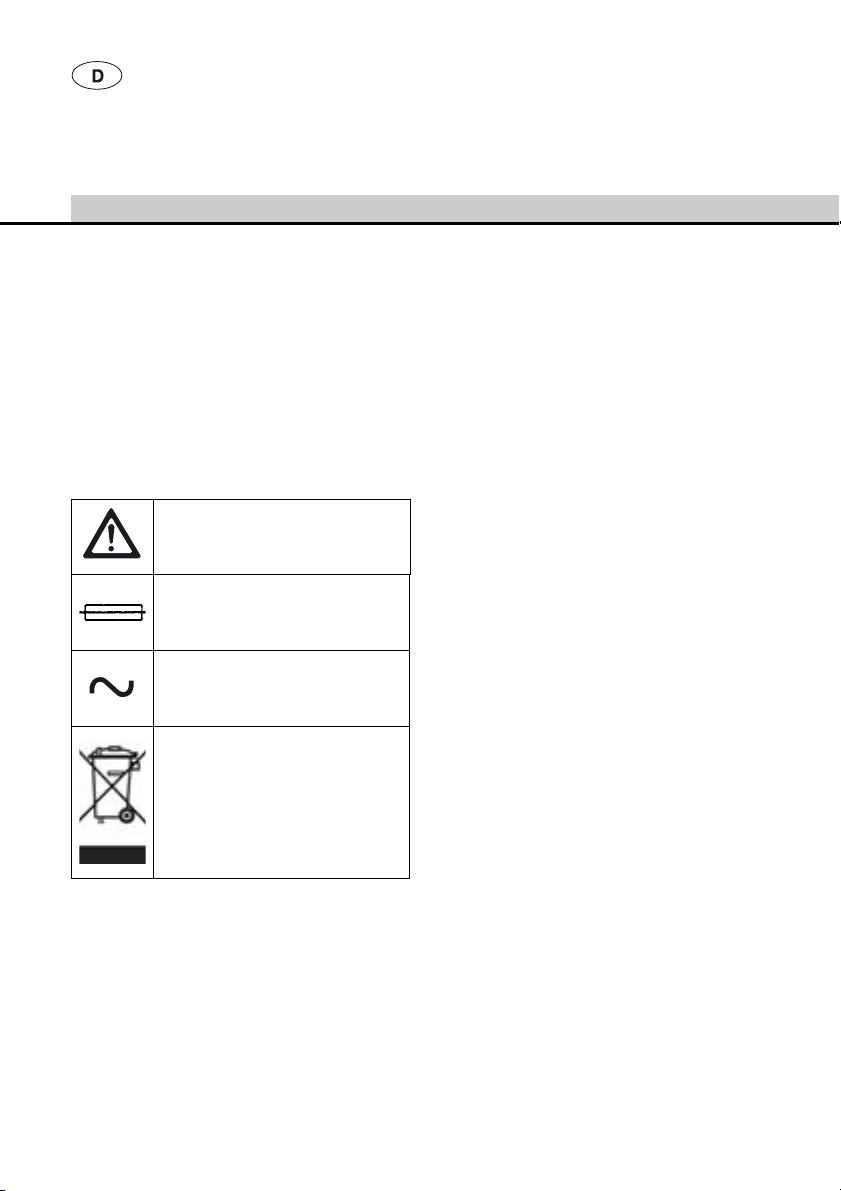
Attention, see instructions for use
Fuse
Alternating current
Labeling of electric and electronic
devices according to directive 2002/
96/EC (WEEE), see chapter Disposal
3
1. Safe handling
CAUTION
Federal law restricts this device to sale by or
on order of a physician!
¾Prior to use, check for proper condition and func-
tioning of the product.
¾Observe “Notes on Electromagnetic Compatibility
(EMC)", see TA022130.
¾To prevent damage caused by improper setup or
use and in order not to compromise the warranty
and liability:
– Use the product only as described in these
instructions for use.
– Observe all safety information and maintenance
notes.
– Only combine Aesculap products with each
other.
– Ensure the manufacturer’s approval before using
accessories that are not mentioned in the
instructions for use.
¾Ensure that the product and its accessories are
operated and used only by persons with the requi-
site training, knowledge or experience.
¾Keep the instructions accessible for the O.R. per-
sonnel.
¾Always adhere to applicable standards.
¾Ensure that the electrical facilities in the room in
which the device is being used conform to IEC
norms.
¾Unplug the device by pulling on the plug, and never
on the power cord.
¾Do not operate the product in explosion-hazard
areas.
¾Use the product in unsterile areas only.
¾Do not use the product if it is damaged or defec-
tive. Set aside the product if it is damaged.
¾Always observe the instructions for use of the
Acculan® rechargeable batteries.
2. Product description
2.1 System components
2.2 Components necessary for use
• Acculan® 3Ti charger
• Mains power cord
DANGER
Risk of death by electric shock!
¾Do not open he product (except for
changing a charging bay).
¾Only ever connect the product to
power mains with equipment ground-
ing conductor.
Designation Art. no.
Acculan® 3Ti charger GA677
Instructions for use TA022160
Notes on Electromagnetic Com-
patibility (EMC)
TA022130

Aesculap Power Systems
Acculan® 3Ti charger GA677
4
2.3 Intended use
The Acculan® 3Ti charger GA677 with an appropriate
charging bay is used for charging Aesculap Acculan®
3Ti rechargeable batteries GA666 and GA676 and
Acculan® rechargeable batteries GA646, GA626 and
GA616.
Note
Other batteries must not be charged with this product!
2.4 Explanation of charging bay indica-
tors/symbols
2.5 Operating principle
The Acculan® 3Ti charger GA677 has been designed for
the mains voltage range 100 V to 240 V / 50 Hz to
60 Hz.
To make the Acculan® 3Ti charger GA677 ready for
operation, connect it to the mains supply using the
mains power cord. There is no other action required to
activate or deactivate the charger.
The Acculan® 3Ti charger GA677 performs a self-test,
which takes approx. 3 seconds. During this test, all
indicator elements at the front panel of the charger are
illuminated.
The Acculan® 3Ti charger is equipped with four inde-
pendent slots for charging bays for Acculan® 3Ti
rechargeable batteries GA666 and GA676 or for charg-
ing bays for Acculan® rechargeable batteries GA646,
GA626 and GA616.
Each charging bay has an indicator field on the charger
front panel assigned to it.
Charging starts automatically as soon as a battery is
inserted in a charging bay.
The charging time in all 4 charging bays depends on
the charge state and capacity of the batteries.
Charging principle
The batteries are charged very gently with constant
current pulses.
The charge state of the battery is continuously moni-
tored throughout charging. Monitoring of the charging
curve ensures that the battery is fully charged without
overcharging.
The battery temperature and charging time are moni-
tored, too.
The Acculan® 3Ti rechargeable batteries GA666 and
GA676 undergo an automatic battery check during
charging. This check assesses the battery condition. If
this assessment yields a negative result, the "Battery
change recommended" symbol (in the respective indi-
cator field 2) is illuminated to alert the user.
Charging progress indicator (illumi-
nated in green)
The symbol is divided in 4 sections and
indicates the progress of charging.
Minimal illumination: Start of auto-
matic charging
Complete illumination: Charging com-
pleted
Symbol "Action request" (illuminated
in orange)
Charging could not be completed nor-
mally, see chapter Troubleshooting
list.
Symbol "Battery change recom-
mended" (illuminated in orange)
Automatic battery check failed.
This function is only available with
Acculan® 3Ti rechargeable battery
GA676, see chapter Charging of Accu-
lan® 3Ti rechargeable batteries GA666
and GA676
5
Battery temperature
Each charging bay is equipped with a fan, which works
independently of the battery temperature.
The charging of the battery is aborted as soon as a bat-
tery temperature of > 47 °C is detected.
Excessive battery temperature is indicated by the
“Action request” symbol illuminated in indicator field 2.
When the battery temperature drops below 45 °C, the
"Action request" symbol in indicator field 2still
remains illuminated. The battery must be removed
from the respective charging bay and plugged in again
to restart charging.
Charging time
Charging is stopped as soon as the maximum charging
time is reached.
The permanent monitoring of the battery also allows
detecting faults in the battery block.
When a battery fault or a charging fault is detected,
this is indicated by the “Action request” symbol illumi-
nated in indicator field 2and charging is aborted.
The charging bays can be ordered separately, see chap-
ter Accessories/Spare parts.
3. Preparation and setup
Non-compliance with these rules will result in com-
plete exclusion of liability on the part of Aesculap.
¾Observe the following regulations when setting up
and operating the product:
– national regulations for installation and opera-
tion,
– national regulations on fire and explosion pro-
tection.
– operating advisories according to IEC-/VDE reg-
ulations.
DANGER
Fire and explosion hazard!
¾Do not operate the product in explo-
sion-hazard areas.
CAUTION
Malfunction of, or damage to the prod-
uct caused by improper setup!
¾Do not expose the product to direct
sunlight or moisture.
¾Do not cover ventilation slots 7 of
the product.
¾Only connect the product to a mains
power system with an equipment
grounding conductor and with a volt-
age rating 100 V to 240 V and a
mains power frequency range of
50 Hz to 60 Hz.
¾Ensure that the mains power socket
used for supplying the product is
freely accessible.

Aesculap Power Systems
Acculan® 3Ti charger GA677
6
4. Working with the
Acculan® 3Ti charger
4.1 System set-up
Connecting the power supply
Prior to connecting the product to mains power:
– Check the mains power cord for any damage.
– Check the product for any damage (e. g. bent,
short-circuited contacts of the charging bays).
¾Plug in the mains power cord at device socket 5.
¾Plug in the mains plug at the mains power socket.
4.2 Function checks
¾Carry out a visual inspection.
Prior to connecting the product to mains power:
– Check the mains power cord for any damage.
– Check the product for any damage (e. g. bent,
short-circuited contacts of the charging bays).
¾Plug in the mains power cord at device socket 5.
¾Plug in the mains plug at the mains power socket.
As soon as the product is connected to mains power, it
will perform a self-test for approx. 3 seconds. During
this period all indicator elements at the front panel of
the charger must be illuminated. With the self-test
completed, only "Power On" indicator 3is illuminated.
The product is ready for operation.
The charging process is started by correctly inserting a
fault-free rechargeable battery in a charging bay. The
respective charging progress indicator is illuminated.
Note
For any deviations from the sequence described above,
see chapter Troubleshooting list!
7
4.3 Operation
Note
As excessive battery temperatures will prolong the
charging time, allow batteries to cool down prior to
charging.
Note
Batteries will heat up during charging. If necessary, use
a cloth to remove the battery.
Note
Disconnect the charger from mains power by unplug-
ging the mains power cord at the mains power socket.
WARNING
Risk of injury and material damage due
to damaged batteries!
¾Check batteries for any damage
before charging.
¾Do not use or recharge damaged bat-
teries.
CAUTION
Loss of capacity/performance due to
prolonged storage of discharged batter-
ies!
¾Store batteries only in fully charged
condition and recharge stored bat-
teries once a month.

Aesculap Power Systems
Acculan® 3Ti charger GA677
8
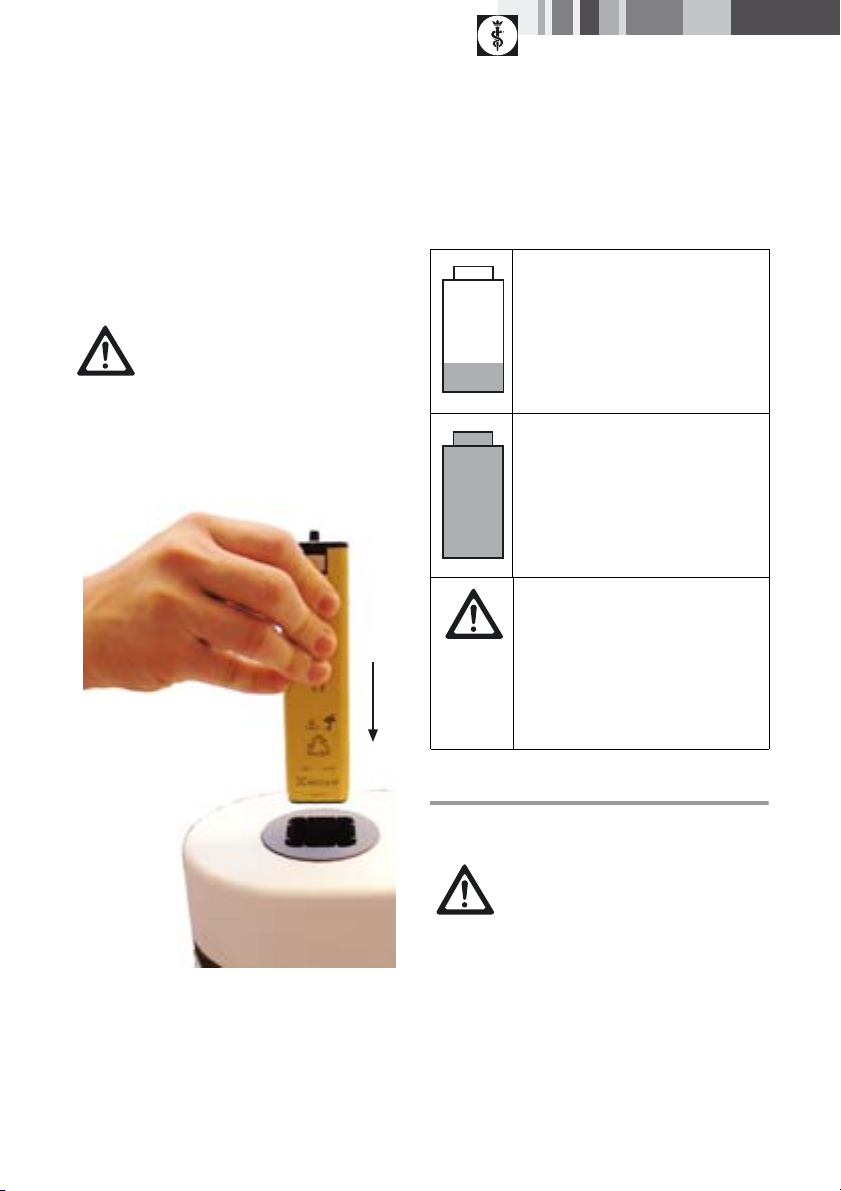
Charging of Acculan® 3Ti rechargeable bat-
teries GA666 and GA676
Fig. 1
Legend
AMark on rechargeable battery
BMark on battery compartment
¾Insert the battery with the contacts downwards in
the battery compartment, making sure that the
mark on rechargeable battery Ais aligned with the
mark on battery compartment B, see Fig. 1.
CAUTION
Destruction of the product, charging bay
or battery due to inserting the wrong
type of battery in the charging bay!
¾Insert batteries only in their appro-
priate charging bays.
¾Insert batteries in their correct posi-
tion.
A
B
"Charging progress” indicator
Battery charging starts automatically.
"Charging progress” indicator
Charging has been completed; remove
the battery from the charging bay.
The charging time depends on the
charge state and capacity of the bat-
teries.
"Battery change recommended" indi-
cator
Symbol is illuminated in addition to
"Charging completed“ indicator.
The battery failed the automatic bat-
tery check.
It is recommended to replace the bat-
tery, see chapter Troubleshooting list.
"Action request“ indicator
Charging cannot be performed nor-
mally; the “Charging progress” indica-
tor goes dark.
Possible cause: bad contacts; exces-
sive battery temperature during
charging, see chapter Troubleshooting
list.
9
Charging of Acculan® rechargeable batteries
GA646, GA626 and GA616
Fig. 2
¾Insert batteries with their contacts pointing down
in the charging bay, see Fig. 2.
5. Processing
CAUTION
Destruction of the product, charging bay
or battery due to inserting the wrong
type of battery in the charging bay!
¾Insert batteries only in their appro-
priate charging bays.
¾Insert batteries in their correct posi-
tion.
"Charging progress” indicator
Battery charging starts automatically.
"Charging progress” indicator
Charging has been completed; remove
the battery from the charging bay.
The charging time depends on the
charge state and capacity of the bat-
teries.
"Action request“ indicator
Charging cannot be performed nor-
mally; the “Charging progress” indica-
tor goes dark.
Possible cause: bad contacts; exces-
sive battery temperature during
charging, see chapter Troubleshooting
list.
CAUTION
Damage to, or destruction of the product
caused by mechanical cleaning/disinfect-
ing or sterilization!
¾Only clean and disinfect the product
manually.
¾Do not sterilize the product under
any circumstances.

Aesculap Power Systems
Acculan® 3Ti charger GA677
10
5.1 Cleaning/Disinfecting
Note
Always follow disposal and hygiene instructions and
regulations!
Manual cleaning, disinfecting
¾Carry out a wipe disinfection by wiping the product
housing with a lint-free cloth moistened with a
disinfecting agent (e. g. B. Braun Meliseptol).
¾If necessary, after the appropriate exposure time,
wipe off any residues of the cleaning/disinfecting
agent with a lint-free cloth moistened with clean
water.
¾Dry the product with a clean, lint-free cloth.
¾Clean the contacts in the charging bay with isopro-
panol or ethyl alcohol and a cotton swab. Do not
use corrosive chemicals.
¾If necessary, repeat the cleaning/disinfection pro-
cess.
Control, care and inspection
¾Inspect the product after each cleaning and disin-
fecting cycle to be sure it is clean, functional and
undamaged.
6. Servicing/Inspection
¾Send in the Acculan® 3Ti charger with its accesso-
ries for annual inspection by the manufacturer.
Aesculap Technischer Service
Am Aesculap-Platz
78532 Tuttlingen / Germany
Phone: +49 7461 95-2700
Fax: +49 7461 16-2887
E-Mail: ats@aesculap.de
Or in the US
Aesculap Inc.
Attn. Aesculap Technical Services
615 Lambert Pointe Drive
Hazelwood, MO 63042
Aesculap Repair Hotline
Phone: +1 800 214-3392
Fax: +1 314 895-4420
Other service addresses can be obtained from the
address indicated above.
DANGER
Risk of electric shock and fire hazard!
¾Unplug the unit before cleaning.
¾Make certain that no fluids will pen-
etrate the product.
¾Leave the product exposed to air for
at least 1 minute after cleaning/dis-
infecting.
CAUTION
Damage to the product due to incorrect
cleaning or inappropriate cleaning/disin-
fecting agents!
¾Only use a cleaning/disinfecting
agent approved for surface cleaning
according to manufacturer’s instruc-
tions.
¾Never immerse the product in water
or detergent.
¾Do not introduce any fluid into the
charging bays.
¾Clean the contacts in the charging
bays, applying extreme care.

11
7. Troubleshooting list
Malfunction Finding Cause Remedy
Product not functioning at
all
“Power On” indicator 3
not illuminated
Power cord not plugged
in
Plug in mains power cord
in device socket 5 at the
product and in a mains
power socket
Mains power cord defec-
tive
Replace mains power
cord
Fuses blown Replace fuses, see chap-
ter Changing fuses
Product defective Have the product
repaired by the manufac-
turer
Battery is not charged Battery inserted, Charg-
ing progress indicator
not illuminated
Product contacts dirty Clean the contacts, see
chapter Processing
Battery defective Have battery repaired by
the manufacturer
Product defective Have the product
repaired by the manufac-
turer
Battery inserted,
“Action request” indica-
tor illuminated
Excessive battery temper-
ature detected during
charging
Remove the battery from
the charging bay, let it
cool down and restart
charging.
If the malfunction recurs,
have battery repaired by
the manufacturer
Charging fault or battery
defective
Remove the battery from
the charging bay and
repeat charging, if nec-
essary in another charg-
ing bay.
If the malfunction recurs,
have battery repaired by
the manufacturer

Aesculap Power Systems
Acculan® 3Ti charger GA677
12
7.1 Changing fuses
Mandatory fuse set:
2 x IEC 127 - T 1.25 A breaking capacity H (1 500 A)
¾Pull the mains plug before replacing the fuse sets.
¾Use a small screwdriver to release the clip on the
fuse holder.
¾Pull out the fuse holder.
¾Replace both fuses.
¾Reinsert the fuse holder in such a way that it audi-
bly snaps into place.
Note
If the fuses blow frequently, the product is defective
and must be repaired, see chapter Technical Service.
8. Technical Service
For service, maintenance or repairs, contact your
national B. Braun/Aesculap agency.
Modifications carried out on medical technical equip-
ment may result in loss of guarantee/warranty rights
and forfeiture of applicable licenses.
Service addresses
Aesculap Technischer Service
Am Aesculap-Platz
78532 Tuttlingen / Germany
Phone: +49 7461 95-2700
Fax: +49 7461 16-2887
E-Mail: ats@aesculap.de
Or in the US:
Aesculap Inc.
Attn. Aesculap Technical Services
615 Lambert Pointe Drive
Hazelwood, MO 63042
Aesculap Repair Hotline
Phone: +1 800 214-3392
Fax: +1 314 895-4420
Other service addresses can be obtained from the
address indicated above.
DANGER
Fatal injury from electric shock!
Open components can hold live-threat-
ening mains voltage.
¾Pull the mains plug before replacing
the fuse sets.
13
9. Accessories/Spare parts
9.1 Mains power cord
9.2 Spare parts
10. Technical specifications
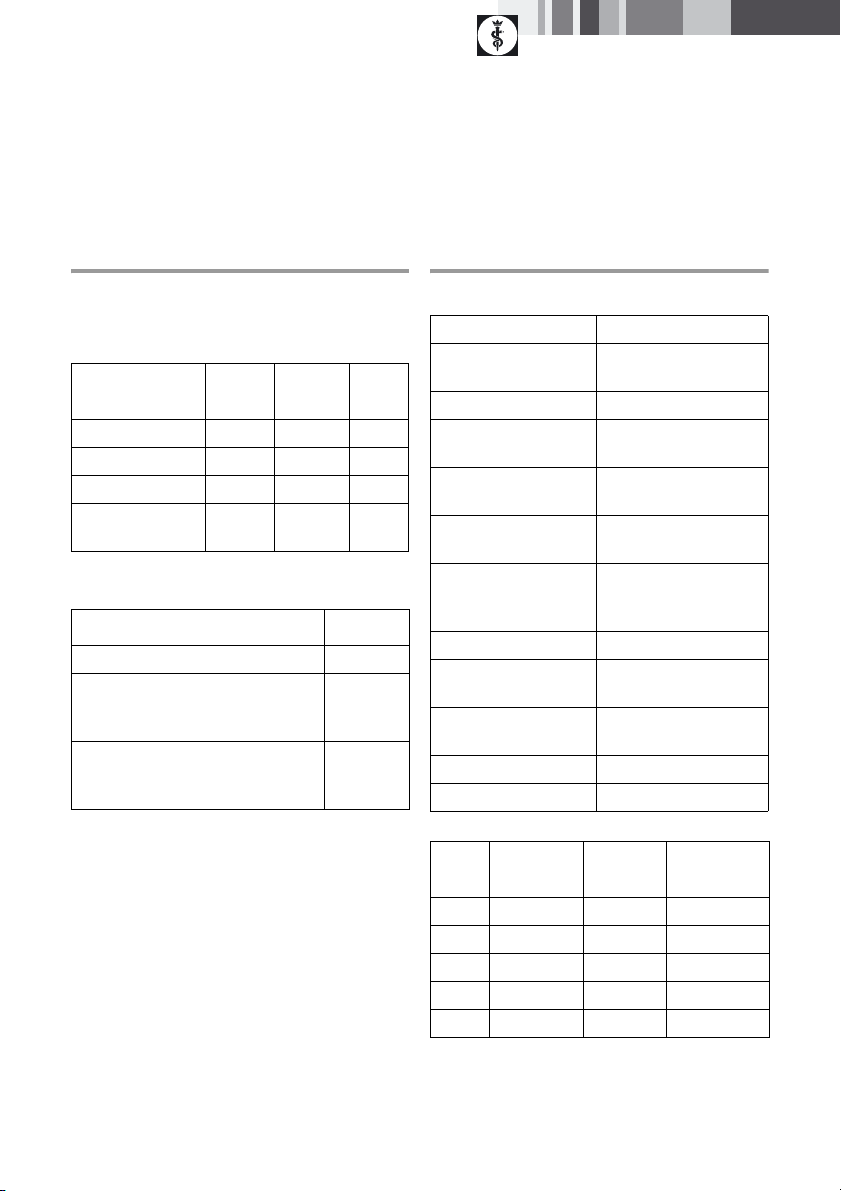
Approved for Color Length
(in m)
Art.
no.
Europe black 1.5 TE780
Europe black 5.0 TE730
UK black 5.0 TE734
USA, Canada,
Japan
gray 3.5 TE735
Designation Art. no.
Fuse set (melting) T 1.25 A TA020112
Charging bay complete, for Acculan®
rechargeable batteries GA646, GA626,
GA616
GA677830
Charging bay complete for
Acculan® 3Ti rechargeable batteries
GA666, GA676
GA677831
Model GA677
Mains power ranges
(current intake)
100-120 V~ (1.1-0.9 A)
220–240 V~ (0.5–0.45 A)
AC frequency 50-60 Hz
Protection class
(acc. to IEC 60601-1)
I
Charging/Output volt-
age
max. 12.5 V
Charging/Output volt-
age
max. 1.2 A
Device fuse
Breaking capacity
T 1.25 A
H (1 500 A at
250 V/50 Hz)
Weight 7.72 lb
Dimensions (L x W x H) 17.32 in x 5.51 in x
7.09 in
Classification acc. to
directive 93/42/EEC
I
EMC IEC 60601-1-2
Norms IEC 60601-1
Type Technology Voltage Nominal
capacity
GA676 NiMH 9.6 V 1 950 mAH
GA666 NiMH 9.6 V 1 100 mAH
GA646 NiCd 9.6 V 500 mAH
GA626 NiCd 9.6 V 800 mAH
GA616 NiMH 9.6 V 1 700 mAH

Aesculap Power Systems
Acculan® 3Ti charger GA677
14
11. Disposal
Note
The user institution is obliged to process the product
before its disposal, see chapter Processing.
Always adhere to national regulations when disposing
of or recycling the product or its components!
In case of any questions regarding the disposal of the
product, please contact your national B. Braun/Aescu-
lap agency, see chapter Technical Service.
12. Changing a charging bay
Note
A Pozidrive® cross slot screwdriver size 1, blade length
140 mm is required for installing and uninstalling the
charging bay cover!
Fig. 3
¾Loosen the eight screws of charging bay cover 6.
Products carrying this symbol are sub-
ject to separate collection of electric
and electronic devices. Within the
European Union, disposal is taken care
of by the manufacturer as a free-of-
charge service.
CAUTION
Damage to the product during charging
bay change!
¾Charging bay changes may only be
carried out by persons who, due to
their training and practical experi-
ence, are equipped with the requisite
expertise in the maintenance of
medical products.
¾Disconnect the product from mains
power.
6
6

15
Fig. 4
¾Remove the charging bay cover.
Fig. 5
¾Pull out the old charging bay.
¾Insert the new charging bay.
¾Position and screw on the charging bay cover.
¾Carry out function checks, see chapter Function
checks.
13. Distributor in the US/Contact
in Canada for product infor-
mation and complaints
Aesculap Inc.
3773 Corporate Parkway
Center Valley, PA 18034
USA
Aesculap Power Systems
Acculan® 3Ti Ladegerät GA677
16
Legende
1Ladeschächte
2Anzeigefelder zu Ladeschächte
3Anzeige "Netz Ein" (leuchtet blau)
4Sicherungshalter
5Gerätestecker
6Schrauben Ladeschachtabdeckung
7Lüftungsschlitze
8Typenschild
Symbole am Produkt
Inhaltsverzeichnis
1. Sichere Handhabung ............................................17
2. Gerätebeschreibung .............................................17
2.1 Lieferumfang ..........................................................17
2.2 Zum Betrieb erforderliche Komponenten ......17
2.3 Verwendungszweck ..............................................18
2.4 Erläuterung Anzeige/Symbole der Lade-
schächte ..................................................................18
2.5 Funktionsweise ......................................................18
Ladeprinzip.............................................................. 18
Akku-Temperatur .................................................. 19
Ladezeit.................................................................... 19
3. Vorbereiten und Aufstellen ................................19
4. Arbeiten mit dem Acculan® 3Ti Ladegerät ....20
4.1 Bereitstellen ...........................................................20
Spannungsversorgung anschließen ................. 20
4.2 Funktionsprüfung ..................................................20
4.3 Bedienung ...............................................................21
Acculan® 3Ti Akkumulatoren GA676 und
GA666 laden........................................................... 22
Acculan® Akkumulatoren GA646, GA626
und GA616 laden .................................................. 23
5. Aufbereitung ..........................................................24
5.1 Reinigung/Desinfektion .......................................24
6. Wartung/Prüfung ..................................................24
7. Fehler erkennen und beheben ...........................25
7.1 Sicherungswechsel ...............................................26
8. Technischer Service ..............................................26
9. Zubehör/Ersatzteile ..............................................27
9.1 Netzanschlussleitung ...........................................27
9.2 Ersatzteile ...............................................................27
10. Technische Daten ..................................................27
11. Entsorgung ..............................................................28
12. Ladeschacht wechseln .........................................28
Gebrauchsanweisung einhalten
Sicherung
Wechselstrom
Kennzeichnung von Elektro- und Elek-
tronikgeräten entsprechend Richtlinie
2002/96/EG (WEEE), siehe Kapitel Ent-
sorgung

17
1. Sichere Handhabung
¾Vor der Anwendung des Produkts Funktionsfähig-
keit und ordnungsgemäßen Zustand prüfen.
¾„Hinweise zur elektromagnetischen Verträglichkeit
(EMV)“ beachten, siehe TA022130.
¾Um Schäden durch unsachgemäßen Aufbau oder
Betrieb zu vermeiden und die Garantie und Haf-
tung nicht zu gefährden:
– Produkt nur gemäß dieser Gebrauchsanweisung
verwenden.
– Sicherheitsinformationen und Instandhaltungs-
hinweise einhalten.
– Nur Aesculap-Produkte miteinander kombinie-
ren.
– Zubehör, das nicht in der Gebrauchsanweisung
erwähnt wird, nur mit Zustimmung des Herstel-
lers verwenden.
¾Produkt und Zubehör nur von Personen betreiben
und anwenden lassen, die die erforderliche Ausbil-
dung, Kenntnis oder Erfahrung haben.
¾Gebrauchsanweisung für das OP-Personal zugäng-
lich aufbewahren.
¾Gültige Normen einhalten.
¾Sicherstellen, dass die elektrische Installation des
Raums den IEC-Anforderungen entspricht.
¾Netzverbindungen durch Ziehen am Stecker lösen,
nie durch Ziehen am Kabel.
¾Produkt nicht in explosionsgefährdeten Bereichen
einsetzen.
¾Produkt nur im unsterilen Bereich betreiben.
¾Kein beschädigtes oder defektes Produkt verwen-
den. Beschädigtes Produkt sofort aussortieren.
¾Gebrauchsanweisung der Acculan® Akkumulatoren
einhalten.
2. Gerätebeschreibung
2.1 Lieferumfang
2.2 Zum Betrieb erforderliche Kompo-
nenten
• Acculan® 3Ti Ladegerät
• Netzanschlussleitung
GEFAHR
Lebensgefahr durch elektrischen Strom-
schlag!
¾Produkt nicht öffnen (hiervon ausge-
nommen ist der Ladeschacht-Wech-
sel).
¾Produkt nur an ein Versorgungsnetz
mit Schutzleiter anschließen.
Bezeichnung Art.-Nr.
Acculan® 3Ti Ladegerät GA677
Gebrauchsanweisung TA022160
Hinweis zur elektromagnetischen
Verträglichkeit (EMV)
TA022130

Aesculap Power Systems
Acculan® 3Ti Ladegerät GA677
18
2.3 Verwendungszweck
Das Acculan® 3Ti Ladegerät GA677 wird, mit entspre-
chendem Ladeschacht, zum Laden der Aesculap-
Acculan® 3Ti Akkumulatoren GA676 und GA666 und
der Acculan® Akkumulatoren GA646, GA626 und
GA616 eingesetzt.
Hinweis
Andere Akkumulatoren dürfen nicht geladen werden!
2.4 Erläuterung Anzeige/Symbole der
Ladeschächte
2.5 Funktionsweise
Das Acculan® 3Ti Ladegerät GA677 ist für einen Netz-
spannungsbereich von 100 V bis 240 V und von 50 Hz
bis 60 Hz konzipiert.
Zur Herstellung der Betriebsbereitschaft wird das
Acculan® 3Ti Ladegerät GA677 mit der Netzanschluss-
leitung an das Versorgungsnetz angeschlossen. Ein
zusätzliches Ein- bzw. Ausschalten entfällt.
Das Acculan® 3Ti Ladegerät GA677 führt einen Selbst-
test von ca. 3 Sekunden Dauer durch. Während des
Tests leuchten alle Anzeige-Elemente an der Ladege-
rätefront.
Das Acculan® 3Ti Ladegerät verfügt über vier vonein-
ander unabhängige Steckplätze für Ladeschächte der
Acculan® 3Ti Akkumulatoren GA676 und GA 666 oder
für Ladeschächte der Acculan® Akkumulatoren GA646,
GA626 und GA616.
Die Ladeschächte sind dem jeweiligen Anzeigefeld an
der Ladegerätefront zugeordnet.
Mit dem Einstecken eines Akkumulators in die
Ladestation startet der Ladevorgang automatisch.
Die Ladezeit in allen 4 Ladeschächten hängt vom Lade-
zustand und der Kapazität der Akkumulatoren ab.
Ladeprinzip
Die Akkumulatoren werden mit konstanten Stromim-
pulsen sehr schonend aufgeladen.
Der Ladezustand des Akkumulators wird während der
Aufladung dauernd überwacht. Durch die Überwa-
chung der Ladekurve wird eine 100-%-Ladung ohne
Überladung sichergestellt.
Zusätzlich werden die Akkutemperatur und die Lade-
zeit überwacht.
Die Acculan® 3Ti Akkumulatoren GA676 und GA666
werden beim Ladevorgang einem automatischen
Akku-Check unterzogen. Bei diesem Check wird der
Akku-Zustand beurteilt. Bei negativer Beurteilung wird
dem Anwender durch Aufleuchten des Symbols "Akku-
austausch empfohlen" (im entsprechenden Anzeige-
feld 2) ein Austausch des Akkus empfohlen.
Ladeverlaufsanzeige (leuchtet grün)
Das Symbol ist in 4 Teile unterteilt und
zeigt den Ladeverlauf an.
Minimale Ausleuchtung: Beginn der
automatischen Ladung
Komplette Ausleuchtung: Ladevorgang
ist abgeschlossen
Symbol "Handlungsaufforderung"
(leuchtet orange)
Der Akku-Ladevorgang konnte nicht
bestimmungsgemäß durchgeführt
werden, siehe Kapitel Fehler erkennen
und beheben.
Symbol "Akkuaustausch empfohlen"
(leuchtet orange)
Automatischer Akku-Check nicht
bestanden.
Diese Funktion ist nur in Verbindung
mit dem Acculan® 3Ti Akkumulator
GA676 durchführbar, siehe Kapitel
Acculan® 3Ti Akkumulatoren GA676
und GA666 laden
Table of contents
Languages:
Other B. Braun Batteries Charger manuals


Popular Batteries Charger manuals by other brands


Trust
Trust 16665 quick start guide

Sandberg Active
Sandberg Active 420-55 quick guide

Chargery Power
Chargery Power 550B operating instructions

Bosch
Bosch Professional AL 1820 CV Original instructions

DeWalt
DeWalt DCB115 Series instruction manual

Hitachi Koki
Hitachi Koki UC 24Yjuc24yj Handling instructions