B.E.G. LUXOMAT LK-IP/KNXs REG User manual

Subject to technical changes
KNX IP Router with KNX Security
LK-IP/KNXs REG
Operating Manual
90403

© 2020
B.E.G. Brück Electronic GmbH
Gerberstraße 33
51789 LindlarGERMANY
Phone: +49 (0) 2266 90121-0
Fax: +49 (0) 2266 90121-50
E-mail: [email protected]
Internet: www.beg-luxomat.com
All device data can also be found here:
https://beg-luxomat.com/qr.php?prtno=90403

LK-IP/KNXs REG
Operating Manual 1
Content
1 About this document . . . . . . . . . . . . . . . . . . . . . . . . . . . . . . . . . . . . . . . . . . . . . . . . . . . . . . . 3
1.1 Other applicable documents . . . . . . . . . . . . . . . . . . . . . . . . . . . . . . . . . . . . . . . . . . . . . . . . . . . . . . 3
1.2 Used symbols and signal words . . . . . . . . . . . . . . . . . . . . . . . . . . . . . . . . . . . . . . . . . . . . . . . . . . . 3
2 Safety . . . . . . . . . . . . . . . . . . . . . . . . . . . . . . . . . . . . . . . . . . . . . . . . . . . . . . . . . . . . . . . . . . . . . 3
2.1 Intended use . . . . . . . . . . . . . . . . . . . . . . . . . . . . . . . . . . . . . . . . . . . . . . . . . . . . . . . . . . . . . . . . . . . . 3
2.2 Foreseeable misuse . . . . . . . . . . . . . . . . . . . . . . . . . . . . . . . . . . . . . . . . . . . . . . . . . . . . . . . . . . . . . . 4
2.3 Qualified persons / electricians . . . . . . . . . . . . . . . . . . . . . . . . . . . . . . . . . . . . . . . . . . . . . . . . . . . 4
2.3.1 Certified electricians . . . . . . . . . . . . . . . . . . . . . . . . . . . . . . . . . . . . . . . . . . . . . . . . . . . . . . . 4
2.4 Disclaimer . . . . . . . . . . . . . . . . . . . . . . . . . . . . . . . . . . . . . . . . . . . . . . . . . . . . . . . . . . . . . . . . . . . . . . . 5
3 Device description . . . . . . . . . . . . . . . . . . . . . . . . . . . . . . . . . . . . . . . . . . . . . . . . . . . . . . . . . . 5
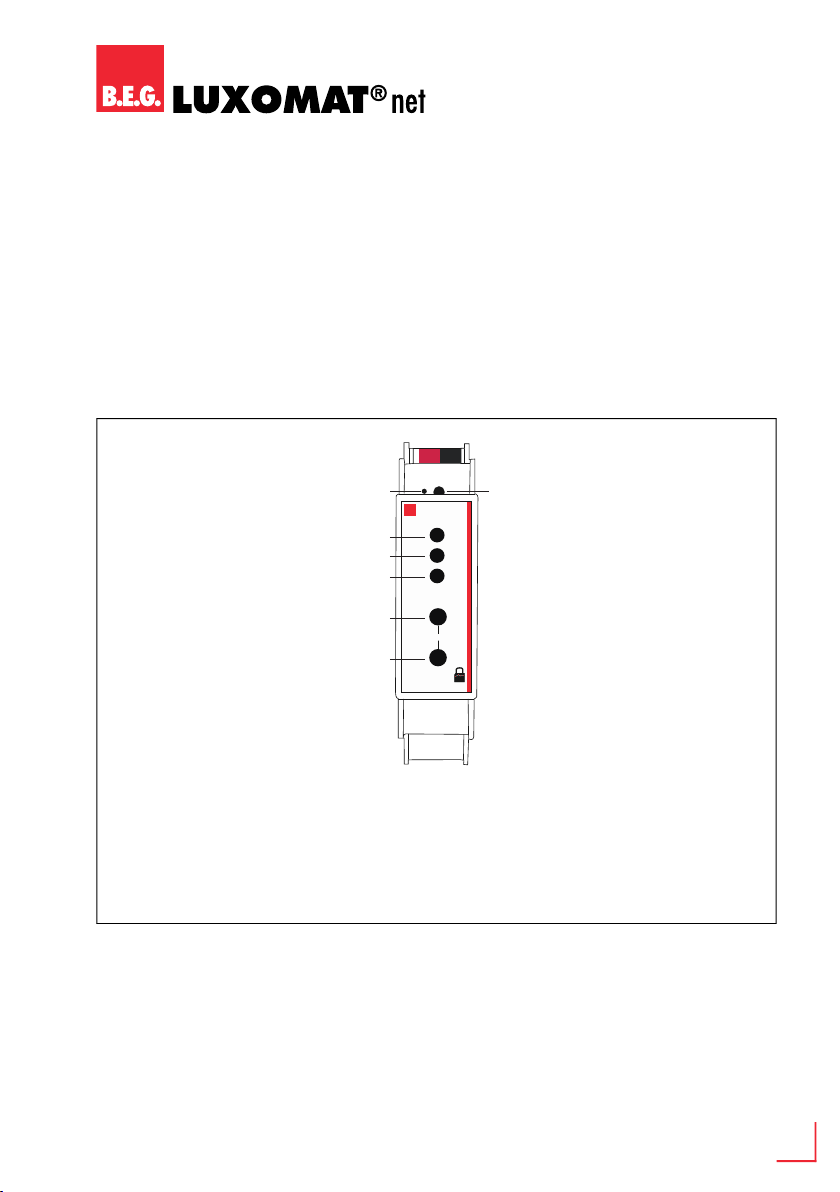
3.1 Device overview . . . . . . . . . . . . . . . . . . . . . . . . . . . . . . . . . . . . . . . . . . . . . . . . . . . . . . . . . . . . . . . . . 5
3.2 Functions . . . . . . . . . . . . . . . . . . . . . . . . . . . . . . . . . . . . . . . . . . . . . . . . . . . . . . . . . . . . . . . . . . . . . . . 6
3.2.1 KNX Security . . . . . . . . . . . . . . . . . . . . . . . . . . . . . . . . . . . . . . . . . . . . . . . . . . . . . . . . . . . . . . 6
3.2.2 KNX IP Security for the router function . . . . . . . . . . . . . . . . . . . . . . . . . . . . . . . . . . . . . . 6
3.2.3 KNX IP Security for the interface function . . . . . . . . . . . . . . . . . . . . . . . . . . . . . . . . . . . 6
3.2.4 KNX Data Security for the device . . . . . . . . . . . . . . . . . . . . . . . . . . . . . . . . . . . . . . . . . . . 7
3.2.5 KNX Data Security for group telegrams . . . . . . . . . . . . . . . . . . . . . . . . . . . . . . . . . . . . . 7
3.2.6 Coupler function (KNXnet/IP Routing) . . . . . . . . . . . . . . . . . . . . . . . . . . . . . . . . . . . . . . . 7
4 Mounting . . . . . . . . . . . . . . . . . . . . . . . . . . . . . . . . . . . . . . . . . . . . . . . . . . . . . . . . . . . . . . . . . 11
5 Electrical connection . . . . . . . . . . . . . . . . . . . . . . . . . . . . . . . . . . . . . . . . . . . . . . . . . . . . . . . 12
6 Commissioning . . . . . . . . . . . . . . . . . . . . . . . . . . . . . . . . . . . . . . . . . . . . . . . . . . . . . . . . . . . . 13
6.1 Factory default settings . . . . . . . . . . . . . . . . . . . . . . . . . . . . . . . . . . . . . . . . . . . . . . . . . . . . . . . . . 13
6.1.1 Reset to factory default settings . . . . . . . . . . . . . . . . . . . . . . . . . . . . . . . . . . . . . . . . . . . 13
6.2 KNX programming mode . . . . . . . . . . . . . . . . . . . . . . . . . . . . . . . . . . . . . . . . . . . . . . . . . . . . . . . . 13
6.3 Manual operation and status display . . . . . . . . . . . . . . . . . . . . . . . . . . . . . . . . . . . . . . . . . . . . . 14
6.4 Commissioning via ETS . . . . . . . . . . . . . . . . . . . . . . . . . . . . . . . . . . . . . . . . . . . . . . . . . . . . . . . . . . 16
6.4.1 Programming with the ETS . . . . . . . . . . . . . . . . . . . . . . . . . . . . . . . . . . . . . . . . . . . . . . . . 16
6.4.1.1 Via the KNX bus . . . . . . . . . . . . . . . . . . . . . . . . . . . . . . . . . . . . . . . . . . . . . . . . . . . 16
6.4.1.2 Via KNXnet/IP Tunneling . . . . . . . . . . . . . . . . . . . . . . . . . . . . . . . . . . . . . . . . . . . 16
6.4.1.3 Via KNXnet/IP Routing . . . . . . . . . . . . . . . . . . . . . . . . . . . . . . . . . . . . . . . . . . . . . 16
6.4.1.4 Via direct IP connection . . . . . . . . . . . . . . . . . . . . . . . . . . . . . . . . . . . . . . . . . . . . 16

Operating Manual
Content
2
6.4.2 Interface settings within ETS . . . . . . . . . . . . . . . . . . . . . . . . . . . . . . . . . . . . . . . . . . . . . . . 17
6.4.3 ETS product database . . . . . . . . . . . . . . . . . . . . . . . . . . . . . . . . . . . . . . . . . . . . . . . . . . . . . 19
6.4.4 Project password . . . . . . . . . . . . . . . . . . . . . . . . . . . . . . . . . . . . . . . . . . . . . . . . . . . . . . . . 20
6.4.5 Device certificate . . . . . . . . . . . . . . . . . . . . . . . . . . . . . . . . . . . . . . . . . . . . . . . . . . . . . . . . . . 21
6.4.6 Device properties . . . . . . . . . . . . . . . . . . . . . . . . . . . . . . . . . . . . . . . . . . . . . . . . . . . . . . . . 22
KNX addresses . . . . . . . . . . . . . . . . . . . . . . . . . . . . . . . . . . . . . . . . . . . . . . . . . . . 22
Device properties – Settings . . . . . . . . . . . . . . . . . . . . . . . . . . . . . . . . . . . . . . . 23
Device properties – IP . . . . . . . . . . . . . . . . . . . . . . . . . . . . . . . . . . . . . . . . . . . . . 25
6.4.7 Setting parameters with the ETS . . . . . . . . . . . . . . . . . . . . . . . . . . . . . . . . . . . . . . . . . . 27
General settings . . . . . . . . . . . . . . . . . . . . . . . . . . . . . . . . . . . . . . . . . . . . . . . . . . 27
Routing (KNX -> IP) . . . . . . . . . . . . . . . . . . . . . . . . . . . . . . . . . . . . . . . . . . . . . . . . 27
Routing (IP -> KNX) . . . . . . . . . . . . . . . . . . . . . . . . . . . . . . . . . . . . . . . . . . . . . . . 29
6.4.8 Filter table . . . . . . . . . . . . . . . . . . . . . . . . . . . . . . . . . . . . . . . . . . . . . . . . . . . . . . . . . . . . . . . . 31
7 Care, maintenance and disposal . . . . . . . . . . . . . . . . . . . . . . . . . . . . . . . . . . . . . . . . . . . . . 32
7.1 Cleaning . . . . . . . . . . . . . . . . . . . . . . . . . . . . . . . . . . . . . . . . . . . . . . . . . . . . . . . . . . . . . . . . . . . . . . . 32
7.2 Maintenance . . . . . . . . . . . . . . . . . . . . . . . . . . . . . . . . . . . . . . . . . . . . . . . . . . . . . . . . . . . . . . . . . . . 32
7.3 Disposing . . . . . . . . . . . . . . . . . . . . . . . . . . . . . . . . . . . . . . . . . . . . . . . . . . . . . . . . . . . . . . . . . . . . . . 32
8 Diagnostics and troubleshooting . . . . . . . . . . . . . . . . . . . . . . . . . . . . . . . . . . . . . . . . . . . . 32
9 Service and support . . . . . . . . . . . . . . . . . . . . . . . . . . . . . . . . . . . . . . . . . . . . . . . . . . . . . . . 33
9.1 Manufacturer's warranty . . . . . . . . . . . . . . . . . . . . . . . . . . . . . . . . . . . . . . . . . . . . . . . . . . . . . . . . 33
9.1.1 Product code . . . . . . . . . . . . . . . . . . . . . . . . . . . . . . . . . . . . . . . . . . . . . . . . . . . . . . . . . . . . . 33
9.2 Contact details . . . . . . . . . . . . . . . . . . . . . . . . . . . . . . . . . . . . . . . . . . . . . . . . . . . . . . . . . . . . . . . . . 33
10 Technical Data . . . . . . . . . . . . . . . . . . . . . . . . . . . . . . . . . . . . . . . . . . . . . . . . . . . . . . . . . . . . . 34
10.1 General data . . . . . . . . . . . . . . . . . . . . . . . . . . . . . . . . . . . . . . . . . . . . . . . . . . . . . . . . . . . . . . . . . . . 34
10.2 Dimensioned drawings LK-IP/KNXs REG . . . . . . . . . . . . . . . . . . . . . . . . . . . . . . . . . . . . . . . . . 35
11 EU declaration of conformity . . . . . . . . . . . . . . . . . . . . . . . . . . . . . . . . . . . . . . . . . . . . . . . 35
12 Annex – Open Source Licenses . . . . . . . . . . . . . . . . . . . . . . . . . . . . . . . . . . . . . . . . . . . . . . 36

LK-IP/KNXs REG
Operating Manual 3
LK-IP/KNXs REG 90403
1 About this document
1.1 Other applicable documents
Short operating manual
90403M1_Short_MAN_LK-IP_KNXs_REG_de_en_fr_nl_V1 (supplied with the device).
1.2 Used symbols and signal words
2 Safety
The KNX IP Router LK-IP/KNXs REG was developed, manufactured and tested in accordance with
the applicable safety standards. It corresponds to the state of the art.
2.1 Intended use
The device is a KNX IP router with KNX security for indoor installation in the sub-distribution
cabinet.
Symbol indicating possible dangers to persons
Symbol indicating possible property damage
Symbol for useful information and tips
NOTICE Signal word for possible property damage
CAUTION Signal word for possible minor injuries
WARNING Signal word for possible serious injuries
DANGER Signal word for possible fatal injuries
CAUTION
Observe intended use!
The protection of personnel and the device cannot be guaranteed if the device is oper-
ated in a manner not complying with its intended use.
➜Only operate the device in accordance with its intended use.
➜B.E.G. Brück Electronic GmbH is not liable for damages caused by improper use.
➜Read these operating instructions before commissioning the device. Knowledge of the
operating instructions is an element of proper use.

Operating Manual
LK-IP/KNXs REG 90403
4
2.2 Foreseeable misuse
Any use other than that defined under "Intended use" or which goes beyond that use is considered
improper use.
In particular, use of the device is not permitted in the following cases:
■in rooms with explosive atmospheres
■in circuits which are relevant to safety
■for medical purposes
2.3 Qualified persons / electricians
Connection, mounting, commissioning and adjustment of the device must only be carried out by
competent persons.
Prerequisites for competent persons:
■They have a suitable technical education.
■They are familiar with the rules and regulations for occupational safety and safety at work.
■They are familiar with the operating instructions for the device.
■They have been instructed by the responsible person on the mounting and operation of the
device.
2.3.1 Certified electricians
Work on electrical equipment may only be carried out by certified electricians or by instructed
persons under the direction and supervision of a certified electrician in accordance with the elec-
trical engineering regulations.
Due to their technical training, knowledge and experience as well as their familiarity with relevant
standards and regulations, certified electricians are able to perform work on electrical systems and
independently detect possible dangers.
In Germany, certified electricians must fulfill the requirements of accident-prevention regulations
DGUV (German Social Accident Insurance) provision 3 (e.g. electrician foreman). In other countries,
there are respective regulations that must be observed.
NOTICE
Comply with conditions and regulations!
➜Observe the locally applicable legal regulations and the rules of the employer's liability
insurance association.
NOTICE
Do not modify or otherwise interfere with the device!
➜Do not carry out modifications or otherwise interfere with the device. The device must
not be tampered with and must not be changed in any way.
➜The device must not be opened. There are no user-serviceable parts inside.
➜Repairs must only be performed by B.E.G. Brück Electronic GmbH.

LK-IP/KNXs REG
Operating Manual 5
LK-IP/KNXs REG 90403
2.4 Disclaimer
B.E.G. Brück Electronic GmbH is not liable in the following cases:
■The device is not being used properly.
■Reasonably foreseeable misuse is not taken into account.
■Mounting and electrical connection are not properly performed.
■Changes (e.g., constructional) are made to the device.
3 Device description
3.1 Device overview
The compact KNX IP router LK-IP/KNXs REG enables the forwarding of telegrams between
different lines via a LAN (IP) as a fast backbone. The device also serves as a programming interface
between a PC and the KNX bus (e.g. for ETS programming).
The device supports KNX Security. The option can be activated in the ETS. As a secure router, the
device enables the coupling of unsecured communication on a KNX TP line with a secure IP back-
bone.
KNX Security also prevents unauthorised access to the interface function (tunneling).
1Bus connector KNX TP 6LED IP, multicolor
2KNX programming LED 7Button Pass GAs
3KNX button for programming mode 8Button Pass IAs
4LED KNX, multicolor 9LAN connector
5LED Mode, multicolor
KNX
Mode
IP
Pass
GAs
Pass
IAs
LK-IP/KNXs REG
90403
LUXOMAT
®
net
B.E.G.
P/Esc
KNX
1
32
4
5
6
7
8
9

Operating Manual
LK-IP/KNXs REG 90403
6
The IP address can be assigned via DHCP or via the ETS configuration. The device operates
according to the KNXnet/IP specification using core, device management, tunneling and routing.
The LK-IP/KNXs REG has an extended filter table for main groups 0 … 31 and can buffer up to
150 telegrams. Power is supplied via the KNX bus.
3.2 Functions
3.2.1 KNX Security
The KNX standard was extended by KNX Security to protect KNX installations from unauthorized
access. KNX Security reliably prevents the monitoring of communication as well as the manipulation
of the system.
The specification for KNX Security distinguishes between KNX IP Security and KNX Data Security.
KNX IP Security protects the communication over IP while on KNX TP the communication remains
unencrypted. Thus KNX IP Security can also be used in existing KNX systems and with non-secure
KNX TP devices.
KNX Data Security describes the encryption at telegram level. This means that the telegrams on the
twisted pair bus are also encrypted.
3.2.2 KNX IP Security for the router function
The coupling of individual KNX TP lines via IP is referred as KNX IP routing. Communication between
all connected KNX IP routers takes place via UDP multicast.
Routing communication is encrypted with KNX IP Security. This means that only IP devices that
know the key can decrypt the communication and send valid telegrams. A time stamp in the routing
telegram ensures that no previously recorded telegrams can be replayed. This prevents the so-
called replay attack.
The key for the routing communication is reassigned by ETS for each installation. If KNX IP Security
is used for routing, all connected KNX IP devices must support security and be configured accord-
ingly.
3.2.3 KNX IP Security for the interface function
When using a KNX IP router as an interface to the bus, access to the installation is possible without
security for all devices that have access to the IP network. With KNX Security a password is
required. A secure connection is already established for the transfer of the password. All communi-
cation via IP is encrypted and secured.

LK-IP/KNXs REG
Operating Manual 7
LK-IP/KNXs REG 90403
3.2.4 KNX Data Security for the device
The LK-IP/KNXs REG also supports KNX Data Security to protect the device from unauthorised
access from the KNX bus. If the KNX IP router is programmed via the KNX bus, this is done with
encrypted telegrams.
3.2.5 KNX Data Security for group telegrams
Telegrams from the bus that do not address the KNX IP router as a device are forwarded or blocked
according to the filter settings (parameters and filter table). It does not matter whether the tele-
grams are unencrypted or encrypted. Forwarding takes place exclusively on the basis of the desti-
nation address. The security properties are checked by the respective recipient.
KNX Data Security and KNX IP Security can be used in parallel. In this case, for example, a KNX
sensor would send a group telegram encrypted with KNX Data Security to the bus. When
forwarding via KNX IP with KNX IP Security, the encrypted telegram would be encrypted again just
like unencrypted ones. All participants on the KNX IP level that support KNX IP Security can decode
the IP encryption, but not the data security.
Thus the telegram from the other KNX IP routers is again transmitted to the target line(s) with KNX
Data Security. Only devices that know the key used for data security can interpret the telegram.
3.2.6 Coupler function (KNXnet/IP Routing)
The LK-IP/KNXs REG operates as a line or backbone coupler. In both cases, the LAN (IP) is used as a
backbone.
The following table shows the application possibilities of the LK-IP/KNXs REG compared to the
classic topology:
INFO
Encrypted telegrams!
Encrypted telegrams are longer than the previously used unencrypted ones. For secure
programming via the bus, it is therefore necessary that the interface used (e. g. USB) and
any intermediate line couplers support the so-called KNX long frames.
Classical Topologie
(without IP)
IP coupling
of areas
(IP area coupler)
IP coupling
of lines
(IP line coupler)
Area
(Backbone) TP IP IP
Coupling KNX line coupler
(max. 15 pcs.)
KNX IP router
(max. 15 pcs)
direct via
LAN switch
Main line TP TP IP
Coupling KNX line coupler
(max. 15 x 15 = 225 pcs.)
KNX line coupler
(max. 15 x 15 = 225 pcs.)
KNX-IP-router
(max. 15 x 15 = 225 pcs.)
Line TP TP TP

Operating Manual
LK-IP/KNXs REG 90403
8
The individual address assigned to the LK-IP/KNXs REG determines whether the device operates as
a line or area coupler.
■If the individual address is in the form of x.y.0 (x, y: 1..15), the router operates as a line coupler.
■If it is in the form of x.0.0 (x: 1..15), the router acts as a backbone coupler.
NOTICE
LK-IP/KNXs REG as line coupler!
If the LK-IP/KNXs REG is used as a line coupler (x.y.0), there must not be a KNX IP router
in the topology above it.
For example, if a KNX IP Router has the individual address 1.1.0, there must be no KNX IP
Router with the address 1.0.0.
LK-IP/KNXs REG as line coupler
Switch
KNX TP
LAN
2.1.12
2.1.7
2.1.8
2.1.9
2.1.10
2.1.11
2.1.6
2.1.1
2.1.2
2.1.3
2.1.4
2.1.5
KNX TP
1.1.1
1.1.6
1.1.5
1.1.4
1.1.3
1.1.2
1.1.7
1.1.12
1.1.11
1.1.10
1.1.9
1.1.8
1.1.0 2.1.0
LK-IP/KNXs REG
LK-IP/KNXs REG

LK-IP/KNXs REG
Operating Manual 9
LK-IP/KNXs REG 90403
NOTICE
LK-IP/KNXs REG as area coupler!
If the LK-IP/KNXs REG is used as a area coupler (x.0.0), there must not be a KNX IP
Router in the topology beneath it.
For example, if a KNX IP router has the individual address 1.0.0, there must be no KNX IP
router with the address 1.1.0.
6ZLWFK
/$1
.1; 73 .1; 73
LK-IP/KNXs REG
LK-IP/KNXs REG
LK-IP/KNXs REG as area coupler

Operating Manual
LK-IP/KNXs REG 90403
10
The KNX IP router has a filter table and thus contributes to reducing the bus load. The filter table
(8 kB) supports the extended group address range (main groups 0 … 31) and is automatically gener-
ated by the ETS.
Because of the speed difference between the Ethernet (10/100 MBit/s) and KNX TP (9.6 kBit/s), a
far greater number of telegrams can be transmitted on IP. If several consecutive telegrams are
transmitted for the same line, they must be buffered in the router to avoid telegram loss.
The LK-IP/KNXs REG has a memory for 150 telegrams (from IP to KNX).
6ZLWFK
/$1
.1; 73
.1; 73
LK-IP/KNXs REG
LK-IP/KNXs REG
LK-IP/KNXs REG as area and line coupler

LK-IP/KNXs REG
Operating Manual 11
LK-IP/KNXs REG 90403
4 Mounting
The LK-IP/KNXs REG is fixed to a top-hat DIN rail in the sub-distributor and requires 1 division unit
(18 mm) of space.
CAUTION
Observe KNX installation regulations!
This device complies with the KNX guidelines. Detailed knowledge of the KNX system is
required for commissioning.
top-hat DIN rail TH 35
EN 60715
1
3
2

Operating Manual
LK-IP/KNXs REG 90403
12
5 Electrical connection
The device is powered via the KNX bus main line connection. It is not necessary to connect an
external supply voltage.
CAUTION
Observe KNX installation regulations!
This device complies with the KNX guidelines. Detailed knowledge of the KNX system is
required for commissioning.
NOTICE
Missing bus voltage!
If there is no bus voltage (main line), the device has no function.

LK-IP/KNXs REG
Operating Manual 13
LK-IP/KNXs REG 90403
6 Commissioning
6.1 Factory default settings
The following configuration is set by factory default:
Individual device address: 15.15.0
Number of configured KNXnet/IP tunneling connections: 1
Individual address of tunneling connection: 15.15.240
IP address assignment: DHCP
Initial key (FDSK): active
Security mode: not active
6.1.1 Reset to factory default settings
It is possible to reset the device to its factory settings:
➜Separate the KNX bus connector (1) from device
➜Press the KNX programming button (3) and keep it pressed down
➜Reconnect the KNX bus connector (1) to the device
➜Keep the KNX programming button (3) pressed for at least another 6 seconds
➜A short flashing of all LEDs (2, 4, 5, 6) visualizes the successful reset of the
device to factory default settings.
6.2 KNX programming mode
The KNX programming mode is activated/deactivated either by pressing the flushed KNX program-
ming button (3) or by simultaneously pressing the buttons (7) and (8).
CAUTION
Factory default settings!
The individually made settings are lost.
KNX
Mode
IP
Pass
GAs
Pass
IAs
LK-IP/KNXs REG
90403
LUXOMAT
®
net
B.E.G.
P/Esc
KNX
1
32
4
5
6
7
8
9

Operating Manual
LK-IP/KNXs REG 90403
14
6.3 Manual operation and status display
The KNX LED (4) lights up green if the device is successfully powered by the KNX bus. If the LED is
flickering, telegram traffic takes place on the KNX bus.
Errors in the communication (e.g. repetitions of telegrams or telegram fragments) are indicated by
a short change of the LED color to red.
Overview of the different indications of the KNX LED (4):
The IP LED (6) lights up when an Ethernet link is active. This LED is green if the device has valid IP
settings (IP address, Sub net and Gateway). With invalid or nonexistent IP settings the LED is red.
This is also the case if e.g. the device has not yet received the IP settings by a DHCP server. The LED
indicates IP telegram traffic by flickering.
Overview of the different indications of the IP LED (6):
For testing purposes (for example, during commissioning) the configured routing settings (Filter or
Block) can be bypassed via manual operation.
With the button Pass GAs (7) the forwarding of group addressed telegrams can be activated.
With the button Pass IAs (8) the forwarding of individually addressed telegrams can be activated.
This is visualized with a single flash of the Mode LED (5, orange). If both modes are activated the
Mode LED flashes two times.
Pressing button Pass GAs (7) or Pass IAs (8) again these settings can be selected and deselected on
demand. Via the Escape function (Esc) the manual operation can be stopped by simultaneously
pressing the buttons Pass GAs (7) and Pass IAs (8).
If neither programming mode nor manual mode are active the Mode LED (5) can visualize configu-
ration errors (for details see following table).
LED Status Meaning
LED lights green KNX bus voltage available.
LED flickers green Telegram traffic on the KNX bus.
LED flashes red shortly Communication error on the KNX bus.
LED Status Meaning
LED lights green The device has an active Ethernet link and valid IP settings.
LED lights red The device has an active Ethernet link and invalid IP settings or
not yet received the IP settings by a DHCP server.
LED flickers green IP telegram traffic.

LK-IP/KNXs REG
Operating Manual 15
LK-IP/KNXs REG 90403
Overview of the different indications of the Mode LED (5):
LED Status Meaning
LED lights green Device is working in standard operation mode.
LED lights red Programming mode is active.
LED flashes 1 x orange
Programming mode is not active.
Manual operation is active:
Forwarding IA or GA
LED flashes 2 x orange
Programming mode is not active.
Manual operation is active:
Forwarding IA and GA
LED flashes red
Programming mode is not active.
Manual operation is not active:
The device is not properly loaded e.g. after an interrupted down-
load.

Operating Manual
LK-IP/KNXs REG 90403
16
6.4 Commissioning via ETS
6.4.1 Programming with the ETS
The LK-IP/KNXs REG can be programmed in different ways via the ETS:
6.4.1.1 Via the KNX bus
The device only needs to be connected to the KNX bus. The ETS requires an additional interface (for
example, USB) to have access to the bus. Via this way both the individual address and the entire
application including IP configuration can be programmed. Programming via the bus is recom-
mended if no IP connection can be established.
6.4.1.2 Via KNXnet/IP Tunneling
No additional interface is required. Programming via KNXnet/IP Tunneling is possible if the device
already has a valid IP configuration (e.g. via DHCP). In this case the device is displayed in the inter-
face configuration of the ETS and must be selected. The download is executed via the ETS project
as with many other devices.
6.4.1.3 Via KNXnet/IP Routing
Programming via KNXnet/IP Routing is possible if the device already has a valid IP configuration
(e.g. by using DHCP or Auto IP). In the ETS, the routing interface appears if at least one device on the
network which supports routing is available. The name of the network interface appears in the PC
as description. If routing is selected as interface, the programming is done from the ETS project as
like with other devices. In this case LAN is used as a KNX medium like TP. There is no additional inter-
face device required.
6.4.1.4 Via direct IP connection
While KNXnet/IP Tunneling and KNXnet/IP Routing is limited to the speed of KNX TP the device can
be loaded via a direct IP connection at high speed. The direct IP connection is possible if the device
already has a valid IP configuration as well as a physical address. To do this, select "Use direct IP
connection if possible" in the ETS menu under "Bus –> Connections –> Options". The download then
takes place directly into the device and is not visible in the ETS group monitor.

LK-IP/KNXs REG
Operating Manual 17
LK-IP/KNXs REG 90403
6.4.2 Interface settings within ETS
Within the ETS, KNX interfaces can be selected and set up via the ETS menu "Bus –> Interfaces".
The ETS can access configured KNX IP routers even without a database entry. If the setup of the
KNX IP router does not comply with the conditions of the KNX installation it must be configured via
an ETS project. See section "ETS product database" on page 19 for more information.
As factory default the assignment of the IP address is set to “automatically via DHCP” and thus no
further settings are necessary. To use this feature a DHCP server on the LAN must exist (e.g. many
DSL routers have an integrated DHCP server).
After connecting the KNX IP router to the LAN and the KNX bus, it should automatically appear in
the ETS within the menu "Bus" under "Discovered interfaces".
By clicking on the discovered interface it is selected as the current interface. On the right side of the
ETS window all specific information and options of the connection appear.
The indicated device name and the "Host Individual Address" (individual address of the device) can
be changed within your ETS project then.
INFO
Due to the significantly shorter transmission times, it is recommended to perform down-
loads via IP.

Operating Manual
LK-IP/KNXs REG 90403
18
Like all programmable KNX devices the LK-IP/KNXs REG has an individual address which can be
used to access the device. This is used, for example, of the ETS when downloading to the KNX IP
router via the bus.
For the interface function the device contains additional individual addresses that can be set in the
ETS. When a client (e.g. ETS) sends telegrams to the bus via the KNX IP router, these contain one of
the additional addresses as the sender address. Each address is assigned to a connection. This
means that response telegrams can be uniquely forwarded to the respective client.
The additional individual addresses must be selected from the address range of the bus line in which
the router is installed and may not be used by another device.
The individual KNX device address and the individual addresses for additional tunneling connections
can be changed within the ETS project after the device has been added to the project.
This manual suits for next models
1
Table of contents
Popular Network Router manuals by other brands

Motorola
Motorola BR700 - EN Broadband Router Troubleshooting

Peak
Peak PCAN-Router Pro user manual

Moxa Technologies
Moxa Technologies UC-8112-LX-STK user manual

D-Link
D-Link Rangebooster N Router 650 DIR-635 Quick installation guide

JRS Eco
JRS Eco JRS Eco 100 manual

Siemens
Siemens RUGGEDCOM RS930W installation guide

TRENDnet
TRENDnet TEW-731BR Quick installation guide

Draytek
Draytek Vigor 2620 Series quick start guide

ADTRAN
ADTRAN Total Access 1200F Specification sheet

Linksys
Linksys BEFSX41 - Instant Broadband EtherFast Cable/DSL Firewall... user guide

ZyXEL Communications
ZyXEL Communications VMG3312-T20A quick start guide

Zte
Zte ZXR10 3800-8 Handling manual