BAC Trillium Series Owner's manual

RIGGING, INSTALLATION, OPERATION & MAINTENANCE MANUAL
TrilliumSeries™Adiabatic Products
–

DANGER
• DANGER: Do not perform any service on or near the fans, motors, and drives, without first ensuring that the fans are disconnected, locked out,
and tagged out.
• WARNING: Failure to use designated lifting points can result in a dropped load causing severe injury, death, and/or property damage. Lifts
must be performed by qualified riggers following BAC published Rigging Instructions and generally accepted lifting practices. The use of
supplemental safety slings may also be required if the lift circumstances warrant its use, as determined by the rigging contractor.
• WARNING: Only personnel qualified to do so should undertake the installation, operation, maintenance and repair of this equipment. Proper
care, procedures, and tools must be used in handling, lifting, installing, operating, maintaining, and repairing this equipment to prevent
personal injury and/or property damage.
• WARNING: To prevent possible contamination of the make-up water supply, install a backflow prevention method in accordance with applicable
local and national codes.
• WARNING: The top horizontal surface of the unit is not intended to be used as a walking surface or working platform. If access to the top of the
unit is desired, the purchaser/end-user is cautioned to use appropriate means complying with applicable safety standards of governmental
authorities.
• WARNING: All electrical, mechanical, and rotating machinery are potential hazards, particularly for those not familiar with their design,
construction, and operation. Accordingly, use appropriate lockout procedures. Adequate safeguards (including the use of protective enclosures
where necessary) should be taken with this equipment both to safeguard the public from injury and to prevent damage to the equipment, its
associated system, and the premises.
• WARNING: Incoming power lines to the disconnect switch remain energized. Take proper electrical precautions when working near energized
equipment.
• WARNING: The TrilliumSeries™ Adiabatic Product controls are set up to periodically flush and drain the water system, thereby eliminating the
need for water treatment. However there may be unusual circumstances where chemicals or biological contaminants could be introduced into
the recirculating water system, which could be harmful if inhaled or ingested. If there is a concern that this has happened, wear appropriate
respiratory protection as a precaution, when exposed to the discharge air stream or to the mists produced by cleaning activities associated with
the recirculating water system or Pre-Cooler Pads.
• CAUTION: The operation, maintenance, and repair of this equipment shall be undertaken only by personnel authorized and qualified to do
so. All such personnel shall be thoroughly familiar with the equipment, the associated system and controls, and the procedures set forth
in this manual. Proper care, personal protective equipment, procedures, and tools must be used in handling, lifting, installing, operating,
maintaining, and repairing this equipment to prevent personal injury and/or property damage.
• BAC units are typically installed immediately after shipment and many operate year round. However, if the unit is to be stored for a prolonged
period of time either before or after installation, certain precautions should be observed.
• Do not run the unit wet with the pre-cooler pads out and the fans on (thereby getting the coils wet). Wet/dry cycling of the unit this way could
shorten the coil life, and voids the warranty.
• Before an actual lift is undertaken, open the access hatch(es) and check to ensure no water, snow, ice, or debris has collected in the sump or
elsewhere in the unit. Such accumulations will substantially add to the equipment’s lifting weight.
• When connecting power to the unit, do not penetrate the top of the control panel. Doing so may allow moisture to enter the panel. All cable and
conduit should be supported separately from the unit. Do not penetrate the unit for supports or other connections.
• Do not use steam, high pressure water, or high pressure air to clean any component.
• Do not attempt to remove the Pre-Cooler Pads while wet to prevent excessive degradation.
WARNING
NOTICE
CAUTION

Table of Contents
RIGGING, INSTALLATION, OPERATION & MAINTENANCE »
TRILLIUMSERIES™ADIABATIC PRODUCTS
Warranties
Please refer to the Limitation of Warranties in the submittal packet applicable to and in effect at the time of the sale/purchase of these products.
Described in this manual are the recommended services for start-up, operation, and shutdown, and the approximate frequency of each. For
generic terms and conditions, refer to www.baltimoreaircoil.com/terms.
PART 1 Unit Description
2Unit Overview
PART 2 Rigging
4Safety
4Pre-Rigging Checks
6Layout Guidelines
7Rigging
10 Prolonged Outdoor Storage
PART 3 Installation
11 Refrigerant Connection
13 Piping Guidelines
13 Water Connection
16 Ammonia Installation Instructions
16 Customer Electrical Connections
17 Wiring and Electrical Information
23 Controls Setup for Microchannel Coils
PART 4 Unit Operation
24 Start-Up
28 Modes of Operation
32 Winter Operation
32 Coil Freeze Protection
33 Discrete Spray Connection
34 Auto-Discrete Backup Spray System
35 EcoFlex™ Controls Operation
PART 5 Detailed Component Maintenance
38 Pre-Cooler Pad and Water System Maintenance
39 Water Distribution System Maintenance
40 Strainer and Pump Maintenance
40 Sump and Water Collection Maintenance
41 Fan and Motor Maintenance
41 Coil Maintenance
42 Water Treatment
42 EcoFlex™ Controls Maintenance
PART 6 Troubleshooting Guide
46 Troubleshooting Guide
Appendix a EcoFlex™Controls
48 Menus
52 Datalogging
Appendix b Danfoss and Emerson
55 Danfoss
58 Emerson

WWW.BALTIMOREAIRCOIL.COM
2
Unit Overview
TRILLIUMSERIES™ADIABATIC PRODUCTS
Unit Description
1
Figure 1a. TrilliumSeries™ Adiabatic Condenser (TSDC Shown)
4
7
2
1
1
2
3
3
4
Detail A, TSDC Shown
13
8
9
10
11
17
13 14
Detail B. TSDC2 Shown
Figure 1b. TrilliumSeries™ Adiabatic
Condenser (TSDC2 Shown)
7
8
12
19
19
10
11
15
15 16
16
17
20

WWW.BALTIMOREAIRCOIL.COM
3
1. Coils: TrilliumSeries™ Adiabatic Producs have either microchannel, or tube/fin coils. The coils are
designed to be corrosion resistant, minimize refrigerant or fluid charge, allow for thermal expansion,
and be easy to inspect and clean.
2. Whisper Quiet Fan(s): The fans have integrated electronically commutated motors (ECMs).
These motors have embedded speed control and are highly efficient. They communicate with the
EcoFlex™ Controls via Modbus.
3. Pre-Cooler Pads: when saturated with water, the pads precool the air to 1-3°F above the wet
bulb temperature, thus improving the ability of the unit to reject heat on hot summer days. In
conjunction with the distribution system they are designed to keep the water off the coils. When
dry, the pads are removable for coil inspection or for cleaning.
4. Refrigerant/Fluid Connections: This is where customers connect to their piping systems. Some units
have these connections on the opposite end from the controls.
5. Discrete Spray Connection (Not Shown): Since uptime is critical, this backup connection is
available for water supply to the spray system. Should the pump or valve get damaged, or main
water supply be interrupted on a hot day, a garden hose can be connected to this connection for a
backup. See page 31 for more details.
6. Auto-Discrete Valve (Optional): This normally closed (NC) valve is located at the discrete spray
connection location. Should the pump, make-up valve, or float switch get damaged, the valve will
automatically open to supply water to the spray system.
7. Access Hatch: This door allows access to the sump, pump(s), float switch, strainer, and for general
inspection. There is no general need to climb inside the unit; reaching into the sump is all that
would be necessary during inspection and maintenance.
8. Pump(s): The industrial grade stainless steel pump(s) are controlled by the EcoFlex™ Controls to
deliver water to the distribution system when the unit is in the Pre-Cooler Mode. The pump(s) are
rated for continuous duty and can run dry for short periods without harm.
9. Pump Valve (Optional, Not Shown): This valve is a slow acting, normally open (NO) ball valve that
prevents water from discharging through the pump when the Discrete Spray Connection is used. When
the optional Auto-Discrete Backup Spray System mode is activated, the valve automatically closes.
10. Sump: This stainless steel basin collects the water from the gutters and the spray system, and
houses the pump(s). It can be accessed through the access hatch(es).
11. Strainer(s): The strainer(s) surrounds the pump(s). It protects the spray system from collecting
debris that is larger than the holes in the distribution system.
12. Float Switch (Not Shown for TSDC): The industrial grade stainless steel float switch detects the
water level in the sump, ensures that water doesn’t overflow, and, in concert with the EcoFlex™
Controls, protects the pump(s) from operating dry.
13. Make-up Valve: This normally closed (NC) valve provides fresh water to the unit to replenish the water
that evaporates into the entering air stream, and the water that is drained to keep the unit clean.
14. Make-up Pressure Balancing Valve (TSDC2 Only): This valve is adjusted to set the correct water
flow to the pre-cooler pads. This valve is preset a the factory. See page 24 for more information.
15. Water Distribution System: Water is evenly dispersed over the full length of the pad using a PVC
pipe system (TSDC) or a stainless steel gutter system (TSDC2 and TSDF2).
16. Water Collection Gutter: The unused water from the pre-cooling pads is collected in this gutter and
returned to the sump to be recycled instead of dumping the water to a drain.
17. Drain Valve: This valve is a slow opening, normally open (NO) ball valve that drains water from the
unit when the unit cycles into Dry Mode or during periodic cleaning cycles.
18. Outdoor Air Sensor (Not Shown): This sensor determines the outside temperature, and when
comparing it to the precool set temperature helps the controller determine whether the unit should
be in Dry Mode or Pre-Cooler Mode.
19. EcoFlex™ Controls: Each unit is shipped with custom controls logic that reduces energy
consumption and optimizes water usage. With preset controls, the system is programmed and ready
to operate upon arrival from the factory. For more information, see pages 28, 33 and 40.
20. Flow Meter(s) with Valve (TSDC2 and TSDF2 Only): This is set from the factory to control the flow
of water over the Pre-Cooler Pads. See page 24 for adjustment.
21. Easy Pad Removal (Not Shown) (TSDC2 and TSDF2 Only): Steel partitions facilitate pad removal
without damage while minimizing downtime. See page 36 for more information.
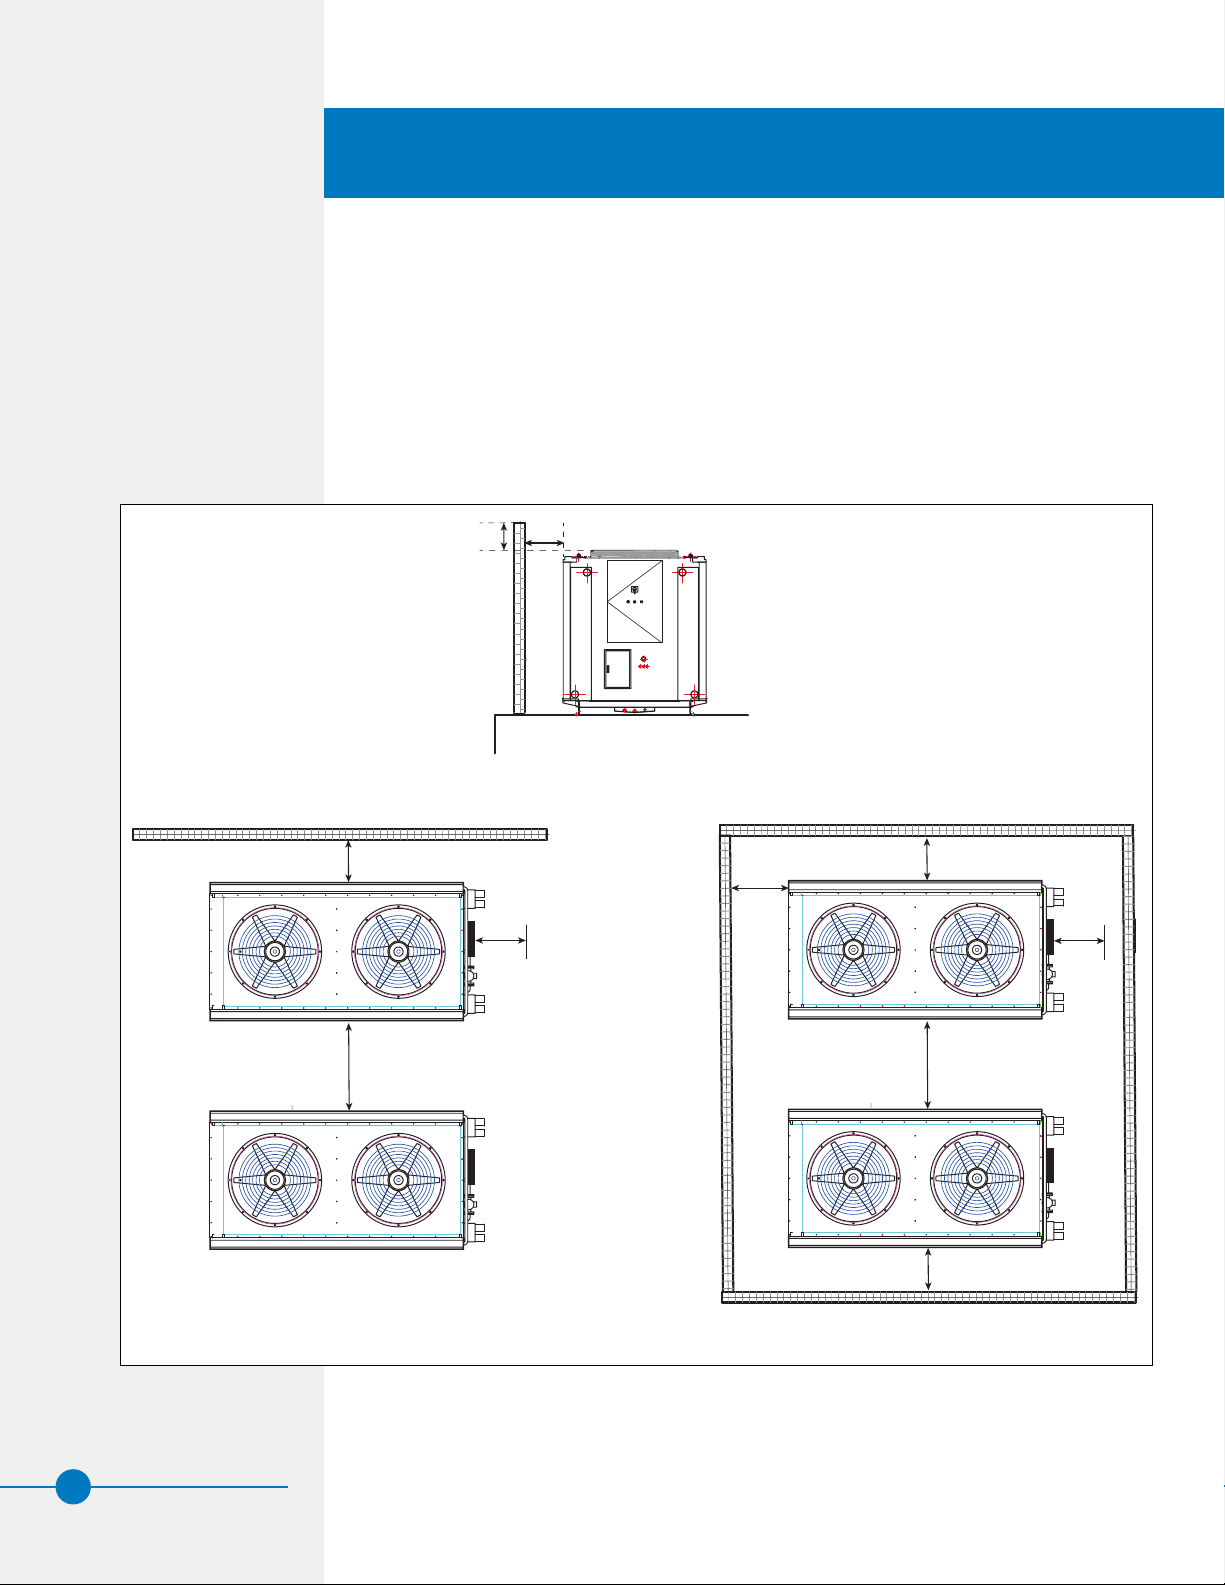
Unit Description
Unit Overview
Detail A, TSDC Shown
Detail B. TSDC2 Shown
NOTE: For transcritical CO2
operation, the coil operates
with vapor in and vapor out. For
subcritical CO2operation, the coil
operates with subcritical vapor in
and liquid out.

WWW.BALTIMOREAIRCOIL.COM
4
TRILLIUMSERIES™ADIABATIC CONDENSER
Rigging
Safety
Adequate precautions appropriate for the installation and location of these products should
be taken to safeguard the equipment and the premises from damage, and the public from
possible injury. The procedures listed in this manual must be thoroughly reviewed prior to
rigging. Read all dangers, warnings, cautions, notices, and notes detailed in the margins.
Pre-Rigging Checks
When the unit is delivered to the jobsite, it should be checked thoroughly to ensure all
required items have been received and are free of any shipping damage prior to signing the
bill of lading. If the unit will be in prolonged outdoor storage, refer to page 10.
The following parts should be inspected:
2
For TrilliumSeries™ Adiabatic products that have been shipped charged with Nitrogen,
verify that the coil maintained pressure (15 psi) by measuring the pressure with a Shrader
valve prior to installation.
Fan Motor(s)
Fan Guard(s)
Fan(s)
Drain Valve
Make-up Valve
Water Distribution System
Pump
Pump Valve (Optional)
Auto-Discrete Valve (Optional)
Sump and Gutters
Exterior Surfaces
Pre-Cooler Pads
EcoFlex™ Control Panel
Coils
Inlet Strainer(s) (Optional)
WARNING: Failure to use designated
lifting points can result in a
dropped load causing severe injury,
death, and/or property damage.
Lifts must be performed by qualified
riggers following BAC published
Rigging Instructions and generally
accepted lifting practices. The
use of supplemental safety slings
may also be required if the lift
circumstances warrant its use,
as determined by the rigging
contractor.
WARNING: Only personnel qualified
to do so should undertake the
installation, operation, maintenance
and repair of this equipment. Proper
care, procedures, and tools must be
used in handling, lifting, installing,
operating, maintaining, and
repairing this equipment to prevent
personal injury and/or property
damage.

WWW.BALTIMOREAIRCOIL.COM
5
Unit Weights
Before rigging any unit, the weight should be verified from the unit submittal drawing.
Anchoring
For the TSDC, 7/8” diameter holes are provided in the bottom flanges of the unit for
bolting the unit to the support beams. Refer to the suggested support drawing included
in the submittal for location and quantity of the mounting holes. The unit must be level
in both length and width directions for proper operation (max 1/16”/ft for the TSDC2 and
TSDF2). Anchor bolts must be provided by others, BAC recommends 3/4” bolt SAE J429
Grade 5, ASME A325 Type 1 or equivalent. If vibration isolated supports are to be used,
the units shall be installed on steel support first and the vibration isolators (provided
by others) should be mounted under the steel support. Refer to the vibration isolation
manufacturer’s guidelines before loading/unloading weight from the unit.
Point Support for Curb Mounting (For TSDC Only)
If mounting a TrilliumSeries™Adiabatic Product on a curb, follow Figure 2 below for point
support locations.
NOTICE: Before an actual lift is
undertaken, open the access hatch
and check to ensure no water, snow,
ice, or debris has collected in the
sump or elsewhere in the unit. Such
accumulations will substantially
add to the equipment’s lifting
weight.
UNIT OUTLINE
AIR INLET
11'-0 1/2"
4'-2"
PLAN VIEW
AIR INLET
10'-7 7/8"
2" MIN
4" MIN
5"
10" MIN
CONNECTION END
POINT 1
POINT 2
POINT 3
POINT 4
2" MIN
Figure 2. Unit Point Support for Curb Installation (TSDC Only)
Rigging
Safety
Pre-Rigging Checks
Unit Weights
Anchoring

WWW.BALTIMOREAIRCOIL.COM
6
Layout Guidelines
TrilliumSeries™Adiabatic Products must be located to ensure an adequate supply of fresh
air to the coils. The axial fan(s) are not equipped to overcome external static pressure.
When units are located adjacent to walls or in enclosures, care must be taken to ensure
the discharge air is not deflected and recirculated back to the air intakes.
Each unit must be located and positioned to prevent the introduction of discharge air
into the ventilation systems of the building on which the unit is located and of adjacent
buildings. For detailed recommendations, see Figure 3 and Table 1.
Figure 3. TrilliumSeries™ Adiabatic Product Location
Elevation View
Parapet wall is not restrictive provided D
(or C, as applicable) is equal to or greater than 2X.
D or C
X
Plan View
(TSDC-058-6.2 Shown)
Minimum Wall Separation Distance
Solid Wall
D
Solid Wall
1.6xD
Note: Additional units can
be added with 1.6xD
between them. This dimension
appliesif there is a wall or no wall.
C
1.6xC
Note: Additional units can
be added with 1.6xC
between them.
Solid Wall
C
3’-6”
3’-6”
3’-3”
Well InstallationsInstallations Near Walls

WWW.BALTIMOREAIRCOIL.COM
7
Model Number D C
TSDC-xxx-3 1’-6” 2’-0”
TSDC-xxx-6.2 2’-4” 2’-11”
TSDC-xxx-9.6 3’-0” 3’-8”
TSDC-xxx-12.4 3'-6" 4'-0"
TSDx2-xxx-12.4 2'-8" 4'-6"
TSDx2-xxx-18.6 3'-8" 5'-6"
TSDx2-xxx-24.8 4'-3" 6'-2"
TSDx2-xxx-31.0 4'-7" 6'-8"
TSDx2-xxx-37.2 5'-3" 7'-0”
TSDx2-xxx-43.4 5'-7" 7'-3"
Table 1. Minimum Wall Separation Distance
Rigging
Layout Guidelines
Rigging
Rigging
Refer to Table 2 and Figure 4 for each unit’s required minimum spreader bar length “W1”
and the recommended minimum vertical dimension “H”. Dimension“H” is the vertical
distance from the lift point to the lifting device.
Model Number
# of
Fans H W1 W2 S
TSDC-xxx-3 1 2'-0" 3'-4" 1'-8" 2’-10”
TSDC-xxx-6.2 2 3'-1" 3'-4" 1'-8" 4’-5”
TSDC-xxx-9.6 3 5'-5" 3'-4" 1'-8" 7’-3”
TSDC-xxx-12.4 4 6'-6" 3'-4" 1'-8" 9’-8”
Model Number
# of
Fans H W L
TSDx2-xxx-12.4 4 10’-11” 5’-6” - 7’-11”
TSDx2-xxx-18.6 6 10’-11” 5’-6” - 11’-10”
TSDx2-xxx-24.8 8 10’-11” 5’-6” - 15’-9”
TSDx2-xxx-31.0 10 10’-11” 5’-6” - 19’-9”
TSDx2-xxx-37.2 12 10’-11” 5’-6” - 23’-8”
TSDx2-xxx-43.4 14 10’-11” 5’-6” - 27’-7”
Table 2. Recommended Vertical Dimension

WWW.BALTIMOREAIRCOIL.COM
8
NOTE: For weight information, refer
to the submittal drawing package.
W1
H
W2
S
Figure 4a. TSDC Lift (TSDC-xxx-9.6 Shown)
WARNING: Failure to use designated
lifting points can result in a
dropped load causing severe injury,
death, and/or property damage.
Lifts must be performed by qualified
riggers following BAC published
Rigging Instructions and generally
accepted lifting practices. The
use of supplemental safety slings
may also be required if the lift
circumstances warrant its use,
as determined by the rigging
contractor.
H
NOTICE: To avoid damage during
hoisting, a spreader beam should
be used and the angles shown in
the figures must be observed.
Figure 7. TSDx2-xxx-18.6 Side View (6 Fan)
NOTICE: When lifting the TSDC or
the TSDC2/TSDF2, the spreader bar
is oriented differently. The TSDC2
and TSDF2 have strict requirements
on lifting angles and the number of
lifting points.
Figure 4b. TSDC2 and TSDF2 Lift (TSDC2-xxx-24.8 Shown)
Figure 6. TSDx2-xxx-12.4 Side View (4 Fan shown)
Figure 5. TSDC2 or TSDF2 End View

WWW.BALTIMOREAIRCOIL.COM
9
Figure 8. TSDx2-xxx-24.8 Side View (8 Fan)
Figure 9. TSDx2-xxx-31.0 Side View (10 Fan)
Figure 11. TSDx2-xxx-43.4 Side View (14 Fan)
Rigging
Rigging
Figure 10. TSDx2-xxx-37.2 Side View (10 Fan)

WWW.BALTIMOREAIRCOIL.COM
10
Prolonged Outdoor Storage
TrilliumSeries™ Adiabatic Products are shipped wrapped. If the unit is going to remain in
outdoor storage in excess of three months prior to installation, remove the strech-wrap and
tarp and follow the storage recommendations below.
Storage Preparation
• Ensure the sump is fully drained. Remove any leaves or debris that may have
accumulated in the sump and gutters.
• For extended shutdown periods after start-up, coils should be charged with nitrogen
at 15 psig in the field and capped by adding a threaded connection or a welded cap.
Upon start-up, the coil connections will require cutting.
• Insert desiccant bags into the EcoFlex™ Control panel to absorb moisture. Seal the
control panel for storage.
• Inspect the protective finish on the unit. Clean as required.
Motor Recommendations
TrilliumSeries™Adiabatic Product motors are designed for storage at ambient
temperatures of -40ºF to 176ºF (-40ºC to 80ºC). Prolonged periods of exposure above
or below these specified conditions could degrade components of the motor and cause
malfunction or premature failure.
• Care must also be taken to protect the motor from flooding or from harmful chemical
vapors.
• The storage area should be free from ambient vibration. Excessive vibration can cause
damage.
• Keep stored motor(s) dry and protected from weather.
• Rotate the fan once per month.
Preparation After Prolonged Storage
Keep in mind that start-up procedures after long periods of storage are just as important as
pre-shutdown procedures. Follow the instructions in the rest of this manual after prolonged
storage. Be especially thorough for cleaning and inspection prior to start-up. Also, check
the battery of the EcoFlex™ Control Panel.
NOTICE: BAC units are typically
installed immediately after
shipment and many operate year
round. However, if the unit is to
be stored for a prolonged period
of time either before or after
installation, certain precautions
should be observed.
Figure 12. Refrigerant Connection

WWW.BALTIMOREAIRCOIL.COM
11
TRILLIUMSERIES™ADIABATIC PRODUCT
Installation 3
Refrigerant Connection and Fluid Connections
The Pre-Cooler Pads represents the only potential flammable component of the
TrilliumSeries™Adiabatic Product. Remove the first two Pre-Cooler Pads on each side
of the unit closest to the coil connection end on each side prior to brazing or welding the
refrigerant or fluid piping.
For TrilliumSeries™ Condenser units, each unit must be piped with a trapped drop leg as
shown in Figure 12. To ensure the unit operates with full capacity ensure that the drop
leg is tall enough so the column of liquid has a static pressure greater than the pressure
drop through the coil. This will be particularly important on multi-unit installations. Typical
pressure drops through microchannel coils for TSDC are 5-6 psi for HFCs and 2 psi for
NH3, which correspond to ~10 foot drop leg heights, although this will vary with unit sizing
and application. For TSDC HFC’s in tube/fin coils the typical pressure drop is ~ 2 psi. For
TSDC CO2coils, the pressure drop is 4-12 psi. For TSDC2 the maximum allowed pressure
drops is 12 psi for water, 10 psi for CO2, 1 psi for NH3and 3 psi for HFCs. Contact BAC
for special selections that may fall outside of these parameters.
NOTICE:
1. Weld/braze the pipes with care,
noting that the coil itself may
be aluminum. Protect the PVC
piping and any exposed wiring
from weld splatter.
2. Vacuum and clean all
copper dust.
3. When piping the refrigerant
connections, take care not to
block the door opening of the
access hatch or control panel.
4. For units equipped with
threaded connections, be sure
not to apply all torque directly
to the header as this may cause
damage and leaks.
5. Connections for fluid coolers
are available in red brass MPT,
flanged, or copper sweat. Always
follow best practices when
connecting refrigerant or fluid
connections.
Figure 12. Refrigerant Connection
Equalizing Line
Compressor Discharge
Liquid to System
Receiver
Condenser
Relief Valve
Piping with Top Inlet Receiver Using Ammonia or CO2
Supply of valves and fittings beyond these points
are supplied and installed by others.
Refrigerant Ball
Valves
Field Supplied and
Installed Charge &
Purge Valves
Relief Valve
Drop Leg
Discharge Line
NOTE: If you are unable to pipe an
adequate drop leg, the discharge
line can be piped to the bottom of
the receiver.

WWW.BALTIMOREAIRCOIL.COM
12
Figure 13a. Parallel Piping with Common Liquid Header above
Receiver Level Alternative 1
Refrigerant Piping for Multiple Units
See Figures 13a and 13b for the refrigerant piping connections for multiple units:
• All valves and piping shown to be field provided and installed if necessary.
• These piping diagrams show the arrangement of multiple TrilliumSeries™ Adiabatic
Condensers. Additional piping requirements may be necessary for your system such as
backflow valves or equalizing lines.
• Weld/braze the pipes with care to prevent damage to the coil and unit.
• When piping the refrigerant connections, take care not to block the door opening of the
access hatch or control panel. See Figure 14.
• It is desirable to trap the liquid header as shown in Figure 13a. Trapping the header
will insure a stable operating condition for the condensers. If the liquid header is not
trapped, there will be times, particularly at initial start-up, where there will be erratic
condenser operation until all liquid leg seals are stabilized. Piping must be sized for
100 fpm drain velocities, and should be sloped a minimum of 1/4” per foot toward the
receiver.
• Figure 13b indicates an alternative method of trapping the main liquid header using
a vertical trap. The volume of the vertical trap between the bottom inlet connection
and the top outlet connection must be equal to the combined volume of the liquid in
all of the drop legs. The top of the vertical trap must be connected to the equalizing
line to prevent a siphoning effect from the liquid header to the receiver. There is no
need to trap the individual drip legs when a vertical trap is used. The drop legs and the
common liquid header should be sized for a maximum liquid velocity of 100 fpm.
Figure 13b. Parallel Piping with Common Liquid Header above
Receiver Level Alternative 2

WWW.BALTIMOREAIRCOIL.COM
13
Piping Guidelines
When piping the unit, route the water pipes down or to the side so that there is a clear
landing area in front of the unit for accessing the control panel and access hatch(es) in
compliance with NEC regulations.
Water Connection
Water Piping
TrilliumSeries™ Adiabatic Products require a water supply between 25 and 60 psi in a
¾” pipe for the TSDC and in a 1” pipe for the TSDC2 and TSDF2 at the unit’s inlet. If
your building’s pressure is too high, it is recommended to use a pressure reducing valve.
If multiple TrilliumSeries™ Adiabatic Products are being installed, use Table 3 to
determine the proper size of the water line that should be run to the units. This is critical
for proper operation of the unit. Failure to meet these requirements will result in poor
performance, lower capacity, and possible damage to the pump.
Number of
Units
Nominal Pipe Size of Main
Water Line (Inches)
TSDC TSDx2
1 3/4 1
2 1 1/4 1 1/2
3 1 1/2 2
4 1 1/2 2
5 2 2 1/2
6 2 2 1/2
Table 3.Nominal Pipe Size of Main Water Line
Clear
Working
Area
Figure 14. Clear Working Area
Installation
Refrigerant Connection
Refrigerant Piping for Multiple
Units
Piping Guidelines
Water Connection
Water Piping

WWW.BALTIMOREAIRCOIL.COM
14
• For units with the water monitoring option, a water regulator will be provided with
the unit which will be shipped loose inside the basin. The regulator must be installed
before the make up valve and must be sized according to Figure 16 on page 16. If
multiple units are ordered one water regulator should be installed per unit.
• If the optional Auto-Discrete Backup Spray System is ordered, the water supply to the
unit can be split to provide water to both the make-up valve and auto-discrete valve. -
• Customers in climates that reach below freezing temperatures should refer to page 30
for winter operation.
• On page 15, Figures 15a and 14b show the suggested water piping for one or multiple
units. These figures show an optional hose faucet connection which can be used to
connect a garden hose for cleaning the unit or for the discrete spray back up. They
also show a 3-way valve which allows the water piping to be remotely drained when
temperatures are below freezing. This valve is field provided, installed, and controlled.
• Backflow prevention should be installed on TrilliumSeries™ Adiabatic Products per
local and national codes.

WWW.BALTIMOREAIRCOIL.COM
15
1 1/2" MPT Overflow
1 1/4" FPT Dump/Drain Valve
(Factory Supplied on the Unit)
3/4" FPT Make Up Valve
(Factory Supplied on the Unit)
3-way valve
Ball Valve
Backflow Preventer
Ball Valve
Overflow piped to the drain line
Cold weather drain piping if necessary
DRAININCOMING
WATER
Above the Roof
Below the Roof
Field Provided and Installed If Necessary
Hose faucet
Pressure Reducing Valve (PRV)
Strainer
Auto-Discrete Valve
3/4" FPT Make Up Valve
(Field provided and installed, if necessary)
Figure 15a. Water Piping (TSDC Shown)
NOTES FOR FIGURES 8A AND 8B:
1. Only valves labeled factory
supplied are provided with the
unit.
2. Optional hose faucet connection
and 3-way valve shown
(supplied by others).
3. The hose faucet can also be
used as a vent during winter
operation.
4. Backflow prevention should be
installed per local and national
codes.
5. Ensure proper venting for all
piping.
6. For TSDC2 and TSDF2 models,
refer to the submittal package
for specific connection and valve
locations.
Figure 15b. Water Piping for Multiple Models (TSDC Shown)
1 1/2" MPT Overflow
1 1/4" FPT Dump/Drain Valve
(Factory Supplied on the Unit)
3/4" FPT Make Up Valve
(Factory Supplied on the Unit)
3-way valve
Ball Valve
Backflow Preventer
Ball Valve
Overflow piped to the drain line
Cold weather drain piping if necessary
DRAININCOMING
WATER
Above the Roof
Below the Roof
Field Provided and Installed If Necessary
Main TrilliumSeries™ Condenser Water Line (see Table 3 for sizing)
Hose faucet
Pressure Reducing Valve (PRV)
Installation
Water Connection
Water Piping
Main TrilliumSeries™ Product Water Line (see Table 3 for sizing)

WWW.BALTIMOREAIRCOIL.COM
16
Installation of the Pressure Regulating Valve
As part of the Water Monitoring option, a pressure regulating valve (PRV) is supplied.
Follow the instructions for installation. The valve must be installed on straight rigid pipe
7.5” (19 cm) from the make-up valve, refer to the diagram below for more information.
Direction of Flow
Minimum of 10 Inlet
Pipe Diameters from
PRV to First Turn
Minimum of 20 Inlet
Pipe Diameters from
PRV to First Turn
Set to 20 psi
Figure 16. Pressure Regulating Valve
Ammonia Installation Instructions
If using ammonia, on TSDC models the following additions are recommended to ensure
integrity and cleanliness of the microchannel coil:
• Discharge strainer (provided by others) on the discharge line from the compressor to
the TrilliumSeries™Adiabatic Condenser as close to the unit as possible. The strainer
will catch weld slag and other system impurities during start-up. Suggested strainers
are Danfoss FIA 50 with a 100 mesh strainer or finer.
• Filter dryer for the ammonia in the exiting liquid line, such as Parker C-40016-P
replaceable core filter dryers or similar. This eliminates any moisture in the ammonia.
• Autopurger installed to eliminate any non-condensables.
Customer Electrical Connections
• Customer connection of 3 phase power and earth/ground is within the isolator/
disconnect. Ensure correct voltage is supplied to the unit. Refer the submittal in the
Customer Information Packet for this information.
• The connection of the above items will allow the TrilliumSeries™ Adiabatic Product
to operate as specified. Please see the following sections for further details and see
“Wiring and Electrical Information” on page 17.
Installation of Leaving Fluid Temperature Sensor (TSDF2 Fluid Cooler Models Only)
As part of the self-contained Temperature Control Package, a leaving water temperature
sensor is supplied with a socket for installation in the piping leaving the unit. The sensor
should be installed at least 10 times the pipe diameter from curves in the piping. The socket
is equipped with a PG7-IP68 cable gland applied to the hexagonal end to secure the cable.
Figure 17. Leaving Fluid Temperature Sensor

WWW.BALTIMOREAIRCOIL.COM
17
Installation
Water Connection
Installation of the Pressure
Regulating Valve
Ammonia Installation
Instructions
Customer Electrical
Connections
Wiring and Electrical Information
For the diagram showing customer power and control signal input connections, refer to the
submittal package. This information is also in a package on the inside of the control panel.
NOTE:
FLA = Full Load Amps
MCA = Minimum Circuit Ampacity
MOP = Maximum Overcurrent
Protection
Table 4. FLA, MCA and MOP Ratings (amps) for 60 Hz Three Phase Power
Model Number Fan Qty. Pump Qty. FLA MCA MOP
460V
TSDC-xxx-3 1 1 4.7 5.9 15
TSDC-xxx-6.2 2 1 8.7 10.8 15
TSDC-xxx-9.6 3 1 12.6 15.8 20
TSDC-xxx-12.4 4 1 16.6 20.7 25
TSDx2-xxx-xxx-12.4 4 2 16 20 25
TSDx2-xxx-xxx-18.6 6 2 23.3 29.1 30
TSDx2-xxx-xxx-24.8 8 2 30.6 38.2 40
TSDx2-xxx-xxx-31.0 10 2 37.9 47.3 50
TSDx2-xxx-xxx-37.2 12 2 45.1 56.4 60
TSDx2-xxx-xxx-43.4 14 2 52.4 65.5 70
380V
TSDC-xxx-3 1 1 5.7 7.1 15
TSDC-xxx-6.2 2 1 10.5 13.1 15
TSDC-xxx-9.6 3 1 15.3 19.1 20
TSDC-xxx-12.4 4 1 20.1 25.1 30
TSDx2-xxx-xxx-12.4 4 2 19.4 24.3 25
TSDx2-xxx-xxx-18.6 6 2 28.2 35.3 40
TSDx2-xxx-xxx-24.8 8 2 37 46.3 50
TSDx2-xxx-xxx-31.0 10 2 45.8 57.3 60
TSDx2-xxx-xxx-37.2 12 2 54.6 68.3 70
TSDx2-xxx-xxx-43.4 14 2 63.5 79.3 80
230V
TSDC-xxx-3 1 1 9.6 12 15
TSDC-xxx-6.2 2 1 17.8 22.2 25
TSDC-xxx-9.6 3 1 25.9 32.4 40
TSDC-xxx-12.4 4 1 34 42.5 50
TSDx2-xxx-xxx-12.4 4 2 31.6 39.5 40
TSDx2-xxx-xxx-18.6 6 2 45.9 57.4 60
TSDx2-xxx-xxx-24.8 8 2 60.2 75.3 80
TSDx2-xxx-xxx-31.0 10 2 74.6 93.2 100
TSDx2-xxx-xxx-37.2 12 2 88.9 111.1 125
TSDx2-xxx-xxx-43.4 14 2 103.2 129 150
200V
TSDC-xxx-3 1 1 11.2 14 20
TSDC-xxx-6.2 2 1 20.6 25.7 30
TSDC-xxx-9.6 3 1 30 37.5 40
TSDC-xxx-12.4 4 1 39.4 49.2 50
TSDx2-xxx-xxx-12.4 4 2 36.5 45.6 50
TSDx2-xxx-xxx-18.6 6 2 52.9 66.2 70
TSDx2-xxx-xxx-24.8 8 2 69.4 86.8 90
TSDx2-xxx-xxx-31.0 10 2 85.9 107.4 110
TSDx2-xxx-xxx-37.2 12 2 102.4 127.9 150
TSDx2-xxx-xxx-43.4 14 2 118.8 148.5 150
NOTE: For other voltages, contact
your local BAC Representative.

WWW.BALTIMOREAIRCOIL.COM
18
Electrical Power Quality
This unit requires clean electrical power to operate properly. Voltage and frequency should be within
10% of the designed voltage for the unit. Failure to provide this power may damage the unit.
The EC fan motors contain built-in protection circuits that will shut down the fan if there is
a power quality issue. If the fans go into protection mode, the unit must be shut down and
restarted to return to normal operation.
Power Connections
TrilliumSeries™Adiabatic Products require a 3 phase 60Hz power source (50Hz also
available). The voltages available are 200V, 230V, and 460V (380V and 415V also available).
Please ensure that the correct voltage is supplied to the unit. If unsure, check your unit’s
submittal to verify that the provided power matches your unit. The TSDC includes a power
wire port on the upper left-hand side. The TSDC2 and TSDF2 includes a power wire port on
the bottom right-hand side. In both instances, remove the NEMA plug. Make sure to use the
proper sealing methods to comply with NEMA standards. This will maintain the panel’s NEMA
4 rating and prevent water ingression to the unit.
Controls Connections
The controls wiring should be provided in a separate conduit from any power wiring. BAC
recommends penetrating the control panel from the bottom or side panel observing standards.
It is also recommended to use of shielded wire to avoid interference.
BAC offers the following options to control the TrilliumSeries™ Adiabatic Product. Check the
submittal package to determine how the unit was setup and shipped:
• Control signal (0-10VDC, 10-0VDC or 4-20mA): The 0-10VDC signal commands the fans
off at 0V and full speed at 10V. The 10-0VDC signal commands the fans off at 10V and
full speed at 0V. The voltage signals should be wired to terminals – V (negative) and 10V
(positive). The 4-20mA signal commands the fans off at 4mA and full speed at 20mA.
The 4-20mA should be wired to terminals 10V (negative) and mA (positive).
• Communications via ModBus or BACnet: BAC offers both protocols over RS485 and
BACnet over IP. For RS485 connection, BAC recommends the use of twisted shielded
twisted paired wire with a ground. The communications card will be located on the
bottom of the controller. The BAC modbus and BACnet connections do not have any
device restrictions or proprietary protocols. However, you should contact your building
management system provider or controls integrator to verify your system will work with
the TrilliumSeries™Adiabatic Product communications protocols. Please see Table 5 on
page 16 for specific communication points map.
• Head Pressure Control: For units with this option, BAC has already preset the controller
to operate with the specified refrigerant at the factory. A pressure sensor will be furnished
with the unit. This sensor must be installed in the piping either on the supply side or
discharge side of the coil using a Schrader 7/16” 20 UNF valve (provided by others).
The sensor must be wired to terminals 48 (positive) and 49 (negative). To program the
temperature set point into the controller, scroll down on the screen until the refrigerant
temp set point is shown, press enter and using the up/down arrows select the desired
temperature and press enter. Please note, there is only a single temperature set point
in the TrilliumSeries™ Adiabatic Condenser controller. If you desire to control the unit
based on pressure, the pressure value will need to be converted to temperature for that
specific refrigerant.
• Leaving Fluid Temperature Control: For fluid cooler units, the leaving fluid temperature is
monitored with a sensor installed in the leaving water piping. The sensor must be wired to
terminals as shown in wiring diagrams included with submittal package.
NOTICE: When connecting power
to the unit, do not penetrate the
top of the control panel. Doing so
may allow moisture to enter the
panel. All cable and conduit should
be supported separately from the
unit. Do not penetrate the unit for
supports or other connections.
NOTE: EcoFlex™Controls come
with preset date and time from
the factory and do not need
modification during initial start-up.
NOTE: Units purchased after
November 2015 are fully integrated
with Emerson CPC Controller.
NOTE: The minimum fan speed is
5%. Any signal sent below 5% (i.e.
9.95V or 0.05V) will be ignored and
the fans will turn off.
Other manuals for Trillium Series
1
This manual suits for next models
3
Table of contents
Other BAC Air Conditioner manuals
Popular Air Conditioner manuals by other brands

Frigidaire
Frigidaire CRA073PU11 use & care

Panasonic
Panasonic CU-QE12MKE Service manual

Samsung
Samsung AJ NBNDEH Series user manual

Hisense
Hisense AUC-18UX4SGAA Instruction and installation manual

Johnson Controls
Johnson Controls York VIR 40A installation instructions

TemperZone
TemperZone OSA 840RKTB installation guide