Badabulle B001003 User manual

■
FR
Notice d’utilisation
■
NL
Gebruiksaanwijzing
■
EN
Instruction manual
■
IT
Libretto d’utilizzazione
■
ES
Instrucciones de uso
■
PT
Instruções utilisation
■
DE
Anleitungen zur benutzung
■
PL
Użytkownik
■
CZ
Uživatel
■
SK
Uživatel
■
HU
Használó
■
UA
інструкції користувача
■
RU
уведомление
Réf. B001003 - B001004 - B001005

2
l
Al
B
l
C
l
L
l
K
l
J
l
H
l
I
l
G
l
F
l
E
l
D
l
Nl
Ol
P
l
M

3
MISES EN GARDE IMPORTANTES
Lors de l’utilisation d’appareils électriques, les précautions de sécurité fondamentales
suivantes devront toujours être suivies :
•
Lire l’ensemble des instructions attentivement et familiarisez-vous avec votre appareil de
préparation de repas pour bébé avant une première utilisation.
•
Vérifier que la tension électrique du secteur correspond à celle mentionnée sur l’appareil.
•
Pour se protéger d’une électrocution, ne pas immerger l’appareil, le cordon ou la prise dans
l’eau, ou dans tout autre liquide.
•
Ne pas utiliser l’appareil pour tout autre usage que celui prévu. Toute autre utilisation doit
être considérée comme inappropriée et dangereuse.
•
S’il existe un endommagement visible sur l’appareil, la prise ou le cordon d’alimentation,
débrancher l’appareil immédiatement et ne pas l’utiliser. Une réparation devra être
eectuée par une personne qualifiée ou un centre de services.
•
L’appareil ne doit pas contenir des pièces installées par l’utilisateur. Ne pas procéder à un
démontage.
•
L’utilisation de fixations d’accessoires non recommandés par le fabricant de l’appareil peut
résulter en un incendie, une électrocution ou une blessure.
•
Toujours être vigilant lorsque l’appareil est utilisé en présence ou à proximité d’enfants.
•
Cet appareil est destiné à être utilisé dans des applications domestiques
et analogues telles que :
- des coins cuisines réservés au personnel dans les magasins, bureaux et autres
environnements professionnels
- des fermes
- l’utilisation par les clients des hôtels, motels et autres environnements
à caractère résidentiel
- des environnements du type de chambres d’hôtes
•
Ne pas utiliser l’appareil à l’extérieur.
•
Ne pas laisser le cordon pendre sur le bord d’une table ou d’un comptoir, ou bien au contact
de surfaces chaudes.
•
Placer l’appareil sur une surface plane et stable.
•
Ne pas placer l’appareil sur ou près de surfaces chaudes, dans un four qui fonctionne ou
près de tout ce qui s’apparente à une source de chaleur au gaz ou électrique.
•
Ne pas toucher les surfaces chaudes (cuve de chaue). Utiliser les poignées ou les boutons.
•
Ne pas déplacer l’appareil en utilisation, lorsqu’il est branché, ou s’il contient de l’eau chaude.
•
Débrancher l’appareil lorsqu’il n’est pas utilisé ou avant un nettoyage ou un rangement.
•
Examiner régulièrement l’appareil. En cas de fuite d’eau, ramener l’appareil au fournisseur
ou au centre de services pour une réparation.
•
Si le cordon d’alimentation est endommagé, il doit être remplacé par le fabricant, son
service après-vente ou une personne qualifiée de manière à éviter tout risque.
AVERTISSEMENTS
•
Branchez cet appareil sur une prise 220 volts avec raccordement à la terre.
•
Cet appareil peut être utilisé par des personnes dont les capacités physiques, sensorielles ou
mentales sont réduites ou dont l’expérience ou les connaissances ne sont pas susantes,
à condition qu’ils bénéficient d’une surveillance ou qu’ils aient reçu des instructions quant
à l’utilisation de l’appareil en toute sécurité et en comprennent bien les dangers potentiels.
FR

4
SIGNIFICATION DU SYMBOLE «POUBELLE BARREE»
Protégeons notre environnement : ne pas jeter les appareils électriques dans la poubelle domestique. Ramener tout appareil électrique que vous n’utilisez plus aux
déchetteries prévues pour les déchets. Ceci contribue à éviter les eets potentiels d’une mise au rebut incorrecte sur l’environnement et la santé. Ceci contribuera au
recyclage et à d’autres formes de réutilisation d’appareils électriques et électroniques. Des informations concernant les sites où les appareils peuvent être jetés sont
disponibles auprès de vos autorités locales. Dans de nombreux pays de l’Union Européenne, la mise au rebut des appareils électriques et électroniques dans les poubelles
domestiques est interdite depuis le 13 août 2005.
•
Cet appareil ne doit pas être utilisé par les enfants. Conserver l’appareil et son câble hors
de portée des enfants.
• Cet appareil peut être utilisé par des enfants âgés d’au moins 8 ans, à condition qu’ils
bénéficient d’une surveillance ou qu’ils aient reçu des instructions quant à l’utilisation de
l’appareil en toute sécurité et qu’ils comprennent bien les dangers encourus. Le nettoyage
et l’entretien par l’utilisateur ne doivent pas être eectués par des enfants, à moins qu’ils
ne soient âgés de plus de 8 ans et qu’ils soient sous la surveillance d’un adulte. Conserver
l’appareil et son câble hors de portée des enfants âgés de moins de 8 ans.
• Cet appareil peut être utilisé par des enfants âgés d’au moins 3 ans, à condition qu’ils
bénéficient d’une surveillance ou qu’ils aient reçu des instructions quant à l’utilisation de
l’appareil en toute sécurité et comprennent bien les dangers encourus. Le nettoyage et
l’entretien de l’utilisateur ne doivent pas être eectués par des enfants, à moins qu’ils ne
soient âgés d’au moins 8 ans et qu’ils soient sous la surveillance d’un adulte. Conserver
l’appareil et son câble hors de portée des enfants âgés de moins de 3 ans.
• Les enfants ne doivent pas utiliser l’appareil comme un jouet.
• Vérifiez toujours la température de vos aliments sur le dos de votre main avant de les
donner à votre bébé.
• Veillez à bien conserver ces instructions pour référence future.
ÉLÉMENTS DE L’APPAREIL DE PRÉPARATION DE REPAS POUR BÉBÉ :
A - Couvercle du bol de mixage
B - Système de verrouillage du couvercle
C - Bol de Mixage
D - Lame de Mixage
E - Bouton de Mixage
F - Bouton de Cuisson, Réchauage
et Décongélation
G - Base de la Bébé Station
H - Cuve de Cuisson
I - Récupérateur de Jus de Cuisson
J - Panier de Cuisson, Réchauage
et Décongélation
K - Cloche de Cuisson Vapeur
L - Pince pour retirer le Panier Vapeur
en toute sécurité
M - Cordon d’alimentation
Éléments pour l’utilisation chaue-biberon
N - Cloche vapeur pour chaue biberon
O - Dosette d’eau
P - Anneau d’adaptation
220-240 V - 50Hz
Cuiseur Vapeur 800W
Mixeur 200W
A- B001005SAV601
C+D- B001005SAV600
I- B001005SAV202
J- B001005SAV200
Les pièces de rechange A,C,D,I,J,K,L,O,P sont disponibles
K- B001005SAV205
L- B001005SAV201
O- B001005SAV203
P- B001005SAV204

5
1 - Utiliser le Bol de Mixage (C) pour ver-
ser l’eau dans la Cuve de Cuisson (H).
Le remplir d’eau selon les quantités
indiquées dans le livre de recettes.
2 - Déposer les aliments coupés
en dés dans le Panier de
Cuisson (J).
3 - Appuyer sur le Bouton de Cuisson
(F) pour démarrer la cuisson.
4 - Une fois la cuisson terminée, verser les
aliments dans le Bol de Mixage (C).
Ne pas oublier de verser également le jus de
cuisson du Récupérateur de Jus de Cuisson
(I) pour un met plus savoureux et pour récu-
pérer les vitamines qu’il contient.
5 - Bloquer le Bol de Mixage
(C) en le tournant dans le sens
des aiguilles d’une montre.
6 - Refermer et verrouiller le couvercle
en tournant le Système de Verrouillage
(B) dans le sens des aiguilles d’une
montre. Le couvercle est bien en place
lorsque le système de verrouillage est
bien enclenché dans sa fente. Vous enten-
drez un petit clic indiquant que le bol de
mixage est verrouillé et prêt à être utilisé.
7 - Presser le Bouton de Mixage (E)
pour mixer les aliments. ATTENTION:
appuyer sur le bouton par petites
et courtes pressions de 15 à 20 sec.
maximum, pour éviter tout risque
d’échauement. Stopper si la Lame
de Mixage (D) tourne dans le vide.
8 - Verser les aliments dans une
assiette. Le repas de bébé est
prêt!
INSTRUCTIONS POUR L’UTILISATION ROBOT CUISEUR VAPEUR MIXEUR
Mettre le bouton ON/OFF sur « ON »
1 - A l’aide de la dosette, verser la quantité d’eau
indiquée par la notice dans la cuve de cuisson
vapeur en fonction de la quantité
d’eau de votre biberon.
3 - Placer le biberon
rempli d’eau.
2 - Poser la cloche chaue-biberon.
4 - Ajouter l’anneau d’adaptation
s’il s’agit d’un biberon standard.
INSTRUCTIONS POUR L’UTILISATION CHAUFFE BIBERON

6
5 - Mettre le bouton ON/OFF sur «ON» situé
à l’arrière du produit. Lancer la chaue en
appuyant sur le bouton droit. Un voyant lumineux
s’allume. La chaue s’arrête automatiquement
une fois que le biberon est chaud: le voyant
lumineux s’éteint.
6 - Ajouter la poudre de lait.
Le biberon de bébé est prêt !
En mettant dans la dosette les quantités précisées dans ce tableau, on obtient un biberon chaud à 35-37°C, température recommandée pour
le biberon de bébé.
ATTENTION :
Toujours tester la température du biberon en faisant couler un petit peu de liquide sur l’intérieur du poignet, avant
de le donner à votre bébé.
Les quantités d’eau à mettre dans la dosette indiquées ci-dessous, ont été testées avec une eau à température ambiante, au printemps,
avec un biberon standard en plastique de 330 ml, un biberon col large de 330 ml et un biberon col large à fond amovible de 270 ml. Selon le
matériau ou le format de votre biberon, il se peut que les températures obtenues varient. Si vous trouvez que la température obtenue est trop
ou pas assez chaude, augmentez ou diminuez très légèrement les quantités d’eau pour la dosette du tableau ci-dessous.
ATTENTION :
L’anneau d’adaptation ne s’utilise qu’avec les biberons standards et ne s’utilise pas avec les biberons cols larges.
L’utilisation ou la non utilisation de l’anneau peut faire énormément varier les températures.
Toujours tester la température du biberon en faisant couler un petit peu de liquide sur l’intérieur du poignet, avant de le donner à votre
bébé.
Biberon standard plastique 330 ml
Quantité
d’eau dans
le biberon
Quantité
d’eau dans
la dosette
Anneau
d’adaptation
Oui/Non
60 ml 8Oui
90 ml 8Oui
120 ml 10 Oui
150 ml 10 Oui
180 ml 12 Oui
210 ml 12 Oui
240 ml 14 Oui
270 ml 16 Oui
300 ml 16 Oui
330 ml 16 Oui
Biberon col large fond amovible
270 ml
Quantité
d’eau dans
le biberon
Quantité
d’eau dans
la dosette
Anneau
d’adaptation
Oui/Non
60 ml 40 Non
90 ml 45 Non
120 ml 45 Non
150 ml 50 Non
180 ml 50 Non
210 ml 50 Non
240 ml 50 Non
270 ml 50 Non
Biberon col large 330 ml
Quantité
d’eau dans
le biberon
Quantité
d’eau dans
la dosette
Anneau
d’adaptation
Oui/Non
60 ml 12 Non
90 ml 13 Non
120 ml 15 Non
150 ml 18 Non
180 ml 20 Non
210 ml 20 Non
240 ml 20 Non
270 ml 20 Non
300 ml 20 Non
330 ml 22 Non

7
NETTOYAGE DE VOTRE BB Station
•
Débrancher toujours l’appareil et s’assurer qu’il est froid avant un net-
toyage.
•
Base de la Bébé Station (G) : essuyer la surface extérieure, de même que
l’intérieur de la Cuve de Cuisson (H), avec un tissu ou une éponge humide
imprégnée d’un savon liquide doux. Rincer avec de l’eau claire. Laisser
sécher naturellement. Ne pas immerger l’unité dans de l’eau ou dans tout
autre liquide. Ne pas laver l’unité sous l’eau courante. Ne pas utiliser de
produits abrasifs pour un nettoyage.
•
Le Récupérateur de Jus de Cuisson (I), le Panier de Cuisson (J), la Cloche
de Cuisson Vapeur (K), le Couvercle du Bol de Mixage (A), le Bol de Mixage
(C), et la Pince (l) peuvent être lavés grâce à une éponge et de l’eau chaude
imprégnée de savon liquide doux. Rincer avec de l’eau claire et laisser
sécher naturellement. Ces éléments peuvent être également lavés dans
un lave-vaisselle dans le compartiment supérieur uniquement.
•
Ne pas utiliser de tampons récurrents, d’éléments abrasifs ou de solvants
pour un nettoyage. Ils peuvent endommager l’appareil et ses surfaces.
NETTOYAGE DES LAMES DE MIXAGE
Si vous démontez les lames de mixage pour un nettoyage plus en profondeur.
ATTENTION:
il faudra faire le remontage comme il faut pour
éviter tout risque de surchaue de l’appareil. Cf schéma ci-dessous.
DETARTRAGE DE LA CUVE DE CHAUFFE
Après une utilisation plus ou moins prolongée, des dépôts minéraux peuvent
se former sur les surfaces intérieures de la Cuve de Cuisson (h) et peuvent
endommager la Bébé Station. Vous devrez régulièrement détartrer votre
appareil en versant un mélange de 100ml d’eau chaude et de 100ml de
vinaigre blanc dans la Cuve de Cuisson (h). Laisser le mélange agir pendant
une heure ou deux (plus longtemps si nécessaire). Déverser ensuite le
mélange et rincer la Cuve de Cuisson (h ) en la remplissant avec de l’eau
du robinet à l’aide d’un récipient, puis en la vidant plusieurs fois. Ne pas
immerger la Bébé Station dans l’eau. L’essuyer avec un chiffon sec ou
laissez-la sécher.
IMPORTANT
Ne pas oublier les pièces (Q), (R) et (S) lors du remontage des
lames, pour éviter les risques de surchaue.
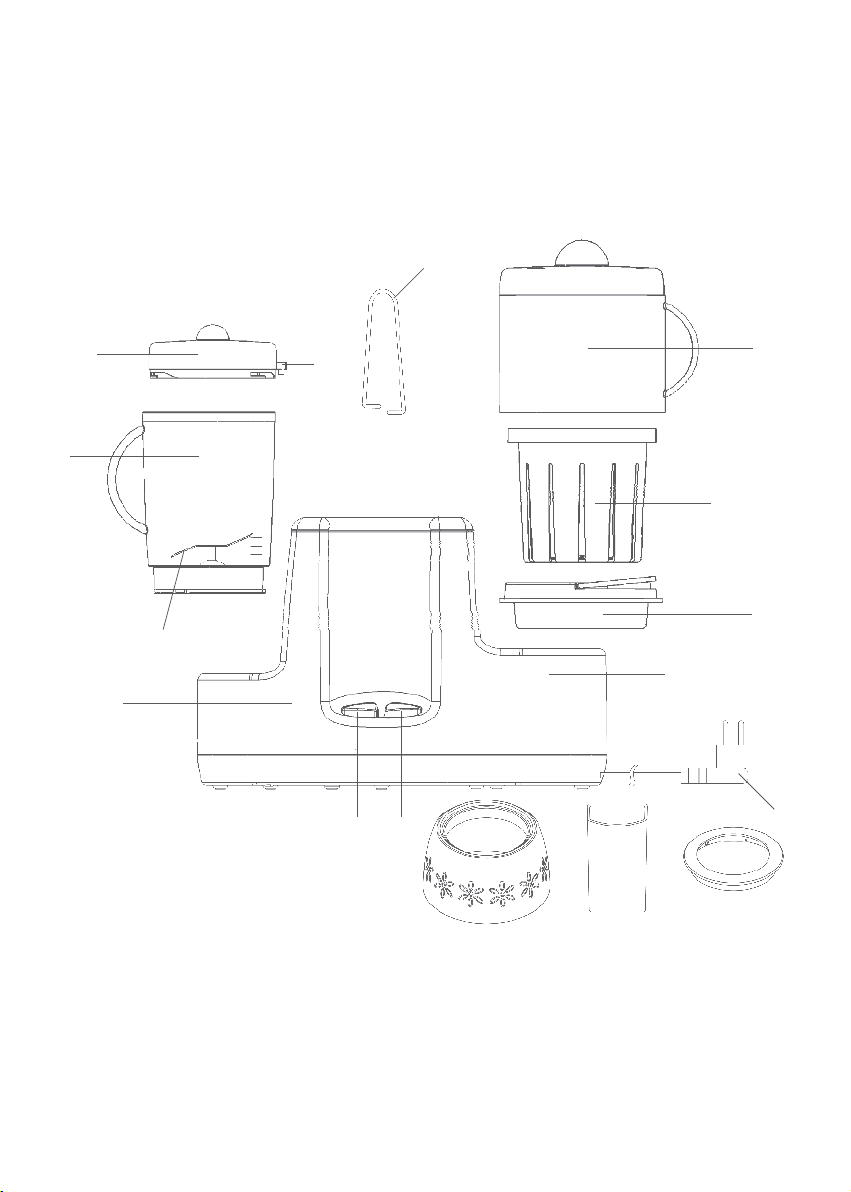
CONSIGNES D’UTILISATION
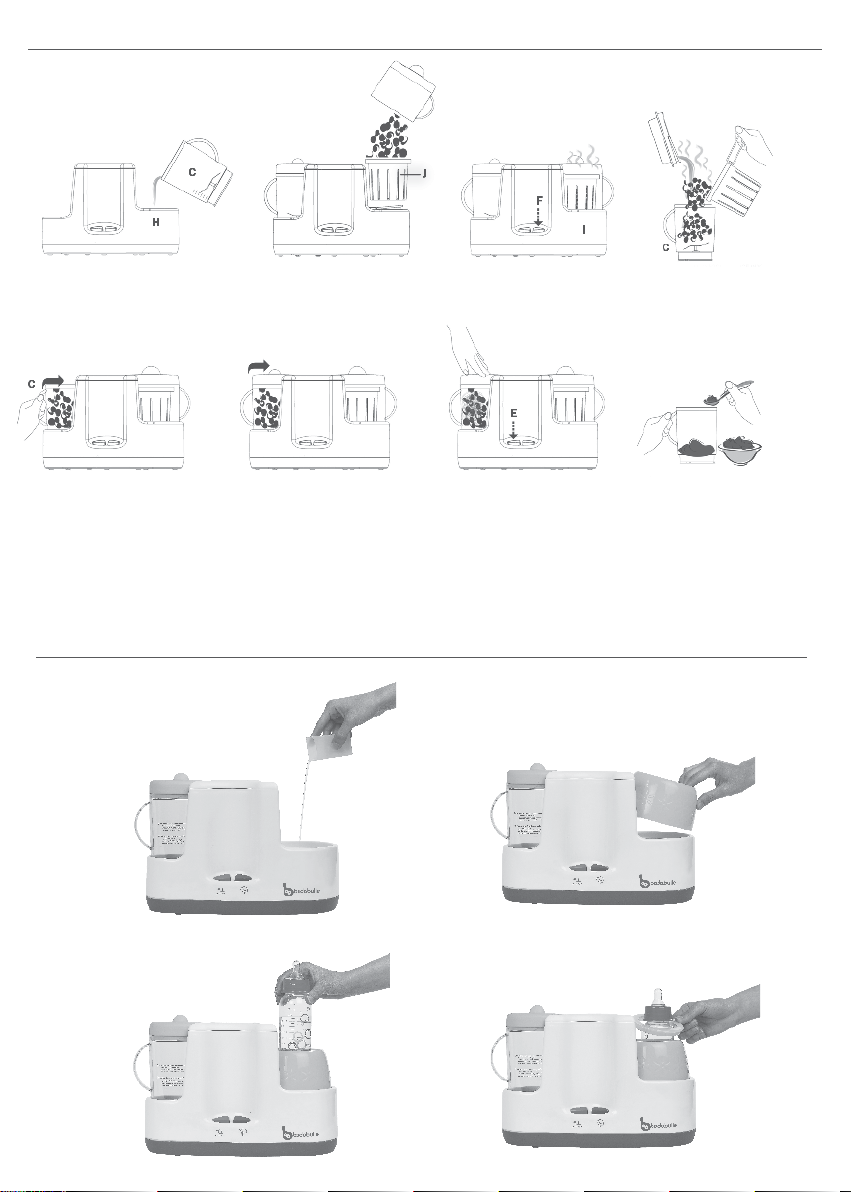
PREPARATION D’UN REPAS :
1 - Placer l’appareil sur une surface plane et stable. S’assurer que l’appareil
et le Cordon d’alimentation (M) sont hors d’atteinte des enfants.
2 - S’assurer que la tension d’alimentation de la prise électrique est adaptée
au dispositif. Si c’est le cas, brancher l’appareil à la prise murale.
3 - Retirer la Cloche de Cuisson Vapeur (K), le Panier de Cuisson (J) pour
aliments et le Récupérateur de Jus de Cuisson (I) de l’appareil.
4 - Placer les aliments dans le Panier de Cuisson (J) (préparer les aliments
conformément au livre de recettes). Pour une cuisson optimum et
uniforme, découper les aliments en de petits dés (ou morceaux).
5 - Retirer le Bol de Mixage (C) et le remplir d’eau selon les quantités
indiquées dans le livre de recettes.
6 - Verser l’eau selon le dosage approprié à l’intérieur de la Cuve de Cuisson
(H).
7 - Réinstaller le Récupérateur de Jus de Cuisson (I) et Panier de Cuisson (J)
(contenant les aliments) sur le Récupérateur de Jus de Cuisson (I).
8 - Replacer la Cloche de Cuisson à la Vapeur (K). Avertissement : la Cloche
de Cuisson Vapeur (K), ne comporte aucun système de fermeture, éviter
de retirer la cloche quand l’appareil est en service.
9 - Appuyer une fois sur le Bouton de Cuisson (F). Un voyant lumineux à
l’intérieur du bouton s’allumera, indiquant que le cycle de cuisson est
lancé. Avertissement : au cours de la cuisson, la Cloche de Cuisson
Vapeur (K). risque d’être extrêmement chaude et la vapeur sortira du
trou situé sur la cloche. Maintenir vos mains éloignées pour éviter de
vous brûler.
10 - Lorsque le cycle de cuisson est terminé, le voyant lumineux s’éteint
et l’appareil s’arrête automatiquement.
11 - Retirer la Cloche de Cuisson Vapeur (K). Avertissement : la Cloche
de Cuisson Vapeur est très chaude. La manipuler avec soin.
12 - Laisser le Panier de Cuisson (J) refroidir pendant 1 à 2minutes. Utiliser
la Pince (l) pour retirer le Panier de Cuisson (J)
13 - Transférer les aliments cuits à la vapeur dans le Bol de Mixage (C).
Retirer le Récupérateur de Jus de Cuisson (I) avec la poignée et verser
le jus de cuisson dans le Bol de Mixage (C). Ceci rend les aliments plus
savoureux et plus juteux et conserve les vitamines du jus de cuisson.
Avertissement: le Récupérateur de Jus de Cuisson (I) est chaud. Le
manipuler avec soin.
14 - Replacer le Bol de Mixage (C) dans le boîtier principal. Aligner et tourner
le Bol de Mixage (C) dans le sens des aiguilles d’une montre jusqu’à ce
qu’il se verrouille dans la Base de la Bébé Station (G).
15 -
Replacer le Couvercle du Bol de Mixage (A) sur le Bol de Mixage (C). Aligner
et tourner le Couvercle du Bol de Mixage (A) dans le sens des aiguilles
d’une montre.
Le couvercle est bien en place lorsque le système de verrouillage est bien
enclenché dans sa fente. Vous entendrez un petit clic indiquant que le bol
de mixage est verrouillé et prêt à être utilisé.
16 - Placer une main sur le Couvercle du Bol de Mixage (A) en appuyant
légèrement et utiliser l’autre main pour enfoncer le Bouton de Mixage (E)
afin de lancer le mixage. Avertissement : ne pas eectuer un mixage
continu mais de petites et courtes pressions de 15 à 20 secondes
maximum, afin d’éviter une surchaue du moteur de la Bébé Station.
17 - Lorsque les aliments sont prêts, relâcher le Bouton de Mixage (E) et
le mixage s’arrêtera.
18 - Déverrouiller le Couvercle du Bol de Mixage (A) et retirer le Bol de Mixage
(C) de la Base de la Bébé Station (G).
19 - Vous pouvez à présent nourrir votre bébé avec ce repas fraîchement
préparé. Avertissement : vérifiez toujours la température de vos
aliments avant de les donner à votre bébé.
Avertissement : Ne pas lancer le mixage en l’absence d’aliments ou de
liquide dans le Bol de Mixage (C).
Laisser la Bébé Station refroidir pendant au moins 15minutes avant d’utiliser
l’appareil pour une nouvelle cuisson.
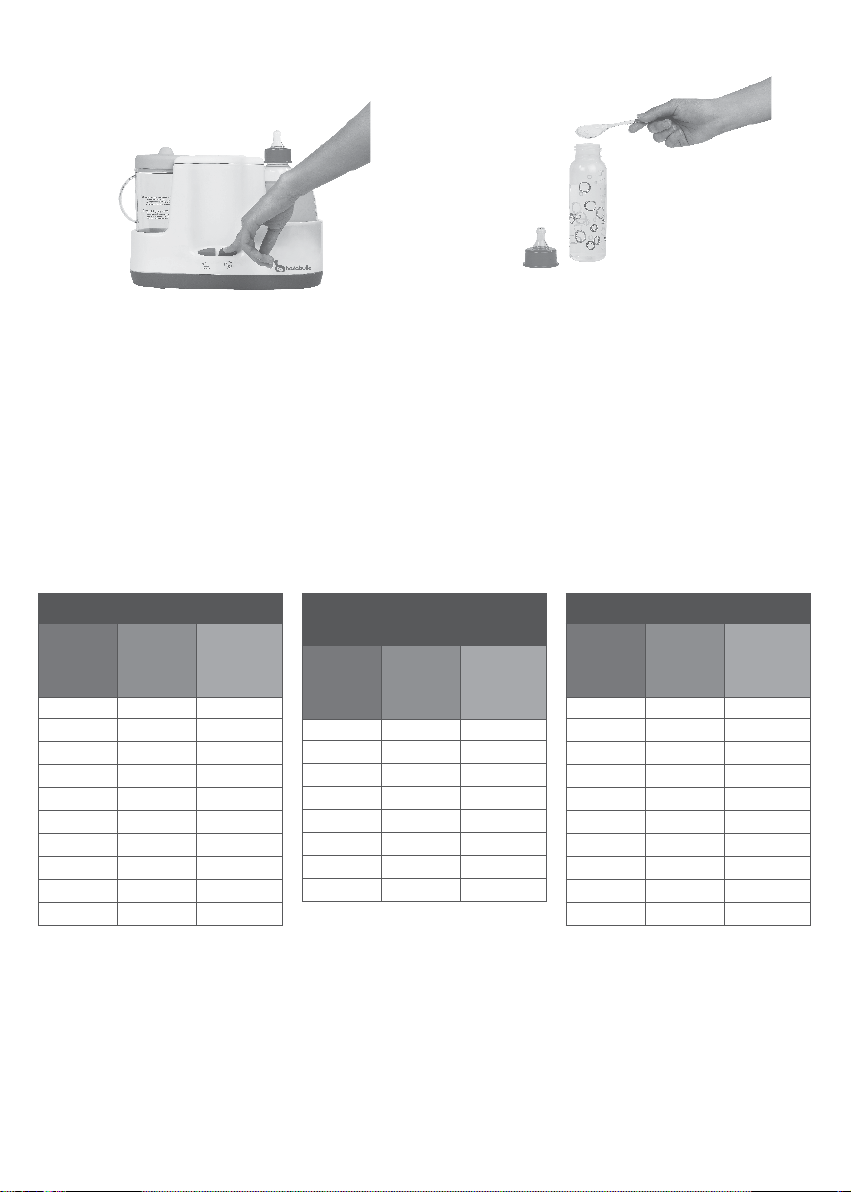
RECHAUFFAGE
1 - Mettre les aliments à réchauer dans un petit pot en verre ou en plastique
supportant les hautes températures.
2 -
Placer le petit pot sans couvercle dans le Panier de Cuisson (J) ou
directement sur le Récupérateur de Jus de Cuisson (I) et refermer avec la
Cloche de Cuisson Vapeur (K).
3 - Mettre 100 ml d’eau dans la Cuve de Cuisson (H).
4 - Appuyer sur le Bouton de Cuisson (F)
5 - Une fois le réchauage fini, le voyant lumineux s’éteint. Enlever le petit pot
avec précaution pour éviter de se brûler.
6 - Verser les aliments dans une assiette, le repas de bébé est prêt!
AVERTISSEMENT
: vérifiez toujours la température de
vos aliments avant de les donner à votre bébé.
DECONGELATION
Procéder de la même façon que pour le réchauage
avec 300 ml d’eau.
NETTOYAGE

8
BELANGRIJKE VEILIGHEIDSVOORSCHRIFTEN
Bij het gebruik van elektrische apparatuur
dient altijd een aantal veiligheidsvoorschriften
in acht te worden genomen:
•
Lees aandachtig deze gebruiksaanwijzing
door en maak kennis met uw Baby Station
voordat u hem de eerste keer in gebruik
neemt.
• Controleer of de plaatselijke netspanning
overeenkomt met die vermeld op het
apparaat.
• Dompel het apparaat, het snoer of de stekker
nooitonderin waterofineenanderevloeistof.
Zo voorkomt u kortsluiting en elektrocutie.
• Gebruik het apparaat nooit voor andere
taken dan die waar het voor gemaakt is. Dit
is onverantwoord en kan gevaarlijk zijn.
• Als het apparaat, het snoer of de stekker
beschadigd zijn, koppel het direct los
van de lichtnet en gebruik het niet.
Een eventuele reparatie moet worden
uitgevoerd door een geautoriseerd
servicecentrum of andere bevoegde
personen.
• Het apparaat mag niet door de gebruiker
worden uitgerust met andere onderdelen.
Het mag ook niet door de gebruiker worden
worden gedemonteerd.
• Het bevestigen van andere accessoires
op het apparaat, als die door de fabrikant
zijn bijgeleverd of aanbevolen, kan brand,
elektrocutie of verwondingen veroorzaken.
• Wees altijd voorzichtig als het apparaat in het
bijzijn van kleine kinderen wordt gebruikt.
• Dit apparaat is gemaakt voor huishoudelijk
gebruik en gelijkwaardige situaties zoals:
- kleine personeelskeukens in winkels,
kantoren en andere werkplaatsen.
- boerderijen
- gebruik door klanten van een hotel, motel en
andere tijdelijke accommodatie.
- in hotelkamers of soortgelijke
accommodatie
• Gebruik het apparaat nooit buiten.
• Laat het snoer nooit over de rand van de tafel
of het aanrecht hangen. Laat het ook niet in
contact komen met een hittebron.
• Plaats het apparaat op een horizontaal en
stevig oppervlak.
• Plaats het apparaat niet in nabijheid van een
hittebron, in een oven of een andere plaats
ENNL IMPORTANT WARNINGS
When using electrical appliances, always
follow the following safety precautions:
• Read allinstructionscarefullyandfamiliarise
yourself with your meal preparation
appliance before using it for the first time
• Ensure that your mains power matches that
indicated on the appliance.
• To prevent electrocution, do not immerse the
appliance, its cord or plug in water or any
other liquid.
• Do not use the appliance for any use other
than that for which it was intended. Any
other use must be considered inappropriate
and dangerous.
• If any damage is visible on the appliance, its
cord or plug, immediately unplug it and do
not use it. It must be repaired by a qualified
technician or service centre.
• The user must not install any parts. Do not
disassemble the appliance.
• The use of accessories not recommended
by the manufacturer may result in fire,
electrocution or injury.
• Always be vigilant when using the appliance
in the presence or near children.
• This appliance is intended for domestic or
similar uses such as:
- kitchenettes reserved for sta in stores,
oces and other professional environments
- farms
- use by guests in hotels, motels and other
residential environments
- bed and breakfasts
• Do not use the appliance outdoors
• Do not let the cord hang over the edge of a
table or counter, or come in contact with hot
surfaces.
• Place the appliance on a flat, stable surface.
• Do not place the appliance on or near hot
surfaces, in a hot oven or near anything
resembling a gas or electric heat source.
• Do not touch the hot surfaces (Heating Tank).
Use the handles or buttons.
• Do not move the appliance while it is in
operation, plugged in or if it contains hot
water.
• Unplug the appliance when not in use or
before cleaning or storing.
• Inspect the appliance regularly. In the event

9
die elektrisch of met gas wordt verwarmd.
• Raak de gedeelten die opwarmen niet aan
met blote handen (waterreservoir). Gebruik
hiervoor de handvatten of de knoppen.
• Verplaats nooit een apparaat dat aan staat,
waarvan de stekker in het stopcontact zit of
waarin heet water zit.
• Haal de stekker van het apparaat uit het
stopcontact als het niet wordt gebruikt,
voordat het wordt schoongemaakt of als het
wordt opgeruimd.
•Controleer het apparaat regelmatig.
Bij lekkage moet het direct worden
teruggebracht naar de klantenservice of een
ander reparatiepunt.
• Als het snoer is beschadigd, moet het worden
vervangen door de klantenservice of een
ander gekwalificeerd persoon, om zo elk
risico te voorkomen.
WAARSCHUWINGEN
•
Sluit dit apparaat aan op een stroomcircuit
van 220 volt, via een geaard stopcontact.
•
Dit apparaat kan worden gebruikt door
personen met fysieke, zintuiglijke of mentale
beperkingen of met onvoldoende ervaring
of kennis, opvoorwaarde dat er in toezicht
wordt gehouden op het veilige gebruik van
het apparaat en zij de mogelijke gevaren
begrijpen.
•
Dit apparaat mag niet door kinderen gebruikt
worden. Houd het apparaat en het snoer
buiten bereik van kinderen.
•
Dit apparaat kan gebruikt worden door
kinderen jonger dan 8 jaar op voorwaarde dat
er toezicht is op het gebruik of dat zij vooraf
instructies hebben gekregen betreende het
veilige gebruik ervan,en zij de gevaren ervan
begrijpen.
•
Schoonmaak en onderhoud door de
gebruiker mogen niet worden uitgevoerd
door kinderen, tenzij deze ouder zijn dan
8 jaar en er toezicht wordt gehouden door
een volwassene. Bewaar het apparaat en
de stroomkabel buiten bereik van kinderen
jonger dan 8 jaar.
•
Dit apparaat kan gebruikt worden door
of a water leak, return the appliance to the
retailer or service centre for repairs.
• If the power cord is damaged, it must be
replaced by the manufacturer, its service
centre or a qualified technician prevent risk
of injury.
WARNINGS
• Connect this appliance to a 220V outlet with
ground protection.
• This appliance may be used by persons
with reduced physical, sensory or mental
capacity,orlackingexperienceorknowledge,
provided they are supervised or have been
previously instructed in using the appliance
safely, and if they clearly understand its
dangers.
• This appliance must not be used by children.
Keep this appliance and its cord out of
children’s reach.
• This appliance may be used by children over
the age of eight years if they are supervised
by an adult or have been instructed in using
the appliance safely, and if they understand
its dangers. Cleaning and maintenance must
not be done by children, unless over the
age of eight years and provided they are
supervised by an adult. Keep the appliance
and its cord out of reach of children under
the age of eight years.
• This appliance may be used by children over
the age of three years if they are supervised
by an adult or have been instructed in using
the appliance safely, and if they clearly
understand its dangers. Cleaning and
maintenance must not be done by children,
unless over the age of eight years and
provided they are supervised by an adult.
Keep the appliance and its cord out of reach
of children under the age of three years.
• Children must not use this appliance as a toy.
• Always check food temperature on the back
of your hand before feeding it to your baby.
• Keep these instructions for future reference.
ENNL

10
ONDERDELEN VAN HET APPARAAT
VOOR HET MAKEN
VAN BABYVOEDING:
A - Deksel van de kom
B - Sluitingssysteem van het deksel
C - Kom
D - Hakmes
E - Schakelaar voor de blender
F - Schakelaar voor de stoompositie, opwarming of ontdooiing
G - Sokkel van het Baby Station
H - Waterreservoir
I - Opvangbakje voor het kookvocht
J - Mandje voor het koken, opwarmen en ontdooien
K - Stoomkap
L - Tang voor het veilig verwijderen van van het stoommandje
M - Elektriciteitskabel
Bedieningsonderdelen Flessenwarmer
N - Stoomstolp voor flessenwarmer
O - Doseerdop
P - Aanpasring
220-240 V - 50Hz - Stoomkoker 800W - Blender 200W
APPLIANCE ELEMENTS:
A - Blending bowl lid
B - Lid locking system
C - Blending bowl
D - Blending blade
E - Blending button
F - Cooking, reheating and thawing button
G - Bébé Station base
H - Heating tank
I - Cooking liquid collector
J - Cooking, reheating and thawing basket
K - Steamer cover
L - Tongs to safely remove the Steamer Basket
M - Power cord
Bottle warmer elements
N - Bottle warmer steamer cover
O - Water doser
P - Adaptor ring
220-240 V - 50Hz - 800W steamer - 200W blender
A- B001005SAV601
C+D- B001005SAV600
I- B001005SAV202
J- B001005SAV200
De reserve-onderdelen A,C,D,I,J,K,L,O,P zijn verkrijgbaar bij
K- B001005SAV205
L- B001005SAV201
O- B001005SAV203
P- B001005SAV204
kinderen jonger dan 3 jaar op voorwaarde dat
er toezicht is op het gebruik of dat zij vooraf
instructies hebben gekregen betreende het
veilige gebruik ervan, en zij de gevaren ervan
begrijpen. Schoonmaak en onderhoud door
de gebruiker mogen niet worden uitgevoerd
door kinderen, tenzij deze ouder zijn dan
8 jaar en er toezicht wordt gehouden door
een volwassene. Bewaar het apparaat en
de stroomkabel buiten bereik van kinderen
jonger dan 3 jaar.
• Kinderen mogen het apparaat niet als
speelgoed gebruiken.
•
Houd toezicht op jonge kinderen om te
voorkomen dat ze met het apparaat gaan
spelen.
•
Controleer altijd de temperatuur van de
voeding op de rug van uw hand, voordat u
het aan uw baby geeft.
•
Bewaar deze handleiding zodat u hem
eventueel later nog eens kunt raadplegen.
MEANING OF THE «CROSSED-OUT BIN» SYMBOL
Let’s protect our environment: do not dispose of electrical appliances
with your domestic waste. Take all electrical appliances that you no
longer use to drop-o centres. This helps prevent the negative eects
of improper disposal on the environment and on our health. It also
contributes to recycling and other forms of reuse of electrical appliances
and electronic devices. Information on sites where appliances can be disposed of
is available from your local authorities. In many countries of the European Union,
disposal of electrical and electronic apparatus in domestic waste bins is prohibited
since 13 August 2005.
EN
NL
The A,C,D,I,J,K,L,O,P spare parts are available with our

11
ENNL
1 - Gebruik de kom (C) om water in het
reservoir (H) te gieten. De hoeveelheden
van benodigd water staan vermeld in het
bijgeleverde receptenboekje.
Use the Blending Bowl(C) to pour the water
in the Heating Tank (H). Fill the tank with the
amount of water indicated in the recipe book.
2 - Plaats de voorgesneden
groenten in het mandje (J).
Place the diced foods in the
Steamer Basket (J).
3 - Druk op schakelaar voor de
stoompositie (F) om het proces te
starten.
Press the Cooking Button (F) to start
cooking.
4 - Als het stomen is voltooid, brengt u
de inhoud van het stoommandje over in
de kom van de blender (C). Vergeet niet
om het vrijgekomen kookvocht erbij
te gieten uit het opvangbakje voor het
kookvocht (I), zodat de vitamines niet
verloren gaan en voor meer smaak.
Once cooking is complete, pour
the foods in the Blending Bowl(C).
Remember to also pour the cooking
liquid from the Liquid Collector (I) into
the Blending Bowl for added flavour
and vitamins.
5 - Zet de kom van de blender (C)
vast door hem met de wijzers van de
klok mee, vast te draaien.
Turn the Blending Bowl (C) clockwise
to lock it.
6 - Zet het deksel op de kom, en vergrendel
deze door het sluitingssysteem (B) met de
wijzers van de klok mee, vast te draaien.
Het deksel is op zijn plaats als deze in de
inkeping en met een kleine hoorbare ‘klik’
vast komt te zitten. De blender is nu klaar
voor gebruik.
Turn the Locking System (B) clockwise
to close and lock the lid. The lid is closed
properly when the locking system is
snapped securely in its slot. You will hear
a click, indicating that the Blending bowl is
ready to be used.
7 - Druk op de schakelaar van de
blender (E) om met het pureren van de
inhoud te beginnen. LET OP:
druk maar een aantal korte keren
op de knop, niet langer dan 15 tot 20
seconden per keer, om oververhitting
van het apparaat te voorkomen. Stop met
pureren als er geen voeding fijngehakt
wordt door het hakmes (D).
Press the Blending Button (E) to blend.
ATTENTION: press the button for short
bursts of 15 to 20 seconds to prevent
overheating. Stop if the Blending Blade
(D) spins without any resistance.
8 - Doe de inhoud van de kom over
op een bord. De babymaaltijd is
gereed!
Pour the food into a dish. Baby’s
meal is ready!
HANDLEIDING
Zet de ON/OFF knop op « ON »
INSTRUCTIONS FOR USE
Switch the ON/OFF button to « ON »

12
6 - Voeg het melkpoeder toe.
De fles voor uw
baby is klaar!
Add the milk powder.
Baby’s bottle
is ready!
1 - Giet met behulp van de doseerdop de in de
handleiding aangegeven hoeveelheid water in de
stoomkuip afhankelijk van de hoeveelheid water
in uw babyfles.
Use the doser to pour the correct amount of
water indicated in the instructions in the steamer
tank depending on the quantity of water in your
bottle.
2 - Plaats de stolp in de flessenwarmer.
Replace the bottle heater cover.
3 - Zet de met water gevulde babyfles erin.
Place the bottle filled with water.
4 - Voeg de aanpasring toe als het
gaat om een standaardfles.
Add the adapter ring for standard
baby bottles.
5 - De ON/OFF schakelaar aan de achterzijde van het pro-
duct op « ON » zetten. Druk op de rechterknop om met het
verwarmen te beginnen. Er gaat een lampje branden. Het
verwarmen stopt automatisch wanneer de babyfles warm
is. Het lampje gaat dan uit.
Switch on the ON/OFF button located on the back of the
product. Press the right-hand button to start heating. The
indicator light turns on. Heating will automatically stop
when the bottle is warm. The indicator light turns o.
ENNL FLESSENWARMER INSTRUCTIONS FOR USE OF THE
BOTTLE HEATER

13
NL
Wanneer u de doseerdop vult met de in deze tabel aangegeven hoeveelheden wordt de fles verwarmd tot 35-37 °C, de aanbevolen temperatuur voor
een babyfles.
OPGELET:
Controleer de temperatuur van de babyfles altijd eerst door een druppel vloeistof op de binnenkant van uw pols te gieten voordat u uw
baby de fles geeft.
De hieronder aangegeven hoeveelheden water om in de doseerdop te doen, zijn getest met water op kamertemperatuur, in de lente, met een plastic standaardfles
van 330 ml, een babyfles met brede hals van 330 ml en een babyfles met brede hals en afneembare bodem van 270 ml. Afhankelijk van
het materiaal of formaat van uw babyfles of potje kunnen de verkregen temperaturen variëren. Als u vindt dat de verkregen temperatuur te warm of niet warm
genoeg is, gebruik dan iets grotere of kleinere hoeveelheden water voor de doseerdop dan in de tabel hieronder vermeld staan.
OPGELET: De aanpasring dient enkel gebruikt te worden bij standaardflessen en niet bij babyflessen met brede hals.
Het al dan niet gebruiken van de ring kan voor een grote variatie in de temperatuur zorgen.
Controleer de temperatuur van de babyfles altijd eerst door een druppel vloeistof op de binnenkant van uw pols te gieten voordat u uw baby de fles geeft.
By adding the exact amount of water indicated in this table, baby’s bottle will be heated to 35-37°C, the recommended temperature for baby bottles.
ATTENTION:
Always test the temperature of the milk by letting a few drops fall on the inside of your wrist before feeding your baby.
The amounts of water indicated below were tested with water at room temperature in the spring, using a standard plastic 330ml baby bottle, a wide-mouth
330ml baby bottle and a wide-mouth 270ml baby bottle with removable bottom. Temperatures may vary depending on your bottle’s material and format. If you
find that the temperature is too warm or cool, slightly increase or decrease the quantity of water in the doser.
ATTENTION:
The adapter ring is used only with standard bottles and not with wide-mouth bottles. The temperature can vary a great deal
depending on whether or not you use the adapter ring.
Always test the temperature of the milk by letting a few drops fall on the inside of your wrist before feeding your baby.
Plastic standaardfles 330 ml
Hoeveelheid
water in de
babyfles
Hoeveelheid
water in de
doseerdop
Aanpasring
Ja/Nee
60 ml 8Ja
90 ml 8Ja
120 ml 10 Ja
150 ml 10 Ja
180 ml 12 Ja
210 ml 12 Ja
240 ml 14 Ja
270 ml 16 Ja
300 ml 16 Ja
330 ml 16 Ja
Standard plastic 330ml bottle
Amount of
water in
the bottle
Amount of
water in
the doser
Adapter
ring
Yes/No
60 ml 8Yes
90 ml 8Yes
120 ml 10 Yes
150 ml 10 Yes
180 ml 12 Yes
210 ml 12 Yes
240 ml 14 Yes
270 ml 16 Yes
300 ml 16 Yes
330 ml 16 Yes
Babyfles met brede hals en
afneembare bodem 270 ml
Hoeveelheid
water in de
babyfles
Hoeveelheid
water in de
doseerdop
Aanpasring
Ja/Nee
60 ml 40 Nee
90 ml 45 Nee
120 ml 45 Nee
150 ml 50 Nee
180 ml 50 Nee
210 ml 50 Nee
240 ml 50 Nee
270 ml 50 Nee
Wide-mouth 270ml baby bottle
with removable bottom
Amount of
water in
the bottle
Amount of
water in
the doser
Adapter
ring
Yes/No
60 ml 40 No
90 ml 45 No
120 ml 45 No
150 ml 50 No
180 ml 50 No
210 ml 50 No
240 ml 50 No
270 ml 50 No
Babyfles met brede hals 330 ml
Hoeveelheid
water in de
babyfles
Hoeveelheid
water in de
doseerdop
Aanpasring
Ja/Nee
60 ml 12 Nee
90 ml 13 Nee
120 ml 15 Nee
150 ml 18 Nee
180 ml 20 Nee
210 ml 20 Nee
240 ml 20 Nee
270 ml 20 Nee
300 ml 20 Nee
330 ml 22 Nee
Wide-mouth 330 ml baby bottle
Amount of
water in
the bottle
Amount of
water in
the doser
Adapter
ring
Yes/No
60 ml 12 No
90 ml 13 No
120 ml 15 No
150 ml 18 No
180 ml 20 No
210 ml 20 No
240 ml 20 No
270 ml 20 No
300 ml 20 No
330 ml 22 No
EN

14
BEREIDEN VAN EEN MAALTIJD:
1 - Plaats het apparaat op een horizontale en stevige ondergrond. Controleer
dat de stroomkabel (M) buiten het bereik van kinderen blijft.
2 - Controleer of het plaatselijk lichtnet overeenkomt met die van het apparaat.
Als dit het geval is, kunt u de stekker in het stopcontact steken.
3 - Verwijder de stoomkap (K), het stoommandje (J) en het opvangbakje voor
het kookvocht (I).
4 - Doe de ingrediënten in het stoommandje (voorbereid volgens de instructies
in het bijgeleverde receptenboekje). Voor een optimaal en gelijkmatig resultaat,
kunt u het beste alle ingrediënten klein snijden.
5 - Haal de kom van de blender (C) van het apparaat en vul hem met de in het
receptenboekje aangeven hoeveelheid water.
6 - Giet de juiste hoeveelheid water in het waterreservoir (H).
7 - Zet het opvangbakje voor het kookvocht (I) terug op zijn plaats, en het
stoommandje (J) (met de ingrediënten) boven op het opvangbakje (I).
8 - Zet de stoomkap (K) op zijn plaats. Let op: de stoomkap (K) heeft geen
sluitingssysteem, haal de kap niet van het apparaat als het in werking is.
9 - Druk eenmalig op de schakelaar voor de stoompositie (F). Een controlelampje
in de schakelaar gaat branden en duidt aan dat met het stomen is begonnen.
Let op: tijdens het stomen kan de stoomkap (K) erg heet worden en ontsnapt
er stoom uit de opening van de kap. Kom hiermee niet in aanraking, u kan zich
hieraan verbranden.
10 - Wanneer het stomen is voltooid, gaat het controlelampje uit en schakelt het
apparaat automatisch uit.
11 - Verwijder de stoomkap (K). Let op: de kap is heet, wees voorzichtig tijdens
het hanteren.
12 - Laat het stoommandje (J) 1 tot 2 minuten afkoelen. Gebruik de tang (L) voor
het verwijderen van het mandje (J).
13 - Doe de gestoomde ingrediënten over in de kom van de blender (C).
Verwijder het opvangbakje voor het kookvocht (I) met behulp van het handvat
en giet de inhoud ervan bij de gestoomde ingrediënten in de kom (C). Hierin
bevinden zich waardevolle vitamines en het kookvocht maakt de voeding
smaakvoller. Let op: het opvangbakje (I) kan heet zijn, wees voorzichtig bij
het hanteren ervan.
14 - Plaats de kom van de blender (C) in de daarvoor bestemde opening op de
sokkel (G). Zet hem vast door hem met de wijzers van de klok mee te draaien.
15 - Plaats het deksel van de kom (A) op de kom van de blender (C). Plaats ze
goed boven elkaar en draai het deksel (A) met de wijzers van de klok mee. Het
deksel zit goed op zijn plaats als hij vast komt te zitten in de kleine inkeping.
Een kleine hoorbare ‘klik’ geeft aan dat het deksel goed vast zit en dat het
apparaat klaar is voor gebruik.
16 - Plaats een hand op het deksel van de kom (A) en druk met uw ander
hand op de schakelaar van de blender (E) om met het pureren te beginnen.
Waarschuwing: druk niet te lang op deze knop, pureer slechts korte,
opeenvolgende periodes van 15 tot 20 seconden, dit om oververhitting van
het apparaat te voorkomen.
17 - Als de babyvoeding voldoende gepureerd is, laat uit de schakelaar (E) los,
om het proces te stoppen.
18 - Open de sluiting van het deksel (A) en verwijder de kom (C) van de sokkel
(G) van het “Baby Station”.
19 - De verse maaltijd is gereed om aan uw baby gegeven te worden.
Waarschuwing: controleer altijd de temperatuur van de voeding, voordat u
het aan uw baby geeft. Waarschuwing: Start nooit het pureerproces van het
apparaat zonder dat er ingrediënten in de kom (C) zitten.
Laat uw Baby Station 15 minuten afkoelen, voordat u hem opnieuw gaat
gebruiken.
OPWARMEN
1 - Plaats de maaltijd die moeten worden opgewarmd in een glazen of plastic
potje, dat geschikt is om hoge temperaturen te weerstaan.
2 - Plaats het potje, zonder deksel, in het stoommandje (J) of direct op het
opvangbakje voor het kookvocht (I) en sluit het apparaat af met de stoomkap (K).
3 - Vul het waterreservoir (H) met 100 ml water.
4 - Druk op de schakelaar voor het stomen (F).
5 - Zodra het opwarmingsproces is voltooid, zal het controlelampje uit gaan.
Haal voorzichtig het potje uit het apparaat.
6 - Doe de maaltijd over op een bord, u kunt met het voeden beginnen!
WAARSCHUWING:
controleer altijd de temperatuur van
de voeding, voordat u het aan uw baby geeft.
ONTDOOIEN
Volg dezelfde instructies als voor het opwarmen met 300 ml water.
MEAL PREPARATION:
1 - Place the appliance on a flat, stable surface. Ensure the appliance and the
power cord (M) are out of children’s reach.
2 - Ensure the mains power is suitable for the appliance. If it is, plug the
appliance in to the wall outlet.
3 - Remove the Steam Cover (K), the Steam Basket (J) and the Liquid Collector
(I) from the appliance.
4 - Place the food in the Steam Basket (J) (prepare the food as instructed in
the recipe book). For optimal and even cooking, dice or chop into small pieces.
5 - Remove the Blending Bowl (C) and fill with water as instructed in the recipe
book.
6 - Add the appropriate amount of water to the Heating Tank (H)
7 - Replace the Cooking liquid collector (I) and Cooking Basket (J) (containing the
food) on the Cooking liquid collector (I).
8 - Replace the Steamer Cover (K).
Warning: The Steamer Cover (K) has no locking system, so avoid touching it
when it is heating.
9 - Press the Cooking Button (F) once. An indicator light inside the button turns
on, indicating that cooking has started.
Warning: During cooking, the Steamer Cover (K) may become very hot and
steam will exit the hole on top of the cover. Keep hands away to avoid burning
yourself.
10 - When the cooking cycle is complete, the indicator light turns o and the
appliance turns o automatically.
11 - Remove the Steamer Cover (K).
Warning: the Steamer Cover is very hot. Handle with care.
12 - Allow the Cooking Basket (J) to cool for 1 or 2 minutes. Use the Tongs (L) to
remove the Cooking Basket (J).
13 - Transfer the steamed food to the Blending Bowl (C). Remove the Liquid
Collector (I) using the handle and pour the cooking liquid in the Blending Bowl
(C). This will add flavour and vitamins to baby’s food.
Warning: The Liquid Collector (I) is hot. Handle with care.
14 - Replace the Blending Bowl (C) in the housing. Align and turn the Blending
Bowl (C) clockwise until it locks in the Bébé Station base (G).
15 - Replace the Blending Bowl Cover (A) on the Blending Bowl (C). Align and
turn the Blending Bowl Cover (A) clockwise. The lid is closed properly when the
locking system is snapped securely in its slot. You will hear a click, indicating
that the Blending bowl is ready to be used.
16 - Place one hand on the Blending Bowl Cover (A), pressing lightly, and
use the other to press the Blending Button (E) to start blending. Warning: Do
not blend continuously, but in short bursts of 15 to 20 seconds, to avoid
overheating the motor.
17 - When the food is ready, release the Blending Button (E) and blending will
stop.
18 - Unlock the Mixing Bowl Cover (A) and remove the Blending Bowl (C) from
the Base of the Bébé Station (G).
19 - You can now feed your baby the freshly prepared meal.
Warning: Always test food temperature before feeding baby.
Warning: Never blend without food or liquids in the Blending Bowl (C).
Allow the Bébé Station to cool for at least 15 minutes before using it to cook
again.
REHEATING
1 - Place food to be reheated in a small glass or plastic jar able to withstand
high temperatures.
2 - Remove the lid and place the jar in the Cooking Basket (J) or directly on the
Liquid Collector (I) and replace the Steam Cover (K).
3 - Pour 100ml of water in the Heating Tank (H).
4 - Press the Cooking Button (F).
5 - When reheating is complete, the indicator light will turn off. Carefully
remove the jar to avoid burning yourself.
6 - Pour the food in a dish; baby’s meal is ready!
WARNING:
Always test food temperature before feeding baby.
THAWING
Follow the same instructions as for reheating, using 300ml of water.
ENNL VOORZORGSMAATREGELEN INSTRUCTIONS FOR USE

15
SCHOONMAKEN VAN UW BABY STATION
• Voordat u met schoonmaken begint, haalt u de stekker uit het stopcontact en
controleert u of het apparaat niet te heet is.
• Voor de sokkel van uw Baby Station (G): het schoonmaken van de buitenkant
van het apparaat en de binnenkant van het waterreservoir (H), moet worden
gedaan met een vochtig doek of spons, met een kleine hoeveelheid schoon-
maakmiddel. Daarna afnemen met schoon water. Laten drogen.
Dompel het apparaat nooit onder in water of een andere vloeistof. Maak de
sokkel nooit schoon onder stromend water. Gebruik voor het schoonmaken
geen schuur middelen.
• Het opvangbakje voor het kookvocht (I), het stoommandje (J), de stoomkap
(K), het deksel van de kom (A), de kom van de blender (C) en de tang (L) kun-
nen worden schoongemaakt met een spons en warm water met schoon-
maakmiddel. Daarna goed afspoelen. Ook mogen zij in het bovenste
gedeelte van de vaatwasmachine.
• Gebruik geen schuursponsjes, schuurmiddelen of oplosmiddelen voor het
schoonmaken. Deze kunnen het apparaat en de onderdelen beschadigen.
SCHOONMAKEN VAN DE HAKMESSEN
Instructies voor wanneer u de hakmessen wilt demonteren, om het apparaat
zo een grondige schoonmaakbeurt te geven.
LET OP: het opnieuw monteren moet op de juiste manier gebeuren
om oververhitting van het apparaat te voorkomen. Raadpleeg zorgvuldig
onderstaand schema.
CLEANING YOUR BABY STATION
• Always unplug the appliance and ensure it is cool before cleaning.
• Bébé Station base (G): wipe the external surface and the inside of the
Cooking Tank (H) with a damp cloth or sponge with mild liquid detergent.
Rinse with water. Let dry. Do not immerse in water or any other liquid. Do
not wash or rinse under running water. Do not use abrasive products.
• The Liquid Collector (I), Cooking Basket (J), Steamer Cover (K), Blending Bowl
Lid (A), Blending Bowl (C) and Tongs (l) can all be washed with a sponge and
hot water and a mild liquid detergent. Rinse with water and let dry. They can
also be washed on the top rack of the dishwasher.
• Do not use abrasive sponges or cleaning solvents. They may damage the
appliance and its surfaces
CLEANING THE BLENDER BLADES
If you remove the blender blades for more in-depth cleaning, reassemble
the blades carefully to avoid overheating the appliance. See diagram below.
REMOVING SCALE FROM THE HEATING TANK
After a certain time of use, mineral deposits may form on the inside surfaces
of the Heating Tank (H) and damage the Bébé Station. You should regularly
remove the scale on your appliance by pouring 100ml of hot water and
100ml of white vinegar in the Heating Tank (H). Let sit for an hour or two
(or longer if necessary). Pour out the liquid and rinse with tap water several
times. Do not immerse the Bébé Station in water. Wipe with a dry cloth or
let dry
BELANGRIJK
Vergeet niet om de verschillende onderdelen (Q), (R) en
(S) terug op hun plaats te brengen bij het monteren van
de hakmessen, om oververhitting van het apparaat te
voorkomen.
IMPORTANT
Remember to replace parts (N), (O) and (P) when
reassembling the blades, to prevent overheating.
ENNL

16
IT AVVERTENZE IMPORTANTI
Durante l’uso di apparecchi elettrodomestici,
devono essere sempre rispettate le
precauzioni fondamentali di sicurezza di
seguito riportate:
• Leggere attentamente tutte le istruzioni e
prendere familiarità con l’apparecchio di
preparazione dei pasti per la prima infanzia
al momento del primo impiego.
•Verificare che il voltaggio della rete
elettrica corrisponda a quello riportato
sull’apparecchio.
• Perproteggersidall’eventualeelettrocuzione,
non immergere l’apparecchio, il cavo o la
presa nell’acqua o in qualsiasi altro liquido.
• Non utilizzare l’apparecchio per qualsiasi
altro uso, diverso da quello previsto.
Qualsiasi altro uso deve essere ritenuto
inadeguato e pericoloso.
• In presenza di danni visibili sull’apparecchio,
la presa o il cavo di alimentazione, disinserire
immediatamente l’apparecchio e non
utilizzarlo.
La riparazione dovrà essere eettuata a
cura di personale qualificato o di un service
centre.
• L’apparecchio non deve contenere
componenti installati dall’utilizzatore. Non
smontare l’apparecchio per alcun motivo.
• L’utilizzo di elementi di fissaggio di
accessori non raccomandati dal fabbricante
dell’apparecchio può dar luogo a un
incendio, a elettrocuzione o infortuni.
• Prestare sempre la massima attenzione
durante l’uso, in presenza o nei pressi di
bambini.
• Questo apparecchio è destinato ad essere
utilizzato per applicazioni domestiche e
analoghe, come:
- angoli cottura riservati al personale in negozi,
uffici e altri ambienti professionali
- fattorie
- l’utilizzo da parte dei clienti di hotel, motel e altri
ambienti a carattere residenziale
- strutture ricettive come B&B
• Non utilizzare l’apparecchio all’esterno.
• Non lasciare pendere il cavo sul bordo di
un tavolo o un bancone, o a contatto con
superfici calde.
PRECAUCIONES IMPORTANTES
Cuando se utilizan aparatos eléctricos es
fundamental seguir siempre las siguientes
precauciones de seguridad :
•Antes de la primera utilización, leer
atentamente todas las instrucciones y
familiarizarse con el aparato de preparación
de comidas para bebé.
• Verificar que la tensión eléctrica del sector
corresponde a la indicada en el aparato.
• Para evitar una posible electrocución, no
sumergir el aparato, el cable, o la toma bajo
el agua o cualquier otro líquido.
• No utilizar el aparato fuera del uso para el cual
ha sido fabricado. Una utilización distinta se
considera inapropiada y peligrosa.
• Si se apreciara en el aparato una
deficiencia visible externa, en la toma, o
en el cable de alimentación, desconectarlo
inmediatamente y no utilizarlo.
El aparato deberá ser reparado por un
técnico cualificado, o por un servicio técnico.
• El aparato no deberá contener piezas
instaladas por el usuario. Se desaconseja
totalmente desmontarlo.
•El uso de accesorios fijadores no
recomendados por el fabricante del aparato
puede causar un incendio, electrocución o
lesiones.
• Vigilar la presencia de niños cuando el
aparato esté funcionando.
• Este aparato está destinado a ser utilizado
para aplicaciones domésticas y análogas
tales como :
- espacios -cocina reservados al personal
en los almacenes, oficinas y otros
ambientes profesionales
- granjas
- la utilización por clientes de hoteles,
moteles y otras instalaciones de tipo
residencial.
- instalaciones, como habitaciones para
huéspedes.
• No utilizar el aparato en el exterior.
• No dejar el cable colgar del borde de una
mesa o de un mostrador, o que esté en
contacto con superficies calientes.
• Colocar el aparato sobre una superficie
plana y estable.
PRECAUCIONES IMPORTANTES
ES

17
IT
• Collocare l’apparecchio su una superficie
stabile e piana.
• Non posizionare l’apparecchio su o nei pressi
di superfici calde, in un forno che funziona
o nei pressi di una fonte di calore a gas o
elettrica, o simile.
• Non toccare le superfici calde (vasca di
riscaldamento). Utilizzare le impugnature o
i pulsanti.
• Non spostare l’apparecchio durante l’uso,
quando è collegato alla rete elettrica o se
contiene acqua calda.
• Disinserire l’apparecchio quando non viene
più utilizzato o prima della pulizia o prima
di riporlo.
• Esaminare regolarmente l’apparecchio. In
casodi perditeriportarloal fornitoreopresso
il centro assistenza per la riparazione.
•Se il cavo di alimentazione risulta
danneggiato, deve essere sostituito dal
fabbricante, il suo servizio assistenza o
una persona qualificata in modo da evitare
qualunque rischio.
AVVERTENZE
• Collegare l’apparecchio a una presa da 220 volt
con messa a terra.
• Il presente apparecchio può venire utilizzato da
persone di ridotte capacità fisiche, sensoriali
o mentali o la cui esperienza o le conoscenze
non siano sufficienti, purché siano sotto
sorveglianza o purché abbiano ricevuto le
opportuneistruzioni perutilizzare l’apparecchio
nella massima sicurezza; pertanto queste
persone dovranno avere capito bene gli
eventuali pericoli.
• L’apparecchio non va utilizzato dai bambini:
conservare l’apparecchio e il suo cavo fuori
dalla loro portata.
• Il presente apparecchio può venire utilizzato
da bambini di età inferiore a 8 anni,
purché siano sotto sorveglianza o purché
abbiano ricevuto le opportune istruzioni
per utilizzare l’apparecchio nella massima
sicurezza; pertanto i bambini dovranno
avere capito bene gli eventuali pericoli. La
pulizia e la manutenzione dell’apparecchio
non vanno effettuate da bambini d’età
inferiore a 8 anni senza la sorveglianza di
• No mover el aparato sobre, o a proximidad
de superficies calientes, dentro un horno en
funcionamiento, o cerca de cualquier fuente
de calor, de gas, o eléctrica.
• No tocar las superficies calientes (cuba
de calentamiento). Utilizar las asas o los
botones.
•No mover el aparato cuando se esté
utilizando, o cuando esté conectado, o si
contiene agua caliente,
• Desconectar el aparato cuando no se utilice, o
antes de limpiarlo o recogerlo.
• Examinar periódicamente el aparato. En
caso de fuga de agua, llevar el aparato al
proveedor, o al servicio técnico para su
reparación.
• Si el cable de alimentación está dañado,
este debe ser sustituido por el fabricante,
por el servicio post-venta, o por un técnico
cualificado, para evitar cualquier riesgo.
ADVERTENCIAS
• Enchufar el aparato a una toma de 220
voltios con conexión de tierra.
•Este aparato puede ser utilizado por
personas cuyas capacidades físicas,
sensoriales o mentales fuesen reducidas o
cuya experiencia o conocimientos no fuesen
suficientes, con la condición de que alguien
los vigile o hubiesen recibido instrucciones
en cuanto a la utilización del aparato en
toda seguridad y que hubieran comprendido
debidamente los peligros potenciales.
• Este aparato no deben utilizarlo los niños.
Conservar el aparato y su cable fuera de
alcance de los niños.
• Este aparato puede ser utilizado por niños
de 8 años de edad como mínimo, con la
condición de que los vigile una persona o que
hayan recibido instrucciones en cuanto a la
utilización del aparato en toda seguridad y
que comprenden perfectamente los riesgos
incurridos. La limpieza y el mantenimiento
por el usuario no deben efectuarla los niños,
al menos que tengan más de 8 años de
edad y que los vigile un adulto. Conservar
el aparato y su cable fuera de alcance de los
niños menores de 8 años de edad.
• Este aparato puede ser utilizado por niños
de 3 años de edad como mínimo, con la
ES

18
un adulto. Conservare l’apparecchio e il suo
cavo fuori dalla portata dei bambini d’età
inferiore a 8 anni.
• Il presente apparecchio può venire utilizzato
da bambini di età inferiore a 3 anni, purché
siano sotto sorveglianza o purché abbiano
ricevuto le opportune istruzioni per utilizzare
l’apparecchio nella massima sicurezza;
pertanto i bambini dovranno avere capito
bene gli eventuali pericoli. La pulizia e la
manutenzione dell’apparecchio non vanno
effettuate da bambini d’età inferiore a 8
anni senza la sorveglianza di un adulto.
Conservare l’apparecchio e il suo cavo fuori
dalla portata dei bambini d’età inferiore a 3
anni.
• I bambini non devono utilizzare l’apparecchio
come un giocattolo.
• Verificare sempre la temperatura degli
alimenti sul dorso della mano prima di
servirli al bambino.
• Conservare con cura queste istruzioni per
consultarle in futuro, all’occorrenza.
condición de que los vigile una persona o que
hayan recibido instrucciones en cuanto a la
utilización del aparato en toda seguridad y
que comprenden perfectamente los riesgos
incurridos. La limpieza y el mantenimiento
por el usuario no deben efectuarla los niños,
al menos que tengan como mínimo 8 años
de edad y que los vigile un adulto. Conservar
el aparato y su cable fuera de alcance de los
niños menores de 3 años de edad.
• Los niños no deben utilizar el aparato como
un juguete.
• Verificar siempre la temperatura de sus
alimentos en el dorso de la mano antes de
darlas a su bebé.
• Conservar bien estas instrucciones para
utilizarlas como futuras referencias.
ELEMENTI CHE COMPONGONO
L’APPARECCHIO DI PREPARAZIONE DEI
PASTI PER LA PRIMA INFANZIA:
A - Coperchio del recipiente del mixer
B - Sistema di blocco del coperchio
C - Recipiente del mixer
D - Lama del mixer
E - Pulsante del mixer
F - Pulsante cottura, riscaldamento, decongelazione
G - Base della Baby Station
H - Vasca di cottura
I - Recupero del sugo di cottura
J - Cestello di cottura, riscaldamento, decongelazione
K - Campana per la cottura al vapore
L - Pinza per estrarre il cestello
M - Cavo di alimentazione
Elementi per l’utilizzazione dello scaldabiberon
N - Campana a vapore per scaldabiberon
O - Misurino per l’acqua
P - Anello di adattamento
220-240 V - 50Hz - Vaporiera 800W - Mixer 200W
ELEMENTOS DA APARELHO DE
PREPAÇÃO DE REFEIÇÕES PARA O
BEBÉ:
A - Tampa do Copo Misturador
B - Sistema de fecho da tampa
C - Copo Misturador
D - Lámina de mistura
E - Interruptor da mistura
F - Interruptor da Cozedura, Aquecimento e Descongelamento
G - Base da Baby Station
H - Recipiente de cozedura
I - Recuperador do Molho de Cozedura
J - Cesto de Cozedura, Aquecimento e Descongelamento
K - Recipiente de Cozedura Vapor
L - Pinça para retirar o Cesto Vapor em segurança
M - Cabo eléctrico
Elementos para utilização do Aquecedor de biberões
N - Campânula de valor para o aquecedor de biberões
O - Doseador de água
P - Anel de adaptação
220-240 V - 50Hz - Cozedor Vapor 800W
Misturador 200W
A- B001005SAV601
C+D- B001005SAV600
I- B001005SAV202
J- B001005SAV200
I pezzi di ricambio A,C,D,I,J,K,L,O,P sono disponibili presso il
K- B001005SAV205
L- B001005SAV201
O- B001005SAV203
P- B001005SAV204
IT ES
Las piezas de recambio A,C,D,I,J,K,L,O,P están disponibles

19
ESIT
1 - Utilizzare il recipiente del mixer (C) per
versare l’acqua nella vasca di cottura (H).
Riempirla d’acqua secondo le quantità
indicate sul ricettario.
Utilizar el Bol de Mezclado (C) para verter el
agua en la Cuba de Cocción (H). Llenarlo de
agua según las cantidades indicadas en el
libro de recetas.
2 - Disporre gli alimenti tagliati a
dadini nel cestello di cottura (J).
Colocar los alimentos cortados en
dados en el Cesto de Cocción (J).
3 - Premere il pulsante di cottura (F)
per avviare la cottura.
Pulsar el Botón de Cocción (F) para
iniciar la misma.
4 - Una volta ultimata la cottura,
versare gli alimenti nel recipiente
del mixer (C). Non dimenticare di
versare anche il sugo di cottura del
recuperatore del sugo di cottura (I) per
un piatto più saporito e per recuperare
le vitamine contenute nel sugo di
cottura.
Una vez terminada la cocción,
verter los alimentos en el Bol de
Mezclado (C). No olvidar verter
también el jugo de cocción del
Recuperador de Jugo de Cocción (I)
para obtener un plato más sabroso y
así recuperar las vitaminas contenidas
en el jugo de cocción.
5 - Bloccare il recipiente del mixer
(C) ruotandolo in senso orario.
Bloquear el Bol de Mezclado (C)
girándolo en el sentido de las agujas
de un reloj.
6 - Richiudere e bloccare il coperchio
ruotando il sistema di blocco (B) in senso
orario.
Il coperchio è posizionato correttamente
quando il sistema di blocco è ben inserito
nella rispettiva fessura. Si sente un clic
indicante che il recipiente è bloccato e
pronto per essere utilizzato.
Volver a cerrar y bloquear la tapa girando el
Sistema de Cierre (B) en el
sentido de las agujas de un reloj.
La tapadera está bien colocada cuando
el sistema de cierre está bien encajado
en su ranura. Oirá un pequeño clic que le
indica que el bol de mezclado está cerrado y
listo para ser utilizado.
7 - Premere il pulsante del mixer
(E) per mixare gli alimenti. ATTENZIONE:
premere il pulsante con brevi pressioni
da 15 a 20 secondi al massimo per
evitare che l’apparecchio si surriscaldi.
Arrestare la lama del mixer (D) evitando
che giri a vuoto.
Pulsar el Botón de Mezclado (E) para
mezclar los alimentos.
ATENCIÓN : presionar el botón por
pequeños toques cortos de 15 a 20
segundos máximo para evitar cualquier
riesgo de recalentamiento. Detener si la
Cuchilla de Mezclado (D) gira en el vacío.
8 - Versare gli alimenti nel piatto. Il
pranzo è servito!
Verter los alimentos en un plato .
¡La comida del bebé está lista!
ISTRUZIONI PER L’USO
Posizionare il bottone ON/OFF su « ON »
INSTRUCCIONES DE USO
Poner el botón ON/OFF en « ON »

20
SCALDA-BIBERON CALIENTA BIBERON
6 - Aggiungere il latte in polvere.
Il biberon del bebè è pronto!
Añadir la leche en polvo.
¡El biberón del bebé
está listo!
1 - Con l’aiuto del misurino, versare la quantità
d’acqua indicata dalle istruzioni nella vaschetta
di cottura a vapore in funzione della quantità
d’acqua del biberon.
Con ayuda del dosificador, verter la cantidad de
agua indicada por el manual en el recipiente de
cocción vapor, en función de la cantidad de agua
del biberón.
2 - Posare la campana scalda-biberon.
Colocar la campana del calienta biberón.
3 - Mettere al suo posto il biberon pieno d’acqua.
Colocar el biberón
con el agua necesaria.
4 - Aggiungere l’anello di adattamento
se si tratta di un biberon standard.
Si se trata de un biberón estándar,
añadir el anillo adaptador.
5 - Posizionare il bottone ON/OFF su « ON » posto sul retro
dell’articolo. Avviare il riscaldamento premendo il pulsante
destro. Si accende una spia luminosa. Il riscaldamento si arresta
automaticamente quando il biberon ha raggiunto la temperatura,
e la spia luminosa si spegne.
Poner el botón ON/OFF, que se encuentra en la parte posterior
del producto, en «ON».Comenzar el calentamiento pulsando
el botón derecho. Se enciende un piloto. El calentamiento se
detiene automáticamente una vez que el biberón está
caliente: el piloto se apaga.
ESIT
Other manuals for B001003
1
This manual suits for next models
2
Table of contents