Bak USA Atlas User manual

Atlas User Guide
BAK USA Technologies Corp.
425 Michigan Ave.
Buffalo, New York 14203
For Windows 10

Atlas User Guide
Version: v3 // 2018
Thanks for embracing the evolution of mobile
technology with Bak USA. We hope you enjoy your
Atlas experience. To best use your Atlas 2-in-1 laptop,
please refer to this guide.
Hello there.

Attention
• Do not drop, crush, step on, or otherwise abuse the charger
• Periodically inspect your Atlas and charger for damage and replace either if necessary
• Report any damage or loose parts to the organization contact or seller immediately
• Do not leave the Atlas plugged in or ON when enclosed in a non-vented container, such as a backpack
• Users should take a 5 minute break every 30 minutes of use
• To prevent electrical shock, keep the charger away from young children
Safety Precautions
Please read and understand the following precautionary measures before using your Atlas.
We want you to stay safe and be happy. To use your Atlas properly, please be sure
to do the following:
CAUTION
RISK OF EXPLOSION IF BATTERY IS REPLACED BY AN INCORRECT TYPE. DISPOSE OF USED BATTERIES ACCORDING
TO THE INSTRUCTIONS.
IT IS RECOMMENDED TO USE THIS DEVICE IN AN ENVIRONMENT WHERE THE AMBIENT
TEMPERATURE IS NO MORE THAN 95°F.
TO PREVENT POSSIBLE HEARING DAMAGE, DO NOT LISTEN AT HIGH VOLUME LEVELS
FOR LONG PERIODS.
1. Do not place your Atlas near re or other sources of heat
2. Do not expose your Atlas to magnetic elds
3. Do not place heavy objects on your Atlas

Introduction................................................................................................................................
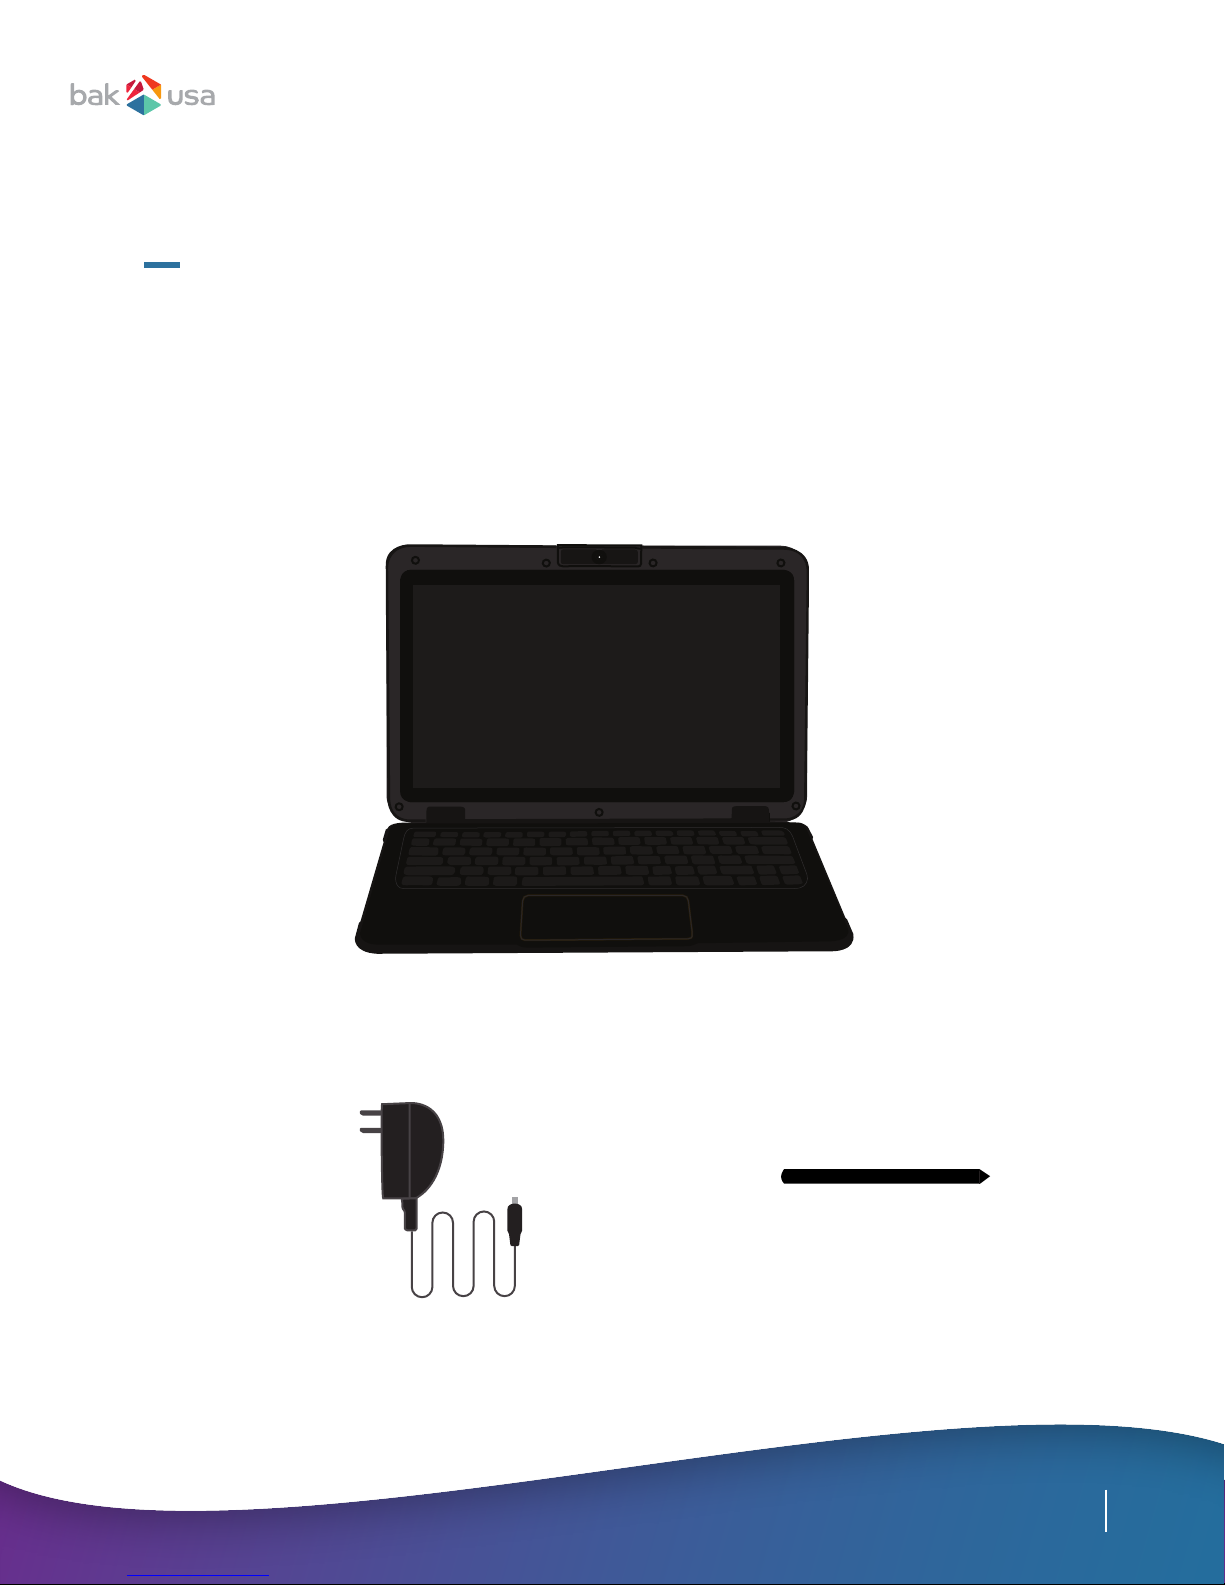
Package contents.....................................................................................................................
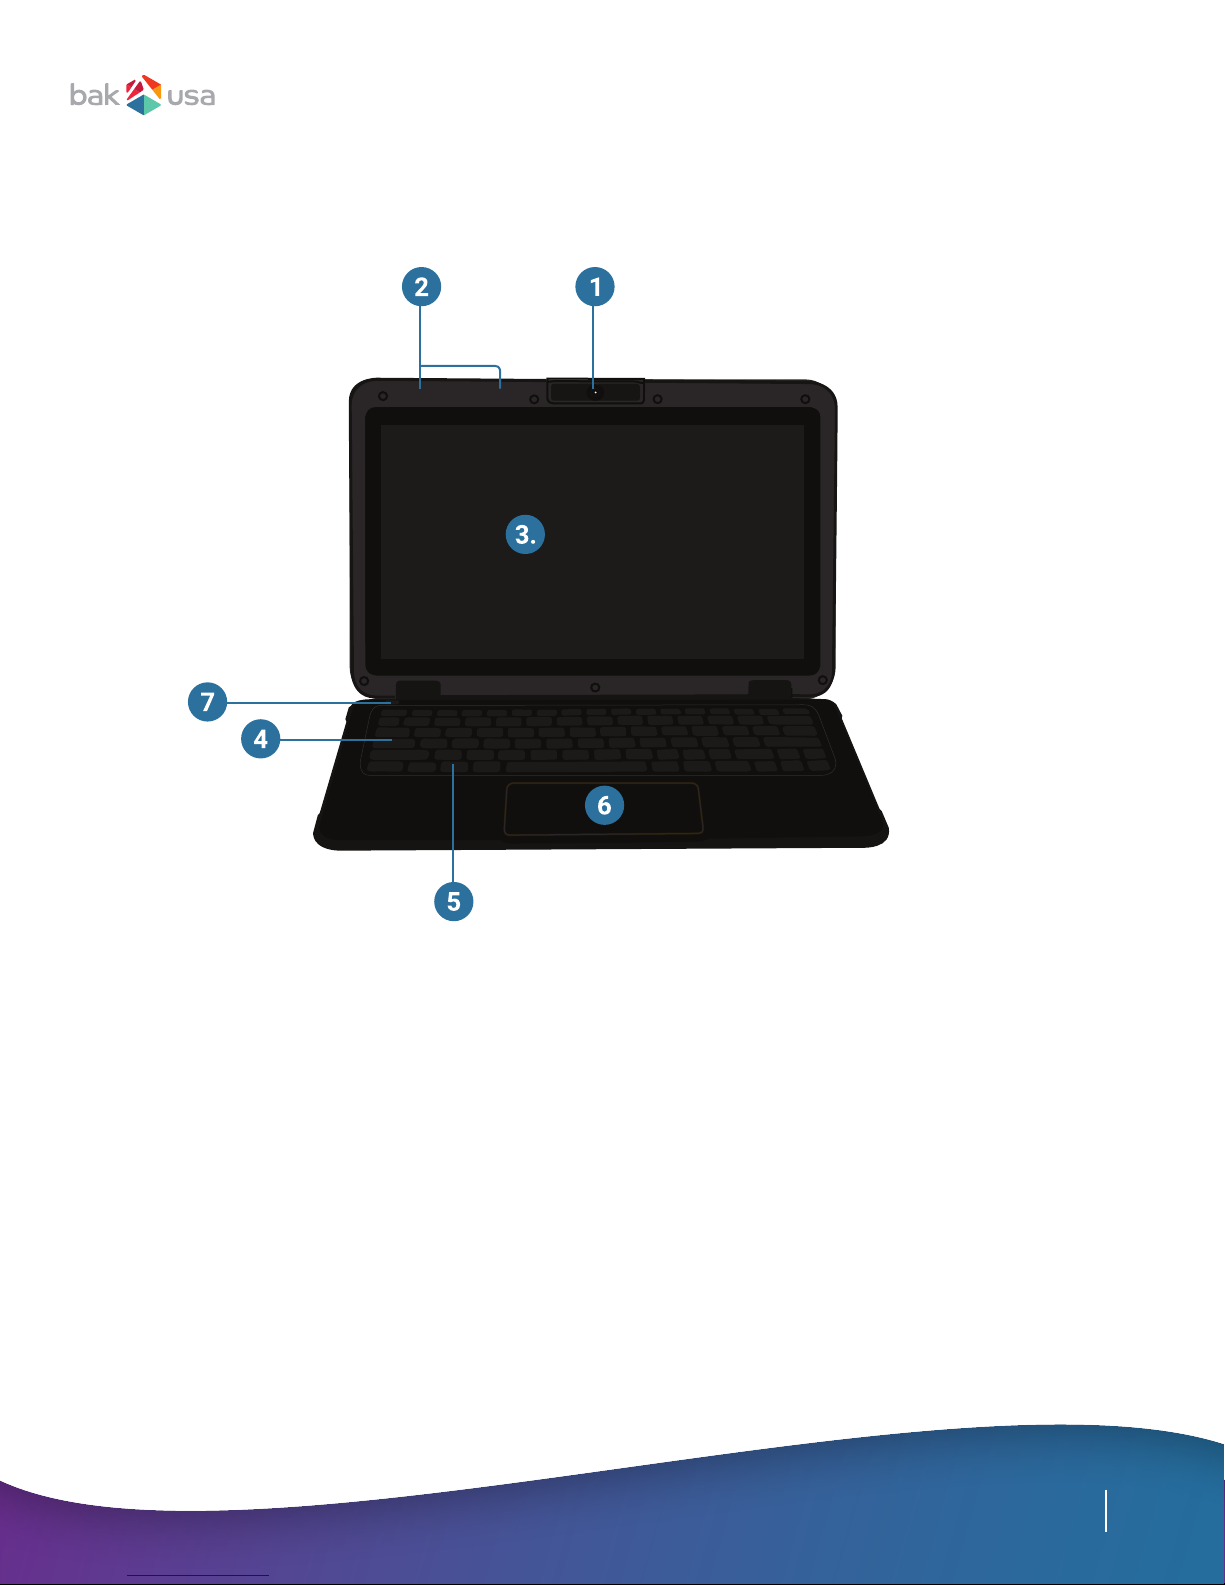
Layout..........................................................................................................................................
Views..........................................................................................................................
Front............................................................................................................................
Right............................................................................................................................
Left..............................................................................................................................
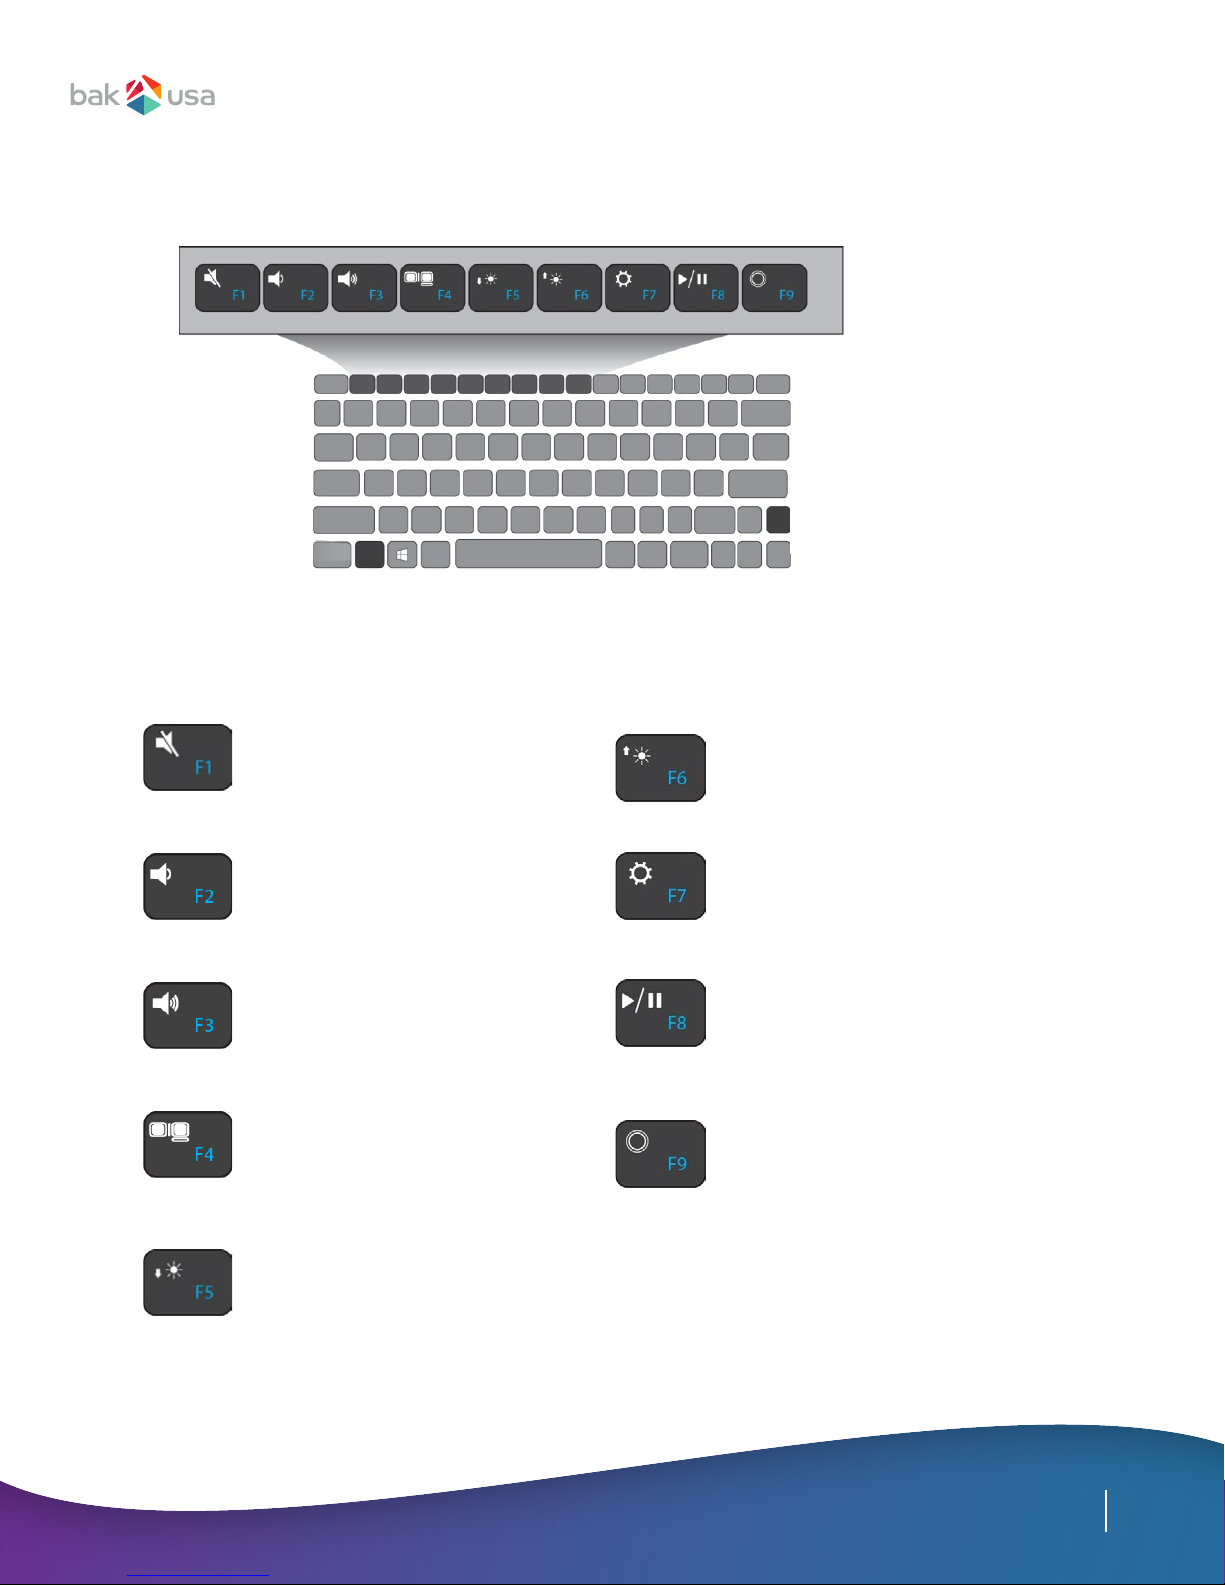
Function keys.............................................................................................................................
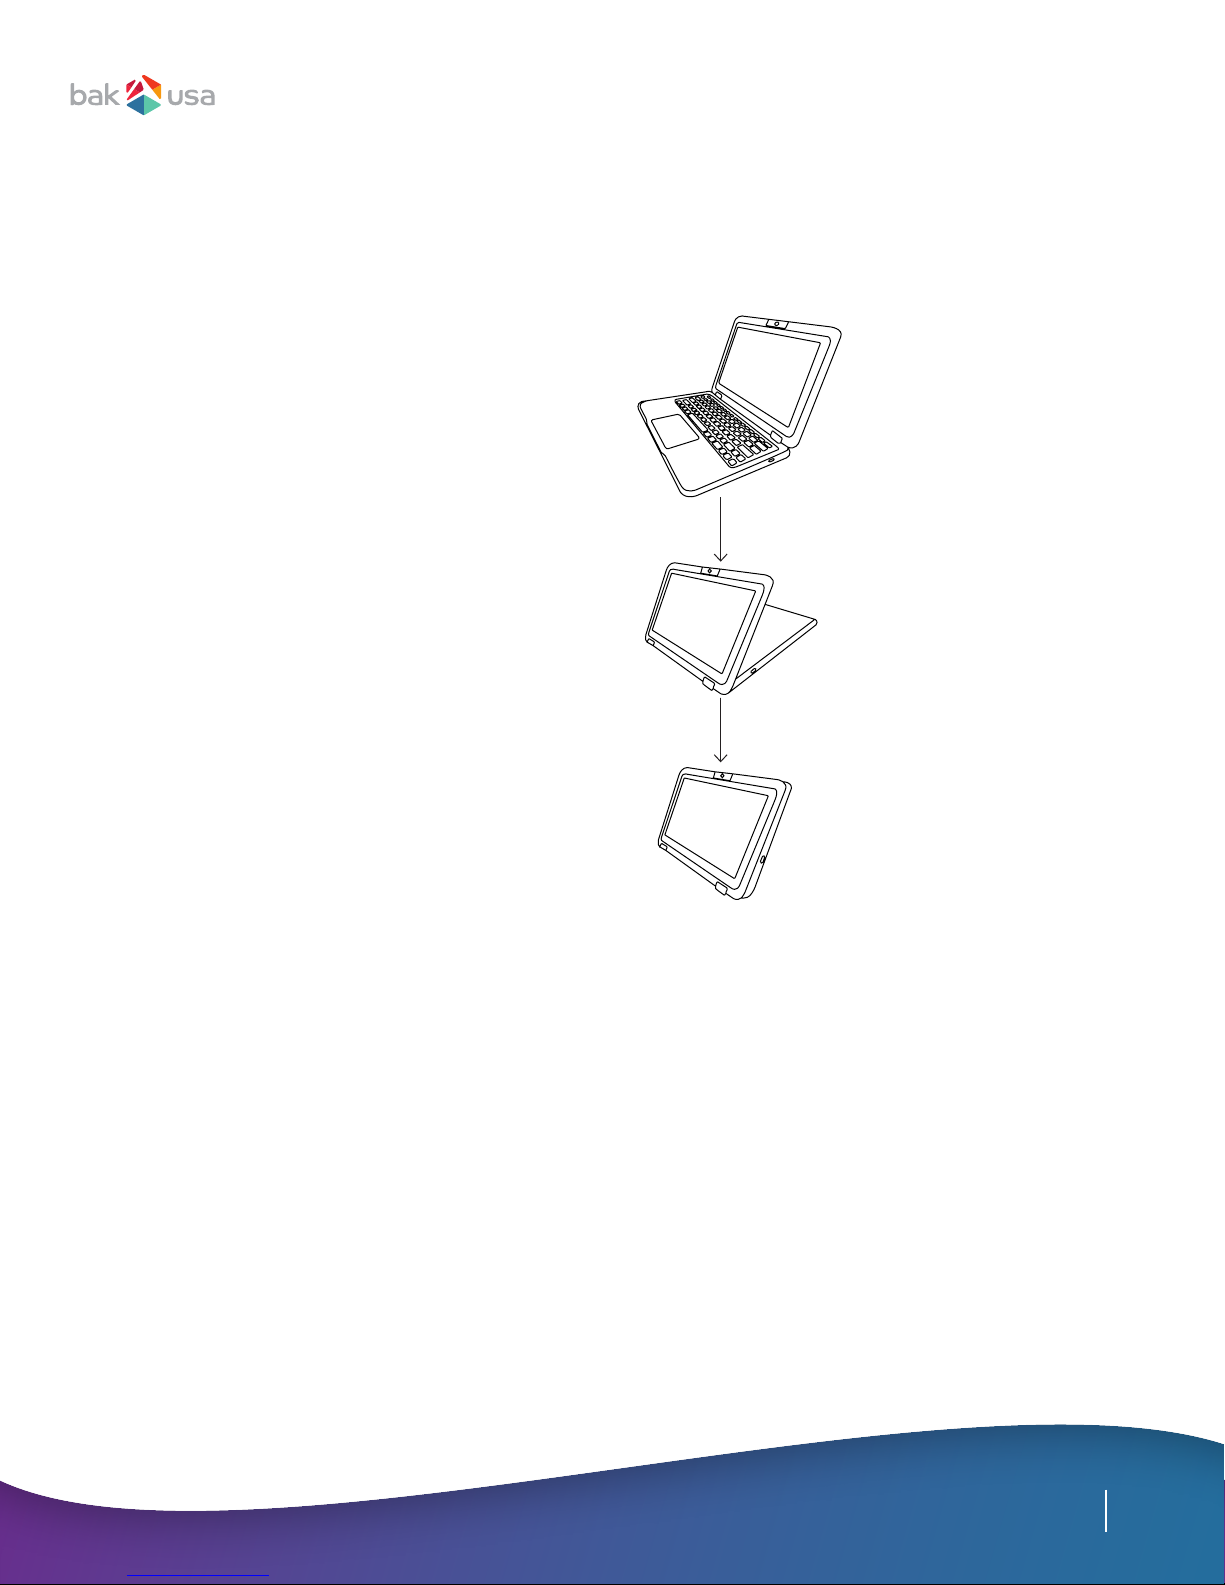
Folding the keyboard................................................................................................................
Power ON/OFF...........................................................................................................................
Powering your Atlas...............................................................................................
Powering ON for the rst time...............................................................................
Powering OFF your Atlas.......................................................................................
Putting your Atlas into sleep mode....................................................................
Waking up your Atlas.............................................................................................
Basic touchscreen options......................................................................................................
11
11
11
11
12
12
13
Section 1 Getting to Know Your Atlas
Section 2 Using Your Atlas
Section 3 Windows Interface
Desktop and virtual desktop experience.............................................................................
Taskbar........................................................................................................................................
Start menu.................................................................................................................................
Searchbox—Cortana................................................................................................
App shortcuts area..................................................................................................
Notication area........................................................................................................................
6
6
7
7
7
8
8
9
10
16
17
17
18
18
19
Content

Charging your battery..............................................................................................................
Inspecting your battery status...............................................................................................
Section 5 Battery
Section 6 Windows Help and Troubleshooting
Troubleshooting........................................................................................................................
Section 7 Specification
28
Settings screen.........................................................................................................................
Activating Windows.................................................................................................................
Setting up your Microsoft account.......................................................................................
Setting up the ngerprint reader...........................................................................................
Replacing desktop with start screen....................................................................................
Pinning and unpinning your app............................................................................................
Pinning an app to start menu or taskbar...........................................................
Removing an app......................................................................................................................
Wireless LAN.............................................................................................................................
Enabling wireless connection...............................................................................
Connecting to a wireless LAN..............................................................................
Micro SD card slot...................................................................................................................
Inserting your micro SD card................................................................................
Removing your memory card...............................................................................
Connecting an external device..............................................................................................
Connecting to the USB port...................................................................................
Section 4 Setup and Connection
20
21
21
22
23
24
24
24
24
24
24
25
25
25
25
25
26
27

6
Package Contents
Carefully unpack your box and identify the following contents.
If any items are missing or damaged, contact the seller immediately.*
*Depending on your purchase, optional add-ons might be included in a separate package
.
Atlas Laptop
Charger Stylus
1.
2. 3.
1. Getting to Know Your Atlas

7
The Hardware
Front View
Often for taking self-portraits as well
as for video conferencing.
Press here to open the Start menu.
Control your system using nger gestures.
Records sounds and speech.
1. Rotatable Camera
2. Microphone
3. Touchscreen
5. Windows Key
6. Touchpad
Turns your Atlas ON/OFF as well as
unlocks your Atlas.
4. Caps Lock
7. Power Button/Fingerprint Reader
The main display of your laptop. View it
and touch it with your ngers to control it.
Capitalizes letters.

8
Right Side
Store your stylus here.
Tie the stylus tether here.
Write on the screen or operate your Atlas.
1. Stylus Sleeve or Clip
2. Tether Anchor
3. Stylus
Left Side
Displays blue when fully charged
and amber when charging.
Insert your USB device here.
Plug in the type-C USB adapter to
charge the battery.
Plug up to 128GB Micro SD card here.
1. Charging Indicator
2. USB Type-C 3.0 Charger Port
3. Micro SD Card Slot
4. USB Type-A 3.0 Port
Plug your microphone/headphone here.
5. Combo Audio Jack for
Microphone/Headphone

9
Function Keys
Press a key to perform a function. For example, if you want to mute or unmute the system,
press the F1 key.
Mute or unmute the system.
Increase the volume.
Decrease the volume.
Toggle the display output between
the Atlas and external monitor.
Decrease the display brightness.
Increase the display brightness.
Open the Settings screen.
Play or pause music and video.
Speak to Cortana.
Fn
Fn

10
Folding the Keyboard
The Atlas supports a swiveling 11.6-inch
touchscreen that can be used in several
different ways. Opening the Atlas as a
standard laptop gives you access to the
keyboard and touchpad, while folding the
keyboard behind the screen turns it into a
tablet and disables the keyboard.
You can also convert the Atlas to tent
mode, which is ideal for viewing videos
and presentations.

11
Powering ON Your Atlas
Powering ON for the First Time
1. Activate Windows 10
2. Sign in or create your Microsoft Account
3. Set up a wireless connection and follow the on-screen instructions
1. If this is the rst time you turn ON this Atlas, fully
charge the battery
2. Press the power button and hold it for 1 to 2 seconds
1. Tap the Windows Icon in the lower left corner of the
Desktop, or press the Windows key on a connected keyboard
2. In the Start menu, tap Power
3. Select Shut down from the power option menu, as shown
on the right
Note: The power button is also a ngerprint reader. Hold your nger on the button
after conguration to unlock the Atlas. See pg. 22 to set up the ngerprint reader.
Powering ON/OFF
2. Using Your Atlas
Power OFF Your Atlas
Save all your data before powering OFF your Atlas.
From the Start menu:
Perform the initial set-up:

12
When you will be away from your Atlas for a short time, put the Atlas to sleep. To put the Atlas
to sleep, perform one of the following:
• Close the display panel
• Press the power button once briey
• Open the Start menu, select Power and then Sleep
Putting Your Atlas into Sleep Mode
Note: You are encouraged to put your Atlas to sleep before moving it.
To wake up your Atlas, press the power button once briey or press any
key on the keyboard, tap the touchpad, or open the display panel.

13
Basic Touchpad Operations
The touchpad works like a traditional mouse. Use it to move the cursor, left-click, right-click,
and double-click actions. Functions may vary based on the app you are using.
Left-Click Tap once on the touchpad surface or press
once on the lower left corner of the touchpad.
Right-Click Press once on the lower right corner of
the touchpad.
Drag Press and hold down the left corner and then
move (drag) your nger across the touchpad
surface.
Vertical Scrolling
Drag two ngers vertically on the touchpad.
Horizontal Scrolling
Drag two ngers horizontally on the touchpad.
Action Name Explanation

14
• Do not use sharp objects to touch the screen
• Do not touch the touchscreen with a conductive material
• Functions may vary based on the app you are using
Touch an item to start an app, open a link, or perform an
optional function. This is similar to a left-click with a mouse.
Touch an item twice in quick succession.
Press and leave your nger on an item. This brings up detailed
information or opens a menu with more options for the item.
This is similar to a right-click with a mouse.
Basic Touchscreen Operations
Tap
Gesture Name Explanation
Double-Tap
Press and Hold

15
Touch two ngers to the screen and then bring
them together or pull them apart to zoom in and
out on visual apps (such as pictures and maps).
Touch your thumb and forenger to an item and
then twist in a circular motion to rotate an object.
Not all items are rotatable.
Drag your nger across the screen to scroll
through lists and pages, to move an object, to
draw, or to write.
Pinch
Rotate
Scroll
Gesture Name Explanation

16
To launch the feature, click the app icon (pictured
left), or press the Window key + TAB key on your
keyboard at the same time.
The Desktop screen is as shown below and natively
provides the virtual desktop feature.
Desktop and Virtual Desktop Experience
3. Windows Interface

17
The black bar on the bottom of the Desktop is called the taskbar.
It provides several key features:
• Start menu
• Search box
• App shortcuts area
• Notication area
To open the Start menu, click or tap the Windows icon (aka Start button)
at the left end of the taskbar, or press the Windows key on the keyboard
(pictured left). The Start menu will appear, as shown below.
Taskbar
Start Menu
For how to set up this menu, please refer to page 24.

18
Search Box—Cortana
Next to the Start menu is the search box, as shown below.
When you select this box, a window will pop out, as shown below.
After you set up Cortana, the search box will look like this:
This is the Cortana icon. Cortana is a new virtual
assistant built into Windows 10. Click here to nish
the setup, and then control Cortana with either your
keyboard or voice commands. Control Cortana to
perform intelligent searches and more.
App Shortcuts Area
In this area, you can put the shortcuts of your frequently used apps.
For how to arrange this area, please refer to page 14.

19
Notification Area
The right part of the taskbar holds several icons that show
you the status of your Atlas, as shown below.
This is called the Notication Area. Click each icon to perform a function.
Show more hidden status icons.
Shows you the current battery status.
For details, please refer to page 27.
Show the status of your wireless
network connection.
Show the system notications and
several shortcuts.
Icon Description

20
Select Settings open the Settings screen, as shown below.
To access to the Settings screen:
Click the Windows icon in the lower
left corner of the Desktop
4. Setup and Connection
1.
2.
Other manuals for Atlas
1
Table of contents
Other Bak USA Laptop manuals