1 2 3 4 5 6
Rinse the fluff filters under running water apage 4. rlimp. filtro
(Filter)
Empty the condensation container.
Clean the filter in the condensation container if necessary apa ge 9.sdepósito
(Container)
Contents Page
ʋPreparation . . . . . . . . . . . . . . . . . . . . . . 2
ʋSetting the programmes . . . . . . . . . . . . . 2
ʋDrying . . . . . . . . . . . . . . . . . . . . . . . . 3/4
ʋNotes on laundry . . . . . . . . . . . . . . . . . . 5
ʋImportant Information . . . . . . . . . . . . . . .6
ʋOverview of programmes . . . . . . . . . . . .7
ʋInstallation . . . . . . . . . . . . . . . . . . . . . . . 8
ʋFrost protection / Transport . . . . . . . . . . . 8
ʋCare and cleaning . . . . . . . . . . . . . . . . . . 9
ʋTechnical data . . . . . . . . . . . . . . . . . . . 10
ʋOptional accessories . . . . . . . . . . . . . . .10
ʋNormal noises . . . . . . . . . . . . . . . . . . . . 11
ʋWhat to do if ... . . . . . . . . . . . . . . . . . . . 12
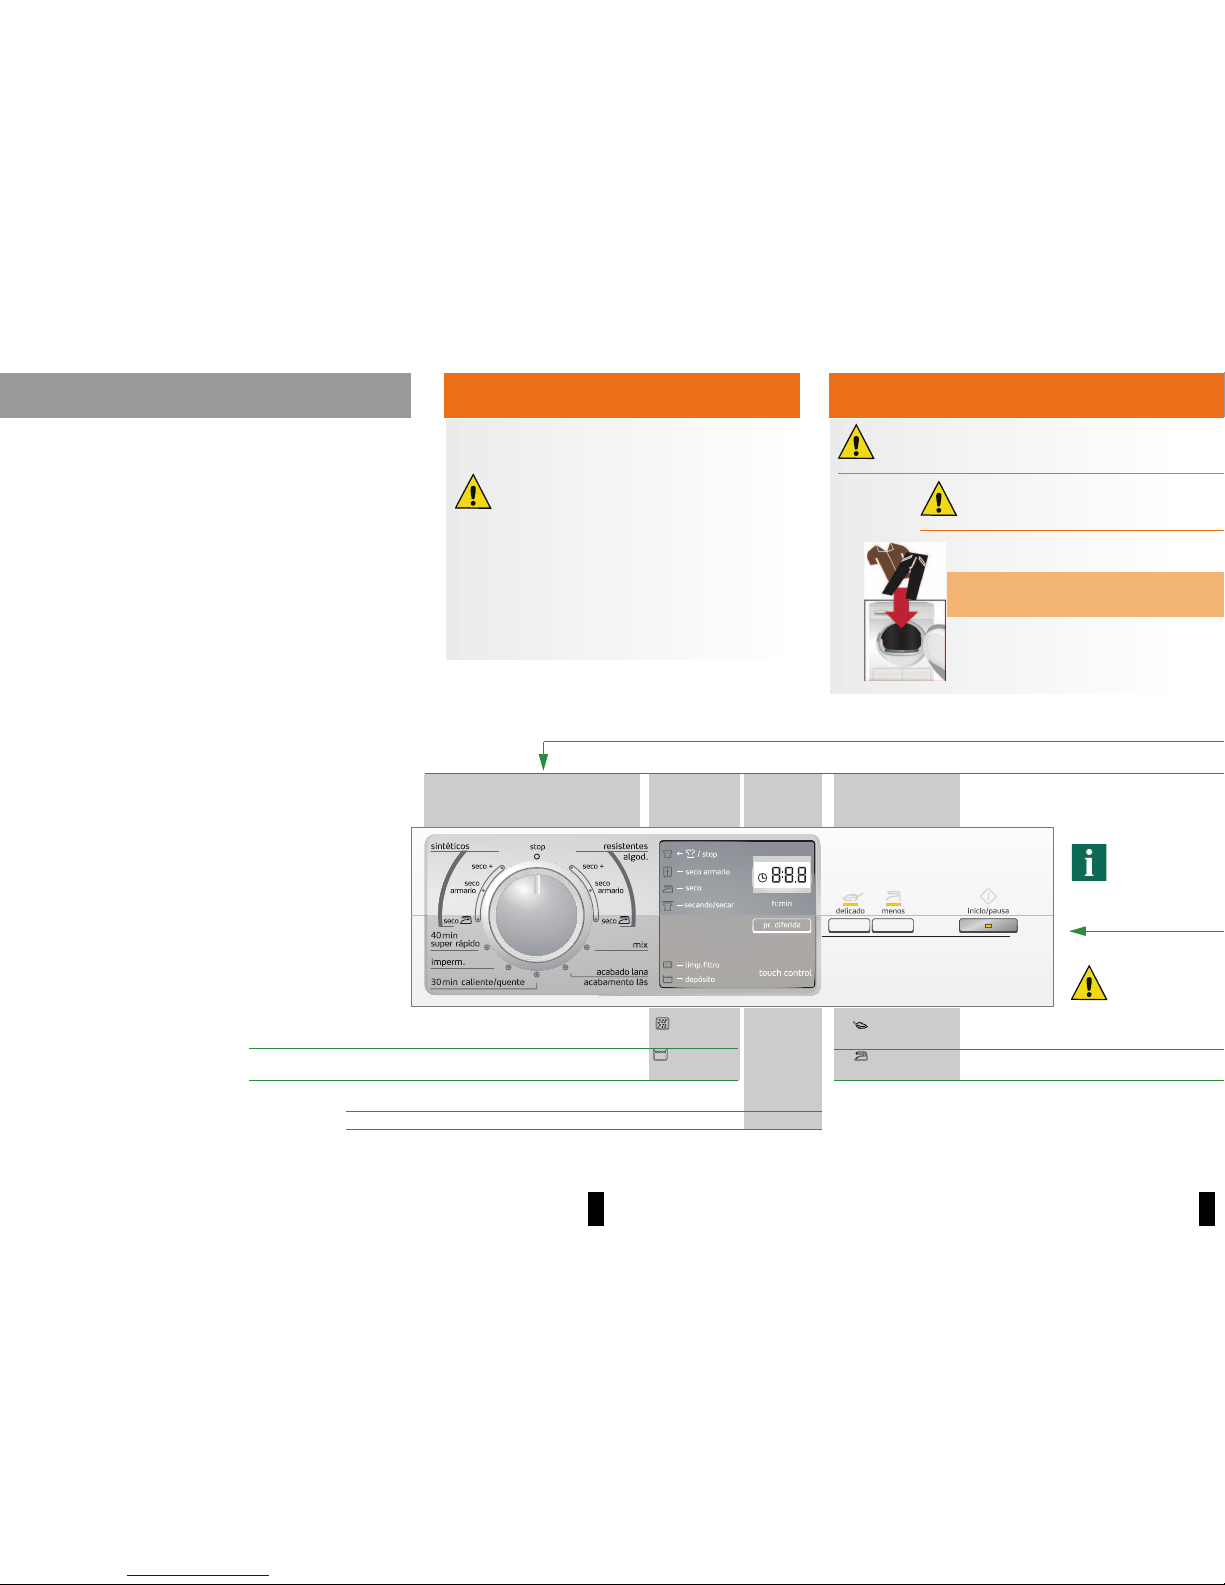
ʋSafety instructions . . . . . . . . . . . . . . . . 13 ˎddelicado
(Low heat)
Reduced temperature for delicate fabrics 'that require a longer
drying time; e.g. polyacrylics, polyamide, elastane, acetate silk.
ˎmenos
(Less ironing)
Reduces creasing and prolongs the 'reduced ironing' phase after
the programme has finished.
... and adapt to individual requirements
Never start the dryer if it is damaged.
Inform your after-sales service. Inspecting the
dryer
Sorting and loading laundry
Remove all items from pockets.
Check for cigarette lighters.
The drum must be empty prior to loading.
See programme overview on page 7.
Your new dryer Intended use Preparation Installation apage 8
Selecting and adjusting the programme
Additional functions
Select the drying programme ...
Press the inicio/pausa (start/pause)
button
Make sure your hands are dry.
Hold the plug only. Connecting the
mains plug
Display
status/
service
Programme selector
All buttons are sensitive and only
need to be touched lightly.
ʋFor domestic use only.
ʋOnly to be used for drying fabrics that h ave been
washed with water.
.
Do not leave children unsupervised nea r the dryer.
Keep pets away from the dryer.
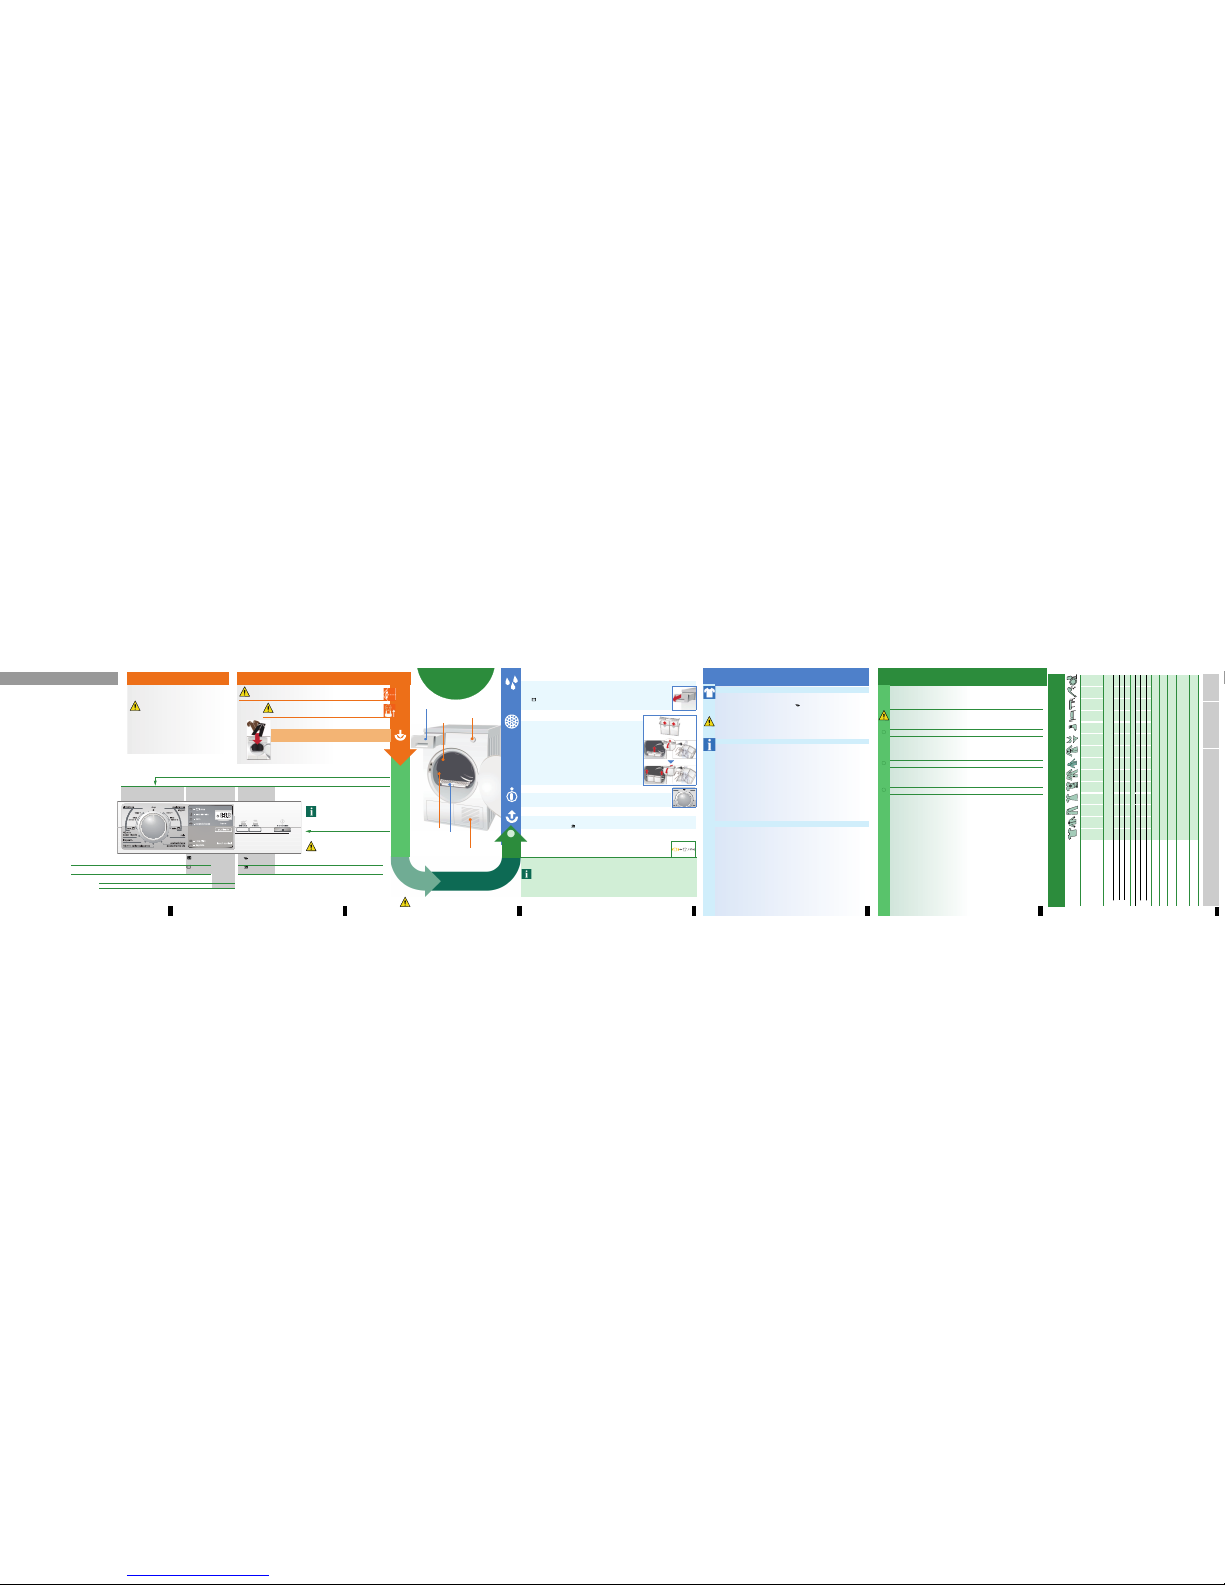
Drying
Drying
Condensation container with filter
Control panel
Air inlet
Two-part
fluff filter
Drum
End of programme as soon as t he AntiCrease/End indicator lamp
lights up.
Interrupt programme Adding or remov ing laundry.
The drying operation can be interrupted briefly to add o r remove laundry. However, it must then be
continued until it has finished.
1. Open the door. The drying process is interrupted.
2. Add or remove laundry then close the door.
3. If r equired, select a new programme and a dditional functions.
4. Press the inicio/pausa (start/pause) button. The rema ining time is updated after a few minutes.
Display/
Remaining
time
End of programme after 1-24 hours (button may ne ed to be pressed
several times) can always be se t to the nearest full hour.
h:min
Automatic cleaning of the heat exchanger. Cln
Only use the dryer with the fluff filter
inserted.
Emptying condensation
Empty the container after each drying cycle, not during drying.
1. Remove the condensation container and h old it level.
2. Pour out the condensation.
3. Always push container in fully until it clicks into place.
If the sdepósito (Container) in dicator lamp flashes despite the
container having been empt ied aFilter in condensation container,
page 9.
Cleaning the fluff filter
The fluff filter consists of two parts.
Clean the inner fluff filter after every drying cycle.
1. Open the door. Remove fluff from the door/door area.
2. Pull out the inner fluff filter and op en it out.
3. Remove the fluff (by wiping the filter with your hand).
If the fluff filter is heavily soiled or b locked, rinse it under
running water and dry thoroughly.
Clean the outer fluff filter after every 5 drying cycles:
4. Remove the outer fluff filter.
5. Open it and remove any fluff.
Rinse under running water and dry t horoughly.
6. Close and re-insert the fluff filter.
Switching off the dryer
Turn the programme selector to stop.
Do not leave laundry in the dryer.
Removing the laundry
Your dryer is equipped with an automatic reduced ironi ng function. The drum is moved at specific time
intervals for 60 minutes once the programm e has ended. The laundry stays loose and fluffy (or
120 minutes if the additional menos (Less ironing) function is selected).
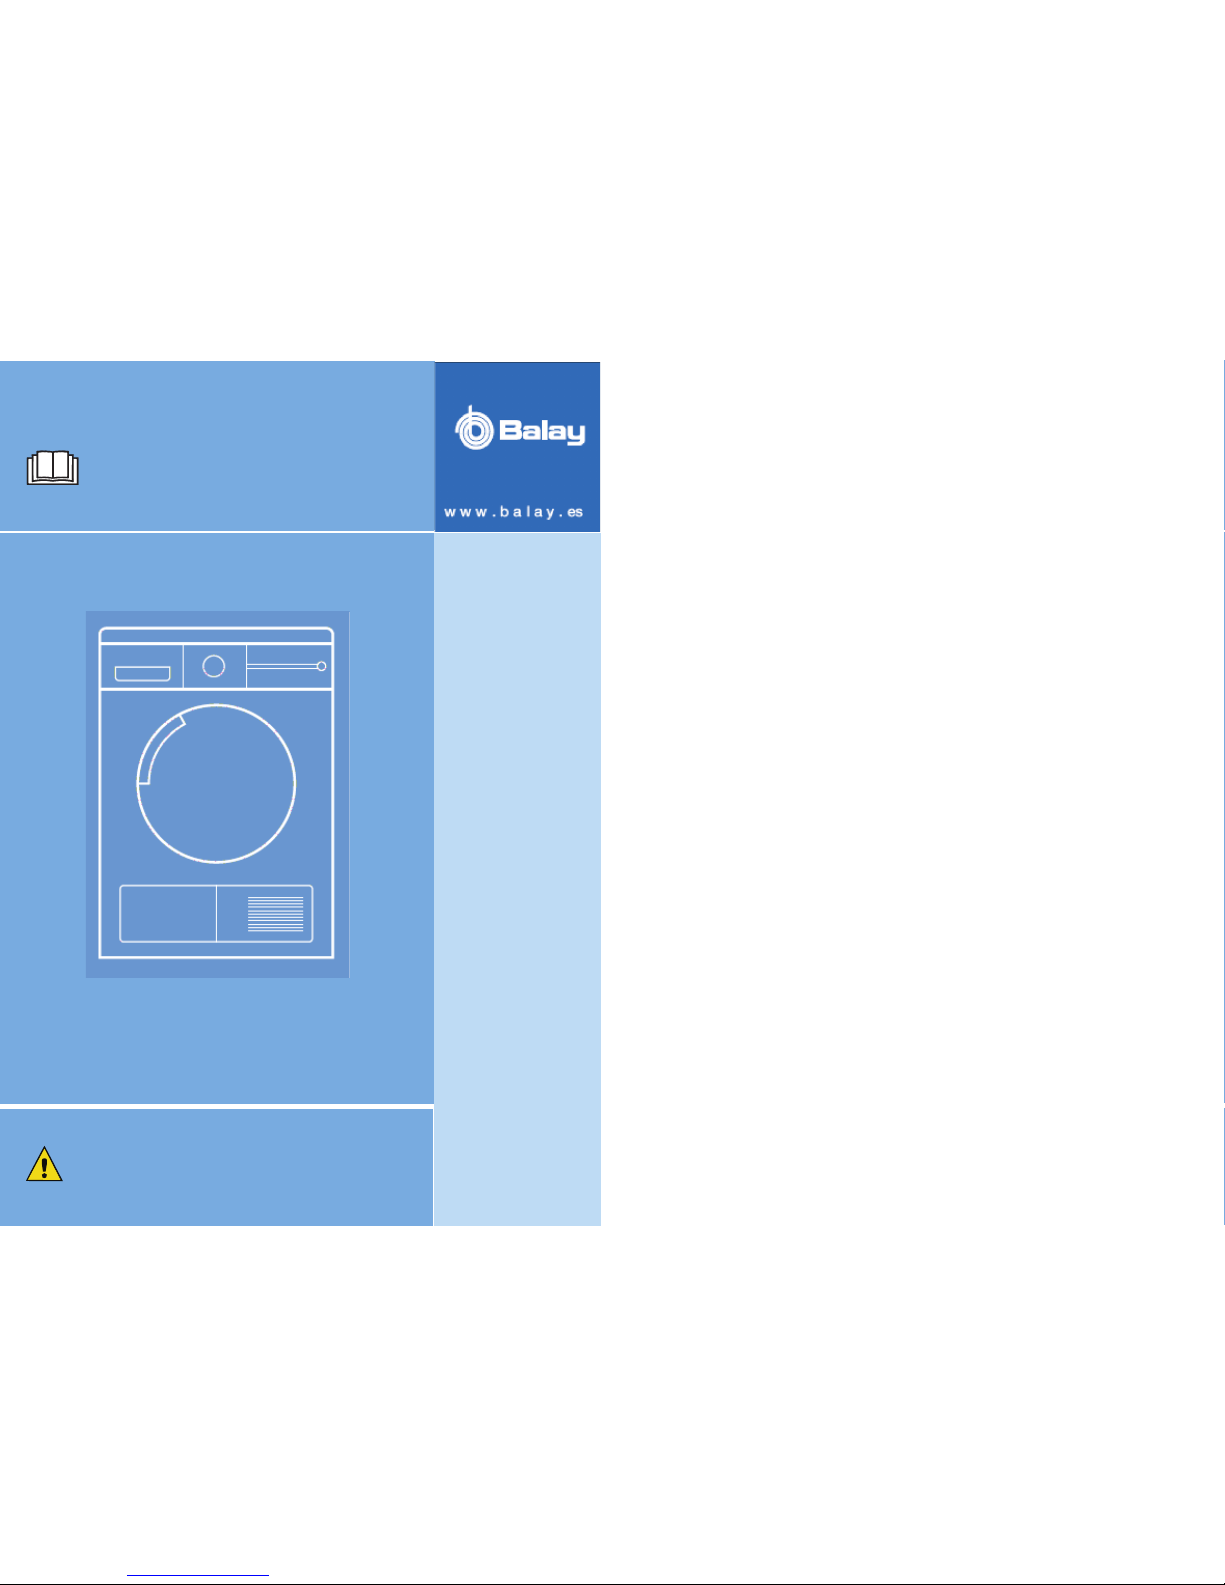
Congratulations - you have chosen to buy a modern, high-quality Balay
domestic appliance.
The condensation dryer with heat exchanger and automatic cle aning
function is outstanding in terms of efficient en ergy consumption and low
maintenance requirements apage 6.
Every dryer which leaves our factory is car efully checked to ensure that
it functions correctly and is in perfect condition.
Should you have any questions, our after-sa les service will be pleased to
help.
Environmentally-responsible disposal
Dispose of packaging in an environm entally-responsible manner.
This appliance is designated according to Eur opean directive 2002/96/EC which governs waste elect rical and electronic
equipment - WEEE).
The directive provides an EU-wide framework for the retu rn and recycling
of used appliances.
For further information about our products , accessories, spare parts and
services, please visit: www.balay.es
Do not pull out/empty the
condensation container when drying is in progress.
Drum interior light
(depending on
model)
Important Information
Your dryer is designed to be particularly energy efficien t. Its technical features include a
refrigeration circuit, which uses energy ef ficiently in a similar way to a refrigerator.
The dryer's heat exchanger is cleaned automatic ally during drying.
The fluff filters and filter in the condensation container must be cleaned regularly.
Never operate the dryer without the fluff filters and/or condensation container with filter.
ʑFluff filters
During drying, fluff and hair from the laundry is t rapped by the fluff filter. Blocked fluff filters
may impair the heat exchange process.
The fluff filters must therefore be cleaned after every drying cycle. Rinse regula rly under
running water apage 4.
ʑFilter in the condensation container
The filter in the condensation container cleans the condensation. This conde nsation is
required for the automatic cleaning process. The fi lter should be cleaned regularly under
running water. Empty the condensat ion container before cleaning the filter apage 4/9.
ʑFabrics
Do not dry any fabrics that have come into contact with solvents , oil, wax, grease or paint:
e.g. hair styling products, nail varnish remover, st ain remover, cleaning solvent. etc.
Empty all pockets.
Do not dry non-breathable fabrics.
Avoid drying items that produce a lot of f luff.
Woollens should be refreshed only, using t he woollens programme.
Information on laundry ...
Labelling of fabrics
Follow the manufacturer's care information.
(Dry at normal temperature.
'cDry at low temperature ain addition, select ddelicado (Low he at).
)cDo not machine dry.
Always observe the safety instructions on page 13.
Do not tumble-dry the following fabrics, for examp le:
– Non-breathable fabrics (e.g. r ubber-coated).
– Delicate materials (silk, curtains m ade from synthetic material) athese may crease.
– Oil-stained laundry.
Drying tips
– To ensure an even re sult, sort the laundry by fabric type and drying programme.
– Always dry very small fabrics (e.g. baby sock s) together with
large items of laundry (e.g. towels) .
– Close zips, hooks and eyelets, and b utton up covers.
Tie fabric belts, apron strings, etc. togethe r
– Do not over-dry easy- care laundry aRisk of creasing.
Allow laundry to finish drying in the air.
– Do not dry woollens in the d ryer. They may, however, be refreshed apage 7 acabado
lana/acabamento lãs (Woollens Finish) programme.
– Do not iron laundry immedi ately after drying; fold items up and leave for a while aresidual
moisture will then be distributed ev enly.
– K nitted fabrics (e.g. T-shirts, jerseys) often shrink slightly the first time they are tumble-dried.
aDo not use the seco+ (Cupbo ard Dry+) programme.
– The drying of starched laundry should be limited. aStarch leaves behind a coating that
impairs drying.
– When washing laundry that is to be tumble-dried af terwards, use the correct amount of
fabric softener as specified in the manufacture r's instructions.
– For pre-dried, multi-layered fabr ics or small, individual items of laundry, use the Timed
programme. Also suitable for subsequent drying.
Environmental protection/energy-saving tips
– Before drying, spin the laundry thorou ghly in the washing machine athe higher the spin
speed, the shorter the drying time wi ll be, thus less energy is consumed. Also spin e asy-
care laundry.
– Use the maximum recommend ed capacity, but do not exceed it
aProgramme overview page 7.
– Make sure the room is w ell ventilated during drying.
– Do not cover or seal the air inlet.
7
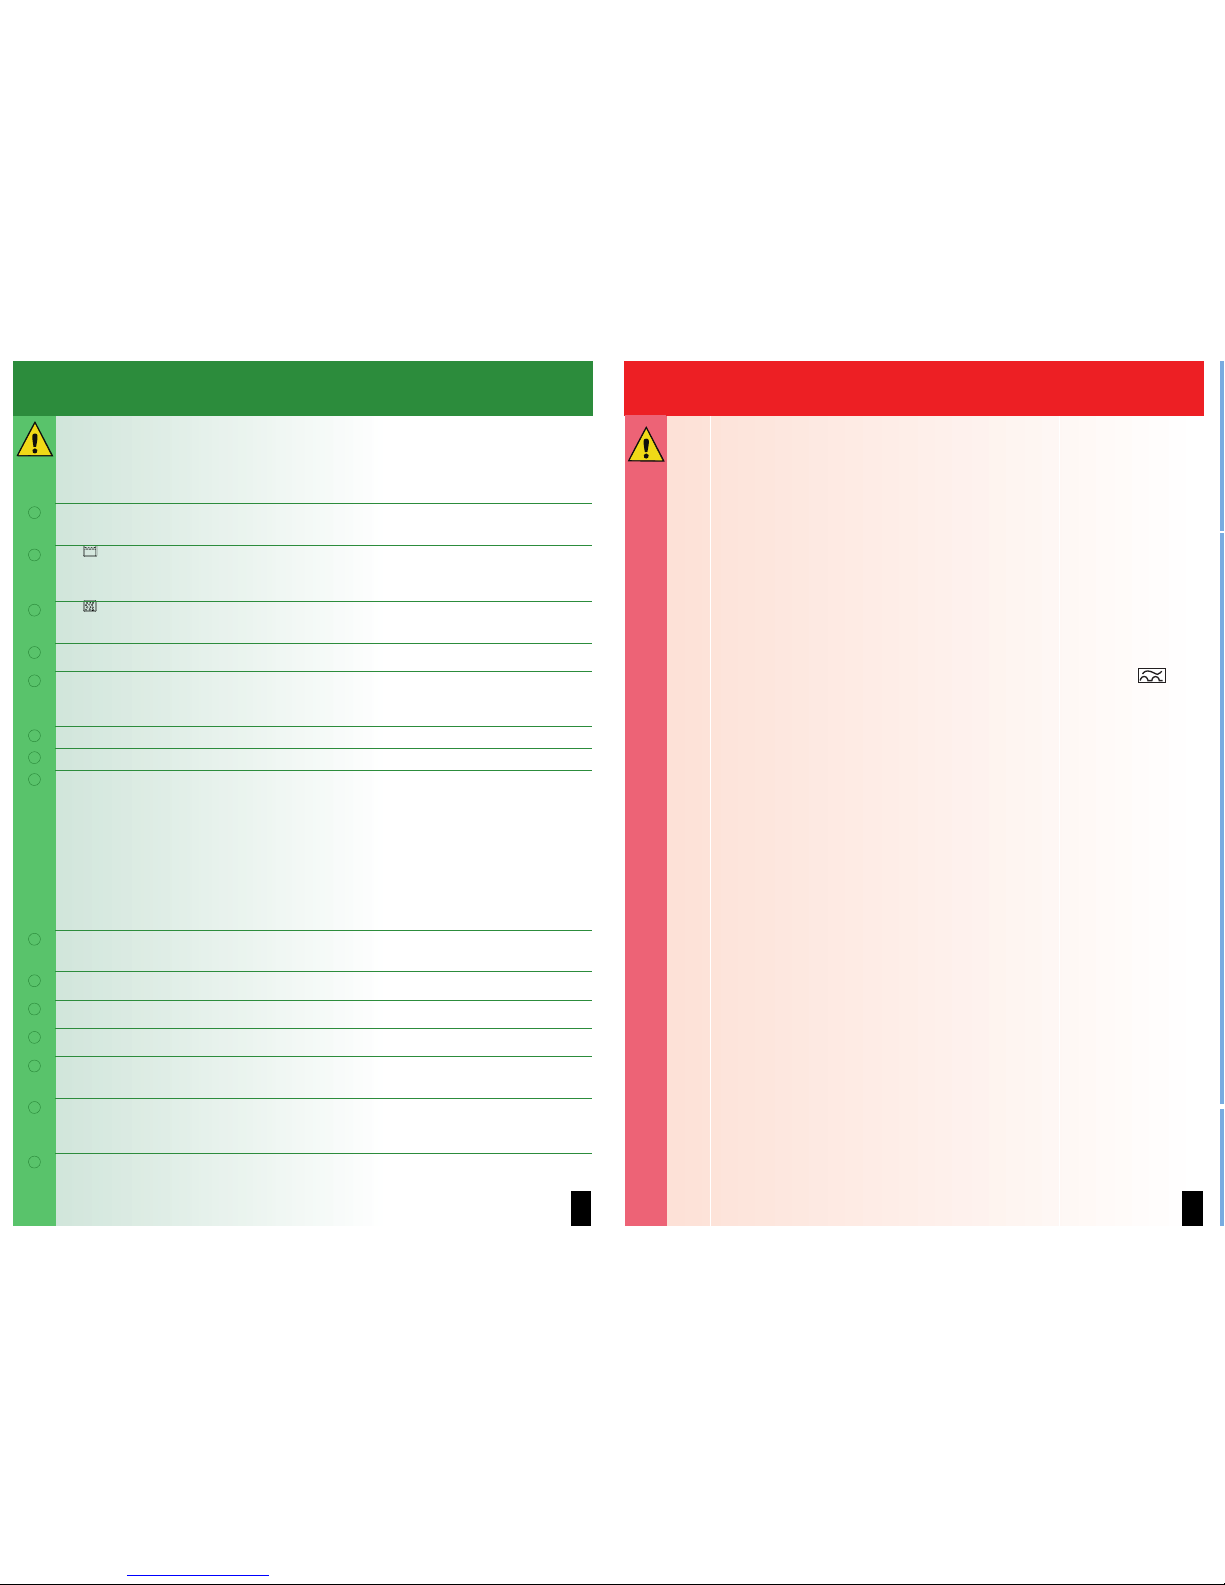
Programme overview see also page 5 .
After drying, laundry is to be ...
T-shirt
Shirts
Trousers
Skirts/dresses
Sportswear
Work clothing
Anoraks
Towelling
dressing gowns
Underwear
Socks
Bed linen
Table linen
Terry towels
Tea towels/
towels
c
ironed
lightly ironed
@c
not ironed
c
mangled
resistentes/algod.
(Cottons / Coloureds) max. 7 kg Suitable for cottons, coloureds and linens.
seco (Iron Dry) ø@ ********
seco armario (Cupboard Dry) @*****
seco + (Cupboard Dry+) @******
sintéticos (Easy-Care) max. 3.5 kg For non-iron laundry made of synthetic f ibres and mixed fabric, cotton.
seco (Iron Dry) cø@c ******
seco armario (Cupboard Dry) @**
seco + (Cupboard Dry+) @***
mix seco armario (Cupboard Dry) max. 3 kg For mixed items of laundry made of cotton and easy-care fabrics.
imperm. (Outdoor) max. 1.5 kg Forfa brics with a membrane coating, water-repellent fabrics, functional clo thing, fleece fabrics (dry removable internal lining
from jackets/trousers separately).
acabado lana/ acabamento
lãs (Woollens Finish) max. 3 kg For woollen fabrics suitable for washing machines. Fabrics bec omef luffier but not dry.
Remove fabrics once the programme has ended and allow to dry.
40 min super rápido
(Rapid 40) max. 2 kg
For laundry made of synthetic fibres, cotton or blended fabrics (for exa mple) that needs to be dried quickly. The values may dif-
fer from the those specified depending on th e type of fabric, composition of the laundry to be dried, residual moisturein the
fabric and size of the load.
30 min caliente/quente
(warm 30) max. 3 kg For pre-dried, multi-layered fabrics or small, in dividual items of laundry.
Also for subsequent drying.
0510/ 9000549316
*549316* Balay Electrogeräte GmbH
CarläWery Str. 34
81739 München / Germany
3SC74300A