IT
Si
cartuccia
BANDIT
Due
vite
inbus
per
svitare
la
porticina
latérale
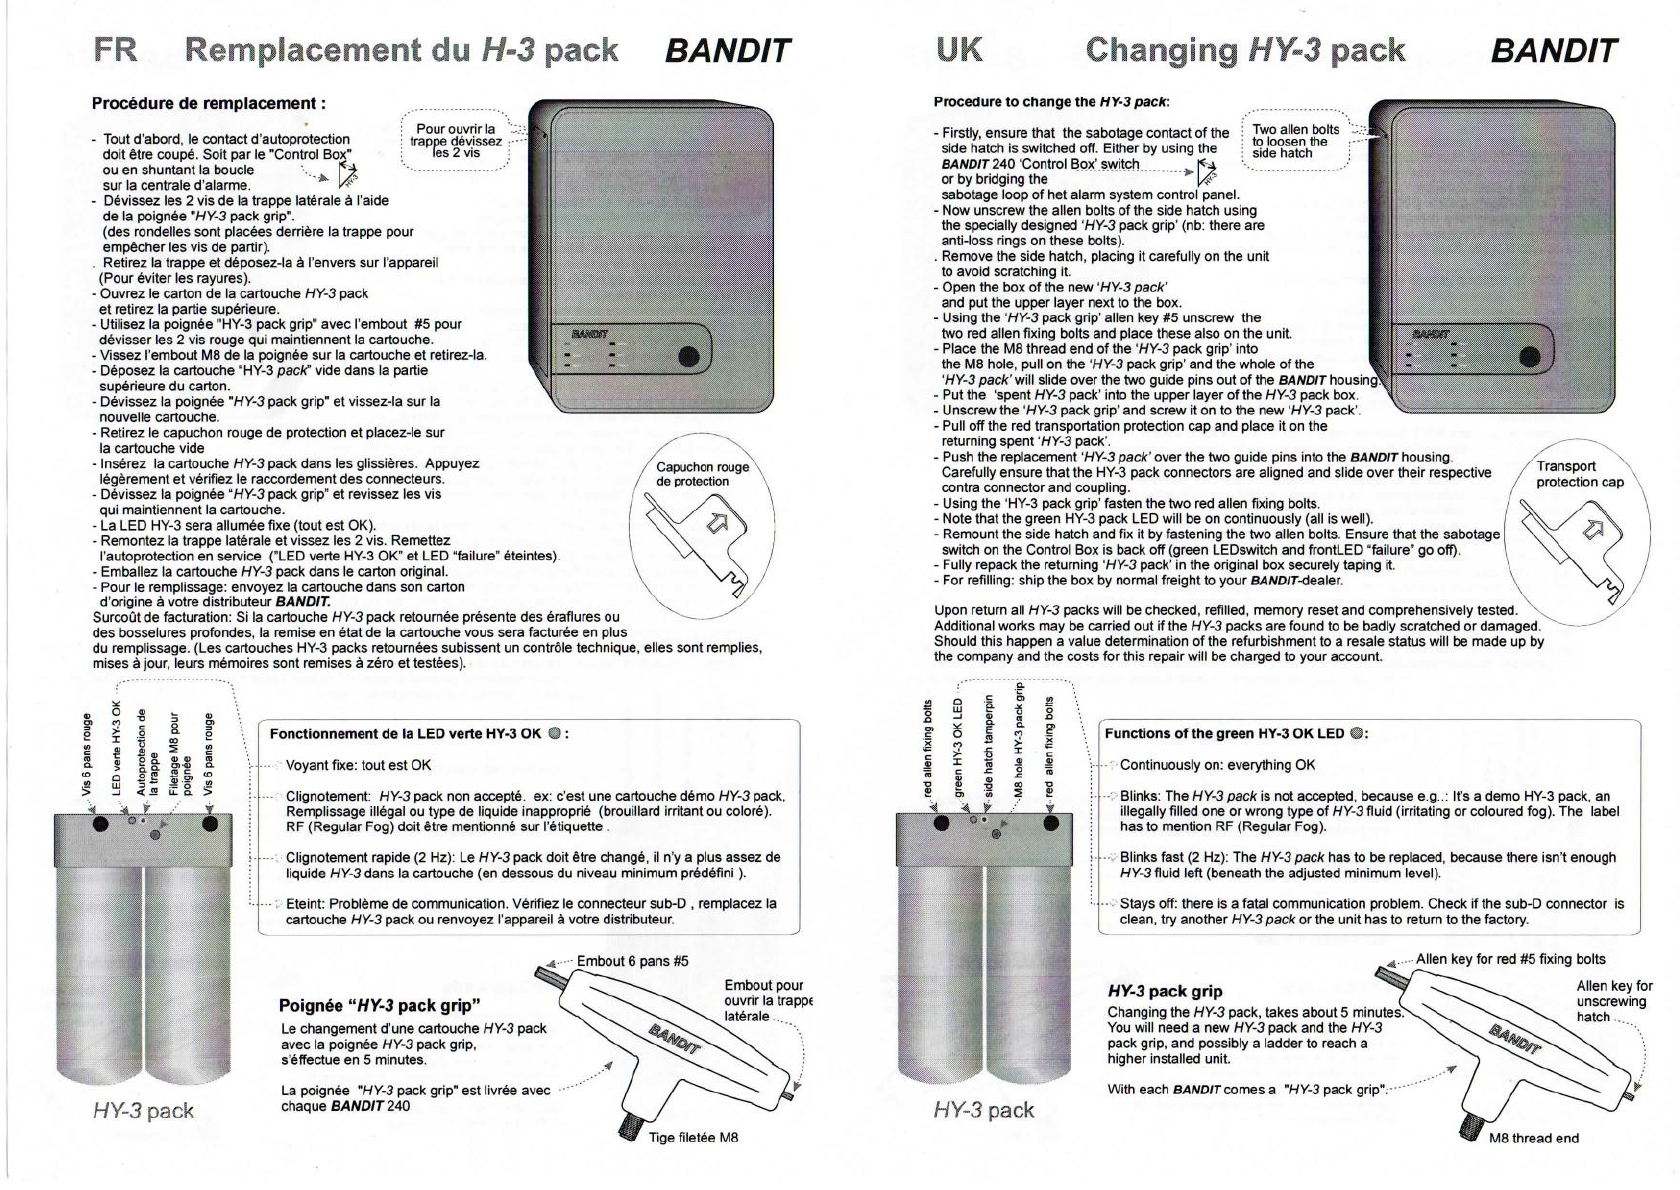
Procédure
sostituzione
cartuccia
HY-3:
-
Prima
di
tutto,
il
contatto
sabotaggiodélia
porticina
latéraledeveesserespentotramite
il
bottone
nel
"Control
Box"
*
1^4
o
se
non
è
stato
collegato
W"
il
"ControlBox",tramite
il
trapasso
del
circuito
anti
sabotaggio
nella
centrale
d'allarme.
-
Svitare
conil
"HY-3packgrip"
la
porticinalatérale
svitando
le2
viteinbus(suite
vite
c'èun
anellino
antiperdita).
.
Levare
la
porticinalatérale
e
metterla
gentilmente
(graffi)
sul
apparecchio.
-
Aprire
la
scatoladélia
nuova
cartucciaHY-3
e
mettere
la
partesuperiore
affianco
a la
scatola.
-
Usare
il
"HY-3packgrip"inbus
#5.
Svitare
le
2
vite
inbus
rosse.Anche
queste
per
adesso
mettere
sul
apparecchio.
-
Invitare
il
M8
del
"HY-3pack
grip"
nel
buco
M8
e
tirare
il
"HY-3
packgrip",
la
cartucciaHY-3usciràpassandodalle
due
penne
di
direzione
-
Mettere
la
cartuccia
HY-3
"vecchia"
nellapartesuperioredéliascatolaHY-3
Svitare
il
"HY-3
pack
grip"
e
rinvitarenellacartucciaHY-3nuova.Levare
il
cappuccio
di
protezione
rosso
e
nmettere
sulla
vecchiacartucciaHY-3.
-
Spingere
gradualmente
la
cartuccia
HY-3
passandodalle
due
penne
di
direzione,
nel
apparecchio
Premere
leggermente
nel
grado
cheil
connettore
délia
cartucciaHY-3
e la
congiunzione
del
liquide
s
agganciano
respettivo
al
loro
contracongiunzione.
-
Svitare
il
HY-3
pack
grip
e
fissare
ledue
vite
inbus
rosse.
-IlLED
verdedéliacartuccia
HY-3
ed
accesa
di
continue
(tutto
OK)
-
Rimettere
la
porticinalatérale
ed
invitare
ledue
vite
inbus.
Rispegnere
il
bottone
sabotaggiodéliaporticinalatérale(LEDverde
del
bottone
edilLEDdel
frontino
"failure"
spenti)
-
Mettere
la
"vecchia"cartucciaHY-3nellascatolaoriginale
(sigillare).
-Per
ricaricare:inviare
la
scatola
con
trasportonormale
al
vostrodealerBANDIT.
Eccezzioni
ad
aver
di
ritorno
la
cartucciaHY-3ricaricatasenzaspese
ulteriori-
La
cartucciaHY-3rimandata
e
graffiata
o ha
déliebotte.
La
ditta
B/WD/Teseguirà
una
valutazionerestante
Le
spese
per
nfare
la
cartuccia
HY-3
sono
a
carica
vostra
(normalmente,
le
cartucce
subiscono
un
contralto
...
tecnico,vengono
ricaricate,
update
&
resetdéliamemoria
e
subiscono
un
test).
HY-3
pack
Funzione
del
OK
LED
verdeHY-3
• :
Acceso
di
continue:
tutto
OK
Lampeggiante:
La
cartuccia
HY-3
non
viene
accettata,perché,
p.e.:
Euna
cartucciaHY-3
démo,
e
stataricaricataillegalmente
o nonè il
tipogiusto
di
liquide
HY-3
(nebbia
irritante).
L'etichetta
deve
nominare
RF
(Regular
Fog).
Lampeggiasvelto
(2
Hz):
La
cartucciaHY-3deveessere
sostituita,
perché
la
riserva
del
liquide
HY-3
non
basta
(sotto
il
livellominimo
programmât^).
••
Rimanespenta:
c'èun
problema
di
communicazionefatale.Controlla
seil
connettoresub-D
è
pulito,prova
un'
altra
cartucciaHY-3oppurerimandare
l'apparecchio
a la
ditta.
HY-3
packgrip
Avete
una
nuovacartucciaHY-3
e il
HY-3packgrip,
più
eventualmente
una
scaletta
per
arrivare
adun
apparecchio
montato
piùin
alto,sostituire
la
cartucciaHY-3
,
impiega
solo
5
minuti
di
lavoro.
Ogniapparecchiovieneconsegnato
conun
•••-'
"HY-3
packgrip".
Inbus
per
svitare
la
porticina
latérale
.
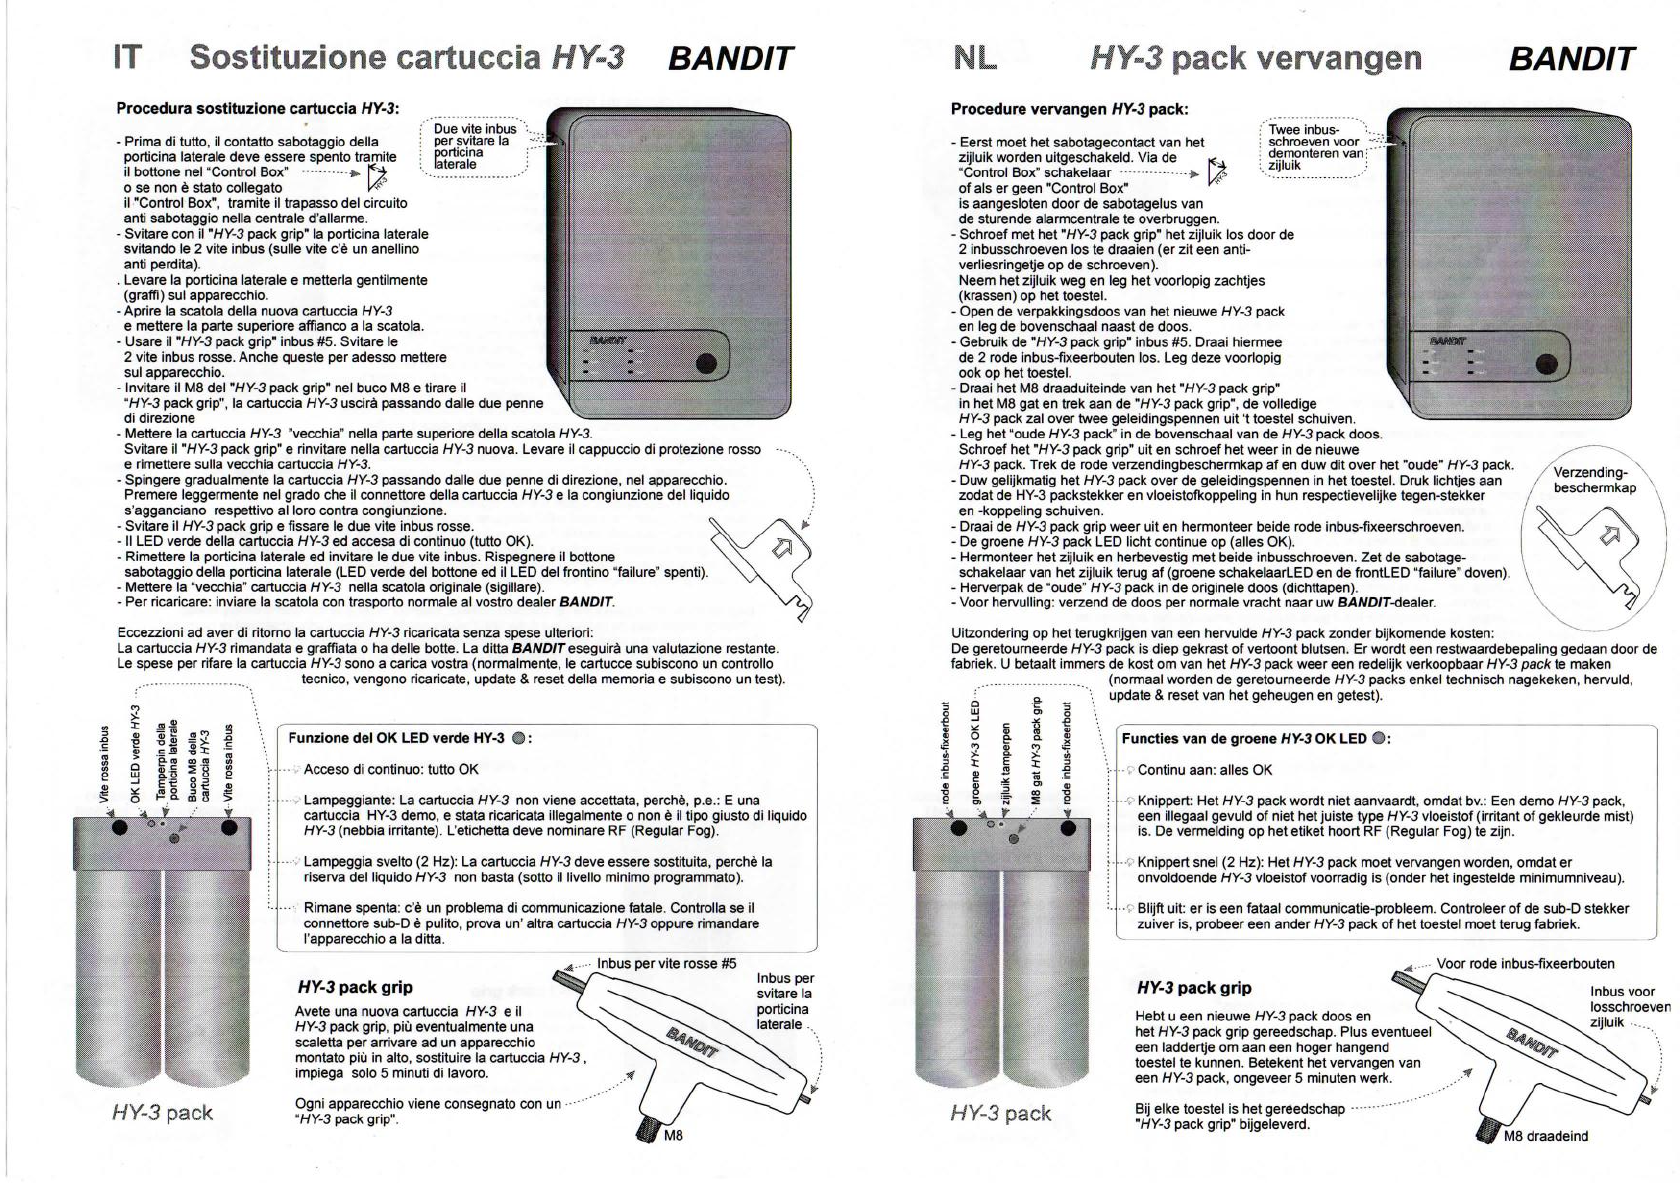
ML
HY-3
pack
vervangen
BANDIT
:
Twee
inbus-
schroeven
voor
-
demonteren
vanr
:.
zijluik
:
Procédure
vervangen
HY-3
pack:
-
Eerst
moet
het
sabotagecontact
vanhet
zijluikwordenuitgeschakeld.
Viade
K
"ControlBox"
schakelaar
-—.»
Ht
of
aïs
er
geen"ControlBox"
"*
is
aangesloten
door
de
sabotagelus
van
de
sturende
alarmcentrale
te
overbruggen.
-
Schroef
methet
"HY-3
packgrip"
het
zijluik
los
door
de
2
inbusschroeven
loste
draaien
(erziteen
anti-
verliesringetje
opde
schroeven).
Neem
het
zijluik
wegen
leg
het
voorlopigzachtjes
(krassen)
ophet
toestel.
-
Open
de
verpakkingsdoos
vanhet
nieuwe
HY-3pack
en
legde
bovenschaalnaast
de
doos.
-
Gebruik
de
"HY-3pack
grip"
inbus
#5.
Draai
hiermee
de
2
rodeinbus-fixeerboutenlos.
Leg
dezevoorlopig
ook
ophet
toestel.
-
Draai
hetM8
draaduiteinde
vanhet
"HY-3
packgrip"
in
hetM8gaten
trek
aande
"HY-3packgrip",
de
volledige
HY-3pack
zal
over
twee
geleidingspennen
uit't
toestel
schuiven
-Leghet
"oude
HY-3pack"
inde
bovenschaal
vande
HY-3packdoos.
Schroef
het
"HY-3pack
grip"
uiten
schroef
het
weer
inde
nieuwe
HY-3
pack.Trek
de
rode
verzendingbeschermkap
afenduwdit
over
het
"oude"HY-3pack
-
Duw
gehjkmatig
het
HY-3packover
de
geleidingspennen
inhet
toestel.
Druklichtjes
aan
zodat
de
HY-3packstekker
en
vloeistofkoppeling
inhun
respectievelijketegen-stekker
en
-koppelingschuiven.
-
Draai
de
HY-3packgripweer
uiten
hermonteerbeiderodeinbus-fixeerschroeven
-De
groeneHY-3pack
LED
licht
continue
op
(allésOK).
-
Hermonteer
het
zijluik
en
herbevestig
met
beideinbusschroeven.
Zetde
sabotage-
schakelaar
vanhet
zijluikterug
af
(groeneschakelaarLED
ende
frontLED"failure"doven)
-
Herverpak
de
"oude"
HY-3pack
inde
originele
doos(dichttapen).
-
Voor
hervulling:
verzend
de
doos
per
normalevrachtnaar
uw
B/WD/T-dealer.
Uitzondering
ophet
terugkrijgen
vaneen
hervuldeHY-3packzonderbijkomende
kosten-
De
geretourneerde
HY-3
pack
is
diep
gekrast
of
vertoont
blutsen.
Er
wordt
een
restwaardebepaling
gedaan
door
de
fabnek.
U
betaaitimmers
de
kost
omvanhet
HY-3packweer
een
redelijkverkoopbaar HY-3
pack
teTmaken
.
(normaal
worden
de
geretourneerde
HY-3
packs
enkel
technisch
nagekeken
hervuld
.
update
&
reset
vanhet
geheugen
en
getest).
Verzending-
\p
\s
vande
groene
HY-3
OKLED
0:
Continuaan:allés
OK
Knippert:
Het
HY-3packwordtnietaanvaardt,omdatbv.:
Een
démo
HY-3pack
een
illegaal
gevuld
of
niet
het
juistetypeHY-3
vloeistof
(irritant
of
gekleurde
mis't)
is.
De
vermelding
ophet
etiket
hoort
RF
(RegularFog)
te
zijn.
-
Knippertsnel
(2
Hz):
Het
HY-3packmoetvervangenworden,omdat
er
onvoldoende
HY-3vloeistofvoorradig
is
(onder
het
ingestelde
minimumniveau).
-'
Blijft
uit:
eriseen
fataal
communicatie-probleem.
Controleer
ofde
sub-Dstekker
zuiver
is,
probeer
een
ander
HY-3pack
ofhet
toestel
moetterugfabriek.
Voor
rodeinbus-fixeerbouten
HY-3
pack
HY-3
pack
grip
Hebt
u een
nieuweHY-3packdoos
en
het
HY-3
packgripgereedschap.Pluseventueel
een
laddertje
omaaneen
hogerhangend
toestel
te
kunnen.
Betekent
het
vervangen
van
een
HY-3
pack,ongeveer
5
minuten
werk.
Bij
elke
toestel
ishet
gereedschap
—
"HY-3
pack
grip"
bijgeleverd.
Inbusvoor
losschroeven
zijluik
....