Barbeskew BARBESKEW II User manual

USER GUIDE AND ASSEMBLY MANUAL
BARBESKEW II

CONTENTS
Introduction
BarbeSkew Safety
How To Use Your BarbeSkew
Maintenance
BarbeSkew II Assembly Instructions
SECTION
Introduction
Warranty
General Barbecue Safety
Food Safety
- Cross-Contamination
- Preparing Food
- Cooking Barbecued Food
- Using Meat Thermometer
- Cooked “Internal” Temperatures
Rotisserie Mechanism
Motors
- Powering the Motor
- Replacing Motors & Drive Shaft
- How to Replace the Rear Motor and/or
Drive Shaft (Kebab Skewer Motor)
- How to Replace the Side Motor and/or
Drive Shaft (Side Skewer Motor)
Cooking Congurations
Kebab Skewers
- How to Use the Kebab Skewers
Cage Skewers
- How to Use the Cage Skewers
- Using Two Cages Simultaneously
- Opening Hot Cage Skewer
- Cleaning the Cage Skewers
Long Skewer
- How to Use the Long Skewer
- How to Use Meat Clamps
Standard Grill
- How to Use the Standard Grill
Half Grill
- How to Use the Half Grill
Skewer Holders
- Using the Skewer Holders
Lighting the BarbeSkew
- Prior to Use
- Charcoal Fuel Types
- Lighting Instructions
Storage and Maintenance
- General Storage Procedure
Repairing Your BarbeSkew
- Repairing Minor Cosmetic Damage (Lid)
- Repairing Minor Cosmetic Damage (Body)
Fixings
Tools
BarbeSkew II Parts
Assembly Instructions
TOPIC PAGE
1
2
3 -4
5 -6
5
5
6
6
6
7
8-10
8
9
9
10
11
12
12
13-14
13
14
14
14
15-16
15
16
17
17
17
17
18
18
19-20
19
19
20
21
21
22
22
22
23
23
24
25-26

INTRODUCTION
1
Thank you for buying the BarbeSkew.
By using the rotisserie functions on the BarbeSkew,
you will nd that food cooks more evenly and more
thoroughly. There is also an added advantage that
the rotisserie ensures the food is constantly self-
basting which leaves the food more moist, more
tender and more succulent.
We call it “hands free” because it leaves you free to
go and enjoy your barbecue party more whilst the
BarbeSkew carries out the job of constantly turning
the food.
Once you have started using the BarbeSkew you’ll
start to wonder why anyone would use an old
fashioned traditional barbecue grill ever again.
We have put our hearts and souls into making the
BarbeSkew give you the best barbecue experience
ever. Should you require any further or extra help
with any aspect of your BarbeSkew then please
don’t hesitate to give us a call or email us using the
information in this manual.
We’re also on Facebook and Twitter and so we’d love you to send us your BarbeSkew pictures
so that we can share everyone’s food ideas and recipes.
Once again thank you for your purchase – and Happy BarbeSkewing!
Ed Wray
BarbeSkew Designer and Managing Director

WARRANTY
2
Every BarbeSkew comes automatically with a standard 1 Year Warranty from the date of delivery of your
BarbeSkew. Please retain your proof of purchase as this may be requested in the event of a claim.
FREE EXTRA YEAR WARRANTY
Register your details and serial number with us (or with your BarbeSkew agent if you are outside the UK)
and we will automatically upgrade you to a 2 Year Warranty free of charge.
EXTENDED 5 YEAR WARRANTY
For complete peace of mind you can also extend your Warranty to a full 5 year no quibble warranty
(including Accidental Damage) as follows:
Small Charcoal BarbeSkew II £49.95
Large Charcoal BarbeSkew £99.95
Large Gas BarbeSkew £99.95
Either apply online at:
www.barbeskew.co.uk/warranties
Title:
BarbeSkew Extended Warranty Form
First Name: Surname:
Choice of Warranty Cover (Please tick box as appropriate)
Or return by post with a cheque made payable to
“BarbeSkew” to:
BarbeSkew
3 Kingsley Road
Brighton
BN1 5NH
Address:
Serial No: Original Purchase Date:
All BarbeSkews Models
Free Extra Year Warranty
(2 Years)
Large Charcoal / Gas
5 years cover for £99.95
BarbeSkew II
5 years cover £49.95
“I purchased a BarbeSkew with Warranty in 2009 and in the early part of 2014, I reported a problem
and within a week I had had my BarbeSkew not only repaired but looking like new. I can’t recommend
the extended warranty enough. We had all the latest enhancements added and even the cover was
replaced. You get high street warranties but then you get the BarbeSkew Warranty…. For me I wouldn’t
hesitate to recommend to anyone purchasing the best barbecue in the world (all my daughters have
a BarbeSkew) or having it covered by their warranty. I’d already saved £200 on the list price so I didn’t
mind paying extra for their warranty.” - Norman Shaw U.K.
Customer Testimonial

BARBESKEW SAFETY

GENERAL BARBECUE SAFETY
It is vitally important that you fully read and understand the following
safety instructions before you assemble or use your BarbeSkew.
Keep the BarbeSkew at least
1 metre away from buildings, and
trees.
Do NOT use the BarbeSkew
indoors or in Semi-Enclosed areas.
Keep children away from the
BarbeSkew at all times.
Allow 8 hours for the BarbeSkew
to cool before cleaning, storing or
covering the BarbeSkew.
Ensure the BarbeSkew is on level
ground before using it.
3
8 hours
1m 1m

GENERAL BARBECUE SAFETY
Do NOT use or store any
ammable liquids or aerosols on
or near the BarbeSkew.
Once lit DO NOT move the
BarbeSkew.
Do NOT use the BarbeSkew whilst
under the inuence of alcohol or
drugs.
When the BarbeSkew is not in use,
remove the batteries from the
BarbeSkew motors and store them
indoors in a cool and dry place
(especially over the winter so that
the batteries don’t leak).
4

FOOD SAFETY
Raw meat can contain food poisoning bacteria. If raw meat touches or drips onto food that is already
cooked, these bacteria can get onto that food. Bacteria can also transfer onto food from your hands,
chopping board, knives or tongs, this is called cross-contamination. You can prevent it by doing the
following things:
CROSS-CONTAMINATION
Always wash your hands thoroughly after handling raw meat;
Use separate utensils for raw and cooked meat;
Never put cooked food on a plate or surface that has been used for raw meat;
Keep raw meat in a sealed container away from ready-to-eat foods, such as burger buns
and salads;
Don’t put raw meat products next to cooked or partially cooked meat on the barbecue;
Don’t add sauce or marinade to cooked food if it has already been used with raw meat.
•
•
•
•
•
•
5
PREPARING FOOD
Use separate chopping boards and knives for preparing food.
Ensure cooked meats and raw meats are kept separate when preparing, cooking or serving. Ensure
that raw meat is separated from cooked food or food that is almost cooked. For example, when
using the cage skewers and kebab skewers at the same time do not have any raw food in the area
directly below the cage skewer, as illustrated below.
1.
2.
1. 2.

To ensure food is properly cooked on the BarbeSkew you must always ensure that any frozen food is
properly thawed before you cook it.
Always make sure you cook chicken, pork, burgers, sausages and kebabs until they’re piping hot all the
way through, and none of the meat is pink and their juices run clear.
Remember, when you reheat food on the BarbeSkew, always make sure it’s piping hot all the way
through before serving.
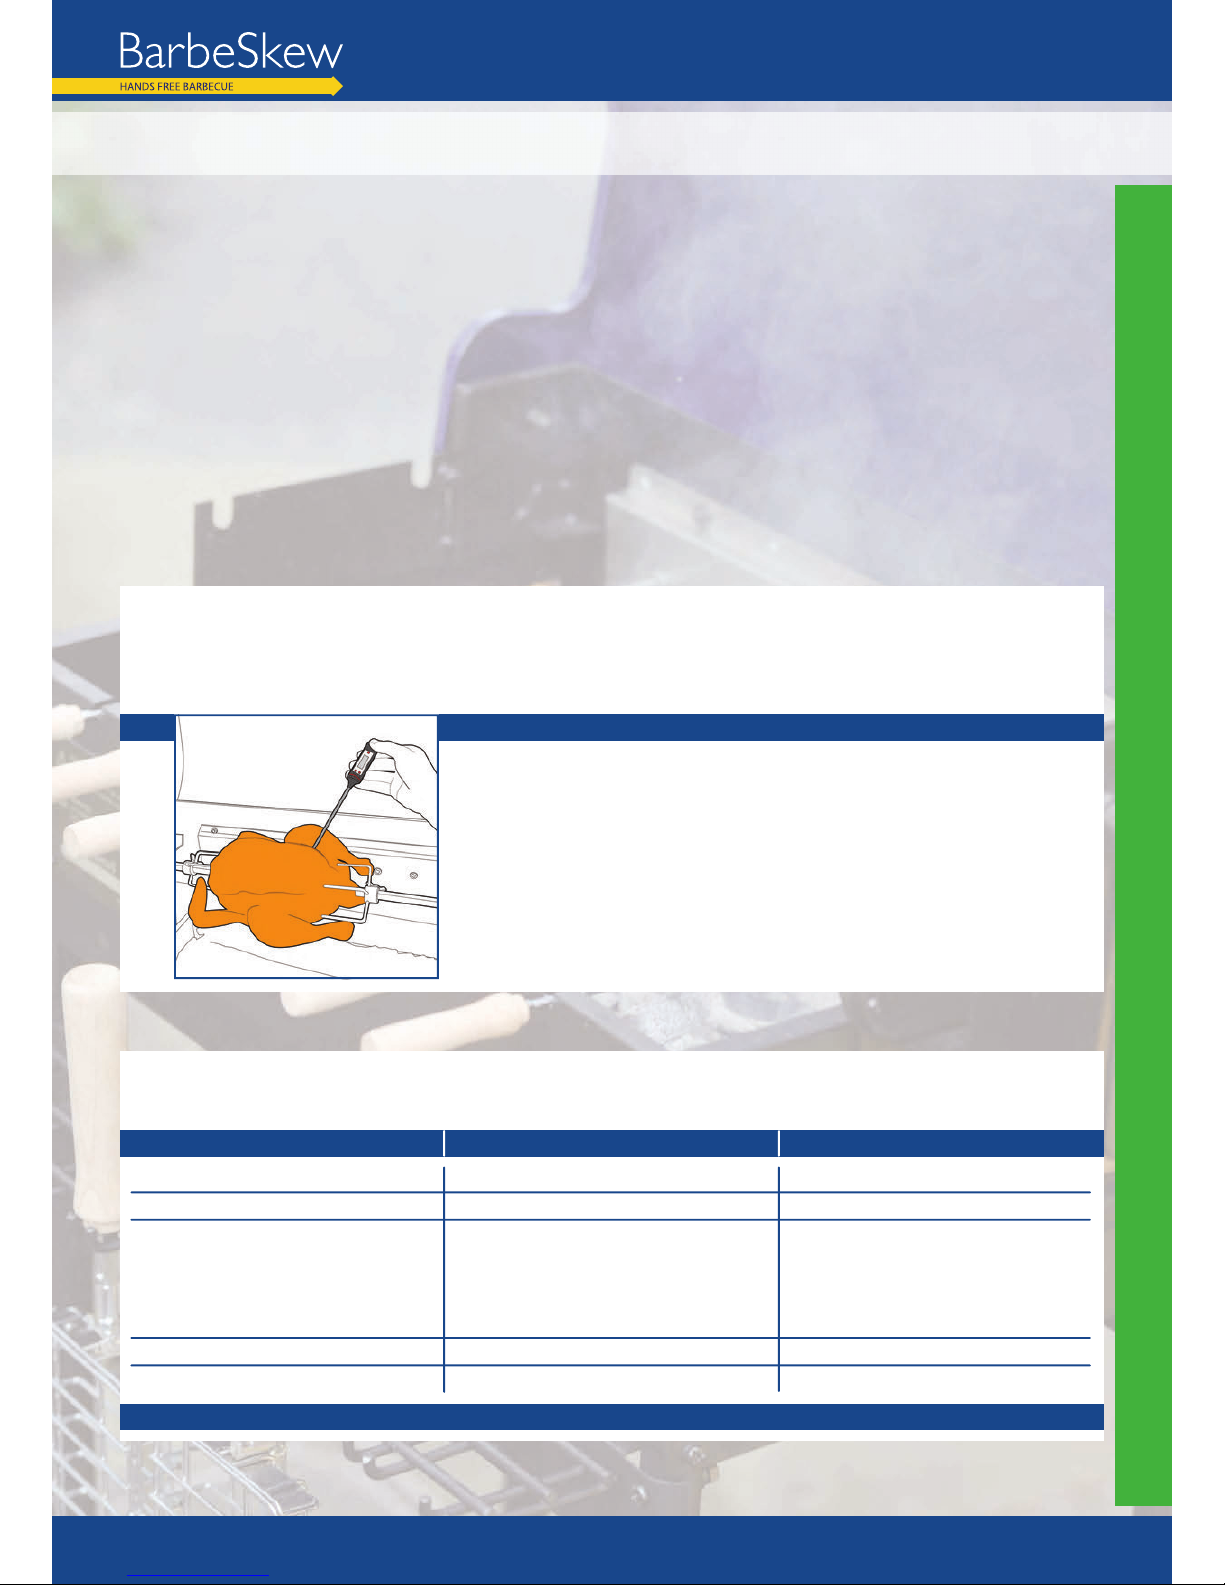
BarbeSkew highly recommends the use of a meat thermometer to check the internal temperature
of the meat to gauge if it is properly cooked. Listed below are the preferred areas for taking internal
temperatures of the cooking meat.
COOKING BARBECUE FOOD
Poultry (whole) - Insert the thermometer into the inner thigh area near the breast of the chicken or
turkey, but not touching the bone.
Poultry (breast, thigh, wing) - Insert the thermometer into the centre of the thickest part of the meat
away from any bone or fat.
Beef, veal, lamb, pork (steak, joint, chops, burgers) - Insert the thermometer in the centre of the
thickest part of the meat away from any bone, fat or gristle.
Fish - Insert the thermometer into the centre of the thickest part of the meat away from any bone.
•
•
•
•
Different meats require different internal temperatures to destroy harmful bacteria. The table below lists
the minimum required internal temperatures for safe food.
6
Fish
Sausages
Beef, Veal, Lamb, Pork
Chicken, Turkey
Left overs
TYPE OF MEAT
N/A
Well Done
Medium
Medium Rare*
N/A
N/A
STYLE INTERNAL TEMPERATURE
63OC
71OC
77OC
71OC
63OC - Allow at least 3
minutes for the meat to rest.
74OC
75OC
* Food that is cooked to “Medium Rare” may still pose a food poisoning risk.
“COOKED” INTERNAL TEMPERATURES
USING MEAT THERMOMETER
1.
Insert the meat thermometer into the centre of the meat for the most accurate reading. Always
follow manufacturer’s guidelines.
1.
The superfast Thermopen reads the temperature of the centre of
your chicken within 4 seconds: buy it at www.barbeskew.co.uk/
accessories

HOW TO USE YOUR BARBESKEW

HOW TO USE THE BARBESKEW II
Unlike a traditional barbecue, the BarbeSkew uses skewers and cage skewers to cook food. The skewers
turn automatically via the electrical rotisserie mechanism at the rear (for kebab skewers) and side (for
long skewer and cage skewers).
ROTISSERIE MECHANISM
KEBAB SKEWER ROTISSERIE MECHANISM
LONG/CAGE SKEWER ROTISSERIE MECHANISM
7
The BarbeSkew II comes with the following items as standard:
Kebab Skewer x 7
Long Skewer x 1
Cage Skewer x 2
Set of Meat Clamps x 1
Standard Grill x 1
Motors x 2
Mains Transformer x 2
All handles are made of the highest quality black resin. This
means all accessories are dish-washer friendly
Additional skewers, grills and other accessories can be purchased at www.barbeskew.co.uk/accessories
BARBESKEW II

MOTORS
POWERING THE MOTOR
Each motor takes 2 x D type batteries. We have found that the 2 x D type batteries last for around
100 hours usage – so if each BarbeSkew is 2 hours long they will last for 50 BarbeSkews.
Alternatively you can use the mains transformer to power the motors from the mains. Please ensure
a power breaker is used in a similar way that you would use one for an electric lawn-mower for
safety.
PLEASE NOTE: The motors are much quieter when being powered by batteries as they are not taking
the full weight of the mains voltage through them.
1.
2.
1. 2.
8

9
MOTORS
REPLACING MOTORS & DRIVE SHAFT
Remove the batteries.
Undo the four securing screws on the inside of the motor – behind where the batteries would sit
(Not the ones on the outside of the motor!).
Remove the motor and drive shaft* from the BarbeSkew. If the drive shaft is broken then make sure
you remove any additional parts of the drive shaft that may have been left in the mechanism.
Replace the drive shaft ensuring that the end with the little square hole is pushed back into the
skewer rack to allow it to have a kebab skewer pushed into it. If you insert it the wrong way round
then when re-assembled you will not be able to insert a kebab skewer in the central location.
Finally re-attach the motor.
*PLEASE NOTE: The rear motor drive shaft is different to the side motor drive shaft, ensure you order
the correct replacement.
1.
2.
3.
4.
5.
1. 2. 3.
4.
HOW TO REPLACE THE REAR MOTOR AND/OR DRIVE SHAFT
(KEBAB SKEWER MOTOR)
Replacement motors / rear drive shafts are available and can be purchased from www.barbeskew.co.uk/accessories
5.

10
Remove the batteries.
Undo the two securing screws (1 above the other), holding the side skewer rack in place.
Lift the skewer rack, drive shaft* and motor assembly directly upwards.
Replace the motor and then ensure that the drive shaft has the conical end pushed back into the
skewer rack to allow it to have the long skewer pushed into it.
Slide back the skewer rack, drive shaft and motor assembly in place and reattach the two screws
one above the other
*PLEASE NOTE: The rear motor drive shaft is different to the side motor drive shaft, ensure you order
the correct replacement. Please also note the motors are very reliable and rarely break down.
1.
2.
3.
4.
5.
1. 2. 3.
4.
HOW TO REPLACE THE SIDE MOTOR AND/OR DRIVE SHAFT
(SIDE SKEWER MOTOR)
Replacement motors / side drive shafts are available and can be purchased from www.barbeskew.co.uk/accessories
MOTORS
5.

COOKING CONFIGURATIONS
Your BarbeSkew has been designed to offer you the most versatile outdoor cooking experience possible.
Listed below are the cooking options available to you when using the BarbeSkew.
Some cooking options may require accessories that do not come as standard with particular models,
please visit www.barbeskew.co.uk/accessories to purchase additional accessories.
11
1. 2. 3.
4. 5. 6.
7. 8.
7 x Kebab Skewers 3 x Kebab Skewers
Half Grill (Not Standard) Standard Grill
1 x Long Skewer 3 x Kebab Skewer
1 x Long Skewer 1 x Cage Skewer
7 x Kebab Skewer
1 x Cage Skewer 2 x Cage Skewer*
*When two Cage Skewers are used they must be placed perpendicular to one another.

KEBAB SKEWERS
Pack the food tightly on the
skewer, this helps ensure all the
food rotates together. DO NOT
twist the skewer as you spike the
food on otherwise the food will
not rotate with the skewer.
Food on kebab skewers should
not exceed 5cm (2”) in diameter
(otherwise it will hit the food on
the skewer next to it!).
To ensure perfect cooking leave
approximately 5cm (2”) space
between the ends of the skewer
and the food (i.e. ensure all
the food is over the lit charcoal
embers!).
5cm
2“
5cm
2“
5cm
2”
KEBAB SKEWER DETAILS
HOW TO USE THE KEBAB SKEWERS
Place food on the kebab skewers following the directions below (Kebab Skewer Details). Insert the
end of kebab skewer into one of the holes on the mechanism located at the back of the barbecue
pit.
Rest the rounded section of the skewer in the groove directly opposite the mechanism.
Once all skewers are in place turn the power on at the rear of the BarbeSkew.
PLEASE NOTE: The skewers move slowly and may appear not to be moving when the motor is running.
They are intended to turn slowly – so long as the food is turning then it is not burning. To prove to
yourself they are turning, hold onto the resin handles of one of the kebab skewers and you will
gradually feel it turning.
1.
2.
3.
1. 2. 3.
12
EXTRA TIP: Mushrooms make great end stops and retain all their moisture so when you
bite into them the mushroom taste explodes in your mouth.

The cage skewer can hold food
with a thickness of 2cm (1”),
DO NOT over pack the cage
skewer.
2cm (1”)
To ensure perfect cooking allow a
gap of approximately 1cm (1/2”)
between each sausages.
The cage skewer can only take
food that is 6cm (2.5”) wide.
6cm
2.5”
CAGE SKEWER
HOW TO USE THE CAGE SKEWER
Fill the cage skewer following the directions below (Cage Skewer Details). Close and lock the cage
skewer, by using the central clip.
Insert the cage skewer into one of the holes on the side mechanism and seat the rounded area of
the skewer into the corresponding groove in the skewer rack on the opposite side of the BarbeSkew.
Please refer to the “Cooking Conguration” section for details of how to best optimise your use of the
side mechanism.
Turn on motor at the side of the BarbeSkew that connects into the side mechanism.
1.
2.
3.
1. 2. 3.
CAGE SKEWER DETAILS
13

OPENING HOT CAGE SKEWER
Remove the cage skewer from the BarbeSkew by rst lifting the handle until the cage skewer is no
longer resting on the guide, and then pull the cage skewer out of the rotisserie mechanism. Always
wear heat protective gloves or use a thick tea towel when touching the metal cage.
Using a thick tea towel or oven glove, open the cage lock and remove food.
1.
2.
1. 2.
CAGE SKEWERS
WARNING! The cage skewers get very heavy when fully loaded with food, exercise caution
when removing them from the BarbeSkew and ensure that no children or pets are nearby when
removing the hot cage skewer.
USING TWO CAGES SIMULTANEOUSLY
If you are using two cage skewers at the same time you should position the second perpendicular to
the rst to ensure they can both rotate freely.
1.
1.
14
CLEANING THE CAGE SKEWERS
The cages t the dishwasher and have dishwasher friendly black resin handles. Alternatively soak them in
the sink with hot soapy water for an hour and use a hard washing up brush with plastic bristles. Do not use
anything abrasive like wire wool or a scraper as these will damage the chrome plating. You can use a
brillo though as this won’t damage the chrome.

LONG SKEWER
HOW TO USE THE LONG SKEWER
Push the long skewer through the centre of the chicken/meat ensuring it is weighted correctly. To
test this, hold the end of the skewer with one hand and rotate it manually between your hands. If
you nd it lollops, then take the meat off and re-skewer it until you nd it is evenly weighted, nally
use the meat clamps to hold the meat in place (see pg16 for how to use meat clamps).
Insert the long skewer into the centre hole only and seat the rounded area of the skewer into the
corresponding groove in the skewer rack on the opposite side of the BarbeSkew.
Turn on motor at the side of the BarbeSkew that connects into the side mechanism.
1.
2.
3.
1. 2. 3.
LONG SKEWER DETAILS
DO NOT over pack skewers, and
always use the meat clamps to
secure the meat into place.
Food on the long skewer
should not exceed 15cm (5”) in
diameter.
To ensure perfect cooking leave
approximately 7.5cm (3”) space
between the ends of the skewer
and the food.
7.5cm
3“
7.5cm
3“
15
Additional long skewers & meat clamps can be purchased at www.barbeskew.co.uk/accessories
15cm
5”

LONG SKEWER
HOW TO USE MEAT CLAMPS
Slide one meat clamp onto the long skewer, once it is in place tighten the screw to prevent it
moving.
Slide the meat onto the skewer and press it rmly down onto clamp. Slide a second clamp onto the
long skewer and press it into the meat and tighten the screw to secure the clamp and meat into
place.
1.
2.
1. 2.
16
Additional long skewers & meat clamps can be purchased at www.barbeskew.co.uk/accessories
Table of contents
Other Barbeskew Grill manuals