BASISRAUCH Lava LP-4011-E User manual

USER MANUAL
P1 P2
Lava LP-4011-E

Introduction
Thank you for purchasing Lava LP-4011-E. Lava LP-4011-E
is a PMR-product (Private Mobile Radio) that lets you talk to
as many people you wish, as often as you like, with no need
for a license, subscription or tax payment. It is very easy to
use so even children can handle it.
Please read through this manual carefully for many features
of this model.
Safety Information
1. Use only the supplied antenna. Unauthorized antennas,
modifications or attachments could damage the radio and
changes or modifications not expressly approved by the
party responsible for the compliance could void the
authority to operate the radio.
2. Avoid storing in high temperature or humid place for long
time.
3. If strange smell or smoke comes off the radio, dispatch it
to service center immediately.
4. Turn to lowest volume if external mic/speaker is used,
then adjust appropriately.
5. Never use other power sources for charging other than
the standard charger set designed for this radio model.
6. Take off battery pack if out of use for long time.

Features
Use of TCXO resonator to enhance freq. stability
(±1.5PPM).
Digitally designed to ensure stable quality.
High quality sound (40mm speaker).
Extra-small size with sturdy case, comply with US
military standards 810E.
7 tone calls & MORSE code.
9 levels of VOX (voice-activate feature) with quick VOX
ON / OFF.
Auto-power save modes.
Auto-power-off.
Transmit time-out-timer.
Channel scan features.
Dual Watch Scan features.
Multi group-code up to 262, CTCSS <52> DCS <210>.
Multi-Icon Backlit LCD display.
-
-
-
-
-
-
-
-
-
-
-
-
-
Contents
Radio Controls / Functions.............................................
Icons Guide....................................................................
Operation Guide.............................................................
Installing / Removing Battery Pack.................................
Battery Charging.............................................................
PMR Channel Frequency Table.......................................
CTCSS Code Table.........................................................
DCS Code Table..............................................................
Specifications..................................................................
1
2
3
9
10
11
11
12
13

P1 P2
1
1. LED indicator
2. External speaker jack
3. External microphone jack
4. Speaker area
5. Microphone
6. LCD screen
7. Channel key
8. Power key
9. Function / DW key
10. CTCSS / DCS / SCAN key
11. Down key
12. Up key
13. Monitor / Back light key
14. PTT key (Push-To-Talk)
15. Antenna
Radio Controls / Functions
1
2
3
4
5
6
7
8
12
13
14
15
11
10 9
2
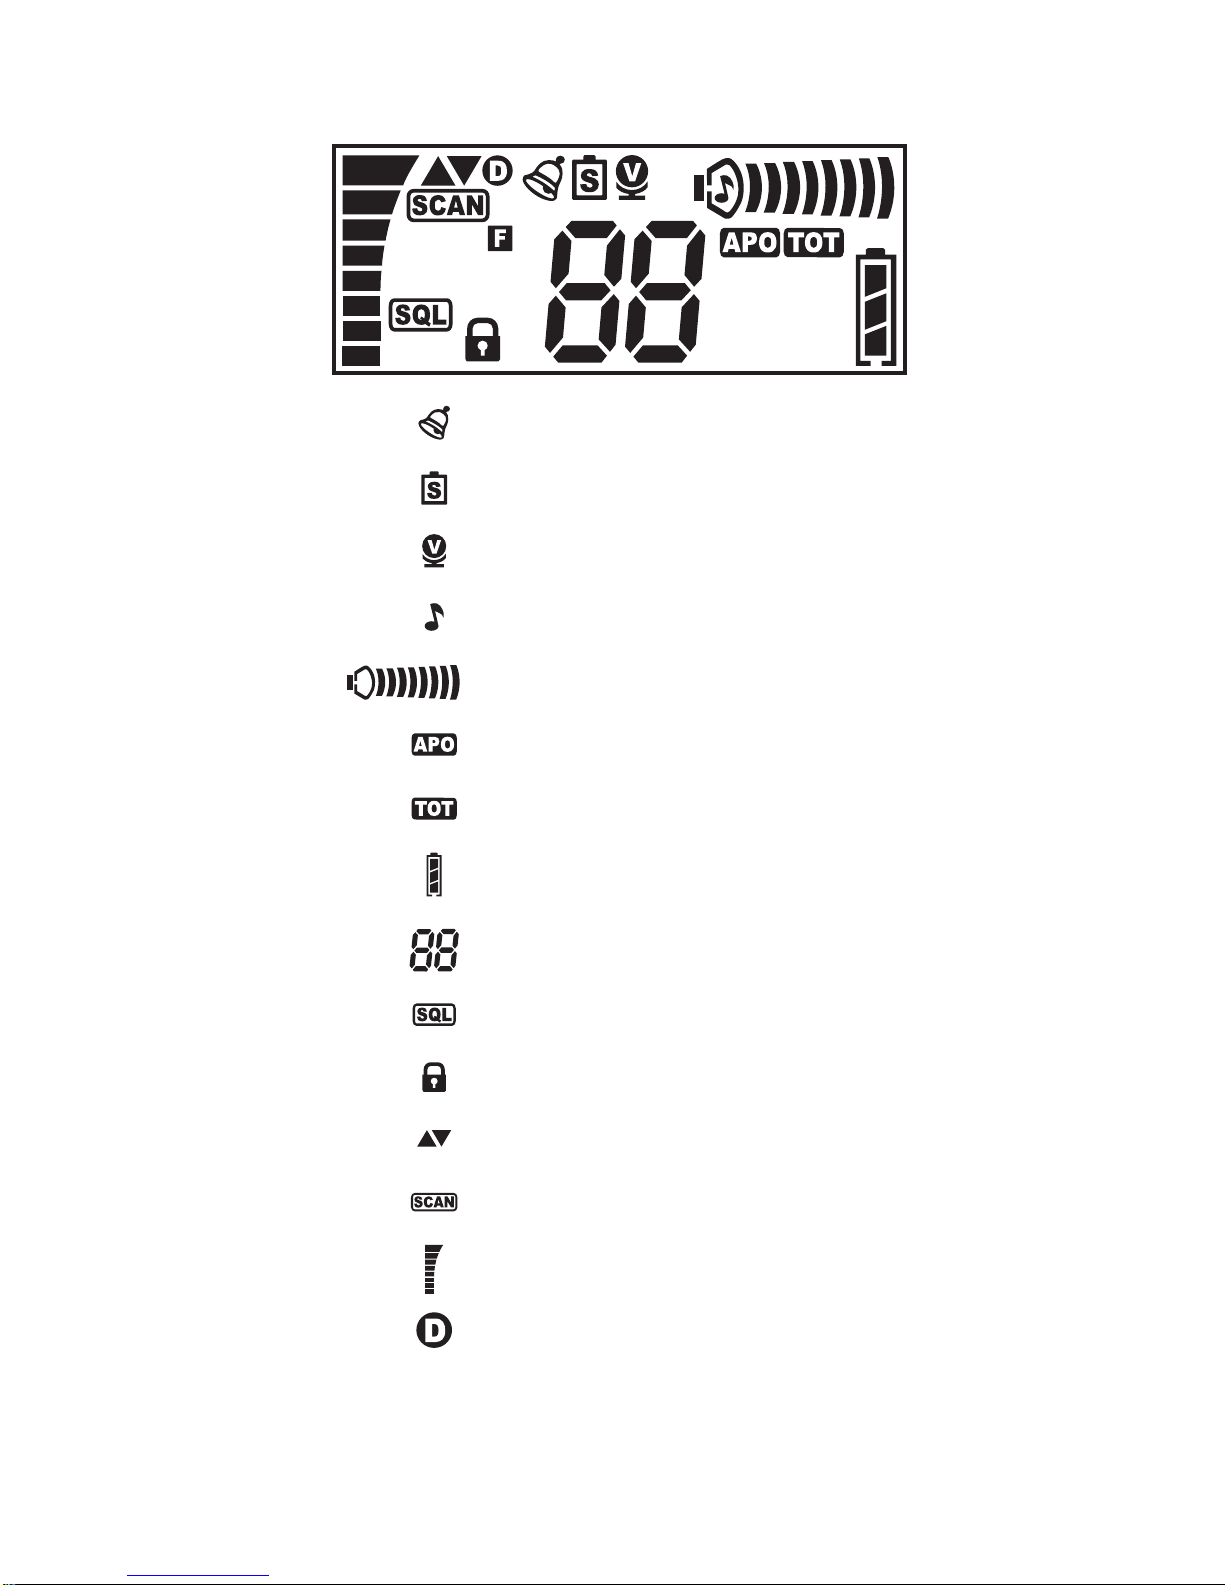
Icons Guide
Tone Call
Auto-Power Save
VOX (Voice-activate system)
Keypad Tone
Volume
Auto-Power-Off
Transmit Time-Out-Timer
Battery Power
Channel Number
Squelch Level
Keypad Lock
Scrambler
Scanning
Signal Strength Indicator
Dual Channel Watch

3
Operation Guide
Power ON / OFF
Hold about 1 sec to power radio. While power ON, hold
about 1.5 sec to turn power off.
Transmitting / Receiving
While holding [PTT], speak to the microphone area. LED
glows red during transmission. To receive, release [PTT].
LED glows green when receiving.
*Keep about 10 cm from microphone area when speaking
slowly and clearly.
Volume Adjustment
Momentarily press repeatedly on [▲] to adjust volume
louder. Momentarily press repeatedly on [▼] to adjust
volume lower. Press and hold [▲] or [▼] to swiftly adjust
volume. Do adjustment as you need.
*Caution: For external mic/ear user, adjust volume starting
from the lowest level.
Channel Selection
Momentarily press [CH]. While channel icon blinks,
temporarily press repeatedly on [▲] or [▼] to select
channel. To preset channel, temporarily press [CH] / [PTT] /
[P1] / [P2].
Scan Channels
- Press and hold [P1] about 2 sec to start scanning of
channel. Jumping of channel numbers increasingly or
decreasingly and the LCD indicates in progress.
- Press [▲] or [▼] to change the channel scanning direction.
- Press [PTT] to Talk with original channel, release [PTT] will
be continued to scan after 5 sec.

4
- When the signal is received, pressing [PTT] will talk on the
current channel, Release [PTT] will be continues to scan
after 5 sec.
- When scanning, pressing [P2] or Press and hold [P1] will
stop scanning and return to the original channel.
- When the signal is received, pressing [P2] or Press and
hold [P1] will stop scanning and stay in the current channel.
Dual Watch Scan
Press and hold [P2] about 2 sec to start Dual Watch Scan
function. The LCD show and indicates Dual
Watch Scan in progress.
*In the Dual Watch Scan, press [P2] will stop the Dual Watch
Scan and return to the original channel.
CTCSS / DCS setting
1. Press [P1] to select the CTCSS /
DCS Sub-Tone code for the current
channel. If the current channel not
setting CTCSS / DCS the LCD will be
show:
- CTCSS: LCD will show Ct xx,
xx=01~ud, detailed like CTCSS code
table.
- DCS: LCD will show dn xx or dI xx,
xx=01~99, :00~:04 and ud, detailed
like DCS code table.
2. Press [P1] once, the LCD will show "▼" and original RX
Sub-Tone code (-- -- / Ctxx / dn xx / dI xx), then press [▲] or
[▼] to select the new RX Sub-Tone code that you wanted.
After selecting, press [P1] again, the LCD will show "▲" and
now TX Sub-Tone code, then press [▲] or [▼] to select the
new TX Sub-Tone code. After setting finished, press [P1],
[PTT], [P2] or [CH] once to jump out of the Sub-Tone code
setting mode and save your setting.

5
*If the original RX / TX Sub-Tone code is the same and you
want to change the RX / TX Sub-Tone code synchronously,
just press [P1] once, the LCD will show "▼" and original RX
Sub-Tone code, then press [▲] or [▼] to select the new RX
Sub-Tone code. After setting finished, just press [P1] twice
or press [PTT], [P2] or [CH] once to jump out of the
Sub-Tone code setting mode and save your setting.
LCD Back Light ON / OFF
Temporarily press [○] (Monitor / Back light key) to turn back
light ON. Temporarily press [○] again to turn back light OFF
or it will automatically turn OFF after 10 sec lighting.
Monitoring
Hold on [○] for about 1 sec. Static is heard if the channel is
clear or any voice on this channel can be heard regardless
of CTCSS or DCS setting. LED glows green.
Monitor is used for following purposes
- To receive weak signal due to distance or for signal
intermittently received.
- To receive all signals on same channel even with different
CTCSS / DCS setting.
Keypad Lock / Unlock
Hold on [CH] for about 1.5 sec until shows on the screen
to confirm keypad lock is enabled. To unlock keypad, hold
on [CH] again for about 1.5 sec until clear from the
screen.
*When keypad lock is enabled, only PTT, LOCK, POWER,
Monitoring, LCD back light ON / OFF and Volume control
can be operated.

6
Function Settings
Temporarily press [P2] to entry function menu mode.
In the function menu mode, press [P2] to switch the function
menu items F1~F10, and then adjust the function data with
[▲] or [▼]. After the adjustment is completed, short press
[PTT] will leave the function menu mode and save the
changed function data.
F1 Tone Call
Under menu item 1, tone call off / 1 - 7 can be selected.
Factory default: 1
F2 Power Save Mode
Under menu item 2, power save modes off / 01-03 can be
selected. Choose 03 if talk time is short for best power
saving.
Factory default: 02
F3 VOX ON / OFF
Under menu item 3, VOX ON / OFF can be selected.
Factory default: OFF
F4 VOX Sensitivity
Under menu item 4, VOX sensitivity levels 1 - 9 can be
selected. L9 is least sensitive.
Note: If VOX is disabled in F3, this feature is invalid.
F5 Keypad Tone
Under menu item 5, select ON / OFF to enable / disable the
beep sounds.
Factory default: OFF

7
F6 Auto Power Off
Under menu item 6, choose OFF / 30 / 60 / 120 min.
depending on your need. If 30 is selected, the radio
automatically turns power off if none of the keys is operated
or no signal received after 30 min.
Factory default: OFF
F7 Transmit Time Out Timer
Under menu item 7, choose OFF / 30 / 60 / 90 / 180 /360
depending on your need. If 30 is selected, the radio will stop
transmission if continuous talk exceeds over 30 sec and the
radio will automatically swift to receiving mode.
Factory default: 90 sec
F8 Squelch
Under menu item 8, choose squelch level 0 to 7 depending
on your need. If the squelch level is at 0, the static sound is
heard all the time. If setting at 1, the radio is best to pick up
weak signal but susceptible to interferences. Squelch level 7
is the least sensitive and suited for use against high
interferences.
Factory default: 3
F9 End of Call Confirmation
ON / OFF (factory default is OFF). When this function is on,
each time the Call is finished, the unit will send a tone to
confirm the end of the call.
F10 DW Channel Selection
With [▲] or [▼] to select the channel is programmed for the
DW channel, select the DW channel after short press [CH]
that is selected as the DW channel.
Factory default: On, The default channel is user-defined.

8
*F3 / F4 / F7, these are the channel parameters, there are
just temporary change, after turn off the device or switch the
current channel, these setting are restore to the original
settings.
Tone Call
Holding [PTT], temporarily press [P1] to send tone call to
other receivers. (For selection of tone call, refer to F1).
VOX ON / OFF
Holding [PTT], temporarily press [P2] to enable VOX. To
disable it, hold [PTT] and temporarily press [P2] again. For
programming of VOX sensitivity, refer to F4.
*While VOX is enabled, press of [PTT] is no longer required
during transmission. Just talk into the microphone area with
appropriate sound (depending on VOX sensitivity).
9
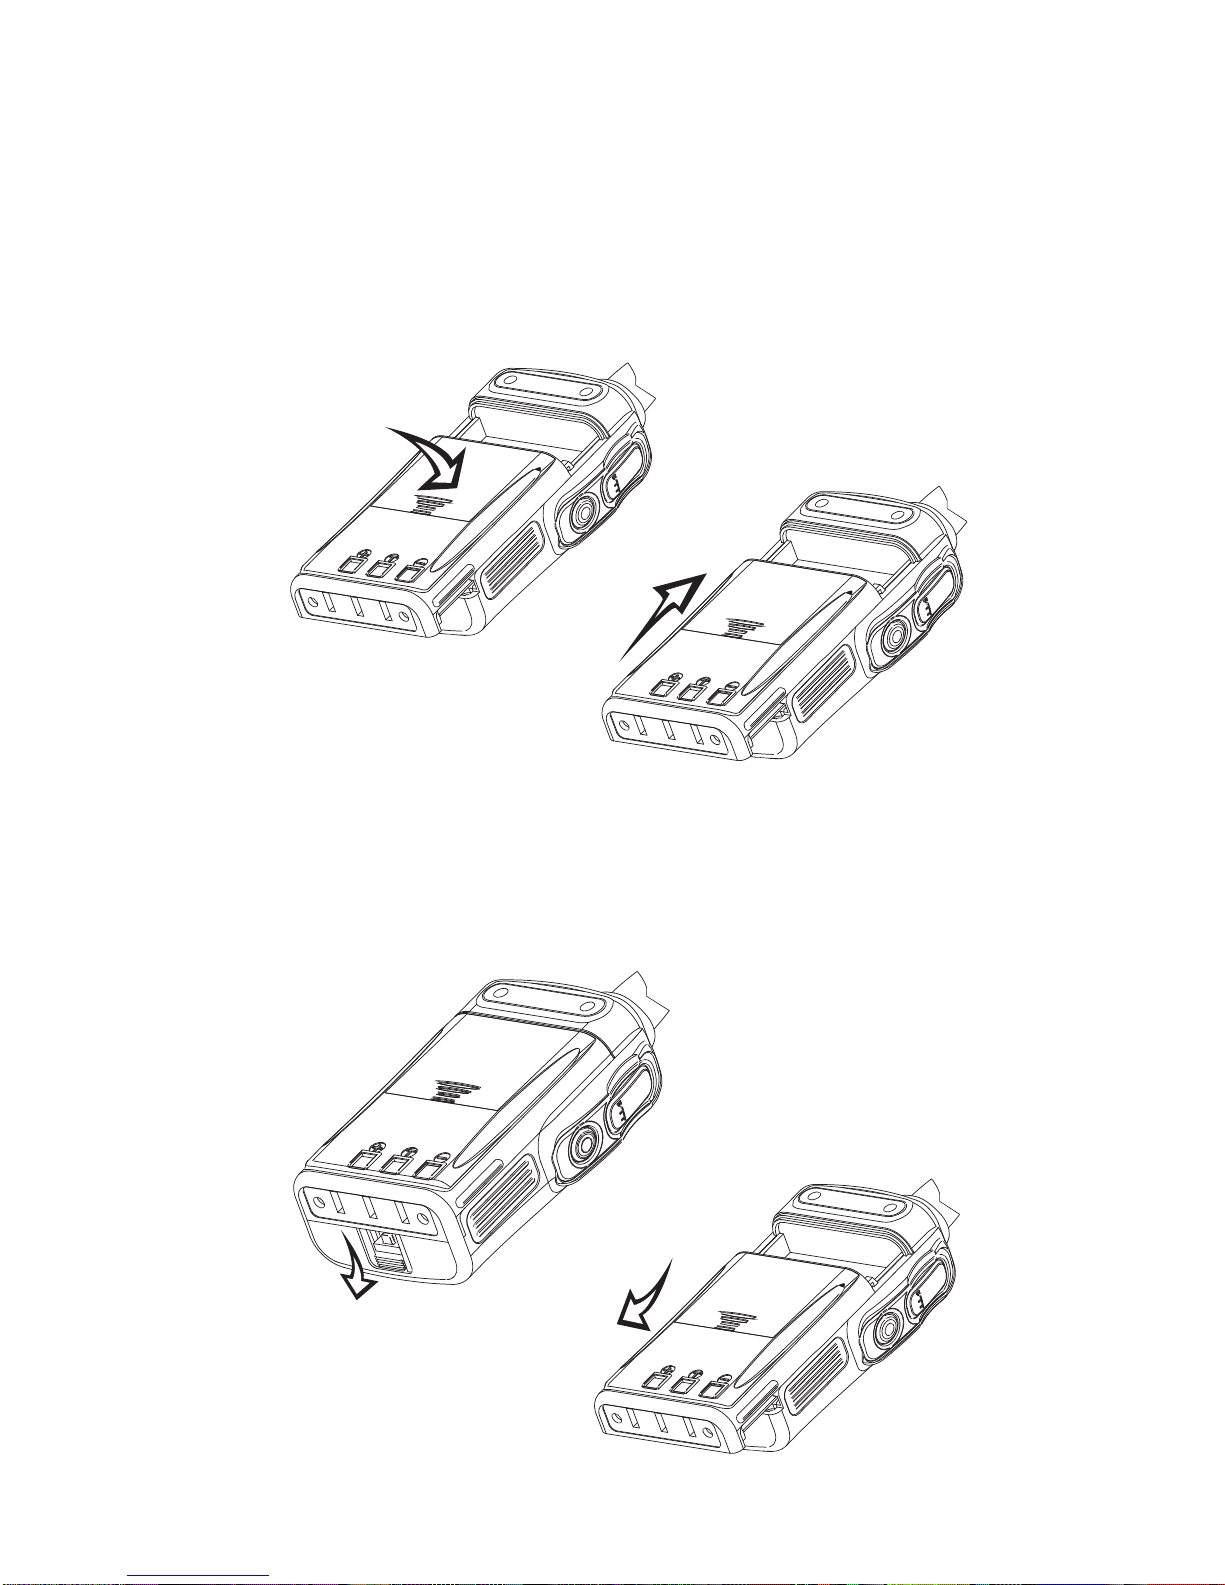
Installing / Removing Battery Pack
To Install
1. Place the battery pack into battery compartment as in illus
#1.
2. Push battery pack forward as in illus #2. It will lock into
compartment.
To Remove
1. Holding the radio in one hand, push down battery latch as
in illus #3.
2. Slide battery pack backwards as in illus #4.
#1
#3
#4
#2
P1 P2
10
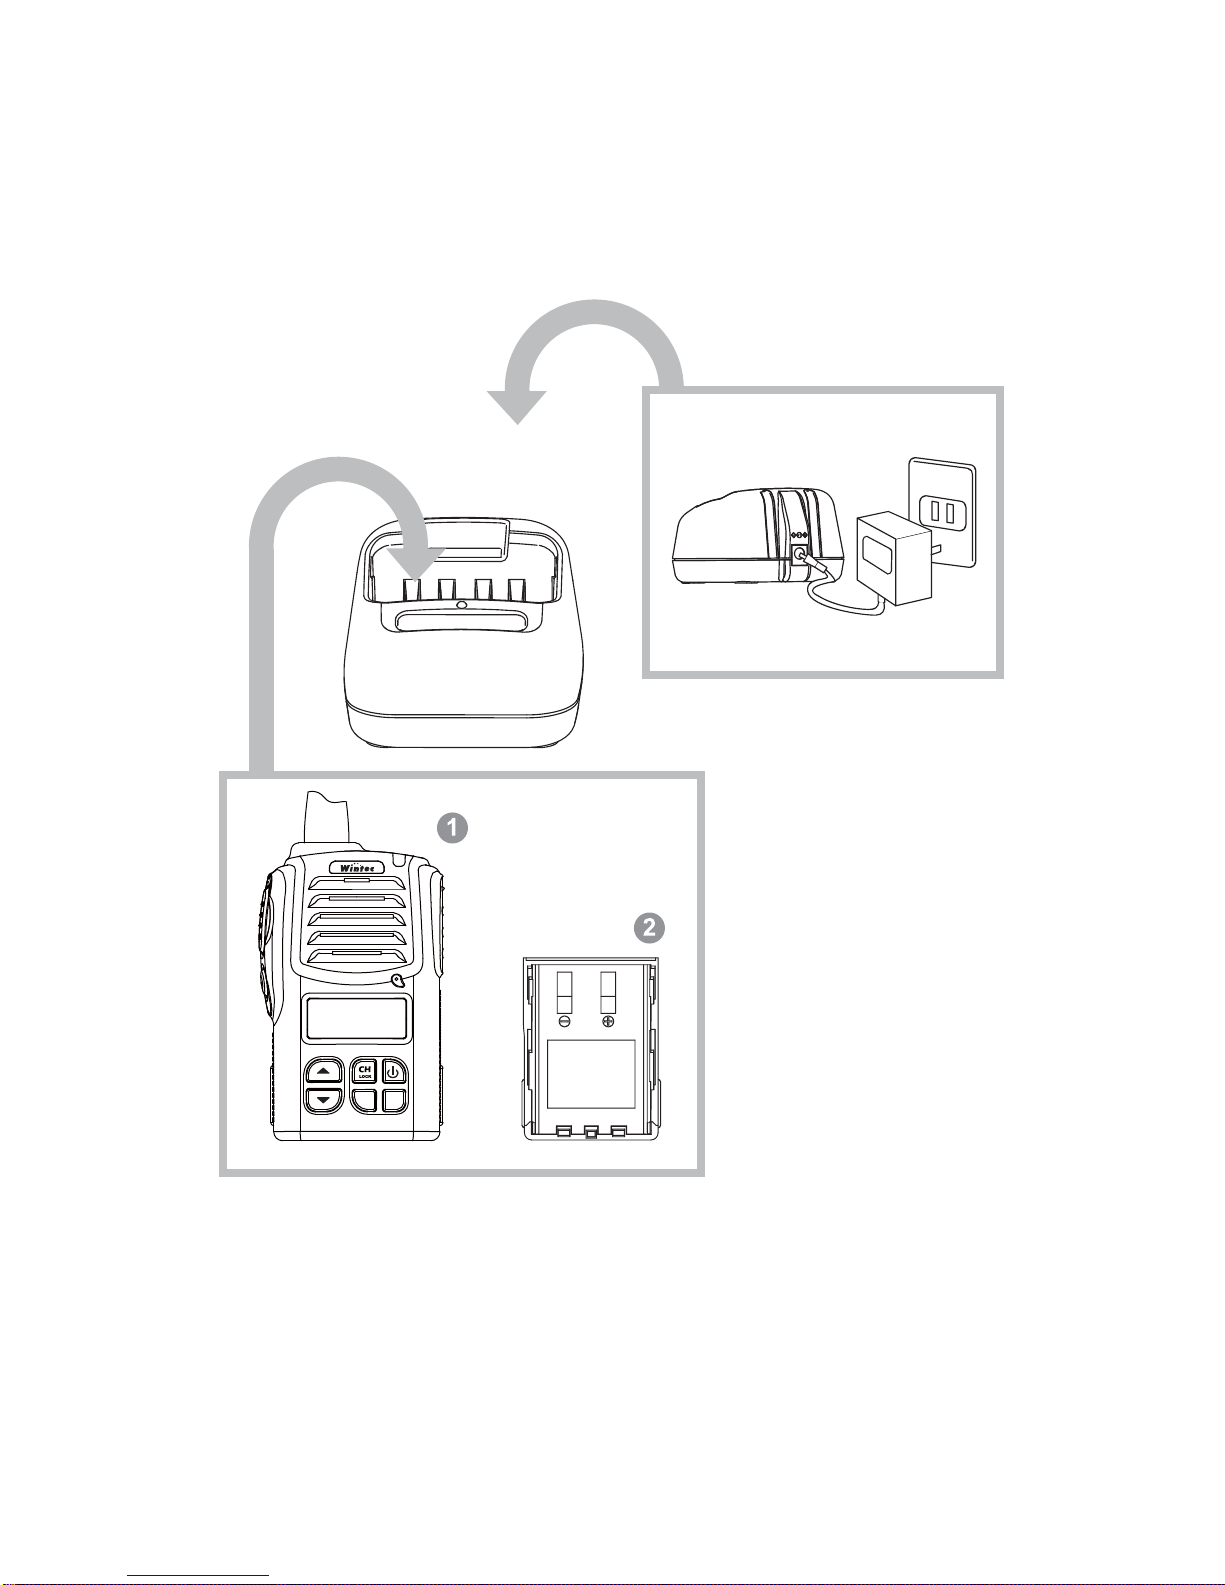
Battery Charging
1. Power drop-in charger with standard AC/DC wall charger
#1.
2. Drop radio with installed battery into the charger slot #2.
#1
#2

11
PMR Channel Frequency Table
CTCSS Code Table
Channel Frequency(MHz) Channel Frequency(MHz)
1 446.00625 9 446.10625
2 446.01875 10 446.11875
3 446.03125 11 446.13125
4 446.04375 12 446.14375
5 446.05625 13 446.15625
6 446.06875 14 446.16875
7 446.08125 15 446.18125
8 446.09375 16 446.19375
1 67.0 11 97.4 21 136.5 31 192.8 41 159.8
2 71.9 12 100.0 22 141.3 32 203.5 42 165.5
3 74.4 13 103.5 23 146.2 33 210.7 43 171.3
4 77.0 14 107.2 24 151.4 34 218.1 44 177.3
5 79.7 15 110.9 25 156.7 35 225.7 45 183.5
6 82.5 16 114.8 26 162.2 36 233.6 46 189.9
7 85.4 17 118.8 27 167.9 37 241.8 47 196.6
8 88.5 18 123.0 28 173.8 38 250.3 48 199.5
9 91.5 19 127.3 29 179.9 39 69.3 49 206.5
10 94.8 20 131.8 30 186.2 40 62.5 50 229.1
51
254.1
★CTCSS ud: 60 Hz

12
DCS Code Table
1 023 19 131 37 261 55 431 73 654 91 252
2 025 20 132 38 263 56 432 74 662 92 255
3 026 21 134 39 265 57 445 75 664 93 266
4 031 22 143 40 271 58 464 76 703 94 274
5 032 23 152 41 306 59 465 77 712 95 325
6 043 24 155 42 311 60 466 78 723 96 332
7 047 25 156 43 315 61 503 79 731 97 356
8 051 26 162 44 331 62 506 80 732 98 446
9 054 27 165 45 343 63 516 81 734 99 452
10 065 28 172 46 346 64 532 82 743 100 454
11 071 29 174 47 351 65 546 83 754 101 455
12 072 30 205 48 364 66 565 84 036 102 462
13 073 31 223 49 365 67 606 85 053 103 523
14 074 32 226 50 371 68 612 86 122 104 526
15 114 33 243 51 411 69 624 87 145
16 115 34 244 52 412 70 627 88 212
17 116 35 245 53 413 71 631 89 225
18 125 36 251 54 423 72 632 90 246
★DCS ud: 001

13
Specifications
Modulation Mode
SAR
Number of Channels
Number of CTCSS
Number of DCS
Frequency Stability
Max Frequency Deviation
Frequency Resolution
Power Supply
RX Current
Audio Output Power
RF Output Power
Sensitivity(12dB sinad)
Operating Temp. Range
Weight
Dimension(H×W×D)
External Mic Connector
External SP Connector
FM
< 1.6 W/Kg
16 (446.00625~446.19375MHz)
52 (60~254.1Hz)
210 (001~754)
1.5ppm
+/- 2.5khz
12.5kHz
7.2V
< 40mA (auto power save off)
> 500mW
< 500mW
< 0.22μV
-30℃to +70℃
224g (with antenna & battery)
95×60×34mm (w/o antenna)
2.5 mm(d), 3-conductor
3.5 mm(d), 2-conductor

Hereby, Wintec declares that the radio
equipment type Lava LP-4011-E is in
compliance with Directive 2014 / 53 / EU.
Manufacturer Information:
Wintec Co., Ltd.
16F.-3, No.716, Zhongzheng Rd.,
Zhonghe Dist., New Taipei City 235, Taiwan
TEL: +886-2-8227 3319
FAX: +886-2-8227 3597
www.win-tec.com.tw
PK AL03-2-6 VER.2

Other manuals for Lava LP-4011-E
1
Table of contents


