Bass Habit Play P8A User manual

P8A
Active Subwoofer Enclosure 8”


Thank you for purchasing this Bass Habit product. Please read this manual in order to understand how to get
the best result from this product and ensure that the advices on how to look after the product and the safety
precautions are followed. We hope you enjoy using the product as much as we enjoyed creating it.
DO NOT EXPOSE THIS PRODUCT TO EXCESSIVE DAMP OR MOISTURE
- Doing so may result in electric shock or damage to the product.
BEFORE WIRING, DISCONNECT THE CABLE FROM THE POSITIVE BATTERY TERMINAL
- Failure to do so may result in electric shock or injury.
ENSURE GOOD AND CORRECT CONNECTIONS
- Failure to make the correct connections may result in permanent damage to the product.
DO NOT USE ANY FUNCTIONS THAT MAY TAKE YOUR CONCENTRATION AWAY FROM DRIVING YOUR VEHICLE
- Do not set up your amplifier whilst driving. Doing so may result in an accident. For prolonged interaction
with the product, make sure that your vehicle is stationary and parked in a safe location.
KEEP THE VOLUME AT A LEVEL SO YOU CAN STILL HEAR OUTSIDE NOISE
- Failure to do this may result in an accident. Bass Habit equipment is capable of producing sound levels
that can permanently damage your hearing. Bass Habit recommends caution when listening at a high
volume. For safety and enjoyable listening, the sound should be clear without distortion.
CAUTION
Never connect any speaker lead to the car chassi. This can cause severe damage to your car audio set up.
Before drilling or cutting any holes, investigate the layout of your vehicle thoroughly.
Use caution when working near the fuel/hydraulic lines and electrical wiring.
Observe the correct polarity when wiring. Improper phasing may cause a loss of bass response.
Ensure that no moving parts catch on the speaker or grill (e.g. door handles or window glass inside the door).
WARRANTY
All Bass Habit products carry a full warranty depending on the conditions in the country where it is sold. The
warrany is valid from the date of the original receipt as proof of purchase (warranty period differs depending
on local warranty laws and policies). Contact your international Bass Habit dealer or distributor concerning
specific procedure for your country’s warranty policies.
WHAT IS NOT COVERED
• Damage to product due to improper installation.
• Subsequent damage to other components.
• Damage caused by exposure to moisture, excessive heat, chemical cleaners and/or UV radiation.
• Damage through negligence, missuse, accident or abuse. Repeated returns for the same fault may be
considered as abuse.
• Any cost or expense related to the removal and/or abuse. Repeated returns for the same fault may be
considered as abuse.
• Damage caused by amplifier clipping or distortion.
• Items repaired or modified by any unauthorised repair facility.
• Return shipping on non-defective items.
• Products returned without a return authorisation number.
• Damage to product due to use of sealant.
WARNING
Bass Habit equipment is capable of sound pressure levels that can cause permanent damage to your hearing
and those around you. Please use common sense when listening to your audio system and practice safe
sound.
INTERNATIONAL TECHNICAL ENQUIRIES
For international technical support please contact the distribution agent for your country.

INSTRUCTIONS
INSTALLATION EXPERIENCE
Installation of Bass Habit products may require experience with a variety of mechanical procedures including
enclosure construction. This manual only provides general installation and operation instructions. If you have
any reservations about your installation skills, please contact your local authorized Bass Habit dealer for help.
CHOOSING LOCATION FOR YOUR SUBWOOFER ENCLOSURE
Choosing a good placement of your Bass Habit product will have the greatest effect of the sound quality of
the system. There are many different considerations needed when choosing the location(s) that best meet
your needs. The location(s) must be large enough for the enclosure to fit. Care is needed to ensure that the
desired location will not affect either the mechanical or electrical operation of the vehicle.
When you have decided on the best location to place your Bass Habit Subwoofer enclosure, secure the
enclosure using the included mounting straps. NOTE! Due to shifting and jarring that will occur in the vehicle
when driving, the mounting straps may stretch or loosen. Please check the mounting straps regularly so that
they are tight and ensures a secure mounting of the subwoofer enclosure.
INSTALLATION PRECAUTIONS
NOTE! Proceed only if you are a qualified installer, otherwise let your dealer do it.
• Always wear protective eyewear when using tools.
• Turn off all stereo and other electrical devices before you begin.
• Disconnect the (-) negative lead from your vehicle’s battery.
• Never use force when installing a Bass Habit product.
• Locate all fuel lines, brake lines, oil lines and electrical cables when planning your installation.
CHOOSE BETWEEN USING HIGH LEVEL OR LOW LEVEL CONNECTION
NOTE! Do not connect your Bass Habit Subwoofer Encosure to both High and Low level inputs at the same time.
This might result in damage to the product or your sound system. You need to choose to use either High or Low.
High level input connection is used to connect to the head unit’s High Level (speaker wire) output. Low level
input connection is used to connect to the head unit’s Low Level (RCA) output. A dedicated subwoofer or low
level signal will give you the best performance of the product. When connecting your subwoofer enclosure,
please follow the folowing wiring examples depending on your choise regarding usage of the High or Low
level. Look at the next page to see the wiring examples.
UNPACKING
INCLUDED IN THE PACKAGING
• P8A active subwoofer enclosure
• Remote subwoofer gain control module
• Remote gain control cable 5m (telephone wire with RJ45 connectors)
• High level input cable 1m (4-pin molex style wiring harness)
• Power connection cable 0,3m (6-pin molex style wiring harness with +12V, REM & GND)
• 20Amp fuse (Yellow ATC)
• Mounting straps 1,2m
• Screws
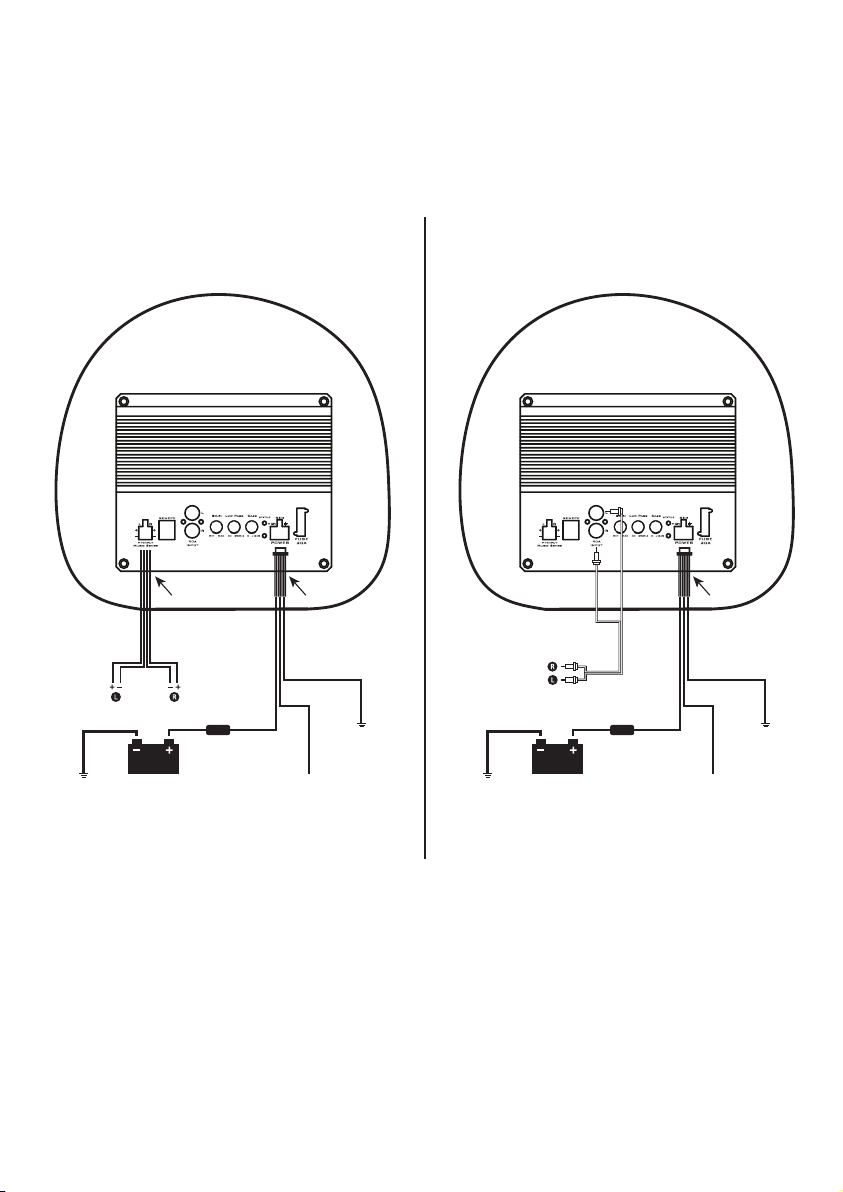
WIRING EXAMPLES
You need to choose if you want to use the High Level input or Low Level input when connecting your Bass Habit
Subwoofer Enclosure to your sound system. When you have decided, see the correct wiring example below.
NOTE! The included fuse should be installed within 30cm of the battery.
HIGH LEVEL CONNECTIONS LOW LEVEL CONNECTIONS
L+
L-
R+
R-
6-pin
(black)
(blue)
(red) CHASSI
GROUND
REMOTE TURN ON
(TO POWER ANTENNA)
GROUND
4-pin
12V
(Fuse)
6-pin
(black)
(blue)
(red) CHASSI
GROUND
REMOTE TURN ON
(TO POWER ANTENNA)
GROUND
12V
LR
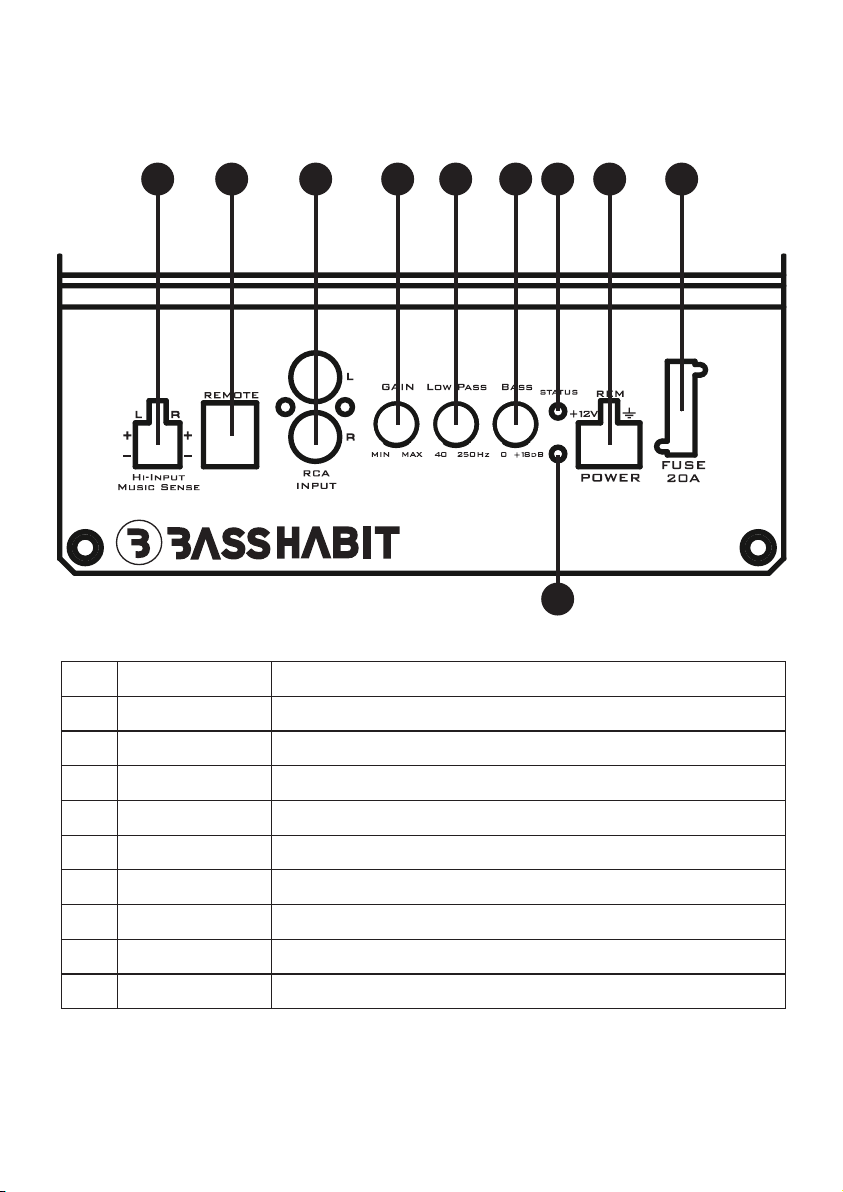
AMPLIFIER CONTROL PANEL
1
2
3
4
5
6
7
8
High input
Remote
Low input
Gain
LPF
Bass boost
Status LED
Power LED
9
10
Power
Fuse
Connect to the sound system’s existing speaker wires
Remote volume control input
Connect to source unit RCA output
Set the input sensitivity from the source unit
Low Pass Filter 40-250Hz, adjust frequency reproduction
Enhances bass frequencies 0-18dB (45Hz)
Indicates active protection mode (glows red)
Indicates system working and power on (glows green)
Plug-in connector for power, ground & remote turn-on
20A fuse that protects the amplifier against overdrive
1 2 3 4 5 6 7
8
9 10

Grey&White
Grey
Green&White
Green
AMPLIFIER CONTROL PANEL & CONNECTIONS
HIGH INPUT
Use included connector to establish contact with existing speaker wires. Make sure to follow the correct
polarity.
High level connector polarity:
• Green & White stripe: Left speaker +
• Green: Left speaker -
• Grey & White stripe: Right speaker +
• Grey: Right speaker -
High-level input also has AUTO ON that allows the
subwoofer to start without a pre-drawn REM connection.
GAIN
Gain control to set the input sensitivity from the source unit. Turn the GAIN control to a minimum (full counter
clockwise) and the connected remote volume control to full (clock- wise), turn off BASS BOOST and any EQ
functions on your head unit. Increase the volume on the source unit to 3/4 using a music track you know well.
Very slowly increase the GAIN control until the music gets slightly distorted. Reduce the GAIN slightly until the
distortion is gone. CAUTION! The GAIN is not a volume control.
BASS BOOST
Enhances bass frequencies 0-18dB. Use this function with care, and do not adjust after setting the GAIN
correctly.
POWER CONNECTION
The Bass Habit Subwoofer Enclosure has been included with a Plug-in connector to wire up the Power,
Ground and Remote Turn-on in the following steps:
+12V: Connect the two twisted Red wires to 12Volt positive. Route the wire through a rubber grommet in the
vehicles firewall. NOTE! If there is no factory made grommet available you will have to install one yourself.
You need to install a FUSE HOLDER with a 20A fuse in line with the power cable close to the battery. The fuse
needs to be placed closer than 30cm from the battery.
REM: Connect the single blue wire to the radio power antenna lead or remote output. The wire is used for
turning the amplifier on and off. If your source unit does not have a remote lead equipped, you can connect
the wire to an accessory or ignition point at the vehicle’s fuse block.
GND: Connect the two twisted black wires directly to the chassi of the vehicle. The wires should be kept at a
minimum length and be terminated to bare metal using a ring terminal.

Component
Size
RMS Power
MAX Power
Nominal Impedance
Freq. Response
Sensitivity
Voice coil diameter
Active subwoofer enclosure
8” (200MM)
100W
200W
4 Ohm
35Hz - 250Hz
95 dB
1,5” (40MM)
SPECIFICATION P8A
Magnet
Crossover slope
Crossover range
Ferrite
12db / Octave
40Hz - 250Hz
Dimension (LxWxH) 368/546x254x254mm
546mm254mm
368mm
254mm
254mm

Symptom
No power
No Audio
Status LED glowing
Distortion
Check / Control
Power cable (measure), REM
connection (measure). Check
fuses, control GND connection
Control source unit and signal
cables. If the unit is connected
with high-level: control connec-
tions and speaker cables.
Control power cables (measure)
and battery condition. Check
impedance at speaker terminals.
Check speaker cables.
Check GAIN setting. Turn off bass
boost.
TROUBLESHOOTING

The crossed-out wheelie bin symbol means that the product, literature and packaging included must be taken to
separate collection at the end of their working life. Do not dispose of these products as unsorted municipal waste:
dispose of them at a recycling point. For info on your nearest recycling point, check with your local waste
authority.
Winn Scandinavia reserves for possible typos, factual or numeric errors that may have been printed on any
products, package designs, user manuals and/or other included accessories.
Products marked with the RoHS symbol complies with the relevant provisions of the RoHS Directive for the
European Union. In common with all Electrical and Electronic Equipment (EEE) the product should not be
disposed of as household waste. Alsternative arrangements may apply in other jurisdictions.
The product with the CE mark indicates that it has passed the correspondning conformity assessment procedure
and the manufacturer’s declaration of conformity, and it complies with the relevant EU directives, and is used as
a pass for the product to be allowed to enter the European Community market. Relevant directives require
industrial products to be affixed with the CE mark. Those that do not have the CE mark shall not be marketed.


Table of contents
Other Bass Habit Subwoofer manuals


