Bavaria BPH 2652/1 User manual

BPH 2652/1
Original operating instructions
Petrol Hedge Trimmer
Art.-Nr.: 34.038.18 I.-Nr.: 11013
Anleitung_BG-PH_2652_SPK1__ 12.06.2012 8:20 Uhr Seite 1

2
Read and follow the operating instructions and safety information
before using for the first time.
Anleitung_BG-PH_2652_SPK1__ 12.06.12 08:20 Seite 2

3
1
2
161143
2
1
13 6
20
18
19
3
8
14
7
17 510 9
14
7
815
12
21
6
13
Anleitung_BG-PH_2652_SPK1__ 12.06.12 08:20 Seite 3
4
4 5
6 7
8 9
5A
45°
45°
90°
90°
9
B
Anleitung_BG-PH_2652_SPK1__ 12.06.12 08:20 Seite 4

5
10 11
12 13
14 15
A
Anleitung_BG-PH_2652_SPK1__ 12.06.12 08:20 Seite 5
6
16
12
17
3
18
4
19
5
20
12345
78910
11
6
Anleitung_BG-PH_2652_SPK1__ 12.06.12 08:20 Seite 6

Important!
When using the equipment, a few safety precautions
must be observed to avoid injuries and damage.
Please read the complete operating instructions and
safety regulations with due care. Keep this manual in
a safe place, so that the information is available at all
times. If you give the equipment to any other person,
hand over these operating instructions and safety
regulations as well. We cannot accept any liability for
damage or accidents which arise due to a failure to
follow these instructions and the safety instructions.
1. Safety regulations
The corresponding safety information can be found
in the enclosed booklet.
CAUTION!
Read all safety regulations and instructions.
Any errors made in following the safety regulations
and instructions may result in an electric shock, fire
and/or serious injury.
Keep all safety regulations and instructions in a
safe place for future use.
Explanation of the warning signs on the
equipment (see Fig. 20)
1. Warning!
2. Read the directions for use before operating the
equipment.
3. Do not expose the hedge trimmer to rain or wet
conditions.
4. Wear eye protection and ear plugs.
5. Wear safety gloves.
6. Wear sturdy, non-slip footwear.
7. Caution: Sharp blades! Always keep hands and
feet away from the blades.
8. Operate and start the equipment only outdoors in
well ventilated areas to reduce the danger of
injury from toxic gases.
9. Explosive material.
10. Very hot surface. Do not touch the hot exhaust
silencer, gearbox or cylinder. You may burn
yourself. These parts have become very hot
during operation and remain very hot over a long
period even after the equipment has been
switched off.
11. Maintain a distance of at least 15 m from other
persons.
2. Layout and items supplied (Fig. 1-2)
1. Cutting blade
2. Cutting blade safety cover
3. Safety plate
4. Front handle
5. Choke lever
6. ON/OFF switch
7. Locking knob for throttle lever
8. Locking knob for rotary handle
9. Fuel pump (primer)
10. Air filter cover
11. Starter handle
12. Rear handle
13. Throttle lever “release”
14. Throttle lever
15. Silencer cover
16. Tank for fuel mixture
17. Spark plug boot
18. Spark plug wrench
19. 8 mm / 10 mm open-ended spanner
20. Combined oil/petrol cylinder
21. Cutter rail cover
3. Proper use
Important. This hedge trimmer is suitable for cutting
hedges, bushes and shrubs.
Please note that our equipment has not been
designed for use in commercial, trade or industrial
applications. Our warranty will be voided if the
equipment is used in commercial, trade or industrial
businesses or for equivalent purposes.
GB
7
Anleitung_BG-PH_2652_SPK1__ 12.06.12 08:20 Seite 13

4. Technical data
Engine type:
2-stroke engine, air-cooled, chrome cylinder
Engine output (max.): 0.75 kW / 1.0 hp
mcc62:tnemecalpsiD
Idle speed of engine: 2960 min-1
nim0088deepsenigne.xaM -1
Weight (with empty tank): 5.5 kg
mc56:htgnelliarrettuC
mc25:htgnelgnittuC
mm82:gnicapshtooT
mm91).xam(yticapacgnittuC
l5.0:yticapacknaT
A7RMPBKGN:gulpkrapS
Max. cutting speed 2300 ± 100 cuts/min
Vibration (front handle) ahv 13.33 m/s2
s/m5,1ytniatrecnuK 2
Vibration (rear handle) ahv 7.69 m/s2
s/m5,1ytniatrecnuK 2
Sound pressure level LpA 97 dB
Bd3ytniatrecnuK
Sound power level LWA 107 dB
Bd3ytniatrecnuK
Sound and vibration were measured in accordance
with DIN EN 10517.
5. Before starting the machine
5.1 Installation
The hedge trimmer is supplied fully assembled. No
assembly work is required.
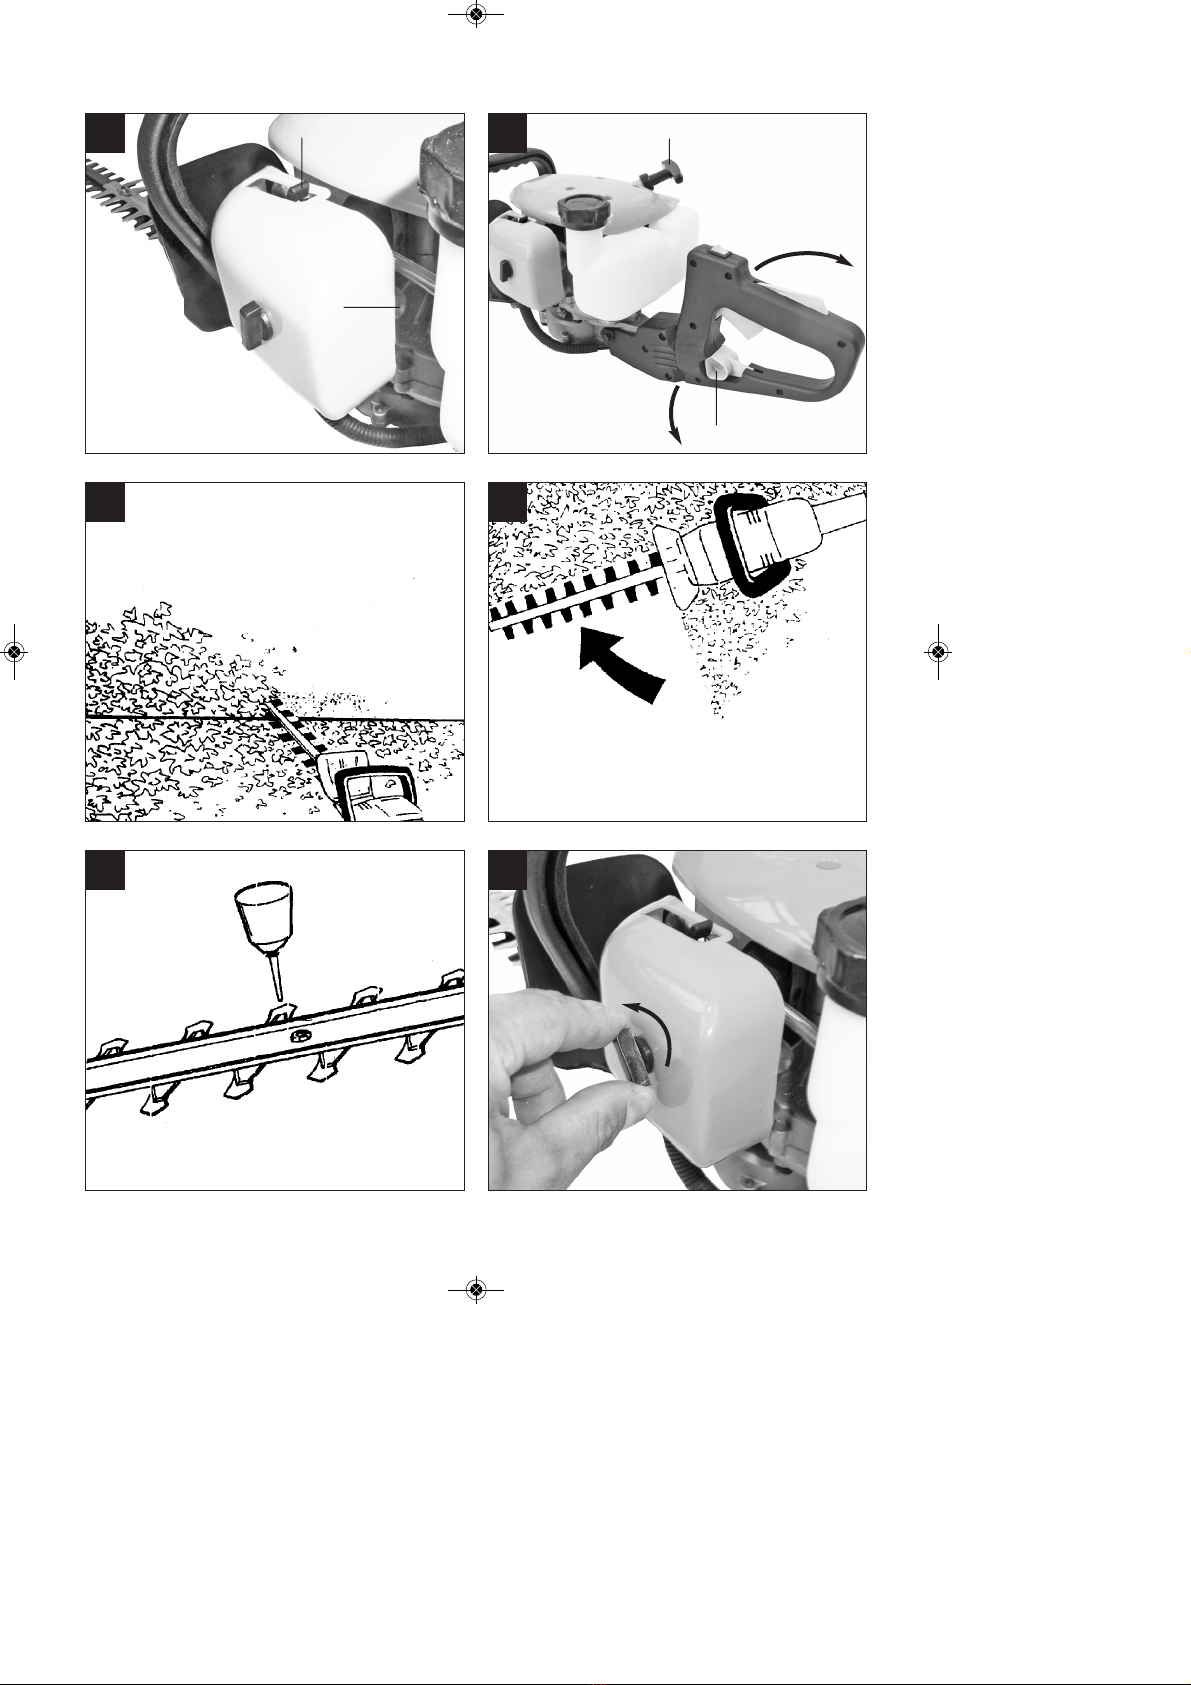
To make it easier to control, the machine is fitted with
a rotary handle that can be adjusted as required into
positions at angles of -90°/-45°/0°/+45°/+90°. To do
this, pull the lever (Fig. 5/Item B) backwards, turn the
rotary handle into the required position and then
allow the lever to lock at the front again. The various
adjustable positions facilitate working above head
height or in other places with different access.
Please note: The rotary handle may only be
adjusted when the engine is switched off.
5.2 Fuel and oil
Recommended fuels
Use only a mixture of normal unleaded petrol and
special 2-stroke engine oil. Mix the fuel mixture as
indicated on the fuel mixing table.
Please note: Do not use a fuel mixture which has
been kept for longer than 90 days.
Please note: Do not use 2-stroke oil with a
recommended mixing ration of 100:1. If inadequate
lubrication causes engine damage, the
manufacturer’s engine warranty will be voided.
Please note: Only use containers designed and
approved for the purpose to transport and store fuel.
Pour the correct quantities of petrol and 2-stroke oil
into the mixing bottle (see scale printed on the
bottle). Then shake the bottle well.
5.3 Fuel mixture table
Mixing procedure: 40 parts petrol to 1 part oil
6. Operation
Please note that the statutory regulations governing
noise abatement may differ from town to town.
6.1 Starting the engine from cold (Fig. 3-5)
Fill the tank with the required amount of oil/petrol
mix.
1. Set the machine down on a hard, level surface.
2. Set the choke lever (Fig. 4/Item 5) to “ ”.
3. Press the fuel pump (primer) (Fig. 4/Item 9) 10
times.
4. Move the ON/OFF switch (Fig. 3/Item 6) to “I”
5. Secure the throttle lever. To do this, press the
throttle lever lock (Fig. 3/Item 13) and then press
the throttle lever (Fig. 3/Item 14) and lock the
throttle lever by pressing the locking knob (Fig.
3/Item 7) at the same time.
6. Hold the machine by the front handle in your
right hand and pull the starter cable (Fig. 5/Item
A) up to the first resistance point (approx. 10
cm). Then tug sharply on the starter cable 4
times. The machine should start.
Please note: Never allow the starter cable to
snap back. This may damage the machine.
7. If the engine has started, set the choke lever
immediately to “ ” and allow the machine to
GB
8
Petrol 2-stroke oil
1 liters 25 ml
5 liters 125 ml
Anleitung_BG-PH_2652_SPK1__ 12.06.12 08:20 Seite 14

warm up for approx. 10 seconds.
Then release the throttle lever by simply
actuating it (the engine then returns to running in
idle mode).
8. If the engine does not start up, repeat steps 6-7
above.
Please note: If the engine does not start up even
after several attempts, read the section “Engine
Troubleshooting”.
Please note: Always pull the starter cable out in a
straight line. If it is pulled out at an angle, then friction
will occur on the eyelet. As a result of this friction, the
cable will become frayed and will wear away faster.
6.2 Starting the engine when warm (if the
machine has not been switched off for more than
15 – 20 minutes)
1. Set the machine down on a hard, level surface.
2. Switch the ON/OFF switch to “I”.
3. Secure the throttle lever (in the same way as
described in “Starting the engine when cold”).
4. Hold the machine by the front handle in your
right hand and pull the starter cable up to the first
resistance point (approx. 10 cm). Then tug
sharply on the starter cable. The machine should
start after 1-2 tugs. If the machine does not start
after 6 pulls, repeat steps 1 – 7 of the procedure
for starting the engine from cold.
6.3 Switching off the engine
Emergency Stop procedure:
If it becomes necessary to stop the machine
immediately, set the ON/OFF switch to “Stop” or “0”
Normal procedure:
Let go of the throttle lever and wait until the engine
has changed to idling speed. Then set the ON/OFF
switch to “Stop” or “0”.
6.4 Practical tips
Never allow the machine to run at low speed for
starting or for cutting.
Cutting for dense growth: The most effective
method is to use wide, sweeping movements,
guiding the cutting edge of the blade straight through
the branches. A slight incline of the blade downwards
towards the movement will produce best cutting
results.
It is recommended to tie a guide line of string or the
like along the hedge so that you cut the hedge to a
level height. The branches above it will be cut off.
(Fig. 6)
Cutting the side of a hedge: Cut the sides of the
hedge with curve-shaped movements from the
bottom up. (Fig. 7)
Please note: As a result of its design, if you work
with the machine on its side for a lengthy period and
the tank not completely filled, the motor may stall.
7. Cleaning, maintenance, storage and
ordering of spare parts
7.1 Cleaning
Keep all safety devices, air vents and the motor
housing free of dirt and dust as far as possible.
Wipe the equipment with a clean cloth or blow it
with compressed air at low pressure.
We recommend that you clean the device
immediately each time you have finished using it.
Clean the equipment regularly with a moist cloth
and some soft soap. Do not use cleaning agents
or solvents; these could attack the plastic parts of
the equipment. Ensure that no water can seep
into the device.
7.2 Maintenance
Always switch off the head trimmer and remove the
spark plug boot before carrying out any maintenance
work.
1. The cutter blades are high quality, made of
tempered steel and in normal use there is no
need to sharpen the blades. If you accidentally
strike a wire, stone, glass or other hard object,
this may cause a notch in the blade. There is no
need to remove the notch as long as it does not
adversely affect the movement of the cutting
edges. If it does adversely affect this movement,
switch off the machine and use a fine file or a
fine grinding stone to remove the notch. Ensure
that the blade’ s cutting edge is always well oiled
(see Fig. 8).
2. If you drop the hedge trimmer, check whether it
has suffered any damage. If it is damaged
contact an authorized customer service outlet or
call 1300 922 271.
3. Only clean the machine after it has been
switched off. Use only mild soap and a damp
cloth to clean it. Never allow fluid to get into the
machine. Do not use caustic cleaning products.
GB
9
Anleitung_BG-PH_2652_SPK1__ 12.06.12 08:20 Seite 15

7.2.1 Maintenance of the air filter (Fig. 9-11)
Soiled air filters reduce the engine output by supply
too little air to the carburetor.
Regular checks are therefore essential. The air filter
should be checked after every 25 hours of use and
cleaned if necessary. If the air contains a lot of dust,
the air filter should be checked more frequently.
1. Remove the air filter cover (Fig. 9-10)
2. Remove the filter element (Fig. 11)
3. Clean the filter element by tapping it or blowing
it.
4. Assemble in reverse order.
Please note: Never clean the air filter with petrol or
inflammable solvents. Clean the air filter with
compressed air or by tapping it.
7.2.2 Maintenance of the spark plug (Fig. 12-14)
Spark plug gap = 0.025 inch (0.635 mm). Tighten the
spark plug with a torque of 12-15 Nm.
Check the spark plug for dirt and grime after 10
hours of operation and if necessary clean it with a
copper wire brush. Thereafter service the spark plug
after every 50 hours of operation.
1. Pull off the spark plug boot (Fig. 13) by twisting.
2. Remove the spark plug (Fig. 14) with the
supplied spark plug wrench.
3. Assemble in reverse order.
7.2.3 Maintenance of the gearbox (Fig. 15)
The gearbox must be lubricated every year before
the start of the season at the lubrication nipple (Fig.
15/Item A). Place a conventional grease gun on the
nipple and press approx. 3 strokes of conventional
machine grease into the gearbox. If you use the
trimmer frequently, grease the gearbox more often.
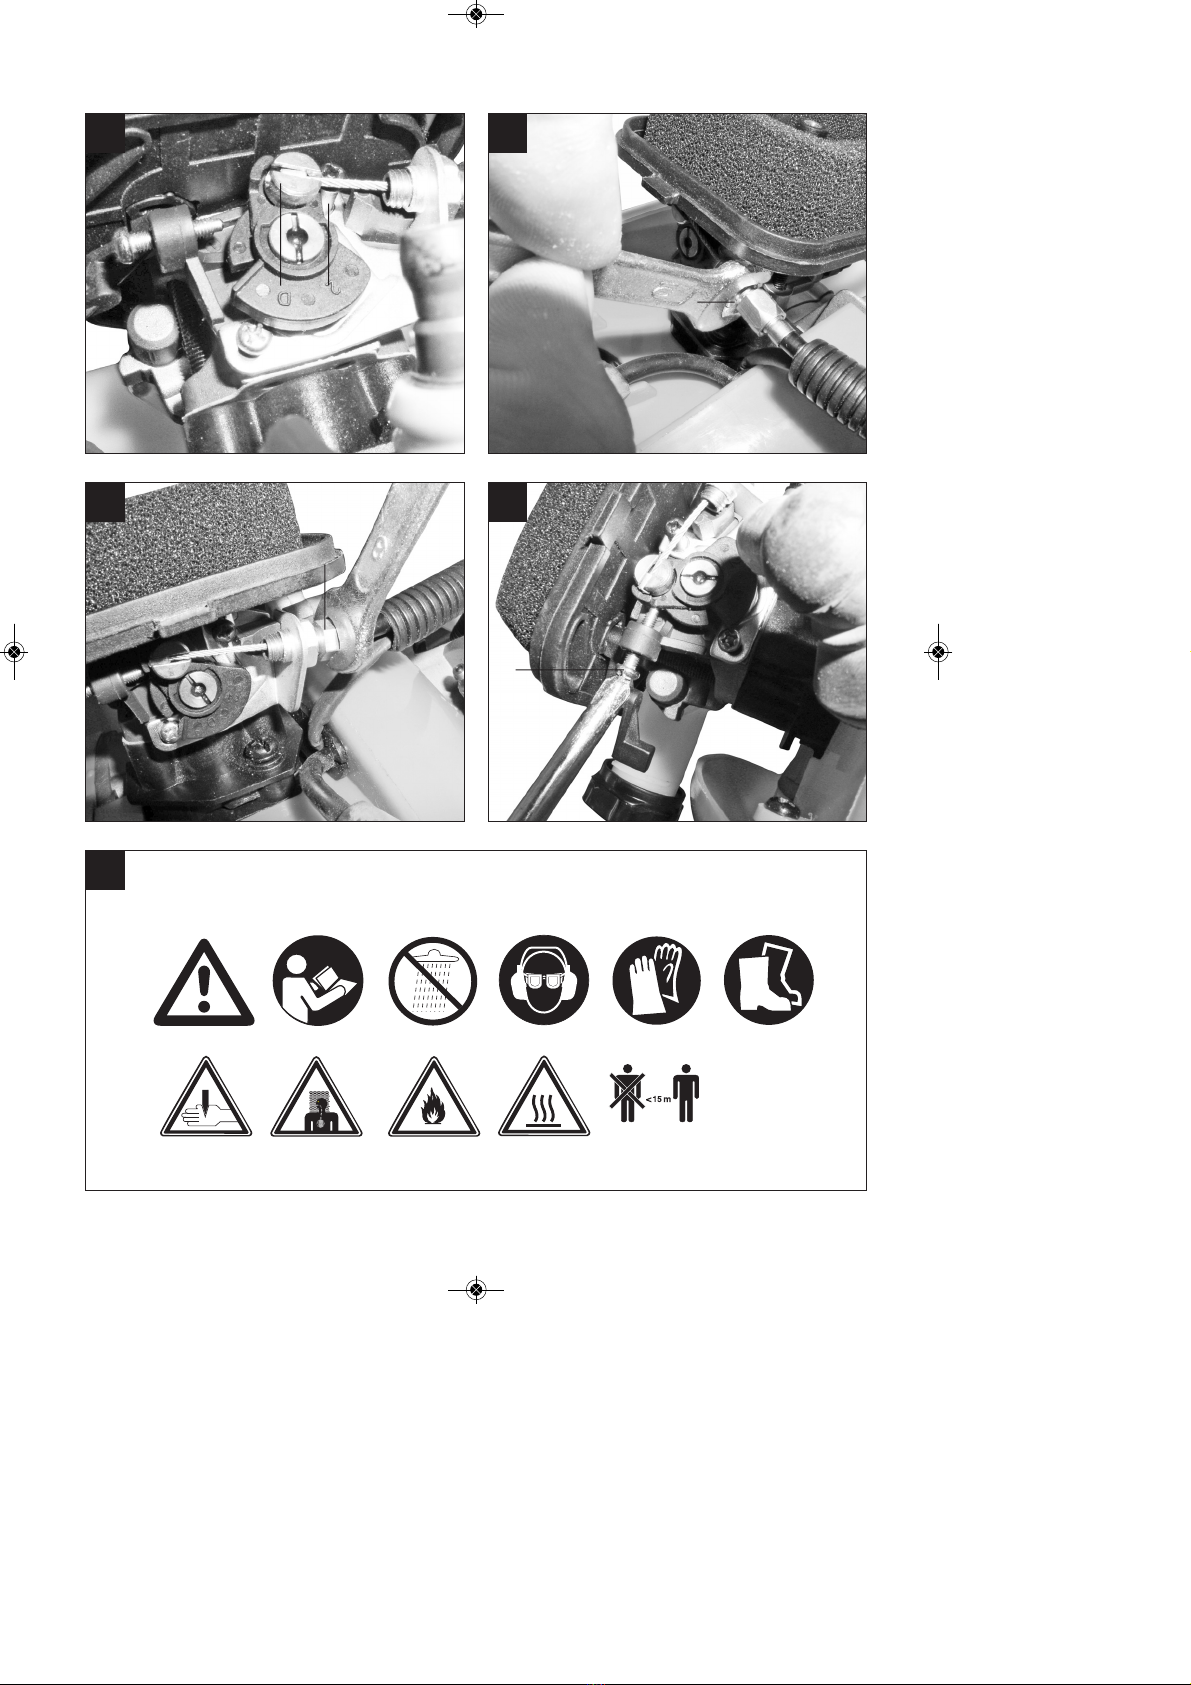
7.2.4 Carburetor settings
Important. Settings on the carburetor may only be
made by authorized customer service personnel.
The air filter cover must be removed before any work
on the carburetor, as shown in Figures 9 – 10.
Setting the throttle cable:
If the maximum speed of the machine falls over time
and you have ruled our all the other causes listed in
section 9 Troubleshooting, it may be necessary to
adjust the throttle cable.
First of all check whether the carburetor opens fully
when the throttle handle is pressed fully. This is the
case if the carburetor slide (Fig. 16/Item 1) rests
against the stop (Fig. 16/Item 2) when the throttle is
fully open. Figure 16 shows the correct setting. If the
carburetor slide does not touch the stop, it must be
adjusted.
The following work is required to adjust the throttle
cable:
Undo the lock nut (Fig. 17/Item 3) a few turns.
Undo the adjusting screw (Fig. 18/Item 4) until
the carburetor slide rests against the stop when
the throttle is fully open, as shown in Figure 16.
Retighten the lock nut.
Setting the idling speed:
Important. Set the idling speed when the machine is
warm.
If the engine stalls when the throttle is not pressed
and you have ruled out all the other causes listed in
section 9 Troubleshooting, the idling speed must be
adjusted. To do this turn the idling speed screw (Fig.
19/Item 5) clockwise until the machine runs smoothly
at idling speed.
If the idling speed is so fast that the cutting blades do
not reach a standstill, the idling speed must be
reduced by turning the idling speed screw (Fig.
19/Item 5) counterclockwise until the cutting blades
stop.
7.3 Storage
Please note: If you fail to follow these instructions
correctly, deposits may form on the interior of the
carburetor which may result in the engine being more
difficult to start or the machine suffering permanent
damage.
1. Carry out all the maintenance work.
2. Drain the fuel out of the tank (use a conventional
plastic petrol pump from a DIY store for this
purpose).
3. When the fuel has been drained, start the
engine.
4. Allow the engine to run at idling speed until it
stops. This will clean the remainder of the fuel
out of the carburetor.
5. Leave the machine to cool (approx. 5 minutes).
6. Remove the spark plug (see point 7.2.2).
7. Place a teaspoon full of 2-stroke engine oil into
the combustion chamber. Pull the starter cable
several times carefully to wet the internal
components with the oil. Fit the spark plug again.
8. Clean the exterior housing of the machine.
9. Store the machine in a cold, dry place where it is
out of the reach of ignition sources and
inflammable substances.
10. Always place the cover over the cutter when
transporting or storing the equipment.
GB
10
Anleitung_BG-PH_2652_SPK1__ 12.06.12 08:20 Seite 16
Other manuals for BPH 2652/1
1
This manual suits for next models
1
Table of contents
Other Bavaria Trimmer manuals


