Bavarian Soundwerks E46 Convertible User manual

1 of 10
Any reproduction, distribution, modification, or dissemination of these instructions without written permission from Bavarian Soundwerks is
expressly forbidden and a violation of international copyright law. Any violation will result in prosecution to the full extent available under
the law!
© 2006 Bavarian Soundwerks, LLC.
2195 Defoor Hills Rd., Suite D, Atlanta, GA 30318
P: 404.963.8857 | www.bavsound.com
Stage 1 Audio Upgrade (BMW Speakers) Installation Instructions
for BMW 3 Series, M3 Convertible ‘00-‘06 (E46)
Tools Required:
(All the below are readily available at your local auto
parts store)
•Phillips Head Screwdriver
•Panel Removal Tools
•Torx bit set
•Small, Straight Pick Tool
•8mm Socket Wrench
•13mm Socket Wrench
•Hot Glue Gun w/Glue Sticks
•Brain
Before you Begin
•Please review and familiarize yourself completely with these instructions
before starting work on your vehicle!
•Insure that your bass and treble settings are set to their default middle positions before
installing your new speaker upgrade. Once you’ve installed your Stage 1, you can reset the
bass and treble settings to taste. Keep in mind that we generally recommend keeping them both
very close to center as large adjustments introduce distortion into the audio signal and will lower
performance of your system.
•Perform the installation one door at a time. Since there are many small parts that you’ll remove
when completing the project, limiting the work you’re doing to one door will prevent you from
confusing which parts go with what door. Take a quick listen to confirm that the speakers are
functional, but wait until all of the speakers are installed for a complete audition. Installing the
speakers into one door and comparing them to the rest of the factory speakers will not yield the
desired results of the upgrade.
•
The Process
As each customer’s installation is unique, it is important to remember that installation is essentially the
reverse of the removal process outlined below, though you will need a certain level of personal ingenuity and
certain tools outlined above. Variations occasionally occur, so if anything seems out of line with what is
contained in the pages that follow, don’t hesitate to contact us.
If you experience any issues with your installation, please consult the troubleshooting guide located
at the rear of this installation packet.
We’re going to proceed as follows:
1. Front Doors
2. Rear Side Panels

2 of 10
Any reproduction, distribution, modification, or dissemination of these instructions without written permission from Bavarian Soundwerks is
expressly forbidden and a violation of international copyright law. Any violation will result in prosecution to the full extent available under
the law!
© 2006 Bavarian Soundwerks, LLC.
2195 Defoor Hills Rd., Suite D, Atlanta, GA 30318
P: 404.963.8857 | www.bavsound.com
Front Door Removal:
1. Start by rolling down the windows on all of the doors. This will decrease the chance of scratching
the glass or tint on the window.
2. Starting with the passenger door, locate the door handle/armrest that runs the length of the door.
You will see three indentions along the underside of this panel. There will be one towards the front
of the door near the top of the handle, one at the bottom of the handle, and one more towards the
rear. These three bolts are Torx T20. Remove them by turning them counter clockwise, and placing
them in a safe place where you won’t lose them.
3. Locate the airbag plug towards the rear center of the door panel. Remove this using your panel
popper. Pry from the top and bottom very carefully. This will reveal another Torx T20.
4. Now, look behind the chrome door handle, and you will see a small plastic black circle. Remove
this with the straight pick, and you will see another Torx T20.
5. Driver’s side door only: You will also need to pop out the side mirror control switch in the driver’s
door. Remove it using a small flat head screwdriver, lifting upward from the rear of the switch, and
unplug. This may also be done when the door panel is off by using your finger to push it out
from the inside.
6. Carefully insert your panel removal tool on the front side bottom edge as shown (Figure 4). Pry
steadily outward until your hear the clip(s) release themselves.

3 of 10
Any reproduction, distribution, modification, or dissemination of these instructions without written permission from Bavarian Soundwerks is
expressly forbidden and a violation of international copyright law. Any violation will result in prosecution to the full extent available under
the law!
© 2006 Bavarian Soundwerks, LLC.
2195 Defoor Hills Rd., Suite D, Atlanta, GA 30318
P: 404.963.8857 | www.bavsound.com
7. Now, using your hands, as this will decrease the chances of anything becoming scratched;
continue pulling outward around the bottom and side edges of the door. Leave the top part
attached, as we will release this edge of the door panel last.
8. Carefully pull outward and upward from the rear of the door along the top edge.
9. Be careful of the lock mechanism because the door can be released now, but you aren’t quite
finished. You have to unhook the door handle itself. Simply lift the white clip away from the door
panel, and pull it out of the mechanism.
10. Unplug the speaker wires from each speaker, and you can remove the panel completely.

4 of 10
Any reproduction, distribution, modification, or dissemination of these instructions without written permission from Bavarian Soundwerks is
expressly forbidden and a violation of international copyright law. Any violation will result in prosecution to the full extent available under
the law!
© 2006 Bavarian Soundwerks, LLC.
2195 Defoor Hills Rd., Suite D, Atlanta, GA 30318
P: 404.963.8857 | www.bavsound.com
Front Midbass Installation:
First, notice that the larger speaker in the lower panel is attached using three Phillips head screws. (See
below) These can also be Torx T20 or T27 bolts. Remove these, and place them with the other Torx bolts
which you have already put aside in a safe place, haven’t you? ☺
Reattach the new midbass driver to the door panel using the original factory hardware. If your factory
speaker had a foam baffle around it, remove it and reuse it on the new BSW midbass driver.
Tweeter/Midrange Assembly Removal/Installation:
You’ll first want to remove the entire tweeter/midrange assembly by removing the three Torx T20 screws that
attach it to the door panel. Once removed, again place the screws somewhere safe so as not to lose them.
You’ll simply reattach the new midrange/tweeter housing into place using the factory hardware that was
removed from the factory speaker housing.
Let’s take the door panel back over to the vehicle and make our final wiring connections with the midbass
drivers.

5 of 10
Any reproduction, distribution, modification, or dissemination of these instructions without written permission from Bavarian Soundwerks is
expressly forbidden and a violation of international copyright law. Any violation will result in prosecution to the full extent available under
the law!
© 2006 Bavarian Soundwerks, LLC.
2195 Defoor Hills Rd., Suite D, Atlanta, GA 30318
P: 404.963.8857 | www.bavsound.com
Front Midbass Wiring Connections:
In order to make the wiring connections on the new midbass drivers, we’re going to use the existing factory
plugs. We’re just going to slide the terminals on the end of the wiring attached to your new speaker into the
factory plugs that you removed from the factory speakers. Here are a few photos to illustrate the process:
Driver Door
Blue w/White Stripe (+) Red
Blue w/Brown Stripe (-) Connects to Black
Passenger Door
Blue w/Red Stripe (+) Red
Blue w/Brown Stripe (-) Connects to Black
Rear Speaker Removal/Installation
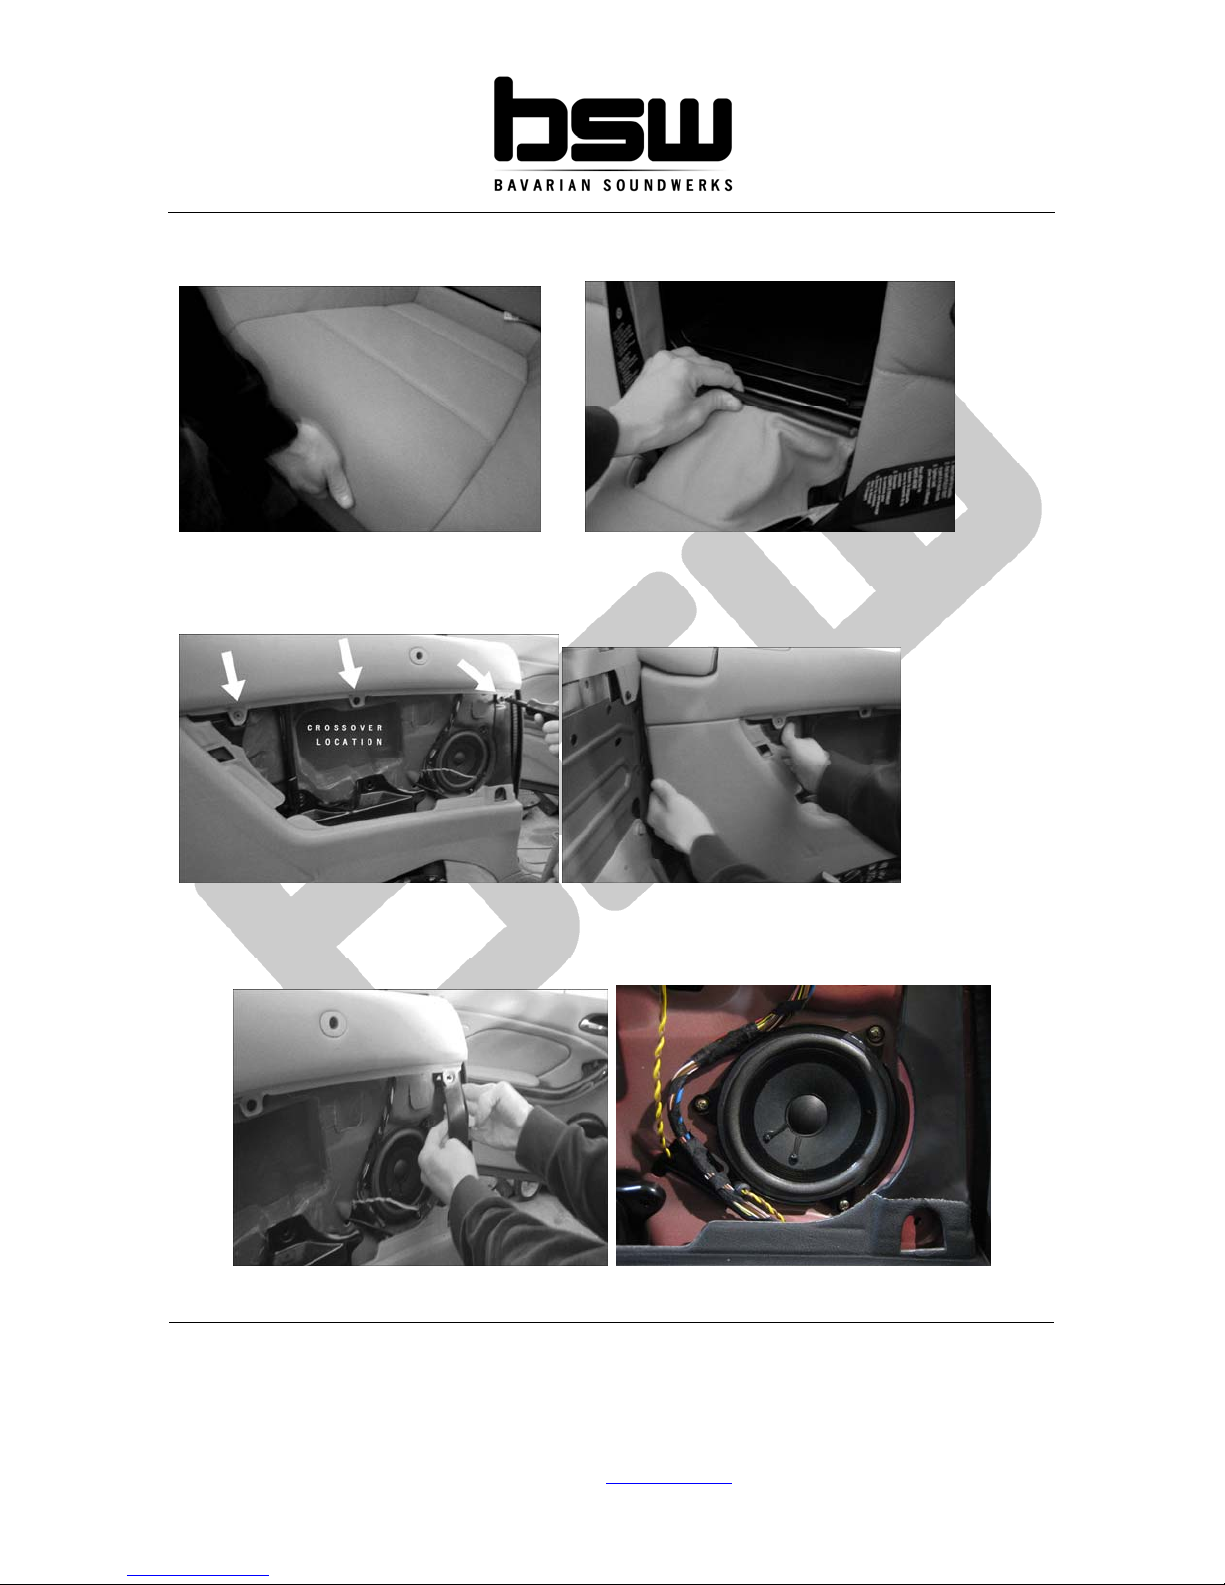
1. First look underneath the armrests on the side panels on either side of the vehicle. You will see two
holes there. Inside are 8mm bolts that secure the panels to the vehicle. Remove these. We have
also seen these as Torx T20 bolts, but they may be another type.
2. Pull the side moldings from the door jams back, and place your fingers behind the panel containing
the speakers. Firmly pull towards you, and the panel will release itself. Now, slide the panel down
and toward the front of the vehicle. Unplug the tweeter.
6 of 10
Any reproduction, distribution, modification, or dissemination of these instructions without written permission from Bavarian Soundwerks is
expressly forbidden and a violation of international copyright law. Any violation will result in prosecution to the full extent available under
the law!
© 2006 Bavarian Soundwerks, LLC.
2195 Defoor Hills Rd., Suite D, Atlanta, GA 30318
P: 404.963.8857 | www.bavsound.com
3. At this point, it makes things a bit easier to remove the seating area of the backseat to grant better
access to the side panels. Simply lift upward and the seat will free itself. (Figure 14)
4. Unhook the leather flap that attaches the cushion to the back portion of the backseat and remove
the seat bottom.
5. Now, look back to the area uncovered by the side panels. You will see three 7mm bolts along the
bottom edge of the top panel. We will only remove the front and rear bolts. Leave the center one in
place. (Figure 16)
6. Starting at the rear of the panel, pull toward you and downward.
7. Now pull outward and downward, freeing up the top edges of the panel, which will allow you to
remove the panel completely and have ready access to the factory mid bass driver. It is secured by
three (3) Philips head screws. Remove these and unplug the speaker.
7 of 10
Any reproduction, distribution, modification, or dissemination of these instructions without written permission from Bavarian Soundwerks is
expressly forbidden and a violation of international copyright law. Any violation will result in prosecution to the full extent available under
the law!
© 2006 Bavarian Soundwerks, LLC.
2195 Defoor Hills Rd., Suite D, Atlanta, GA 30318
P: 404.963.8857 | www.bavsound.com
8. Plug your new midbass drivers in like you did with the front midbass drivers. Use the chart below
to match wire colors.
Driver Side
Yellow (+) Red
Negative (-) Connects to Black
Passenger Side
Blue (+) Red
Brown (-) Connects to Black
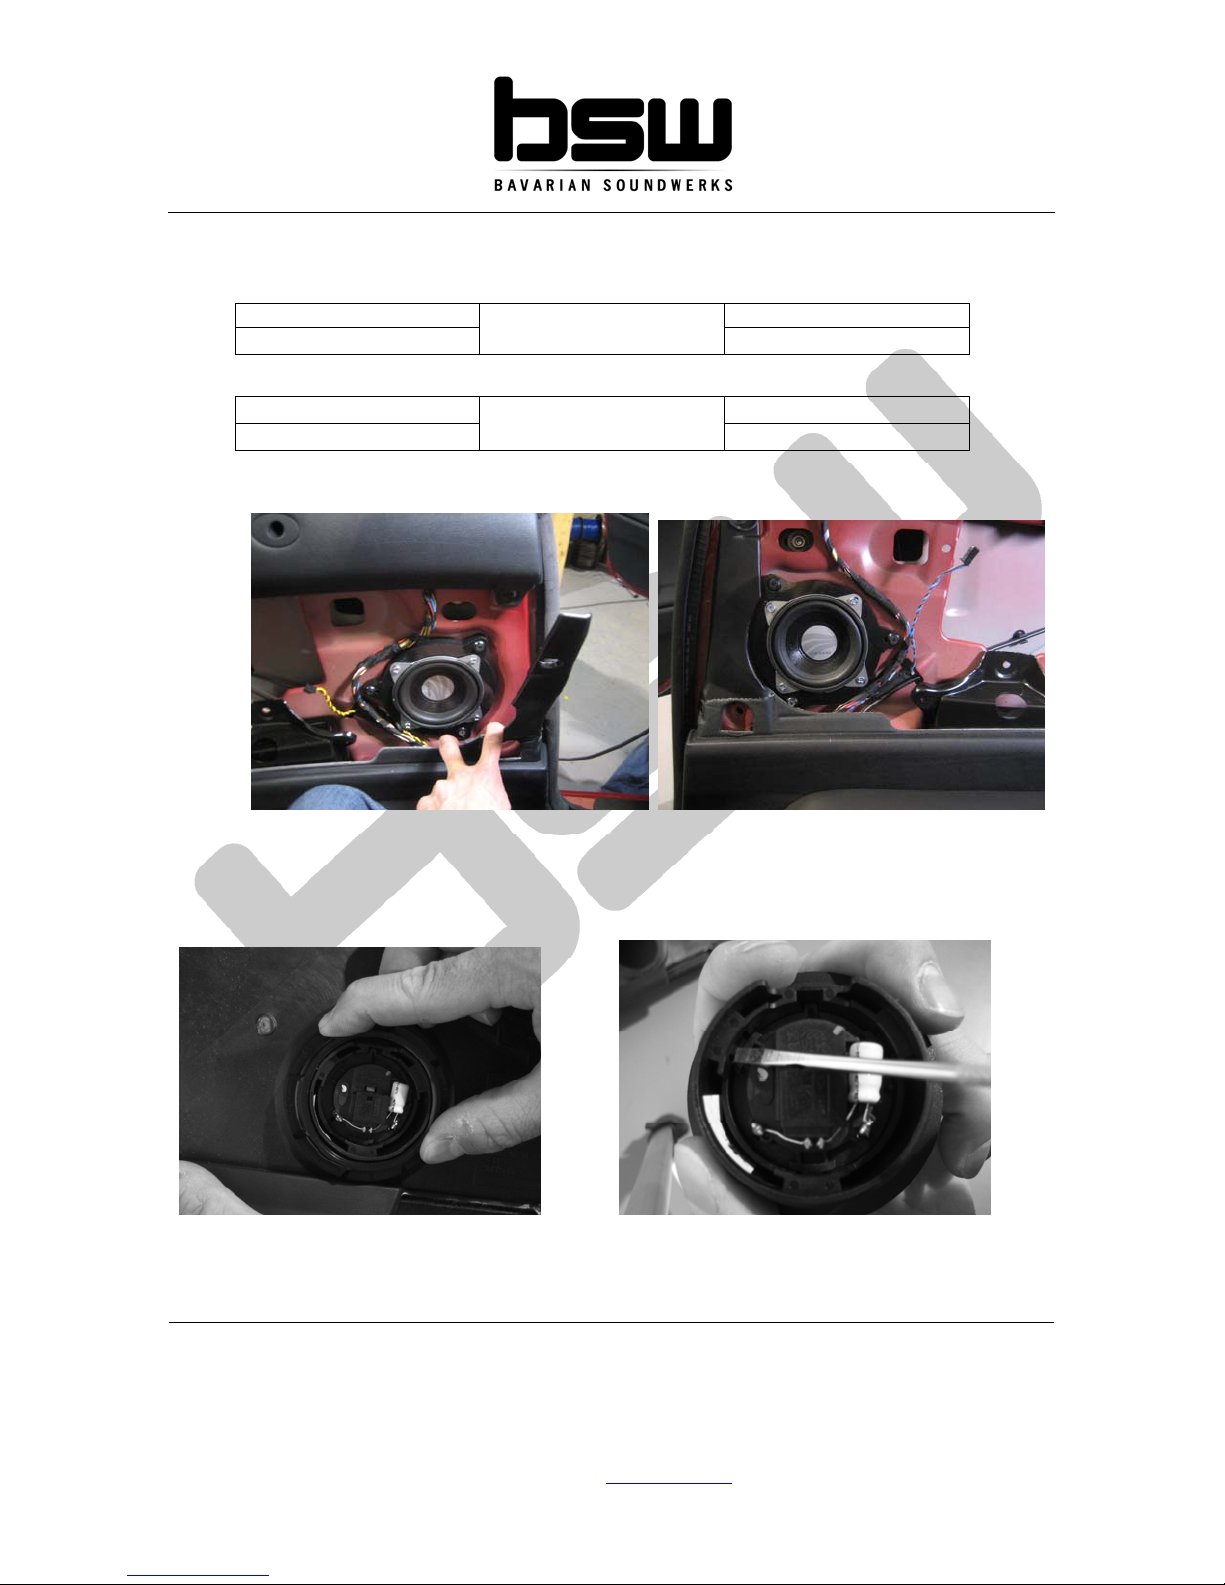
9. Install the new midbass drivers in the factory locations using the supplied long fine thread
screw/washer combination.
Rear Tweeter Installation
1. Before beginning this step, plug in your hot glue gun so that it will be ready by the time you need it.
2. Unscrew the ring that secures the tweeter to the back of the panel. (Figure 19) Remove the entire
tweeter assembly from the panel.
3. Pry the factory tweeter by lifting from the edges of the tweeter using a small screwdriver or pick
tool.

8 of 10
Any reproduction, distribution, modification, or dissemination of these instructions without written permission from Bavarian Soundwerks is
expressly forbidden and a violation of international copyright law. Any violation will result in prosecution to the full extent available under
the law!
© 2006 Bavarian Soundwerks, LLC.
2195 Defoor Hills Rd., Suite D, Atlanta, GA 30318
P: 404.963.8857 | www.bavsound.com
4. Once removed, place the new tweeter in the factory tweeter’s location.
5. Using your hot glue gun, place a bead of hot glue around the outer perimeter of the tweeter,
securing it to the grille housing.
6. Allow 2-3 minutes for the glue to dry, then reinstall the front portion of the assembly back through
the panel, and tighten the ring back into place. Plug the tweeter back in, and reinstall the panel.
Now enjoy your new audio system: go for a drive with the top down!
Stage 1 Speaker Upgrade Troubleshooting Guide:
If you’re experiencing an issue with your new speakers, please carefully read through this guide, as it covers
almost any issue that you are likely to encounter.
If the issue cannot be resolved, please call us at (404) 963.8857 for further support.
Here are the most common issues we’ve experienced:
•No sound from speaker (s)
•Distorted sound from speaker (s)
•Lack of Bass response
•Too much Treble (harshness, brightness, etc.)
•Physically defective speaker (broken or damaged during shipping, no sound)
•Missing product

9 of 10
Any reproduction, distribution, modification, or dissemination of these instructions without written permission from Bavarian Soundwerks is
expressly forbidden and a violation of international copyright law. Any violation will result in prosecution to the full extent available under
the law!
© 2006 Bavarian Soundwerks, LLC.
2195 Defoor Hills Rd., Suite D, Atlanta, GA 30318
P: 404.963.8857 | www.bavsound.com
Let’s address each bullet point:
•No Sound from Speaker:
One of three things is most likely happening, and they are listed in order of most common
occurrence:
1. Wiring on plug-n-play connector is misaligned.
Here we want to check for alignment of wires from their factory plug through the BSW
connector.
Do they line up? If so, was the factory speaker working prior to replacing the speaker?
Go ahead and plug the factory speaker back in to confirm operation. If the factory speaker
works, and the wires in the plug are aligned, the speaker is defective. We need to get you
a new speaker!
If not, let us guide you to the proper connections. Remember, on our wires, the Red
Stripe is positive, while the solid black is negative, while on the BMW side of the plug that
following holds true:
•Black Stripes, Red Stripes, White Stripes, Purple Stripes are Positive.
•Solid wires are negative, as are wires with Brown Stripes or Grey Stripes.
2. Check to make sure that no speaker terminal is touching metal. This can cause the
speaker to not function, as it is effectively grounded (shorted) out. This is very common,
especially in E46 vehicles front mid bass installations.
If you find that this was the case, place electrical tape over the terminals to prevent future
mishaps. If the entire system has no sound after the installation of new speakers, we
almost know for sure that there is a speaker whose terminals are grounded out. Let’s
check the most likely culprits, (E46 mid bass drivers) by disconnecting each speaker until
the music comes back on and we’ve isolated the problem speaker.
3. The Factory Speaker did not work either. If this was the case, and you were trying to fix
the problem by purchasing new speakers, we may need to look at the factory amplifier, as
it is most likely the culprit. Is the entire side (left front, right rear, right front, left rear) not
working, or is it a particular speaker that was not working. Most likely it was a single
speaker. If an entire side is not working, make sure, especially on the tweeters that you
just installed, that neither the positive or negative terminals are touching metal. This can
contribute to an entire side (channel) not working properly.
•Distorted Sound coming from new Speaker
Again, a few things come to mind:
1. Where are the bass/treble settings on the radio/EQ? Flatten out the settings to ensure
no pre-amp distortion is the cause of the problem. If you’re using the radio to test the
speakers, go ahead and use a CD or directly connected iPod instead.
2. Speaker terminals may be touching ground (metal). Where is the distortion coming
from? A single speaker, an entire side (channel), or the entire system? Its best at this
point to go back and disconnect each speaker until the distortion goes away. The
most likely culprit is the E46 front midbass connections.
3. The factory speaker was distorted as well. If a single speaker was distorting, the most
likely culprit is the amplifier. We may need to explore replacing/repairing your factory
amplifier.
•Lack of Bass Response:
A common occurrence when a mid bass speaker is wired “out of phase”. This means that the
positive (+) and negative (-) are backwards on the plug and play connections. Here we’ll want
to check alignment of the connectors as they come together between the speaker and the

10 of 10
Any reproduction, distribution, modification, or dissemination of these instructions without written permission from Bavarian Soundwerks is
expressly forbidden and a violation of international copyright law. Any violation will result in prosecution to the full extent available under
the law!
© 2006 Bavarian Soundwerks, LLC.
2195 Defoor Hills Rd., Suite D, Atlanta, GA 30318
P: 404.963.8857 | www.bavsound.com
factory plugs. The lack of bass response generally is due to one speaker being out of phase
and the other speaker (s) being in phase. The easy fix is checking these connections to make
sure that positives go to positive and negatives go to negatives. Basically, double check your
wiring on each speaker. If one speaker is out of phase, the bass response of the entire vehicle
can be compromised.
•Too Much Treble, Harshness, or Brightness:
There are a couple of things here we’ll need to consider:
1. Where are the bass/treble settings on the radio/EQ? Go ahead and flatten out the
settings to ensure no pre-amp distortion is the cause of the problem. If you’re using
the radio to test the speakers, try using a CD or directly connected iPod instead.
2. What type of factory audio system did the car have in it from the factory? Was it a
Harmon Kardon or a DSP equipped car? We then need to assess whether or not you
were sent the right speakers.
-If the car is a Harmon Kardon 3 Series, and you are experiencing brightness, we
most likely left the capacitors out of the tweeter wiring. We need to send you the
corresponding capacitors for a 3 Series with Harmon Kardon.
-If the car is a non Harmon Kardon equipped 3 Series, the most likely culprit is
that we forgot to install the 8 ohm resistors inline with the midranges and tweeters. Do
you recall seeing a black heat shrink wrapped piece (2” long) inline with the tweeters
and midranges? Alternatively, another indicator of the 8ohm midrange is presence of
a white dot on the speaker basket directly below the terminals. If you don’t have the
resistors or see the dot, you were most likely sent the wrong speakers, and we need
to get the appropriate speakers to you.
•A speaker is physically defective, as in defective from shipping or directly from the
manufacturer.
There is only one solution here:
1. We will be happy to get a replacement speaker out to you. We’ll need to bill you for
the replacement speaker, and once the defective speaker arrives back to us, we will
gladly issue a refund. Once you get the new speaker, please keep us posted on the
results, as want to make sure that everything is sounding as it should.
•Missing Product(s)
If you feel that a product or accessory is missing, let’s check a few things before we send out
replacements. It’ll save everyone a lot of time!
1. Please check to make sure that nothing has gone unnoticed in the packaging. If
you’re calling from your office and don’t have access to the package, please bring the
package to the office the next day so that we can go over with you exactly what was
supposed to be in the packages that we shipped out to you. Sometimes our shipping
department uses filler boxes in packages to ensure that your products aren’t
damaged in shipping, and often times those boxes are mistaken for missing products.
2. If indeed a product is missing, firstly please accept our apologies. We try our best to
ensure that all orders are filled as they should be, but we’re only human! ☺Please
notify us immediately of the missing product, and we will the appropriate pieces out to
you that same business day, provided FedEx hasn’t already come for the day. We
want you to get your new equipment installed as quickly as possible, so we’ll make
sure you have it in an expedited fashion once we’ve been made aware of the
problem.
Table of contents


