manuals.online logo
Brands
  1. Home
  2. •
  3. Brands
  4. •
  5. Hertz
  6. •
  7. Car Speakers
  8. •
  9. Hertz MILLE PRO User manual

Hertz MILLE PRO User manual

Other Hertz Car Speakers manuals

Hertz uno K 130 User manual

Hertz

Hertz uno K 130 User manual

Hertz Dieci DT 16 Setup guide

Hertz

Hertz Dieci DT 16 Setup guide

Hertz Mille User manual

Hertz

Hertz Mille User manual

Hertz Cento CK 130 User manual

Hertz

Hertz Cento CK 130 User manual

Hertz diECi User manual

Hertz

Hertz diECi User manual

Hertz COMP Setup guide

Hertz

Hertz COMP Setup guide

Hertz DCX 87.3 User manual

Hertz

Hertz DCX 87.3 User manual

Hertz HCX 690.4 User manual

Hertz

Hertz HCX 690.4 User manual

Hertz SPL Show ST 25K Neo User manual

Hertz

Hertz SPL Show ST 25K Neo User manual

Popular Car Speakers manuals by other brands

Audiopipe TXX-APA-12BL user manual

Audiopipe

Audiopipe TXX-APA-12BL user manual

Bazooka RS10A-hp installation manual

Bazooka

Bazooka RS10A-hp installation manual

Blaupunkt GTt 300 OPERATING AND INSTALLATION Manual

Blaupunkt

Blaupunkt GTt 300 OPERATING AND INSTALLATION Manual

Boston Acoustics SX55 Specifications

Boston Acoustics

Boston Acoustics SX55 Specifications

Kenwood KFC-W212 Service manual

Kenwood

Kenwood KFC-W212 Service manual

VR3 Elite VRS653 installation manual

VR3

VR3 Elite VRS653 installation manual

Premier TS-W3001D4 Specifications

Premier

Premier TS-W3001D4 Specifications

Infinity 6530cx installation manual

Infinity

Infinity 6530cx installation manual

Blaupunkt GTx Series manual

Blaupunkt

Blaupunkt GTx Series manual

Focal K2 Power 165 KRX3 Specification sheet

Focal

Focal K2 Power 165 KRX3 Specification sheet

Precision Power PPI4.2 owner's manual

Precision Power

Precision Power PPI4.2 owner's manual

Jensen XS Series instruction sheet

Jensen

Jensen XS Series instruction sheet

AudioBahn AT60 operating instructions

AudioBahn

AudioBahn AT60 operating instructions

Focal BombA 27 V1 user manual

Focal

Focal BombA 27 V1 user manual

Blueant S1 user manual

Blueant

Blueant S1 user manual

Naxa NCS-768 Installation diagram

Naxa

Naxa NCS-768 Installation diagram

Focal Polyglass 130 VRS user manual

Focal

Focal Polyglass 130 VRS user manual

Boston Mobile Audio SR80 owner's manual

Boston Mobile Audio

Boston Mobile Audio SR80 owner's manual

manuals.online logo
manuals.online logoBrands
  • About & Mission
  • Contact us
  • Privacy Policy
  • Terms and Conditions

Copyright 2025 Manuals.Online. All Rights Reserved.

OWNER’S MANUAL
Comp - System - Coax
www.hertzaudiovideo.eu
6
English / English
Congratulations on purchasing our product. Your satisfaction is the first requirement that our products
must meet: the same satisfaction as the one gained by those who long for experiencing the car audio
emotion. This manual has been drawn to provide the main instructions required to install and use the
system properly. However, the range of possible applications is wide; for further information, please feel
free to contact your trusted dealer or our technical support at the email [email protected] Before
installing the components, please carefully read all of the instructions contained in this manual. Failure to
respect these instructions may cause unintentional harm or damage to the product.
1. All components must be firmly secured to the vehicle structure. Do the same when installing any
custom structures you may have built. Confirm your installation is solid and safe. A component
coming loose while driving may cause serious damage to the passengers, as well as to other vehicles.
2. Always wear protective eyewear when using tools, as splints or product residue may become airborne.
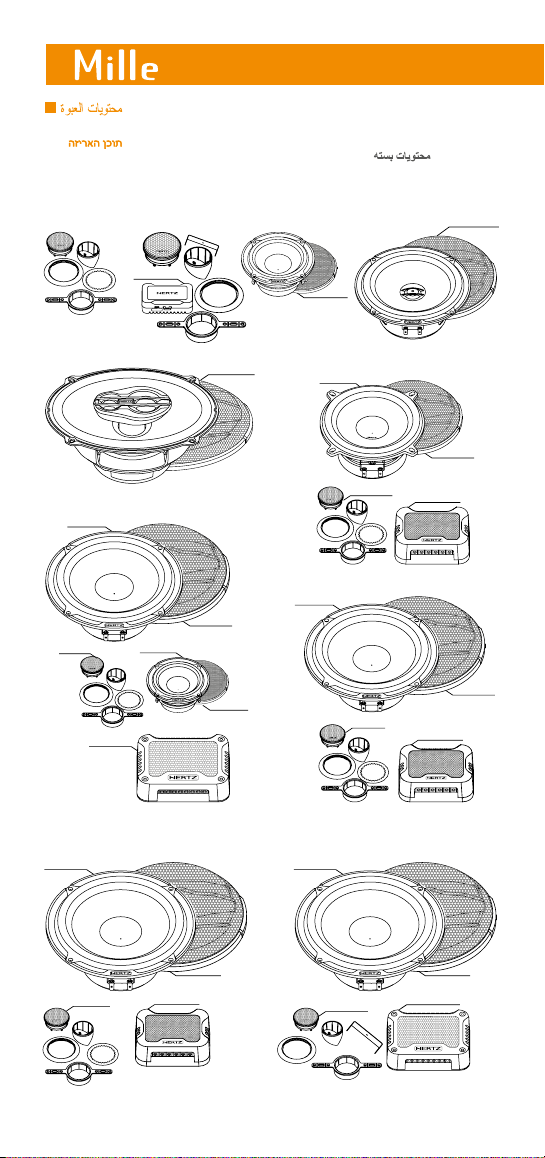
3. In order to avoid incidental damage, keep the product in the original packaging until you are ready
for the final installation.
4. Do not carry out any installation inside the engine compartment.
5. Before starting with the installation turn the head unit and all other audio system devices off, avoiding
any possible damage.
6. Make sure that the location you choose to install the components does not interfere with the normal
operation of any mechanical or electrical devices of the vehicle.
7. Do not install loudspeakers where they may be exposed to water, excessive humidity, dust or dirt.
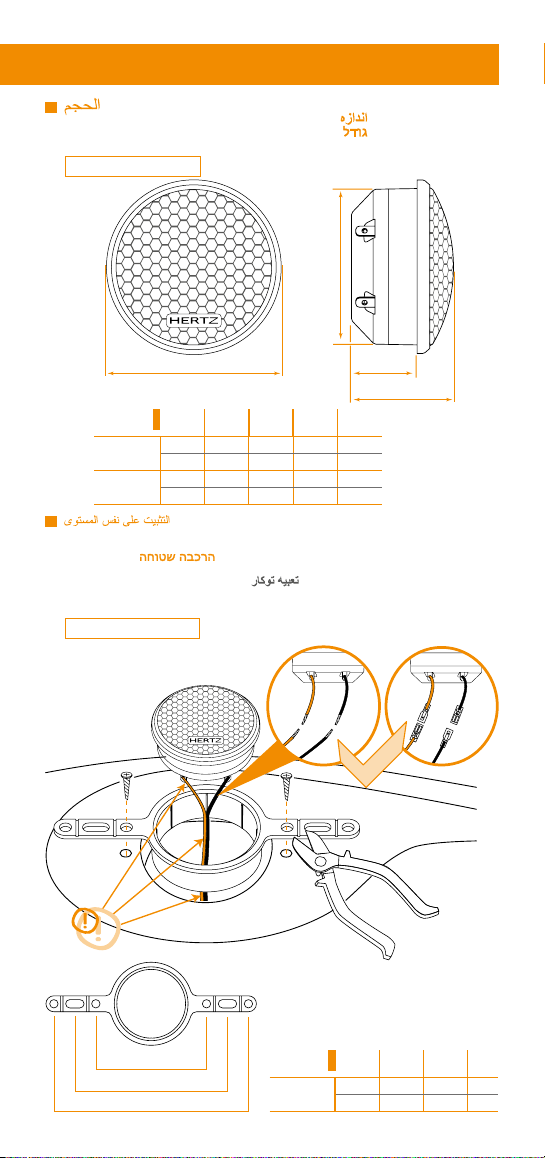
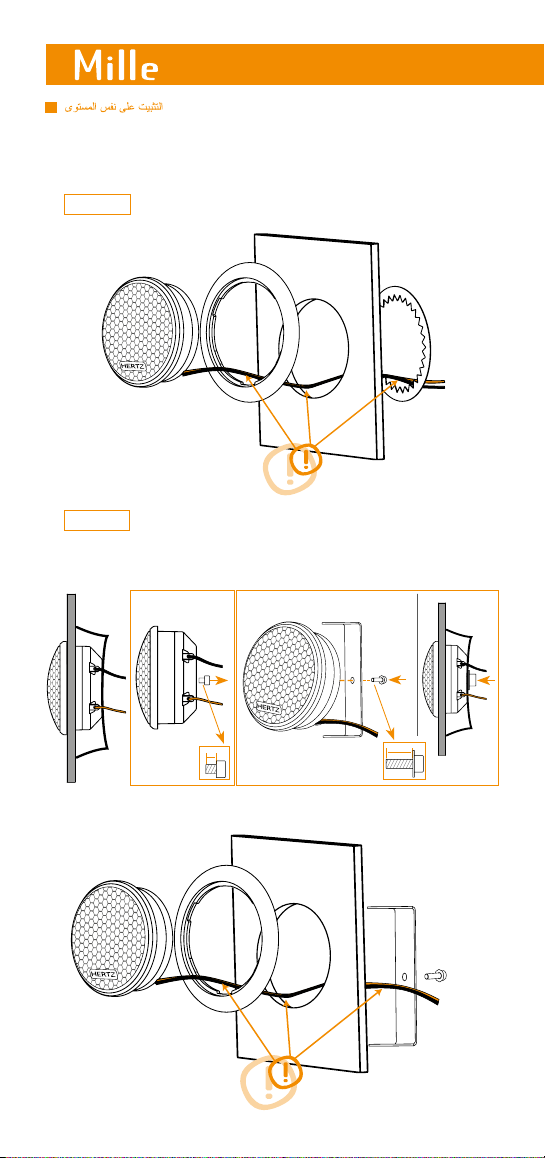
8. Do not install the tweeter without the protective grille.
9. Do not install the components or make cable run close to electronic or mechanical devices of the vehicle.
10. Be very cautious when drilling or cutting into the vehicle chassis, making sure there are no cables
or structural elements essential to the vehicle underneath or in the selected area.
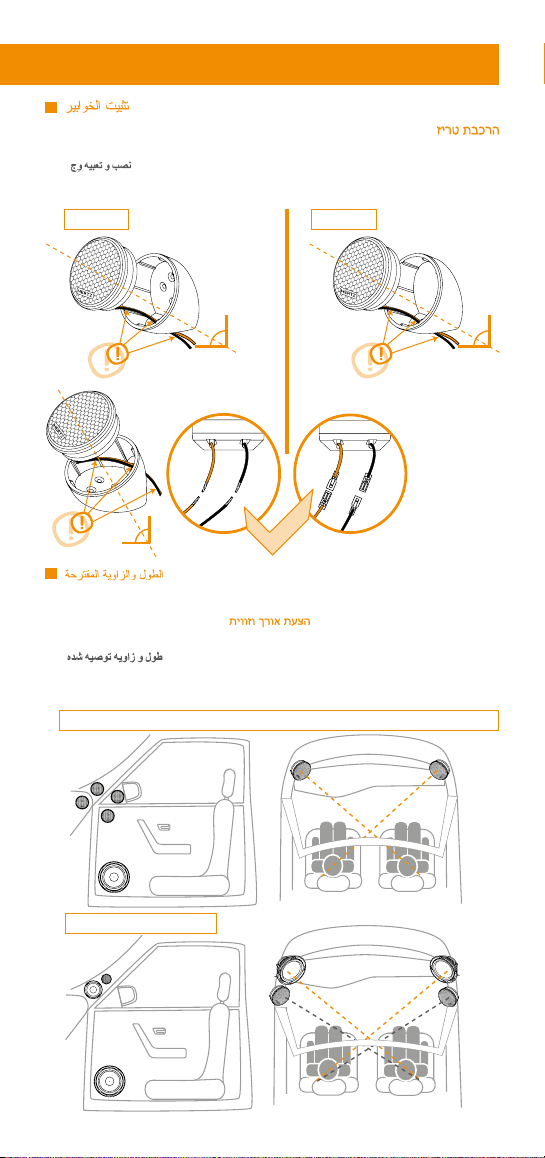
11. When routing cables, make sure that the cable does not come in contact with sharp edges or near
moving mechanical devices. Make sure that it is firmly attached and protected along its entire
length and its insulation is self-extinguishing.
12. Only use cables with the proper section (AWG) indicated herein.
13. When running the cable through a hole in the vehicles chassis, protect the cable with a rubber ring
(grommet). Be sure to provide proper protection for cables running close to heat-generating devices.
14. Do not run the wires outside of the vehicle.
15. Use top quality cables, connectors and accessories such as found in the Connection catalogue.
16. Warranty certificate: For more information visit the Hertz website.
SAFE SOUND
USE COMMON SENSE AND PRACTICE SAFE SOUND. PLEASE REMEMBER THAT LONG EXPOSURE TO
EXCESSIVELY HIGH SOUND PRESSURE LEVELS MAY DAMAGE YOUR HEARING. SAFETY MUST BE AT THE
FOREFRONT WHILE DRIVING.
Information on electrical and electronic equipment waste (for those European countries which organize the separate collection
of waste)
Products which are marked with a wheeled bin with an X through it can not be disposed of together with ordinary
domestic waste. These electrical and electronic products must be recycled in proper facilities, capable of managing the
disposal of these products and components. In order to know where and how to deliver these products to the nearest
recycling/disposal site please contact your local municipal office. Recycling and disposing of waste in a proper way
contributes to the protection of the environment and to prevent harmful effects on health.
Eesti / Estonian
Õnnitleme teid meie toote ostmise puhul. Teie rahulolu on esimene tingimus, millele meie tooted peavad
vastama; rahulolu, mille saavad need, kes loodavad kogeda auto helisüsteemist saadavaid elamusi. See
kasutusjuhend on mõeldud pakkuma peamisi juhiseid, mis on vajalikud süsteemi õigeks paigaldamiseks
ja kasutamiseks. Siiski on kasutusrakenduste valik lai; täpsema info saamiseks võtke ühendust oma
usaldusväärse edasimüüjaga või meie tehnilise toega e-posti aadressil [email protected] Lugege
enne komponentide paigaldamist põhjalikult kõiki selles kasutusjuhendis sisalduvaid juhiseid. Nende
juhiste eiramine võib põhjustada tootele soovimatuid kahjusid ja vigastusi.
1. Kõik komponendid tuleb korralikult šassii külge kinnitada. Sama kehtib mistahes spetsiaalpaigalduste
kohta. Veenduge, et paigaldus on korralikult kinnitatud ja turvaline. Sõidu ajal lahti tulev detail võib
rängalt vigastada nii autosolijaid kui teisi sõidukeid.
2. Tööriistade kasutamisel kasutage alati silmakaitseid, kuna killud või tootejäägid võivad laiali paiskuda.
3. Hoidke soovimatute kahjustuste vältimiseks toodet võimalusel originaalpakendis seni, kuni te olete
valmis seda lõplikult paigaldama.
4. Ärge paigaldage midagi mootoriruumi.
5. Enne paigalduse alustamist lülitage välja põhiseade ja kõik muud audiosüsteemi osad, kuna vastasel
juhul võivad need viga saada.
6. Veenduge, et osade paigaldamiseks valitud koht ei häiri sõiduki mehaaniliste ja elektriseadmete
normaalset tööd.
7. Ärge paigaldage kõlareid kohta, kus nad võivad kokku puutuda vee, ülemäärase niiskuse või
mustusega.
8. Ärge paigaldage kõrgsageduskõlarit ilma kupli eesmise kaitsevõreta.
9. Ärge paigaldage komponente ega vedage kaableid sõiduki elektrikarbi lähedale.
10. Šassii puurimisel ja lõikamisel tuleb olla äärmiselt ettevaatlik ning kontrollida, et paigalduseks valitud
piirkonnas ega selle all pole ei elektrijuhtmeid ega sõiduki struktuurielemente.
11. Kaablite juhtimisel jälgige, et kaabel ei puutuks kokku teravate servadega ega satuks liikuvate
mehaaniliste seadmete lähedale. Veenduge, et see on kogu pikkuses kindlalt kinnitatud ja kaitstud
ning et selle isolatsioon on isekustuv.
12. Kasutage vastavalt kasutatavale toitele ainult sobiva ristlõikega (AWG) kaableid.
13. Kaabli tõmbamisel läbi sõiduki šassiis oleva ava kaitske kaablit kummist kaitserõngaga. Jälgige, et
te tagaksite kuumust kiirgavate alade läheduses olevate kaablitele sobiva kaitse.
14. Ärge vedage kaableid väljaspool sõidukit.
15. Kasutage parima kvaliteediga kaableid, ühendusi ja muid lisaseadmeid, näiteks kataloogist Connection.
16. Garantiikaart: Lisainfot leiate Herzi veebilehelt.
OHUTU HELI
KASUTAGE MÕISTLIKULT OHUTUT HELI. PIDAGE MEELES, ET PIKAAJALINE VÄGA TUGEVA HELIRÕHUGA
HELI KUULAMINE VÕIB KUULMIST KAHJUSTADA. SÕIDUKI JUHTIMISEL ON ESMATÄHTIS OHUTUS.
Teave elektriliste ja elektroonikajäätmete kohta (nendele Euroopa riikidele, mis korraldavad sorteeritud jäätmete kogumist)
Tooted, mis on märgistatud läbikriipsutatud (X) ratastel prügikonteineri märgiga, ei või utiliseerida koos teise tavapäraste
olmejäätmetega. Neid elektrilisi ja elektroonilisi tooteid tuleb ümber töödelda sobivates tehastes, mis on suutelised neid
tooteid ja komponente utiliseerima. Võtke ühendust oma kohaliku omavalitsusega, et teada saada kuhu ja kuidas tuleks
neid tooteid lähimasse ümbertöötlemis/utiliseerimisjaama toimetada. Jäätmete sobiv ümbertöötlemine ja utiliseerimine
aitab kaasa keskkonna kaitsmisele ja ennetab ohtlikke mõjusid tervisele.
19
Owner’s Manual
ПродукцияHertzобладаетгарантиейвтечениеуставленноготекущими
законамисрока,принормальныхусловияхиспользования,еслионавызвана
дефектамиматериаловилиихпроизводства.Гарантиядействительнасдаты
покупки,подтвержденнойчеком.Гарантиянедействительнавследующихслучаях:
• продуктповрежденврезультатеинцидентов,некасающимсяматериаловили
  производственныхдефектов;
• продуктизмененилифальсифицированнеуполномоченнымилицами;
• егосерийныйномеризмененилистерт.
Еслинапродуктраспространяетсягарантия,егопроизводительпринимает
решениеоремонтеилизаменеегонеисправныхдеталей.Неисправный
продуктнеобходимопередатьраспространителю,гдеонбылкуплен,
предъявивполностьюзаполненныйгарантийныйсертификат.Вслучаеесли
гарантиябольшенераспространяетсянапродукт,онбудетотремонтирован
потекущейстоимости.Мынепринимаемнасебяобязательства,связанныес
повреждениямивследствиетранспортировки.Мыненесемответственности
за:расходыилипотеряприбылейвследствиеневозможностипользования
даннымпродуктом,прочиеслучайныеиливозможныеиздержки,расходыили
повреждения,покрытыеклиентом.Гарантиявсоответствиисдействующим
законодательством.
Гарантия HertzHertz
The Hertz products are warranted, under normal functioning conditions, for the period
of time as set by the laws in force, against defects concerning materials or their
manufacturing. The warranty is valid from the date of purchase, certified by receipt.
The warranty is not valid if:
• the product is damaged by incidents, installations and/or improper use, or by
any other causes not depending on materials or manufacturing defects;
• the product is modified or tampered with by unauthorised people;
• its serial number has been altered or cancelled.
While the product is under warranty, defective parts will be repaired or replaced at the
manufacturer’s discretion.
The defective product, along with notification about it, must be returned to the dealer
from which it was purchased together with the warranty certificate duly filled in. If the
product is no longer under warranty, it will be repaired at the current costs.
Elettromedia s.r.l. does not undertake any liability for damages due to transportation.
Elettromedia s.r.l. does not take any responsibility for: costs or loss of profit due to the
impossibility to use the product, other accidental or consequential costs, expenses or
damages suffered by the customer.
Warranty according to laws in force.
For more information visit the Hertz website.
Hertz Warranty
20
MPG 70.3
MP 70.3MP 25.3
MPX 690.3MPG 690.3
MPK 165.3
MP 25.3
MPG 165.3
MP 165.3
MPCX 2.3
MPK 165P.3
MPG 165.3
MP 165P.3
MP 25.3MPCX 2P.3
MPK 130.3
MP 130.3
MPG 130.3
MP 25.3MPCX 2.3
MP 70.3
MPG 70.3
MPCX 3.3
MP 25.3
MPG 165.3
MP 165.3
MPK 163.3
MPX 165.3Optional
MPG 165.3
/ Съдържание на опаковката /包裝內容包裝內容
/
内装物 内装物 /Sadržaj pakiranja
/
Obsah
balení
/
Pakkens indhold /Pakket inhoud
/
Packaging contents / Pakendi sisu
/
Pakkauksen
sisältö /Contenu de l’emballage / Verpackungsinhalt
/
Περιεχόμενα συσκευασίας
/
/A csomag tartalma
/
Isi kemasan / Contenuto dell’imballo
/
パッケージ内容 パッケージ内容 //
패키지 내용 패키지 내용
/
Lepakojuma saturs / Pakuotės turinys
/
Innhold // Zawartość
opakowania / Conteúdo da embalagem
/
Conținutul pachetului /Комплектация
/
Obsah
balenia /Vsebina embalaže
/
Contenido del embalaje /Förpackningens innehåll
/
ส่วนประกอบส่วนประกอบ
ผลิตภัณฑผลิตภัณฑ /Paket içeriği
MP 28.3
MPCX 2T.3
MPK 1650.3
MP 28.3
MPG 165.3
MP 165P.3
MPCX 165.3
21
Owner’s Manual
A
B
D
C
A B C D
MP 25.344 41 27 17 mm
1.73 1.61 1.06 0.67 in.
MP 28.353,4 48 28 13,5 mm
2.1 1.89 1.1 0.53 in.
X1X2X3
MP 25
.3
MP 28
.3
66 91 116 mm
2.6 3.58 4.57 in.
X1
X2
X3
/ Размер / 尺寸尺寸 /规格规格 /Veličina /Velikost /Størrelse /Afmetingen / Size /
Suurus / Koko / Dimensions / Größe /Διαστάσεις / / Méretek / Ukuran /
Ingombro / サイズサイズ /크기크기 /Izmērs /Dydis / Størrelse / / Wielkość /Dimensão /
Dimensiuni / РазмерРазмер /Rozmery /Velikost /Tamaño /Storlek / ขนาด ขนาด /Ebat
MP 25
.3
-MP 28
.3
MP 25
.3
-MP 28
.3
/ Скрит монтаж / 沖洗安裝 沖洗安裝 /嵌入装置嵌入装置 /Razinska ugradnja
/Montáž pod omítku / Flush montering /Inbouwmontage /Flush mounting /
Süvispaigaldus /Asennus pinnan tasoon /Montage encastré /Einbau / Χωνευτή
τοποθέτηση / /Szintbe szerelés /Pemasangan di dinding langit-langit
/Montaggio incassato /フラッシュマウントフラッシュマウント /플러시 마운트플러시 마운트 /Iedziļinātā uzstādīšana
/Rėmelio montavimas / Innfelling //Montaż płaski /Montagem embutida
/Montaj incastrat /Скрытый монтажСкрытый монтаж /Zapustená montáž /Prilegajoča namestitev /
Montaje empotrado /Spolmontering /การใส่ลำาโพงในแนวราบ การใส่ลำาโพงในแนวราบ /Gömme montaj
++--++
--
OK
MP 25
.3
MP 28
.3
22
/ Скрит монтаж / 嵌入装置 嵌入装置 /Razinska ugradnja /Montáž pod
omítku /Inbouwmontage /Flush mounting /Süvispaigaldus /Asennus pinnan tasoon /
Montage encastré /Einbau / Χωνευτή τοποθέτηση / Szintbe szerelés /Pemasangan
di dinding langit-langit /Montaggio incassato / フラッシュマウント フラッシュマウント / 플러시 마운트 플러시 마운트
/Rėmelio montavimas /Montaż płaski /Montagem embutida / Скрытый монтаж Скрытый монтаж /
Zapustená montáž /Prilegajoča namestitev /Montaje empotrado /Spolmontering /
การใส่ลำาโพงในแนวราบ การใส่ลำาโพงในแนวราบ /Gömme montaj
++
--
++
--
++
--
L1 < L2
L1 L2
L2
L1
L1 max= 8 mm
0.31 in.
L2 max= 12 mm
0.47 in.
L2
1 2 3
MP 28
.3
MP 25
.3
23
Owner’s Manual
30° 35°
MP 70
.3
- MPK 163
.3
MP 25
.3
MP 28
.3
MP 25.3 -MP 28.3 -MPK 130.3 -MPK 165.3 -MPK 165P.3 -MPK 1650.3
/ Предложени дължина и ъгъл / 建議長度和角度 建議長度和角度 /建议长度及角建议长度及角
度度/Preporučena duljina i kut nagiba /Požadovaná délka a úhel / Foreslået længde og vinkel
/Voorgestelde lengte en hoek /Suggested Length and Angle /Soovitatav pikkus ja nurk /
Suositeltu pituus ja kulma /Longueur et angle recommandés /Empfohlene Länge und Winkel /
Προτεινόμενο μήκος και γωνία / /Javasolt hossz és szög /Panjang dan
sudut terbaik / Distanze e angolazione suggeriti /長さ・角度案長さ・角度案 /권장 길이 및 앵글권장 길이 및 앵글 / Ieteicamais
garums un lenķis /Rekomenduojamas ilgis ir pakreipimo kampas /Foreslått lengde og vinkel /
/Sugerowana długość i kąt /Sugestão de extensão e ângulo / Distanța
recomandată și unghiul de instalare /Рекомендуемое расстояние и угол установки Рекомендуемое расстояние и угол установки /
Odporúčaná dĺžka a uhol /Predlagana dolžina in nagib /Longitud y ángulo sugeridos /Föreslagen
längd och vinkel /ความยาวและมุมที่แนะนำาความยาวและมุมที่แนะนำา /Önerilen uzunluk ve açı
60°
/ Монтаж с болтове Монтаж с болтове / 楔形安裝 楔形安裝 / 楔形件安装楔形件安装 / Montaža s klinom / Zaklínění
/Wedge montering / Montage op hellende steun / Wedge mounting / Kiilpaigaldus / Kiila-
asennus / Montage avec cale / Montage der Keile / Τοποθέτηση σε συρτή βάση Τοποθέτηση σε συρτή βάση /
/ Beszerelés ferdén / Pemasangan datar / Montaggio con supporto inclinato / ウェッジマウウェッジマウ
ントント / 웨지 마운트웨지 마운트 /Uzstādīšana ieķīlējot / / Tvirtinimo pleištų montavimas / Ekstern montering
/ / Montaż klinowy / Montagem de cunha / Montaj de fixare / Клиновой монтажКлиновой монтаж
/Delená montáž / Namestitev z zagozdo / Cuña de montaje / Kilmontering / งัดการใส่ลำาโพงงัดการใส่ลำาโพง /
Eğimli destek montaj
++--
MP 25
.3
++
--
MP 28
.3
OK
24
EF
A A3B C D E F U V
MP 70
.3
87,8 - 73 50 44 93 17 80 3,7 mm
3.46 - 2.87 1.97 1.73 3.66 0.67 3.15 0.15 in.
MP 130
.3
130 152 114 68 57 168,5 29 139 5 mm
5.12 5.98 4.49 2.68 2.24 6.63 1.14 5.47 0.2 in
MP 165
.3
165 - 141 74 63 183,5 29 156 5 mm
6.5 - 5.55 2.91 2.48 7.22 1.14 6.14 0.2 in.
MP 165P
.3
165 - 141 74,5 64 183,5 29 156 5 mm
6.5 - 5.55 2.93 2.52 7.22 1.14 6.14 0.2 in.
MPX 165
.3
165 - 141 74 62,2 183,5 29 156 5 mm
6.5 - 5.55 2.91 2.46 7.22 1.14 6.14 0.2 in.
A
A
U
U
V
D
B
C
A3
A
U
V
MP 70
.3
-MPK 130
.3
-MPK 165
.3
-MPK 165P
.3
-MPK 1650
.3
/ Размер / 尺寸尺寸 /规格规格 /Veličina /Velikost /Størrelse /Afmetingen / Size /
Suurus / Koko / Dimensions / Größe /Διαστάσεις / / Méretek / Ukuran /
Ingombro / サイズサイズ /크기크기 /Izmērs /Dydis / Størrelse / / Wielkość /Dimensão /
Dimensiuni / РазмерРазмер /Rozmery /Velikost /Tamaño /Storlek / ขนาดขนาด /Ebat
25
Owner’s Manual
A1
E1
E2
A2
B1
B2
D C
F
V
A1A2B1B2C D E1E2F V
MPX 690.3241 166 223 157 108 90 267,5 196 38,5 5 x 7 mm
9.49 6.54 8.78 6.18 4.25 3.54 10.53 7.72 1.52 0.2x0.28 in.
MPX 690
.3
26
Option 1
Option 2
Option 3
OK
/ Монтаж / 安裝 安裝 /安装安装 /Montaža / Montáž / Montering /Montage / Mounting
/ Paigaldamine / Kiinnitys / Montage / Montage / Τοποθέτηση / / Beszerelés /
Pemasangan / Montaggio /マウントマウント /마운트마운트 /Uzstādīšana / Montavimas / Montering
// Montaż / Montagem / Montaj / МонтажМонтаж /Montáž / Namestitev / Montaje /
Montering / การใส่ลำาโพงการใส่ลำาโพง /Montaj