Bavarian Soundwerks BMW E46 User manual

BMW E46 Subwoofer System by BSW Installation Guide:
d110.e46c for BMW 3 Series, M3 Coupe ’00-’06 (E46)
Tools Required:
•Panel Removal Tool
•Flat Head screwdriver
•Metric Socket Set
•Crimping Tool
•Drill
•Brain
We’re going to proceed as follows:
1. Disassembling the trunk
2. Power/ground wire connections
3. Making appropriate wiring connections for audio inputs
4. Installing the subwoofer enclosure
5. Tuning/testing the system
Disassembling the Trunk Panels:
All of our connections take place in the trunk. We need to remove the drivers side carpeted panel in order to
gain access to the factory amplifier, where we will tap into the factory audio system.
1. Begin by removing all items from the trunk of the vehicle. Make sure that all tail lights are in working
order. If not, now is a good time to replace them. Also remove the carpet that covers the floor of the
trunk, as it will reveal several fasteners that will need removing.
2. Start by removing the taillight covers. Push inward on the clip, and the light will release itself. Now
depress the wiring clip attached to the light bulb housing to release the housing, and move the
housing safely away from your working space
1of 11
Any reproduction, distribution, modification, or dissemination of these instructions without written permission from Bavarian Soundwerks is
expressly forbidden and a violation of international copyright law. Any violation will result in prosecution to the full extent available under the
law!
© Bavarian Soundwerks, LLC.
2195 Defoor Hills Rd., Suite D, Atlanta, GA 30318
P: 404.963.8857 | www.bavsound.com

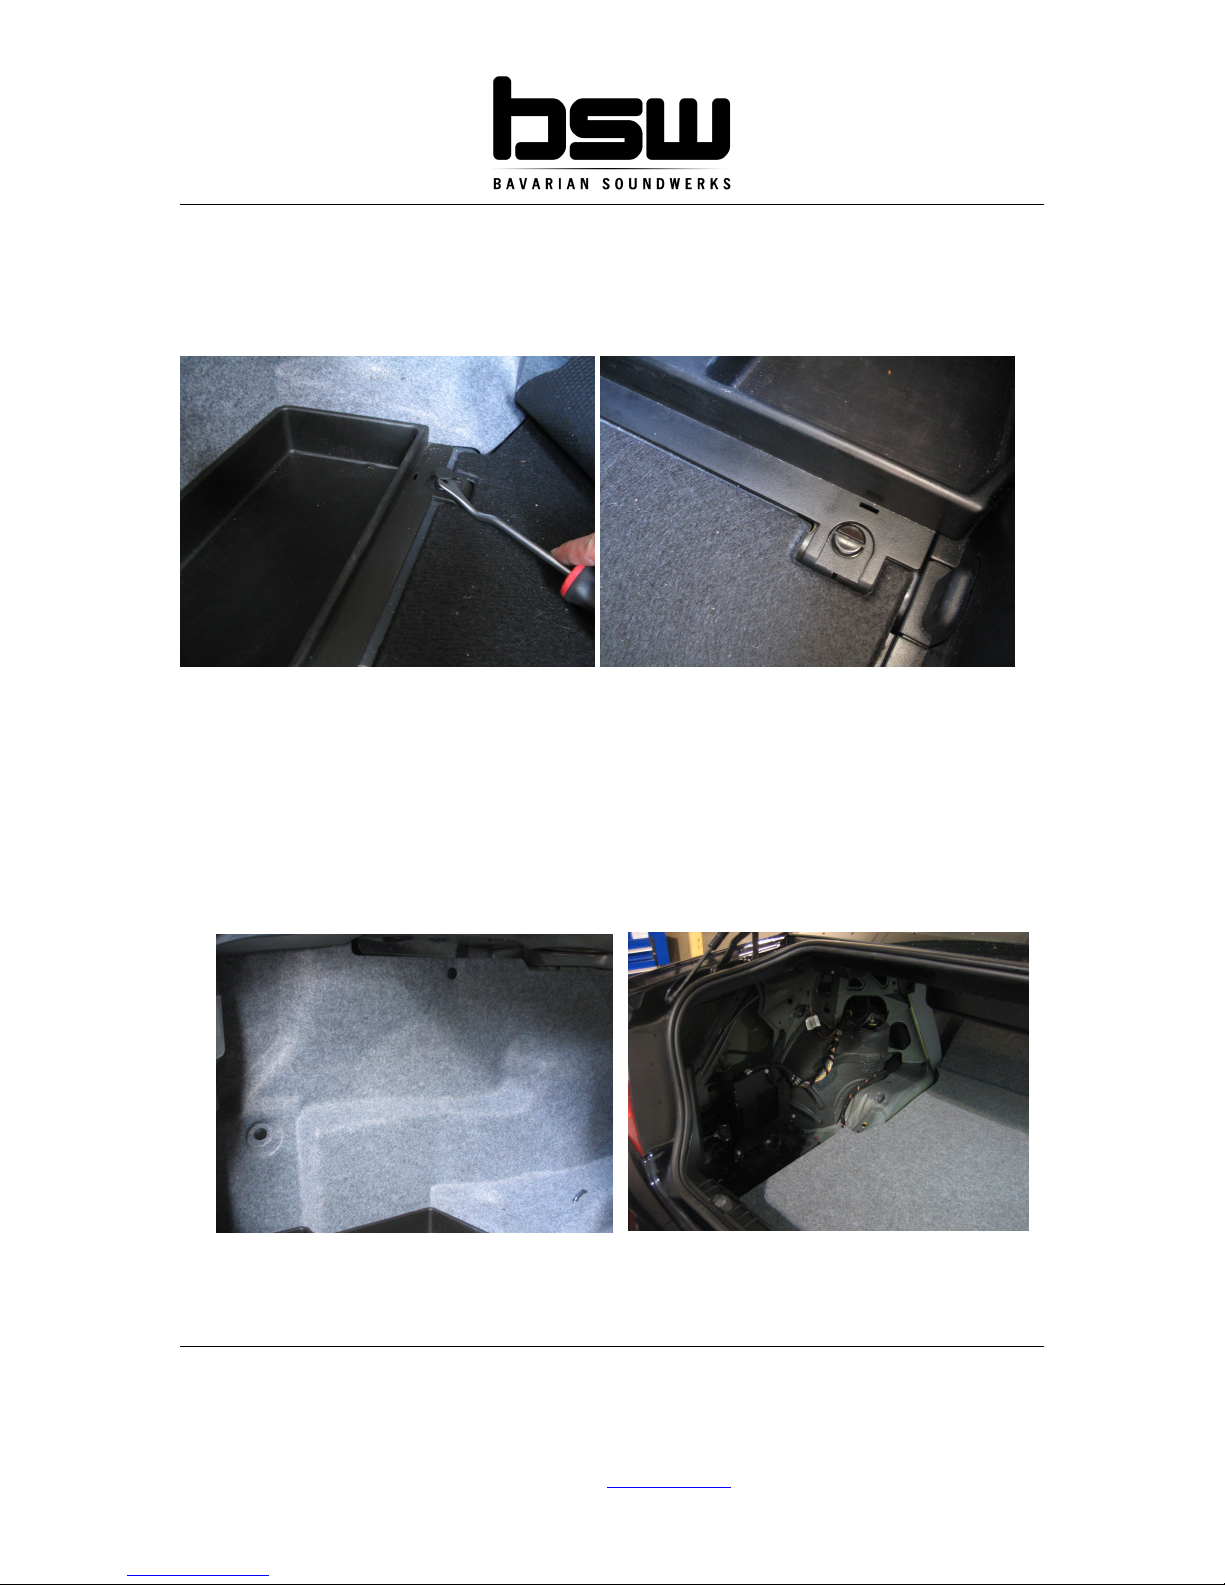
3. Now, look to the floor of the trunk. You will see that the two plastic casings on either side of the
trunk are secured by plastic screws on the passenger side and fasteners on the drivers’ side.
Remove the fasteners using you panel removal tool as shown. The plastic screws on the
passenger side can be removed using a flat head screwdriver and turning them 90 degrees in
either direction. The battery is located underneath this panel on the passenger side of the
vehicle.
4. Remove these panels and place them to the side. Be sure and keep the fasteners together with
their respective panels.
5. Now, look to the driver’s side of the trunk and identify the two black fasteners shown in the photo
below. We need to remove these in the same manner as shown above in the photo on the left.
Once removed, the panel can be removed and the factory amplifier will be revealed, as shown in
the photo on the right. There is also one more fastener on the front edge (closest to the cabin)
slightly behind the side bolster. You’ll see where the panel is being held in when you attempt to
remove the carpeted panel. Remove this as well, and place it with the other fasteners.
Power/Ground Connections for the new Amplifier:
IMPORTANT: Before you make any connections, disconnect the negative battery terminal from the
battery. This will reduce the chance of electrical damage to the vehicle.
2of 11
Any reproduction, distribution, modification, or dissemination of these instructions without written permission from Bavarian Soundwerks is
expressly forbidden and a violation of international copyright law. Any violation will result in prosecution to the full extent available under the
law!
© Bavarian Soundwerks, LLC.
2195 Defoor Hills Rd., Suite D, Atlanta, GA 30318
P: 404.963.8857 | www.bavsound.com

-Now that the vehicle is sufficiently disassembled, we can begin making our connections with the included
amplifier wiring harness. We’re going to start with the power, ground, and remote turn on connections, and
then move on to the Line Output Converter connections (RCA Cable connections)
Power Wire (Large Gauge Red Wire): Route the large red wire to the positive terminal of the
battery. Loosen and remove the 10mm nut on top of the terminal that secures the actual terminal to the
battery. Put the amplifier power wire ring over the bolt, and tighten the nut back down with the terminal on
the battery. This is the primary power supply for your new amplifier. Connect the other side of the power wire
to the +12V terminal on the amplifier. ONLY when both sides of the wire are connected should you install the
included fuse into the in-line.
Ground Wire (Large Gauge Black Wire):
We recommend using the factory grounding point shown below, on the outer wall on the driver’s side of the
vehicle.
3of 11
Any reproduction, distribution, modification, or dissemination of these instructions without written permission from Bavarian Soundwerks is
expressly forbidden and a violation of international copyright law. Any violation will result in prosecution to the full extent available under the
law!
© Bavarian Soundwerks, LLC.
2195 Defoor Hills Rd., Suite D, Atlanta, GA 30318
P: 404.963.8857 | www.bavsound.com

Audio Input and Remote Turn-On Connections
Audio Input Connections (Getting the music to the new amplifier)
This part of the installation is the most time consuming. Use the supplied blue butt connectors to make the
connections. Make the connections at least 6” away from the factory amplifier plugs.
1. Carefully observe the factory amplifier. You will see a large bundle of wires going into the amplifier.
The harness contains several wires, but don’t be overwhelmed. We will be using only four of them,
and they are easy to locate. The wires will be twisted together, and each twisted pair represents a
speaker or input.
2. You’ll need to isolate the following four (4) wires. They will be twisted together in pairs, as they
enter the factory amplifier.
-Blue w/Black Stripe (+) twisted with Brown w/Orange Stripe(-)
-Yellow w/Black Stripe (+) twisted with Brown w/Orange Stripe (-)
3. Now, orient yourself with the BSW amplifier harness. It contains the following four wires, along with
the blue remote turn on wire.
Grey (+) White (+)
Grey/Black (-) White/Black(-)
We are essentially “T’ing” into the wires.
Tapping into the factory wires using the blue butt connectors, the connections will essentially be as
follows:
Wire Color at Harness Wire Color at Factory Amplifier
Grey (+)
Blue w/Black Stripe
Grey/Black (-)
Brown w/Orange Stripe
White (+)
Yellow w/Black Stripe
White/Black (-)
Brown w/Orange Stripe
4of 11
Any reproduction, distribution, modification, or dissemination of these instructions without written permission from Bavarian Soundwerks is
expressly forbidden and a violation of international copyright law. Any violation will result in prosecution to the full extent available under the
law!
© Bavarian Soundwerks, LLC.
2195 Defoor Hills Rd., Suite D, Atlanta, GA 30318
P: 404.963.8857 | www.bavsound.com

Here’s how you’ll tap into the factory wires:
Here’s what the completed connections will look like:
5of 11
Any reproduction, distribution, modification, or dissemination of these instructions without written permission from Bavarian Soundwerks is
expressly forbidden and a violation of international copyright law. Any violation will result in prosecution to the full extent available under the
law!
© Bavarian Soundwerks, LLC.
2195 Defoor Hills Rd., Suite D, Atlanta, GA 30318
P: 404.963.8857 | www.bavsound.com

Remote Turn-On Wire (Smaller gauge Blue Wire):
In the large plug going into the factory amplifier, we’ll need to find the remote turn on wire. You’ll notice a
large black housing around the plug, with two separate plugs inside of this black housing. We will make our
wiring connections exactly as highlighted above.
The wire we’ll be looking for is in the GREY plug. It’s a small gauge White wire.
Once you’ve identified these two plugs, we need to remove them from the outer black housing. Once
removed, the remote turn on wire is in the grey connector, Pin #10.
Preparing the Trunk and Enclosure for Installation:
We need to apply the strips of included sound deadening to the top of the enclosure before we install it.
Using your heat gun, or more likely, hair dryer, get the strips warm to the touch and apply as shown.
6of 11
Any reproduction, distribution, modification, or dissemination of these instructions without written permission from Bavarian Soundwerks is
expressly forbidden and a violation of international copyright law. Any violation will result in prosecution to the full extent available under the
law!
© Bavarian Soundwerks, LLC.
2195 Defoor Hills Rd., Suite D, Atlanta, GA 30318
P: 404.963.8857 | www.bavsound.com

At this point, you can go ahead and reinstall the carpeted panel on the driver’s side of the vehicle. Leave
approximately 8” of the wiring harness exposed coming out from the top of the carpeting, so that we can
plug the amplifier in once the enclosure is installed.
Firstly, and easily enough, open your trunk and locate the seat release latches. Remove the latch bolts with
an 8mm nut driver. Carefully pry the latch from its clips in the rear deck.
1. Now there are 2 small circular holes (approx ¾”) on the near side of the rear deck that were
uncovered when you removed the seat latches. This is where the front brackets of the enclosure
will be inserted.
2. Now it’s time to install your BSW support brackets, which will ensure your enclosure is secure on
the rear deck of your E46. Line up the edge of the plate with the edge of the hole (which you
revealed under the seat release latches) using your finger. Make sure the bracket is straight and
centered with the hole when viewed from outside the trunk. Now use the supplied screws to secure
the plate to the rear deck.
7of 11
Any reproduction, distribution, modification, or dissemination of these instructions without written permission from Bavarian Soundwerks is
expressly forbidden and a violation of international copyright law. Any violation will result in prosecution to the full extent available under the
law!
© Bavarian Soundwerks, LLC.
2195 Defoor Hills Rd., Suite D, Atlanta, GA 30318
P: 404.963.8857 | www.bavsound.com

3. Next, lie down in the trunk with your head facing upward. You will see the two gold bolts that attach
each seat release mechanism where the back seats latch to the trunk support brace. We will be
using the inner bolt on each seat release mechanism.
4. Remove the two inner bolts using the 13mm socket wrench, and place these in a secure location.
Also, loosen the remaining two bolts on the seat latch mechanism. This will assist you in lining up
the enclosure with the bolt holes as you lift it into place.
5. Now, let’s remove the factory subwoofer enclosure (HK equipped vehicles only).
Locate the (4) 8mm bolts that surround the outer perimeter of the enclosure. Remove these.
Unplug the factory amplifier as shown below, by sliding the outer harness casing towards the front
of the vehicle.
Using your panel removal tool, pry out the white fasteners shown below on the factory enclosure.
The enclosure is now removed.
Installing the actual enclosure
1. At this point it helps to have a friend here, but it’s not completely necessary. Have the quick-release
knobs handy (near your head) because while lying in the trunk, you’ll have the enclosure resting on
top of you. Insert the front brackets (side with BSW logo) into the front mounting holes.
8of 11
Any reproduction, distribution, modification, or dissemination of these instructions without written permission from Bavarian Soundwerks is
expressly forbidden and a violation of international copyright law. Any violation will result in prosecution to the full extent available under the
law!
© Bavarian Soundwerks, LLC.
2195 Defoor Hills Rd., Suite D, Atlanta, GA 30318
P: 404.963.8857 | www.bavsound.com

2. Now push the enclosure towards the rear of the car as much as you can, and lift the rear of the
enclosure up towards the rear deck.
3. Now, make sure your included washers have been placed over each knob/bolt combo (bolt through
the washer). Place one of the quick-release knob/bolt combos into one of the exposed seat
release mechanism holes.
4. With the enclosure secured, you can now thread the remaining quick-release knob/bolt combo into
the remaining hole.
5. As far as relocation of the seat latches, simply use only a small screw (5/8” -3/4” in length) to attach
the latches to your D110.E46 enclosure, or relocate as needed. You’ll notice round holes on either
side of the enclosure. This is where you’ll attach the seat latches using wood screws (if you so
choose). Otherwise, you can velcro the latches to the carpet on either side of the carpeted trunk
lining.
9of 11
Any reproduction, distribution, modification, or dissemination of these instructions without written permission from Bavarian Soundwerks is
expressly forbidden and a violation of international copyright law. Any violation will result in prosecution to the full extent available under the
law!
© Bavarian Soundwerks, LLC.
2195 Defoor Hills Rd., Suite D, Atlanta, GA 30318
P: 404.963.8857 | www.bavsound.com

At this point, we can plug the amplifier harness into the amplifier and begin the tuning process as
outlined below.
Amplifier Tuning
Head up to the front of the car and turn on the stereo. Put in your favorite CD (not a burned CD, but one that
was professionally mastered and recorded), and tune in to your favorite track. We recommend using a very
dynamic type of music, with many types of musical variations within the CD. Make sure that your bass
settings on your radio are set in the middle or slightly lower. This will decrease distortion and increase the
overall sound quality in the vehicle.
Make sure all bass and treble settings on your radio are flat, or in the middle.
We’ve roughly adjusted the settings on the amplifier at the factory, but you’ll want to fine tune things
based on your own listening preferences and sensitivities.
Gains:
Begin turning up the volume until you hear the music at a reasonable level and increase the volume slightly
up to the point that you begin to hear distortion coming from your interior speakers. Now, back down the
volume until the distortion disappears and stop there. Head back to the trunk and slowly begin adjusting the
gain(s) of the amplifier until you are content with the amount of bass being produced by the subwoofer
without any audible distortion of the woofer. Make sure that this blends in with the rest of the music, and
you’re on your way to a rich, full sound.
When adjusting the amplifier gains, do everything in very small increments. Make sure that you
increase both gain control knobs at the same rate.
We recommend 1/8th turn adjustments of the gain to find that sweet spot where there is no distortion and
plenty of volume. Everyone listens to music differently, so the tuning process make take some of us days,
while others can do it in a matter of minutes, whether they’re a beginner or not.
Boost:
Again, make SMALL, incremental adjustments. We’re boosting frequencies at 45hz by adjusting this
knob, so keep a keen ear out for distortion.
XOVER:
You’ll want this set at approximately 80hz. Eyeballing is fine, as the potentiometer has some forgiveness to
it. Your ears will tell you where the crossover needs to be set in your car based on your listening
preferences.
Troubleshooting Guide
Invariably you’ll come across one or two things in your install that didn’t quite match up or weren’t perfectly
clear to you. We’ve put together several common things that may come up during an install, and how to
isolate and troubleshoot them if they do. It is very advantageous to have a digital multi-meter on hand to
troubleshoot anything electrical in your BMW. They can be found at any hardware store for around $20-$30.
No Sound from subwoofer:
•The fuse wasn’t installed inline on the power wire at the battery. This is very often overlooked. Pop
in the fuse, and you’ll be good to go.
•Amplifier isn’t turning on properly. See next section.
Amplifier isn’t Powering Up:
10of 11
Any reproduction, distribution, modification, or dissemination of these instructions without written permission from Bavarian Soundwerks is
expressly forbidden and a violation of international copyright law. Any violation will result in prosecution to the full extent available under the
law!
© Bavarian Soundwerks, LLC.
2195 Defoor Hills Rd., Suite D, Atlanta, GA 30318
P: 404.963.8857 | www.bavsound.com

•The fuse wasn’t installed inline power wire at the battery. This is very often overlooked. Pop in the
fuse, and you’ll be good to go.
•Check to make sure you’ve found the correct remote turn-on wire. This is a very common oversight.
Set your DMM to direct current and place one lead on the ground terminal of your amplifier and one
on the remote turn on terminal. Turn the car and the radio on. If you don’t have 12-14 volts on the
remote turn on terminal, your connection may be the issue.
•Make sure your power and ground connections are correct. Using your DMM, again check each
terminal to make sure that a connection has been established.
-Ground Connection: Set the DMM to its continuity section. Place one lead of the DMM on the
amplifiers ground location where you screwed into the chassis, and the other lead on the negative
battery terminal. If you don’t see any continuity, move your ground wire until you do.
-Power Connection: Set the DMM to direct current again, and place one lead on the amplifiers
power terminal and the other on the amplifiers ground terminal. You should see 12-14 volts. If not,
check your inline fuse.
Subwoofer sounds muffled or quiet:
•Your input signals are out of phase. Check to make sure that your input connections are exactly as
outlined in the guide. An easy test is to simply cut one of the input wires and see if the sound output
increases exponentially.
11of 11
Any reproduction, distribution, modification, or dissemination of these instructions without written permission from Bavarian Soundwerks is
expressly forbidden and a violation of international copyright law. Any violation will result in prosecution to the full extent available under the
law!
© Bavarian Soundwerks, LLC.
2195 Defoor Hills Rd., Suite D, Atlanta, GA 30318
P: 404.963.8857 | www.bavsound.com
Other manuals for BMW E46
1
This manual suits for next models
1
Table of contents
Other Bavarian Soundwerks Subwoofer manuals
Popular Subwoofer manuals by other brands

Teufel
Teufel IP 3000 SW operating instructions

Ohm Acoustics
Ohm Acoustics SBm-10 quick start guide

Rockford Fosgate
Rockford Fosgate T3-BMW-SUB Installation & operation

AMC
AMC B1-19 Instructions for installation and operation

Cerwin-Vega
Cerwin-Vega Junior Earthquake JE-36 brochure

EAW
EAW VFS220i Specifications