Bavarian Soundwerks Subwoofer System User manual
Subwoofer System Installation Guide for BMW 3 Series /
M3 Coupe, Sedan 92-99 (E36)
Tools Required:
•Panel Removal Tool
•10mm socket wrench
•Crimping Tool / Wire Cutters
•Brain
•Needle Nose Pliers
We’re going to proceed as follows:
1. Disassembling the trunk
2. Making appropriate wiring connections for audio inputs
3. Power/ground wire connections
4. Installing the subwoofer enclosure
5. Tuning/testing the system
The Process:
1. Begin by removing all items from the trunk of the vehicle. Make sure that all tail lights are in working
order. If not, now is a good time to replace them. Also, remove the carpet that covers the floor of the
trunk, as it will reveal several fasteners that will need removing.
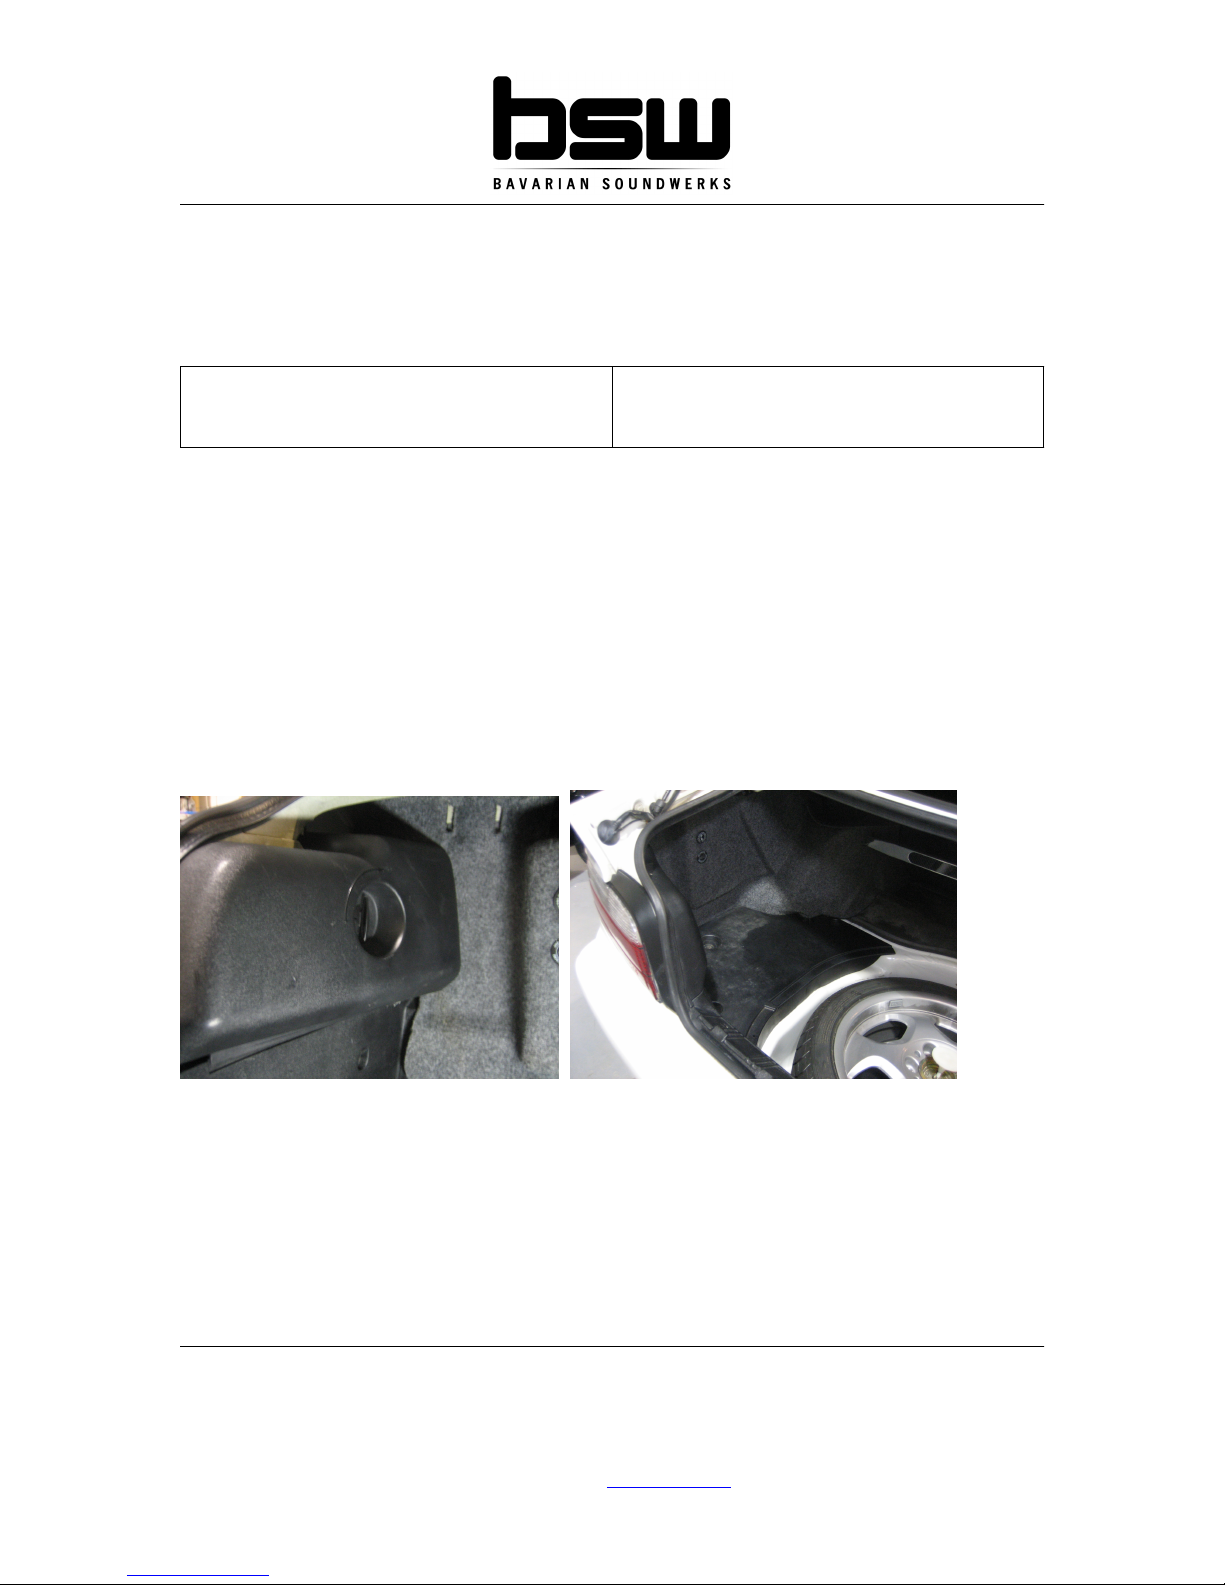
2. Start by removing the taillight covers. Twist the lever clockwise to free the plastic housing.
3. Now, look to the floor and you’ll notice that there is a large black plastic tray on the driver’s side of the
vehicle. We’ll need to remove this. It is secured in place by 10mm plastic nuts.
Once the floor panel is removed, we can now pry the carpeted panel on the driver’s side out of the car,
which will reveal the factory amplifier where our wiring connections will take place.
See photos next page.
1of 8
Any reproduction, distribution, modification, or dissemination of these instructions without written permission from Bavarian Soundwerks is
expressly forbidden and a violation of international copyright law. Any violation will result in persecution to the full extent available under the
law!
© 2006 Bavarian Soundwerks, LLC.
2195 Defoor Hills Rd., Suite D, Atlanta, GA 30318
P: 404.963.8857 | www.bavsound.com

Power/Ground Connections for the new Amplifier:
*Before you make any connections, we recommend disconnecting the negative battery terminal from
the battery. This will eliminate any chance electrical damage to the vehicle.
Power Wire (Red Wire)
•You’ll want to run the large red wire to the positive terminal of the battery. Loosen and remove the
10mm nut on top of the terminal that secures the actual terminal to the battery. Put the amplifier
power wire ring over the bolt, and tighten the nut back down with the terminal on the battery. This is
the primary power supply for your new amplifier.
•Do NOT put the fuse into the fuse-holder until you have made all other connections to the
amplifier.
Ground Wire (Black Wire)
•The large black wire goes to a chassis ground. We’re going to use the factory ground point shown
in the photo below. (Large Plugs with multiple brown wires in it)
Simply loosen the 10mm bolt and attach the ring terminal over the bolt.
2of 8
Any reproduction, distribution, modification, or dissemination of these instructions without written permission from Bavarian Soundwerks is
expressly forbidden and a violation of international copyright law. Any violation will result in persecution to the full extent available under the
law!
© 2006 Bavarian Soundwerks, LLC.
2195 Defoor Hills Rd., Suite D, Atlanta, GA 30318
P: 404.963.8857 | www.bavsound.com
Remote Turn-On Wire (Blue Wire)
The remote turn-on wire is the small, white wire in the plug located closest to the front of the car. Tap into
this wire in the same manner as outlined below for the audio input connections.
Audio Input Connections (Getting the music to the new amplifier)
This part of the installation is the most time consuming. Use the supplied blue butt connectors to make the
connections. Make the connections at least 6” away from the factory amplifier plugs.
1. Carefully observe the factory amplifier. You will see a large bundle of wires going into the amplifier.
The harness contains several wires, but don’t be overwhelmed. We will be using only four of them,
and they are easy to locate. The wires will be twisted together, and each twisted pair represents a
speaker or input.
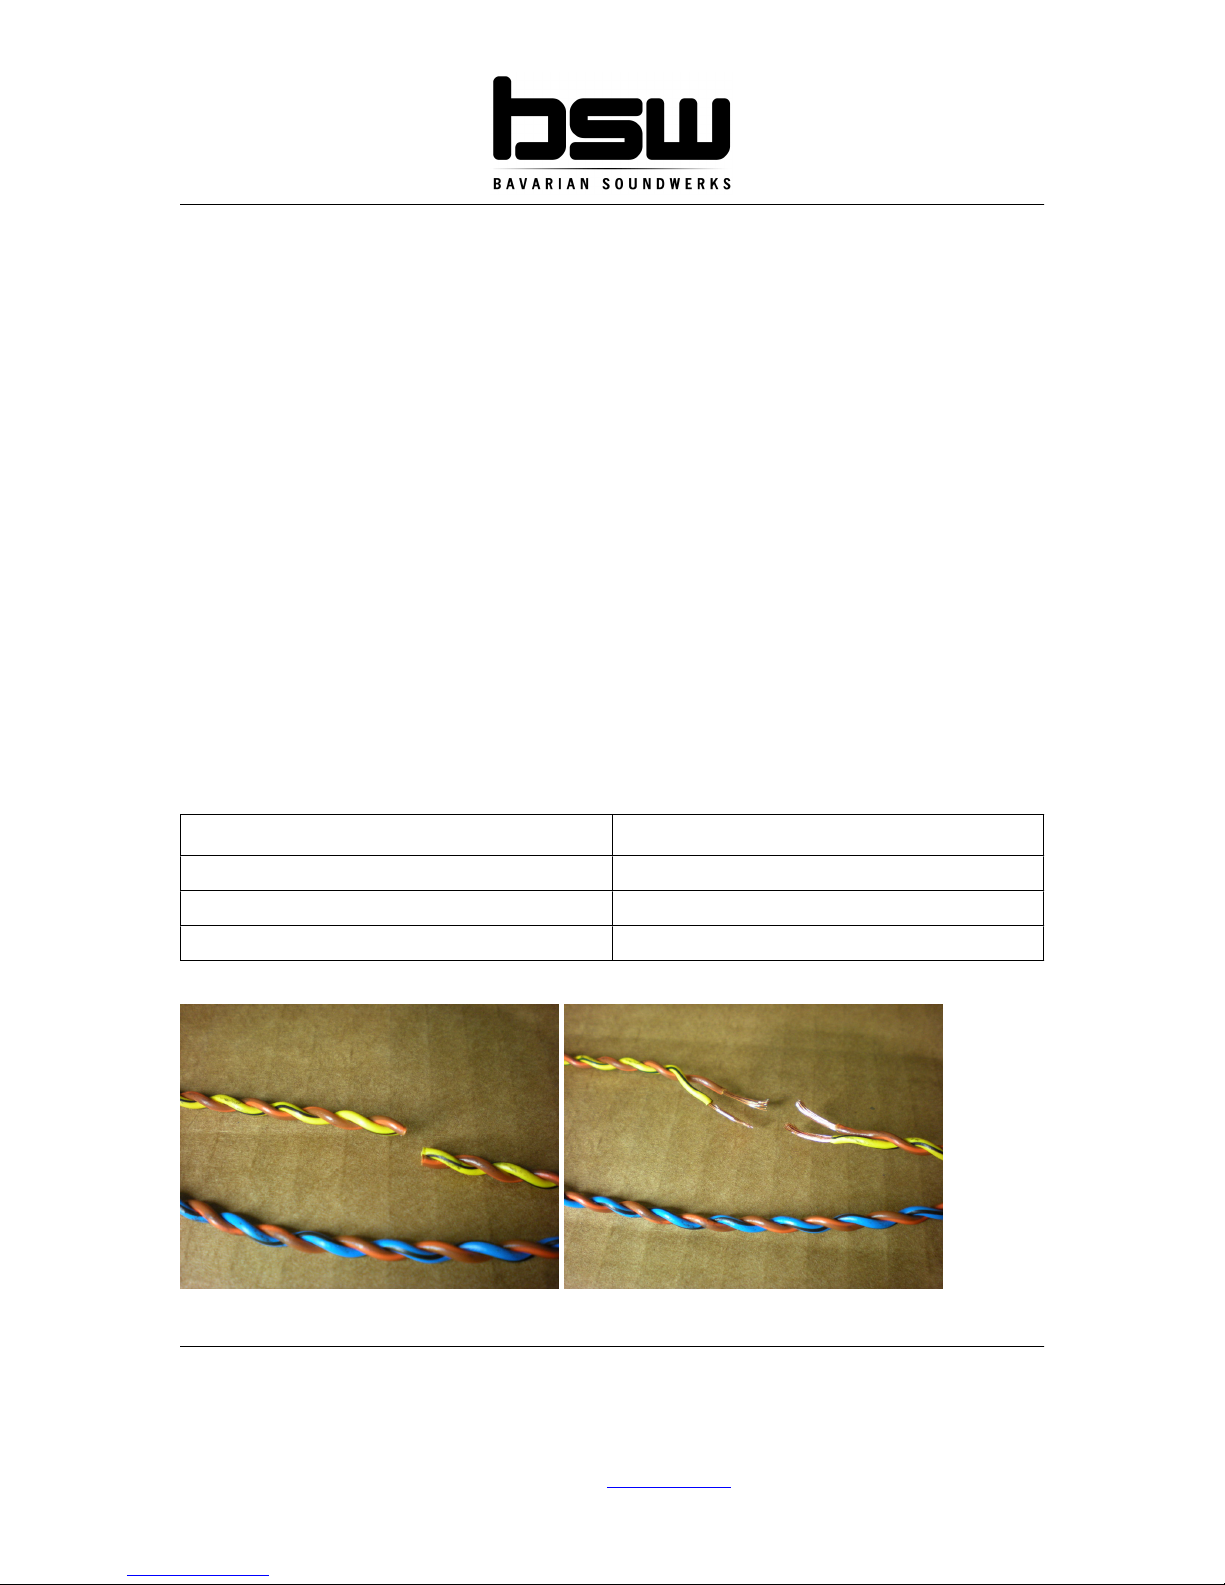
2. You’ll need to isolate the following four (4) wires. They will be twisted together in pairs, as they
enter the factory amplifier.
-Blue w/Black Stripe (+) twisted with Brown w/Orange Stripe(-)
-Yellow w/Black Stripe (+) twisted with Brown w/Orange Stripe (-)
3. Now, orient yourself with the BSW amplifier harness. It contains the following four wires, along with
the blue remote turn on wire.
Grey (+) White (+)
Grey/Black (-) White/Black(-)
We are essentially “T’ing” into the wires.
Tapping into the factory wires using the blue butt connectors, the connections will essentially be as
follows:
Wire Color at Harness Wire Color at Factory Amplifier
Grey (+)
Blue w/Black Stripe
Grey/Black (-)
Brown w/Orange Stripe
White (+)
Yellow w/Black Stripe
White/Black (-)
Brown w/Orange Stripe
Here’s how you’ll tap into the factory wires:
3of 8
Any reproduction, distribution, modification, or dissemination of these instructions without written permission from Bavarian Soundwerks is
expressly forbidden and a violation of international copyright law. Any violation will result in persecution to the full extent available under the
law!
© 2006 Bavarian Soundwerks, LLC.
2195 Defoor Hills Rd., Suite D, Atlanta, GA 30318
P: 404.963.8857 | www.bavsound.com
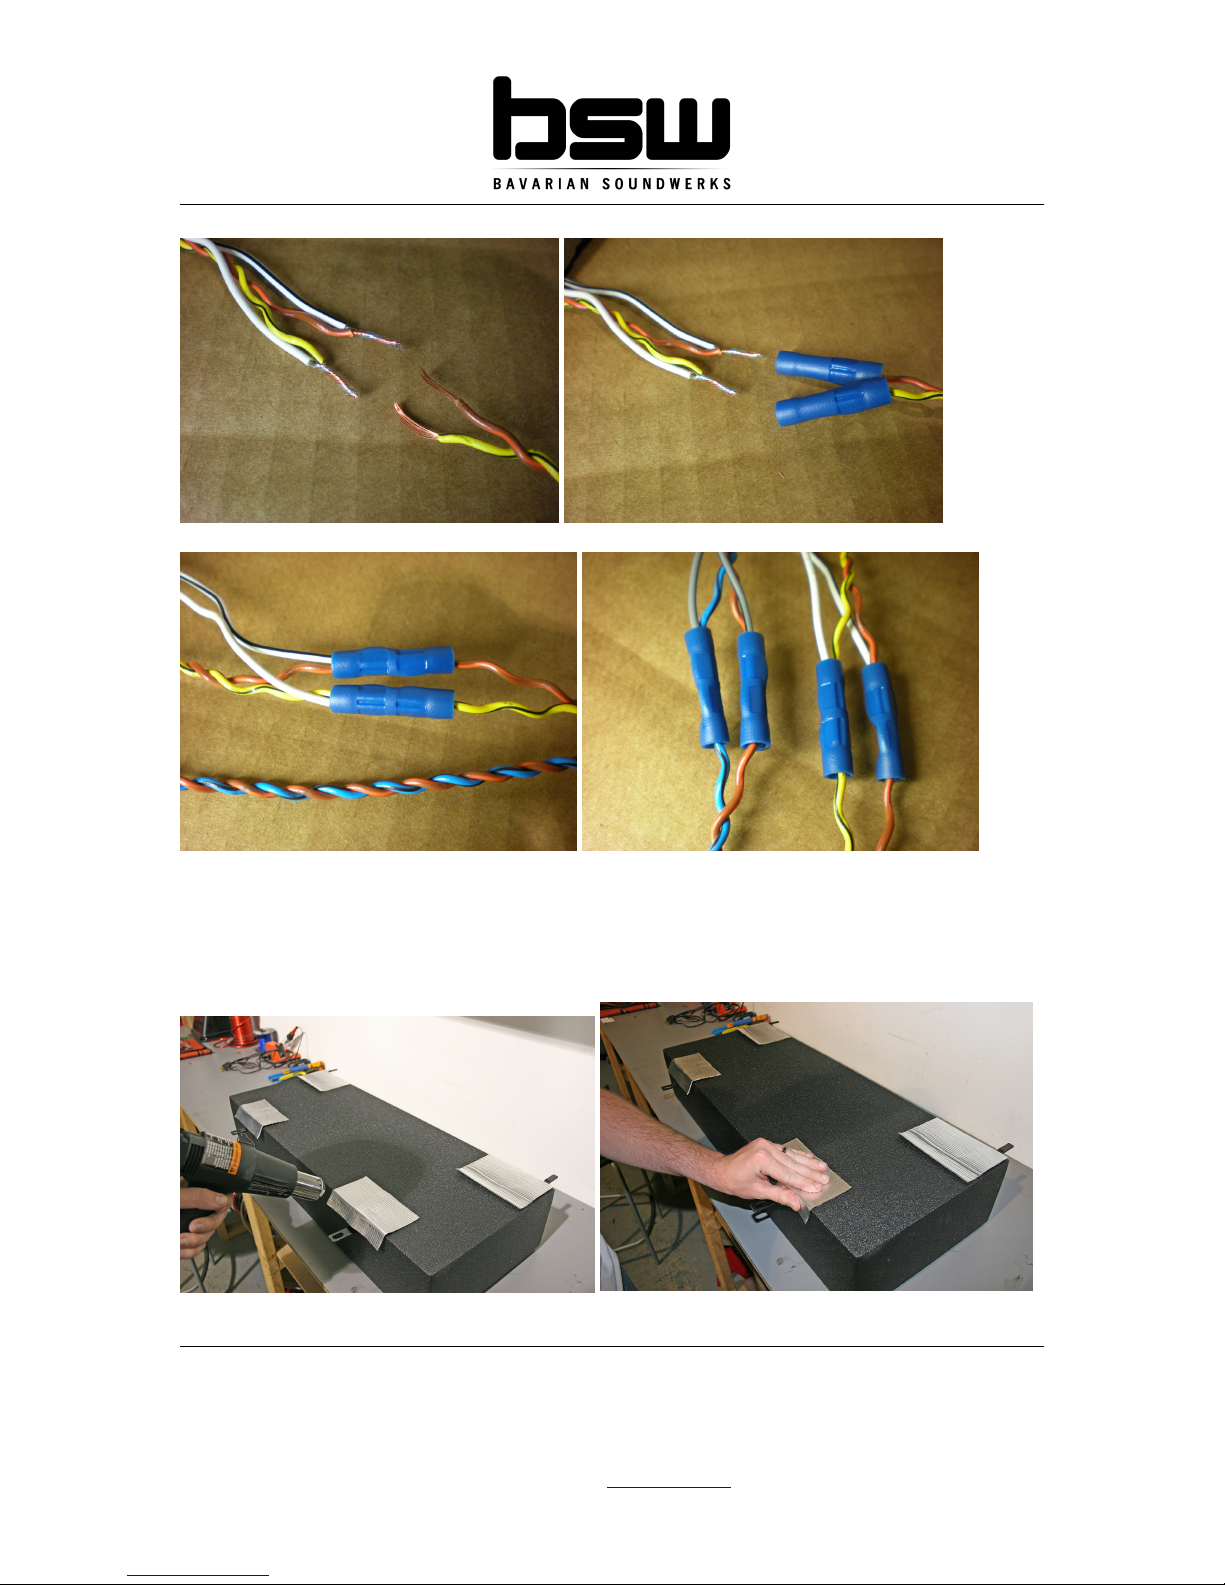
Here’s what the completed connections will look like:
At this point, you can put the grey carpeted panel back into the car and route the amplifier harness
up above the carpeted panel, leaving about 8” exposed.
Preparing the Enclosure for Installation:
We need to apply the strips of included sound deadening to the top of the enclosure before we install it.
Using your heat gun, or more likely, hair dryer, get the strips warm to the touch and apply as shown.
4of 8
Any reproduction, distribution, modification, or dissemination of these instructions without written permission from Bavarian Soundwerks is
expressly forbidden and a violation of international copyright law. Any violation will result in persecution to the full extent available under the
law!
© 2006 Bavarian Soundwerks, LLC.
2195 Defoor Hills Rd., Suite D, Atlanta, GA 30318
P: 404.963.8857 | www.bavsound.com

Installing the D110.E36 into your BMW
The first thing we need to do is familiarize ourselves with the way the quick release mechanism works. The
photo below shows how the hardware fits together. The space between the two washers represents the
chassis of the car.
Now, we need to identify the mounting locations that the enclosure will use to mount to the rear deck. In the
photo on the upper right you can see the front mounting holes (Enclosure has “BSW” on front side of it)
where the front tabs simply slide into the holes. You may find small plastic inserts covering these holes in
your car. Remove these.
5of 8
Any reproduction, distribution, modification, or dissemination of these instructions without written permission from Bavarian Soundwerks is
expressly forbidden and a violation of international copyright law. Any violation will result in persecution to the full extent available under the
law!
© 2006 Bavarian Soundwerks, LLC.
2195 Defoor Hills Rd., Suite D, Atlanta, GA 30318
P: 404.963.8857 | www.bavsound.com
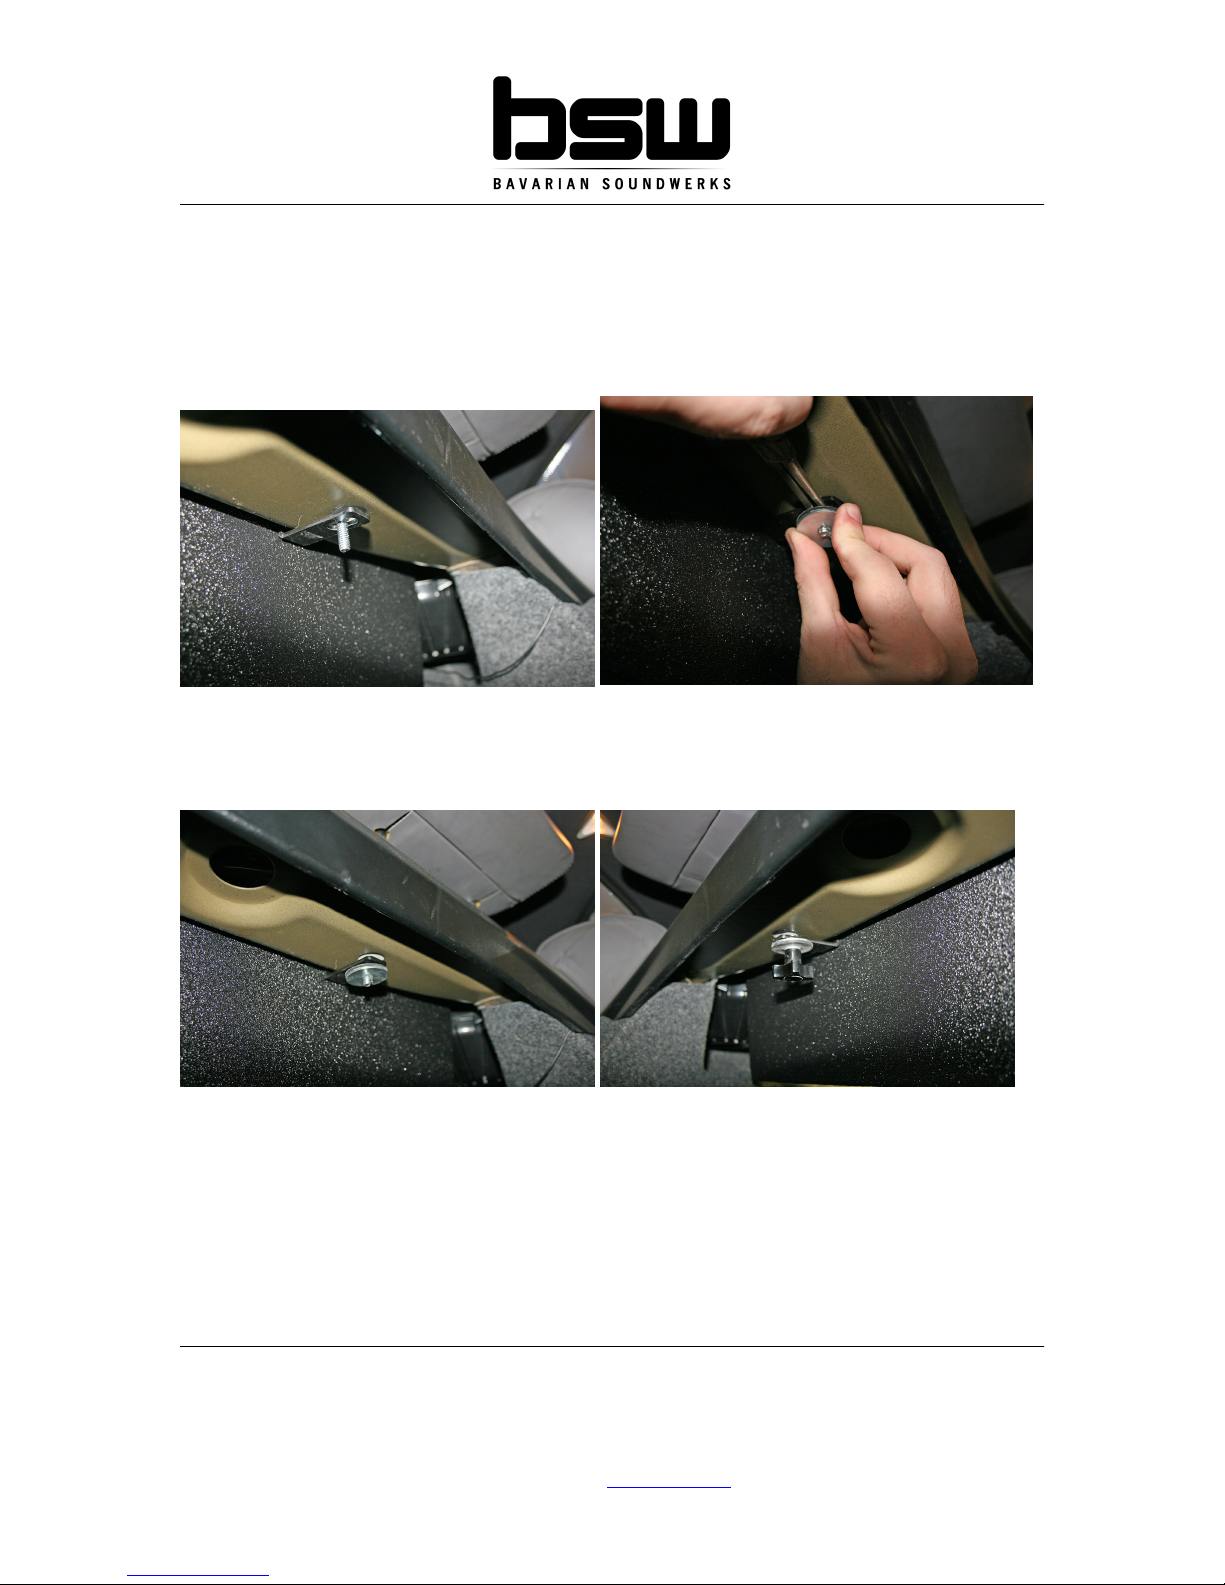
Having installed the quick release bolts, we can now install the enclosure. To do this, it helps to have a friend
handy, although it isn’t completely necessary. You’ll want to lie down in the trunk with the enclosure resting
on top of you.
1. Lift the front of the enclosure (side with BSW logo on it) up and slide the front brackets into the holes
closest to the rear of the car.
2. With the brackets inserted into the holes, you can lift the rear of the enclosure up, being sure to align
the holes in the brackets with the bolts that you dropped down into the I-Beam.
3. Using a small pair of needle nose pliers to hold the bolt steady, install the second washer up onto the
bolt.
4. Now, slide the lock washer and quick release knob up onto the bolt and tighten down securely. Repeat
for both sides.
6of 8
Any reproduction, distribution, modification, or dissemination of these instructions without written permission from Bavarian Soundwerks is
expressly forbidden and a violation of international copyright law. Any violation will result in persecution to the full extent available under the
law!
© 2006 Bavarian Soundwerks, LLC.
2195 Defoor Hills Rd., Suite D, Atlanta, GA 30318
P: 404.963.8857 | www.bavsound.com

Basic Testing of your Install
First things first, after physically completing the installation, let’s go ahead and plug the amplifier in. We need
to make sure your amplifier is powered up properly. It needs to turn off and on with the key.
Amplifier Tuning
Head up to the front of the car and turn on the stereo. Put in your favorite CD (not a burned CD, but one that
was professionally mastered and recorded), and tune in to your favorite track. We recommend using a very
dynamic type of music, with many types of musical variations within the CD. Make sure that your bass
settings on your radio are set in the middle or slightly lower. This will decrease distortion and increase the
overall sound quality in the vehicle.
Make sure all bass and treble settings on your radio are flat, or in the middle.
We’ve roughly adjusted the settings on the amplifier at the factory, but you’ll want to fine tune things
based on your own listening preferences and sensitivities.
Gains:
Begin turning up the volume until you hear the music at a reasonable level and increase the volume slightly
up to the point that you begin to hear distortion coming from your interior speakers. Now, back down the
volume until the distortion disappears and stop there. Head back to the trunk and slowly begin adjusting the
gain(s) of the amplifier until you are content with the amount of bass being produced by the subwoofer
without any audible distortion of the woofer. Make sure that this blends in with the rest of the music, and
you’re on your way to a rich, full sound.
When adjusting the amplifier gains, do everything in very small increments.Make sure that you
increase both gain control knobs at the same rate.
We recommend 1/8th turn adjustments of the gain to find that sweet spot where there is no distortion and
plenty of volume. Everyone listens to music differently, so the tuning process make take some of us days,
while others can do it in a matter of minutes, whether they’re a beginner or not.
Boost:
Again, make SMALL, incremental adjustments. We’re boosting frequencies at 45hz by adjusting this
knob, so keep a keen ear out for distortion.
XOVER:
You’ll want this set at approximately 80hz. Eyeballing is fine, as the potentiometer has some forgiveness to
it. Your ears will tell you where the crossover needs to be set in your car, based on your listening
preferences.
7of 8
Any reproduction, distribution, modification, or dissemination of these instructions without written permission from Bavarian Soundwerks is
expressly forbidden and a violation of international copyright law. Any violation will result in persecution to the full extent available under the
law!
© 2006 Bavarian Soundwerks, LLC.
2195 Defoor Hills Rd., Suite D, Atlanta, GA 30318
P: 404.963.8857 | www.bavsound.com

Troubleshooting Guide
Invariably you’ll come across one or two things in your install that didn’t quite match up or weren’t perfectly
clear to you. We’ve put together several common things that may come up during an install, and how to
isolate and troubleshoot them if they do. It is very advantageous to have a digital multi-meter on hand to
troubleshoot anything electrical in your BMW. They can be found at any hardware store for around $20-$30.
No Sound from subwoofer:
•The fuse wasn’t installed inline on the power wire at the battery. This is very often overlooked. Pop
in the fuse, and you’ll be good to go.
•Amplifier isn’t turning on properly. See next section.
Amplifier isn’t Powering Up:
•The fuse wasn’t installed inline power wire at the battery. This is very often overlooked. Pop in the
fuse, and you’ll be good to go.
•Check to make sure you’ve found the correct remote turn-on wire. This is a very common oversight.
Set your DMM to direct current and place one lead on the ground terminal of your amplifier and one
on the remote turn on terminal. Turn the car and the radio on. If you don’t have 12-14 volts on the
remote turn on terminal, your connection may be the issue.
•Make sure your power and ground connections are correct. Using your DMM, again check each
terminal to make sure that a connection has been established.
-Ground Connection: Set the DMM to its continuity section. Place one lead of the DMM on the
amplifiers ground location where you screwed into the chassis, and the other lead on the negative
battery terminal. If you don’t see any continuity, move your ground wire until you do.
-Power Connection: Set the DMM to direct current again, and place one lead on the amplifiers
power terminal and the other on the amplifiers ground terminal. You should see 12-14 volts. If not,
check your inline fuse.
Subwoofer sounds muffled or quiet:
•Your input signals are out of phase. Check to make sure that your input connections are exactly as
outlined in the guide. An easy test is to simply cut one of the input wires and see if the sound output
increases exponentially.
8of 8
Any reproduction, distribution, modification, or dissemination of these instructions without written permission from Bavarian Soundwerks is
expressly forbidden and a violation of international copyright law. Any violation will result in persecution to the full extent available under the
law!
© 2006 Bavarian Soundwerks, LLC.
2195 Defoor Hills Rd., Suite D, Atlanta, GA 30318
P: 404.963.8857 | www.bavsound.com
Table of contents
Other Bavarian Soundwerks Subwoofer manuals


