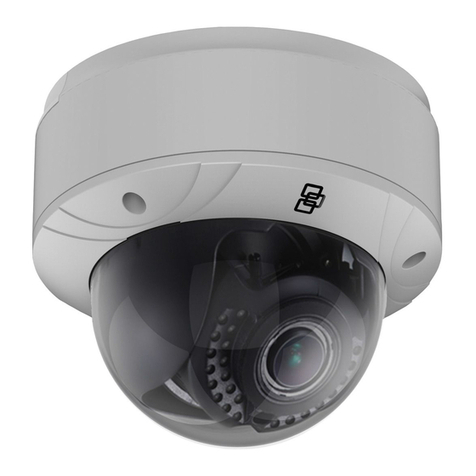
Bavono WDR-600DN User manual

06
07
01
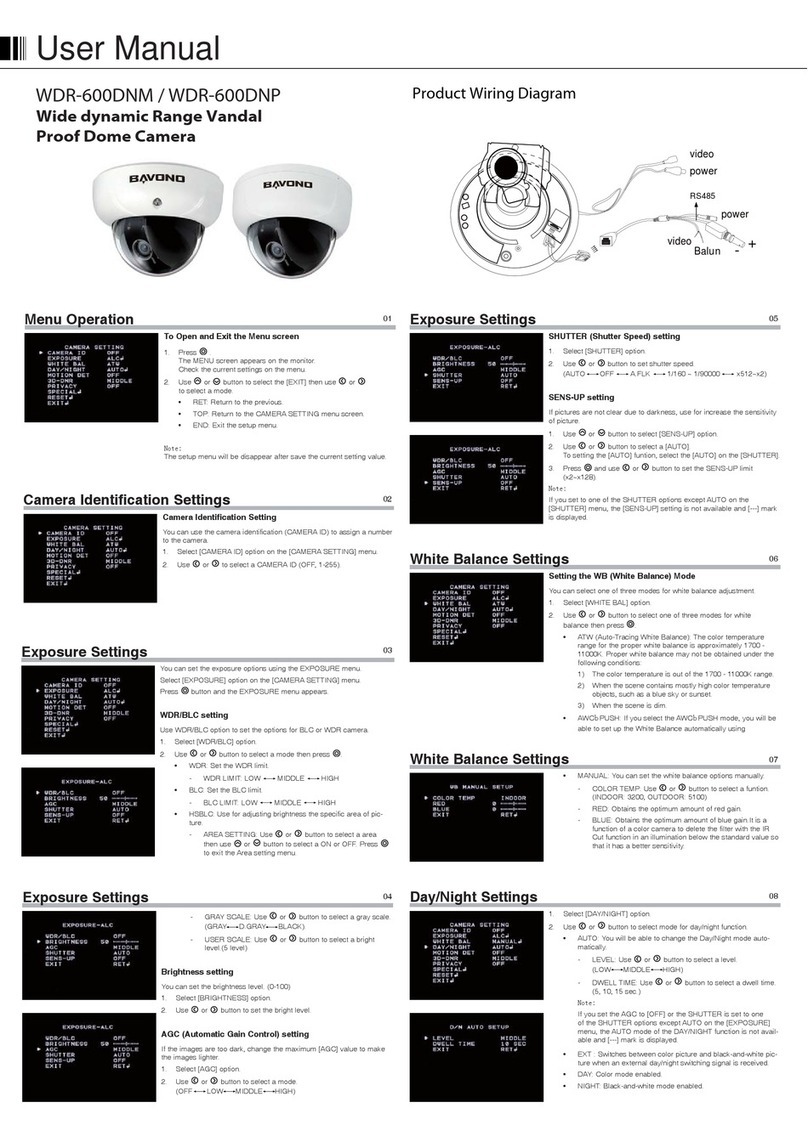
Menu Operation
To Open and Exit the Menu screen
1. Press .
The MENU screen appears on the monitor.
Check the current settings on the menu.
2. Use or button to select the [EXIT] then use or
to select a mode.
• RET: Return to the previous.
• TOP: Return to the CAMERA SETTING menu screen.
• END: Exit the setup menu.
Note:
The setup menu will be disappear after save the current setting value.
02
Camera Identification Settings
Camera Identification Setting
You can use the camera identification (CAMERA ID) to assign a number
to the camera.
1. Select [CAMERA ID] option on the [CAMERA SETTING] menu.
2. Use or to select a CAMERA ID (OFF, 1-255).
03
Exposure Settings
You can set the exposure options using the EXPOSURE menu.
Select [EXPOSURE] option on the [CAMERA SETTING] menu.
Press button and the EXPOSURE menu appears.
WDR/BLC setting
Use WDR/BLC option to set the options for BLC or WDR camera.
1. Select [WDR/BLC] option.
2. Use or button to select a mode then press .
• WDR: Set the WDR limit.
- WDR LIMIT: LOW MIDDLE HIGH
• BLC: Set the BLC limit.
- BLC LIMIT: LOW MIDDLE HIGH
• HSBLC: Use for adjusting brightness the specific area of pic-
ture.
- AREA SETTING: Use
or button to select a area
then use or button to select a ON or OFF. Press
to exit the Area setting menu.
04
Exposure Settings
- GRAY SCALE: Use or button to select a gray scale.
(GRAY D.GRAY BLACK).
- USER SCALE: Use or button to select a bright
level.(5 level)
Brightness setting
You can set the brightness level. (0-100)
1. Select [BRIGHTNESS] option.
2. Use or button to set the bright level.
AGC (Automatic Gain Control) setting
If the images are too dark, change the maximum [AGC] value to make
the images lighter.
1. Select [AGC] option.
2. Use or button to select a mode.
(OFF LOW MIDDLE HIGH)
05
Exposure Settings
SHUTTER (Shutter Speed) setting
1. Select [SHUTTER] option.
2. Use or button to set shutter speed.
(AUTO OFF A.FLK 1/160 ~ 1/90000 x512~x2)
SENS-UP setting
If pictures are not clear due to darkness, use for increase the sensitivity
of picture.
1. Use or button to select [SENS-UP] option.
2. Use or button to select a [AUTO].
To setting the [AUTO] funtion, select the [AUTO] on the [SHUTTER].
3. Press and use or button to set the SENS-UP limit
(x2~x128).
Note:
If you set to one of the SHUTTER options except AUTO on the
[SHUTTER] menu, the [SENS-UP] setting is not available and [---] mark
is displayed.
White Balance Settings
Setting the WB (White Balance) Mode
You can select one of three modes for white balance adjustment.
1. Select [WHITE BAL] option.
2. Use or button to select one of three modes for white
balance then press .
• ATW (Auto-Tracing White Balance): The color temperature
range for the proper white balance is approximately 1700 -
11000K. Proper white balance may not be obtained under the
following conditions:
1) The color temperature is out of the 1700 - 11000K range.
2) When the scene contains mostly high color temperature
objects, such as a blue sky or sunset.
3) When the scene is dim.
• AWC PUSH: If you select the AWC PUSH mode, you will be
able to set up the White Balance automatically using
White Balance Settings
• MANUAL: You can set the white balance options manually.
- COLOR TEMP: Use
or button to select a funtion.
(INDOOR: 3200, OUTDOOR: 5100)
- RED: Obtains the optimum amount of red gain.
- BLUE: Obtains the optimum amount of blue gain.It is a
function of a color camera to delete the filter with the IR
Cut function in an illumination below the standard value so
that it has a better sensitivity.
08
Day/Night Settings
1. Select [DAY/NIGHT] option.
2. Use or button to select mode for day/night function.
• AUTO: You will be able to change the Day/Night mode auto-
matically.
- LEVEL: Use or button to select a level.
(LOW MIDDLE HIGH)
- DWELL TIME: Use or button to select a dwell time.
(5, 10, 15 sec.)
Note:
If you set the AGC to [OFF] or the SHUTTER is set to one
of the SHUTTER options except AUTO on the [EXPOSURE]
menu, the AUTO mode of the DAY/NIGHT function is not avail-
able and [---] mark is displayed.
• EXT : Switches between color picture and black-and-white pic-
ture when an external day/night switching signal is received.
• DAY: Color mode enabled.
• NIGHT: Black-and-white mode enabled.
Application Diagram
WDR-600DN
Wide Dynamic Range Body Camera
POWER
DC10V ~ 56V
AC7V ~ 40V
50 / 60Hz
POWER
DC10V ~ 56V
AC7V ~ 40V
50 / 60Hz
BNC Video
BNC Video
1 2 3 4 5 6 7 8
1 2 3 4 5 6 7 8
Auto IRIS
Auto IRIS
1 + Video
2 - Video
3 + Data
4 + (&-)Power
5 + Power
6 - Data
7 - (&+)Power
8 - Power
1 + Video
2 - Video
3 + Data
4 + (&-)Power
5 + Power
6 - Data
7 - (&+)Power
8 - Power
User Manual

09
Motion Detection Settings
The motion detection detects the moving objects in the scene by moni-
toring changes in brightness level. You can select the level of sensitivity
for motion detection to 4 zone.
1. Select [MOTION DET] option.
2. Use or button to select a [ON] and press .
The MOTION DETECTION menu appears.
3. Use or button to select a zone number (AREA1~AREA4) on
the [ZONE NUMBER].
4. Use or button to set up the ON or OFF on the ZONE STATE.
5. Use or to select an option then use or button to adjust
the option.
• HEIGHT: Enlarge or decrease the vertical size of the mask.
• WIDTH: Enlarge or decrease the horizontal size of the mask.
• MOVE X: Moves horizontal position of the mask.
• MOVE Y: Moves vertical position of the mask.
6. Use [SENSITIVITY] option to obtain the optimum detection level.If
pictures are not clear due to bightness, use for reduce the noise of
picture.
10
11
12
13
3D-DNR Settings
1. Select [3D-DNR] option.
2. Use or button to select a option.
(OFF LOW MIDDLE HIGH)
Note:
If you set the AGC to [OFF] on the [EXPOSURE] menu, the [3D-DNR]
function is not available and [---] mark is displayed.
Privacy Settings
This function is aiming at the protection of personal privacy, selecting a
screen part black not to be displayed in the screen. This function permits
the control of the strength level in 8 levels. You may setup the size and
location of the area.
1. Select [PRIVACY] option.
2. Use or button to select a [ON] and press . The PRIVACY
SETUP menu appears.
3. Use or button to select a mask (AREA1~AREA8) on the
[MASK NUMBER].
4. Use or button to set up the ON or OFF on the DISPLAY
option.
5. Use or button to set up the GRAY, WHITE or BLACK on the
COLOR option.
6. Use or to select an option then use or button to adjust
the option.
• HEIGHT: Enlarge or decrease the vertical size of the mask.
• WIDTH: Enlarge or decrease the horizontal size of the mask.
• MOVE X: Moves horizontal position of the mask.
• MOVE Y: Moves vertical position of the mask.
Special Menu Settings
This menu lets you adjust and set up D-ZOOM, D-EFFECT,
SHARPNESS, COLOR, SYNC, USER TITLE, LANGUAGE function by
yourself in the SPECIAL menu.
1. Select [SPECIAL] option.
2. Press button and the SPECIAL menu appears.
Setting the D-ZOOM (Digital Zoom ) level
You can select the digital zoom level.
1. Select [D-ZOOM] option on the [SPECIAL] menu.
2. Use or button to select a [ON] then press the DIGITAL
ZOOM menu appears.
3. Use or to select a option then use or button to select a
level.
- ZOOM: Use or button to enlarge the screen.
- PAN: Use or button to move the screen.(left or right)
- TILT: Use or button to move the screen.(up or down)
Special Menu Settings
Setting the D-EFFECT (Digital effect)
You can select the digital effect.
1. Select [D-EFFECT] option on the [SPECIAL] menu.
2. Use or button to select a digital effect.
• V-FLIP: Flip the picture vertically.
• MIRROR: Turn on the mirror effect.
• ROTATE: Rotate the picture. (180°)
• OFF: Turn off the digital effect.
Setting the SHARPNESS effect
You can select the color effect.
1. Select [SHARPNESS] option on the [SPECIAL] menu.
2. Use or button to change a adjust the option.
14
Special Menu Settings
Setting the COLOR effect
You can select the color effect.
1. Select [COLOR] option on the [SPECIAL] menu.
2. Use or button to change a color effect.
• ON: Color screen
• OFF: B/W (Black and White) screen
Setting the SYNC (Synchronization)
You can select internal sync (INT) mode or line-lock (LINE) mode.
The SYNC function is available only with AC power source.
1. Select [SYNC] option on the [SPECIAL] menu.
2. Use or button to select [INT] or [LL] (Line Lock).
• INT: Selects for using the internal synchronization.
• LL (Line Lock): Selects for the operation of multi cameras
because it synchronizes the camera phase by using the exter-
nal signal (AC Signal). A little phase deviation for some sets
may be aligned.
15
Special Menu Settings
Setting the USER TITLE
You can use the camera identification to assign a number and character
to the camera (0 - 9, A-Z, a-z).
The USER TITLE is displayed on the upper left of the screen.
To disappear the user title, select [OFF].
1. Select [USER TITLE] option on the [SPECIAL] screen.
2. Use or button to select a [ON] then press .
The USER TITLE menu appears.
3. Use , , or button to select a character or number.
- CLR: If you enter the wrong code, select CLR then press
- POS: Use , , or button to move position of USER
TITLE on the screen.
- END: Confirm your selection.
- 1 (Blank): Inserts a space at the cursor position.
- / : Moves cursor to left or right.
1
16
Special Menu Settings
Language Setting
Select a language for the Setup menu and on-screen display.
1. Select [LANGUAGE] option on the [SPECIAL] screen.
2. Press or button to select a language.
17
Reset Settings
1. Select [RESET] option.
2. Press button and the RESET menu appears.
3. Use or to select option.
• CAMERA REBOOT: To reboot the camera system.
• FACTORY RESET: To reset the camera setting to factory set-
ting, select [FACTORY RESET] option.
Specications
POWER
CCD
SYNC.
VIDEO
CHARACTERIS TICS
And FUNCTIONS
Board Array
Shell Material
Built-In Balun
Remote Control
Model WDR-600DN
Power Input
Operating Temperature
Power Consumption
CCD Image Sensor
Sync.
Scanning Synchronization
Video Out
Auto Gain Control
Exposure
Electric Shutter
Day / Night
Min. Illumination
Resolution
White Balance
Backlight Compensation
3D - DNR
Privacy Masking
Digital Zoom
EIS
Digital Effect
Sharpness
DC 10V ~ 40V / AC 7V ~ 40V
0℃~45℃
Max. 1.8W
1/3 inch Vertical Double Interline CCD
2:1 Interlace
Internal / Line-Lock (External Sync Input)
1.0Vp-p Composite Signal (75ohm)
OFF/ LOW/ MIDDLE/ HIGH
ALC / ELC
1/50 ~ 1/90,000(PAL),1/60~1/90,000(NTSC)
True Day and Night ( Auto/ Day / Night / Ext. D&N )
0.0001 Lux
600 TV Lines
ATW / AWC / Manual (1,700°K ~11,000°K)
BLC/ WDR
OFF/ Low/ Middle/ High
8 Zone
X8
ON / OFF
OFF/ V-Flip / Mirror / Rotate
Adjustable
Two Board
Metal
Yes
RS485
Other Bavono Security Camera manuals

