Bavsound BMW E90 User manual

BMW E90/91/92 Subwoofer System Installation Guide:
uf110 for BMW 3 Series, 330i, 328i
’06-’13 – Standard Audio (HiFi)
You’ll need:
•Bavsound tool kit (or some variety thereof - the video highlights the tools needed for
this particular installation) - http://www.bavsound.com/product/414/361/BSW-
Interior-Disassembly-Tool-Kit/
•Wire Crimpers
•Metric Wrench / Socket Set
•Tunes in the garage (your choice)
Before you Begin
•Please review and familiarize yourself completely with these instructions before
starting work on your vehicle!
•Ensure that your bass and treble settings are set to their default middle positions
before installing your new speaker upgrade. Once you’ve installed your Stage
1, you can reset the bass and treble settings to taste. Keep in mind that we
generally recommend keeping them both very close to center as large
adjustments introduce distortion into the audio signal and will lower
performance of your system.
•Be sure and watch this video, which covers the amplifier connections on your
new Bavsound amplifier: http://vimeo.com/28744796
•And, once completed with the install, be sure and watch this video which covers
tuning the amplifier in your E9x: http://vimeo.com/72214312
The Process

We’re going to proceed as follows:
1. Disassembling the trunk – locating factory amplifier
2. Deciding on mounting location for the new amplifier
3. Making appropriate wiring connections for audio inputs
4. Power/ground wire connections
5. Installing the subwoofer enclosure
6. Tuning/testing the system
Disassembling the Trunk Panels:
We are only removing the driver side of the carpeted paneling in the trunk. Lift the
floor panel out of the trunk, exposing the bottom edge of the passenger side panel.
There is no need for further disassembly.
1. Locate the three (3) fasteners that secure the driver side carpeted panel to the
frame of the vehicle.
2. Using your Bavsound Metal panel removal tool, slide the fork of the tool
between the smaller head of the plastic fastener and the larger base, carefully
prying outward to slide the center fastener out of its outer casing. Repeat this
process on all three (3) fasteners.

3. With the fasteners removed and placed to the side, we now need to remove the
metal tie down that is located toward the rear of the trunk, closest to the back
seat. It is attached to the chassis using a Torx T40 bolt. This needs to be
removed as well as the plastic housing that surrounds the bolt.
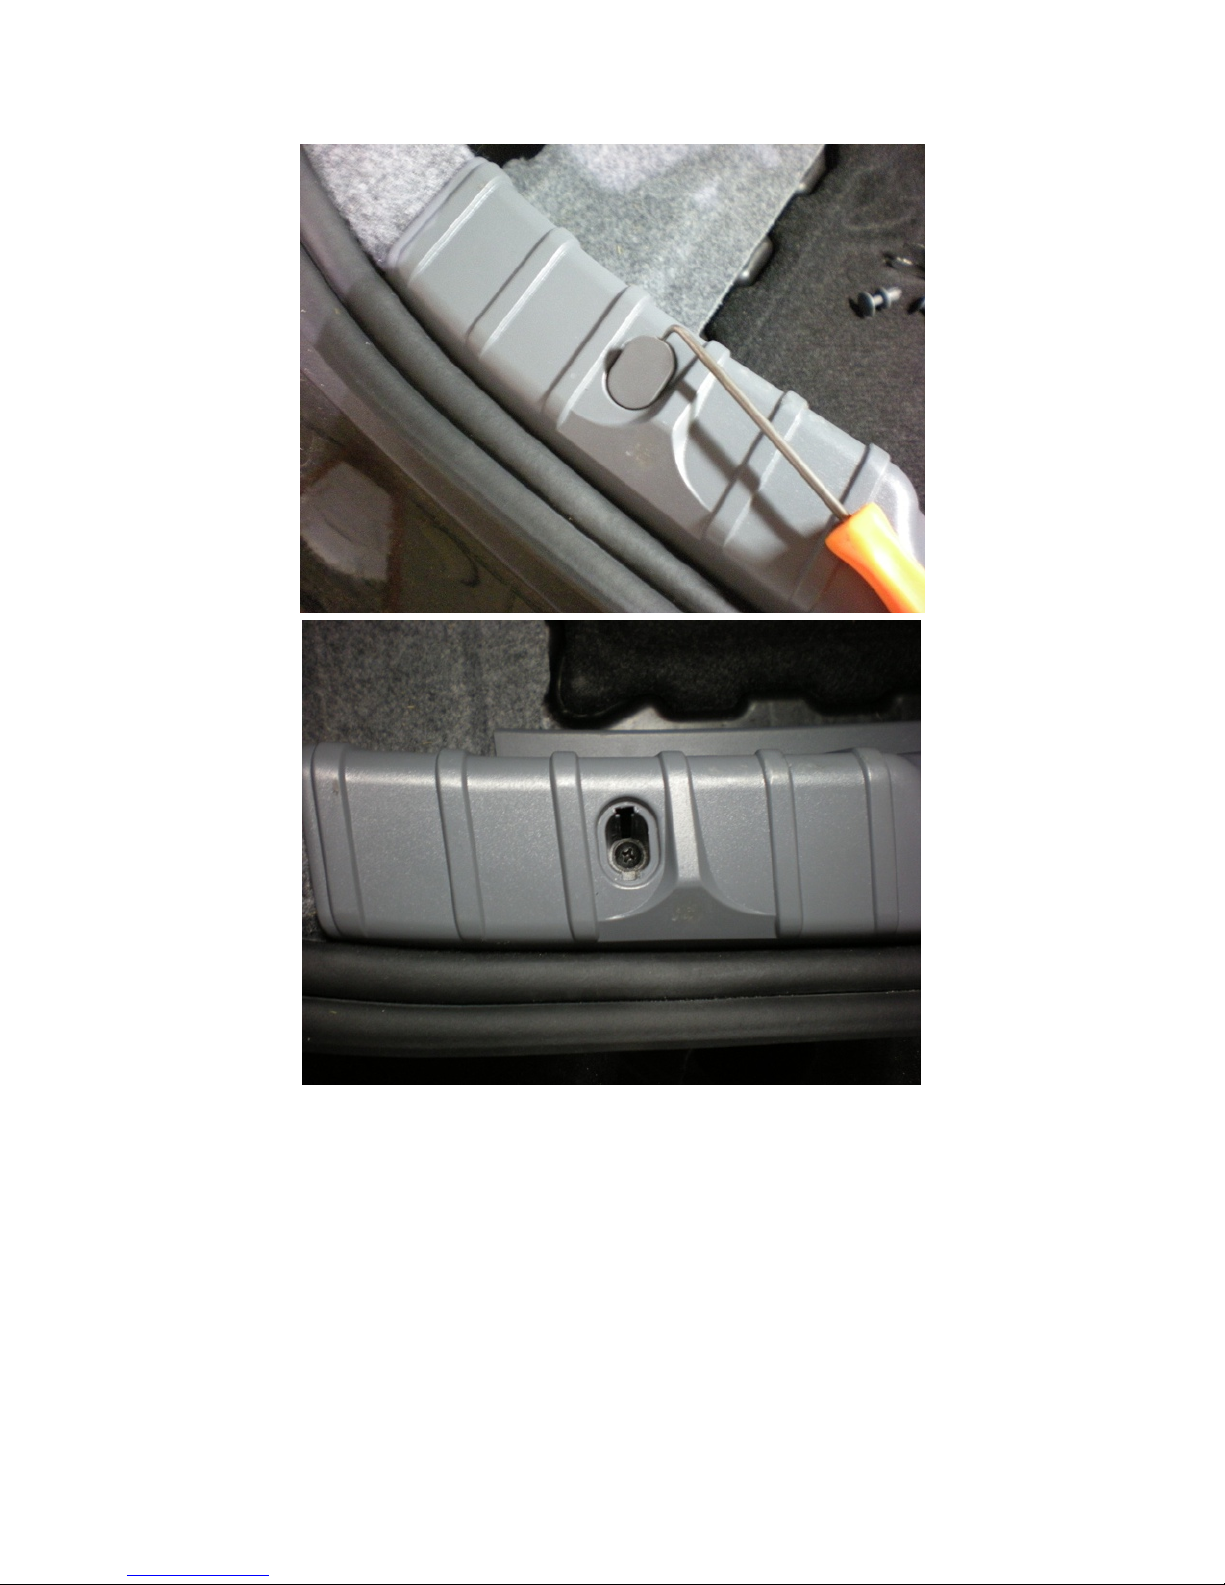
4. With the tie-down removed, we now need to look to the center plastic piece
that sits along the edge of the trunk. It is attached by two (2) Philips head screws
on the top portion, and four (4) plastic fasteners along its bottom rear-facing
panel.

5. Now, let’s first remove the two Philips head screws that attach the top portion of
the panel. We need to use our Bavsound right angle pick tool to remove the
plastic covers on either side of the panel. Once removed, using a Philips head
screwdriver, remove the screws from either side of the panel.
6. With the screws removed, we now need to use our metal Bavsound panel
removal tool to remove the four (4) plastic fasteners across the lower portion of
the panel.
Take note: These fasteners can be VERY tight. Be patient here. Use the same
methodology as when removing the trunk carpet liner fasteners.
7. Now, with all of the fasteners removed, we can remove the plastic trunk lip panel
by lifting upward and toward the front of the vehicle simultaneously. Note the
metal trunk tie-downs that you will have to maneuver around when lifting the

panel upwards.
You may elect to remove the rubber gasket from the rear-most edge of the
panel at this point, as it will allow easier removal of the panel. Simply slide the
gasket toward you by firmly pulling on it using your hands.
8. It’s time to remove the driver side carpeted panel at this point. Using your
hands, free the panel from the edge of the trunk as shown in the photo, and pull
the panel inward toward the center of the vehicle. Once you’re at this point, pull
the trunk liner outward towards the exit of the trunk.
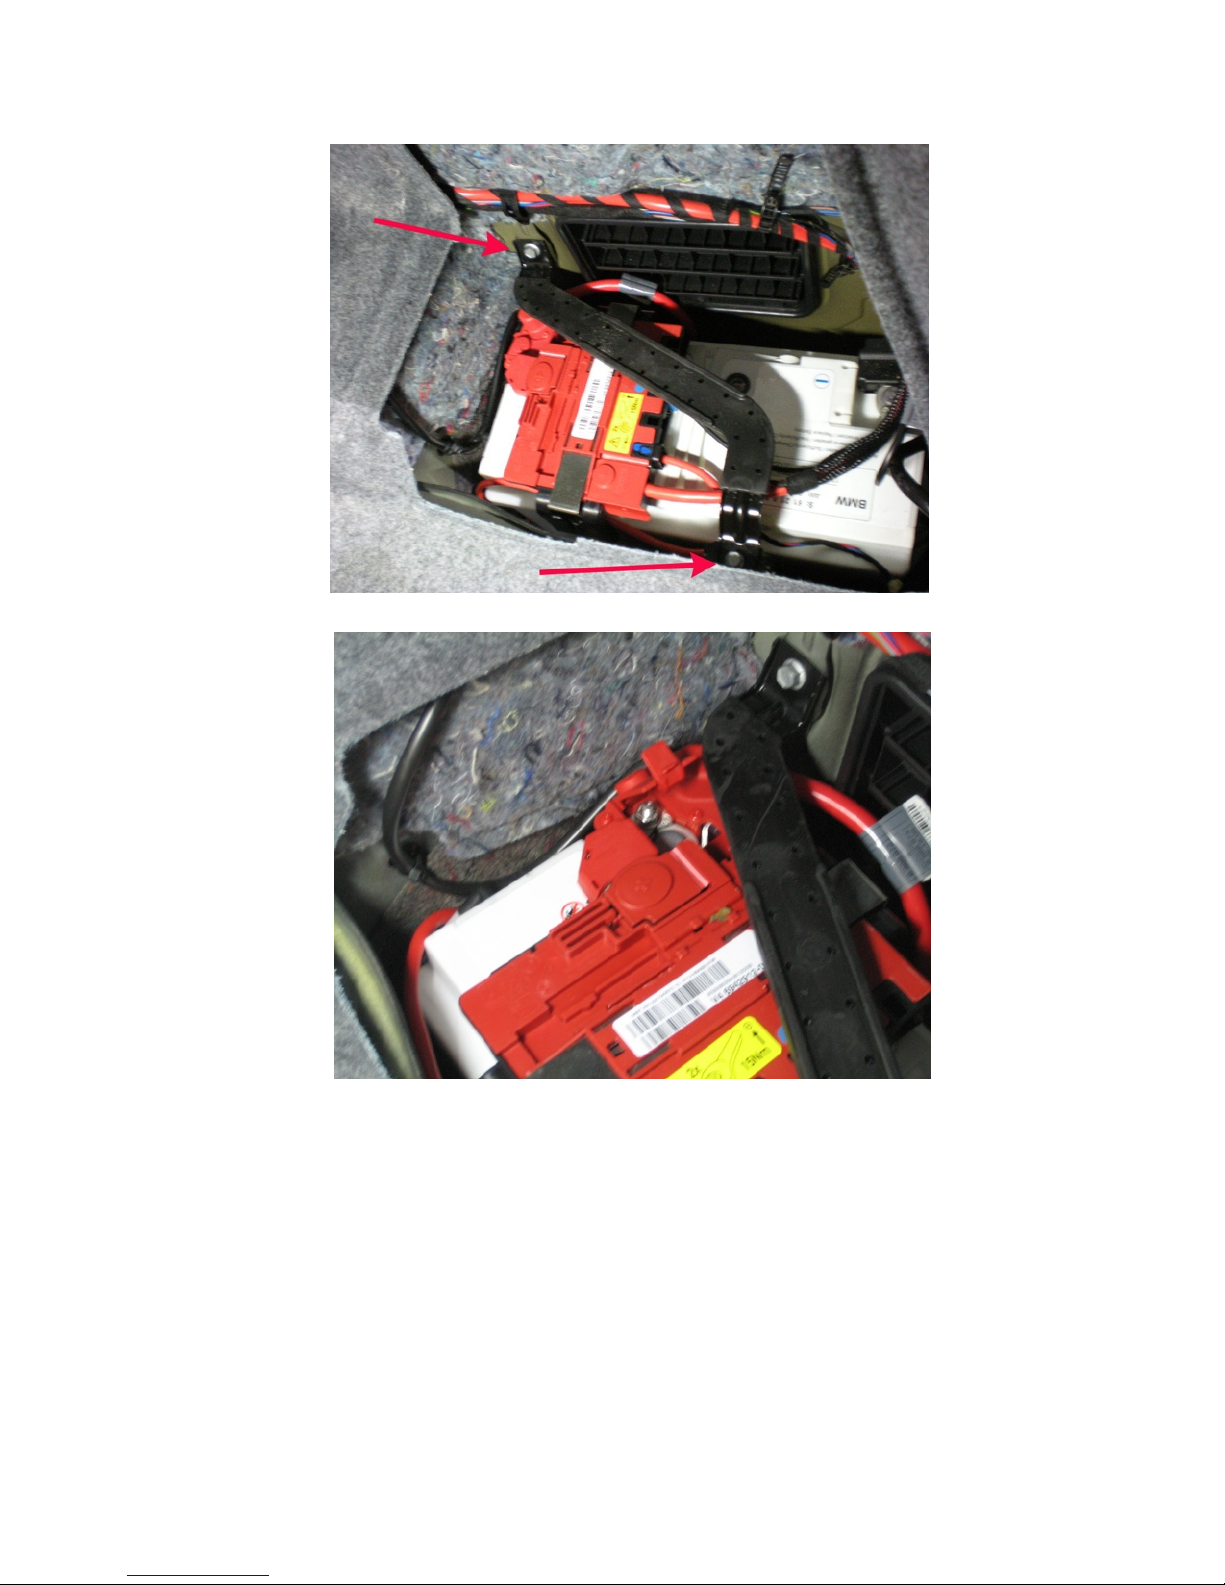
9. With the panel removed, you will see the factory amplifier and all of the
associated wiring harnesses shown below:

Mounting Location for New Amplifier
1. With everything removed, we now need to decide on a location to mount our
new amplifier. Most vehicles have ample room beneath the center floor piece, as
shown in the photo below:

2. The vehicle shown has a factory installed component present on the passenger
side, but as you can see there is nothing mounted on the driver’s side. Here is
where we will mount our new amplifier.
3. Place the amplifier in it’s location without mounting it, as we’ll now decide on
the appropriate paths for the wiring entering/exiting the amplifier. Ultimately we
will simply Velcro the amplifier to the chassis.
Power/Ground Connections for the new Amplifier:
*Before you make any connections, we must insist on disconnecting the negative
battery terminal from the battery. This will eliminate any chance electrical damage to
the vehicle.
Power Wire (Red Wire)
•You’ll want to run the large red wire to the positive terminal of the battery. We
need to first remove the 10mm bolts that attach the metal battery bracket that
covers the top portion of the battery.
•Once removed, loosen the 10mm nut on top of the positive terminal itself.
•Place the amplifier power wire ring over the bolt, and tighten the nut back
down with the terminal on the battery. This is the primary power supply for
your new amplifier. This wire will be connected to the +12 terminal on the
amplifier. Do NOT put the fuse into the fuse-holder until you have connected
the other end of the wire to the amplifier. Once you’ve made this connection
at the new amplifier, it is safe to install the included fuse into the fuse-holder

Ground Wire (Black (Brown) Wire)
This wire is connected to the factory grounding connector located on the passenger
side of the vehicle in the photo shown below.
To attach the ground wire, simply:
•remove the factory 10mm nut using your Bavsound nut driver
•slide the ring terminal attached to the ground wire over the factory bolt
•reattach the 10mm nut, being careful to firmly secure the nut.

Audio Input Connections (Made at factory amplifier)
1. Note the rectangular black box that was included in your amplifier wiring kit. It
has 7 total wires coming off it, and for this section, we’ll be using the White,
White/Black and Grey, Grey/Black wires. The red, blue, and black wire
connections will be covered in the Remote Turn On section.
2. Now, we need to isolate the 4 wires on the BMW wiring harness that we’re
going to be working with. They are twisted together in pairs, and are found in
the main wiring harness that plugs directly into the factory amplifier which we’ll
unplug.

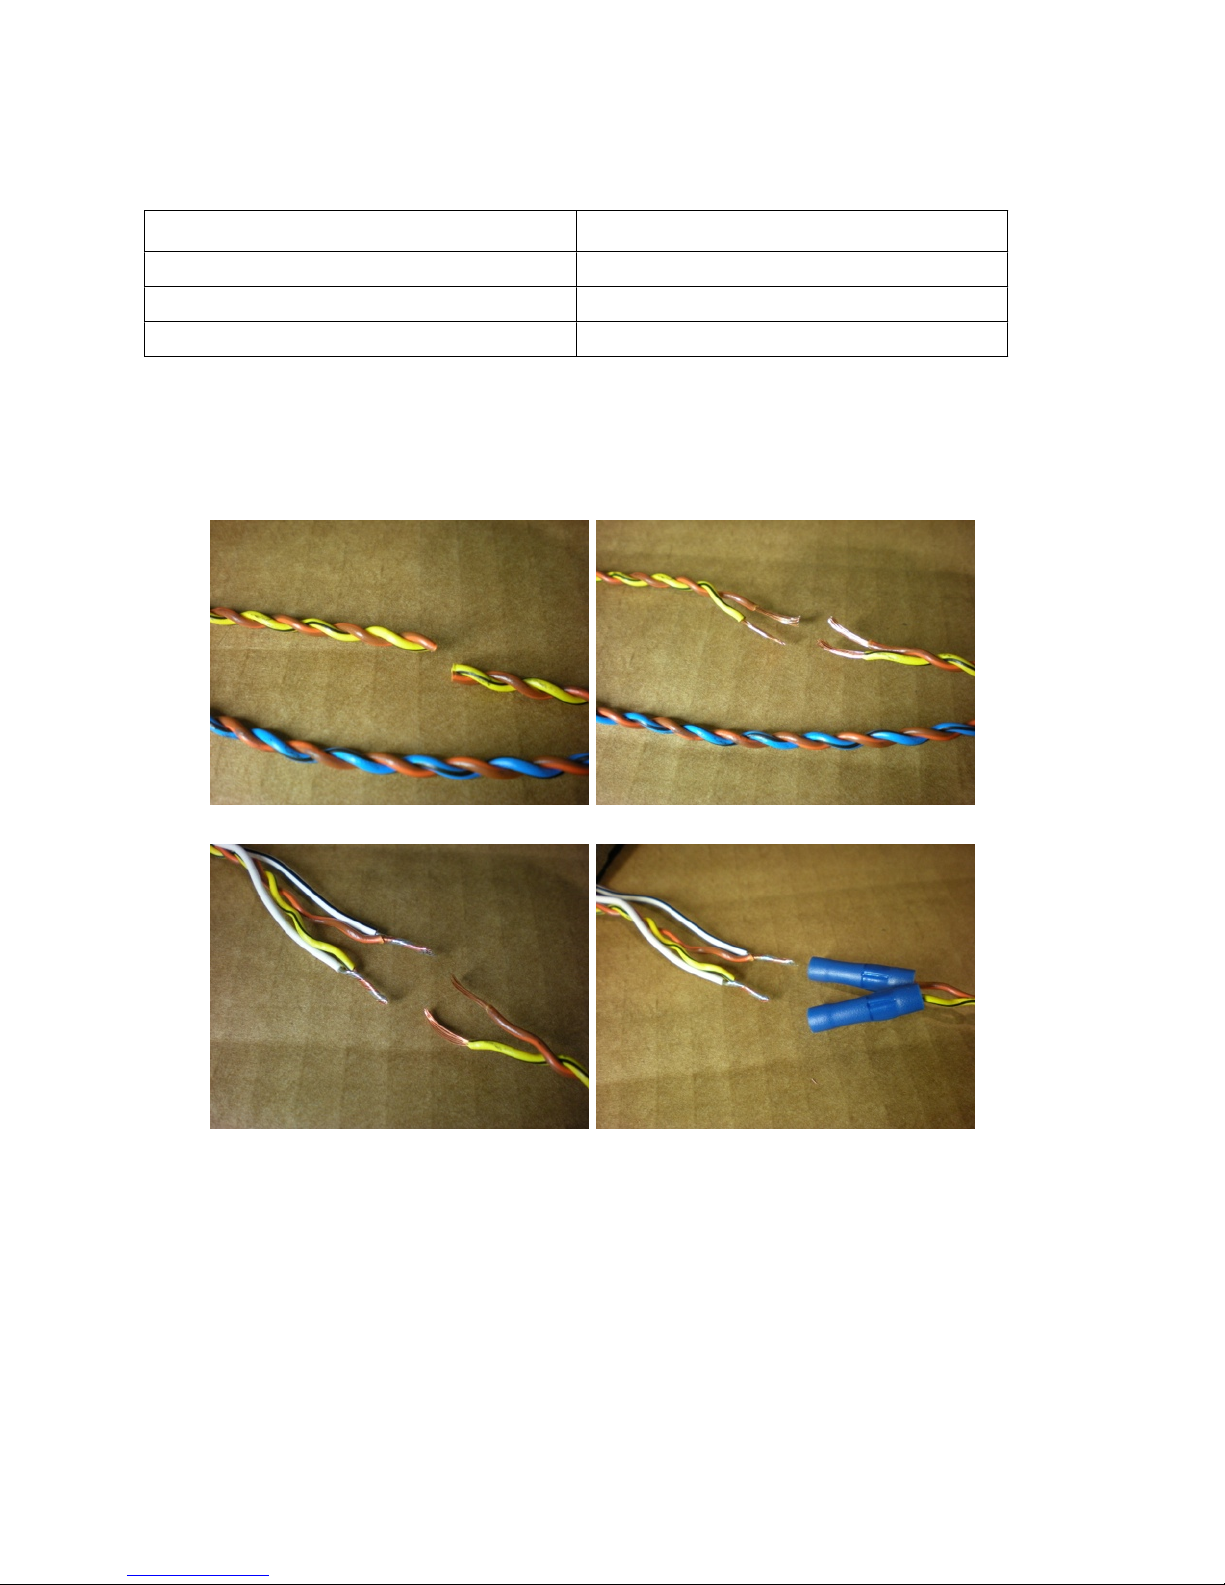
Here are the factory BMW colors we’ll be working with:
-Blue w/Black Stripe (+) twisted with Brown w/Orange Stripe(-)
-Yellow w/Black Stripe (+) twisted with Brown w/Orange Stripe (-)
Keep in mind that we are essentially “T’ing” into the wires.
Tapping into the factory wires using the blue butt connectors, the connections will
essentially be as follows:
Wire Color on LOC Wire Color at Factory Amplifier
Grey (+)
Blue w/Black Stripe
Grey/Black (-)
Brown w/Orange Stripe
White (+)
Yellow w/Black Stripe
White/Black (-)
Brown w/Orange Stripe
At this point, we will cut the factory wires in half, one at a time. We recommend making
your connections one side at a time, so as to avoid to any mistakes.
Strip back ¼” of the insulation from each half of the wire, as shown below right.
Here’s what the completed connections will look like:

Remote Turn-On Connections:
Now, we’ll deal with the black, red, and blue wires on the black rectangular box. These
wires must be connected at the new amplifier terminals as highlighted below.
Here we will very simply make the following connections.
Blue
Connect
to:
Turn On terminal of new
amplifier
Red
Connect
to:
12+ terminal of new
amplifier
Black
Connect
to:
GND terminal of new
amplifier
Now, the Red and Black wires above must be twisted around the larger gauge power
and ground wires as you insert them into the amplifier terminals. See photo below for a
visual. The blue remote turn on wire goes directly to the REM terminal of the amplifier,
all by itself.

Speaker Wiring Connections (connecting the amplifier to the subwoofer
enclosure)
From the new amplifier we’ll need to route the included 12 gauge speaker wire to the
subwoofer enclosure. We’ll use the following guide to highlight your connections.
Subwoofer Terminal
Connects
to:
Connection at Amplifier
Red
Connects
to:
L (+) Output
Black
Connects
to:
R (-) Output
Enclosure Installation
The enclosure simply drops into the tub located beneath the carpeted floor trunk
panel. You’ll need to remove the carpeted insert before installing the enclosure. There
isn’t much to it. Drop in the enclosure (carefully) and that’s about it.
Here’s what you should see:

Amplifier Tuning - Remember, watch this video - http://vimeo.com/72214312
Testing the Actual Installation Prior to Tuning
First things first, after physically completing the installation, make sure your amplifier is
powered up properly. It needs to turn off and on with the key. The power light should
turn off when you take the key out of the ignition. Test this out a couple of times to
make sure. If it does not, and you are having trouble figuring out why, give us a call or
drop us a line. Trust us, it won’t be anything major. Go back over the above
connections, and you’ll undoubtedly find a small, silly mistake.
Now, go to the front of the car, and turn on the stereo. Put in your favorite CD (not a
burned CD, but one that was professionally mastered and recorded), and tune in to
your favorite track. We recommend using a very dynamic type of music, with many
types of musical variations within the CD. Make sure that your bass settings on your
radio are set in the middle or slightly lower. This will decrease distortion and increase
the overall sound quality in the vehicle.
General Tuning Tips - Baseline Settings
Use very light pressure when adjusting the dials on the amplifier. Use a small, jeweler’s
type flat-head screwdriver to make your adjustments.
Make sure all bass and treble settings on your radio or EQ are flat, or in the middle.
1. Preliminarily set the gains, crossovers, and crossover frequencies as follows:
Gains: Both gains, ¼of a turn clockwise, or roughly 9 o’clock.
Crossovers: Set the crossover to LOW.
Crossover Frequency: Start with ~80hz.
Boost approximately 1/4 turn clockwise
2. LOC gains - Set these approximately 1/4 turn, or roughly 10 o’clock
Gain Adjustments:
-Begin turning up the volume until you hear the music at a reasonable level and
increase the volume slightly up to the point that you begin to hear distortion coming
from your interior speakers. Now, back down the volume until the distortion disappears
and stop there. Head back to the trunk and slowly begin adjusting the gain(s) of the
amplifier until you are content with the amount of bass being produced by the
subwoofer without any audible distortion of the woofer. Make sure that this blends in
with the rest of the music, and you’re on your way to a rich, full sound.

When adjusting the amplifier gains, do everything in very small increments.
We recommend 1/8th turn adjustments of the gain to find that sweet spot where there
is no distortion and plenty of volume.
Everyone listens to music differently, so the tuning process make take some of us days,
while others can do it in a matter of minutes, whether they’re a beginner or not.
The tuning is the most important aspect of the installation. Don’t rush any aspect of the
tuning. You may ride around a few days and find that you need to make some
adjustments. Don’t worry, this is perfectly normal.
Crossover Adjustments:
This can be tricky, but if you keep your ears open, it shouldn’t take long at all.
Here are some tricks to finding that sweet spot.
Try turning up the crossover a bit to around 90hz. If you don’t hear distortion, this may
a good spot for you. Keep your ears open!
-You can also readjust the bass on the radio down a notch or two to compensate for
the distortion, but again, keep your ears open.
Boost Adjustments:
You can adjust this as much as you’d like, but you’ve got to keep your ears open for
distortion. This is essentially an artificial boost at 45hz, so if you like boomier bass you’ll
likely adjust this slightly higher.
Keep a fine ear out for any distortion, and once you’ve found that sweet spot where
the volume and the fullness you desire is ideal, you shouldn’t ever need to adjust the
amplifier again.
Troubleshooting Guide
Invariably you’ll come across one or two things in your install that didn’t quite match up
or weren’t perfectly clear to you. We’ve put together several common things that may
come up during an install, and how to isolate and troubleshoot them if they do. It is
very advantageous to have a digital multi-meter on hand to troubleshoot anything
electrical in your BMW. They can be found at any hardware store for around $20-$30.
No Sound from subwoofer:
•The fuse wasn’t installed inline on the red 8 gauge power wire at the battery.
This is very often overlooked. Pop in the fuse, and you’ll be good to go.
•There isn’t a connection between the amplifier and the subwoofer. Did you route
the included speaker wire from the amplifier to the subwoofer enclosure?
•Amplifier isn’t turning on properly. See next section.

Amplifier isn’t Powering Up:
•The fuse wasn’t installed inline on the red 8 gauge power wire at the battery.
This is very often overlooked. Pop in the fuse, and you’ll be good to go.
•Check to make sure you’ve found the correct remote turn-on wire. This is a very
common oversight. Set your DMM to direct current and place one lead on the
ground terminal of your amplifier and one on the remote turn on terminal. Turn
the car and the radio on. If you don’t have 12-14 volts on the remote turn on
terminal, your connection may be the issue.
•Make sure your power and ground connections are correct. Using your DMM,
again check each terminal to make sure that a connection has been established.
-Ground Connection: Set the DMM to its continuity section. Place one lead of
the DMM on the amplifiers ground location where you screwed into the chassis,
and the other lead on the negative battery terminal. If you don’t see any
continuity, move your ground wire until you do.
-Power Connection: Set the DMM to direct current again, and place one lead on
the amplifiers power terminal and the other on the amplifiers ground terminal.
You should see 12-14 volts. If not, check your inline fuse.
Subwoofer sounds muffled or quiet:
•Check to make sure your phasing is correct between the amplifier and the
subwoofer. Positive should go to positive, and negative to negative.
•Your input signals are out of phase. Check to make sure that your input
connections are exactly as outlined in the guide. An easy test is to simply cut
one of the input wires and see if the sound output increases exponentially.

This manual suits for next models
2
Table of contents
Other Bavsound Subwoofer manuals


