Bavsound ib110 User manual

BMW E46 Subwoofer System by BSW Installation Guide:
ib110 for BMW 3 Series, M3 Convertible ’00-’06 (E46)
Please note: This is a supplement for the installation videos that you will find on our
website (www.bavsound.com). Locate your vehicle and find the respective video
installation guide covering the D.110 Subwoofer Upgrade. There are details we go
over in the installation videos that cannot possibly be covered as effectively through
the written word. This guide is meant to help you in the garage. We still suggest taking
your computer/tablet/phone to the car with you and streaming the videos to make sure
everything goes off without a hitch. Now, let’s get started!
You’ll need:
•Bavsound tool kit (or some variety thereof - the video highlights the tools needed for
this particular installation) - http://www.bavsound.com/product/414/361/BSW-
Interior-Disassembly-Tool-Kit/
•Wire Crimpers
•Metric Wrench / Socket Set
•Tunes in the garage (your choice)
Before you Begin
•Please review and familiarize yourself completely with these instructions before
starting work on your vehicle!
•Ensure that your bass and treble settings are set to their default middle positions
before installing your new speaker upgrade. Once you’ve installed your Stage
1, you can reset the bass and treble settings to taste. Keep in mind that we
generally recommend keeping them both very close to center as large
adjustments introduce distortion into the audio signal and will lower
performance of your system.

•Be sure and watch this video which covers wiring connections for the new
Bavsound amplifier in your E46: http://vimeo.com/28744796
•Also, here’s how we’ll tune the amplifier once we’ve installed it: http://
vimeo.com/28743443
We’re going to proceed as follows:
1. Bavsound Amplifier Placement
2. Disassembling the back seat area
3. Disassembling the trunk
4. Power/ground wire connections
5. Making appropriate wiring connections for audio inputs
6. Installing the subwoofer enclosure
7. Tuning/testing the system
Amplifier Mounting Options:
You’ll want to start by first deciding exactly where you want to mount your new
amplifier. From there, you’ll decide on appropriate paths to run your wiring. Don’t do
anything permanently until you have completed the rest of the install! This step is
only so you can plan your install out first! There are several places in the convertible
trunk that you can mount the amplifier, as it’s so compact.
We recommend not screwing the amplifier down, as it’s lightweight enough to be held
to any surface using velcro. Besides, screwing into the car’s metal is dangerous, and we
love these cars too much to risk damaging something.
Mount the amplifier to the back wall of the trunk. We oftentimes mount the
amplifier on the back wall of the convertibles on the driver’s side. With the bottom of
the amplifier resting on the floor, the male velcro does a fantastic job of otherwise
adhering the amplifier to the back carpeted panel.
Mount the amplifier on top of the spare tire underneath the floor. (This is not an
option for M3 owners – see option below). You’ll need to remove and relocate the tool
kit attached to your spare tire cover by popping it out off of the tire tray with a panel
removal tool. We simply attach the amplifier and tool kit in their new locations using
two strips of very strong Velcro for each.
M3’s have the option of removing the M Mobility kit and mounting the new amplifier in
the same location. You’ll bend back the aluminum tabs towards the floor, and the
amplifier will rest on top of them, while remaining concealed underneath the factory

floor panel. Simply screw the amplifier to the trunk floor.
Interior Disassembly
To make the installation as simple as possible, we’ll get the car the entire way apart
first, and then we’ll make our connections.
1. First look underneath the armrests on the side panels on either side of the
vehicle. You will see two holes there. Inside are 8mm bolts that secure the panels
to the vehicle. Remove these. We have also seen these as Torx T20 bolts.
2. Pull the side moldings from the door jams back, and place your fingers behind
the panel containing the speakers. Firmly pull towards you, and the panel will
release itself. Now, slide the panel down and toward the front of the vehicle.
Unplug the tweeter.
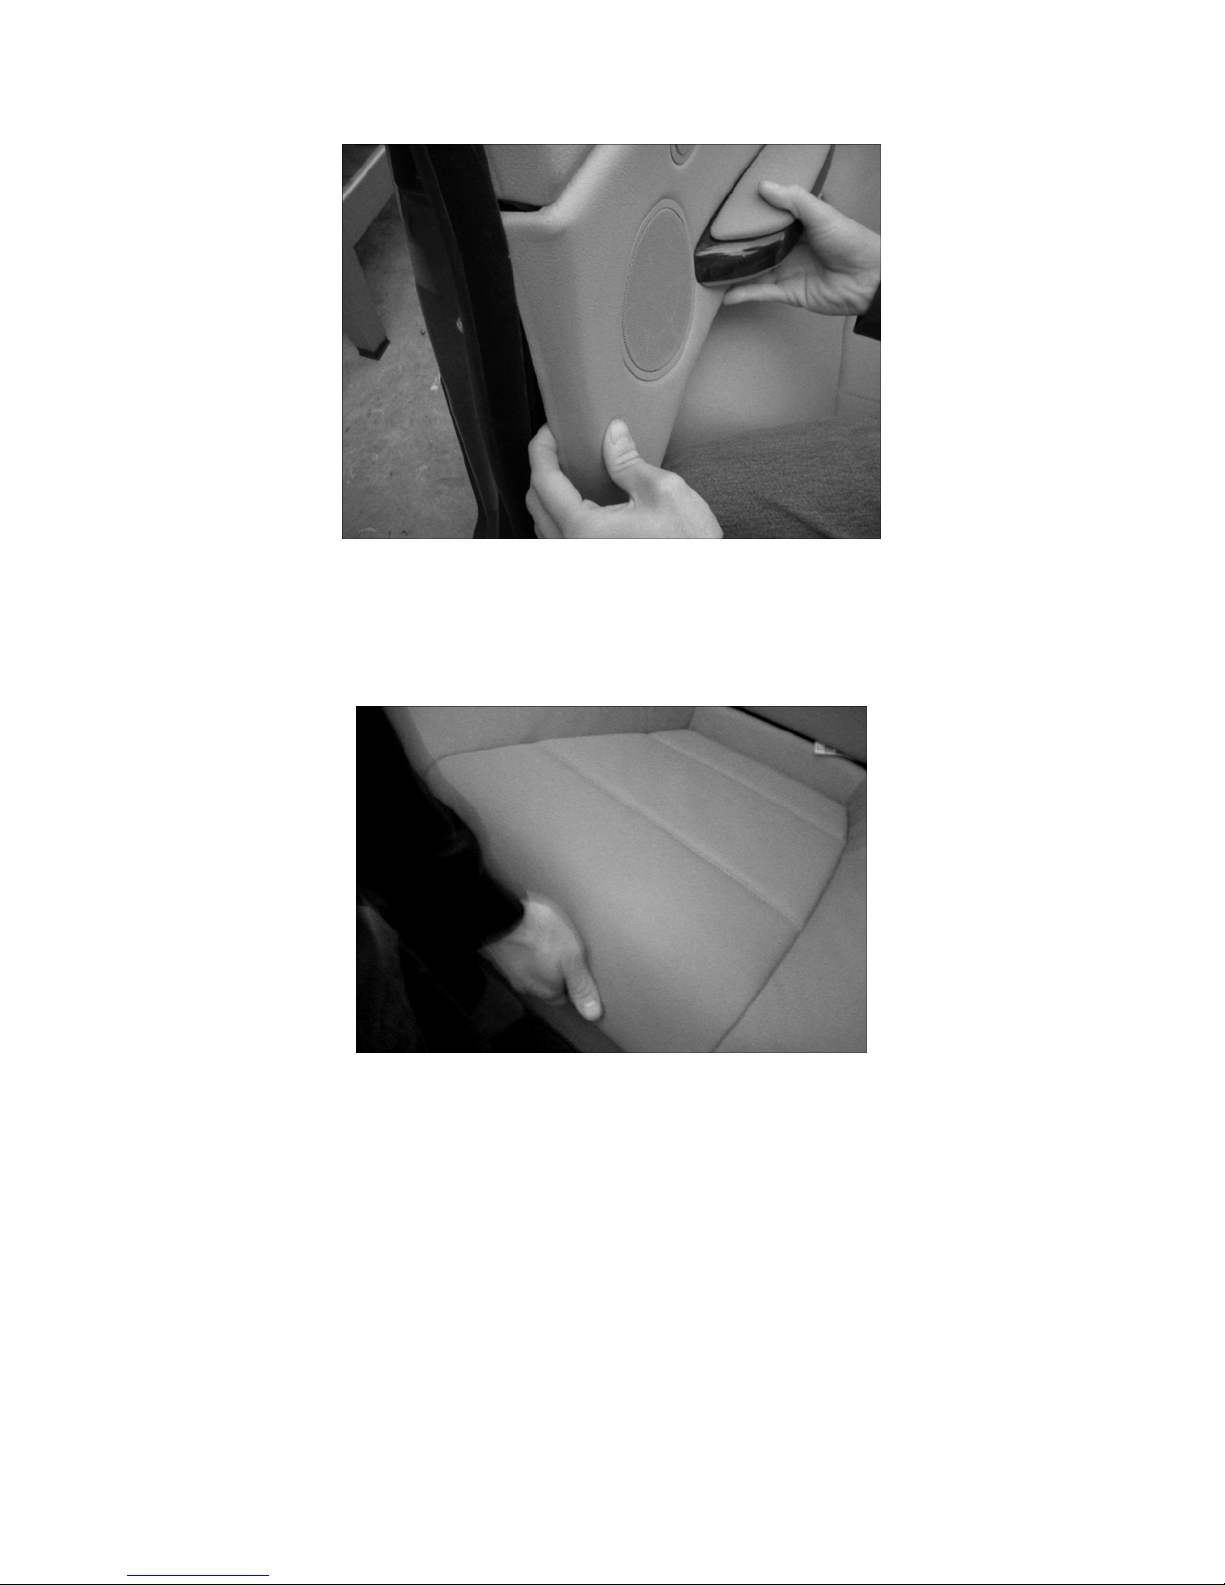
3. At this point, it makes things a bit easier to remove the seating area of the
backseat to grant better access to the side panels. Simply lift upward and the
seat will free itself.
4. Unhook the leather flap that attaches the cushion to the back portion of the
backseat and remove the seat bottom.

5. Now, look back to the area uncovered by the side panels. You will see three
7mm bolts along the bottom edge of the top panel. Remove these.
6. Starting at the rear of the panel, pull toward you and downward.
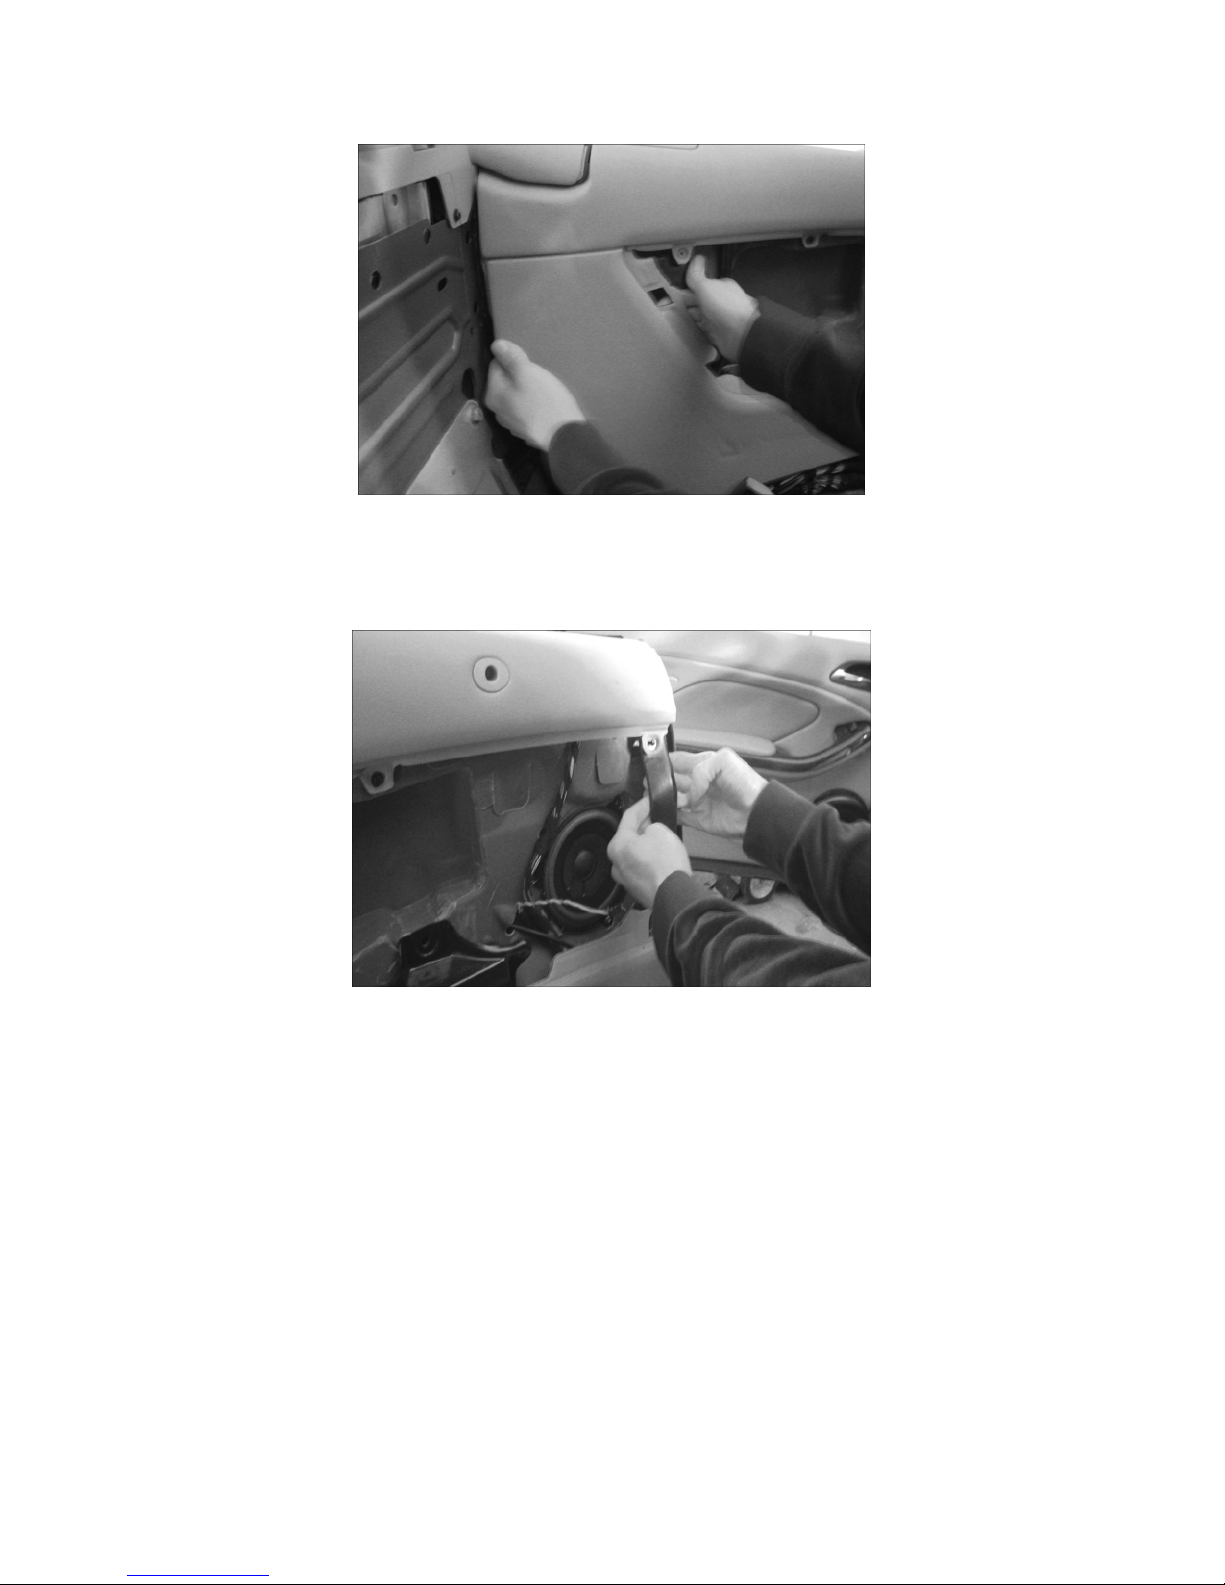
7. Now pull outward and downward, freeing up the top edges of the panel, then
remove this panel.
8. The panel will come out, revealing the factory amplifier in its housing. Here is
where all of your wiring connections will be made. The arrows below show
where the 8mm bolts are used to secure the amplifier bracket housing. A large
harness going into the side of the amplifier contains all of the connections we’ll
need.
Unbolt the amplifier and it’s housing at this point. We’ll need to also unbolt
the amplifier from its housing. Remove the 3 brass nuts that secure the
amplifier to the bracket.
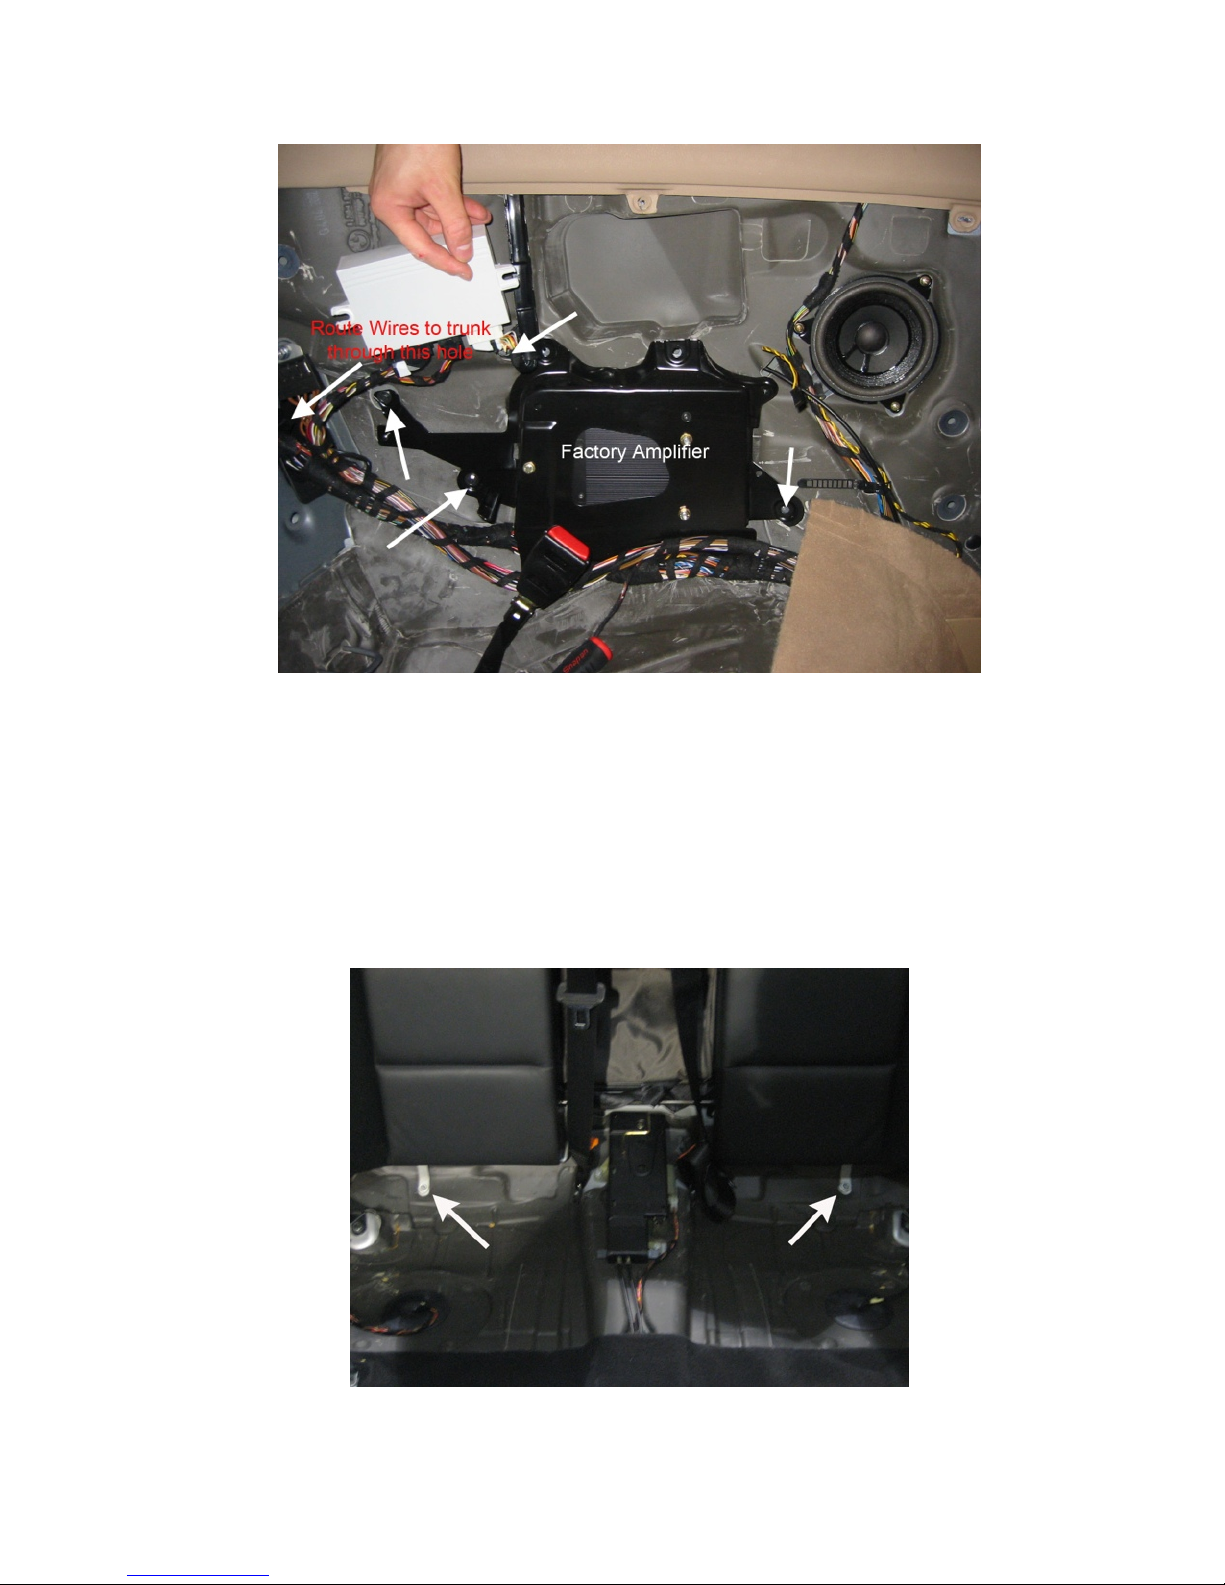
9. We now need to remove the back cushion of the backseat. To do this, first lift
both headrests up as high as they can be lifted. You don’t have to remove them
completely.
10. Now, look on the bottom section of the back cushion and you’ll see where it
attaches to the vehicle using a 10mm nut on each side of the car. Remove these
nuts, and the bottom portion is now free.
11. Lift the headrests upward a few notches, and simply lift upwards. The seat back
will free itself. Now unwrap the seat belts from the cushion, and remove from the
vehicle.
Factory Subwoofer Removal (HK Cars Only)
We also need to remove the factory subwoofer, which is easiest to do from the trunk.
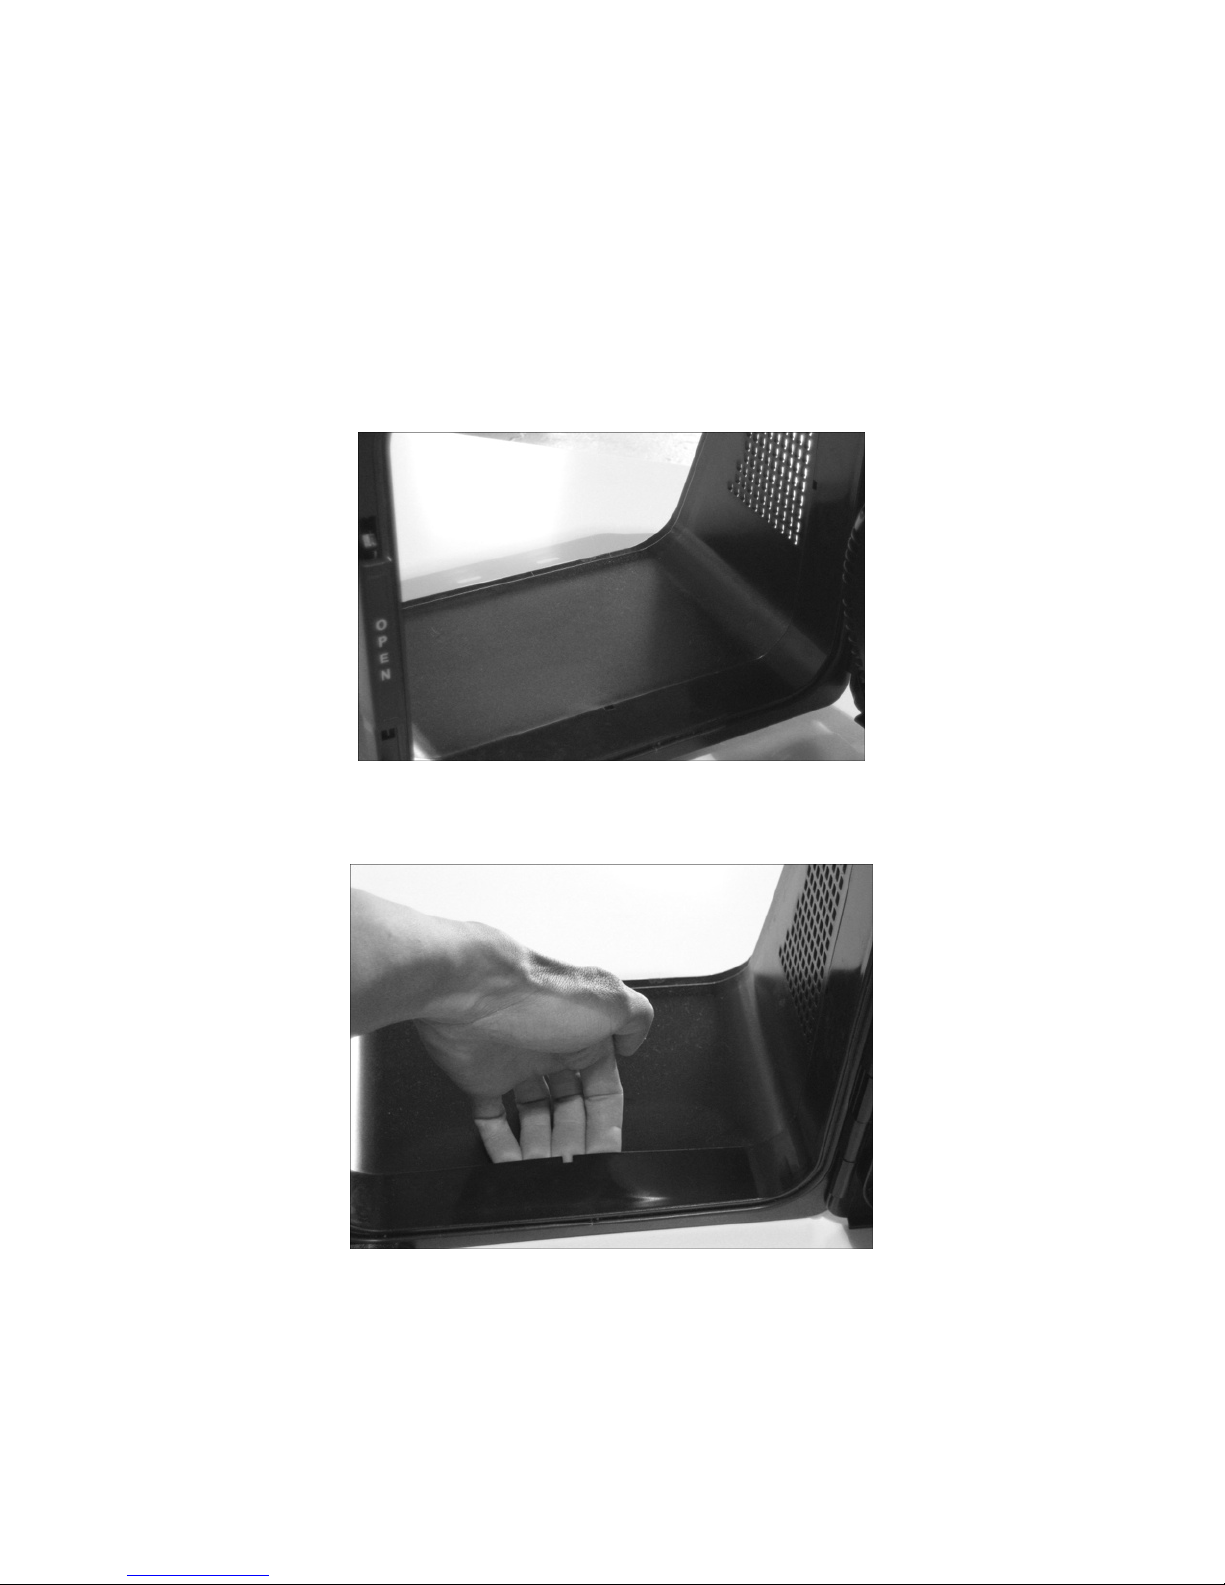
1. Open the subwoofer door to where the ski pass is completely open. You will see
a seam along the bottom floor of the ski pass about 2” in from the trunk.
2. Wedge your fingers (I know, ouch) or panel tools underneath the seam and lift
upward and outward towards you.
3. The subwoofer portion of the ski pass will free itself. Unplug the wiring harness
from the subwoofer, and tuck it away behind the carpet.
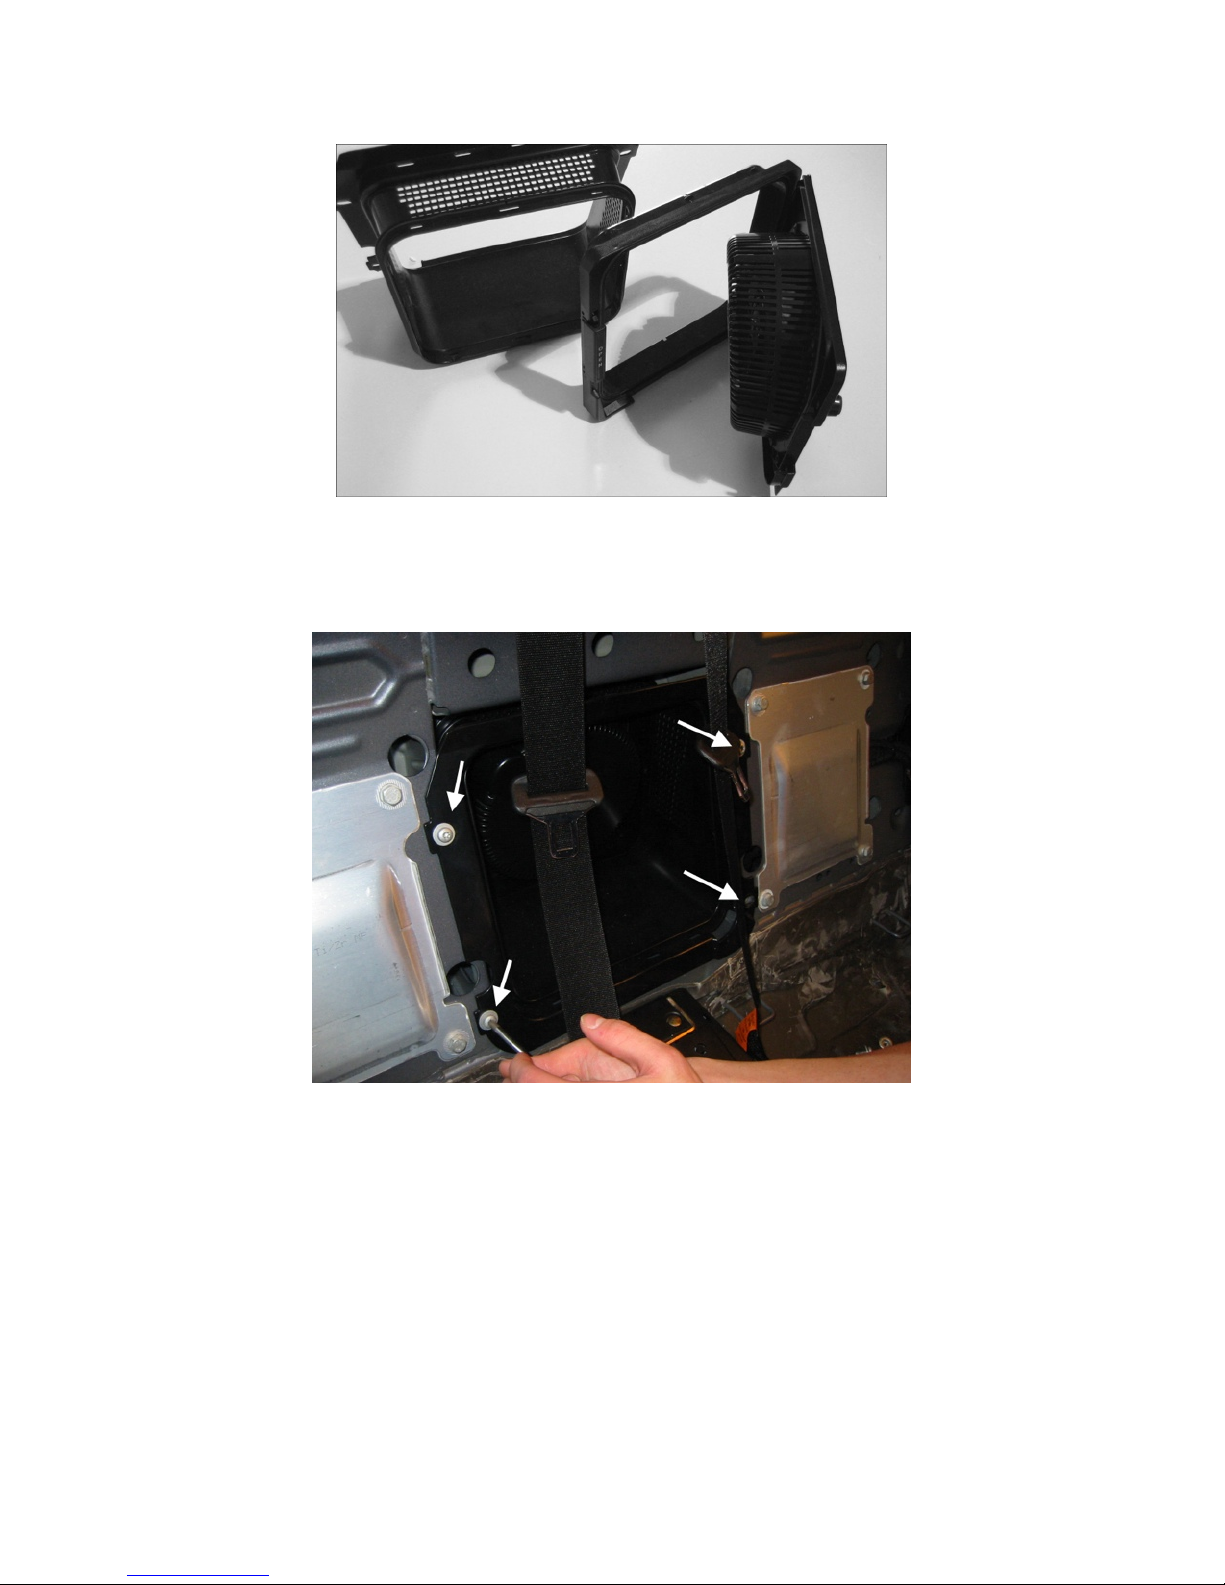
4. The front half of the enclosure can be removed from the inside of the cabin. It is
secured using 4 Torx T30 bolts. Remove these and the pathway is now clear for
the new enclosure to be installed.
5. We can now bolt the new enclosure into the car. This couldn’t get any easier.
Unravel the wire coming from the bottom of the enclosure. Slide it through the
small gap underneath the bottom of the ski pass on the passenger side as it
enters the trunk.

IMPORTANT: It is imperative that the enclosure seal tightly against the rear
wall. The speaker wire CANNOT impede this seal. Make sure that the speaker
wire enters the trunk in such a way that doesn’t affect this seal.
6. Now simply bolt the new enclosure into place using the factory hardware. Make
sure that the bolts are VERY secure, and you’re ready to begin installing the
amplifier at this point. Here’s what the completed install should look like:
Trunk Disassembly:
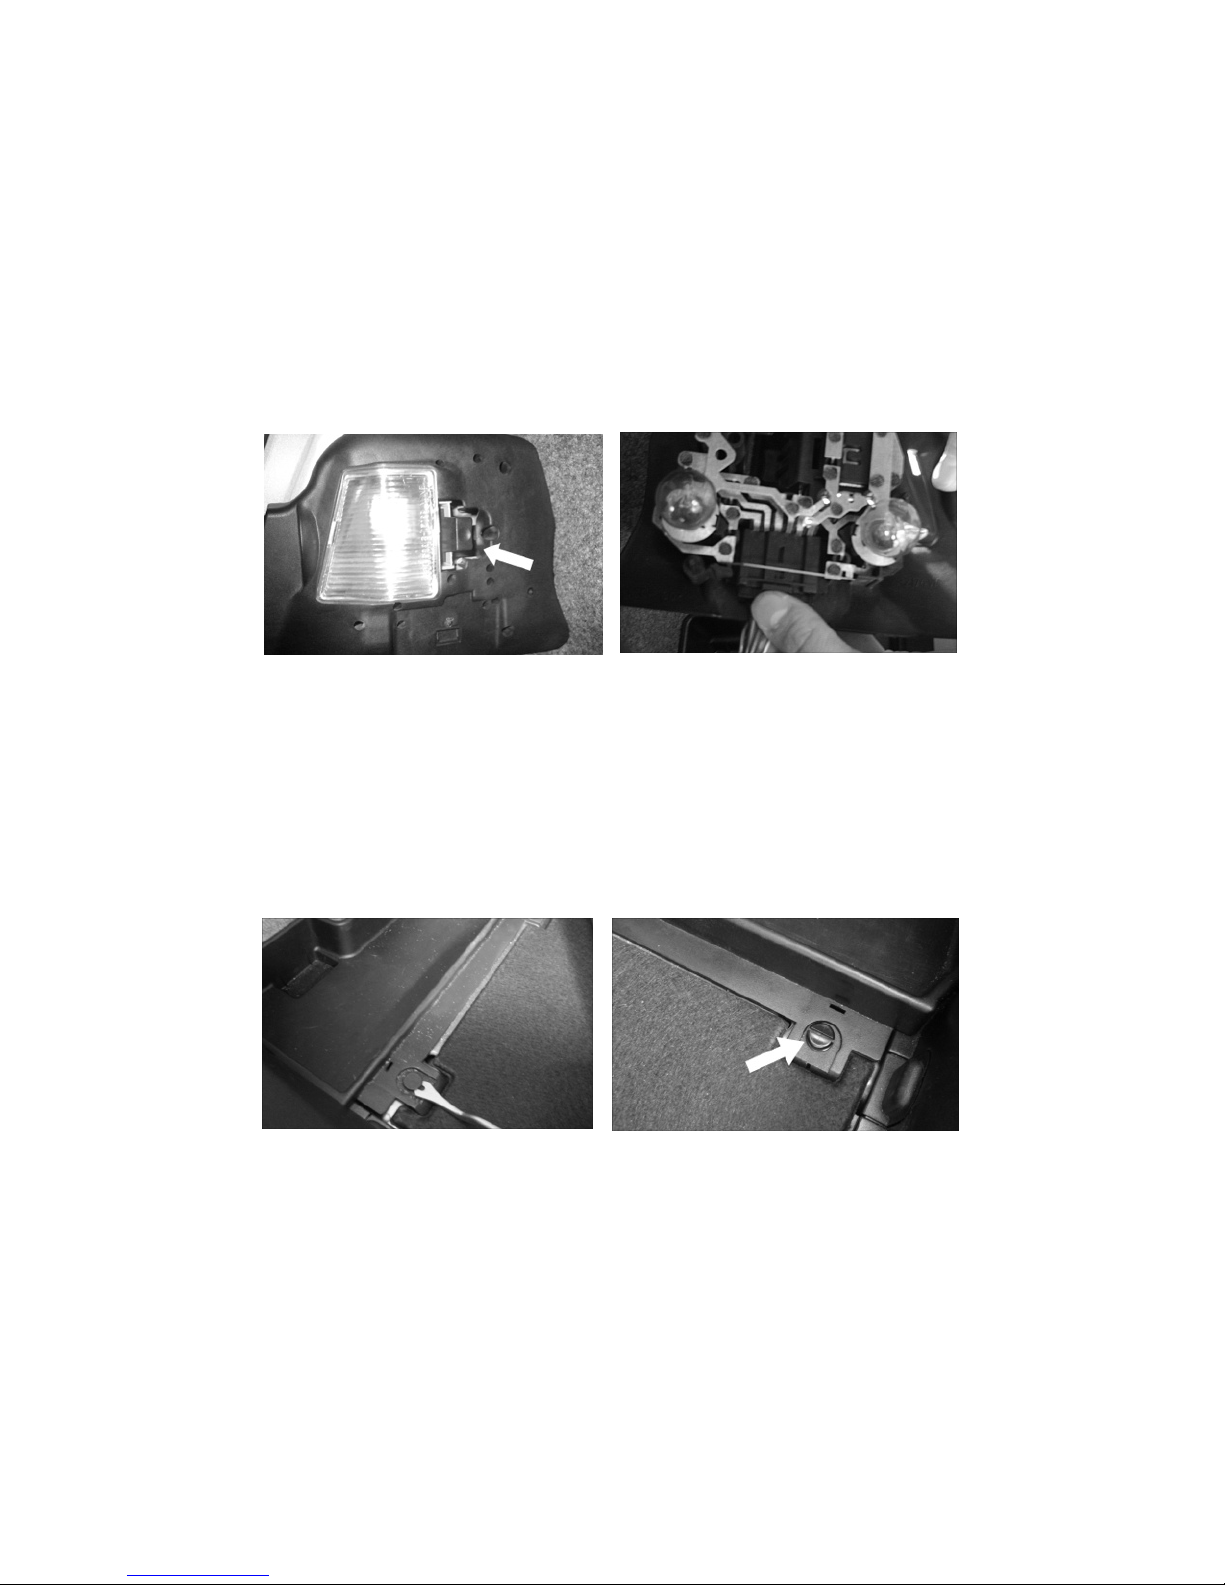
1. Begin by removing all items from the trunk of the vehicle and make sure that all
tail lights are in working order. If not, now is a good time to replace them. Also
remove the carpet that covers the floor of the trunk, as it will reveal several
fasteners that you will remove later.
2. Remove the tail light covers. Push inward on the clip, and the light will release
itself. Now depress the wiring clip attached to the light bulb housing to release
the housing, and move the housing safely away from your working space.
3. Now, look to the floor of the trunk. You will see that the two plastic casings on
either side of the trunk are secured by plastic screws on the passenger side and
fasteners on the drivers’ side. Remove the fasteners using you panel removal
tool as shown. The plastic screws on the passenger side can be removed using a
flat head screwdriver. The battery is located underneath this panel on the
passenger side.
(Driver’s Side) (Passenger’s Side)
Now, remove the two plastic fasteners on the carpeted driver side panel out of
the trunk, remove the panel, and you’ll see the pass through into the trunk.

Power, Ground, and Turn-On Amplifier Connections

(see supplemental video at http://vimeo.com/28744796)
IMPORTANT: Before you make any connections, disconnect the negative battery
terminal from the battery. This will reduce the chance of electrical damage to the
vehicle.
Your new amplifier produces quite a bit more power than the original amplifier. As a
result, the original amplifier power and ground wires simply aren’t large enough to
provide the new amplifier enough power. So, we’ll attach the new, included power
connections in locations that differ slightly from the original amplifier’s connections.
Additionally, we have to have a way to tell our new amplifier to turn on. The original
amplifier gets a signal from the vehicle’s head unit via a small wire. Since this wire
doesn’t provide the amplifier power, it is also sufficient for our new amplifier, so we will
reuse this connection.
Ground Wire (Included Large Gauge Black Wire): Connect to GND terminal on
new amplifier
We’ll use any factory ground location in the trunk area where an existing 10mm bolt
can be found. These photos show a couple of different factory ground bolts:

Power Wire (Included Red Wire): Connect to +12V terminal on new amplifier
Run the large red wire to the positive terminal of the battery. Loosen and remove the
10mm nut on top of the terminal that secures the actual terminal to the battery. Put the

amplifier power wire ring over the bolt, and tighten the nut back down with the
terminal on the battery. This is the primary power supply for your new amplifier.
Connect the other side of the power wire to the +B terminal on the amplifier. ONLY
when both sides of the wire are connected should you install the included fuse into the
in-line.
Remote Turn-On Wire (Smaller gauge Blue Wire): Connect to Turn On terminal of
new amplifier.
•It is important to remember here that we are essentially “T’ing” into the
factory wires. It is important that the factory signal flow be allowed to continue
back into the factory amplifier.
•For connection instructions, both written and visual, please see the next
section “Audio Input Connections”. Both the remote turn on and audio
input connections are made in the same manner.
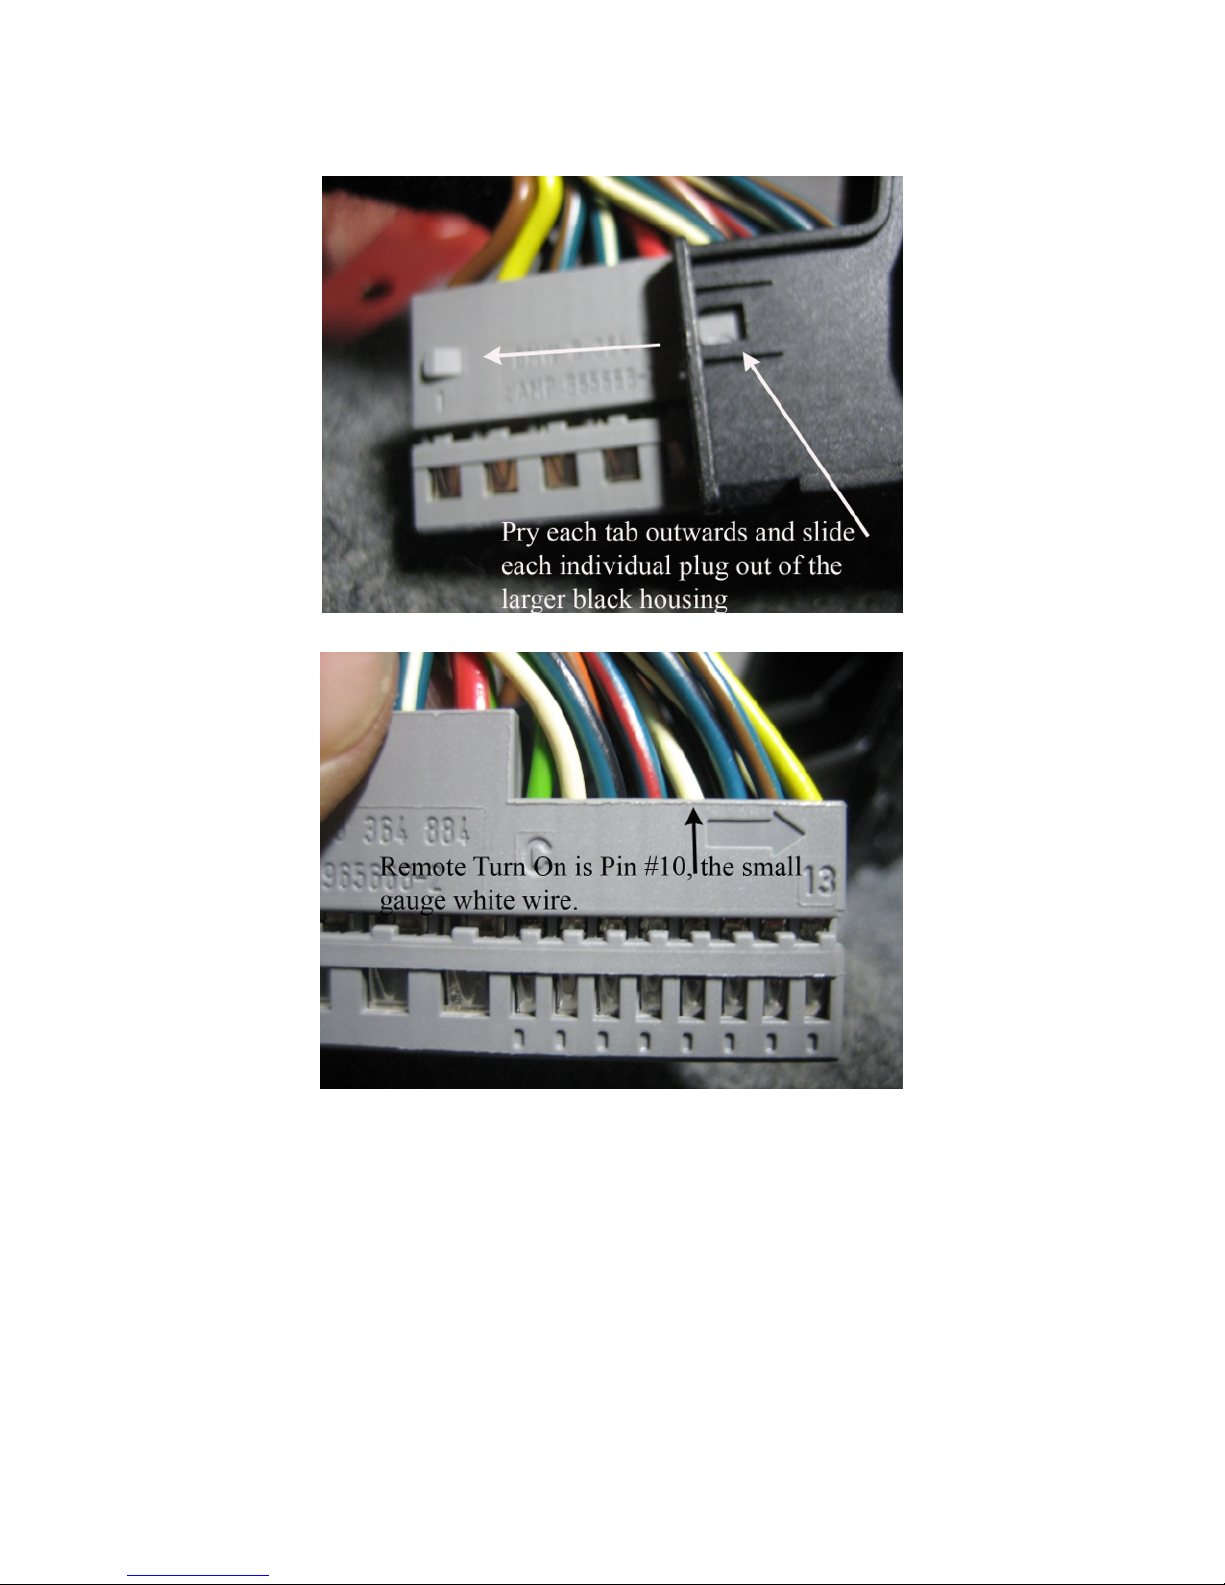
In the large plug going into the factory amplifier, we’ll need to find the remote turn on
wire. You’ll notice a large black housing around the plug, with two separate plugs
inside of this black housing.
The wire we’ll be looking for is in the GREY plug. It’s a small gauge White wire.

Once you’ve identified these two plugs, we need to remove them from the outer black
housing. Once removed, the remote turn on wire is in the grey connector, Pin #10.
Getting the music to your new amplifier (Audio Input Connections)
Again, it is important to remember here that we are essentially “T’ing” into the
factory wires. It is important that the factory signal flow be allowed to continue back
into the factory amplifier.
1. You’ll need to isolate the following four (4) wires. They will be twisted together in
pairs as they enter the factory amplifier.
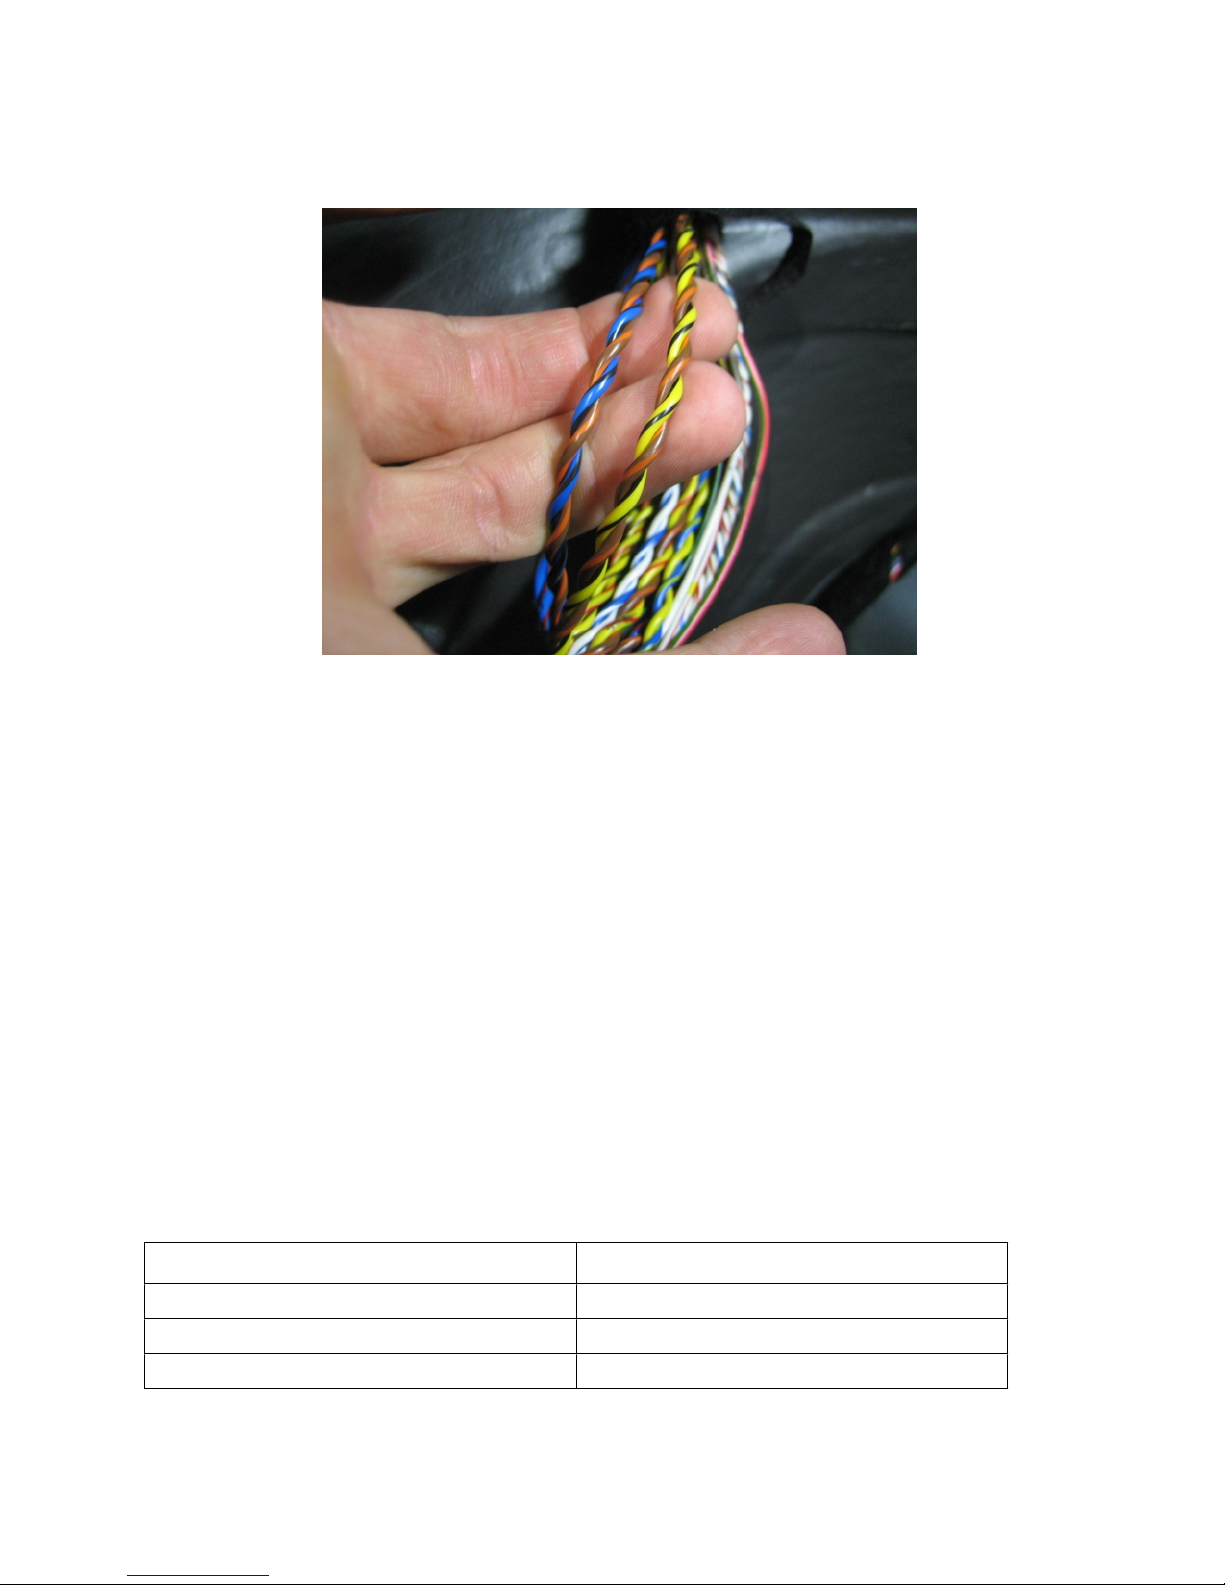
-Blue w/Black Stripe (+) twisted with Brown w/Orange Stripe (-)
-Yellow w/Black Stripe (+) twisted with Brown w/Orange Stripe (-)
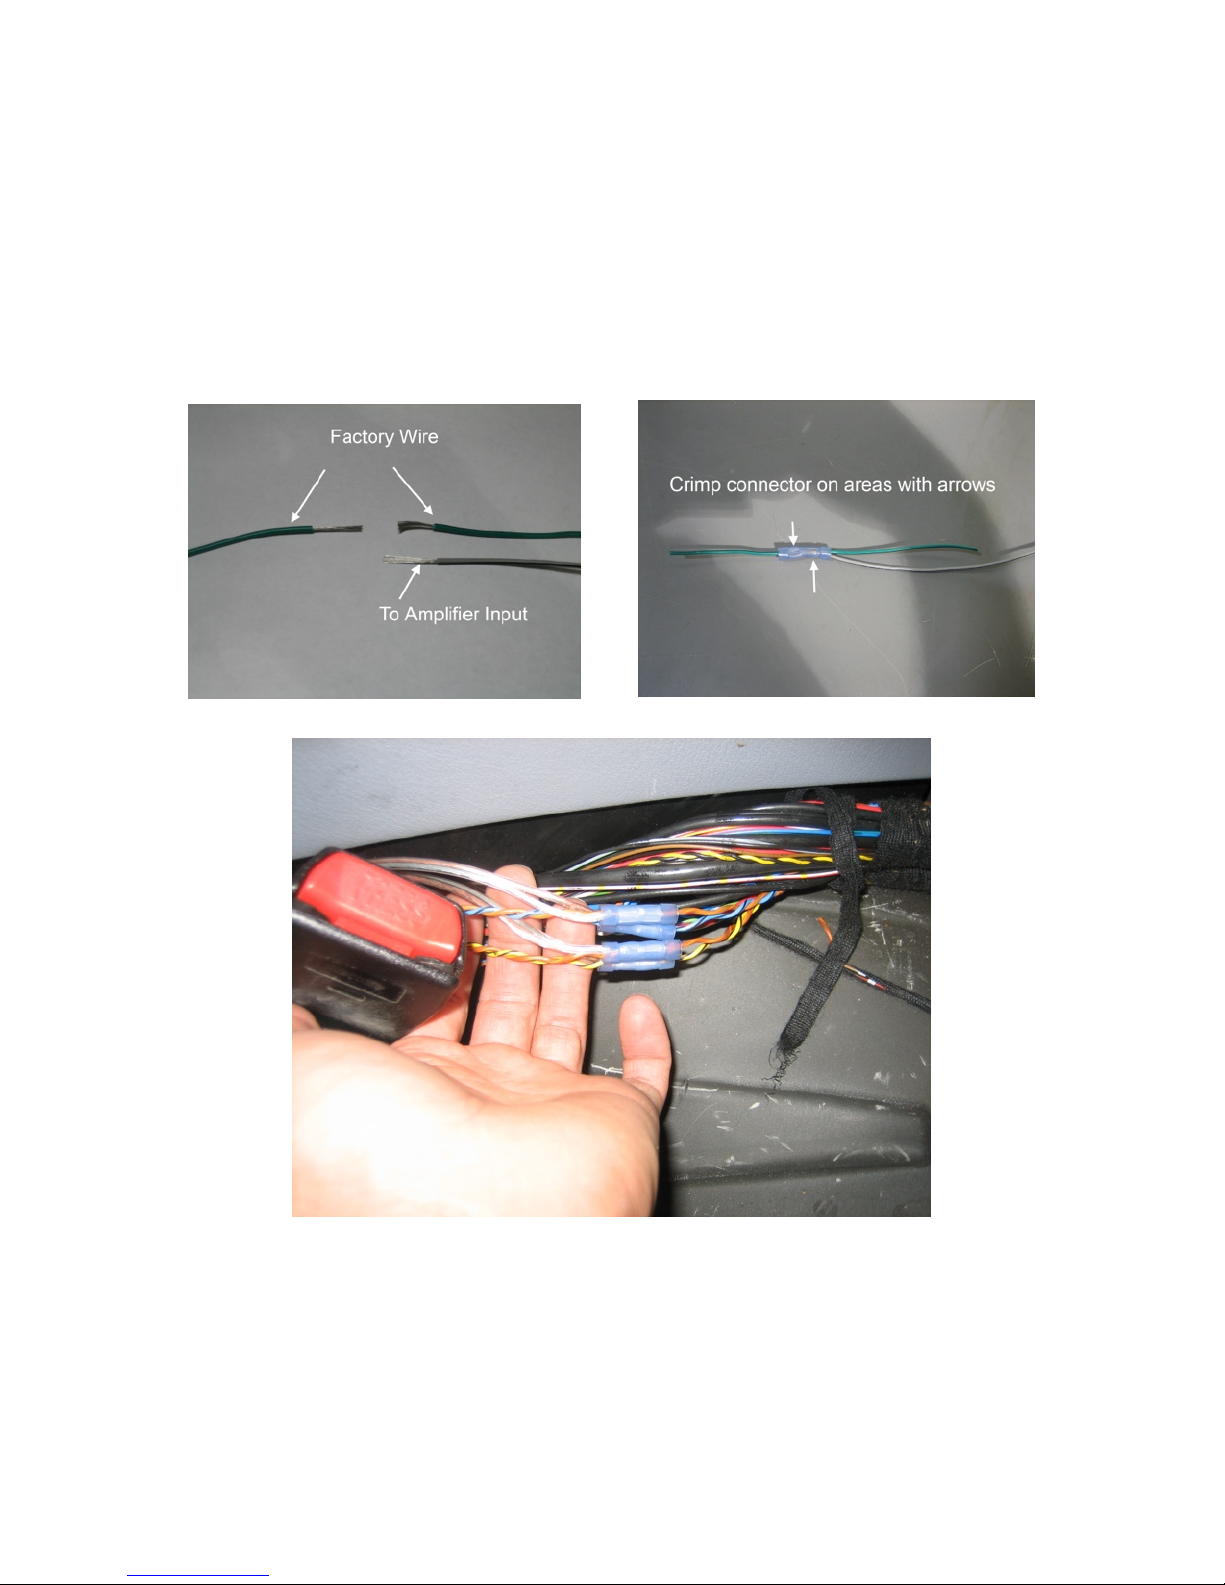
Visual Representation of Tapping into the Factory Wires:
Here is a visual of how we’ll make the connections. Basically, we’re just “T’ing” into the
factory wire, so you’ll want to cut the wire directly in half, at a minimum of 6” away
from the factory plug.
First, orient yourself with the RCA Cables that you received with your order. There are
four individual wires coming out of one of the ends of the cable twisted together in two
pairs.
White (+) twisted with Red (-) connects to Blue/Black (+) and Brown/Orange (-)
Yellow (+) twisted with Red (-) connects to Yellow/Black (+) and Brown/Orange (-)
Connect the wires from the RCA Cables to the appropriate wire in the BMW amplifier
harness using the included blue butt connectors. Left and right here is not relevant, so
don’t worry
Wire Color on RCA Cables Wire Color at Factory Amplifier
White (+)
Blue w/Black Stripe
Red (-)
Brown w/Orange Stripe
Yellow (+)
Yellow w/Black Stripe
Red (-)
Brown w/Orange Stripe
1. After stripping back approximately ¼’ of the insulation from the wires, exposing
the copper wiring itself, twist one side of the factory wire that you cut in half
together with either the included blue remote turn on wire or one of the RCA
leads, of course depending on your connection.
2. Insert these two wires into one side of the butt connector, and crimp tightly.
3. Insert the remaining half of the white wire into the unused side of the butt
connector and again crimp down tightly.
Visual of RCA connections
PLEASE NOTE: When making these connections, please keep in mind that the wires at
the original BMW harness are twisted in pairs. These pairs MUST remain together
when making your connections since there may be multiple instances of the same wire
color and there would be no way to identify which wire is appropriate for which

connection if the wires are separated.
2. Double-check your connections! With the variety of wire colors and the
number of wires present in this area of the trunk, it’s easy to make a mistake.
Before going any further, it’s absolutely worth your time to insure that you’ve
made the right connections. Go over the connections you’ve made one more
time being sure to verify colors are correctly matched and correct any mistakes,
if present.
3. Run the RCA cables and remote turn on wire back through the large hole on the
driver’s side of the back wall into the trunk and over to the mounting location of
the amplifier and plug the RCA cables into the input section of the amplifier. It
doesn’t matter which RCA plugs into which input, as subwoofer sound isn’t
stereo. Connect the remote turn on wire to the “Turn On” input on the
amplifier.
Connecting the Subwoofer
Now, we need to get the music from the amplifier to the subwoofer. Use the wire with
(+) markings for positive, and the wire with (-) markings for negative. We will be
bridging the amplifier, so connect the (+) wire to the L+ terminal and the (-) to the R-
terminal.
Testing the Actual Installation Prior to Tuning
First things first, after physically completing the installation, make sure your amplifier is
powered up properly. It needs to turn off and on with the key. The power light should
Other Bavsound Subwoofer manuals


