Baxall ZKX3-K User manual

Please read this manual before installing your keyboard
ZKX3-K and ZKX3-J Keyboard
Installation and Operation Instructions
ZKX3-K and ZKX3-J Keyboard
Installation and Operation Instructions

Page 2
ZKX3-.. Keyboard Installation and Operating Instructions
IMPORTANT
The first few pages of these instructions contain important information on safety and product
conformity. Please read, and ensure that you understand this information before continuing.

Page 3
Installation and Operating Instructions ZKX3-.. Keyboard
CONTENTS
PRODUCT SAFETY ...................................................................................................................................................................................... 4
ELECTROMAGNETIC COMPATIBILITY (EMC)......................................................................................................................................... 4
MANUFACTURERS DECLARATION OF CONFORMANCE ....................................................................................................................... 4
UNPACKING .................................................................................................................................................................................................. 4
ACCESSORIES ............................................................................................................................................................................................. 5
INSTALLATION .............................................................................................................................................................................................. 6
DESCRIPTION OF UNIT IDs ........................................................................................................................................................................... 7
CONNECTINGA SINGLE KEYBOARD TOASINGLE ZMX.. OR ZTX6/.. ....................................................................................................... 7
TERMINATING/BIASING THE BAXNET NETWORK ........................................................................................................................................ 8
BAXNET - UNIT IDsAND KEYBOARD PRIORITIES ....................................................................................................................................... 8
UNIT IDs - KEYBOARD PRIORITIES .............................................................................................................................................................. 8
UNIT IDs - LEGAL VALUES .......................................................................................................................................................................... 8
UNIT IDs - CHANGING THE UNIT ID ON YOUR KEYBOARD ........................................................................................................................ 8
BASIC OPERATIONS ..................................................................................................................................................................................... 9
FUNCTION TABLE ....................................................................................................................................................................................... 10
RESPONDING TOANALARM ..................................................................................................................................................................... 11
HOW TO MANUALLY ACTIVATE AN ALARM USING THE ZKX3.. ............................................................................................................. 11
SETTINGAPRESET POSITION USING THE KEYBOARD ............................................................................................................................ 11
HOW TO RECORD AFULL SCREEN CAMERASEQUENCE USING THEAUTOLIST FUNCTION ............................................................. 11
SPECIAL POWER-UP SEQUENCES ............................................................................................................................................................ 11
KEY FUNCTIONS ........................................................................................................................................................................................ 12
CONTROLLINGA VCR ................................................................................................................................................................................ 13
CAMERA TITLE EDITING USING THE ZKX3 ................................................................................................................................................ 14
SUMMER/WINTER TIME ADJUSTMENT USING THE ZKX3 .......................................................................................................................... 14
SPECIFICATIONS ......................................................................................................................................................................................... 14
APPENDIXA ................................................................................................................................................................................................ 15

Page 4
ZKX3-.. Keyboard Installation and Operating Instructions
PRODUCT SAFETY
Please follow these instructions as you install your keyboard and retain them for future use. If you have any problems,
contact your Baxall agent.
WARNING
Installation is only to be carried out by competent, qualified and experienced personnel.
Wire in accordance with your national wiring regulations. Failure to do so can result in injury or death by electric
shock.
Use a class 2 isolated power supply for the 12V DC.
This product must not be used for intrinsically safe or medical applications.
CAUTION
Do not exceed the voltage and temperature limits given in the specification.
ELECTROMAGNETIC COMPATIBILITY (EMC)
CAUTION
This is a Class A product. In a domestic environment this product may cause radio interference in which case the
user may be required to take adequate measures.
This product is intended for use in general purpose CCTV applications in a residential, commercial or light industrial
EMC environment, and has no other use. Refer to Baxall Security before using the product in an industrial EMC environment.
The product must be installed in accordance with good installation practice to enable the product to function as intended
and to prevent problems. Refer to your agent for installation guidance.
Contact Baxall Limited to obtain a specification defining the acceptable levels of product degradation with regard to EMC
immunity.
MANUFACTURERS DECLARATION OF CONFORMANCE
Baxall Security Limited declare that the product supplied with this manual is compliant with the essential protection
requirements of the EMC directive 89/336 and the Low Voltage Directive LVD 73/23 EEC. Conforming to the requirements
of standards EN 55022 for emissions, IEC801 parts 2, 3 and 4 for immunity and BS415 superseded by EN 60950 for
Electrical Equipment safety.
UNPACKING
Keep your packaging for use if your keyboard is stored for a time or needs to be returned for whatever reason. The
packaging should contain:-
ZKX3-.. keyboard
BAX-NIL2/RJ
BAX-NIL4
These Instructions
Check the product code on the serial number label. If you have an incorrect item or it is damaged then inform Baxall
Limited and the carriers immediately. If the equipment is incorrect or damaged, do not attempt to use it.

Page 5
Installation and Operating Instructions ZKX3-.. Keyboard
ACCESSORIES
BAX-RKIT - Remote keyboard wiring kit, for connecting a keyboard at a distance greater than 10 metres from the main
unit. It can also be used to connect multiple keyboards. Kit includes PSU11/T power supply, 2 x BAX-NIL2/RJ, 2 x BAX-NAP
screw terminal to RJ45 adapters.
BAX-NIL1 - 1 metre lead, RJ45 to 6 pin mini-din
BAX-NIL2/RJ - 2 metre lead, RJ45 to RJ45
BAX-NIL4 - 4 metre lead, RJ45 to 6 pin mini-din
BAX-NIL9 - 9 metre lead, RJ45 to 6 pin mini-din
These leads are for connecting your keyboard to the ZTX6 matrix or ZMX multiplexer. The maximum length of this
connection is 10 metres.
BAX-NILA - 1 metre lead, 2 x 6 pin mini-din
This lead is for connecting local main-units together. It only makes the network connections.
BAX-NAP - Network Access Point. RJ45 to screw terminal adapter
BAX-CON1 - Back-to-back RJ45 connector
PSU11/T - 12V DC Class 2 isolated power supply

Page 6
ZKX3-.. Keyboard Installation and Operating Instructions
INSTALLATION
BaxNet
Your keyboard can control ZMX+, ZMXStorm, ZMX/../9, ZMX/../16 and ZTX6/.. units over the BaxNet network. Note throughout
this manual, ZMX+, ZMXStorm, ZMX/../9, ZMX/../16 are referred to collectively as ZMX.. .
Fig. 1 Connection to a ZTX6
You can connect multiple keyboards, multiple ZMX.. and multiple ZTX6/.. units on a single network providing that the total
number of devices does not exceed 32. A BAX-RKIT provides the facility for remote keyboard connection via screw
terminal network access points.
ZTX6
/
..
PSU
ZKX3...
BAX-NIL1, 4 or 9 BAX-NIL2/RJ
BAX-NIL2/RJ
ZKX3..
Fig. 2 Connection to a ZMX.. Fig. 3 Connection to a ZMXS.. Fig. 4 Connection to a ZMX+
ZKX3.. ZKX3..
ZMX/../9; ZMX/../16 ZMXS.. ZMX+...
Page 7
Installation and Operating Instructions ZKX3-.. Keyboard
INSTALLATION
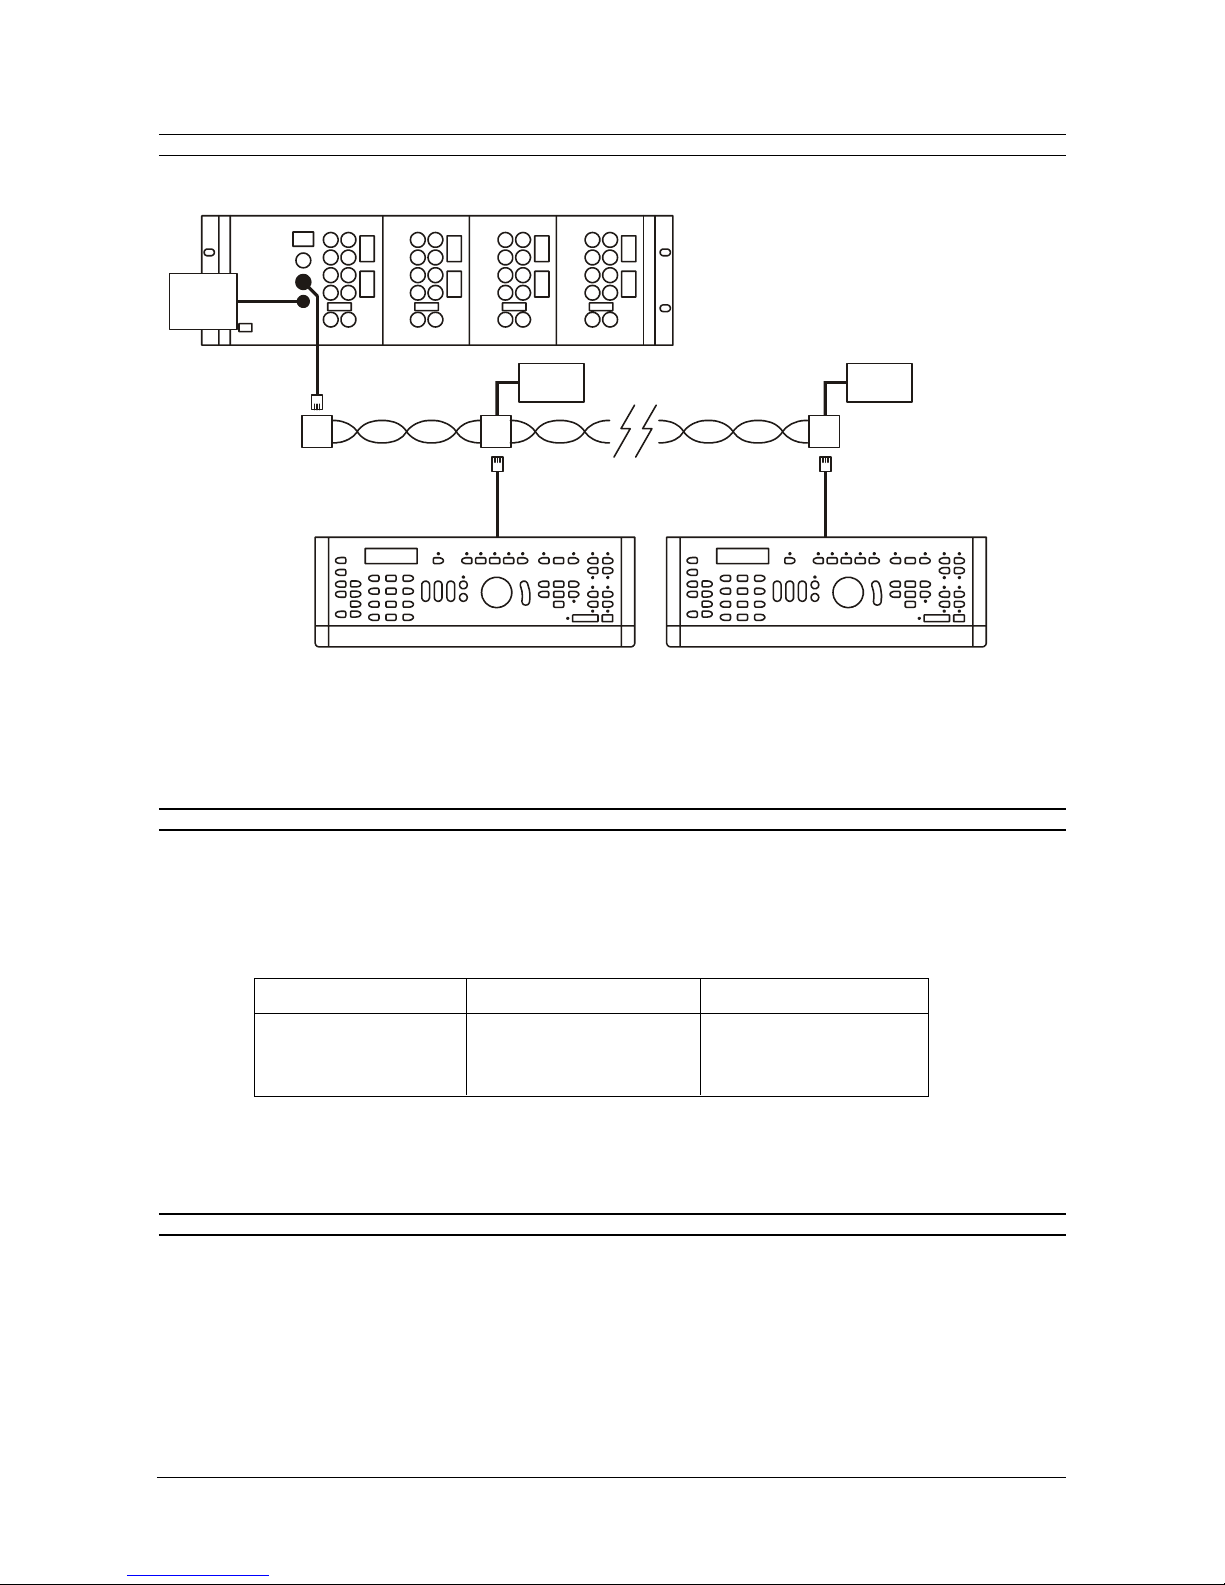
Fig. 5 BaxNet system showing multiple keyboards
If you wish to wire your network using 8 pin RJ45s then Appendix A gives details of the RJ45 connections on the rear of your
keyboard.
DESCRIPTION OF UNIT IDS
Each unit on the BaxNet network requires a Unit ID number. This Unit ID is used to select a unit for control. The keyboard
Unit ID determines the control priority over other keyboards (lower number keyboards take precedence over higher
number keyboards).
The table below defines the maximum number of units which can be installed on a single BaxNet network and their valid
unit IDs. For a more full explanation see Unit IDs - Legal Values. Note that Unit ID 0 is reserved do not use it.
* Total number of devices connected including keyboards must not exceed 32. Therefore with 8 keyboards 24 other
devices may be connected, with 3 keyboards, 29 other devices etc.
CONNECTING A SINGLE KEYBOARD TO A SINGLE ZMX.. OR ZTX6/..
The keyboard accepts power over the BaxNet network (max distance 10 metres) from a ZMX.. or a ZTX6/.. . Each can
power a single keyboard.
Connect the leads as shown in figures 1, 2, 3, 4 or 5.
If you are only using a single keyboard, the installation is now complete. The ZTX6/.. Unit ID is displayed on power-up. The
ZMX.. Unit ID will need setting in the COMMUNICATIONS, RS485 menu, refer to your ZMX.. instructions.
ZTX6/..
BAX-NIL-1
ZKX3.. ZKX3..
BAX-NIL2/RJ BAX-NIL2/RJ
BAX-NAP
BAX-NAP BAX-NAP PSUPSU
PSU
Unit Possible Unit IDs Maximum Units
ZKX3-.. 1 to 8 8
ZMX.. 9 to 32 *
ZTX6/.. 9 to 32 *

Page 8
ZKX3-.. Keyboard Installation and Operating Instructions
TERMINATING/BIASING THE BAXNET NETWORK
The keyboard has built in network termination and/or biasing. For most small to medium sized installations, it should not
be necessary to change the switches from their default settings. Only for large installations should your network require
biasing and/or terminating. Contact Baxall Security Limited for advice. The switches are shown below for your reference.
The default setting for switches 1, 2 and 3 is OFF. Switch 4 is not used.
BAXNET - UNIT IDs AND KEYBOARD PRIORITIES
The Unit ID is a number between 1 and 32. It is used to select a ZMX.. or ZTX6/.. for control from your keyboard and also
to decide the priority of one keyboard over another (lower numbers take precedence).
UNIT IDs - KEYBOARD PRIORITIES
The priority of keyboards over each other is determined by the value of the Unit ID. Keyboards with a lower value Unit ID
take precedence over keyboards with a higher Unit ID. A higher priority keyboard can take control of a ZMX.. or ZTX6/..
immediately and at any time from a lower priority keyboard. A lower priority keyboard must wait for 30 seconds from the
last command by the higher priority unit before it can take control. If another command from the higher priority keyboard
is sent in this time then it must wait another 30 seconds. The following control messages are displayed on on the ZKX
keyboard:
CONTROL LOST Indicated when a higher priority keyboard on BaxNet has taken control or when the current keyboard
has timed out.
CONTROL UNIT #n Indicated when the current keyboard has control over all other keyboards on the BaxNet connection.
To re-activate control of a keyboard that has timed-out (CONTROL LOST), operate the pan or tilt keys.
UNIT IDs - LEGAL VALUES
IMPORTANT NOTE: Use the table to decide the Unit IDs. ZKX3-..s Unit IDs must be between 1 and 8
Setting the unit ID is included in the ZTX6/.. instructions, setting the unit ID on a ZMX.. is done in the COMMUNICATIONS,
RS485 menu and setting the unit ID on the keyboard is described below.
The following table gives the valid unit IDs for the listed products. Note that Unit ID 0 is reserved do not use it.
UNIT IDS - CHANGING THE UNIT ID ON YOUR KEYBOARD
Read these instructions thoroughly before attempting to change the Unit ID.
1. Disconnect the power from your keyboard
2. Reconnect the power
3. Within 5 seconds of reconnecting the power, press the two keys shown below simultaneously.
AND
Unit Possible Unit IDs
ZKX3-.. 1 to 8
ZMX.. 9 to 32
ZTX6/.. 9 to 32
4
OFF UP
ON
321
*Default setting
Network setting Switch 1 Switch 2
Biased ON ON
Not Biased* OFF* OFF*
Network setting Switch 3
Terminated ON
Not Terminated* OFF*
*Default setting

Page 9
Installation and Operating Instructions ZKX3-.. Keyboard
UNIT IDS - CHANGING THE UNIT ID ON YOUR KEYBOARD
4. The LCD display should change to:
Special Config
5. Within 5 seconds press the Reverse Play key
6. The LCD display should change to:
Change KBD Id
7. Within 5 seconds enter the new ID number (1 - 9) and press the enter key.
8. The LCD display should change to:
Change KBD Id
New SELFUNT = 00n
where nis the new unit number.
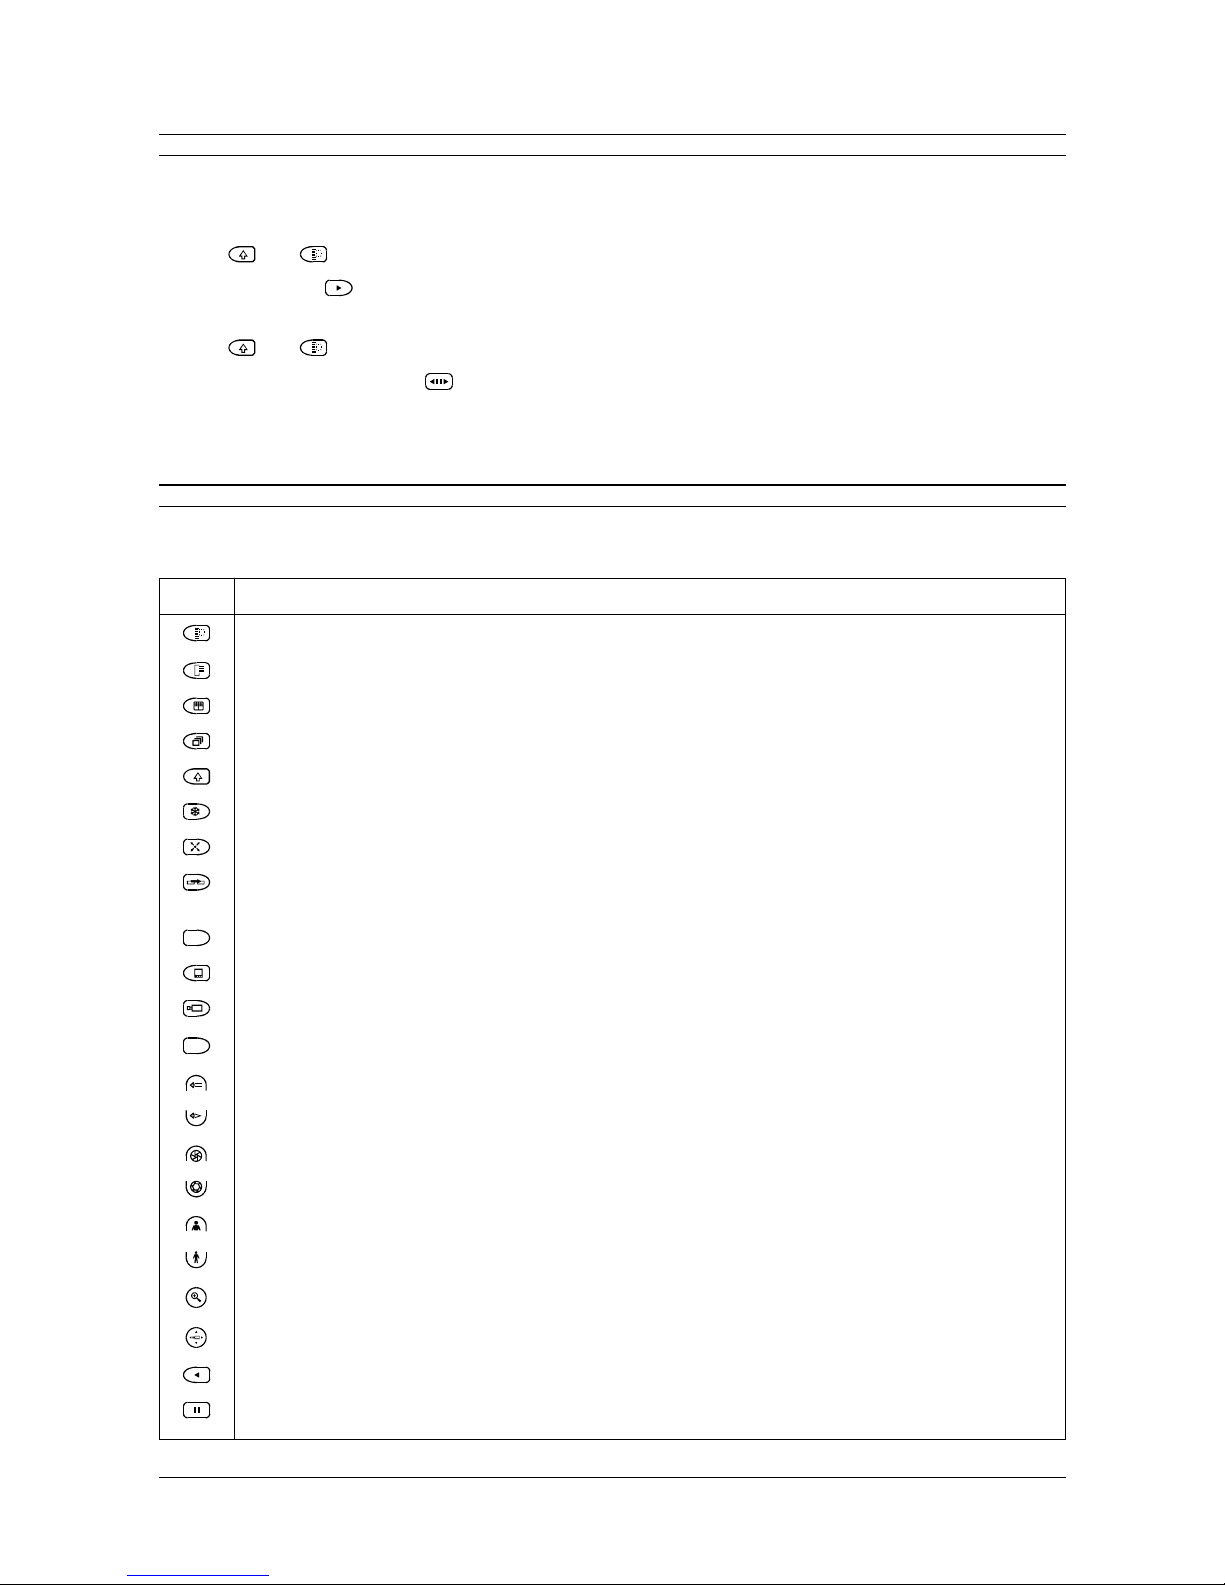
BASIC OPERATIONS
Fig. 6 ZKX3.. Keyboard layout and key descriptions
9
F
A
Menu
Escape
Multiscreen
Sequence
Shift
Freeze
Preset
Unit select Zoom out
Focus near
Open iris
Zoom in
Focus far
Close iris
Joystick/Control Disk
ENTER key
Telemetry
Camera power
Lamp
Auto pan
Wash
Global
Auxilliary 4
Wipe
Function Electronic Zoom
Alarm acknowledge
Reserved* Increment*
Pause Decrement*
VCR Mode Enhance*
Rewind List Alarms*
Fast forward Remote Site*
Record Audio*
Stop
Play
Monitor select
Camera select
Number keys (0-9)
* reserved for future use

Page 10
ZKX3-.. Keyboard Installation and Operating Instructions
BASIC OPERATIONS
ZKX3-.. keyboards are provided with a means of controlling cameras fitted with pan/tilt heads. Depending upon the
keyboard model, this may be either a three axis joystick (ZKX3-J) or a control disk (ZKX3-K). Where on screen programming
is required, these controls serve to input text, navigate through menus, etc. Important Note: During power-up, the
keyboard performs a joystick calibration function. Do not move the joystick during this period until the keyboard has been
properly initialised.
Control Disk Joystick
Note: In the following function table + indicates an action followed by another action e.g. Unit ID + means enter the
Unit ID number using the numerical keys then press the Select Unit key. AND indicates the simultaneous action of two
keys e.g.
F
AND means press the Function and Menu keys simultaneously.
FUNCTION TABLE
FUNCTION DESCRIPTION KEYSTROKE
Select Unit You must select a unit in order to control it. To select a unit: Unit ID No. + AND
Select Camera Enables a specific camera to be selected Camera No. +
Select Monitor Enables a specific monitor to be selected Monitor No. +
Select Monitor A to E Selects Monitor A - E (1=A, 2=B, 3=C, 4=D, 5=E).
9
+
Select Sequence Starts a predefined sequence on the current monitor Sequence No. +
To stop the sequence, select a camera.
Select Preset Selects a preset camera position Preset No. +
Select Preset Selects a preset camera position + Preset No. +
Record Preset Records a preset camera position
F
+ Preset No. +
Selecting a Macro Selects and runs a predefined Macro Macro No. +
F
Adjusting the LCD Allows the LCD contrast to be adjusted.
F
AND
(Use Focus Near and Focus Far keys to adjust
followed by enter to store the setting).
Enable Beep Switches on the beep-on-keypress function Press and hold
F
then
press + +
Disable Beep Switches off the beep-on-keypress function Press and hold
F
then
press + +
ZMX... only
Zoom Out Zoom In
1
Page 11
Installation and Operating Instructions ZKX3-.. Keyboard
RESPONDING TO AN ALARM
Responding to an alarm on the ZMX..
1. Select the ZMX.. : Unit ID No. + AND
2. Press the Alarm Acknowledge key
Responding to an alarm on the ZTX6/..
1. Select the ZTX6/.. : Unit ID No. + AND
2. Select the alarm monitor: Monitor No. +
3. Press the Alarm Acknowledge key
HOW TO MANUALLY ACTIVATE AN ALARM USING THE ZKX3-..
This action allows you to manually activate an alarm using your ZKX3-.. :
1. Press and hold the Shift key
2. Press the number key corresponding to the camera associated with the alarm.
3. Press the Camera key
SETTING A PRESET POSITION USING THE ZKX3-..
This action allows you to store a camera position as a preset in enhanced mode:
F
+ preset number using the number keys +
HOW TO RECORD A FULL SCREEN CAMERA SEQUENCE USING THE AUTOLIST FUNCTION USING THE ZKX3..
This action allows you to record a full screen camera sequence using your multiplexers Autolist feature (ZMXplus
series). See the ZMX+ manual for a detailed description of the Autolist function.
To start Autolist recording
1. Enter full screen live mode for the desired Monitor
2. Press and hold the Shift key
3. Press the number key 1 followed by the Sequence key
To stop Autolist recording, press the number key 1 followed by the Sequence key
To start the Autolist camera sequence, press the number key 1 followed by the Sequence key
To stop the Autolist camera sequence, press the number key 1 followed by the Sequence key
SPECIAL POWER-UP SEQUENCES
The following special operations are not operator functions. Only in exceptional circumstances should it be necessary to
change these settings. Refer to Baxall Security Limited for guidance. They must all be performed within 5 seconds of
power connection.
Change the number of Keyboard Retries (default setting is 003)
1. Press AND
2. Press the Pause key
3. Enter a number using the numerical keypad
4. Press the Enter key
Note that high keyboard retry values will cause the keyboard to wait for long periods before responding to further operator
input.
Page 12
ZKX3-.. Keyboard Installation and Operating Instructions
SPECIAL POWER-UP SEQUENCES
Performing a Factory Reset
This operation allows you to reset your keyboard to its factory default settings. Note that after performing this procedure
the Unit ID will need to be re-entered - see page 8.
1. Press AND
2. Press the Play key
Change Timeout setting (default setting is 035 units. Each unit = 5ms )
1. Press AND
2. Press the Forward/Reverse key
3. Enter a number using the numerical keypad
4. Press the Enter key
KEY FUNCTIONS
The following table shows the keys and briefly describes their function. Not all keys will function. Their use depends upon
the type of equipment being controlled by the keyboard.
KEY DESCRIPTION
Used in menu functions. Cancels the current menu level and returns to the previous level (where supported)
Selects Menu mode for ZTX6/.. and ZMX.. (shift key must also be depressed to enable menu selection)
Toggles the multiple picture display on a multiplexer
Allows you to select a camera sequence
Shift key - allows multiple use of keys
Electronically freezes the picture on a multiplexer
Enables a specific preset to be selected, displayed or recorded
Allows you to select which remote unit to communicate with (shift key must also be
depressed to enable remote selection)
F
Used in conjunction with other keys to modify their actions; enable disable macros
Enables a specific monitor to be selected
Enables a specific camera to be selected
9
Numerical keys (0-9).
Focus on a distant object for cameras with controllable lenses.
Focus on a near object for cameras with controllable lenses.
Close the iris for cameras with controllable irises.
Open the iris for cameras with controllable irises.
Zoom in for cameras with controllable zoom lens.
Zoom out for cameras with controllable zoom lens.
Electronically zooms the display on the monitor when used in conjunction with a multiplexer.
Allows telemetry control (multiplexer specific key).
Reserved for future use.
VCR Pause.
Page 13
Installation and Operating Instructions ZKX3-.. Keyboard
KEY FUNCTIONS
KEY DESCRIPTION
Switches the keyboard to VCR mode enabling VCR control keys - see Controlling a VCR
VCR Rewind.
VCR Fast Forward.
VCR Record; Selects Record mode on multiplexer.
VCR Stop; Selects Live mode on multiplexer
VCR Playback; Selects Playback mode on multiplexer
Toggles camera power relay on/off for a selected camera (Aux 1). May be used globally.
Toggles lights on/off for a selected camera (Aux 5). May be used globally
Starts Autopan for selected camera
Selects wash for selected camera (Aux 2). May be used globally.
Selects wipe for selected camera (Aux 6). May be used globally.
Applies certain selected functions globally. E.g. + will wash all cameras.
A
Auxiliary 4
Decrement time lapse function (reserved for future use)
Increment time lapse function (reserved for future use)
Enhance/Picture quality (reserved for future use)
List Alarms (reserved for future use)
Remote site (reserved for future use)
Audio on/off (reserved for future use)
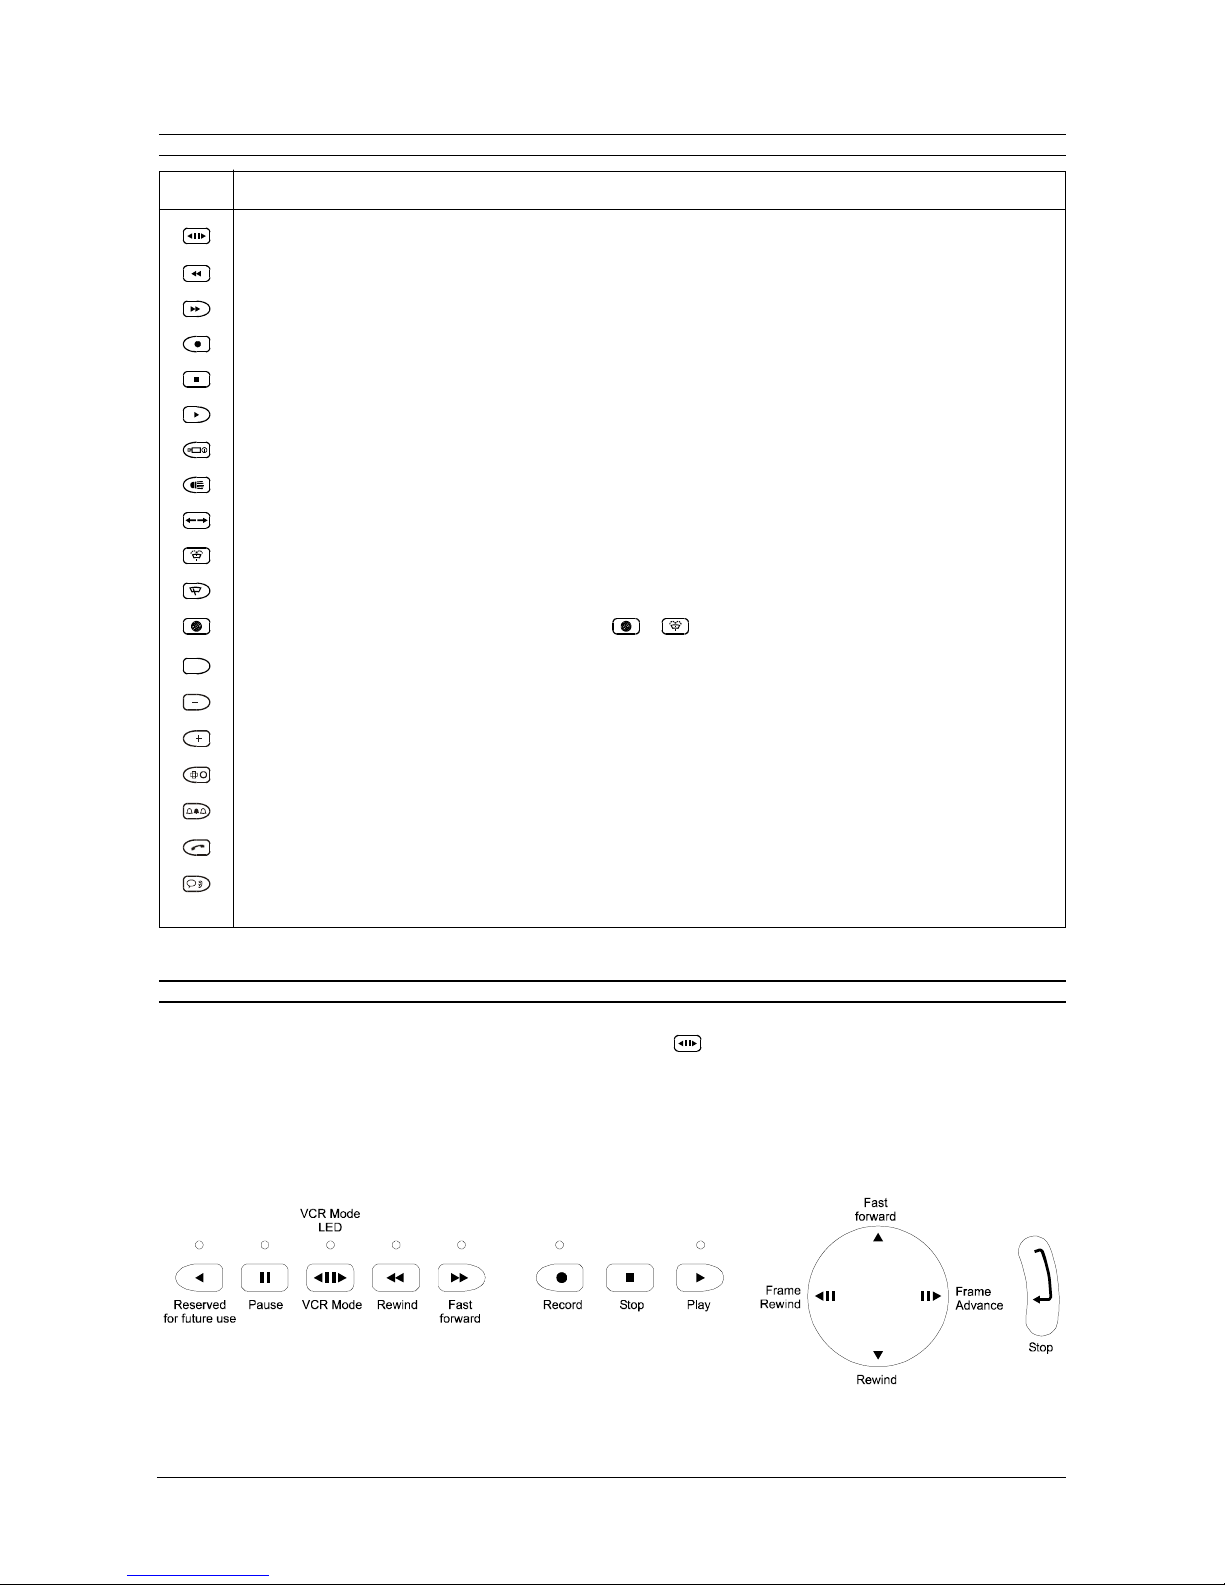
CONTROLLING A VCR
Your ZKX3.. keyboard can control a VCR connected to a multiplexer via an RS232 link. To enable VCR control, the
keyboard must be switched to VCR mode using the VCR mode key . This key has a toggle action and the led above
the key will be lit indicating that the keyboard is in VCR control mode. To exit VCR mode, press the VCR mode key again.
When the keyboard is in VCR mode, the following keys are available to control your VCR.
Note. Ensure that the submacros in your multiplexer are programmed correctly for the type of VCR in use. Refer to your
multiplexer and VCR manuals for further details.

Page 14
ZKX3-.. Keyboard Installation and Operating Instructions
CAMERA TITLE EDITING USING THE ZKX3
When editing the camera title on a multiplexer, the character set can only be changed using the sequence key.
SUMMER/WINTER TIME ADJUSTMENT USING THE ZKX3
Summer/Winter time adjustment on a multiplexer must be performed using the appropriate keys on your multiplexer front
panel.
SPECIFICATIONS
The BaxNet Network
Maximum network length 1.2km. Maximum number of nodes 32.
The 32 nodes can be a combination of ZMX.., ZTX6/.. and ZKX3-.. units.
The ZKX3-.. Keyboard
Can control multiple ZTX6/.. and ZMX.. units
ZKX3-K 58 keys, 16x2 LCD and buzzer for messaging
ZKX3-J 54 keys, 16x2 LCD and buzzer for messaging
Each ZTX6 or ZMX can power a single keyboard (less than 10 metres away) from the BaxNet connectors.
Inputs and Outputs
2 x 8 pin RJ45 BaxNet connectors for daisy-chaining of network and power connections to a single keyboard.
Mechanical
ZKX3-K 132 (D), 56 (H), 340 (L) Weight 1.04 kg
ZKX3-J 132 (D), 80 (H), 340 (L) Weight 1.50 kg
Material Mild-steel and aluminium
Colour
Case: Graphite-grey. Keys: blue, orange and grey.
Temperature Specification
Operational temperature limits:-
-10ºC to +50ºC at 10% to 80% relative humidity (non-condensing)
Storage temperature limits:-
-20ºC to +60ºC at 10% to 95% relative humidity (non-condensing)
Network Wiring
2 BaxNet connections via 8 pin RJ45 sockets.
For Standard BaxNet use shielded twisted pair cable Belden 8723. Maximum network length 1.2 kilometres.
For BaxNet and keyboard power use 4 core shielded cable type Belden 8723, maximum length 10 metres.
Power
Power Consumption: Maximum 3 VA

Page 15
Installation and Operating Instructions ZKX3-.. Keyboard
Pin Connection
Shield Chassis Ground
1 Signal Ground
2 Power supply positive (+12 volts unregulated)
3 RS485 wire 1 (signal +)
4 No connection
5 No connection
6 RS485 wire 2 (signal -)
7 Signal Ground
8 Power supply positive (+12 volts unregulated)
APPENDIX A
The connections on the 8 pin RJ45 sockets are given here for your information.

HBZKX3-IN-OP-1 Issue 1 9/99
Baxall Limited, Stockport, England. Visit our Web site: http://www.baxall.com
Baxall Limited reserve the right to make changes to the product and
specification of the product without prior notice to the customer.
Other manuals for ZKX3-K
1
This manual suits for next models
1
Other Baxall Keyboard manuals


