Baxall Pyramid 2 User manual

Please read this manual first
Pyramid 2 Keyboard
Installation and Operating Instructions

Page 2
Pyramid 2 Keyboard Installation and Operating Instructions
IMPORTANT
The first few pages of these instructions contain important information on safety and product
conformity. Please read, and ensure that you understand this information before continuing.
TO PREVENT FIRE OR SHO K HAZARD, DO NOT EXPOSE THIS APPLIAN E TO RAIN OR MOISTURE

Page 3
Installation and Operating Instructions Pyramid 2 Keyboard
CONTENTS
Product Safety ............................................................................................................................................................................................ 5
Electromagnetic Compatibility (EMC) ...................................................................................................................................................... 5
Manufacturers eclaration of Conformance .......................................................................................................................................... 5
Unpacking ................................................................................................................................................................................................... 5
These Instructions ...................................................................................................................................................................................... 5
Features and Controls
Overview ....................................................................................................................................................................................................... 8
Keyboard Controls ........................................................................................................................................................................................ 9
Basic Operations
Powering up the Keyboard ......................................................................................................................................................................... 12
Logging on .................................................................................................................................................................................................. 12
electing a Monitor ..................................................................................................................................................................................... 13
electing a Camera .................................................................................................................................................................................... 14
Controlling Pan, Tilt, Focus, Iris and Zoom Functions ............................................................................................................................... 14
Recalling a Preset ...................................................................................................................................................................................... 15
Controlling Auxiliary Functions ................................................................................................................................................................... 16
Recalling a equence ................................................................................................................................................................................ 18
Using Multi-Matrix Units .............................................................................................................................................................................. 19
Adjusting the LCD creen ettings ............................................................................................................................................................ 20
Advanced Operations
Operating the Tour Functions ..................................................................................................................................................................... 22
electing a VCR ......................................................................................................................................................................................... 24
VCR Controls .............................................................................................................................................................................................. 25
electing a Multiplexer ............................................................................................................................................................................... 26
witching Between a VCR and Multiplexer Pair ........................................................................................................................................ 26
Multiplexer Controls .................................................................................................................................................................................... 27
electing a Hard Disk Recorder ................................................................................................................................................................. 28
HDR Controls .............................................................................................................................................................................................. 29
Operating Alarms
Alarms and Alarm Modes ........................................................................................................................................................................... 34
Responding to Alarms ................................................................................................................................................................................ 36

Page 4
Pyramid 2 Keyboard Installation and Operating Instructions
CONTENTS
Supervisor Operations
Programming Presets ................................................................................................................................................................................. 40
Deleting Presets ......................................................................................................................................................................................... 41
Programming a Privacy Zone ..................................................................................................................................................................... 42
Accessing the Matrix Menu ystem ........................................................................................................................................................... 43
Navigating in the Matrix Menu ystem ...................................................................................................................................................... 44
Text Editing in the Matrix Menu ystem ..................................................................................................................................................... 44
Programming mart Cards ........................................................................................................................................................................ 45
etting up a equence ............................................................................................................................................................................... 48
Clearing a equence .................................................................................................................................................................................. 49
etting the Time and Date .......................................................................................................................................................................... 50
Installer Operations
etting Electronic Limit tops .................................................................................................................................................................... 52
etting Receiver Configuration .................................................................................................................................................................. 53
etting ignal Gain and Lift Levels ............................................................................................................................................................ 54
Testing a Receiver ...................................................................................................................................................................................... 55
etting Auto-Iris Levels .............................................................................................................................................................................. 55
The Function oft-Key ................................................................................................................................................................................ 56
Addressing a Receiver ............................................................................................................................................................................... 57
Addressing a Bridge Interface .................................................................................................................................................................... 59
Addressing a Pyramid 2 Keyboard ............................................................................................................................................................ 60
Addressing Alarm Modules ........................................................................................................................................................................ 61
Direct Connection (Function 100) .............................................................................................................................................................. 62
Installation Guide
Quick Install Instructions ............................................................................................................................................................................ 64
Connections ................................................................................................................................................................................................ 64
Configuring the Network Communications Card ........................................................................................................................................ 65
Reference
creen Gallery ............................................................................................................................................................................................ 68
LCD Messages ........................................................................................................................................................................................... 70
pecifications .............................................................................................................................................................................................. 71

Page 5
Installation and Operating Instructions Pyramid 2 Keyboard
PRO UCT SAFETY
Please follow these instructions as you install the equipment and keep them for future use.
Installation is only to be carried out by competent, qualified and experienced personnel in accordance with the
country of installations National Wiring Regulations. Failure to do so can result in injury or death by electric
shock. A means of disconnecting the equipment from the supply must be provided as part of the installation
and must be situated close by.
This unit contains hazardous voltages and it must be isolated and disconnected from the supply before any
covers are removed or any servicing is carried out.
Do not exceed the voltage and temperature limits given in the specification.
Only use this equipment in a clean, dry, dust-free environment.
Before cleaining this equipment, isolate the unit. Use only a dry, lint-free cloth. Do not use cleaning fluids or
solvents.
If you have any problems, contact Baxall Limited.
ELECTROMAGNETIC COMPATIBILITY (EMC)
This is a lass A product. In a domestic environment this product may cause radio interference in which case
the user may be required to take adequate measures.
This product is intended for use in general purpose TV applications in a residential, commercial or light
industrial EM environment. Refer to Baxall Limited before using the product in medical and/or intrinsically
safe applications or in an industrial EM environment.
The product must be installed in accordance with good installation practice for EM to enable the product to
function as intended and to prevent EM problems.
MANUFACTURERS ECLARATION OF CONFORMANCE
A Declaration of Conformity in accordance with the following EU standards has been made and is on file at Baxall Limited,
tockport K6 2 U England.
The manufacturer declares that the product supplied with this document is complaint with the provisions of the EMC
Directive 89/336 EEC and the Low Voltage Directive LVD 73/23 EEC, the CE Marking Directive 93/68 EEC and all associated
amendments.
UNPACKING
Keep your packaging for use if the product is to be stored for an extended period or needs to be returned for any reason.
The packaging should contain:
Pyramid 2 Keyboard PY-NAP (Network Access Point)
PY-NIL (2 Metre RJ45 connection lead) PY2-I C (Installer mart Card)
P U22 (1A switch mode power supply unit) These instructions
Check the product code on the serial number label. If you have an incorrect item or it is damaged then inform the suppliers
and carriers immediately. If this is the case then do not attempt to use the equipment.
THESE INSTRUCTIONS
The Pyramid 2 Keyboard Installation and Operating Manual has been prepared in sections so that the appropriate parts
can be issued to the operators. The manual includes sections explaining basic and advanced operations, and also features
sections written exclusively for supervisors and installers.
This manual is also available in pdf. format from the Baxall website, www.baxall.com.

Page 6
Pyramid 2 Keyboard Installation and Operating Instructions

Page 7
Installation and Operating Instructions Pyramid 2 Keyboard
FEATURES AND CONTROLS
This section describes the main features of the Pyramid 2 Keyboard and the
controls used to operate it.
Overview ........................................................................................................................................................8
Keyboard Controls .........................................................................................................................................9
Page 8
Pyramid 2 Keyboard Installation and Operating Instructions
OVERVIEW
The Pyramid 2 Keyboard is a self-contained desktop console which provides simple and flexible control of the Pyramid
system. The keyboard features a large, backlit LCD display to provide all necessary functions and menus at a glance. It
uses context sensitive screens, so the appropriate functions are available at the right time.
For example:
When a PTZ camera is selected, screens enabling access to sequence, tour, preset and auxiliary functions are displayed.
When an alarm is triggered, the alarm control keys are displayed.
When a multiplexer, hard disk recorder or VCR are selected, the appropriate controls are displayed.
By only displaying the most appropriate functions, the on-screen displays remain clear and simple, ensuring that the
operator is not overloaded with information. The keyboard also has dedicated keys for the most common functions such as
camera selection and focus/iris control, and incorporates a three-axis joystick providing pan, tilt and zoom functionality.
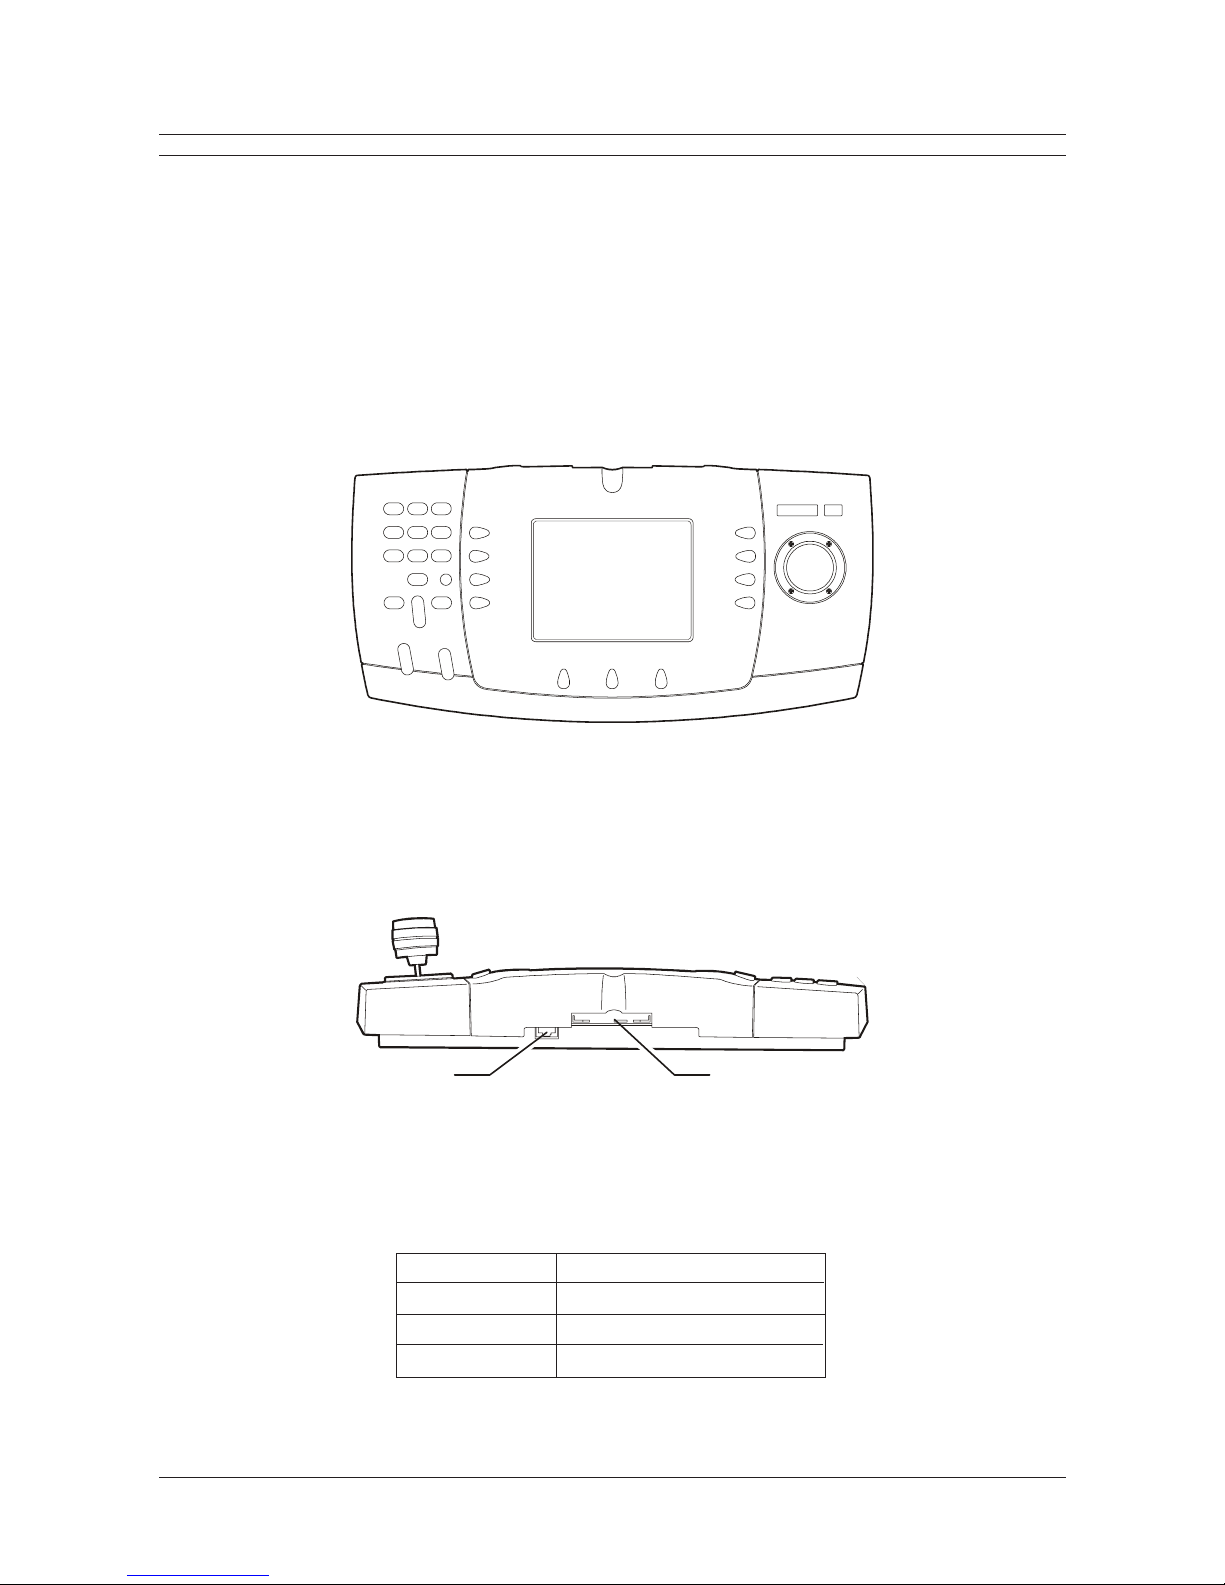
Figure 1 - Front panel of the Pyramid 2 Keyboard
The keyboard is supplied with a installer smart card, which can be programmed by an installer when the keyboard is first
used. It can be programmed to contain information about an operator, such as the access rights/privileges that they have,
and the password that they must enter to gain access to the keyboard. By supplying each operator with their own smart
card, the Pyramid 2 Keyboard can be used in a secure mode to prevent unauthorised access to the Pyramid system.
RJ45 Port Smart Card Slot
Figure 2 - Rear panel of the Pyramid 2 Keyboard
There are three variants of keyboard, based on the network communications card installed and speed of the network. Other
than this, there is no external or operating differences between the three variants. The variants are as follows:
Part Number Network ommunications ard
PY2-KBD-H High peed FTT10
PY2-KBD-HR High peed R 485
PY2-KBD-L Low peed R 485
Figure 3- Pyramid 2 Keyboard Variants

Page 9
Installation and Operating Instructions Pyramid 2 Keyboard
KEYBOAR CONTROLS
The Pyramid 2 Keyboard has the following layout:
I
F
Joystick
Screen keys
LCD display
Soft keys
Focus near
D
ecrement camera
Open iris
Focus far
Increment camera
Close iris
Monitor
Camera
Delete
Number keys
Figure 4 - Pyramid 2 Keyboard layout
Function keys
The keyboard is used primarily to control a Pyramid system. It also functions as a system programming device. These
functions are protected using smart cards and PIN access.
There are six parts to the keyboard control unit:
Number keys
The number keys are grey in colour and they are used to enter values, such as the number of a camera or monitor, a dwell
time in seconds or the number of a preset position that the operator wants a camera to move to.
Function keys
The function keys are marked with icons to help identify the exact job that they are used for. They include the amera and
Monitor keys which are used in conjunction with the number keys to select cameras and monitors, the Increment/Decrement
amera key which is used to move between the connected cameras, and the Focus and Iris keys which allow the operator
to control the camera picture.
L D Screen
The keyboard has a liquid crystal display (LCD) which displays menus, functions and messages as you use the keyboard.
The keyboard uses context-sensitive screens, so the appropriate menus and functions are displayed at the right time.
VCR / MUXOperator Utility Menu
12...
Camera Monitor
1 1
Next
P
Shows the currently
selected camera
Screen tab
Echoes keyboard
number entry Ico
n
Figure 5 - The LCD Screen
Shows the currentl
y
selected monitor
Page 10
Pyramid 2 Keyboard Installation and Operating Instructions
KEYBOAR CONTROLS
Screen keys
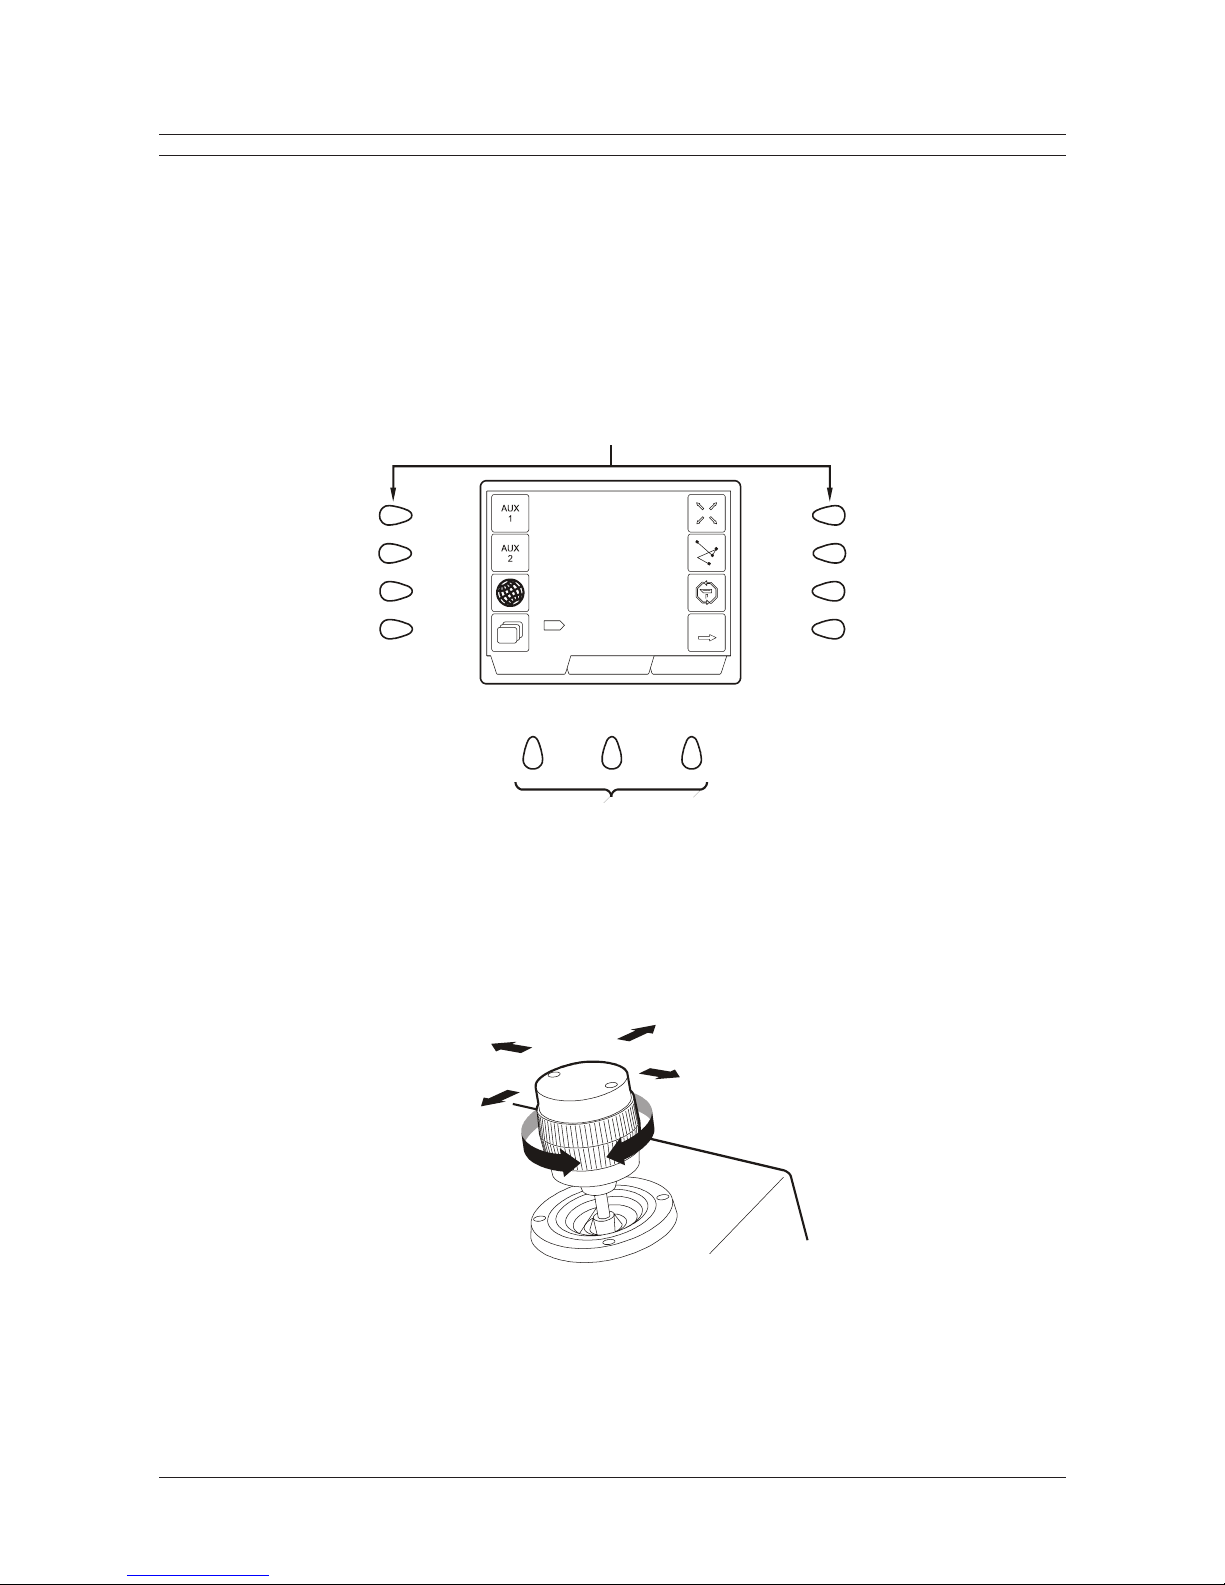
The three orange keys directly under the LCD screen are referred to as screen keys. This is because the LCD displays
three tabs along its bottom edge, each corresponding to a different screen. By pressing the screen key directly below a
screen tab, the required screen will be displayed on the LCD. For example, to enter the Utility Menu in Figure 6, the
operator would press the right screen key.
Soft-keys
The eight blue keys to the left and right of the LCD screen are referred to as soft-keys. They are used to make selections
and to activate functions in on-screen displays. For example to activate the Auxiliary 1 function in the figure below, the
operator would press the top left soft-key.
Soft Keys (blue)
Screen Keys (orange)
VCR / MUXOperator Utility Menu
12...12...
Camera Monitor
1 1
Next
P
Figure 6 - Screen keys and Soft keys
Joystick
The joystick provides simple one-handed control of pan, tilt and zoom functions.
Pan left
T
ilt down
Tilt up
Pan right
Zoom in
Zoom out
Figure 7 - The Pyramid 2 Keyboard joystick

Page 11
Installation and Operating Instructions Pyramid 2 Keyboard
BASIC OPERATIONS
This section describes the most common procedures that an operator will carry out.
These operations include logging on to the Pyramid 2 Keyboard, selecting cameras and monitors, manually
controlling a camera, and the use of presets, sequences and auxillaries.
Powering up the Keyboard ......................................................................................................................... 12
Logging On ................................................................................................................................................. 12
Selecting a Monitor ..................................................................................................................................... 13
Selecting a Camera .................................................................................................................................... 14
Controlling Pan, Tilt, ocus, Iris and Zoom unctions ............................................................................... 14
Recalling a Preset ...................................................................................................................................... 15
Controlling Auxiliary unctions ................................................................................................................... 16
Recalling a Sequence ................................................................................................................................ 18
Using Multi-Matrix Units .............................................................................................................................. 19
Adjusting the LCD Screen Settings ............................................................................................................ 20

Page 12
Pyramid 2 Keyboard Installation and Operating Instructions
POWERING UP THE KEYBOAR
When the keyboard is first powered up, the screen below should be displayed. If this is not the case, check the connections
to ensure that everything is correct. If the connections are found to be correct and there is still no response, contact Baxall
for assistance.
Please Insert Smart Card
LIMITED
Figure 8 - The Welcome Screen
LOGGING ON
Access to the Pyramid 2 Keyboard is strictly controlled by the use of smart cards. For this reason, it is recommended that
each user is supplied with their own smart card, as this guarantees that the Pyramid system is secure and tamper-proof.
A smart card can be programmed so that it contains information about an operator, such as the access rights that they
have, and the password that they must enter to gain access to the keyboard. It also stores the resource code that an
operator has been assigned. The resource code is a setting that is used to split keyboard operators into four groups - basic
users, advanced users, supervisors, and installers. The group that an operator is placed into will define which screens and
functions they are able to access.
Operators will also have been assigned a priority level. This setting is used to resolve conflicts between two users. For
example, if two users are trying to take control of the same PTZ camera, the user with the higher priority level will gain
control. This is known as mugging. For details on the LCD messages that are displayed to resolve mugging issues, see
L D Messages on page 70.
Once an operator has been issued with their programmed smart card, they will be able to log on to the keyboard. To do this,
follow the instructions below:
1. Insert a smart card into the rear of the keyboard. The gold contact and the Baxall Pyramid 2 logo should be facing
upwards as the smart card is inserted:
Smart Card
Figure 9 - Inserting a Smart Card
2. After a few seconds, the Password Entry screen is displayed. Using the numeric keypad, enter the correct password
and press the Enter soft-key.

Page 13
Installation and Operating Instructions Pyramid 2 Keyboard
LOGGING ON
Enter PIN Number
_ _ _ _
B a s i c U s e r
Figure 10 - The Password Entry Screen
3. If the password has been entered correctly, the Monitor/ amera Selection screen is displayed. If this screen is not
displayed and the Password Entry screen is still shown, the password was incorrect and must be entered again.
Figure 11 - Monitor/Camera Selection Screen
Operator Operator Setup
12...12...
Camera Monitor
? ?
Note
If the operator enters the system using a smart card with installer privileges, the Installer Logon screen will be displayed
rather than the Monitor/ amera Selection screen. To move from the Installer Logon screen to the Monitor/ amera
Selection screen, press the Logon soft-key.
SELECTING A MONITOR
The first operation after logging on is to select a monitor on which to work. To select a monitor:
1. Press the number key corresponding to the monitor you want to select. The number selected will be echoed on the LCD
display.
2. Press the Monitor key.
3. The LCD display will change so that the selected monitor number is displayed at the top of the LCD.
Operator Operator Setup
12...12...
Camera Monitor
? 1
Figure 12 - Monitor/Camera Selection Screen

Page 14
Pyramid 2 Keyboard Installation and Operating Instructions
SELECTING A CAMERA
To select a camera to view on the selected monitor:
1. Enter the number key corresponding to the camera you want to select. The number will be echoed on the LCD display.
2. Press the amera key.
3. The monitor will change to display video from the selected camera, and the LCD will change to reflect the camera type.
If the selected camera does not have a receiver attached, the display will resemble Figure 13a. However, if the selected
camera has a receiver attached, the display will resemble Figure 13b, and the operator will also have Pan, Tilt, Zoom
(PTZ) control of the camera.
Operator Operator Setup
12...12...
Camera Monitor
8 1
F
igure 13a - Controls for a camera
without receiver.
Operator Operator Setup
12...12...
Camera Monitor
1 1 P
Figure 13b - Controls for a camera
with receiver in the PTZ Camera
Control screen
Notes
Figure 13b shows the PTZ amera ontrol screen for basic users. Operators with higher privilege levels will see a
screen with more controls. ee Figure 19 on page 17 for an example.
The Increment/Decrement amera key can be used to move between the cameras one by one, but this operation
does not assume control of the camera. To assume control of the camera, the number keys and amera key have to be
used.
If a camera with a receiver is to be selected, but control of the camera is not required, enter a zero in front of the camera
number. This is useful when a second operator wishes to look at an incident being monitored and controlled by another
operator. To resume control of the camera, enter the camera number without the zero.
CONTROLLING PAN, TILT, FOCUS, IRIS AN ZOOM FUNCTIONS
If a camera with a receiver is selected, the operator can control the camera manually using the Pyramid 2 Keyboard:
1. Use the joystick to pan, tilt and zoom the selected camera. Twist the top of the joystick clockwise to zoom in, anticlockwise
to zoom out.
2. Use the Focus key to focus the selected camera.
3. Use the Iris keys to open and close the iris on the selected camera. This facility may not be available if auto-iris lenses
are used.
Figure 14 - Manual Camera Controls
Pan left
T
ilt down
Tilt up
Pan right
Zoom in
Zoom out
I
F
Focus ne
ar
Open iris
Focus far
Close iris
Page 15
Installation and Operating Instructions Pyramid 2 Keyboard
RECALLING A PRESET
When a camera is connected to a receiver, not only is the operator able to manually control the camera using the joystick,
focus and iris controls, they can also use the functions that are available in the PTZ amera ontrol screen.
One of these functions is the Recall Preset function.
Recalling a Preset Position
A preset consists of information stored by a receiver that will move a camera to a particular location each time the preset is
recalled. The receiver must be capable of storing preset information and many receivers (including Pyramid receivers)
have the capability to store up to 128 such positions.
To move a camera to a preset position:
1. elect a suitable camera whose preset position is to be recalled - see Selecting a amera on page 14. The PTZ
amera ontrol screen is displayed.
2. Enter the preset number using the number keys.
3. Press the Preset soft-key.
Operator Operator Setup
12...12...
Camera Monitor
1 1 P
3
Figure 15 - Recalling a Preset
Recalling a Preset Position Globally
You can simultaneously move all of the controllable cameras to any one of the preset positions (assuming that the preset
has been programmed for each camera).
To recall a global preset:
1. In the PTZ amera ontrol screen, press the Global soft-key. The Global icon will turn to inverted colours to indicate
that it is turned on.
2. Use the number keys to enter the required preset position.
3. Press the Preset soft-key. Every camera that has had this preset number programmed will move to the appropriate
position. Any cameras without this preset number programmed (or any cameras without telemetry control) will remain
in the same position.
Figure 16 - Recalling a Global Preset
Operator Operator Setup
12...12...
Camera Monitor
1 1 P
3
1
Notes
For more details on programming preset positions, see page 40.
Domes and devices accessed via bridges or Universal Dome Interfaces can be operated using a Pyramid 2 Keyboard.
These devices usually have preset control, although the number of presets may differ. 128 presets is the maximum
supported by the Pyramid 2 Keyboard.

Page 16
Pyramid 2 Keyboard Installation and Operating Instructions
CONTROLLING AUXILIARY FUNCTIONS
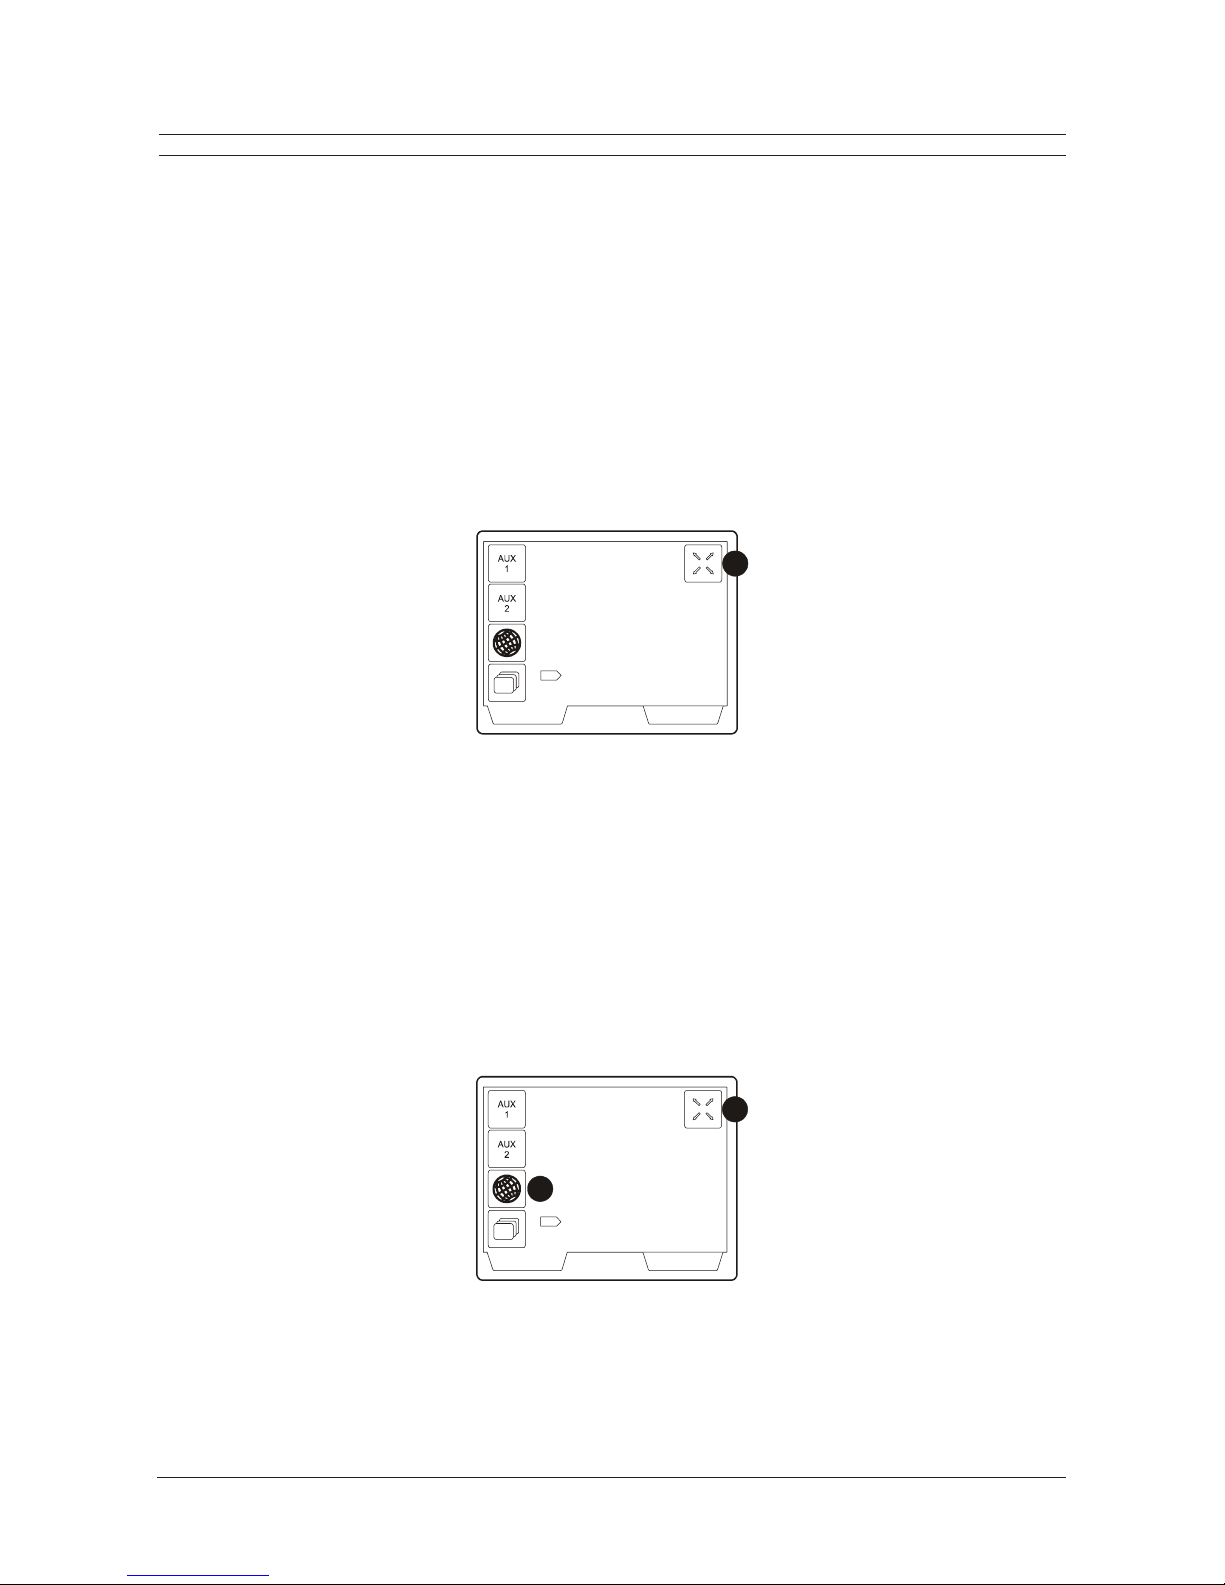
Auxiliary functions can be programmed to the Pyramid 2 Keyboard so that when an key is pressed on the keyboard, an
action takes place. For example, this procedure can be used to operate washers, wipers or lamps on a camera. The
auxiliaries could also control completely different functions such as automatic door or gate activators.
Up to four auxiliary functions can be programmed with the Pyramid 2 Keyboard, and they can then be used by an keyboard
operator. If you are unsure of the function that each auxiliary operates, check with your supervisor or installer.
Activating an Auxiliary Function
Access to auxiliary functions is split over two screens, so that access restrictions can be placed upon certain auxiliaries if
so required. Basic users do have access to auxiliaries 1 and 2, but advanced users, supervisors and installers have access
to all four.
To operate an auxiliary function:
1. elect a suitable camera whose auxiliary is to be used - see Selecting a amera on page 14. The PTZ amera
ontrol screen is displayed.
2. Press the required Auxiliary soft-key (i.e. Aux 1, Aux 2).
3. When an auxiliary is turned on, its corresponding icon will change to inverted colours on the LCD display. To turn the
auxiliary off, press the required Auxiliary soft-key again.
Operator Operator Setup
12...12...
Camera Monitor
1 1 P
2
Figure 17 - Using an Auxiliary Function
Activating an Auxiliary Globally
You can simultaneously activate an auxiliary on all of the controllable cameras. For example, if Auxiliary 1 was set to
operate a wiper, the wiper could be turned on for all cameras when it rains.
To activate a global auxiliary:
1. In the PTZ amera ontrol screen, press the Global soft-key.
2. Press the required Auxiliary soft-key (i.e. Aux 1, Aux 2).
3. To turn the auxiliary off, press repeat steps 1 and 2.
Figure 18 - Global Auxiliary Functions
Operator Operator Setup
12...12...
Camera Monitor
1 1 P
2
1
Page 17
Installation and Operating Instructions Pyramid 2 Keyboard
CONTROLLING AUXILIARY FUNCTIONS
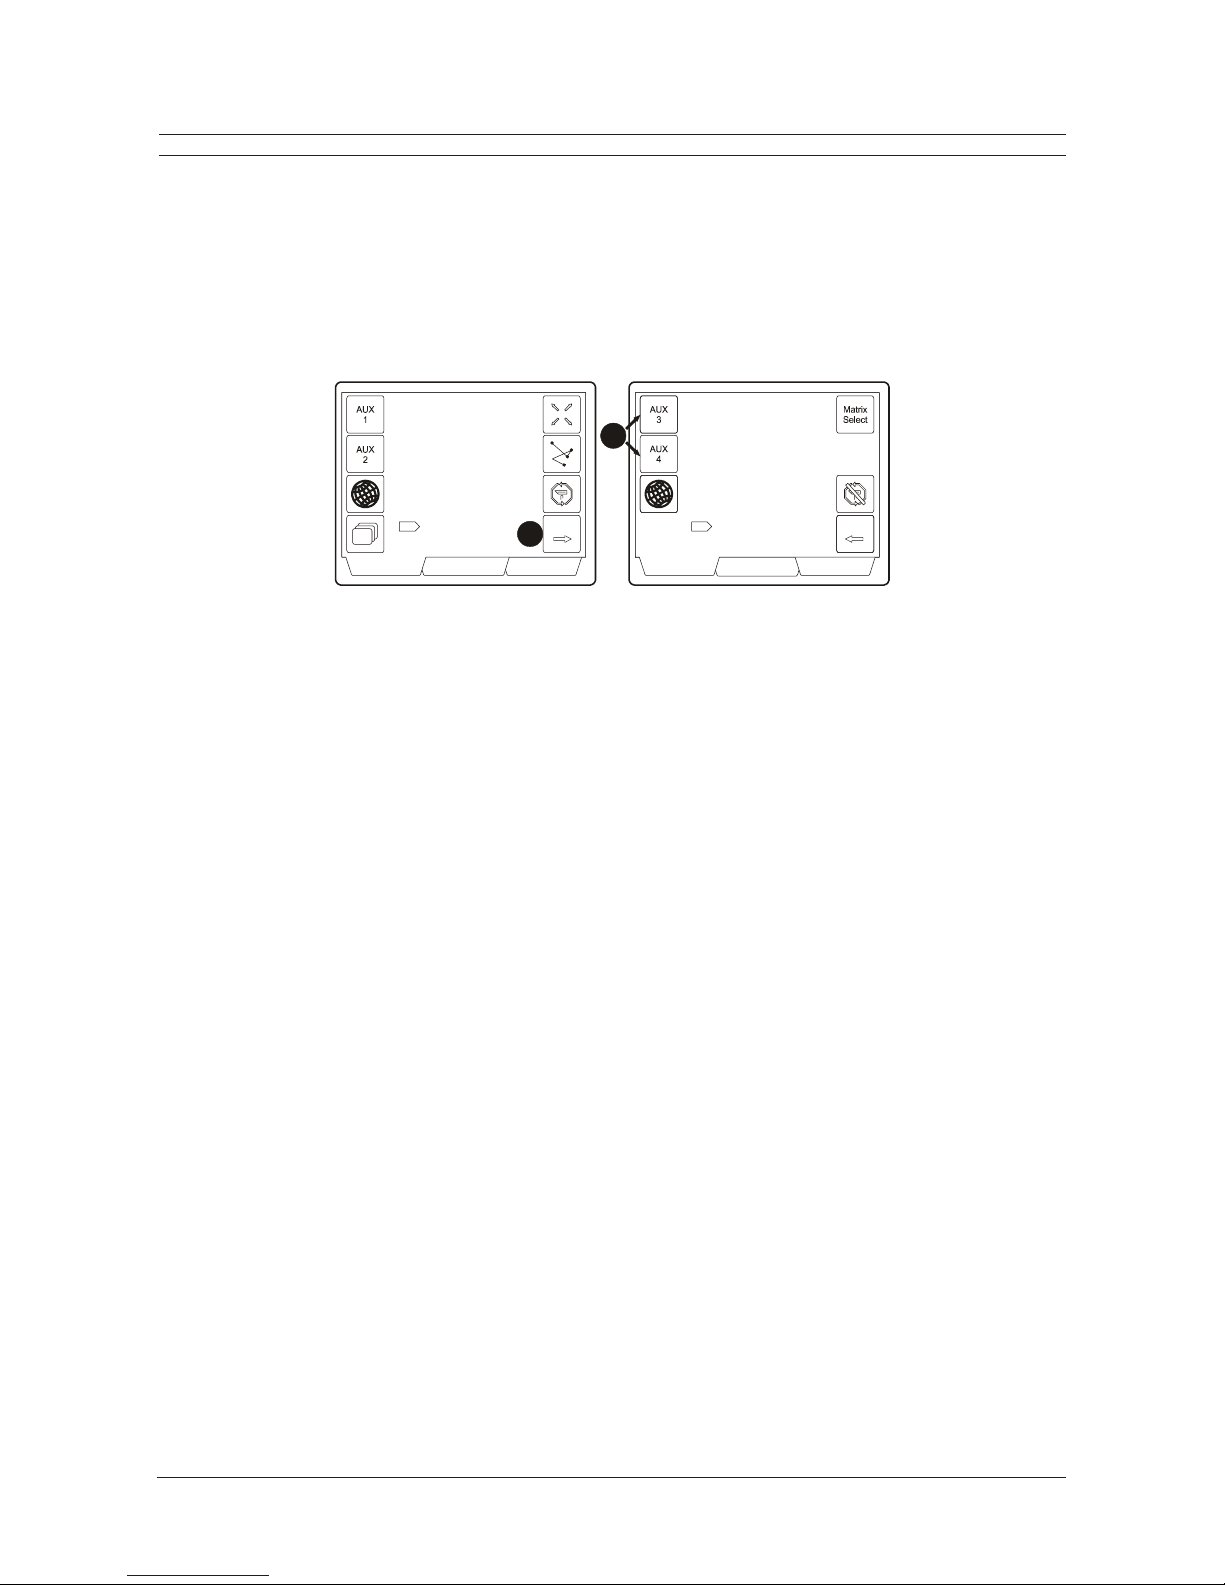
Note
An operator with greater access rights also has the use of Auxiliaries 3 and 4. To access the controls for these extra
auxiliaries:
1. elect a suitable camera whose auxiliary is to be used - see Selecting a amera on page 14. The PTZ amera
ontrol screen is displayed.
2. Press the Next soft-key.
3. The Aux 3 and Aux 4 soft-keys are displayed on the resulting screen.
Figure 19 - Auxiliaries 3 and 4
VCR / MUXOperator Operator Setup
12...12...
Camera Monitor
1 1
Next
P
VCR / MUX
Camera Monitor
1 1
Operator Operator Setup
Back
2
12...12...
3
Page 18
Pyramid 2 Keyboard Installation and Operating Instructions
RECALLING A SEQUENCE
A sequence is an event where two or more video sources are visited in a specified order. Each video source is displayed for
a specified period of time before the next video source in the sequence is shown. Up to 16 sequences can be defined with
each sequence consisting of up to 16 cameras. The sequences are stored in the Pyramid matrix.
To recall a sequence, follow the steps below:
1. elect a suitable monitor for the sequence to be shown on - see Selecting a Monitor on page 13.
2. Using the number keys, enter the number of the sequence to be recalled (1 to 16).
3. Press the Sequence soft-key.
Figure 20 - Recalling a Sequence
Operator Operator Setup
12...12...
Camera Monitor
1 1 P
3
4. The LCD display changes to indicate that a sequence is in progress. To end the sequence, select a camera by pressing
a number key and pressing the amera key.
Operator Operator Setup
12...12...
Camera Monitor
Sequence
? 1
1
Figure 21 - Sequence in Progress
Notes
The option to recall a sequence is available when a PTZ camera is selected, or when a camera with no telemetry is
selected. There is no telemetry requirements when a sequence is recalled.
To recall a sequence, the sequence must first have been defined. ee page 48 for details on defining sequences.

Page 19
Installation and Operating Instructions Pyramid 2 Keyboard
USING MULTI-MATRIX UNITS
A Pyramid system can include multiple matrix units, and for this reason the Pyramid 2 Keyboard has the capability to
assume control of more than one matrix unit. When an operator begins a session, the keyboard will always log on to the
last matrix that was controlled, but if this is not the desired matrix, the operator can easily select which matrix unit to control.
To assume control of a different matrix unit, follow the steps below:
1. Go to the Monitor/ amera Selection screen. The easiest way to do this is to select a camera with no receiver, as the
keyboard will be returned to the required screen. Alternatively, close down the Pyramid 2 Keyboard and log back on
again. The Monitor/ amera Selection screen is the opening screen.
2. Using the number keys, enter the number of the matrix that is to be controlled.
3. Press the Matrix Select soft-key.
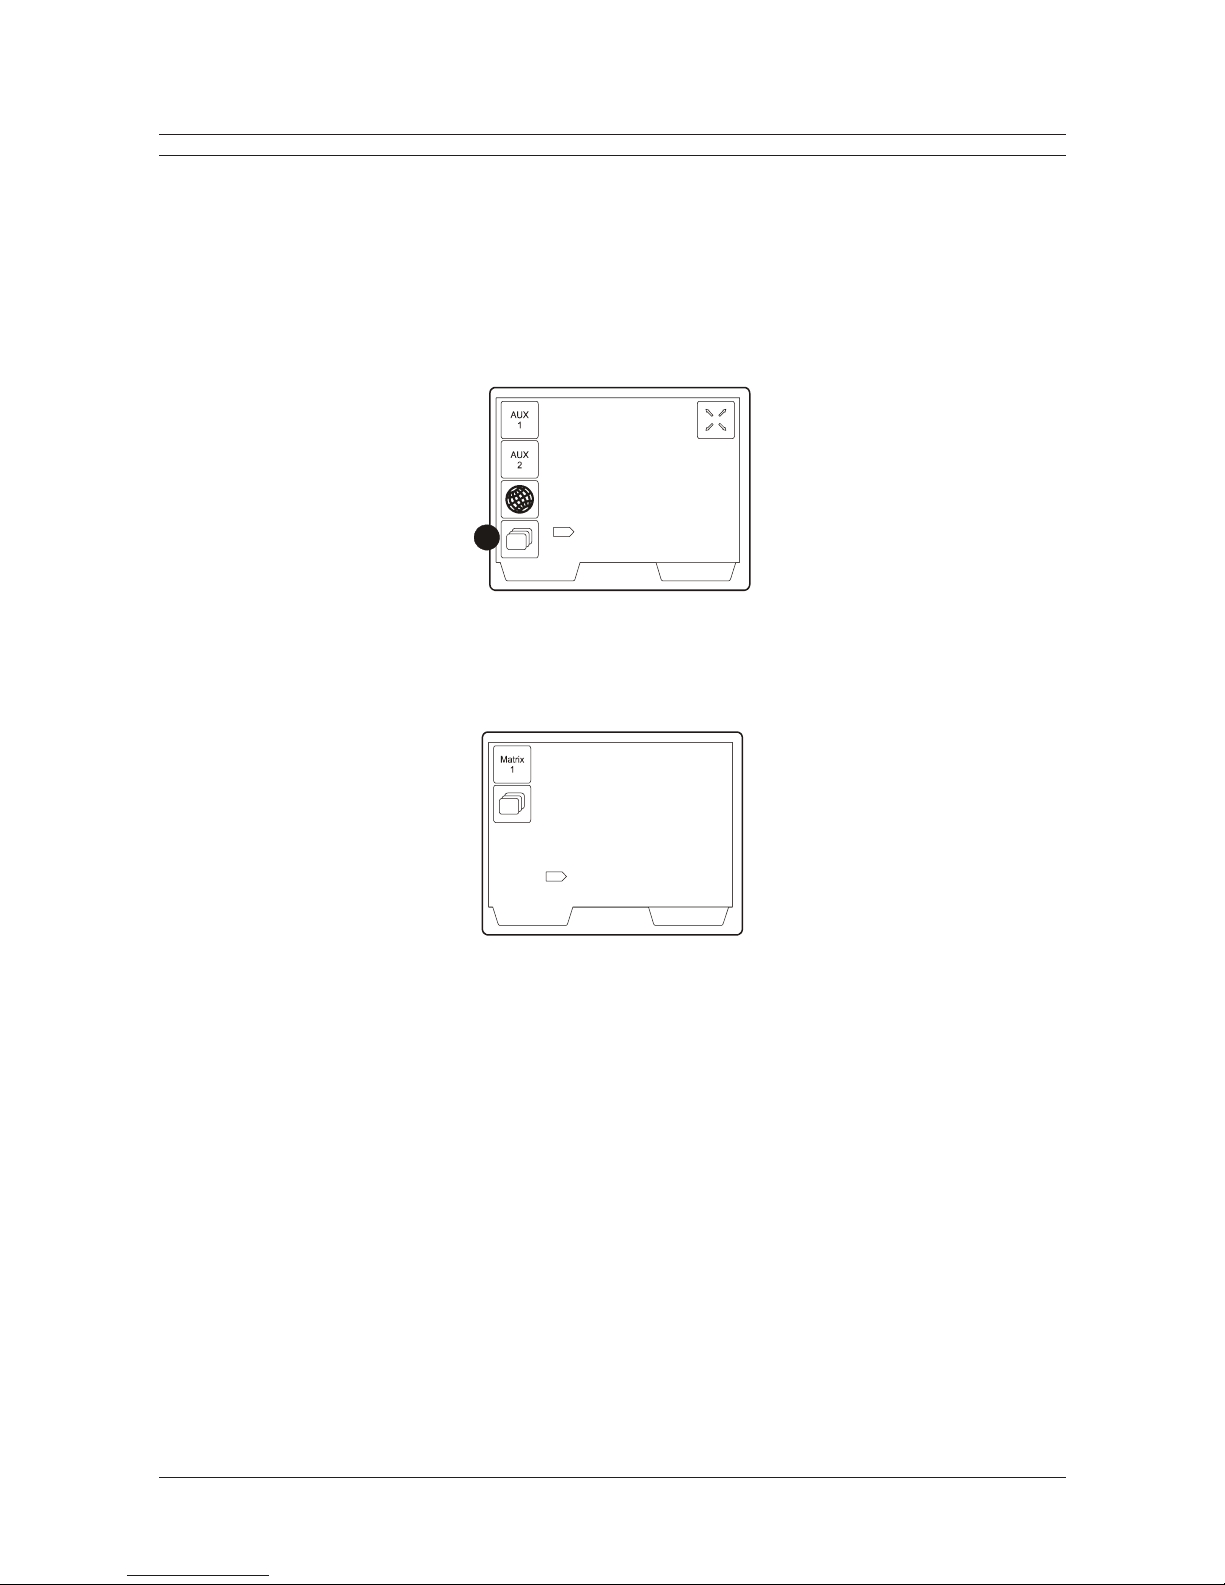
Figure 22 - Matrix Selection
Operator Operator Setup
12...12...
Camera Monitor
? ?
3
Note
For users with advanced privileges, the Matrix Select soft-key can also be found in the PTZ amera ontrol screen. To
access it:
1. elect a camera with a receiver to display the PTZ amera ontrol screen - see Selecting a amera on page 14.
2. Press the Next soft-key.
3. The Matrix Select soft-key is displayed on the resulting screen.
Figure 23 - PTZ Camera Control Screens
VCR / MUXOperator Operator Setup
12...12...
Camera Monitor
1 1
Next
P
VCR / MUX
Camera Monitor
1 1
Operator Operator Setup
Back
2
12...12...
3

Page 20
Pyramid 2 Keyboard Installation and Operating Instructions
A JUSTING THE LC SCREEN SETTINGS
The brightness and contrast of the LCD screen can be adjusted to suit the requirements of an operator. This is carried out
using the Operator Setup screen.
To adjust the LCD screen settings, follow the instructions below:
1. Enter the Operator Setup screen by pressing the Operator Setup screen key.
Operator Operator Setup
12...12...
Camera Monitor
1 1
1
F
igure 24 - Entering the Operato
r
Setup Screen
2. Using the appropriate soft-keys, adjust the Brightness to the desired level.
3. Using the appropriate soft-keys, adjust the ontrast to the desired level.
4. To turn the key sounds off, press the Audio soft-key. Pressing the soft-key again will turn the sounds back on.
Operator Operator Setup
Brightness
I
----------------------------------------------
I
Contrast
----------------------------------------------
-
-+
+
2
3
4
Figure 25 - Operator Setup Screen
Note
Operators with supervisor and installer access rights have to enter the Operator Setup screen by a different route. To do
this:
1. Press the Utility Menu screen key.
2. Press the Keybd Utility soft-key.
VCR / MUXOperator Utility Menu
12...12...12...12...
1
2
F
igure 26 - Accessing the Operator Setu
p
Screen as a Supervisor
Table of contents
Other Baxall Keyboard manuals


