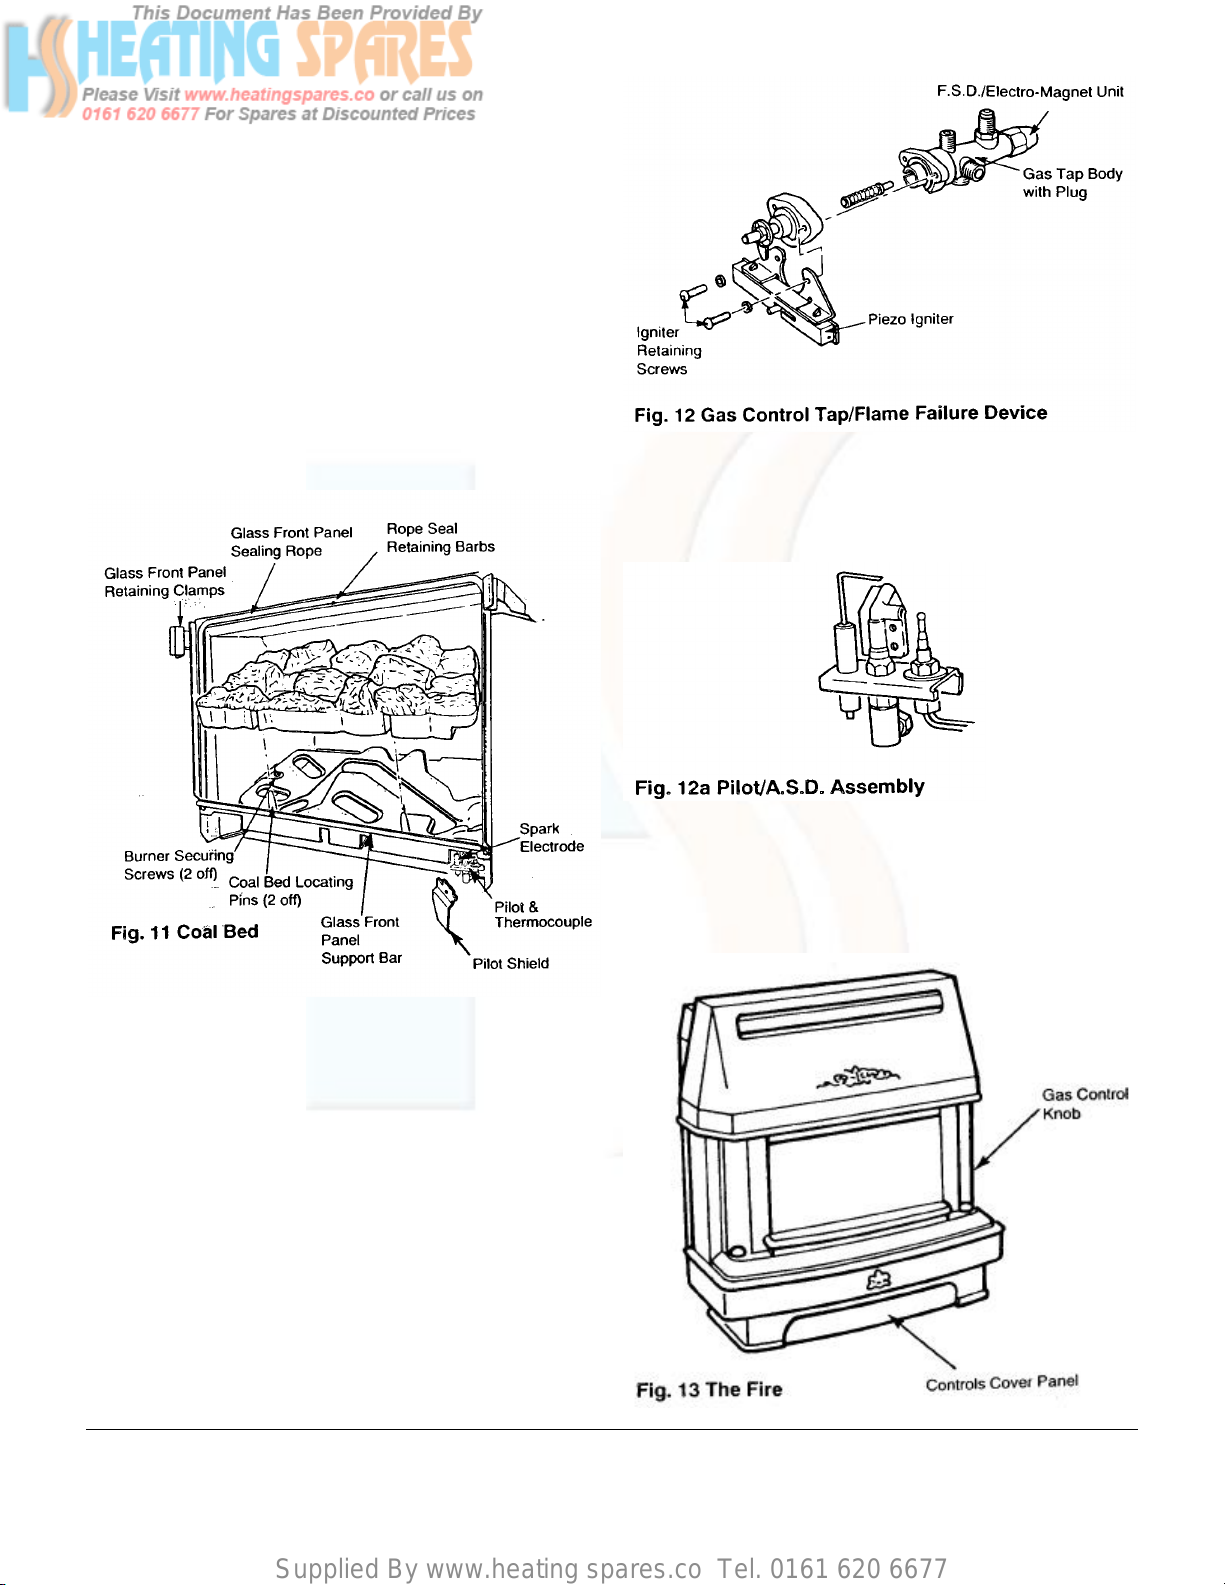
Supplied By www.heating spares.co Tel. 0161 620 6677
Installation Instructions – Page 3
These instructions must be read in conjunction with the
separate instructions for the boiler section
INSTALLATION
The appliance is suitable for installation only in G.B. & I.E.
and should be installed in accordance with the rules in force.
For Ireland install in accordance with l.S. 813 “Installation of
Gas Appliances”.
The Installation must be carried out by a CORGI Registered
installer or other competent person and be in accordance with
the relevant requirements of the GAS SAFETY (Installation and
Use) REGULATIONS, the BUILDING REGULATIONS
(Scotland) (Consolidation), the LOCAL BUILDING
REGULATIONS, the CURRENT I.E.E. WIRING REGULATIONS
and bye laws of the LOCAL WATER UNDERTAKING. It should
also be in accordance with the relevant BRITISH STANDARD
CODES OF PRACTICE.
SITE REQUIREMENTS
The principal site requirements are determined by the boiler but
the following details are essential for the correct installation of
the fire:
Fireplace opening: (Fig.1)
Important Information
This product contains Refractory Ceramic Fibres (R.C.F.) which
are man-made vitreous silicate fibres. Excessive exposure to
these materials may cause temporary irritation to eyes, skin and
respiratory tract. Care must be taken when handling these
articles to ensure the release of dust or fibres is kept to a
minimum.
To ensure that the release of fibres from these articles is kept to
a minimum, during installation and servicing it is recommended
that a H.E.P.A. filtered vacuum is used to remove any dust, soot
or other debris accumulated in and around the appliance. This
should be performed before and after working on the
installation.
It is recommended that any replaced item(s) are not broken up
but sealed within heavy duty polythene bags and clearly labelled
“R.C.F. waste”. This is not classified as “hazardous waste” and
may be disposed of at a tipping site licensed for the disposal of
industrial waste.
Protective clothing is not required when handling these articles
but it is recommended that gloves are worn and the normal
hygiene rules of not smoking, eating or drinking in the work area
are followed and always wash hands before eating or drinking.
Width 406mm (l6in) MIN 584mm (23in) MAX Warning: The addition of anything that may interfere with
Height 560mm (22in) the normal operation of the appliance (e.g. FLUE
Wherever possible always make the fireplace opening to the
maximum dimensions.
Hearth: If the fire is to be hearth mounted, the hearth must be at
least 13mm (½ in) thick non-combustible material. It must be at
least 326mm (12 13/16 in) deep x 897mm (35 5/16 in) wide,
centrally placed about the fireplace opening and at the same
level as the base of the builders opening. The top surface of the
hearth should be a minimum of 50mm (2 in) above floor level
and must be level with the base of the opening. On no account
should the fire unit be fitted directly onto a combustible
floor or carpet.
Surround or Wall Finish: (Figs.1 and 2) The wall behind the
fire must be non-combustible. The surround or wall finish must
have a flat vertical area centrally placed about the opening
measuring a minimum of 765mm (30 1/8 in) high by 765mm (30
1/8 in) wide. If a surround is fitted any gaps between it and the
wall must be sealed and it must have a rating of l00ºC or higher.
Wall Fixing: (Fig.2) The bottom of the fire must be 100mm (4in)
to 125mm (5in) above the floor level.
It is strongly recommended that the fireplace opening is made to
the maximum dimensions.
A shelf may be fitted above the fire provided that it is not less
than 76mm (3in) above the top of the fire and does not exceed
230mm (9in) in depth. The area between the shelf and the top
of the fire must be non-combustible.
Ventilation: Ventilation air supply to BS 5440 Part 2 is
required. The permanent ventilation area size requirements
are:-
SL3 & 45/4 69.075 cm2(10.7 in2)
SL3 & 57/4 89.685 cm2(13.9 in2)
The permanent vent may be directly into the room containing
the appliance. The vent may also be sited in another room
provided an interconnecting vent is used. The vent must not be
installed inside the builders opening. The vent should be sited
following good practice for a habitable room. We recommend
the use of the Stadium BM720 “Black Hole” ventilator which is
available from your local merchant.
DAMPERS, ECONOMISERS etc.). without the express written
permission of Baxi Limited could invalidate the appliance
warranty and infringe the GAS SAFETY (Installation and Use)
REGULATIONS.
ELECTRICAL CONNECTIONS
The supply must be 230V ~ 50Hz 110W. The electrical supply
to the fire is via a length of 3 core cable with 3 pin socket
provided. The cable must be connected to the electrical plug
and socket on the boiler base (Fig.4). These connections should
be made when the boiler electrical connection is made as
follows: (See also Boiler Installation Instructions).
Manual Controls Models
CONNECT THE BLUE WIRE TO THE TERMINAL MARKED ‘N’.
CONNECT THE BROWN WIRE TO THE TERMINAL MARKED ‘L2’.
CONNECT THE GREEN/YELLOW WIRE TO THE TERMINAL MARKED
Electronic Controls Models
CONNECT THE BLUE WIRE TO THE TERMINAL MARKED ‘N’.
CONNECT THE BROWN WIRE TO THE TERMINAL MARKED ‘L’.
CONNECT THE GREEN/YELLOW WIRE TO THE TERMINAL MARKED
A permanent live must be fitted to the remaining terminal in the
socket marked L2’ or ‘L’. (See Boiler Instructions).
NOTE: Both the fire and the boiler must be supplied by the
same isolating switch. 4 core input cable for connection to
the boiler unit must not be less than 0.75mm2(24 x 0.2mm)
PVC to IEC 53 code 227 (heat resistant).