Bayou Classic LPG Hose Assembly User manual
Failure to follow these instructions could result
in fire or explosion which could cause property damage,
personal injury or death.
©2015 Barbour International, Inc.
For Questions and Information call us at: 1-800-864-6194
Monday - Friday 7:30am - 4:30pm CST
For use with outdoor LP gas appliances ONLY!
Not recommended for use in any other application.
Read and Follow all warnings on LPG cylinders and in your
outdoor appliance owner’s manual.
Only Model M5LPH is intended for use with Gas Grills

1
FOR YOUR SAFETY:
•CONFIRM that the LPG Hose Assembly, you are replacing, conforms to the specifications
for the outdoor appliance you are connecting it to.
•This LPG Regulator Hose Assembly is designed to work with an LP gas supply cylinder.
DO NOT attempt to connect this hose assembly to any other fuel supply source such
as a natural gas line.
•DO NOT attempt to adjust or repair the regulator. A replacement regulator hose assembly
can be purchased by contacting Barbour International, Inc. at 1-800-864-6194.
• Read and follow all warnings and instructions provided with your outdoor appliance.
If you no longer have your outdoor appliance manual, you should contact the manufacturer
for a replacement. For Bayou Classic®products, contact using the information provided
on front page of this manual.
•Do not use high pressure regulator hose assemblies on gas grills. Only Bayou Classic®
low pressure Model M5LPH is designed for use on Gas Grills.
• Improper installation, adjustment, alteration, service or maintenance can cause injury
or property damage.
•Read the installation, operation, and maintenance instructions thoroughly before installing
or using this equipment.
WARNING FOR YOUR SAFETY:
NOTICE:
Restrict the use of this equipment to adults who read, understand, and can follow the
warnings and instructions in this manual, on the gas appliance, and LP Cylinder.
"Safety Alerts" alone cannot eliminate the hazards that they signal. Strict compliance
with these instructions, plus common sense operation, are major accident prevention
measures.
Remember, Think Safety and Use Common Sense!
The symbols and boxes shown below explain what each heading means. Read and follow
the safety warnings and instructions contained in this manual and on the appliance.
Carefully read and follow all WARNINGS, SAFETY PRECAUTIONS, ASSEMBLY and
OPERATING INSTRUCTIONS contained in this manual and in the appliance manual.
DO NOT skip any of the warnings and instructions! SAVE THIS MANUAL FOR
FUTURE REFERENCE.
Indicates an imminently hazardous situation which,
if not avoided, will result in death or serious injury.
Hazard or unsafe practices which could result in
minor personal injury, product, or property damages.
Hazard or unsafe practices which could result in
severe property damages, personal injury, or death.
SAFETY SYMBOLS
THE PURPOSE OF THIS SAFETY ALERT SYMBOL IS TO ATTRACT YOUR ATTENTION TO POSSIBLE
HAZARDS AS YOU ASSEMBLE AND USE THIS PRODUCT.
THE PURPOSE OF THIS SAFETY ALERT SYMBOL INDICATES FAILURE TO FOLLOW WARNINGS
COULD RESULT IN FIRE OR EXPLOSION. PAY CLOSE ATTENTION TO THE INFORMATION WHICH
FOLLOWS!

2
1. LP (propane) gas is colorless, tasteless, heavier than air, and is flammable and
explosive. Combustion of propane consumes oxygen and produces carbon
monoxide (a poisonous gas). Therefore, never operate an outdoor gas appliance
inside a building or confined area where ventilation may be restricted. Make
sure the LP Cylinder and outdoor gas appliance is placed in an open area.
Do not obstruct flow of combustion and ventiliation air.
2. Follow lighting procedures as stated with your gas appliance.
3. This LP regulator hose assembly is for OUTDOOR use only.
4. Keep the fuel supply hose away from any heated surfaces.
5. Clean and inspect LP hose assembly before each use of the appliance.
If there is evidence of abrasion, wear, cuts or leaks, the hose must be replaced
prior to the appliance being put into operation.
Contact Barbour International Inc. to purchase replacement.
6. The valve on the propane cylinder is the "ON/OFF" valve. When finished cooking,
or in case of an emergency, turn the tank valve clockwise to the "OFF" position.
Be sure to close the tank valve after use and before disconnecting the hose.
7. Use Bayou Classic®regulator hose assemblies only in accordance with state and
local ordinances and codes. In the absence of local codes, installation must
conform with the National Fuel Gas Code, ANSI Z223.1/NFPA 54, Storage
and Handling of Liquefied Petroleum Gases, ANSI/NFPA 58 or CSA B149.1,
Natural Gas and Propane Installation Code; or CGA-B149.2 Installation Code.
8. Hose is a trip hazard. Do not walk between outdoor appliance and LP cylinder.
WARNING
IF YOU SMELL GAS:
1. Shut off gas to the appliance at the LP cylinder.
2. Extinguish any open flame.
3. If odor continues, keep away from the appliance and immediately call your
fire department.
DANGER
If a fire should occur, keep away from the appliance and immediately call your
fire department. Do not attempt to extinguish an oil or grease fire with water.
DANGER
WARNING
A. DO NOT store a spare LP cylinder under or near
an outdoor gas appliance.
B. Never fill the cylinder beyond 80% full.
C. If the information in (A) and (B) are not followed exactly,
a fire causing death or serious injury may occur.
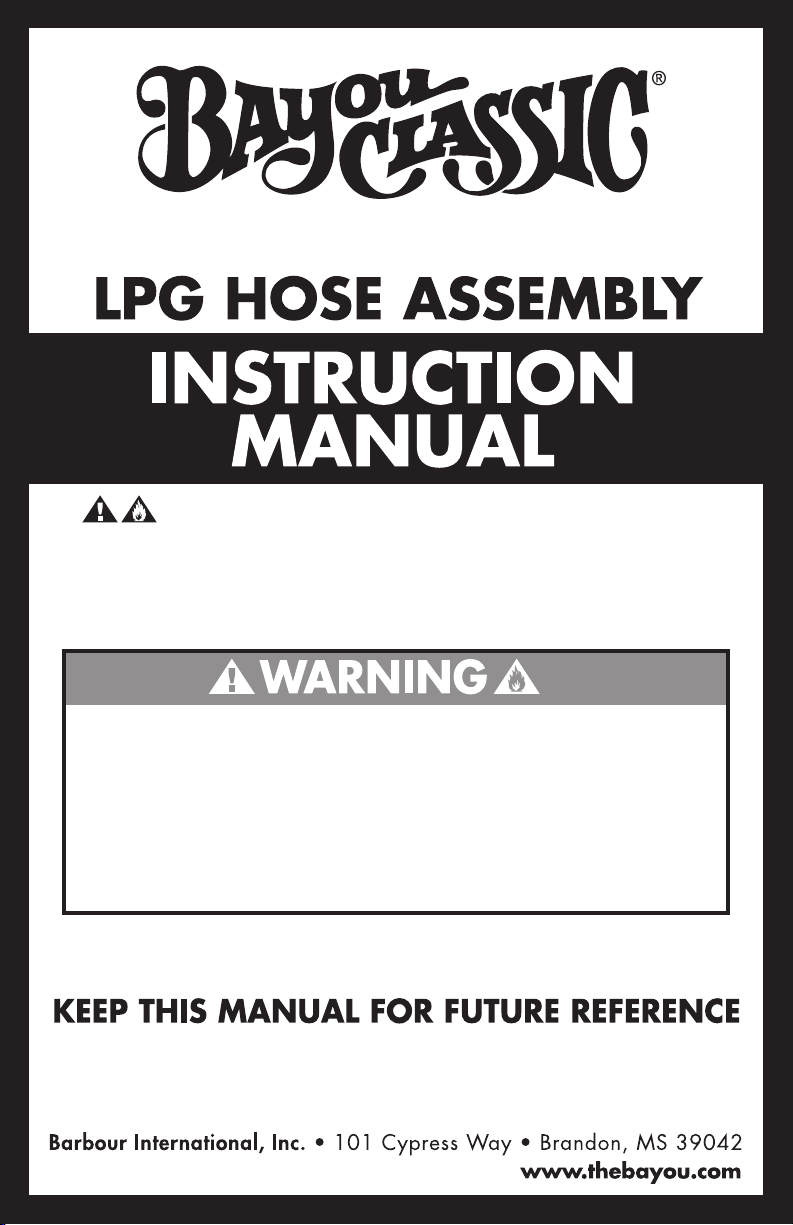
Handwheel Connects
Hose Assembly to Propane Tank
3
Connecting LPG Hose Assembly to 20-lb LP Gas Cylinder
The LPG Hose Assembly is a pre-assembled unit. Do not take apart or alter in any
way. Simply connect the regulator hose assembly to the LP gas cylinder and to the
outdoor appliance. An adjustable wrench is needed when connecting hose to the
outdoor appliance.
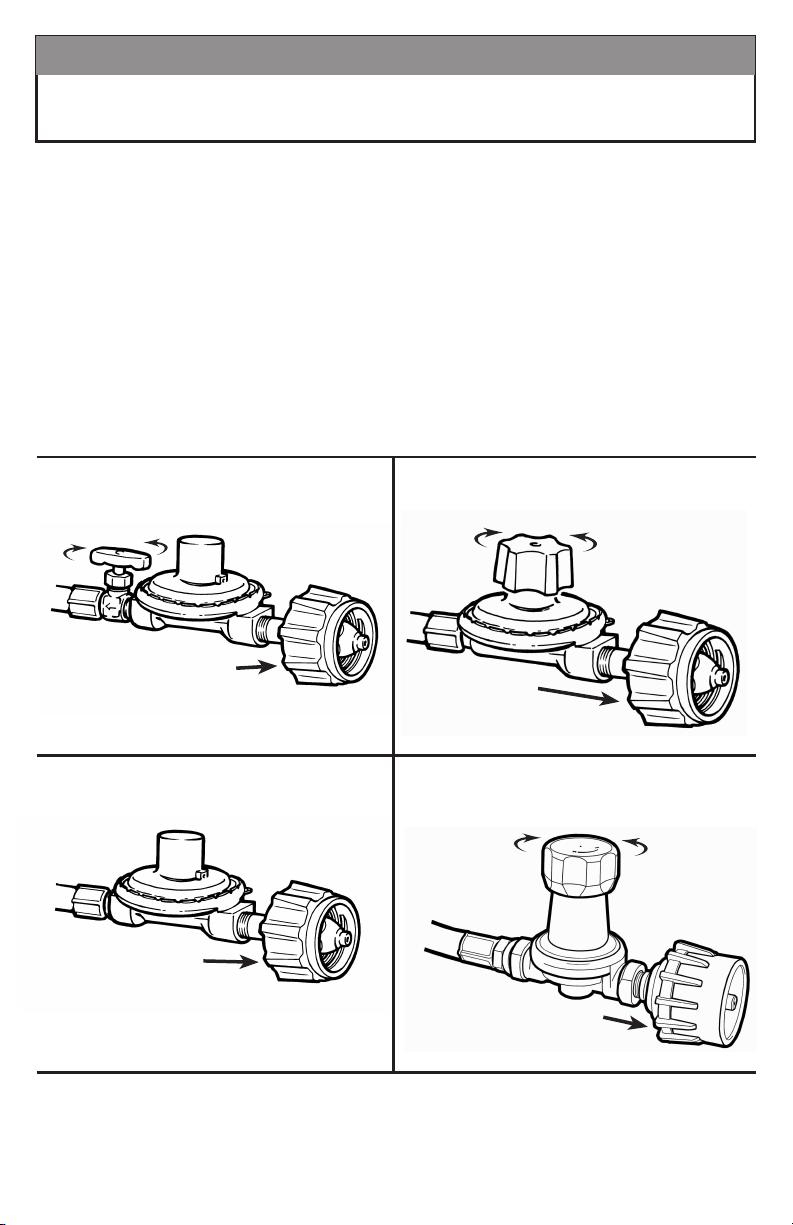
1. Locate your LP regulator hose assembly pictured below.
Follow the instructions. Make sure the valve receptacle on the LP cylinder is clean.
Connect the hose to the cylinder valve by turning the handwheel. Hand tighten.
PRESET REGULATOR WITH VALVE
Use the Valve on the Propane Tank to turn Gas Supply
"ON" or "OFF".
Models: M5HPR-1, 7000
Connect to Tank
CLOCKWISE
Disconnect from Tank
COUNTER-CLOCKWISE
PRESET REGULATOR
Connect to Tank
CLOCKWISE
Disconnect from Tank
COUNTER-CLOCKWISE
Handwheel Connects Hose
Assembly to Propane Tank
Model: M5LPH
For use with Gas Grills
Model: M3HPH
For use with triple burner cookers
ADJUSTABLE REGULATOR
Handwheel Connects
Hose Assembly to
Propane Tank
ADJUSTABLE REGULATOR
Connect to Tank
CLOCKWISE
Disconnect from Tank
COUNTER-CLOCKWISE
Model: M5HPR
Increase or Decrease gas flow by turning the valve as
indicated on the valve knob.
Increase or Decrease gas flow by turning the valve as
indicated on the valve knob.
Connect to Tank
CLOCKWISE
Disconnect from Tank
COUNTER-CLOCKWISE
Model: M5HPR-30, 7850
Increase or Decrease gas flow by turning the valve as
indicated on the valve knob.
Caution: If the regulator has a Control Valve, use it to control the "Volume" of Gas ONLY.
Use the Valve on the Propane Tank to turn Gas Supply "ON" or "OFF".
Handwheel Connects
Hose Assembly to Propane Tank
Model: M2HPH
For use with double burner cookers
This product contains chemicals, and when used, produces chemicals, known to the
State of California to cause cancer, and birth defects or other reproductive harm.
CALIFORNIA PROPOSITION 65 WARNING
Turn Coupling Nut
CLOCKWISE
to Attach Hand Tighten!
Upright
position
Control Valve
located on the
cooker, not
the hose.
Turn CLOCKWISE
Wrench Tighten
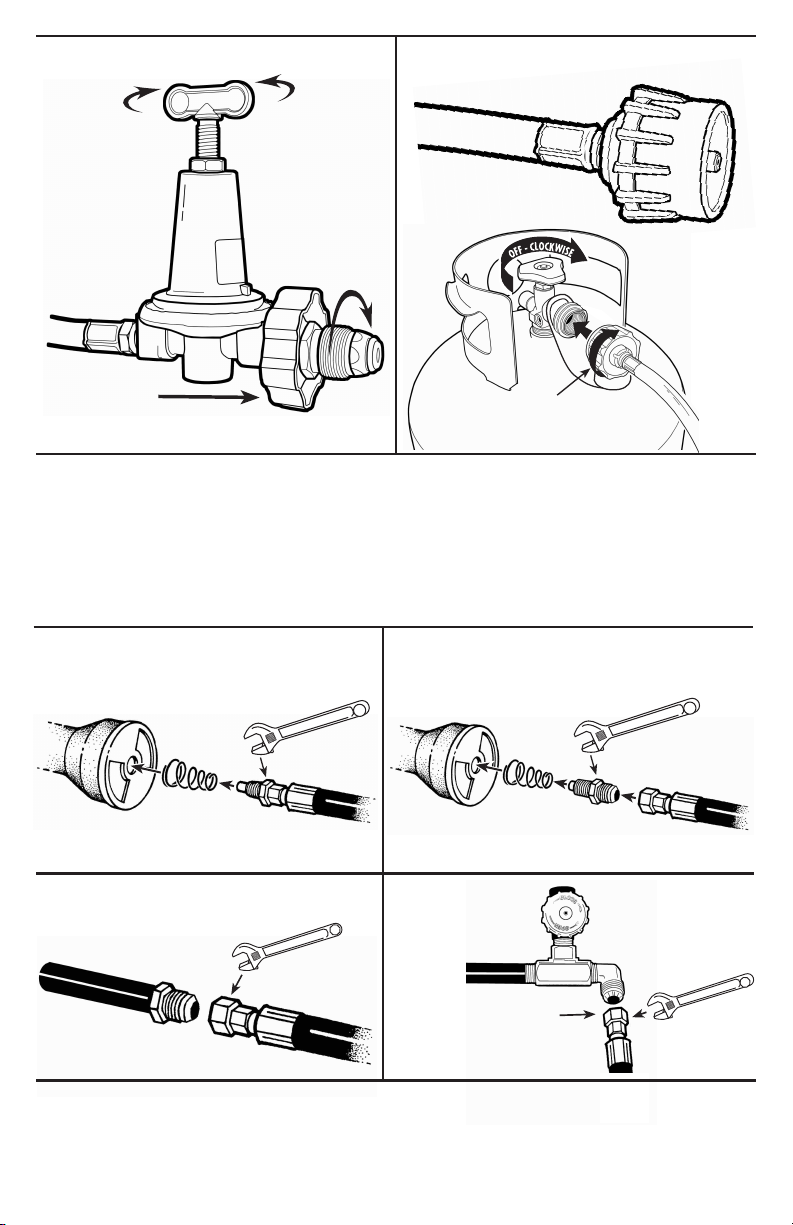
2. Connecting LPG Regulator Hose Assembly to Bayou Classic®Outdoor Appliances.
Review Owner’s Manual provided with your Bayou Classic®Outdoor Appliance.
If you do not have a Bayou Classic®Outdoor Appliance, refer to the manual
supplied with your appliance. Typical connecting methods are pictured below.
IMPORTANT:
Must be able to turn
Air Control Shutter...
do NOT over tighten!
Turn Air Control Shutter to
adjust flame quality
ALL SINGLE & DOUBLE BURNER COOKERS
EXCEPT JET COOKERS
Turn CLOCKWISE
Wrench Tighten
Turn CLOCKWISE
Wrench Tighten
Turn CLOCKWISE
Wrench Tighten
ALL BAYOU CLASSIC®JET COOKERS
AND BAYOU®FRYERS BAYOU CLASSIC®
TRIPLE BURNER
COOKER
ALL SINGLE BURNER COOKERS USING A
BRASS ORIFICE CONNECTOR
Turn Air Control Shutter to
adjust flame quality
IMPORTANT:
Must be able to turn
Air Control Shutter...
do NOT over tighten!
Handwheel Connects
Hose Assembly to
Propane Tank
Increase Gas Flow
CLOCKWISE
ADJUSTABLE REGULATOR
Connect to Tank
COUNTER-CLOCKWISE
Disconnect from Tank
CLOCKWISE
Model: 5HPR-40
Decrease Gas Flow
COUNTER-CLOCKWISE
EXTENSION LPG HOSES
Disconnect from Tank
COUNTER-CLOCKWISE
Connect to Tank
CLOCKWISE
Models: MCR1
Turn clockwise
Hand Tighten LPG Hose
Assembly
5
Check for Gas Leaks
LEAK TESTING:
To prevent fire or explosion hazard:
•DO NOT smoke or permit ignition sources in area while conducting leak test.
• Perform test OUTDOORS only in a well ventilated area.
• Never perform a leak test with a match or open flame.
• Never perform a leak test while the outdoor gas appliance is in use or
while hot after use.
DANGER
WHEN TO PERFORM A LEAK TEST:
• After assembling your outdoor appliance and before lighting for the
first time, even if purchased fully assembled.
• After replacing any regulator hose assembly.
• Every time a 20-lb LP gas cylinder is refilled, or if any of the appliance
components are replaced.
• Any time your outdoor gas appliance has been moved.
• At least once per year, or if your outdoor gas appliance has not been used
for more than 60 days.
WARNING
After assembly is complete, always check for gas leaks before operating.
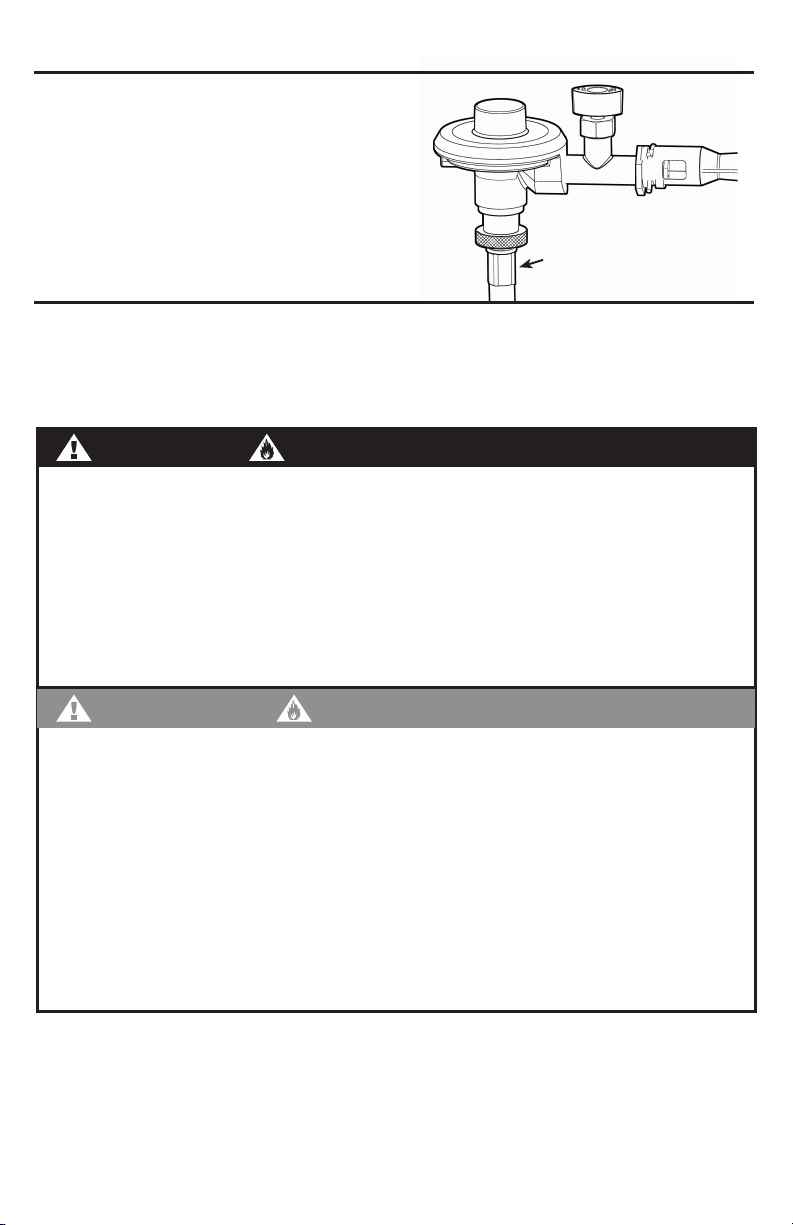
3. Connecting Model #MCR1 LPG Hose Assembly to Regulator.
Position brass connector on hose at opening under
the regulator, and attach by turning brass connector
clockwise fully until snug - Hand Tighten.
DO NOT use tools to tighten.
For BAYOU CLASSIC®
GRIDDLE COOKER
Model: MCR1
Model: 2297

6
Problems with lighting an Outdoor Gas Appliance:
Most LP Hose Regulator assemblies are equipped with a safety device to greatly
reduce gas flow should the hose be cut or severed. Sometimes this safety device
may be activated when lighting the appliance. To prevent this, ALWAYS make sure
all valves are in the closed position (LP cylinder valve, regulator, gas control valves).
Turn LP cylinder valve one full turn to allow gas to flow to regulator.
Then S-L-O-W-L-Y open the regulator or gas control valve to allow gas to flow to
burner while performing the lighting procedure specified in your outdoor appliance
owner’s manual. Does not apply to 5HPR-40
1. Prepare a soapy water mixture using 50% water
and 50% liquid dishwashing soap.
2. Close the LP Cylinder valve, regulator control valve
and all appliance control valves.
Gas Leak Testing
ATTENTION: Always turn LP Cylinder Valve and Regulator
Control Knob/Valve to OFF position after every use!
Spray ALL tank, valve and
hose connections with a soapy liquid
to check for gas leaks. Appearance
of bubbles indicates a leak.
Refer to Owner’s Manual supplied with your outdoor appliance for lighting instructions.
Lighting Instructions
3.
Rotate LP Cylinder Valve counter-clockwise one turn.
Gas will flow through and stop at closed appliance
control valve(s).
4. Using a small brush or spray bottle, apply soapy water mixture to all connections
on cylinder valve, regulator and appliance control valve(s). Repeat procedure
for full length of hose. Any expanding bubbles that appear indicate a gas leak
at that connection. If so, turn off the gas and tighten leaking connections.
Repeat soapy water test until no leaks are detected.
Do Not use outdoor gas appliance if gas leak cannot be stopped.
Contact a qualified appliance repair service.
5. After you are certain there are no leaks, turn LP cylinder valve to "OFF" position.
Wait 5 minutes for any gas fumes to evacuate before operating the outdoor
appliance.

Safety Precautions & Warnings
Remember: Think Safety and Use Common Sense!
For use with Bayou Classic® LP Outdoor Appliances
WARNING FIRE HAZARD READ MANUAL
BEFORE USE NEVER LEAVE
UNATTENDED
KEEP AWAY FROM
FLAMMABLE
OBJECTS
10-FT
NEVER USE ON
FLAMMABLE
SURFACES
KEEP FLAMMABLE
MATERIALS AWAY
25-FT
NEVER LEAN
OVER BURNER
KEEP FIRE
EXTINGUISHER
NEARBY
USE THERMOMETER
WHEN FRYING
NO LID ON POT
WHEN FRYING TRIP HAZARD
WATCH YOUR STEP
HOT DURING AND
AFTER USE!
INSURE PROPER
POSITIONING
20-IN
WIND
DIRECTION
NO BARE FEET ALWAYS PERFORM
GAS LEAK TEST
OUTDOOR USE
ONLY
NEVER USE UNDER
FLAMMABLE
OVERHANG
KEEP CHILDREN
AND PETS AWAY
FROM COOKER
BCA000011-000
Failure to follow these instructions could result in fire
or explosion which could cause property damage,
personal injury or death!
Table of contents
Popular Grill Accessories manuals by other brands


Weber
Weber Grill Accessory Directions for use

Grilla Grills
Grilla Grills CHIMP REV-1 quick start guide

Kenmore
Kenmore ELITE 141.158033 Operator's manual

Adrenaline Barbecue Company
Adrenaline Barbecue Company Slow N Sear Charcoal Basket user guide

Alice's Garden
Alice's Garden BBQ9203COVER manual

Dacor
Dacor OBC36 Planning guide


