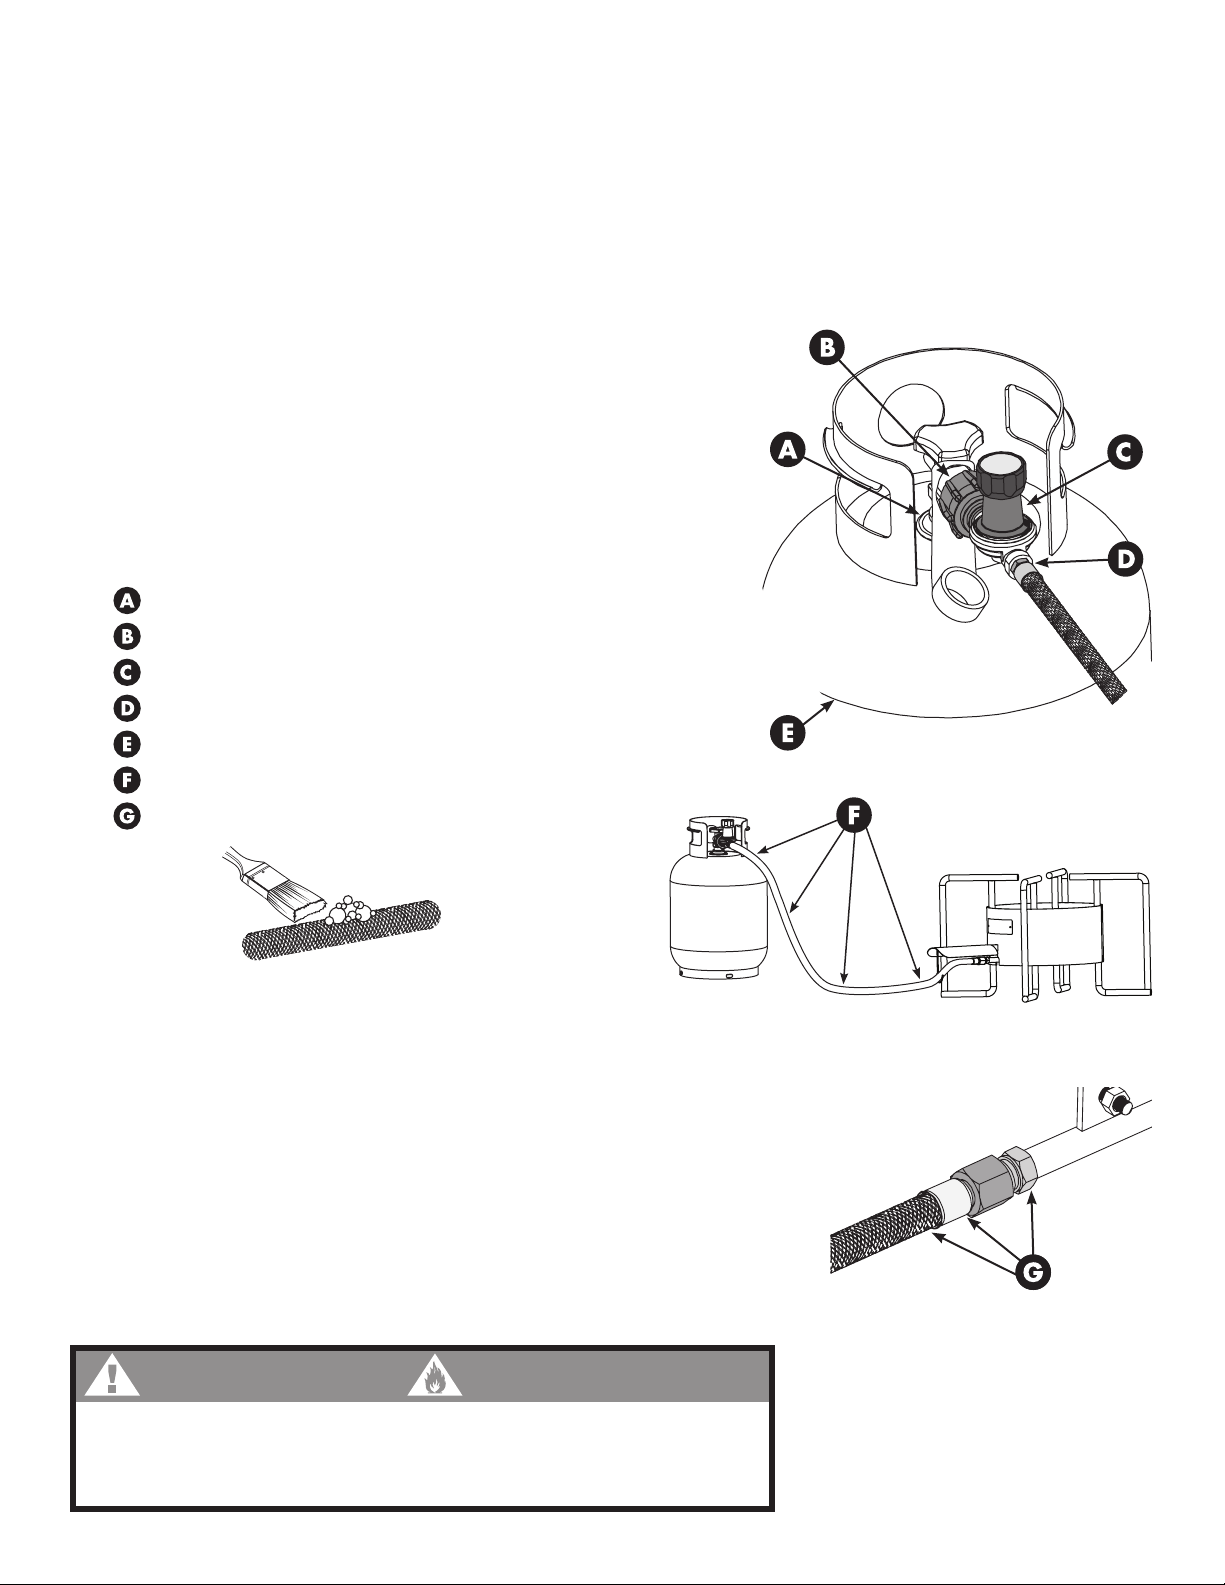
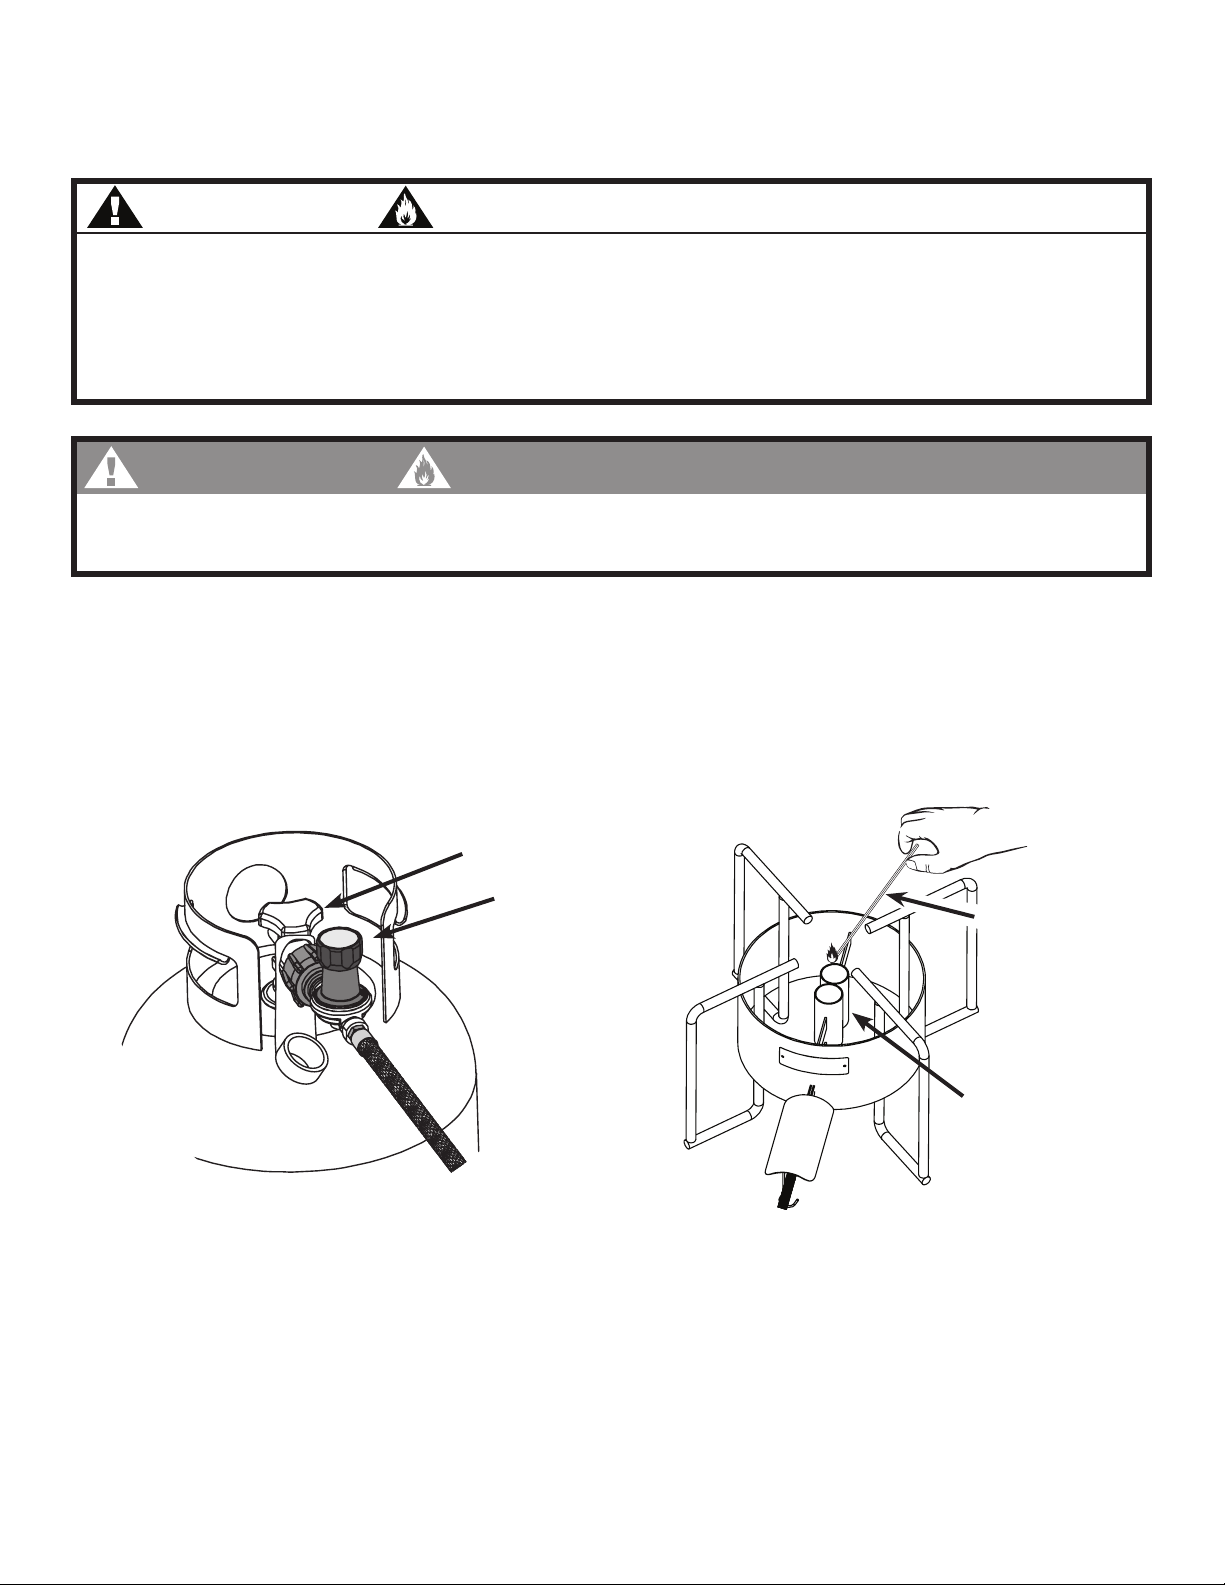
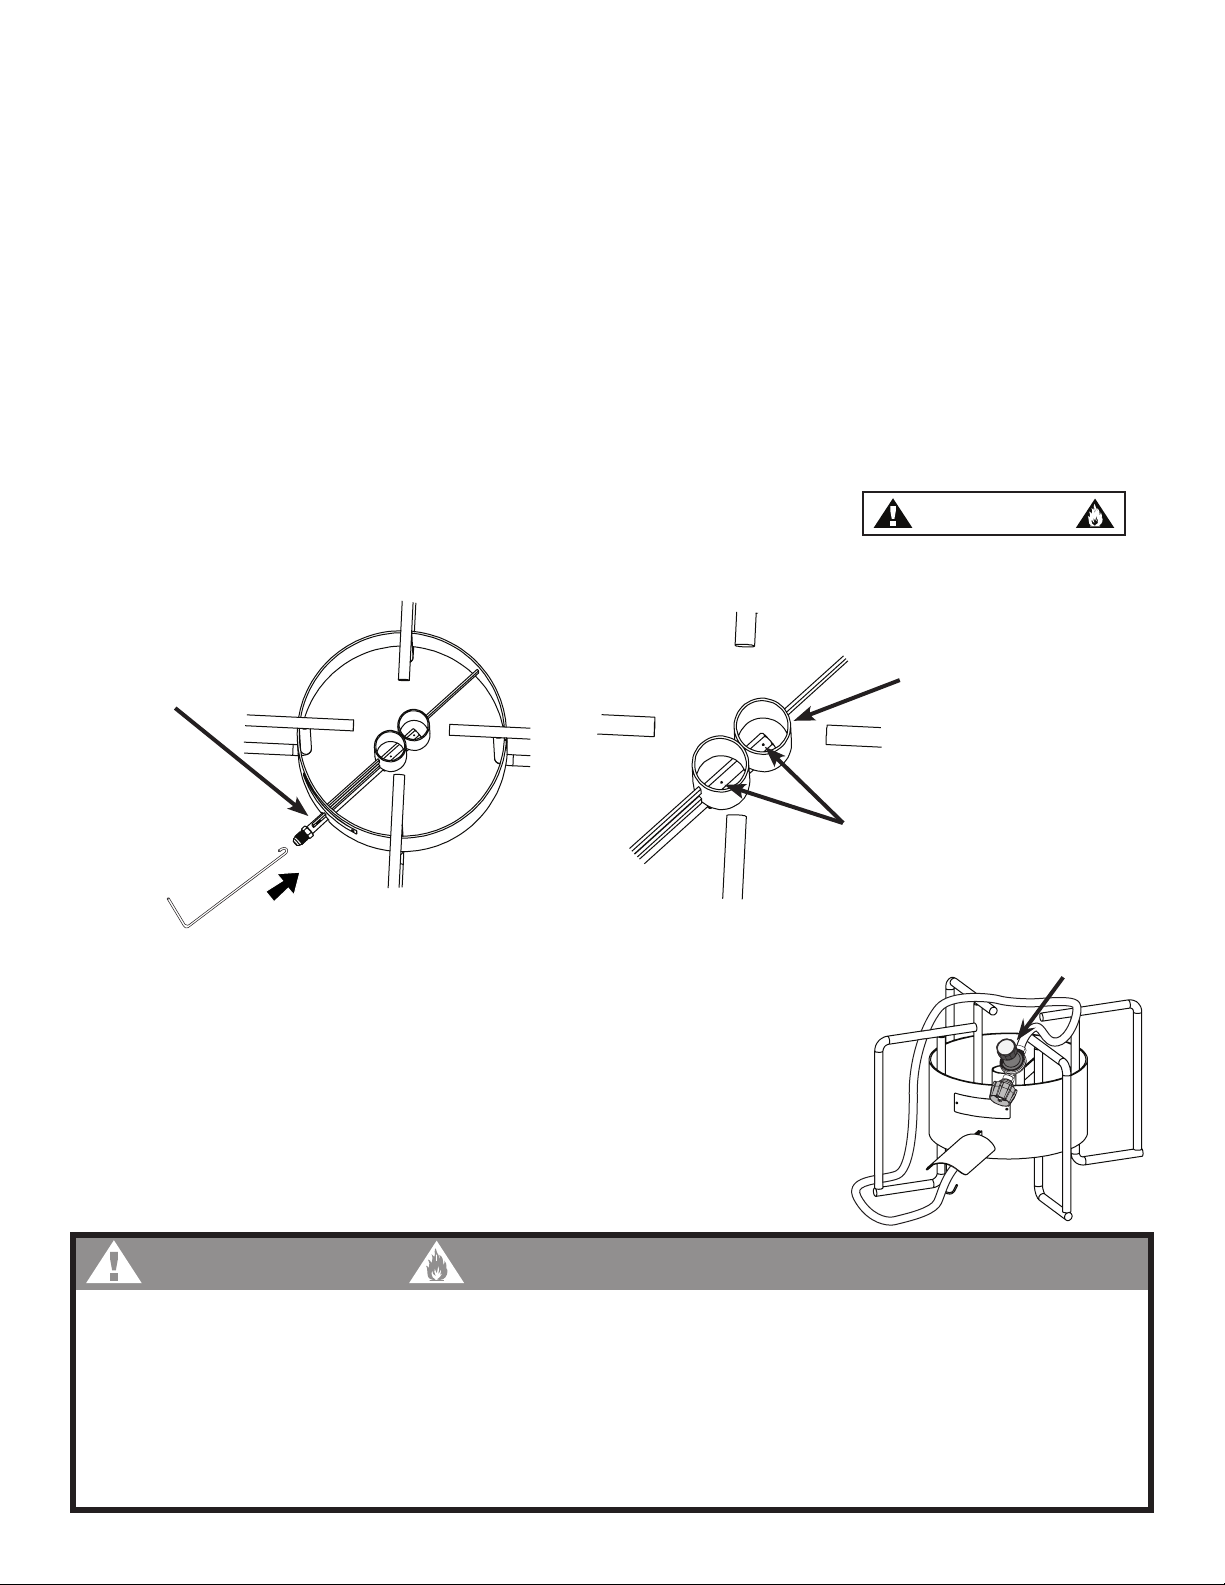
Bayou Classic SP2 User manual

DOUBLE JET COOKER
OWNER’S MANUAL
SAFETY ALERTS, ASSEMBLY & OPERATING INSTRUCTIONS
GENERAL MAINTENANCE & STORAGE
KEEP THIS MANUAL FOR FUTURE REFERENCE
NOT FOR COMMERCIAL USE
Barbour International, Inc. • 101 Cypress Way, Brandon, MS 39042
800-736-8028 (English Only) • Monday - Friday 7:30am - 4:30pm CST
www.bayouclassic.com
SP2
SS2
18-IN DUAL JET
COOKER
SV22
18-IN DUAL JET
VORTEX COOKER
SP40
SS40
22-IN DUAL JET
BAYOU COOKER
This Instruction Manual contains important information necessary for the proper safe use and
maintenance of the appliance. You must carefully read and follow all warnings and instructions before
assembling and using the appliance. This manual is for Barbour International Bayou Classic®products
only. If you are using another manufacturer’s product, refer to the manual supplied with that product.
Only use approved Bayou Classic®replacement parts and accessories with this appliance.
For questions, or to order, please contact:

DANGER
SAFETY SYMBOLS
Not following these instructions will most
certainly result in fire or explosion which
will cause property damage, personal
injury, or death.
Hazard or unsafe practices could result in
severe property damages, personal injury,
or death.
Hazard or unsafe practices possibly
resulting in minor property damages,
personal injury, or death.
1
IF YOU SMELL GAS:
• Shut off gas to the appliance.
• Extinguish any open flame.
• Open Lid.
• If odor continues, keep away from the
appliance and immediately call your fire
department.
DANGER
Failure to follow these instructions could
result in fire or explosion which could
cause property damage, personal injury
or death.
• Never operate this appliance unattended.
• Never operate this appliance within 3 m/10 ft of any structure, combustible material
or other gas cylinder.
• Never operate this appliance within 7.5 m/25 ft of any flammable liquid.
• Never overfill the cooking vessel with water. Follow instructions in this manual for
establishing proper water levels.
• Heated liquids remain at scalding temperatures long after the cooking process.
Never touch cooking appliance until liquids have cooled to 45°C/115°F or less.
• If a fire should occur, keep away from the appliance and immediately call your fire
department.
• This appliance is not intended for and should never be used as a heater.
• Do not place an empty cooking vessel on the appliance while in operation.
• Never use glassware, plastic, or ceramic cookware with this appliance.
• Keep fuel supply away from any heated surface(s).
• Never use a cooking vessel smaller than 35.6 cm/14 in. , and less than 56.8
L/60 Qt in volume.
• Never use a cooking vessel larger than 61 cm/24 in. diameter, and more than
153.3 L/162 Qt in volume.
DANGER
Failure to follow these instructions could result in fire or explosion
which could cause property damage, personal injury, or death!
CAUTION
WARNING

2
If you have any doubts or concerns about your ability to use this product contact
Barbour International, Inc. Should you still have concerns about operating this
product, then do not use. Contact your dealer for return or refund. Strict compliance
to these instructions, plus common sense operation, are primary accident prevention
measures. Restrict the use of this appliance to adults who can read, understand and
follow the warnings and instructions found in this manual.
REMEMBER: THINK SAFETY AND USE COMMON SENSE!
WARNING
• Sober adult operation ONLY! The use of alcohol, prescription or non-prescription drugs
may impair ability to properly assemble or safely operate appliance.
• This appliance is only intended for heating water (not oil or grease).
• Do not use appliance for anything other than its intended purpose.
• This appliance is not designed for frying of any kind. It is not intended for frying turkeys.
• This appliance is for OUTDOOR USE ONLY, and shall not be used in a building, garage or
any other enclosed area.
• Do not use appliance on or under any apartment or condominium balcony or deck. For
more details, see instructions for placement of cooker in this manual.
• This appliance is not intended for use in or on a boat or recreational vehicle.
• Do not attempt to light this appliance without first following the instructions in this manual
for proper assembly, placement, and testing.
• Do not stand with head, body or arms over the appliance when lighting. Loose hair and
clothing can catch fire.
• The hose and regulator assembly supplied with this appliance must be used.
• Always use a properly functioning thermometer to know the temperature of the cooking
liquid.
• In sunlight or other bright light, the flame may not be visible. Always use caution around
an open flame.
• Do not move the appliance while in use.
• Avoid bumping of or impact with the appliance to prevent spillage or splashing of hot
cooking liquid.
• Keep children and pets away from the cooking area at all times.
• Use caution when placing anything in a cooking vessel while the appliance is in operation.
Never drop food or accessories into hot cooking liquid. Lower food and accessories
S-L-O-W-L-Y into the cooking liquid in order to prevent splashing or overflow.
• Always take care when removing food to avoid burns from steam or hot cooking liquids.
• Always have a Type BC or ABC fire extinguisher readily accessible during operation. A
type BC or ABC fire extinguisher may, in some circumstances contain a fire.
• In the event of a fire, immediately call the fire department.
• The appliance will be HOT after being operated. DO NOT TOUCH the frame or cooking
vessel when re-lighting or moving the burner before it has cooled down.

This gas appliance has greater heat output than traditional kitchen stoves. It can be referred to as a cooker or
appliance in this manual. The appliance is designed to work with a large cooking vessel (pot). The appliance is only
designed to work with the hose and regulator supplied with this product. This appliance is only intended for boiling or
steaming food. All other applications could void the warranty or create an unsafe situation.
ABOUT THIS PRODUCT
GENERAL OPERATING
• Always inspect the appliance and its components before every use as described in this manual:
A. Ensure appliance is properly assembled and connected to the LP cylinder
B. Inspect hose and tank for evidence of abrasion, wear, cuts or leaks
C. Confirm that nothing is obstructing the burner
D. Perform Gas Leak Test before lighting
NOTE: If any part or component of this appliance appears damaged or inaccurate, DO NOT USE.
Call Barbour International, Inc. for a replacement part.
• Set up the cooking area in a safe location as outlined in this manual
• Follow Lighting/Re-Lighting Instructions in this manual
• Use these instructions for filling the cooking vessel:
A. Confirm that the vessel is centered on the cooker frame.
B. Place the basket into the pot.
C. Fill vessel with water until the basket is approximately halfway submerged.
D. After the water is properly heated, add the food product carefully to the pot.
NOTE: There must always be a minimum of 8 cm/3 in. between the water level and top of the vessel.
E. Add more water as needed. This will affect the return to boil time.
• This appliance will be hot during and after use; always wear protective clothing when operating. Use insulated
mitts or gloves for protection from hot surfaces or splatter from cooking liquids. Wear close-toed shoes.
• Carefully monitor all activity around cooker to avoid burns or other injuries.
• Control the cooker flame by turning the adjustable regulator knob. If applicable, adjust the air shutter as
instructed for an ideal blue flame.
• Use caution when near cooker as splattered liquid may have created a slick surface.
• When adding or removing food from the vessel, care should be taken to avoid burns from hot cooking liquids.
• When cooking is completed, turn off gas and follow the Care & Maintenance Instructions.
• After cooking, continue to monitor the area. Never touch, move, or store the appliance or cooking liquids before
they have cooled to 115°F/45°C or less. NOTE: Cool down periods will vary with environment.
3

ASSEMBLY INSTRUCTIONS
4
Carefully assemble this appliance according to these instructions. Inspect contents in the box to ensure all parts are
included and undamaged. Please contact Barbour International, Inc. if any parts appear damaged, missing, or
inaccurate. Proof of purchase will be required.
To Assemble:
1. Remove components from the box and packaging.
2. Confirm Jet Orifice is centered inside the Jet Burner Tubes:
It is important that the orifice is properly connected on the
cooker frame. Look into the jet tube make certain that the
orifice in the brass cap is facing straight up. If necessary,
use wrench to gently turn the brass cap to direct the orifice
straight up into the Jet Burner Tube.
Adjustable
Wrench
Phillips Head
Screwdriver
Parts List:
• Welded Cooker Frame
• Brass Fitting, Air Shutter, & Spring (Banjo Burners only)
• Hose Guard with attachment hardware
• 30-PSI Hose and Regulator (pre-assembled)
Tools Required:
(Not Included)
WARNING
Do not over-tighten brass fittings. Too much force can
cause the brittle metal to crack and create a gas leak.
3. Attach Hose Guard: Align hole in hose guard tab with the
hole in the frame. Attach the hose guard with nut and bolt as
shown. Wrench tighten.
4. Attach Hose to Cooker: Attach female hose connector
to the brass fitting on the cooker as shown. Gently
wrench tighten. ATTENTION: Do not cross-thread.
Jet Burner
Tubes
Brass Fitting
with #54
Orifices
Hose with Female
Connector
Brass Fitting with
Male Connector

Safety Relief
Valve
LP Cylinder
Valve
Type-1
Outlet
Protective
Cap
• Read and follow all warnings and instructions on the LP cylinder.
• Specifications (These features and specifications MUST be present):
1. 9.1 Kg/20 lbs; 31.75 cm/ 12.5 in diameter x 45.72 cm/18 in tall
2. Type-1 gas cylinder valve outlet to accommodate the hose and regulator supplied with this
appliance. The Type-1 valve must prevent gas flow until a positive seal is obtained.
3. Over-Filling Protection Device (OPD)
4. Collar to protect the cylinder valve
5. Cylinder must be arranged for vapor withdrawal
6. Protective cap
• The LP cylinder must be constructed and marked in accordance with the specifications for LP gas cylinders, U.S.
Department of Transportation (DOT) or the Standard for Cylinders, Spheres and Tubes for the Transportation of
Dangerous Goods, CAN/CSA-B339.
• If you exchange the LP cylinder, make sure the new tank complies with all the specifications listed here.
LIQUID PROPANE (LP) CYLINDER
CARBON MONOXIDE HAZARD
This appliance is designed to only operate using Liquid Propane (LP) gas in a self-contained gas supply system (tank).
Please follow these instructions for proper specifications and operation.
A. Never store a spare LP gas cylinder under or near this appliance.
B. Never fill the cylinder beyond 80 percent full
If the information in (A) and (B) are not followed exactly, a fire causing death or serious
injury may occur.
DANGER
This appliance can produce Carbon Monoxide, an odorless and poisonous gas. Never operate
this appliance in a building or confined area where ventilation may be restricted. Using it in
an enclosed space can kill you.
DANGER
5
Place dust cap on cylinder valve outlet
whenever the cylinder is not in use.
Only install the type of dust cap on the
cylinder valve outlet that is provided
with the cylinder valve. Other types of
caps or plugs may result in leakage of
propane.
CAUTION

6
HOSE & REGULATOR
WARNING
• Do not attempt to move, alter, or disconnect the LP cylinder while the appliance is in use.
• Always secure the LP cylinder in an upright position.
• Always disconnect to move the appliance and/or LP cylinder.
• If the appliance is not in use, the gas must be turned off at the supply LP cylinder.
• LP cylinders must be stored outdoors out of the reach of children, and shall not be stored in
a building, garage or any other enclosed area.
• Allow only qualified LP gas dealers to properly fill or repair your LP cylinder.
• Always use the protective cap when not connected to the hose and regulator. Only use the
cap supplied with the LP cylinder; any other type may result in leakage of propane.
• The hose and regulator assembly supplied with this appliance must be used.
• Do not attempt to disassemble, alter, or repair any part of the hose and regulator
assembly. Approved replacement parts can be obtained from Barbour International, Inc.
The Hose Valve Regulator (HVR) supplied with this
appliance is an independently CSA certified product. It is
designed to connect the appliance to a 9.1 Kg/20 lbs LP
Cylinder. Read and follow all instructions and warnings
on the supply hose safety tags. If there is evidence of
abrasion, wear, cuts or leaks, the HVR must be replaced
prior to the appliance being put into operation. No matter
the physical appearance, replace the HVR assembly every
two years. Replace only with Model #M5HPR-30.
Adjustable
Regulator Knob
Type-1
Connector
30 PSI
Regulator
48 in/121 cm
High Pressure Hose
3/8” Female
Swivel
Connector
To CONNECT Hose Valve Regulator
to the LP Cylinder:
Upright
Position
To DISCONNECT Hose Valve Regulator
to the LP Cylinder:
Replace
Dust Cap
Hand
tighten only
Always confirm both LP Cylinder Valve and Brass Valve are turned to the
off (closed) positions before connecting or disconnecting the HVR.
CAUTION

Performing a Gas Leak Test:
1. Create a mixture of 50% water and 50% liquid dish washing soap.
2. Turn the LP Cylinder Valve to the off (closed) position. Then turn
the Adjustable Regulator Knob to the off (closed) position.
3. To turn on the fuel supply, turn the LP Cylinder Valve one turn in
the open direction. Gas will flow into the Regulator and stop at the
Adjustable Regulator Knob still turned to the off (closed) position.
4. Using a clean brush, apply the soap water mixture to the following:
7
GAS LEAK TEST
When to test for gas leaks:
• After assembling your cooker and before lighting for the first time, even if purchased fully assembled.
• Every time the LP gas cylinder is refilled, or if any of the gas components are replaced.
• Any time your cooker has been moved.
• At least once per year or if your cooker has not been used for more than 60 days.
NOTE: The gas leak test must be performed in an area that has adequate lighting in order to see if bubbles are
developing. DO NOT use a flashlight to check for bubbles.
5. First, inspect areas A - E for growing bubbles.
6. Next, turn on (open) the Adjustable Regulator Knob and permit
gas to pass through the hose. Inspect areas F and G.
NOTE: Do not allow gas to flow more than 5 - 10 seconds. During
this step, gas will be flowing out the burner into the surrounding air.
7. Turn the LP Cylinder Valve to the off (closed) position. Then turn
the Adjustable Regulator Knob to the off (closed) position.
8. Tighten any leaking connections.
9. Repeat soap water mixture test until no leaks are detected.
10. After you are certain there are no leaks, turn the LP Cylinder
Valve to the OFF position. Wait 5 minutes for any gas fumes
to evacuate before lighting the burner.
• If growing soap bubbles persist throughout any portion
of the Gas Leak Test, terminate use immediately.
• DO NOT use cooker if gas leaks cannot be stopped.
WARNING
LP Cylinder to LP Cylinder Valve
LP Cylinder Valve to Regulator Connection
All Regulator Housing and Connections
Regulator connection to Gas Supply Hose
LP Cylinder Welds
Full length of Gas Supply Hose
Gas Supply Hose connection to Cooker

Wind Direction
Make sure overhead is clear of combustible materials!
50.8 cm/20 in.
Minimum
• Choose a safe outdoor space, clear of combustible material to operate your appliance.
• Place the appliance on a level, stable noncombustible surface such as brick, concrete, or dirt.
• Make sure the LP Cylinder is fully upright and stable.
• Prior to lighting, check wind direction. Place cooker DOWNWIND from the LP cylinder.
• Place LP cylinder at least 50.8 cm/20 in away from the appliance.
• This appliance is portable and should not be installed into cabinetry or any other enclosed
casing. Any placement or installation of the appliance must conform with local codes or,
in the absence of local codes, with the National Fuel Gas Code, ANSI Z223.1/NFPA 54,
Storage and Handling of Liquefied Petroleum Gases, ANSI/NFPA 58; or Natural Gas and
Propane Installation Code, CSA B149.1; Propane Storage and Handling, CSA B149.2.
• Keep the cooking area clear and free of any combustible material such as spare LP tanks
(full or empty), household chemicals, paint, gasoline and other flammable vapors and
liquids.
• Never enclose the appliance to block the wind. Either relocate your cooker to a less windy
location, or choose not to operate your appliance until the wind has stopped.
DANGER
PLACEMENT OF COOKER
8
• Do not walk between the cooker and the propane tank; the connecting hose creates a
tripping hazard. Tripping over the hose may cause the supply cylinder to tip.
• Do not locate appliance under overhead unprotected combustible construction or tree
limbs.
• Do not attempt to move the appliance or cooking vessel when cooking.
• Do not position cooker on wood, asphalt, or plastic/rubber mat which may burn blister or
melt.
WARNING
3 m/10 ft.
Clearance

9
Adjustable
Regulator Knob
LP Cylinder Valve
LIGHTING INSTRUCTIONS
Follow these instructions for safe and proper lighting and re-lighting of the appliance.
Lighting the appliance:
1. Before lighting, completely turn off (close) the LP Cylinder Valve and the Brass Valve to prevent any gas flow.
NOTE: If the Brass Valve is left in any other position, the Gas Flow Limiting Device will activate.
2. Turn on (open) the fuel supply by S-L-O-W-L-Y rotating the LP Cylinder Valve one full turn.
3. Position a fireplace match or long lighter over the Jet Burner Tube, then slowly turn on (open) the regulator to
allow gas to flow. The burner should light in less than 5 seconds.
Long Fireplace
Match
Jet Burner
Tubes
• The Regulator supplied with this appliance is equipped with a Gas Flow Limiting Device
that will greatly restrict the flow of gas if activated by a rapid release of gas. Reference
Trouble-Shooting Tips if flame ever appears weak.
• If the appliance does not light after 2 or 3 attempts, turn OFF gas supply. Refer to Trouble
Shooting Tips and DO NOT attempt to operate the appliance until the problem is resolved.
CAUTION
Even if the flame is extinguished, the tank and regulator will still allow some gas to release
until they are fully CLOSED. You must allow gas to evacuate/dissipate before re-lighting.
WARNING
4. After lighting the burner, fully open the LP Cylinder Valve, and control the jet flame by adjusting the Brass Valve.
5. If ignition does not occur in 5 seconds, completely turn off (close) the LP Cylinder Valve and the Brass Valve,
wait 5 minutes, and repeat the lighting procedure.
Re-Lighting the appliance:
If the appliance is accidentally extinguished, completely turn off (close) the LP Cylinder Valve and the Brass Valve,
wait 5 minutes to allow gas to evacuate/dissipate, and repeat Steps 1 thru 4 of the Lighting Instructions.

1. Before each use of the appliance, light the cooker and let it run for 5 - 7 minutes. This initial fire will burn away the
manufacturing oil and residue. It is normal to have smoke or slight odor.
2. If you ever experience a spill over while cooking, make sure you clean off the cooker before storing. Wait until
the cooker is completely cool, and simply rinse off any spill-over. NOTE: The next time you use the cooker, it
may burn off residue from the previous spill-over, causing an odor and/or smoke.
3. Keep the appliance area clear and free from combustible materials, gasoline, and other flammable vapors and
liquids.
4. Do not obstruct the flow of combustion and ventilation air.
5. Keep the ventilation opening(s) of the cylinder enclosure free and clear from debris.
6. Always check for any obstructions such as insects or insect nests in and around the burner.
To remove obstructions:
A. Use a narrow bottle brush or stiff wire to run up and down the length
of the gas inlet tube.
B. Confirm nothing is blocking a jet orifice or burner tube.
C. If necessary, use a water hose or compressed air to flush out any debris.
Follow these simple steps to keep your appliance looking good and functioning properly for years.
MAINTENANCE & CARE
10
Wear eye protection when
flushing out the burner.
CAUTION
7. Always turn off (close) the gas supply and disconnect the hose and regulator
from the LP cylinder to move or store.
8. To avoid damage to the regulator and minimize trip hazards, place regulator
on the appliance frame any time the hose is not connected to the LP Cylinder.
9. Store appliance in a dry place. If storing indoors (including a shed or
garage), detach the LP cylinder and store the tank outside. For long term
storage, cover the burner and the HVR with a plastic bag.
10. Do not store this appliance, or any of its components, in a corrosive
environment. A corrosive environment can be a highly damp area, or a
saltwater/marine environment.
• Never spray anything on a hot cooker frame:
A. Spraying water will give off steam that can cause burns.
B. Spray paint and other petroleum distillates can burst into flame.
• Check and clean the burner with every use. A clogged tube can lead to a fire beneath the
appliance.
• NEVER disassemble the cast iron banjo burner. If it cannot be cleaned or appears
damaged in any way, immediately contact Barbour International, Inc. for a replacement.
WARNING
Jet Orifices
Burner Tubes
Place regulator
on appliance
frame
Gas Inlet Tube
Stiff Wire
with hook

TROUBLE-SHOOTING
WARRANTY
Still have questions? Contact Barbour International, Inc. customer service
at 1-800-736-8028, or visit www.bayouclassic.com
11
Burner will not light
Burner lights, but has
very small/poor quality
(sooty) flame
Flame dramatically
reduces, and LP cylinder
has frost on it.
Hissing or gurgling
sounds coming from
appliance
Flame has gone out
Symptom Cause Possible Solution
Obstruction in the burner
LP tank has low fuel
Too windy
Gas Flow Limiting Device has
activated
Extended cooking on HIGH
Damaged or leaking hose and
regulator assembly
Not enough gas flow from tank
Part of appliance is damaged
Inspect burner. Wash out and dry if necessary.
Use a tank fill gauge to always know gas level.
If gas is too low to operate, refill or exchange tank.
Use a tank fill gauge to always know gas level.
If gas is too low to operate, refill or exchange tank.
Check wind direction and wait for wind to die
down, or move appliance away from windy areas.
Completely turn off (close) the LP Cylinder Valve
and the Brass Valve to prevent any gas flow. Wait
30 seconds and repeat steps for lighting.
Swap to a full LP tank. If you continue cooking with
the same LP tank, stop cooking for a few minutes and
then start again operating at MEDIUM setting.
Turn appliance off, and wait for it to cool down.
Perform Gas Leak Test to confirm gas leak. Replace
any damaged or faulty parts.
Turn up (open) LP Cylinder Valve all the way.
Inspect LP tank, burner, and HVR assembly for
damage. Replace any damaged or faulty parts.
Moisture in the burner Turn appliance off, and wait for it to cool down.
Detach the hose and pour out water.
Poor oxygen/gas mixture Adjust Brass Valve to obtain optimum blue flame.
Barbour International, Inc. (“Vendor”) warrants to the original retail purchaser of this appliance and no other person, that if this appliance is
assembled and operated in accordance with the printed instructions accompanying it, then for a period of one (1) year from the date of purchase, all parts
in such appliance shall be free from defects in material and workmanship. Vendor may require reasonable proof of your date of purchase from an
authorized retailer or distributor. Therefore, you should retain your sales slip or invoice. This Limited Warranty shall be limited to the repair or replacement
of parts, which prove defective under normal use and service and which Vendor shall determine in its reasonable discretion upon examination to be
defective. Before returning any parts, you should contact Vendor’s Customer Service Department using the listed contact information. If Vendor confirms,
after examination, a defect covered by this Limited Warranty in any returned part, and if Vendor approves the claim, Vendor will replace such defective
part without charge. If you return defective parts, transportation charges must be prepaid by you. Vendor will return replacement parts to the original retail
purchaser, freight or postage prepaid.
This Limited Warranty does not cover any failures or operating difficulties due to accident, abuse, misuse, alteration, misapplication, improper installation
or improper maintenance or service by you or any third party, or failure to perform normal and routine maintenance on the appliance, as set out in
this owner’s manual. In addition, the Limited Warranty does not cover damage to the finish, such as scratches, surface chips and cracks, discoloration, rust
or other weather damage, after purchase.
This Limited Warranty is in lieu of all other express warranties. Vendor disclaims all warranties for products that are purchased from sellers other that authorized
retailers or distributors. AFTER THE PERIOD OF THE ONE (1)-YEAR EXPRESS WARRANTY, VENDOR DISCLAIMS ANY AND ALL IMPLIED WARRANTIES,
INCLUDING WITHOUT LIMITATION THE IMPLIED WARRANTIES OF MERCHANTABILITY AND FITNESS FOR A PARTICULAR PURPOSE. FURTHER,
VENDOR SHALL HAVE NO LIABILITY WHATSOEVER TO PURCHASER OR ANY THIRD PARTY FOR ANY SPECIAL, INDIRECT, PUNITIVE, INCIDENTAL, OR
CONSEQUENTIAL DAMAGES. Vendor assumes no responsibility for any defects caused by third parties. This Limited Warranty gives the purchaser specific
legal rights; a purchaser may have other rights depending upon where he or she lives. Some jurisdictions do not allow the exclusion or limitation of special,
incidental or consequential damages, or limitations on how long a warranty lasts, so the above exclusion and limitations may apply to you.
Vendor does not authorize any person or company to assume for it any other obligation or liability in connection with the sale, installation, use, removal,
return, or replacement of its equipment, and no such representations are binding on Vendor.
This manual suits for next models
4
Table of contents
Other Bayou Classic Grill manuals

Bayou Classic
Bayou Classic 3066 Mounting instructions

Bayou Classic
Bayou Classic 500-515 User manual

Bayou Classic
Bayou Classic 500-724 User manual

Bayou Classic
Bayou Classic 600 User manual

Bayou Classic
Bayou Classic CYPRESS GRILL 500-535 Guide

Bayou Classic
Bayou Classic Cypress series User manual

Bayou Classic
Bayou Classic 3066 User manual
Popular Grill manuals by other brands

Matador
Matador RADIANT GO manual

Redmond
Redmond SteakMaster RGM-M825P user manual

Tera Gear
Tera Gear 13 01 3008TG Assembly instructions and owner's guide

GrillBlazer
GrillBlazer GrillGun Replacing the Valve Stem

ROYAL GOURMET
ROYAL GOURMET ZH3002SN owner's manual

Brinkmann
Brinkmann 810-6420-S Assembly and operating instructions