BCF Solutions Easi-Scan:Go User manual

TM
Your animal imaging partner
Instruction manual

TM
2
Contents
Introduction 3
Scanner menu 4
LED sequence 6
BCF Go Scan App 8
Usage les 10
Factory reset 10
Measurements menu 13
Care & maintenance 17
Certication
BCF Technology Ltd., hereby declares that the radio equipment type that we use on Easi-Scan:Go
is in compliance with all CE Directives. The full text of the EU declaration of conformity is
available at the following internet address: www.bcftechnology.co.uk
This device complies with part 15 of the FCC Rules. Operation is subject to the following two
conditions: (1) This device may not cause harmful interference, and (2) this device must accept
any interference received, including interference that may cause undesired operation.
If the user changes any modifications not expressly approved by the party responsible for
compliance could void the user’s authority to operate the equipment.
Note: All BCF Technology products are for animal applications only.
TM
3
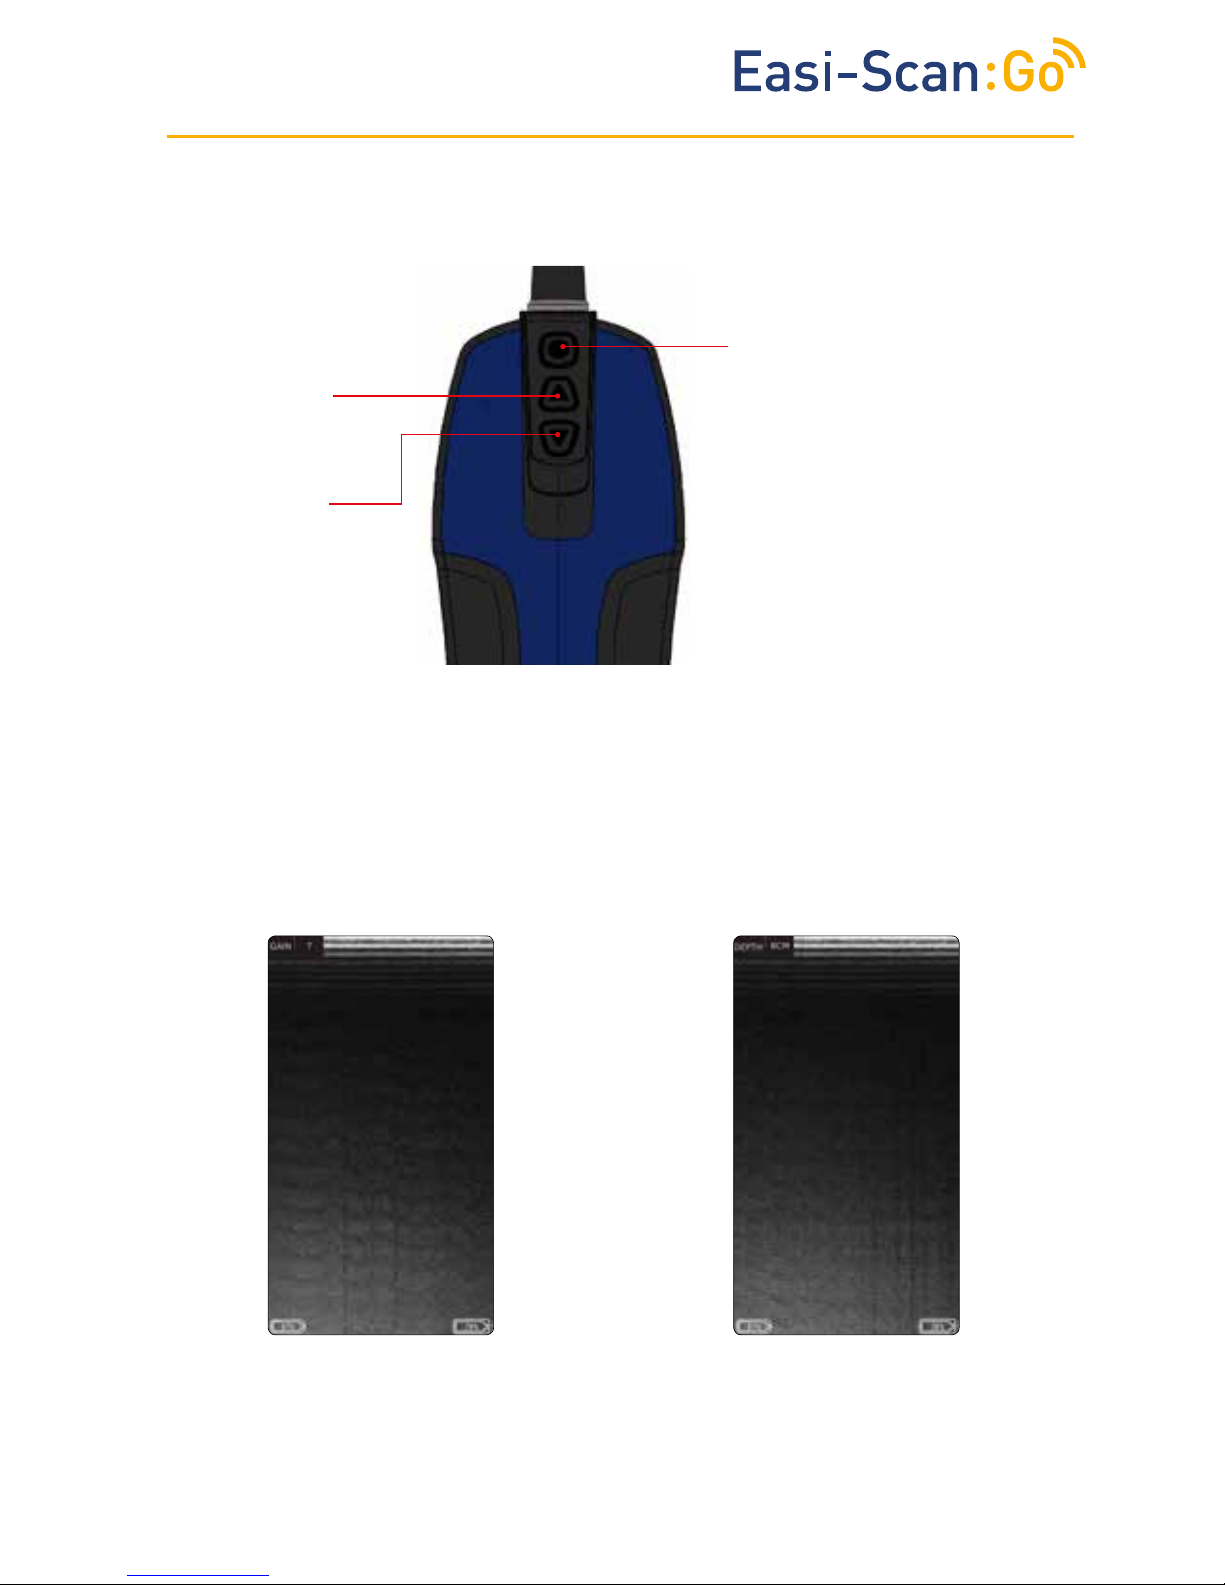
1 Scanner menu
1.1 Adjusting gain and depth using scanner´s buttons
Once the gain or depth is visible, pressing the “Power Button” will select that settings. Use The
Up and Down buttons to adjust the selected settings.
Power button
• To switch on/off the
scanner press and hold
until it beeps.
• If no viewing devices are
connected, double press
to change Wi-Fi channel.
• Short press to freeze the
image.
Up button
• Adjust gain.
• Save videos.
Down button
• Adjust depth.
• Save images.
Pressing “Down” button will bring up depth
menu.
In live scanning pressing “Up” button will bring
up the gain menu.
TM
4
Once the desired option is visible, pressing the Power Button will select that option.
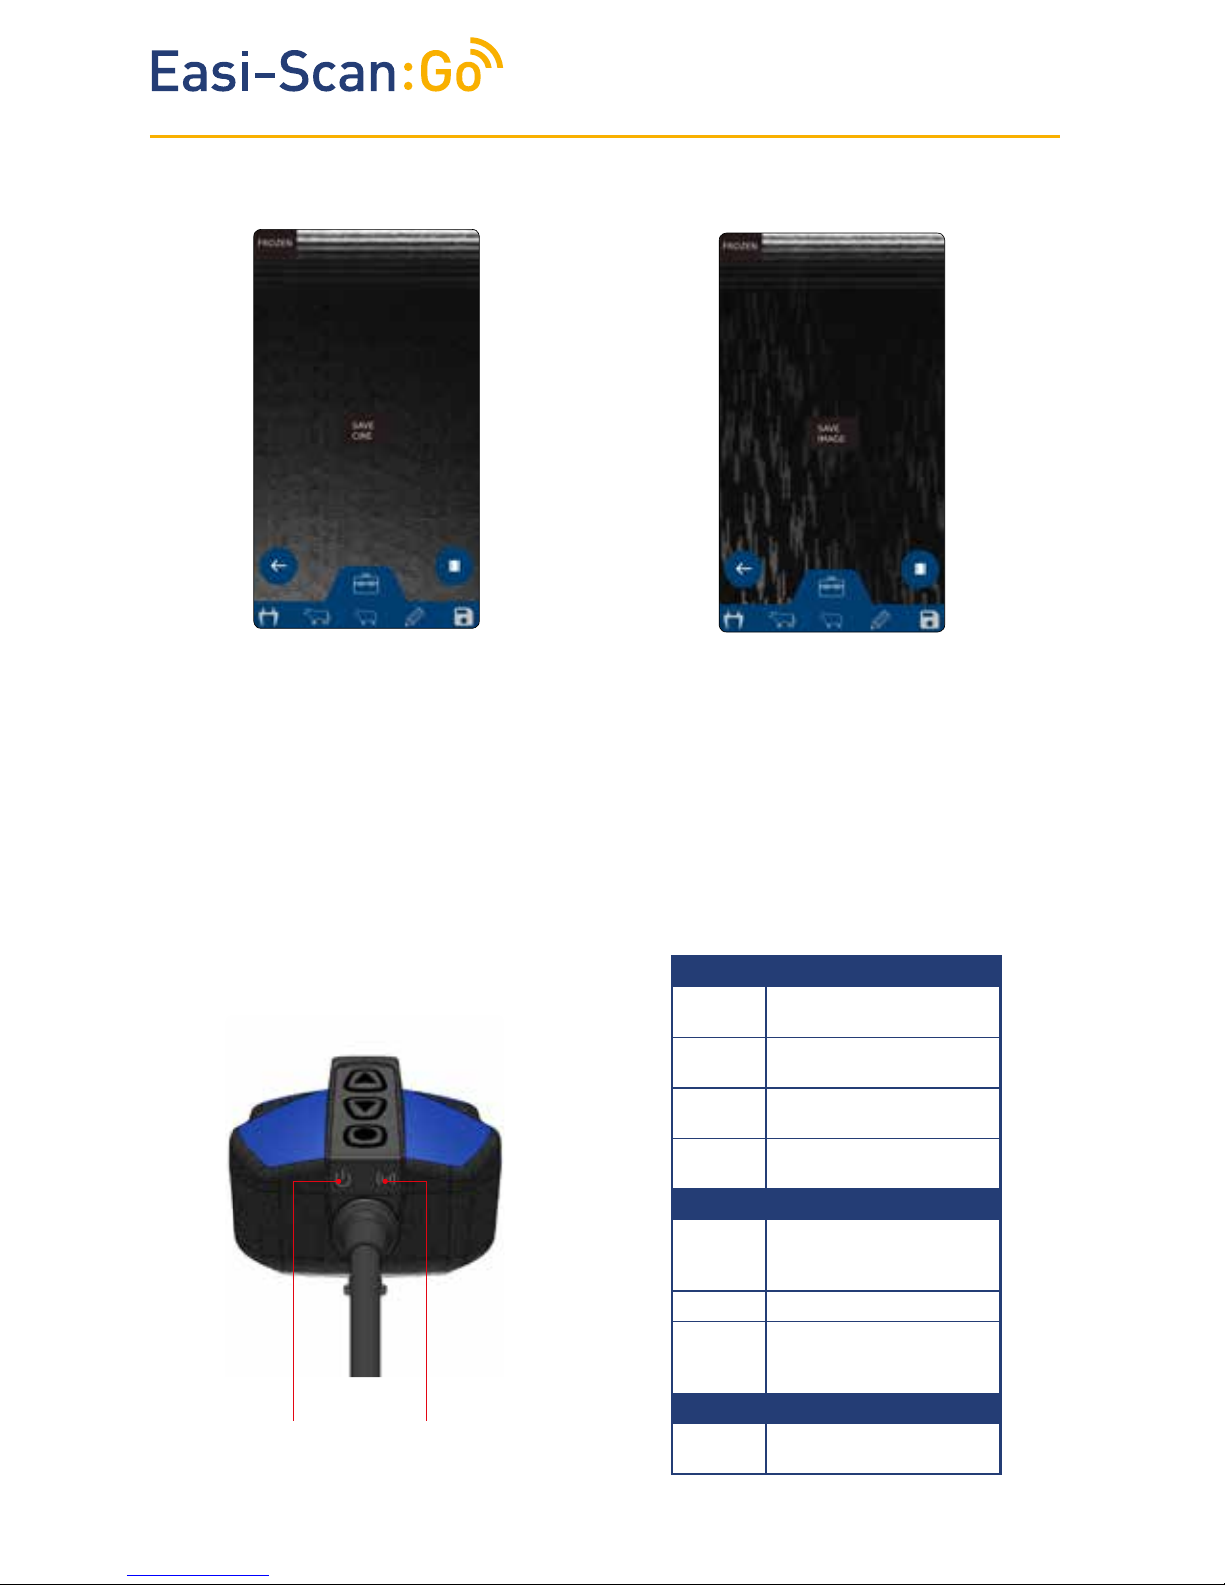
Note: The scanner will store the last 300 frame (10-12.5 seconds depending on the selected scan
depth) in its internal memory.
To store on the scanner, the scanner must be Frozen.
During save,
particularly cine save, the app will pause while downloading and saving the data while scanning.
It is recommended that you save images and videos directly from the app where possible.
2 LED sequence
Freeze the image using “Power button”
Press “Down” will bring up “Save Image”.
Freeze the image using “Power button”
Press “Up” will bring up “Save Cine”.
1.2 Saving images and videos using scanner´s buttons
Power
LED
Wireless
LED
Power LED
Blue
flashing
Scanner turning on
Blue Scanner on and battery
between 66–100% charge
Yellow Scanner on and battery
between 33–66% charge
Yellow
flashing
Scanner on and battery
between 0–33% charge
Wireless LED
Blue
flashing
Scanner ready for smart
device to connect, nothing
connected
Blue Smart device connected
Blue Scanner is charging
when placed on wireless
charging plate
Both LEDs
Flashing
yellow
Software updating
TM
5
3.2 Normal start up process
1. Press “Power
button” to
switch on the
scanner. Open
app on the smart
device. The app
will request to
connect to the
scanner. Click
OK.
3 App requests
to connect to
the internet.
Click OK.
4. Select your
local Wi-Fi
network to
connect to the
internet.
5. App requests
to connect back
to the scanner
and retrieves
the licence
from BCF’s
licence server.
2. Select
EASISCAN
from the Wi-Fi
page and
return to the
app.
The app will
get serial
number from
the scanner.
6. Select your
EASISCAN from
the Wi-Fi page and
return to the app.
3 Activation
3.1 First time use
Download the BCF Go Scan app from Google Play or the App store.
To activate the scanner, ensure that the scanner is charged and that you have a local Wi-Fi
internet connection. This is only necessary the first time you connect the scanner.
Note – if the LED flashes on the scanner it is not connected to any smart device.
After a few seconds, the ultrasound image will appear. Touchanywhere on the screen to bring up
the live scanning menu.
1. Switch on the
scanner and wait
until the Wi-Fi
LED illuminates.
Launch BCF Go
App. App requests
to connect to
scanner.
2. Select your
EASISCAN
from the Wi-Fi
page. Return
to the App.
3.It can take up
to 10 seconds
to connect and
start receiving
ultrasound. You
are now ready
to scan.

TM
6
4 BCF Go Scan App
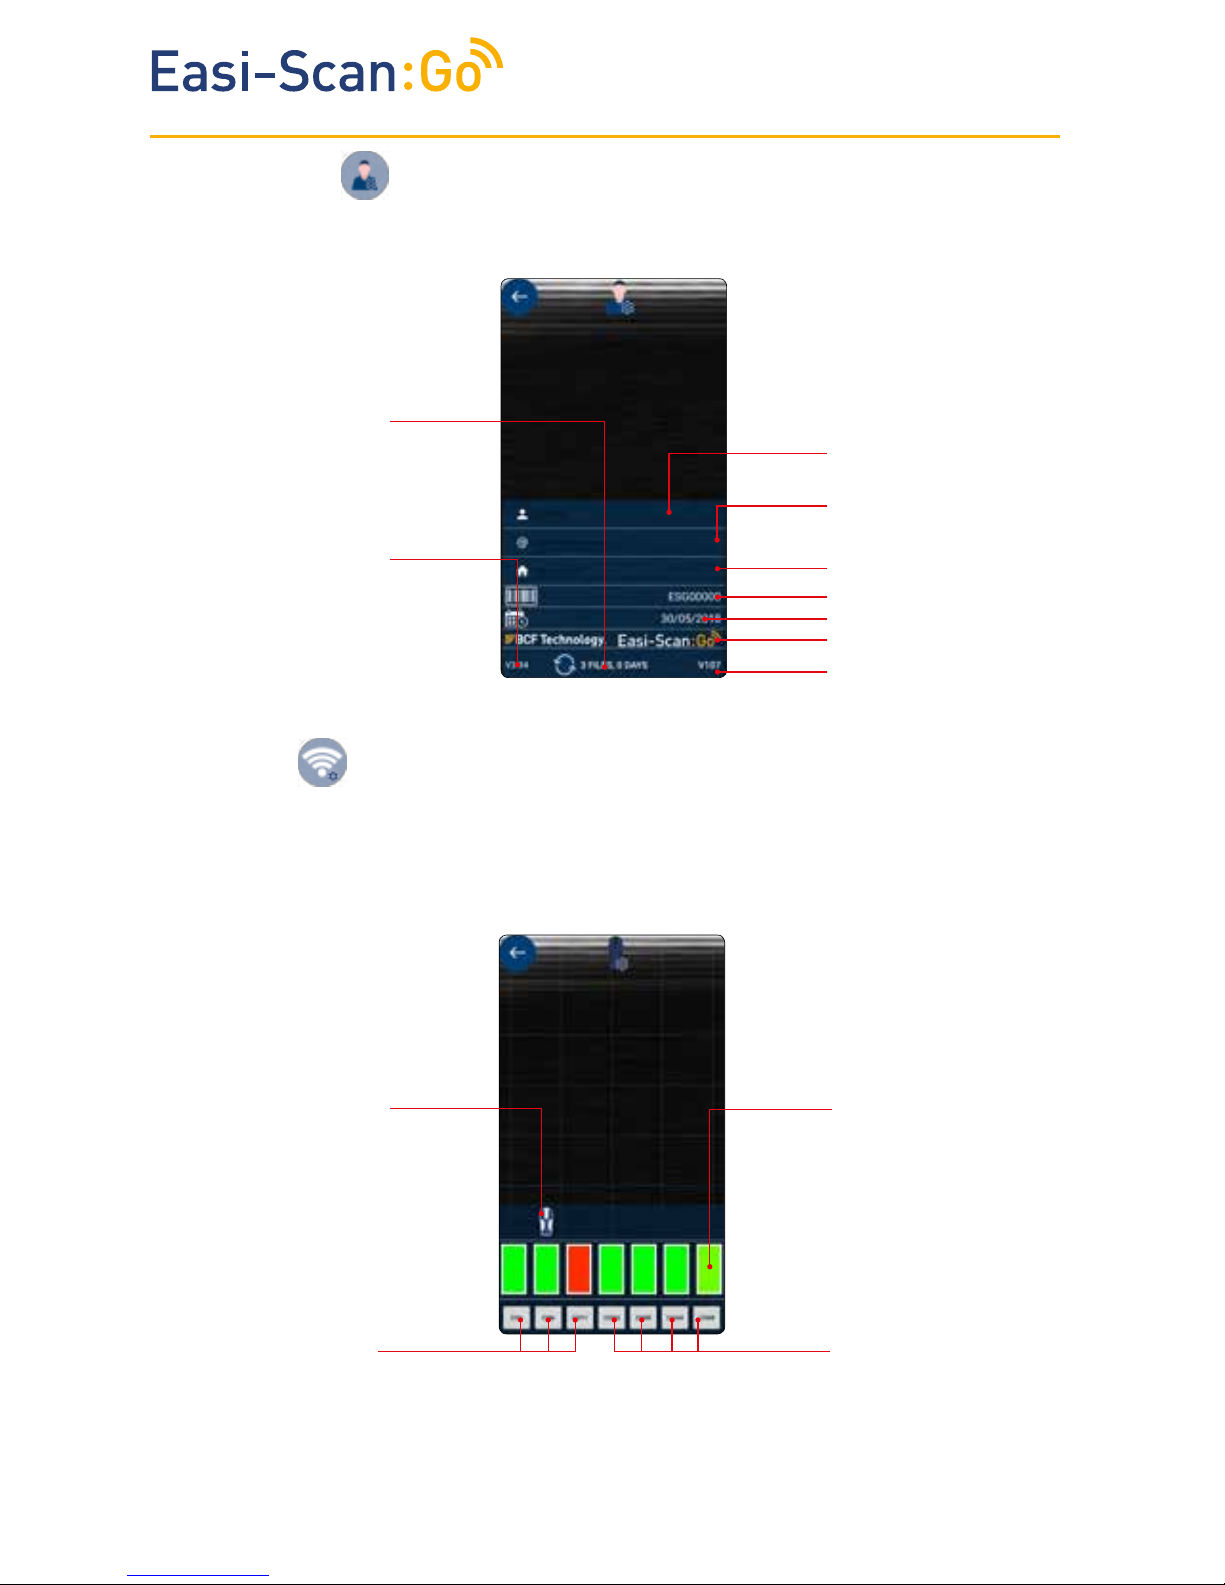
4.1 Live scanning
Recording
indicator
and elapsed
time during
recording.
Wi-Fi channel quality*
(only on Android devices)
The scanner battery
level
The smart device
battery level
No probe contact,
scanner enters
low-power
mode and the
screen will dim.
Touching the scanner with one finger will open
the main menu.
Touching the screen with two fingers
simultaneously will freeze the image.
*Change the channel in Wi-Fi settings. No indicator -clear channel in the 5GHz band. This is
recommended state. White indicator-clear channel, but is on 2.4GHz band. It is more prone to
interference. Orange/red indicator-channel with other networks or scanner. This is likely to cause
interference issues.
TM
7
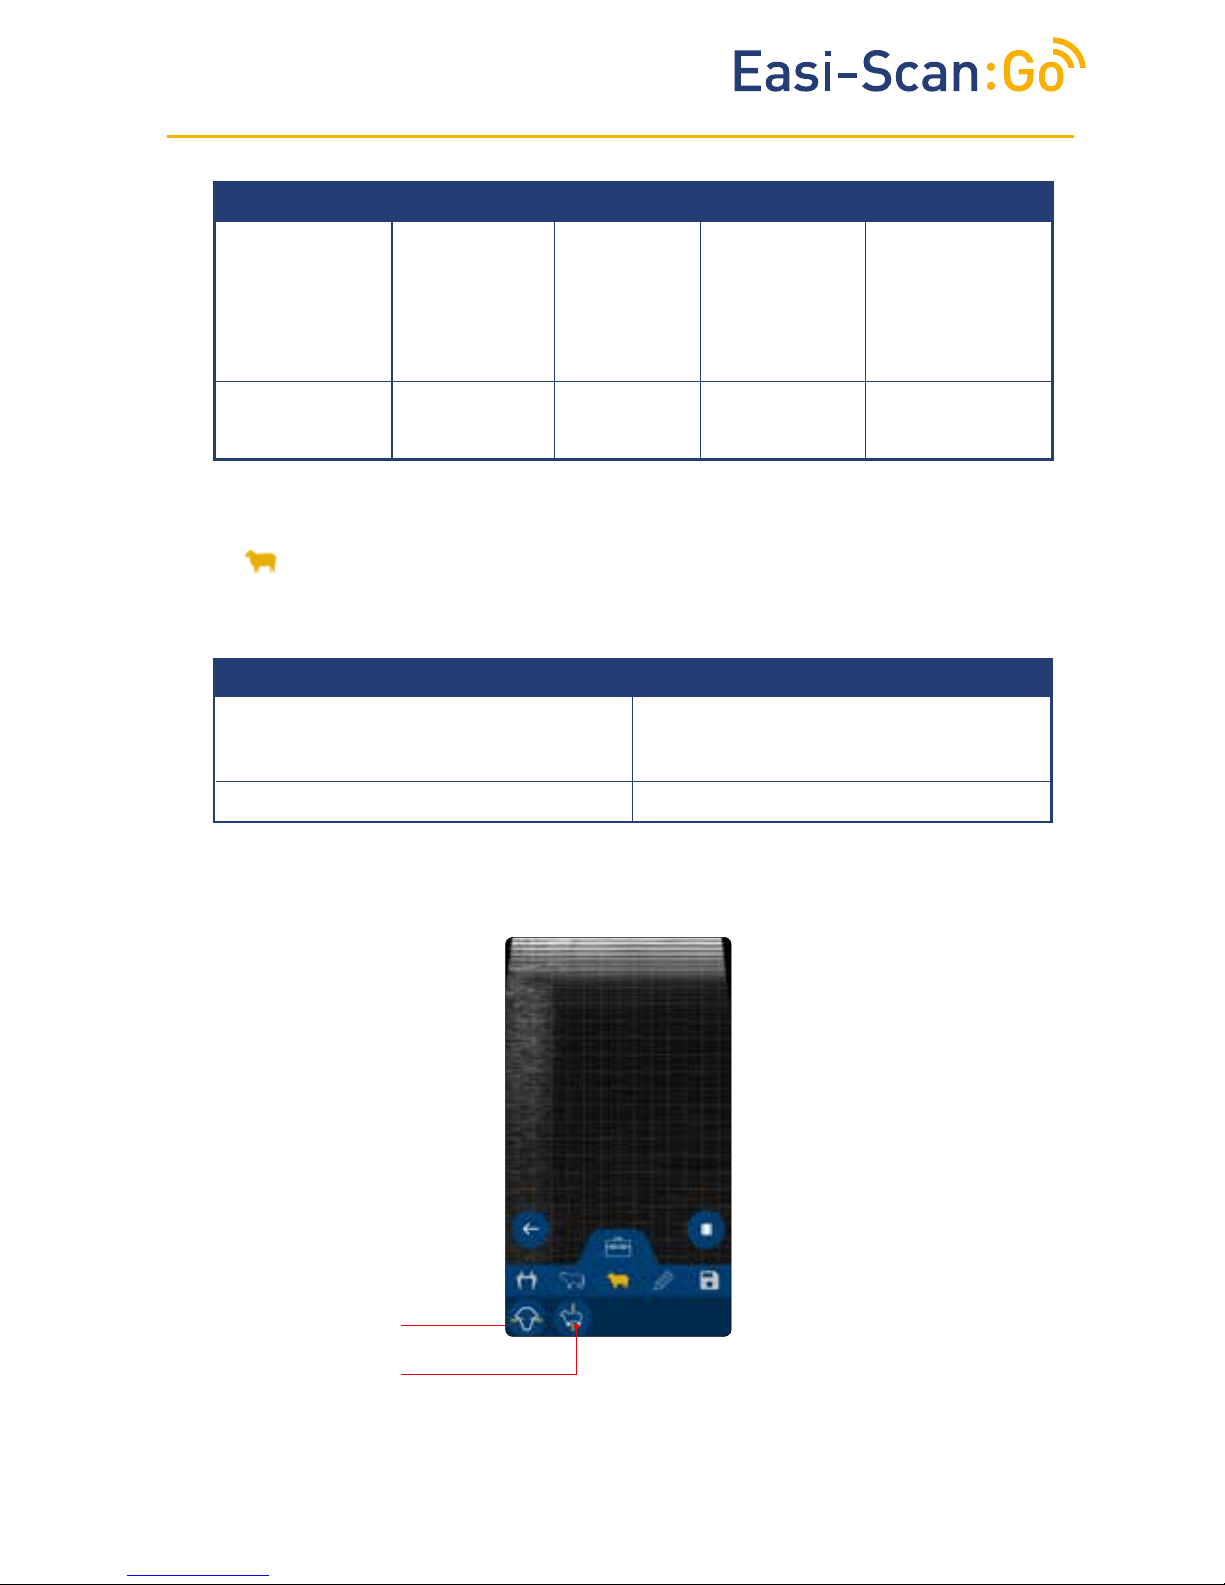
Unfreeze and return
to live scanning.
Callipers to measure
size of the embryo Draw annotations on
the image
4.2.1 Freeze menu
Cattle
Sheep
Go to cine mode
Save image on
smart device
Start recording
Freeze ultrasound
Open Settings
Adjust gain
4.2 Main menu
Adjust
scanning depth

TM
8
Callipers
Reset the cursors to
the initial positon.
Save images to the
camera folder on a
smart device.
Return to freeze
menu.
Note: Use your finger to move crosses.
Cattle
Crown rump length
Head diameter
Trunk diameter
Eye diameter
Head length
TM
9
Sheep
Head diameter
Trunk diameter
Trunk diameter
(width of the ribcage at the widest part)
Head diameter
(width of the skull at the widest point)
14mm – 101mm, 49 – 126 days19mm – 66mm, 48 - 121 days
Gestational measurements available:
Trunk diameter
(width of the
ribcage at the
widest part)
14mm – 123mm,
53 – 133 days
Eye diameter
(diameter of
the eye socket)
3mm – 28mm,
62 – 241 days
Head diameter,
(width of the
skull at the
widest point)
14mm – 86mm,
55 - 135 days
Crown-
Rump length
(distance from
the top of the
skull to the end
of the body)
14mm – 180mm,
33 – 76 days
Head length
(distance from
the top of the
skull to the end
of the nose)
21mm – 146mm,
56 – 134 days
Gestational measurements available:

TM
10
Freedraw
Touch and drag to draw on screen, can be used to make simple annotations or to highlight areas
of interest. Any measurements placed on screen remain visible.
Cine mode
The app automatically stores the last 300 ultrasound frames (approximately 10 seconds), in cine
mode. These frames can be viewed individually or as a video, individual frames can be saved as
still images or the entire loop as in copy.
Reset button, deletes all
drawn lines.
Save button, save the
current image to the
camera folder.
Back button, return to
freeze menu.
Frame back
Frame forward
Back
Save image
Save cine
Play
Frame slider

TM
11
Note: FAQ and terms and conditions require an internet connection.
Machine
settings
User
settings
Wi-Fi settings
(only on Android
devices)
Access the Terms
a n d c o n d i t i o n s , Q u i c k
Guide, FAQ
4.3.1 Machine settings
Adjust screen
brightness. Restores
to original settings
when the app is
closed.
Fit ultrasound by
height or width.
Adjust ulttrasound
contrast
Lock screen rotation
Adjust menu timeout
Grid setting. The grid
overlay will change
on all connected
devices.
Invert the ultrasound
image.
Note: Touching outside the menu area will return to live scanning.
4.3 Settings
Select probe
orientation. The
probe orientation
will change on all
connected devices.
TM
12
User name
User email
Licence expiry date
Type of scanner
Software version of
scanner
Tap and select the channel.
Yellow, orange, red are
congested channels
Green are clear channels
5GHz channels. Best
connection
Software version
of app
Software version
of scanner
2.4 GHz channels
Prone to interference
Number of usage
les on this device,
w h e n i t w a s
synchronised with
the server
Scanner serial number
Practice or company
name
4.3.2 User settings
Wi-Fi settings
Wi-Fi settings are only available on Android devices. Channels can be changed.

TM
13
5 Usage les
The app will generate usage files.
Events logged:
• Images saved – time and date, scanner serial number and location (if permitted)
• Connecting to scanner
• Freeze and unfreeze
• Texts from Visits ToDo App
• Entering and exiting standby mode
Files can be uploaded to BCF’s license server, www.licencing.bcftechnology.com.
• Automatically - if launching app when connected to WiFi
• Manually – by clicking sync button
• Prompts – If there are more than 20 usage files to upload
6 Factory reset
A scanner can be reset to factory firmware settings in the unlikely event the scanner fails.
Hold down power and down until both LED’s glow yellow and release.
This will take a few minutes and the scanner will then switch off – removing the license from the
scanner.

TM
14
Charging, charge level below
33%
Charging, charge level below
66%
Charging, charge level below
100%
Fully charged
Temperature is too high
(more than 45 Celsius, 113
Fahrenheit) for safe charging
Temperature is too low (less
than 0 Celsius, 32 Fahrenheit)
for safe charging.
One Blue
flashing
First LED Blue
solid
Second LED
flashing blue
First and second
LEDs solid
blue, third LED
flashing blue
All LEDs solid
blue – fully
charged.
All LEDs flashing
yellow
All LEDs flashing
blue
7 Charging
The battery can be charged in the charging dock, powered by a standard outlet. It can also be
connected in the carry case for in-car charging.
A fully discharged battery should be fully
charged within 5.5 hours. While in a good
condition, the battery run time will be 5
hours (assuming 50% idle time between
scans).
Scanner will enter low power mode when
idle.
The Li-ion cells used in the battery pack
do not suffer from the ‘Memory effect’. For
optimal battery longevity, avoid letting the
battery run completely down and recharge at
approximately 20 Celsius/68 Fahrenheit.
Electrical connection to the power pack is through the gold pads on battery and scanner. Power
pack output is protected but care should be taken to prevent short circuiting the gold connector
pins and pads.
Warning:
To reduce the risk of burns, fire, electric shock, or injury to persons
an appliance should never be left unattended when plugged into
mains or 12V cigarette lighter.
LED sequence
2nd LED
1st LED
3rd LED

TM
15
8 Care & maintenance
8.1 Easi-Scan: Go & battery
Please note the following important points:
• The unit is not sealed against jets of water. Water will penetrate your scanner if it is hosed
down or rinsed under a fast flowing tap.
• The unit is NOT corrosion proof and thus it should not be left wet.Take care to detach the
external battery and ensure interconnect areas are dry also.
• The battery charger and charging carry case are not waterproof – avoid getting them wet.
8.2 Easi-Scan: Go probe
While every attempt has been made to make the probe as rugged as possible the crystal array
remains vulnerable and should be protected from knocks. The probe has a protective sheath
covering the length of cable subject to wear and flexing. Any damage to this sheath or the rest
of the cable should be repaired before further use to prevent moisture ingress that will rapidly
damage the probe. The probe should be checked regularly for such damage.
Gels
Use only gels recommended by BCF Technology Ltd. Do not store the probe in gel.
Cleaning
The probe may be cleaned by removing all residue and disinfecting using an IPA wipe.
Storage
Clean and dry the probe head prior to storage in dry location. Do not store the transducer in gels
or cleaning/disinfecting solutions. This will lead to premature deterioration of the probe.
Do not expose the transducer to materials containing the following agents:
• Acetone
• Methanol
• Mineral oil
• Iodine
• Freon
• Industrial cleaners
• Materials containing perfumes (lotions, gels, etc.)
9. Specications
Warning:
Never sterilize the transducer with autoclave, ultraviolet, gamma
radiation, gas, steam or heat sterilization techniques. Severe
damage will result.

TM
16
Size 19x8.3x6.2cm / 7.5 x 3.25 x 2.4 in
Weight 800g/1.76lbs
Mechanical Rugged PC/ABS casing with TPE over mould
User Output
Scanner wireless link to compatible viewing device using BCF Sound-Link over standard WI-FI
connection.
Image and video storage
Storage of images and cine loops limited only by available space on smart device linked with
scanner.
Probe
Broadband straight linear rectal
Active array length 64 mm
Frequency range 4.5 to 8.5 MHz
3 user selectable depths of scan: 6cm, 8cm, 12cm
128 element crystal array
16 digital channels and 32 channel receiver
Power and charging
Removable li-ion battery gives 5h runtime *
Battery charge time 5.5h. Only use BCF aproved/supplied 12V vehicle power supply, battery
charger and DC power adapter.
Maximum output voltage and current raiting of the charger is 4.2V and 2A.
*depending on use, assuming 50% scan time, auto power save with BCF Smart-Beam.
Temperature range
Scanner: -10 Deg C to 45 Deg C *.
Battery Charge: 0 Deg C to 35 Deg C *
* Best charged at 25 Deg C, frequent chaging at 35 Deg C / 95 F may shorten battery lifetime.
Battery Charger has under and over temperature protection and LED status indication.
Warranty
BCF Technology warrants Easi-Scan:Go against defects in materilas for one year from the date
of purchase. BCF Technology does not warrant against normal wear and tear, nor damage
caused by accident or abuse. Lifiteme warranty is available on request.
Smart devices compatibility
Android:
Minimum version: Kit Kat (Android V4.4)
Minimum RAM: 1.5Gb
Minimum Processor: Quad-Core 1.2GHz
Recommended WiFi: 802.11 a/ac (5GHz band)
Apple:
Minimum version: iOS 8
Minimum iPhone version: iPhone 5s
Minimum iPad version: iPad4

TM
© BCF Technology Ltd, 2017 | Easi-Scan:GO
For further information and video manuals about the Easi- Scan:Go please visit the “Customer
support“ section of the BCF website www.bcftechnology.com/service-support
Easi-Scan:Go does not contain user serviceable parts. Servicing has to be done by BCF´s
authorised service centers.
11 Service centres
If your Easi-Scan requires servicing please contact official authorised service centres below or
distributor in your country. Distributors contact details can be found at www.bcftechnology.com.
In the UK:
BCF Technology Ltd
Imaging House, Phoenix Crescent
Strathclyde Business Park Bellshill,
ML4 3NJ
Schottland, UK
T +44 (0)1506 460 023
info@bcftechnology.com
www.bcftechnology.com
In Ireland:
BCF Technology Ltd
Unit 2, Quayside Business Park
Mill Street, Dundalk
Co Louth, Ireland
T +353 (0)42 932 0070
ireland@bcftechnology.com
www.bcftechnology.com
In North America:
BCF Technology USA Ltd, LLC
2625 Highway 14 West, Suite K
Rochester, Minnesota 55901
T 507-529-8200
T 800-210-9665
F 507-529-8205
contact@bcftechnology.com
www.bcftechnology.com
In Australasia:
BCF Ultrasound Australasia Pty Ltd
10/56 Norcal Road
Nunawading 3131
Melbourne, Victoria
Australia
T +61 (0)3 9894 8980
service@bcfultrasound.com
www.bcfultrasound.com
Table of contents
Popular Pet Care Product manuals by other brands

Backyard Cat Enclosures
Backyard Cat Enclosures Kitty Kondo Assembly instructions

Floppy Ears Design
Floppy Ears Design Waxed Cotton Canvas Pet Hammock instructions

Silicon Graphics
Silicon Graphics PETBLE SmartTag instruction manual

Dr.Trainer
Dr.Trainer TS1 Series owner's manual

Prevue Hendryx
Prevue Hendryx 3451 parts list

Petsafe
Petsafe PAW POINT PIF00-13651 Operating and training guide


InnoPet
InnoPet Avenue IPS-033 quick start guide

Gen7Pets
Gen7Pets Monaco G2350 quick guide

Life Handle
Life Handle HANDS-FREE COMFORT LEASH instruction manual

KAS SYSTEM
KAS SYSTEM KAS Stuck Box XS user manual

Prevue Pet Products
Prevue Pet Products 425 Assembly instructions

WilTec
WilTec 30255 instruction manual