manuals.online logo
Brands
  1. Home
  2. •
  3. Brands
  4. •
  5. Kurgo
  6. •
  7. Pet Care Product
  8. •
  9. Kurgo BAXTER BACKPACK Installation manual

Kurgo BAXTER BACKPACK Installation manual

Other Kurgo Pet Care Product manuals

Kurgo CARGO CAPE User manual

Kurgo

Kurgo CARGO CAPE User manual

Kurgo ROVER BOOSTER SEAT User manual

Kurgo

Kurgo ROVER BOOSTER SEAT User manual

Kurgo Ridgeline User manual

Kurgo

Kurgo Ridgeline User manual

Kurgo SKYBOX User manual

Kurgo

Kurgo SKYBOX User manual

Kurgo COPILOT User manual

Kurgo

Kurgo COPILOT User manual

Kurgo JOURNEY BENCH SEAT COVER User manual

Kurgo

Kurgo JOURNEY BENCH SEAT COVER User manual

Kurgo back seat BARRIER User manual

Kurgo

Kurgo back seat BARRIER User manual

Kurgo BACKSEAT BRIDGE User manual

Kurgo

Kurgo BACKSEAT BRIDGE User manual

Kurgo Journey Air User manual

Kurgo

Kurgo Journey Air User manual

Kurgo Backseat Bridge User manual

Kurgo

Kurgo Backseat Bridge User manual

Kurgo EXTENDED HAMMOCK User manual

Kurgo

Kurgo EXTENDED HAMMOCK User manual

Kurgo Skybox Booster Seat User manual

Kurgo

Kurgo Skybox Booster Seat User manual

Kurgo JOURNEY HAMMOCK User manual

Kurgo

Kurgo JOURNEY HAMMOCK User manual

Kurgo Loft Hammock User manual

Kurgo

Kurgo Loft Hammock User manual

Kurgo Tru-Fit Smart Harness ENHANCED STRENGTH v.3 User manual

Kurgo

Kurgo Tru-Fit Smart Harness ENHANCED STRENGTH v.3 User manual

Kurgo G TRAIN K9 PACK Quick guide

Kurgo

Kurgo G TRAIN K9 PACK Quick guide

Kurgo Heather Hammock User manual

Kurgo

Kurgo Heather Hammock User manual

Kurgo RSG Active Utility Belt User manual

Kurgo

Kurgo RSG Active Utility Belt User manual

Kurgo Heather Bench Seat Cover User manual

Kurgo

Kurgo Heather Bench Seat Cover User manual

Kurgo Auto Zip Line User manual

Kurgo

Kurgo Auto Zip Line User manual

Kurgo Impact Harness User manual

Kurgo

Kurgo Impact Harness User manual

Kurgo RSG COUNTY HARNESS User manual

Kurgo

Kurgo RSG COUNTY HARNESS User manual

Kurgo HEATHER HALF HAMMOCK User manual

Kurgo

Kurgo HEATHER HALF HAMMOCK User manual

Kurgo Go-Tech Adventure Harness User manual

Kurgo

Kurgo Go-Tech Adventure Harness User manual

Popular Pet Care Product manuals by other brands

PitPat PP02 user manual

PitPat

PitPat PP02 user manual

Schwinn Rascal owner's manual

Schwinn

Schwinn Rascal owner's manual

K&H Small Animal quick start guide

K&H

K&H Small Animal quick start guide

SHOR-LINE 006.3230.00 Product guide

SHOR-LINE

SHOR-LINE 006.3230.00 Product guide

Petsafe Stubborn Dog Receiver Collar operating guide

Petsafe

Petsafe Stubborn Dog Receiver Collar operating guide

juwel Rio 240 instruction manual

juwel

juwel Rio 240 instruction manual

Datamars OMNI MAX user manual

Datamars

Datamars OMNI MAX user manual

Trixie 24444 instructions

Trixie

Trixie 24444 instructions

Roverpet 30DDPP Assembly instructions

Roverpet

Roverpet 30DDPP Assembly instructions

SportDOG SD-105S-C manual

SportDOG

SportDOG SD-105S-C manual

Staywell 400 Series Magnetic user guide

Staywell

Staywell 400 Series Magnetic user guide

Dogtek Sonic Birdhouse user guide

Dogtek

Dogtek Sonic Birdhouse user guide

Togfit Deluxe Trigger Lock Door Gate Instructions for use

Togfit

Togfit Deluxe Trigger Lock Door Gate Instructions for use

Girafus 227PA user manual

Girafus

Girafus 227PA user manual

ubbink KoiFeeder Solar operating instructions

ubbink

ubbink KoiFeeder Solar operating instructions

Petsafe ST-100 operating guide

Petsafe

Petsafe ST-100 operating guide

CADOCA Deuba 106911 instructions

CADOCA

CADOCA Deuba 106911 instructions

Dogtra RR Deluxe owner's manual

Dogtra

Dogtra RR Deluxe owner's manual

manuals.online logo
manuals.online logoBrands
  • About & Mission
  • Contact us
  • Privacy Policy
  • Terms and Conditions

Copyright 2025 Manuals.Online. All Rights Reserved.

Installation and care / Installation et soins
PROPER FITTING INSTRUCTIONS
1. Place sternum loop over the dogs head and rest the pack on the dogs back.
2. Adjust the stabilizer straps (located under each bag) to lower both packs so the
lower part of each bag lines up with the center of the dog’s side
3. Loop the two side straps under the dog’s stomach and clip into the
side release buckles.
4. Clip the sternum loop buckle into the clip located on the side strap.
5. Adjust sternum loop and two side straps to fit snugly. This will ensure
the load is stable on the dog.
6. Load the two saddlebags with Fido’s gear making sure each bag is
loaded equally to prevent shifting of the bags. If you find that the
pack is slipping to one side readjust the stability straps. (step 2)
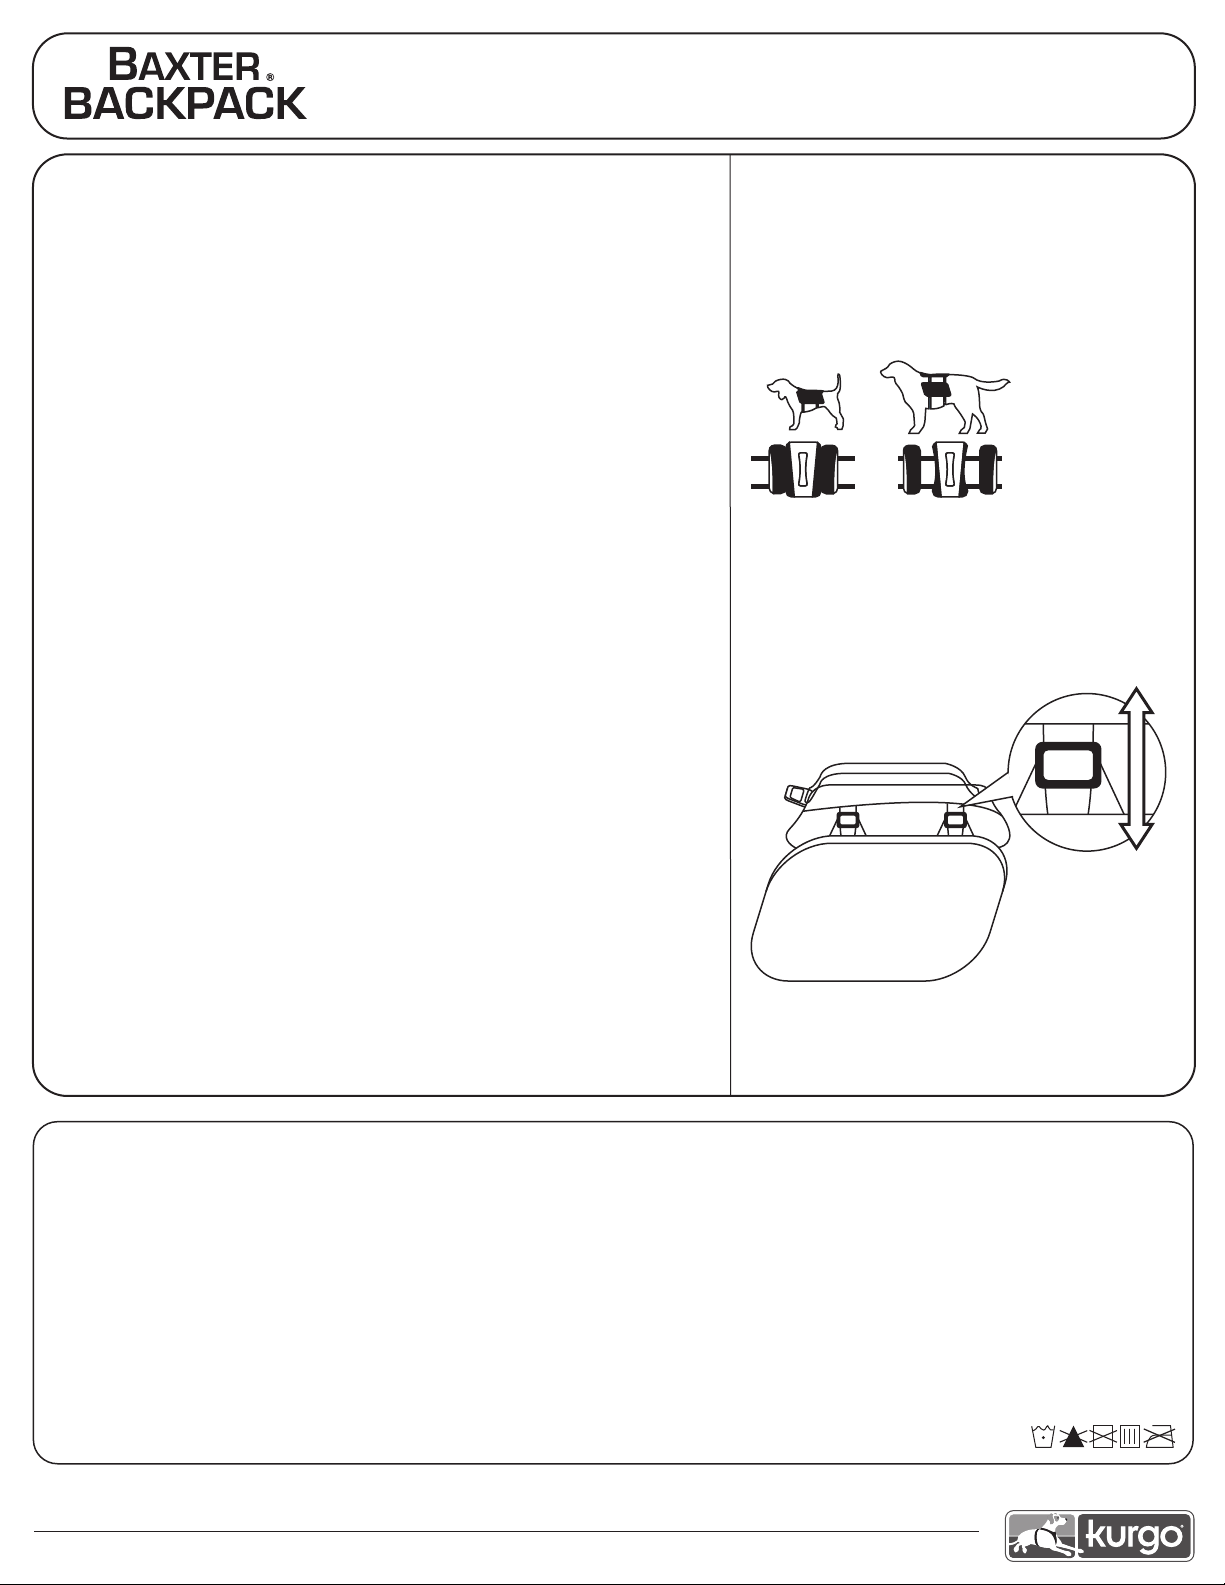
“ASB” CUSTOM FIT SYSTEM
The Adjustable Saddlebag System allows the
Baxter Pack to fit dogs of all sizes.
Smaller dogs:
Storage pouches close together
Larger dogs:
Storage pouches further apart
“ASB” SYSTÈME CUSTOM FIT
Adjustable Saddlebag System permet Pack
Baxter pour tenir les chiens de toutes tailles.
Les petits chiens:
Pochettes de rangement rapprochés
Les gros chiens:
Pochettes de rangement plus éloignés
Slide the saddlebags up or down to achieve a fit that
is customized for your dog.
Faites glisser les sacoches haut ou le bas pour obtenir
un ajustement qui est personnalisé pour votre chien.
INSTRUCTIONS DE MONTAGE APPROPRIÉS
1. Placez la boucle de poitrine sur la tête des chiens et reposer le paquet
sur les chiens en arrière.
2. Ajustez les sangles de stabilisation (situées sous eachbag) pour abaisser
les deux packs de sorte que la partie inférieure de chaque sac s'aligne
avec le centre de la face de chiens.
3. Boucle les deux sangles latérales sous le ventre et le clip du chien dans
la libération de côté boucles.
4. Clip de la boucle de la boucle de poitrine dans le clip situé
sur la sangle de côté.
5. Réglez boucle de poitrine et deux sangles latérales pour s'adapter
parfaitement. Cela permettra d'assurer la charge est stable sur le chien.
6. Chargez les deux sacoches avec la vitesse de Fido en s'assurant que
chaque sac est chargé également à empêcher le déplacement des
sacs. Si vous trouvez que le bloc glisse d'un côté réajuster les
sangles de stabilité. (étape 2)
Our product cleaning instructions will help ensure that your gear has a long, exciting life. In general, washing by hand and hang
air-drying is the best way to care for your Kurgo products. However, for the occasions when the mess is too great and time is
too tight, we recommend using a washing machine.
Hand Wash Instructions
Note: Recommended for small messes.
1. Brush off loose dirt with a dry brush.
2. Spot clean with a damp sponge, cold water,
and mild soap. Avoid harsh detergents.
3. If necessary, rinse larger area to eliminate
excess soap residue.
4. Hang to air dry (do not machine dry).
Machine Wash Instructions
Note: Only machine wash gentle in front-loading units (DO NOT use
machine with an agitator as it could cause damage not covered under
the Kurgo Warranty)
1. Secure all buckles and hardware.
2. Wash with cold water and mild soap. Avoid harsh detergents.
3. Rinse thoroughly to eliminate soap residue.
4. Hang to air dry (do not machine dry).
Cleaning Instructions
Please contact Kurgo directly with any product or warranty inquiries.
Kurgo Products • 2D Fanaras Drive, Salisbury, MA 01952 •877-847-3868 •www.kurgo.com •[email protected]
LIFETIME WARRANTY
WE ARE COMMITTED TO QUALITY
Kurgo prides itself in making superior quality products. There’s nothing more frustrating than buying a product
that breaks. If, during your product’s lifetime, it does not function as it should due to a manufacturing defect,
we will repair or replace your product free of charge. Hassle and worry free!
Please fill out a Warranty Claim Form on Kurgo.com to get started.
US and Canada only. If you are outside of the US and Canada and have an issue with a Kurgo
product, please contact us at [email protected]m
FREQUENTLY ASKED QUESTIONS
What is covered by the Kurgo Warranty?
Manufacturer’s defects caused by poor craftsmanship or defective hardware or materials when purchased
through authorized Kurgo dealers.
What is not covered by the Kurgo Warranty?
All products, except toys, are warrantied against manufacturing defects when purchased through an authorized
dealer. If your Kurgo product is damaged in the course of normal (or abnormal) wear and tear, you may not
qualify for our warranty replacement, but we do offer a complete Repair or Replacement Service for a nominal
fee.
We do not warranty or offer the Repair or Replacement Service for our toys, because toys, after all, are mostly
to be chewed. We believe our toys are very durable, but some dogs are tougher chewers than others.
Products damaged while being used in an unintended way are not covered by the lifetime warranty. For
example, the Wander Hammock is intended to be used between two seats sitting on top of a bench seat. You
cannot hang a Wander Hammock between two trees or over an open space and expect it to hold any weight.
How does the Kurgo Warranty work?
Fill out the Warranty Claim Form on Kurgo.com which requires pictures showing the defect and we’ll take a
look. If the claim meets our guidelines, we will send you a replacement product free of charge. US and Canada
only. If you are outside of the US and Canada and have an issue, please email us at [email protected]m
Repair or Replace Service
Products failing due to normal wear and tear, abuse, accident, critters, or natural breakdown of materials over
extended use and time can be repaired or replaced for a nominal fee. See our Repair or Replace Service policies
for more information.
Customer Service
If you are experiencing any problems or have any questions about your Kurgo Product, our Customer Service
Department is here to help. Please feel free to email us at info@kurgo.com or call us directly at (877) 847-
3868.