BCP SKY3474 User manual
SKY3474Ver. 4
INSTRUCTION
MANUAL
Voice Command Quadcopter
with HD Camera
CAUTION
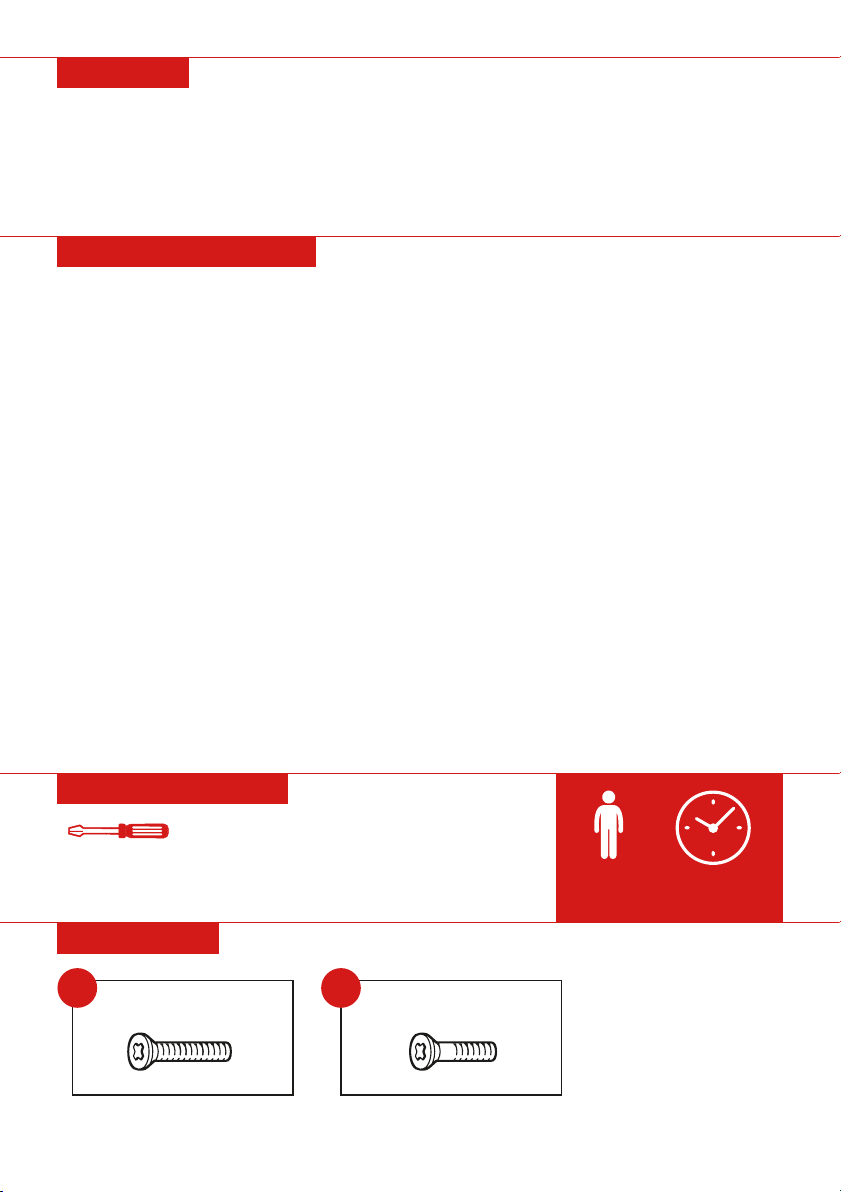
TOOLS REQUIRED
HARDWARE
APPROXIMATELY
15 MIN.
ASSEMBLY
1 PERSON
ASSEMBLY
• Ensure that the drone is correctly assembled to prevent any injuries or accidents.
• This product is intended for ages 14 and older.
• This product is recommended for outdoor use or open spaces. Make sure to follow local laws and
regulations regarding drone flight in public areas.
• Do not use this product for any other purpose than its intended use.
Please retain these instructions for future reference.
BATTERY WARNINGS
The following safety hazards may result in serious injury or death:
•Use of a battery or charger other than the supplied rechargeable battery and charger may cause a fire or
explosion. Only use the supplied battery and charger.
•Use of the rechargeable battery and charger for any other product may result in overheating, fire, or
explosion. Never use the supplied rechargeable battery and charger with another product.
•Explosive gases are created during charging. Charge the battery in a well-ventilated area. Do not charge
the battery near heat or flammable materials.
•Contact between the positive and negative terminals may result in fire or explosion. Avoid direct contact
between the terminals. Picking up the battery by the wires or charger can cause damage to the battery
and may result in a fire. Always pick up the battery by its case or handles.
•Liquids on the battery may cause fire or electric shock. Always keep all liquids away from the battery and
keep the battery dry. Contact or exposure to battery leakage (lead acid) may cause serious injury. If
contact or exposure occurs immediately call your physician. If the chemical is on the skin or in the eyes,
flush with cool water for 15 minutes. If the chemical was swallowed, immediately give the person water or
milk. Do not give water or milk if the patient is vomiting or has a decreased level of alertness. Do not
induce vomiting.
•Battery posts, terminals, and related accessories contain lead and lead compounds (acid) – chemicals
known to the State of California to cause cancer, reproductive harm, and are toxic and corrosive. Never
open the battery.
•Tampering or modifying the electric circuit system may cause a shock, fire or explosion and permanently
damage the system. Exposed wiring and circuitry in the charger may cause electric shock. Always keep
the charger housing closed.
PHILLIPS
SCREWDRIVER
(PROVIDED)
Pg. 2
1LONG SCREW
11 PCS
SHORT SCREW
8 PCS
2
Pg. 3
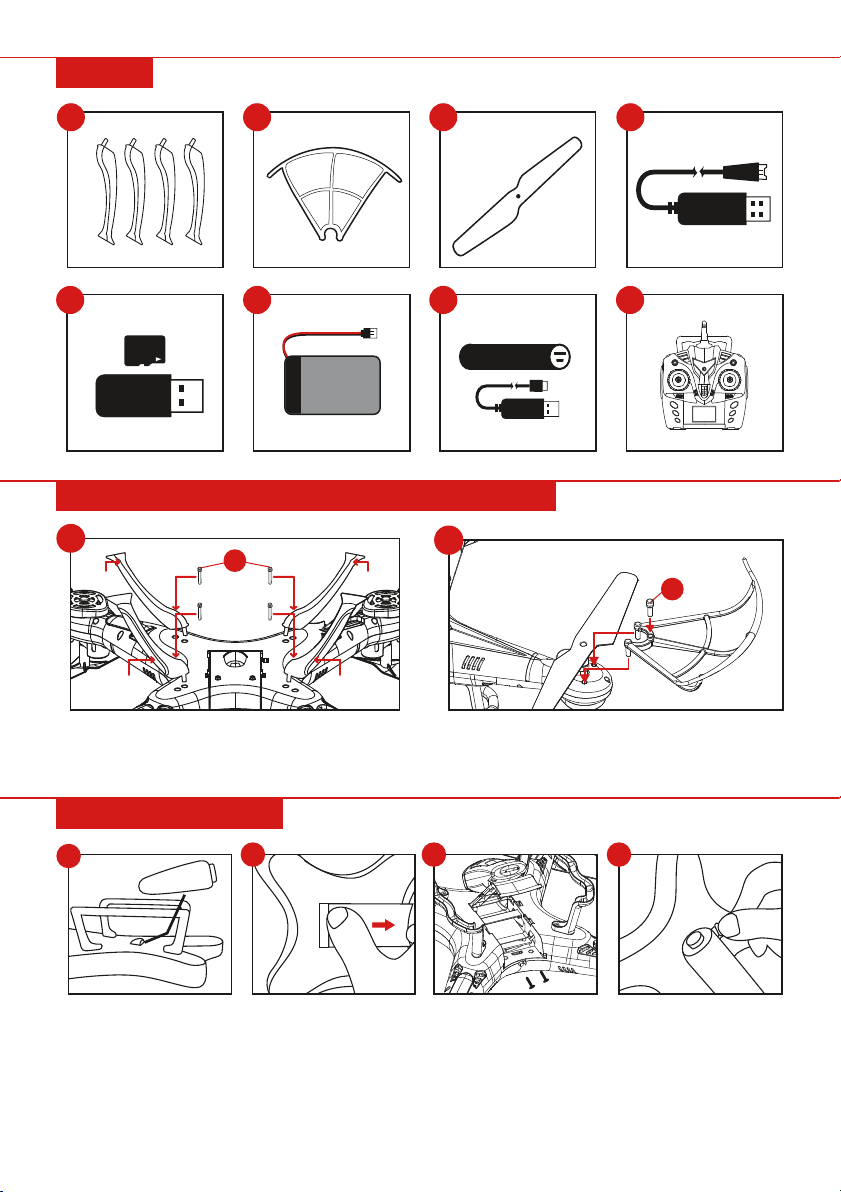
SETTING UP YOUR QUADCOPTER DRONE:
INSTALL CAMERA
ALANDING GEAR
PARTS
4 PC
BPROPELLER CAGES
4 PC
DUSB CHARGING CABLE
1 PC
EMICROSD CARD/
USB READER
1 PC
CSPARE PROPELLERS
4 PC
4GB
FBATTERY
2 PC
GPOWER BANK &
MICRO USB CABLE
1 PC 1 PC
HREMOTE CONTROL
1
2
Install the propeller cages onto the corners of
the quadcopter with four part 1 screws.
1. Slide the camera into the designated slot on the battery cover.
2. Open the battery cover.
3. On the underside of the battery cover, secure the camera to the battery cover with two screws
specific to the camera. Then close the battery cover
4. Insert the 3-pin plug from the camera into the designated slot next to the battery cover.
12 3 4
1
1
(2) (1)
(2)(1)
Install the landing gear onto the bottom of the
quadcopter with the four part 1 screws.
NOTE: the landing gear is numbered and must
be arranged according to the diagram above.

PREPARE THE QUADCOPTER FOR FLIGHT
OPERATING YOUR QUADCOPTER (MODE 1)
HOVER UP & DOWN: Move the left control lever
(throttle) up or down, and the quadcopter will
gain or lose elevation.
ROLL LEFT & ROLL RIGHT: Move the left control
lever (throttle) left or right, and the quadcopter
will roll to the left or right.
RIGHT & LEFT: Move the right control lever left or
right, and the quadcopter will fly to the left or right.
FORWARD & BACKWARD: Move the right control
lever up or down, and the quadcopter will fly
forward or backward.
1. Turn on the remote control.
2. Open the battery cover on the quadcopter, insert the battery, and plug it into the designated power port.
3. Turn on the quadcopter.
4. Push the left control lever (throttle) to the highest position, and then pull it back to the lowest
position. The remote control will emit a sound indicating that the quadcopter is ready to fly.
FINE-TUNING YOUR QUADCOPTER (MODE 1)
FORWARD/BACKWARD FINE
TUNING: If your quadcopter veers
forward or backward, correct it with the
forward/backward fine tuning button.
LEFT/RIGHT TURN FINE TUNING: If
your quadcopter veers to the left or
right, correct it with the left/right turn
fine tuning button.
LEFT/RIGHT ROLL FINE TUNING: If
your quadcopter rolls too much to the
left or right, correct it with the
left/right roll fine tuning button.
1 2 3 4

360° EVERSION
• Once you have a general understanding of how to
control the quadcopter you can activate the
360-degree eversion function.
• Fly the quadcopter at a minimum height of 9 feet.
• Press the 360-degree eversion button located on
the top right of the remote control, then move the
right control lever in the direction you wish to flip.
Pg. 5
RESTART
Turn on the remote control and the quadcopter. Push the left control
lever (throttle) to the
highest position, and
then pull it back to the
lowest position.
Hold the left and right
control levers in the
lower right corner
position for 2 to 3
seconds. The lights will
flash normally to indicate
a successful restart.
• Remove the battery from the quadcopter before charging.
• Charge the battery in a dry and ventilated location away from children.
• Let the the battery cool down before charging. Charging a warm battery could cause swelling and
result in a fire hazard. If the battery becomes swollen, replace it immediately.
• Only use the provided USB charging cable.
Turn the quadcopter o and
open the battery cover.
Pull the battery wire out of the
power port.
Connect the battery to the USB
charging cable. Make sure that the
ports are securely attached. Plug
the USB charging cable into an
outlet or computer to charge.
CHARGE TIME: 1.5 hours | FLIGHT TIME: 5.5 to 6.5 minutes
CHARGING THE BATTERY
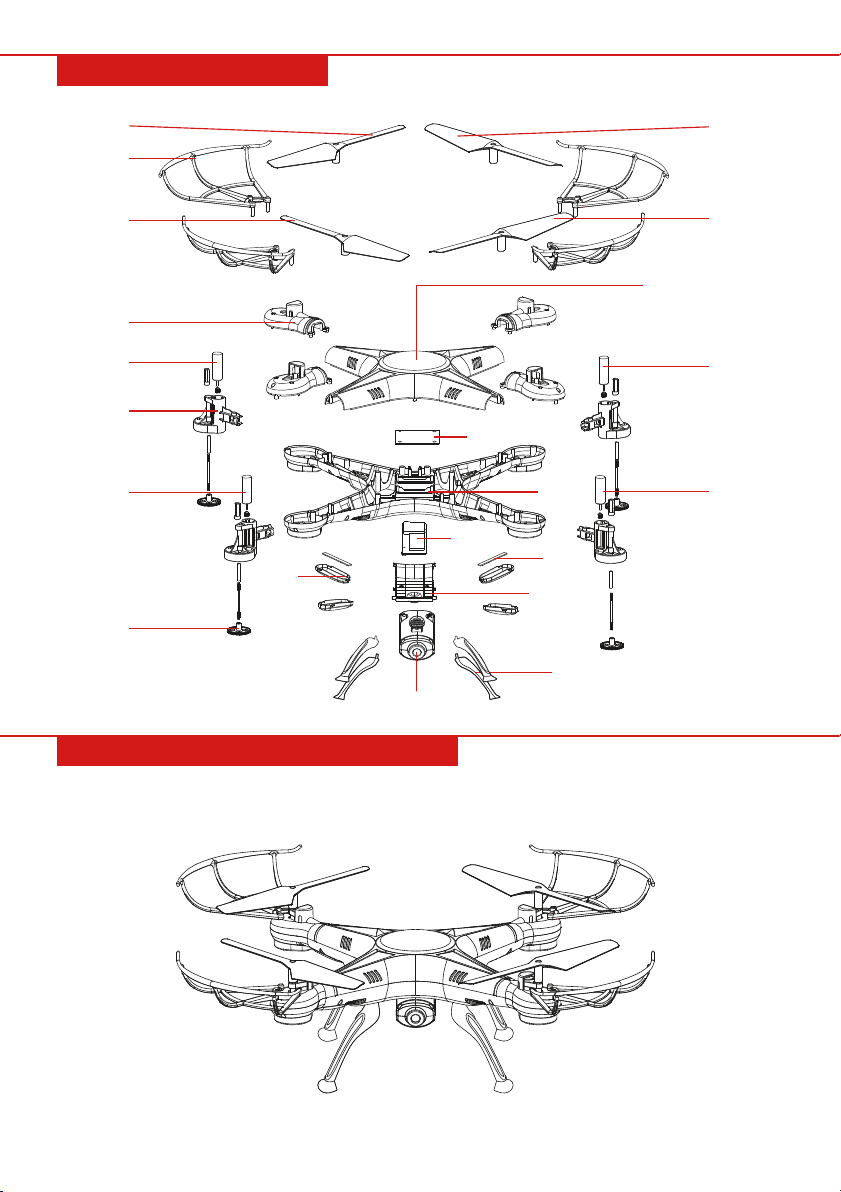
DRONE BREAKDOWN
Upper Body
Propeller
Reverse
Propeller
Reverse
Propeller
Motor
Cover
Motor
Reverse
Motor
Gear
Light
Cover
Light
Board
Battery
Battery
Cover
Landing Gear
Camera
Receiver Board
Motor
Enclosure
Motor
Reverse
Motor
Propeller
Propeller
Cage
Lower
Body
Pg. 6
INSTALLING SPARE PROPELLERS
Make sure that the propellers (A) and reverse propellers (B) are attached to the correct locations. The
following is the correct arrangement:
(A)
(A)
(B)
(B)
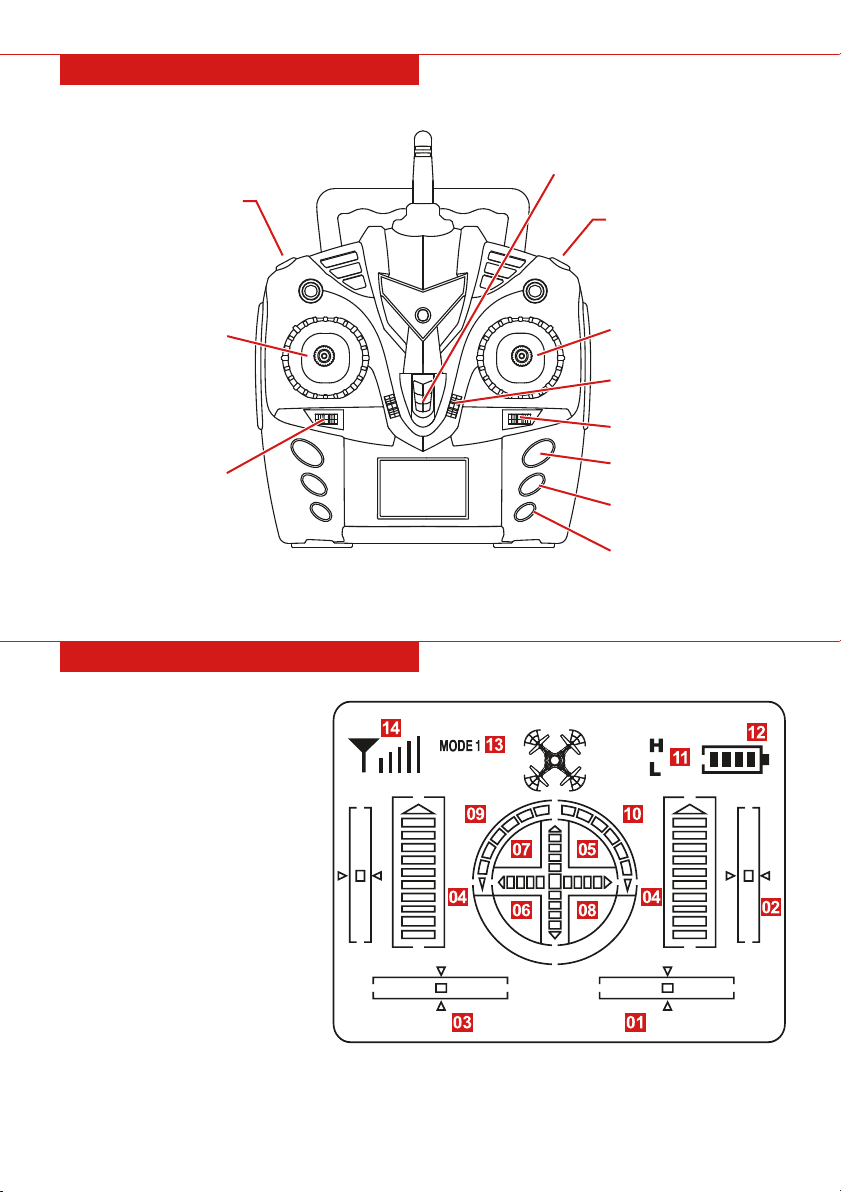
REMOTE CONTROL DIAGRAM
REMOTE CONTROL DIAGRAM
*Hold to the right prior to powering on
the remote to flip roll and turn controls
L/R turn fine tuning
Forward/backward fine tuning
L/R roll fine tuning
Throttle indicator
Forward indicator
Backward indicator
Left indicator
Right indicator
Left roll indicator
Right roll indicator
High/low speed display
Battery level of remote control
Mode 1 indicates normal roll and
turn controls. Mode 2 indicates
flipped roll and turn controls.
Wi-Fi signal strength
1.
2.
3.
4.
5.
6.
7.
8.
9.
10.
11.
12.
13.
14.
Pg. 7
Toggle
high/low speed
L/R roll fine tuning
Left control lever
(throttle)
Power on/o
360° eversion
Right control lever
Forward/backward
fine tuning
L/R turn fine tuning*
One touch
take-o/landing
Headless mode
Altitude hold

DOWNLOAD & INSTALLATION
iOS: Download & install the app “JAD-UFO” from the App Store.
Note:
The app description includes Chinese because the product is made in China. However, the
“JAD-UFO” app itself is in English. This is a third-party app; Best Choice Products does not own or operate
this app. Please contact the developer through the app store if you have any questions or concerns.
OR
SCAN HERE
OR
SCAN HERE
Android: Download & install the app “JAD-UFO” from the
Google Play Store.
JAD-UFO
JAD-UFO
Pg. 8
Turn on the drone. Navigate to your phone’s Wi-Fi settings and connect to
the drone’s Wi-Fi hotspot. The hotspot is named: WiFi-720P_XXXXXX
APP OPERATION
1
FOR FULL ACCESS TO THE
DRONE’S FEATURES,
DOWNLOAD THE PHONE APP!

Press Play to open the
remote control interface.
Press the Gear Icon to
open the app settings.
Pg. 9
Open the JAD-UFO app and the following menu will appear:
2
PREVIEW CAMERA IN 720P
FLIP ROLL AND TURN CONTROLS
ON: Photo/video saves to
media storage within app
OFF: Photo/video saves to
camera's SD card
SETTINGS

VOICE COMMANDS: “Take o” | “Landing” | “Forward” | “Back up” | “Left side” | “Right side”
Return to Main Menu
Take a Photo
Gravity Sensor: Flightpath mimics
the gyroscope of your phone
Toggle remote control interface
Record
Video
Photo/Video Playback
Access media storage to save photo/video to your phone
Altitude Hold: Maintain a consistent altitude
- Press this to toggle take-o/landing functions
Toggle
Drone
Speed:
30%
60%
100%
Toggle
additional
functions
Flip the
camera
Headless Mode: Fly the
drone at any orientation
Calibrate Gyroscope
One touch landing
Emergency stop
One touch take-o
360 ° eversion
Voice Command
Flight Planning:
Flightpath mimics
what you draw
First Person View (FPV):
Fly the drone in first
person view
(FPV headset not included)
REMOTE CONTROL INTERFACE
Table of contents
Other BCP Quadcopter manuals


