Beacon BC-3GM User manual

BC-3GM User Manual
HSPA
Cellular Router
3G
Wireless
w
ith secure HTTPS
BEACON GLOBAL TECHNOLOGY
Pa e
Cellular Router
BC-3GM User M
anual
Wireless
Internet Access Device via HSPA
ith secure HTTPS
environment
BEACON GLOBAL TECHNOLOGY
VERSION: v1.1.49
Technical Support: tech.support
@beacon
For more information: www.beacon
lobal
Pa e
1 of 39
anual
@beacon
t.com
lobal
tech.com

BC-3GM User Manual Pa e 2 of 39
Table of Contents
Copyright ............................................................................................................................. 3
Purpose ................................................................................................................................ 3
Revision History ................................................................................................................ 3
Tra emarks ......................................................................................................................... 3
Hea quarter ....................................................................................................................... 3
1. INTRODUCTION ............................................................................................................ 4
1.1.
OVERVIEW ..................................................................................................... 4
1.2.
MAIN FEATURE ............................................................................................ 5
2.
BRIEF INFORMATION ....................................................................................... 6
2.1.
APPEARANCE ................................................................................................ 6
2.2.
COMPONENT ................................................................................................. 6
2.3.
PACKAGES ..................................................................................................... 8
2.4.
SOFTWARE COMPOSITION ...................................................................... 9
2.4.1.
Web-base configuration page ....................................................... 9
2.4.2.
Firmware ................................................................................................ 9
3.
BEFORE USAGE .................................................................................................... 9
3.1.
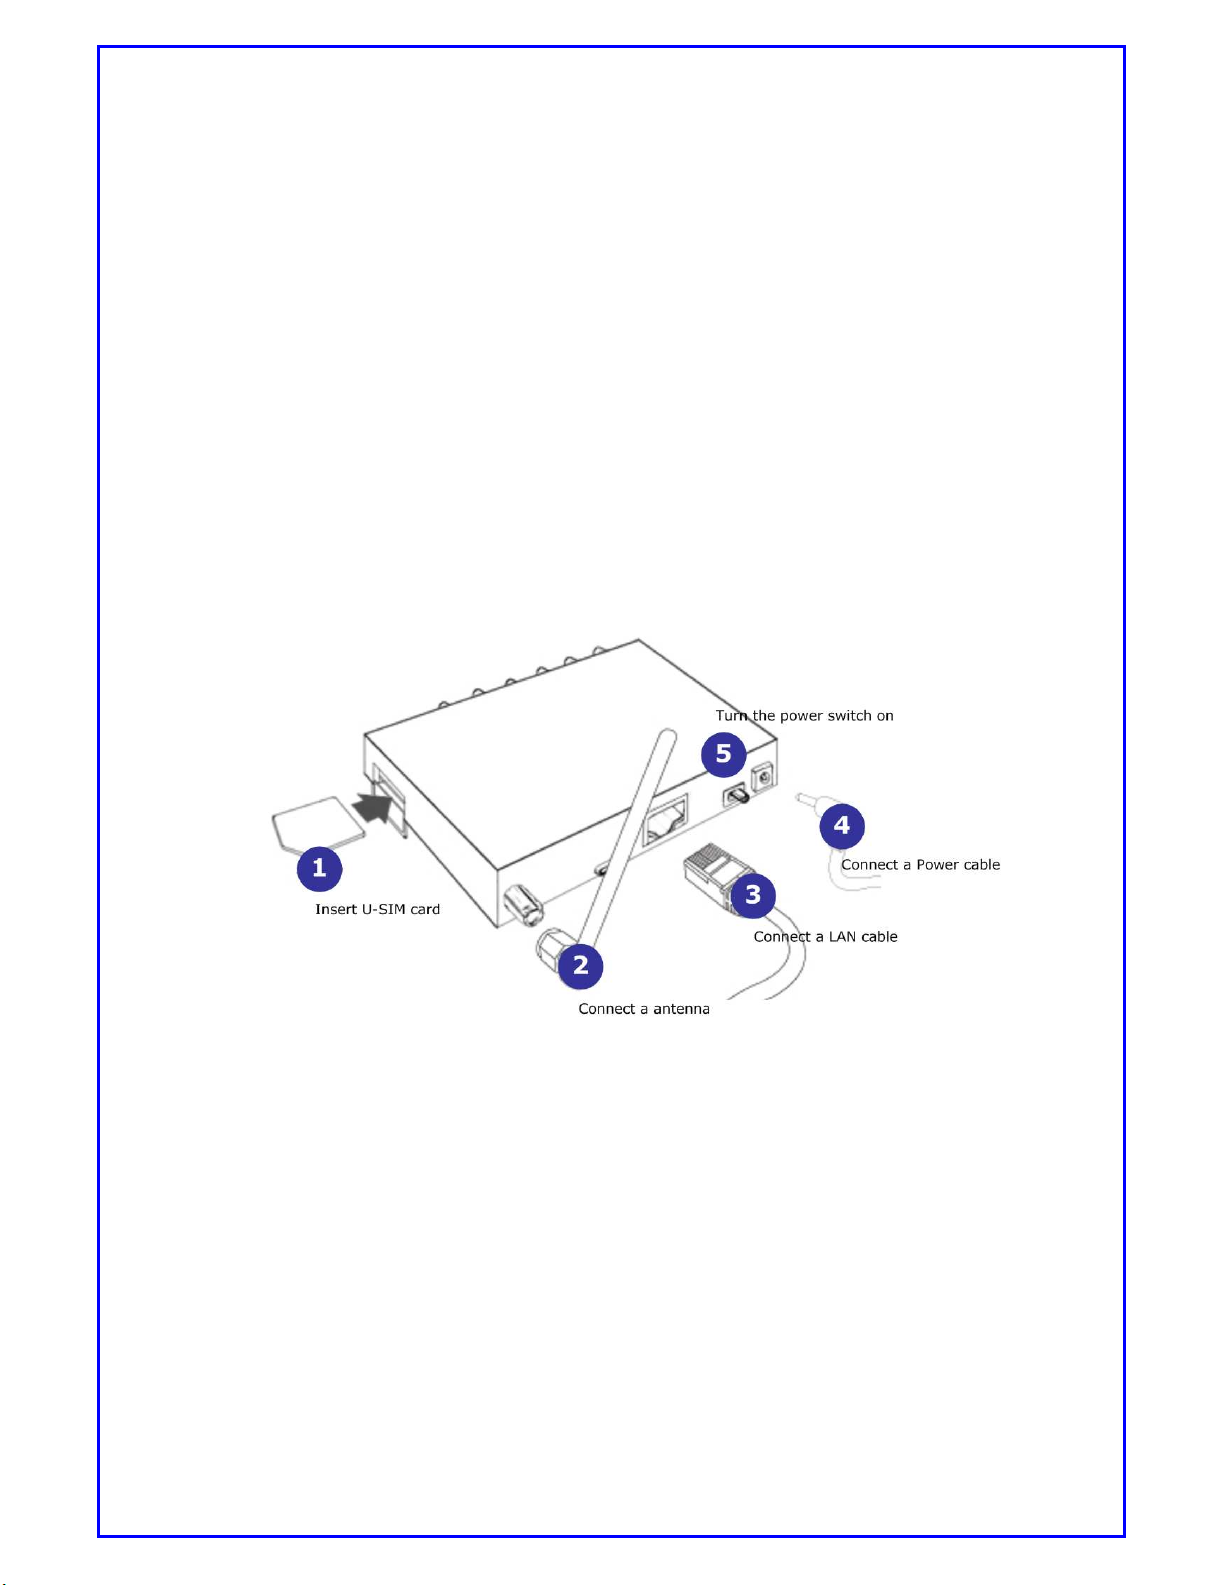
Installation ................................................................................................. 10
3.2.
Checking Device ........................................................................................ 10
3.3.
Un erstan ing Mo em Router Mo e .................................................. 11
4.
SETTING UP YOUR PC ENVIRONMENT ...................................................... 12
4.1.
Setting up host PC .................................................................................... 12
5.
ACCESSING WSU (WEB-BASED SETTING UTILITY) .............................. 14
5.1.
How to access WSU .................................................................................. 14
5.2.
How to configure WSU ............................................................................ 15
6.
CONFIGURATION OF INTERNET CONNECTION ...................................... 15
6.1.
Setting up your cellular environment ................................................ 15
6.1.1.
Accessing WSU ................................................................................... 15
7.
CONFIGURATION GUIDE ............................................................................... 29
7.1.
Rockwell/Allen-Bra ley PLC Configuration ...................................... 29
7.1.1.
Configuration Gui e .......................................................................... 29
7.2.
MODBUS TCP SMS .................................................................................... 37
8.
INFORMATION OF SMS FUNCTION IN HSPA ROUTER .......................... 39
8.1.
DSR.REBOOT ............................................................................................... 39
8.2.
DSR. NETINFO ............................................................................................... 39
8.3.
DSR.PPP = (ON or OFF) ........................................................................ 39

BC-3GM User Manual Pa e 3 of 39
Copyright
This user manual describes features, especially usa e of BC-3GM includin
hardware and software. BEACON GLOBAL TECHNOLOGY has made best effort to
ensure that the information contained in this document is accurate and reliable.
This document is the property of BEACON GLOBAL TECHNOLOGY and implies no
license under patents, copyri hts, trade secrets. No part of this publication should
be copied, reproduced, stored in a retrieval system, or transmitted, in any form or
by any means (electronic, mechanical, photo raphic, or otherwise) without the
prior permission of BEACON GLOBAL TECHNOLOGY.
Purpose
This manual includes how to use and confi ure the BC-3GM (Model name).
Revision History
This user manual is based on firmware version v1.1.49
Tra emarks
All other products or technolo ies are the trademarks or re istered trademarks of
their respective companies.
Hea quarter
Beacon Global Technolo y Inc.
1812 Delacorte Dr.,Bakersfield,CA 93311

BC-3GM User Manual Pa e 4 of 39
1. INTRODUCTION
1.1. OVERVIEW
BC-3GM is a 3G wireless internet access device with Ethernet interface, it
performs wireless internet service between PC and wireless WAN via HSPA
Cellular station.
BC-3GM inte rates a HSPA modem, a 32-bit MCU, system memories, a
10/100 Ethernet, Embedded OS, various network protocols for wireless
internet.
BC-3GM has some additional functionalities which include Always On-line;
HTTP Lo -On for security environment; IP Filterin and MAC filterin for
hi h security application.
BC-3GM also supports confi uration chan e whenever/wherever
necessary throu h Internet.
BC-3GM supports Keep-Alive function to ensure 7*24 hours online service.
BC-3GM is the best choice for industrial application.

BC-3GM User Manual Pa e 5 of 39
1.2. MAIN FEATURE
3G Wireless internet access device
Inte rated 3G wireless HSPA modem
A 10/100Mbps Ethernet interface
Embedded Operatin System
User friendly Web-based Mana ement Tool
6-Status LED indicates real-time status of the device
An external power switch
Support various Network Protocols
Support sendin both En lish and Chinese SMS messa es throu h
EtherNet/IP services from Rockwell Automation devices
Support sendin both En lish and Chinese SMS messa es throu h
Modbus TCP command
DHCP Server
NAT(Network Address Translation)
Confi uration chan e whenever/wherever necessary throu h Internet
HTTPS security access to avoid hackers attack
IP filterin , MAC filterin to ensure access for hi h security
Keep-Alive function to make sure system are 7*24 hours on-line.
Allow up to 3 re istered cellular phones to send SMS messa es to reboot
router and chan e settin s.

BC-3GM User Manual Pa e 6 of 39
2. BRIEF INFORMATION
2.1. APPEARANCE
Below picture shows the appearance and structure of BC-3GM.
[Picture 2.1: BC-3GM Appearance ]
2.2. COMPONENT
2.2.1. MiniDCJack
Must connect the iven power adapter DC 12V/1.5A on this jack.It can accept wide
ran e 6V-30VDC for industrial purpose.
2.2.2. Power S/W
Turn the power on or off.
2.2.3. Reset S/W
Reset the BC-3GM.
2.2.4. LAN
LED State Description
Green ON Indicates that 10Mbps LAN is connected.

BC-3GM User Manual Pa e 7 of 39
[Table 2.1 : LED indicator description on LAN port]
User can connect BC-3GM with Host PC, HUB, Router etc, via 10/100 LAN port. The
RJ-45 connector (LAN port) has two Link-LED. Table below lists out description for
each LED indicator.
2.2.5. Console
This port is for manufacturer use only. The console is desi ned mainly for dia nostic
data readin . Normally this port is for debu in .
2.2.6. Antenna Connector
This connector should be connected to an antenna.
2.2.7. HSPA Mo ule
This Router supports 3G 800/850/900/1700/1900/2100MHz with upload 384Kbps,
downlink 21.1Mbps and uplink 7.2Mbps. 2G 850/900/1800/1900MHz
2.2.8. 6-Status LED
BC-3GM has 6-Status LED to indicate real-time status.
* The LED position are from left to right on top view
LED Display Description
Power
ON Indicates that main power is on
OFF Indicates that main power is off
Modem
ON Reco nizes the HSPA modem
OFF Does not reco nize the HSPA modem.
Net
BLINK Indicates that data exists on 3G wireless network
OFF Indicates that data does not exist on 3G wireless network
IP
ON Indicates that cellular IP is received from ISP
OFF Indicates that cellular IP is not achieved from ISP.
BLINK Indicates that data exists via 10Mbps LAN.
OFF Indicates that 10M LAN is disconnected.
Oran e
ON Indicates that 100Mbps LAN is connected.
BLINK Indicates that data exists via 100Mbps LAN.
OFF Indicates that 100M LAN is disconnected.

BC-3GM User Manual Pa e 8 of 39
SIM
ON Indicates that U-SIM card is ready
OFF Indicates that U-SIM card is not ready
RSSI
ON Indicates that RF si nal sensitivity is perfect (Over 30)
BLINK
RF si nal sensitivity has low, fair, ood, excellent
Excellent: RSSI >= -79dbm On Off with 0.25s
Good:-90dBM <= RSSI <= -80dBm Off 1.5s On 0.25s
Fair:-103dBM <= RSSI <= -91dBm Off 1s On 0.25s
Low and None:RSSI< -103dBm Off 0.5s On 0.25s
This is based on CSQ level
None (99)
Low(from 0 to 4)
Fair(from 5 to 7)
Good(from 8 to 11)
Excellent(from 12 to 31)
OFF Indicates that RF si nal sensitivity is poor.
[Table 2.2: 6-Status LED indication]
2.2.9. U-SIM Socket
For metal housin , it shows location of SIM card on the CASE.
[Picture 2.2: 6-Status LED indication]
2.3. PACKAGES
BC-3GM full packa e includes:
1. BC-3GM

BC-3GM User Manual Pa e 9 of 39
2. UTP Cable (Direct)
3. DC 12V/1.5A Adapter
2.4. SOFTWARE COMPOSITION
BC-3GM software includes:
2.4.1. Web-base configuration page
BC-3GM has a web-based confi uration pa e that user can access and
make chan es on confi urations.
2.4.2. Firmware
Firmware is the pro ram operatin the BC-3GM.
Firmware: Version BC-3GM- v1.1.49*
*
This version name will be changed whenever this is updated.
3.
PREPARE DEVICE

BC-3GM User Manual Pa e 10 of 39
3.1. Installation
BC-3GM is a 3G wireless internet access device with PC or other LAN devices
via HSPA mobile station.
To install this device, please follow 5 steps below (correspondin position is
marked in picture 3) to complete installation.
1. Insert U-SIM card into the slot named “SIM”
2. Connect the proper antenna.
3. Connect the LAN cable between PC and LAN port of this device.
4. Connect the power adapter.
5. Turn on the power switch.
[Picture 3.1: Installation of BC-3GM]
3.2. Checking Device

BC-3GM User Manual Pa e 11 of 39
BC-3GM initial status is set as PPP (NAT Router) and Always On-line mode.
When you et this device for the first time, it is su ested to perform device
check followin below steps.
1. Install BC-3GM referrin to “3.1 Installation.”
* Be sure the LAN cable must be connected between P and B -3GM.
2. When you turn on the power switch, the LED named “POWER” is on.
3. The LED named “MODEM” is on.
* You would see this LED on in 20 seconds. Should you met any problems please contact us
4. The LED named “SIM” is on.
* If this “SIM” LED is not on in 60 seconds, please check the whether the U-SIM card is
correctly inserted.
5. The LED named “NET” is asynchronously blinkin .
* Whenever data are transferred or received from/to 3G wireless network, this “NET” LED will
be blinking asynchronously.
6. The LED named “RSSI” is on or blinkin .
* When this “RSSI” LED is off, please check whether the antenna is correctly connected
7. The LED named “IP” is on.
* When you use wireless internet, this “IP” LED must be on. It might take a little while to get
cellular IP because it depends on the current mobile network status. If this LED is not on,
please check the configuration of [WAN] menu.
(Refer to “6.1.1 Accessing WSU, 3) Select [Network] page then lick [WAN] menu.” for
more details)
3.3. Un erstan ing Mo em Router Mo e
On Modem router mode, BC-3GM ets an IP from ISP (Internet Service Provider)
then BC-3GM keeps the IP and shares the IP with connected Host PC via NAT.

BC-3GM User Manual Pa e 12 of 39
The main feature is that BC-3GM ets the mobile IP from ISP and your PC
connected with BC-3GM has a private IP from DHCP of BC-3GM.
On Modem Router mode, there are two kinds of options, one is always On-line and
the other one is Demand On-line under Manual mode. For these options, please
refer to [WAN] settin s.
4. SETTING UP YOUR PC ENVIRONMENT
4.1. Setting up host PC
BC-3GM initial status is set as Modem router mode/Always On-line for the first
time. Therefore the first step is to connect a LAN cable (Direct) between your
PC and LAN port of BC-3GM. Set the network environment of your PC as
automatically.
1. Take Windows XP as an example, to connect between PC and BC-3GM, point
cursor over “My Network Places” and click ri ht button on your mouse, then
select [properties] in the menu.
[Picture 4.1: Step 1 of settin up your PC’s network environment]
2. Check the “Local Area Connection” then click the ri ht button on your mouse
then select [Properties] in the menu.

BC-3GM User Manual Pa e 13 of 39
[Picture 4.2: Step 2 of settin up your PC’s network environment]
3. Go to “General” Tab, scroll down the ri ht hand side bar until you see “Internet
Protocol [TCP/IP]”, then double click it.
[Picture4.3: Step 3 of settin up your PC’s network environment]
4. Check “Obtain an IP address automatically” then click the [OK] button.

BC-3GM User Manual Pa e 14 of 39
[Picture 4.4: Step 4 of settin up your PC’s network environment]
5. After settin up Host PC, please connect a LAN cable between PC and BC-3GM,
then connect power cable between BC-3GM to power supply. Turn the power
switch on then you will be able to see LED “IP” is on soon.
5. ACCESSING WSU (WEB-BASED SETTING UTILITY)
5.1. How to access WSU
WSU (Web-based Settin Utility) will provide a web-based interface for users to
access and make confi uration. This web-based confi uration pa e just needs a
couple simple steps to setup.
1) Set up your PC’s network environment as automatically referrin to “4.
SETTING UP YOUR PC ENVIRONMENT”
2) Connect the LAN and power cable on BC-3GM.
3) Launch the web browser on your PC then write IP address, https://192.168.0.1:
443/home.asp (Set by default). This router is desi ned for Security HTTP env
ironments. Port 443 accepts IE, Opera, Firebox.etc to access data under sec
ure environment.
4) The pop-up window of lo in pa e appears.

BC-3GM User Manual Pa e 15 of 39
[Picture5.1: Lo -in window]
* Default setting is
User name: admin
Password: admin
You can change this option on [System config] .1page ->[SYSTEM]menu.
5) When you enter the correct information, you will access WSU.
5.2. How to configure WSU
When you finish confi uration please click [Apply Changes] button, then
please reboot BC-3GM to make new settin effective.
Rebootin BC-3GM is a must. Click [REBOOT] menu, which will make new
settin s effective.
6. CONFIGURATION OF INTERNET CONNECTION
6.1. Setting up your cellular environment
6.1.1. Accessing WSU
1) Access WSU referrin to 5.1.1 How to access WSU
2) [Home] pa e will be shown as below picture.

BC-3GM User Manual Pa e 16 of 39
[Picture 6.1: Home pa e of WSU]
Up Time: The time period that router has been ON.
IMEI: ID Number of router.
Firmware version: It shows which firmware version that router is runnin .
Area Information: It shows to which cell station that router is connectin .
PIN Status: It shows PIN status.
Signal level: This shows the si nal stren th. The hi her value shows stron er
si nal. For example -65dbM is better than -80dbm.
WAN: It indicates whether router is connected to network. If connected, it will
show IP address that has been assi ned to this router. It also associates with
volume of data that has been uploaded or downloaded.
LAN: It shows IP address of this router within local network.
3) Select [Network] pa e then click the [WAN] menu.

BC-3GM User Manual Pa e 17 of 39
[Picture6.2: Settin up WAN menu]
Mo e: Mo em router and Disable are available to select. Default value
is Mo em router
APN Name: It is provided by service provider to link to internet. For example,
in Australia, Telstra has a few different APN names. Please use correct one for
your service. Default value will be set as “internet”
Username: Username for your account if any.
Passwor : Password for your account if any.
Authentication: To choose PAP or CHAP or PAP & CHAP. Default is PAP &
CHAP.

BC-3GM User Manual Pa e 18 of 39
[Picture 6.3: Settin up WAN menu]
Auto PIN: To choose from Disable or enable. If you choose enable, Router
will enter PIN code automatically each time router is powered on.
Please keep your PIN co e in safe place. If wrong co e is entere for
3 times, SIM car will be locke by user. By this case, you will nee to
ask service provi er to provi e PUK co e to unlock your SIM.
Perio ic Reset: Router will be reset accordin to preset timer. Value is from
1-24 hours. Default is Disable.
Keep Alive: This is to make sure that router is on-line all the time. If enable
is chosen, router will pin to private server with interval time and IP set by
user on 1
st
or 2
n
or both server. When it fails, it will be counted as 1 time. If
count reaches preset times, router will be reset and re-connect a ain.

BC-3GM User Manual Pa e 19 of 39
[Picture 6.4: Keep alive menu]
4) Select [LAN]
Gateway IP: Choose from Static or DHCP Client. If Static is chose, Router
will use static IP address shown on “IP address”. If choose DHCP Client,
Router IP address will be assi ned by connectin host. Default to static.
IP A ress: To assi n IP address for Router. Default to 192.168.0.1
Subnet Mask: Default to 255.255.255.0
DHCP Client Range: This is the ran e that Router will assi n IP address to
device which connects to this router. Default is 192.168.0.200-
192.168.0.250
1
st
DNS: To set up DNS address. Default is 168.126.63.1
2
n
DNS: To set up DNS address. Default is 168.126.63.2
Assign IP by MAC: This is to prevent that devices link to router which may
be assi ned by different IP address every time router power on or reboot. It
can be added up to 10 MAC address. The same MAC address cannot be assi n
to different IP address.You can enter MAC address format as both 00-00-00-
00-00-00 and 00:00:00:00:00:00. And if router has entered MAC address
format as 00:00:00:00:00:00, it will chan e format to 00-00-00-00-00-00.
So you can see format as 00-00-00-00-00-00 only in list.
When you finish this settin , you must click [Apply change] button

BC-3GM User Manual Pa e 20 of 39
[Picture 6.5: Settin up LAN menu]
5) Click [A vance ] then [DMZ]
This is to enable or disable DMZ function. If DMZ is Enable , please enter DMZ
Host IP a ress. Default is disabled.
[Picture 6.6: Settin up DMZ menu]
Table of contents
Popular Network Router manuals by other brands

ZyXEL Communications
ZyXEL Communications LTE3311 series quick start guide

Sierra Wireless
Sierra Wireless RX55 quick start guide

Elpro Technologies
Elpro Technologies 905U-E user manual

SMC Networks
SMC Networks 8708L2 installation guide

Tenda
Tenda TEG1016G manual

Asus
Asus RT-N13U - Wireless Router quick start guide