Beat-Sonic NDS6223EP User manual

Beat-Sonic Installation Instructions:
Product: NDS6223EP
Car Model: 2013 - 2015 Lexus RX series
Disclaimer:
We are not responsible to damage, loss or injury caused from attempting or performing the DIY. Further, the navigation
and DVD lock while in motion was originally installed for safety reasons. By unlocking the navigation and DVD lock, we
are assuming that the navigation and DVD will be controlled and enjoyed by the passenger and not by the driver. As such,
are not responsible to damage, loss or injury from using the bypass modules. Please be responsible drivers!
For additional information, contact: info@beatsonicusa.com
About the Beat-Sonic NAV/DVD Bypass Module:
System: 100% Plug and play kit from Beat-Sonic for allowing use of factory features that would be locked out during
vehicle movement.
These plug and play module kits allow override of the lock out system equipped in your factory Navigation/DVD system
when the vehicle is in motion. Due to the fact that no modification is needed on the factory harness and this is 100%
plug and play, it is easily reversible to the original factory specs without showing any signs that this modification was
ever made.
The NDS kit provides automatic video in motion for the DVD player at all times. Navigation in motion is activated by the
steering wheel volume control buttons by pressing volume up (+), down (-), up (+), down (-) in sequence and at normal
cadence. While navigation in motion is activated, the navigation system will temporarily lose its GPS location and the
position indicator on the navigation screen will stop moving. By default, a programmable timer will reset the navigation
in motion to switch off after 3 minutes.
Navigation in motion can be switched off before the timeout period has expired by repeating the volume control button
sequence up (+), down (-), up (+), down (-).
This device is suitable for Lexus generation 7 and 8 navigation systems. The full time video in motion feature is
compatible with all navigation system features including Lexus App Suite, Enform App Suite and energy consumption
display found on hybrid models.
The DIY Installation Starts Here:
PRECAUTION:
After turning the engine switch off, waiting time may be required before disconnecting the cable from the negative (-) battery terminal.
A Hard Disk Drive (HDD) is built into the multi-media module receiver assembly to store map and other data, and is used for the
navigation system. Therefore, care must be taken for the following points when handling the multi-media module receiver assembly.
When removing the hard disk drive, eliminate static electricity by touching the vehicle body to prevent components from being damaged.
1. DISCONNECT CABLE FROM NEGATIVE BATTERY TERMINAL
When disconnecting the cable, some systems need to be initialized after the cable is reconnected
2. REMOVE SHIFT LEVER KNOB SUB-ASSEMBLY

Turn the shift lever knob sub-assembly counterclockwise and
remove the shift lever knob sub-assembly.
3. REMOVE UPPER CONSOLE PANEL SUB-ASSEMBLY
a) Move the shift lever to N.
b) Pull the upper console panel sub-assembly in the
direction indicated by the arrow to disengage the 4
claws and 4 clips.
c) w/o Seat Heater System: Disconnect the connector
from the console box hole cover.
d) w/ Seat Heater System:
a. Disengage the 6 claws.
b. Disconnect the connector and remove the
seat heater switch with console box hole
cover.
e) Pull the upper console panel sub-assembly in the
direction indicated by the arrow to disengage the 3
claws and 3 clips.
f) Disconnect each connector.
g) Disengage the clamp and remove the upper console panel sub-assembly.
4. REMOVE INSTRUMENT PANEL GARNISH
a) Using molding remover B, disengage the 6 clips and
remove the instrument panel garnish LH as shown in
the illustration.
5. REMOVE NO. 1 SWITCH HOLE BASE
a) Push the No. 1 switch hole base in the direction
indicated by the arrow to disengage the 4 claws and 2
guides.
b) Disconnect each connector and remove the No. 1
switch hole base.
6. REMOVE LOWER INSTRUMENT PANEL FINISH PANEL SUB-ASSEMBLY
a) Disengage the 2 claws and open the cover as shown
in the illustration.
b) Remove the 2 screws.
7. REMOVE INSTRUMENT PANEL FINISH PANEL
a) Pull the instrument panel finish panel in the direction
indicated by the arrow to disengage the claw, 2 clips
and 2 guides, and remove the instrument panel finish
panel
8. REMOVE LOWER INSTRUMENT PANEL FINISH PANEL
a) Pull the lower instrument panel finish panel in the
direction indicated by the arrow to disengage the 7
clips and remove the lower instrument panel finish
panel.

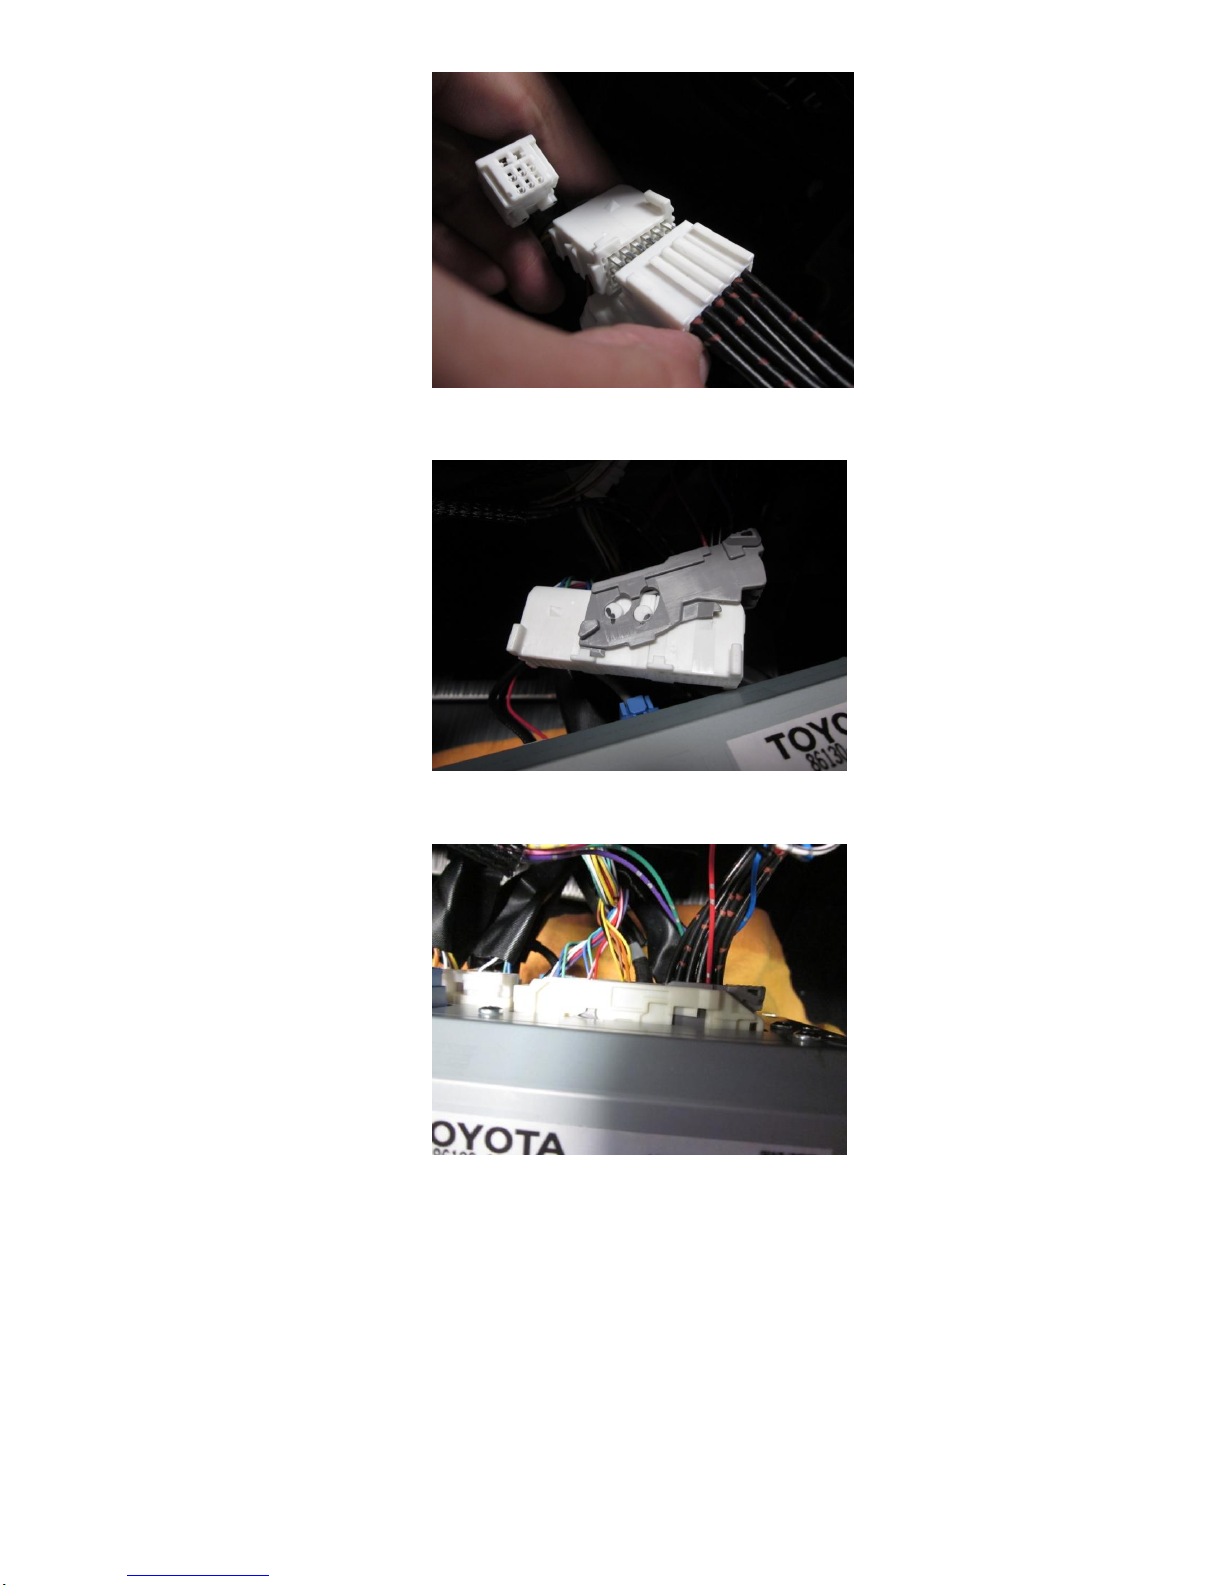
9. MULTI-MEDIA MODULE RECEIVER ASSEMBLY
a) Remove the 4 bolts.
b) Disengage the 7 clips.
c) Disconnect each connector and remove the multi-
media module receiver assembly with register.
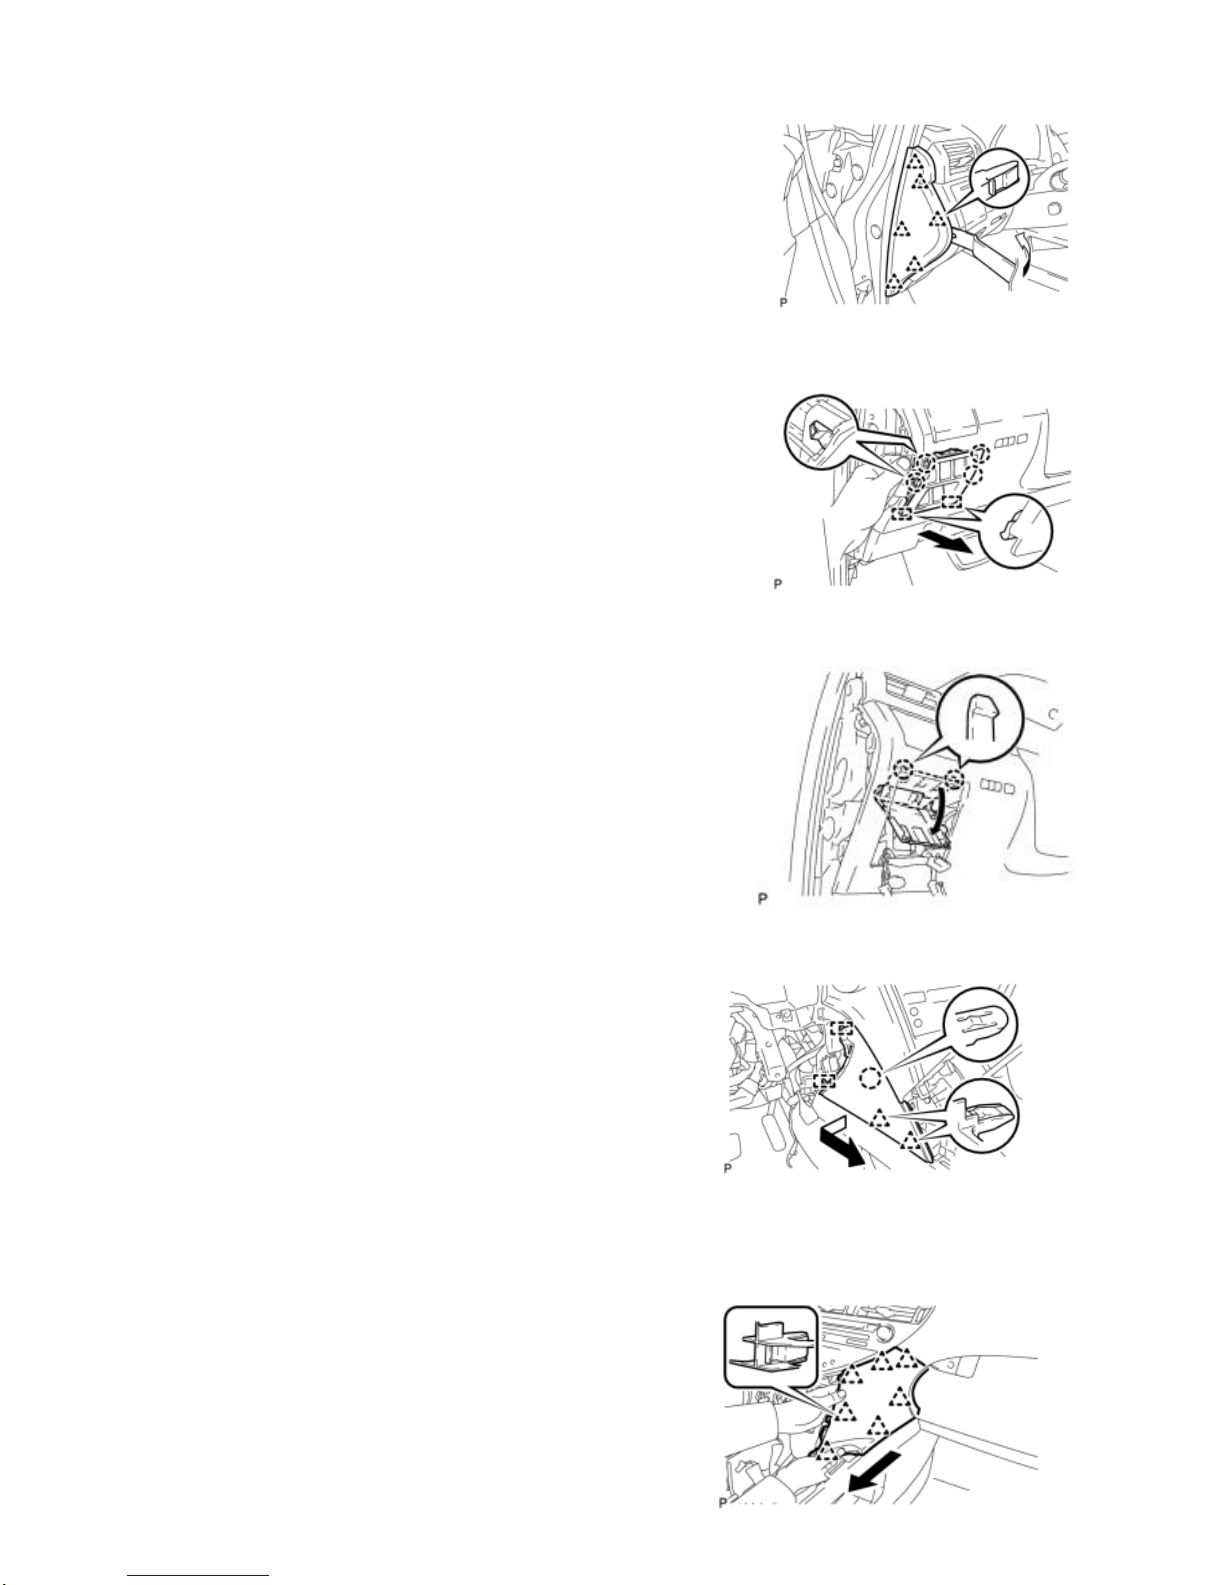
d) Locate the NDS6223EP Connector by pulling the
multi-media module forward exposing the connectors
behind it.
10. INSTALLING THE CONNECTOR
The connector circled in red is what
you will be working on.
Take a flat head screw driver to
release the clip on the right side of the
connector. Then pull the connector
out.
Carefully remove the gray bracket,
which is being used to keep the three
connectors together.
The right side of the connector is what
you need to disconnect from the main
connector.
Connect the male side of the
NDS6223EP connector to the female
connector which was disconnected
from the previous step. Make sure the
connection is secure and that none of
the pins are exposed on the side.
Take the female side of the
NDS6223EP connector and link it back
to the main connector, then mount
the gray bracket back to the main
connector.
Once the main connector is in one
piece with the gray bracket, insert it
back to behind the oem head unit
11. The GPS Connector.
2013-2015 Lexus RX owners: Please do not use the 1-pin connectors on the NDS6223EP. GPS on the 2013-2015
RX models does not engage the safety lockout feature. Wrap the 1-pin connectors on the NDS6223EP
individually by using the electric tape and isolate them to avoid any unwanted contacts with other wires or
connectors.
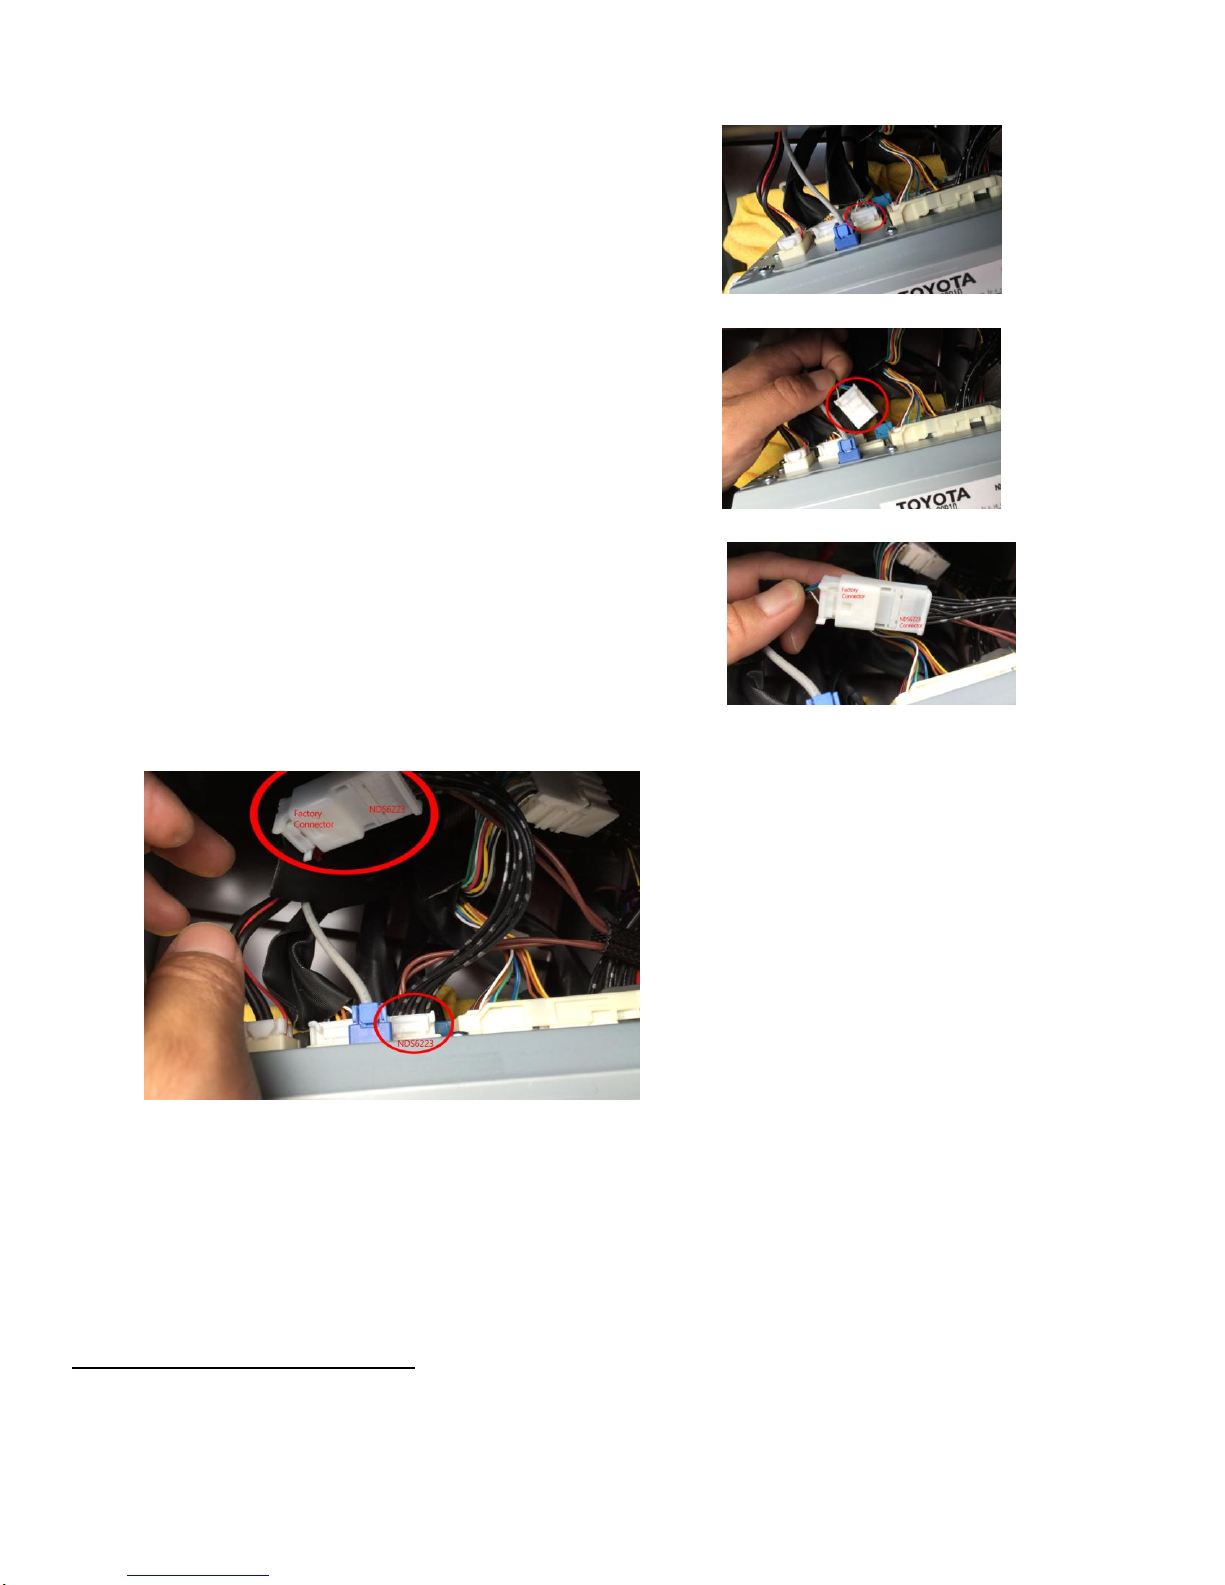
12. The steering wheel connector.
Locate the matching connector behind the
factory head unit as shown on the photo.
Disconnect the steering wheel control
connector.
Connect the matching connector on the
NDS6223EP to the factory steering wheel
control connector what you just disconnected
from the head unit.
Connect the other side of the NDS6223EP connector to the factory head unit.
Programming the switch
The default setting of the NDS6223EP is programmed to turn off automatically after 3 min. Please read the enclosed
programming instruction (found inside the retail box) and program the switch to your desired setting.
TEST THE UNIT AND REVERSE PROCESS:
Test the unit to make sure it is working well and then perform the above steps in reverse to put everything back to normal and
you are done!
Other manuals for NDS6223EP
4
Table of contents
Other Beat-Sonic Car Navigation System manuals


