Beautiful 19041 User manual

FRONT CoverFRONT Cover
Digital Air Fryer Toaster Oven with Touch-Activated Display
Instruction Manual
Horno tostador con freidor de aire digital con pantalla toque
Manual de instrucciones
19041, 19042, 19043, 19015 Beautifu TOV IM_r14.indd 119041, 19042, 19043, 19015 Beautifu TOV IM_r14.indd 1 2021-04-07 10:51 AM2021-04-07 10:51 AM

The kitchen is my family’s happy
place. It’s where we cook and eat
and bake and laugh and share our
most beautiful moments together.
That’s what inspired the creation
of Beautiful, my new collection
of easy-to-use kitchenware that
you’ll want to keep out on your
kitchen counter. So whether
your kitchen has flour all over
the place from a kid's baking
session or you’re throwing an adult
dinner party, I hope every step will
be simple, delicious and beautiful!
www.cookwithbeautiful.com
19041, 19042, 19043, 19015 Beautifu TOV IM_r14.indd 219041, 19042, 19043, 19015 Beautifu TOV IM_r14.indd 2 2021-04-07 10:51 AM2021-04-07 10:51 AM

Section 1: Safety
Important Safeguards............................................ 4-6
Additional Important Safeguards................................. 7-8
Notes on the Plug ................................................ 9
Notes on the Cord ................................................ 9
Plasticizer Warning .............................................. 10
Electric Power ................................................... 10
Section 2: Instructions
Getting to Know Your Digital Air Fryer Toaster Oven .............. 12
Touch-Activated Display Control Panel ......................... 13-18
Shelf Positions .................................................. 18
Weight/Size Restrictions ......................................... 18
Bake/Broil Assembly .............................................. 19
Cooking Containers............................................... 19
Before Using for the First Time.................................. 20
Operation..................................................... 21-22
Preset Times & Temps............................................. 23
Convection Fan Control........................................... 24
Air Fry, Broil, Bake, Toast/Bagel ................................ 24
Convection Broil / Broil......................................... 25
Air Fry / Convection Broil Cooking Chart ..................... 25-28
USDA Cooking Guidelines.......................................... 29
Warm, Pizza, Cookies, Slow Cook, Reheat, Dehydrate ........... 29-32
Figures .......................................................... 32
Beautiful Function Hints ...................................... 33-34
User Maintenance Instructions .................................... 35
Care & Cleaning Instructions ..................................... 35
Storing Instructions ............................................. 36
Warranty ...................................................... 37-38
Table of Contents
19041, 19042, 19043, 19015 Beautifu TOV IM_r14.indd 119041, 19042, 19043, 19015 Beautifu TOV IM_r14.indd 1 2021-04-07 10:51 AM2021-04-07 10:51 AM

2
Sección 1: Seguridad
Medidas de seguridad importantes ............................. 40-43
Otras medidas de seguridad importantes ....................... 44-45
Notas sobre el enchufe .......................................... 46
Notas sobre el cable ......................................... 46-47
Advertencia sobre plasticados................................... 47
Potencia eléctrica ............................................... 47
Sección 2: Instructions
Descripción del horno tostador con freidor de aire digital....... 49
Panel de control de pantalla activado por toque .............. 50-56
Posiciones de la rejilla ......................................... 56
Restricciones de peso o tamaño .................................. 57
Conjunto para hornear/asar ....................................... 57
Recipientes de cocción........................................... 57
Antes de usar por primera vez ................................ 58-59
Funcionamiento ................................................ 59-60
Tiempos y temperaturas preprogramadas ........................ 60-62
Control del ventilador de convección ............................ 62
Air fry (cocción con aire), broil (asar), bake (hornear), toast/bagel
(tostar/panecillo) ............................................ 62-63
Convection broil/broil (asar/asar por convección) ................ 64
Tabla de cocción con aire/asar por convección................. 65-69
Pautas de cocción del USDA ...................................... 70
Warm (mantener caliente), pizza, cookies (galletas), slow cook
(cocción lenta), reheat (recalentar), dehydrate (deshidratar)... 70-73
Figuras .......................................................... 73
Consejos sobre funciones de beautiful..........................74-76
Instrucciones de mantenimiento para el usuario ................... 76
Instrucciones de cuidado y limpieza.............................. 77
Instrucciones de almacenamiento.................................. 78
Garantía ...................................................... 79-80
Índice
19041, 19042, 19043, 19015 Beautifu TOV IM_r14.indd 219041, 19042, 19043, 19015 Beautifu TOV IM_r14.indd 2 2021-04-07 10:51 AM2021-04-07 10:51 AM

Section 1
Safety
1
19041, 19042, 19043, 19015 Beautifu TOV IM_r14.indd 319041, 19042, 19043, 19015 Beautifu TOV IM_r14.indd 3 2021-04-07 10:51 AM2021-04-07 10:51 AM

4
IMPORTANT SAFEGUARDS
When using electrical appliances, basic safety precautions
should always be followed including the following:
1. READ ALL INSTRUCTIONS.
2. Do not touch hot surfaces. Use handles or knobs.
3. To protect against electrical shock do not immerse
cord, plugs, or appliance in water or other liquid.
4. This appliance is not intended for use by persons
(including children) with reduced physical, sensory
or mental capabilities, or lack of experience and
knowledge, unless they have been given supervision or
instruction concerning use of the appliance by a person
responsible for their safety.
5. Children should be supervised to ensure that they do
not play with the appliance.
6. Unplug from outlet when not in use and before cleaning.
Allow Toaster Oven to cool before putting on or taking
off parts.
7. Do not operate any appliance with a damaged cord or
plug, or after the appliance malfunctions, or has been
damaged in any manner. Contact Consumer Service.
NOTE: DO NOT ATTEMPT TO REPAIR THE UNIT YOURSELF. THIS
WILL VOID THE WARRANTY.
8. The use of accessory attachments not recommended by the
appliance manufacturer may cause injuries.
19041, 19042, 19043, 19015 Beautifu TOV IM_r14.indd 419041, 19042, 19043, 19015 Beautifu TOV IM_r14.indd 4 2021-04-07 10:51 AM2021-04-07 10:51 AM

5
9. Do not use outdoors.
10. Do not let cord hang over edge of table or counter, or
touch hot surfaces.
11. Do not place on or near a hot gas or electric burner, or
in a heated oven.
12. Extreme caution must be used when moving an appliance
containing hot oil or other liquids.
13. To disconnect, press or any illuminated FUNCTION
button to turn the Toaster Oven OFF.
14. Remove the plug from the wall outlet.
15. Do not use appliance for other than intended use.
16. Oversize foods or metal utensils must not be inserted
in the Toaster Oven as they may create a re or risk of
electric shock.
17. A re may occur if the Toaster Oven is covered or
touching ammable material, including curtains,
draperies, walls, and the like, when in operation.
Do not store any item on top of the appliance when in
operation.
18. Do not clean with metal scouring pads. Pieces can break
off the pad and touch electrical parts involving a risk
of electrical shock.
19. Extreme caution should be exercised when using
containers constructed of other than metal or glass.
20. Do not store any materials, other than manufacturer’s
recommended accessories, in this Toaster Oven when not
in use.
19041, 19042, 19043, 19015 Beautifu TOV IM_r14.indd 519041, 19042, 19043, 19015 Beautifu TOV IM_r14.indd 5 2021-04-07 10:51 AM2021-04-07 10:51 AM

6
21. Do not place any of the following materials in the
Toaster Oven: paper, cardboard, plastic, and the like.
22. Do not cover crumb tray or any part of the Toaster Oven
with metal foil. This will cause overheating of the
Toaster Oven.
23. Use extreme caution when removing the crumb tray or
disposing of hot grease.
24. Do not cover the Toaster Oven with anything that would
prevent steam from escaping. This may cause warping,
discoloration, malfunction or even re.
FOR HOUSEHOLD
USE ONLY
SAVE THESE
INSTRUCTIONS
19041, 19042, 19043, 19015 Beautifu TOV IM_r14.indd 619041, 19042, 19043, 19015 Beautifu TOV IM_r14.indd 6 2021-04-07 10:51 AM2021-04-07 10:51 AM

7
ADDITIONAL IMPORTANT
SAFEGUARDS
CAUTION HOT SURFACES: This appliance generates heat and
escaping steam during use. Proper precautions must be
taken to prevent the risk of burns, res, or other injury
to persons or damage to property.
1. A person who has not read and understood all operating
and safety instructions is not qualied to operate this
appliance. All users of this appliance must read and
understand this instruction manual before operating
orcleaning this appliance.
2. If this appliance falls or accidentally becomes
immersed in water, unplug it from the wall outlet
immediately. Do not reach into the water!
3. When using this appliance, provide adequate air space
above and on all sides for air circulation. Do not
operate this appliance while it is touching or near
curtains, wall coverings, clothing, dishtowels or other
ammable materials.
4. To reduce the risk of re, do not leave this appliance
unattended during use.
19041, 19042, 19043, 19015 Beautifu TOV IM_r14.indd 719041, 19042, 19043, 19015 Beautifu TOV IM_r14.indd 7 2021-04-07 10:51 AM2021-04-07 10:51 AM

8
5. If this appliance begins to malfunction during use,
press or any illuminated FUNCTION button. Remove
the plug from the wall outlet. Do not use or attempt
torepair a malfunctioning appliance!
Contact Consumer Service
6. The cord to this appliance should only be plugged into
a 120V AC electrical wall outlet.
7. Do not use this appliance in an unstable position.
8. To reduce the risk of burns or other injuries, do not
touch hot surfaces. Use of protective oven mitts or
gloves as well as long-handled utensils is recommended.
9. To reduce the risk of injury to persons or property,
unplug this appliance before inserting food. Always
keep the appliance unplugged from the wall outlet when
not in use.
CAUTION: Never leave the Toaster Oven unattended while
inuse.
19041, 19042, 19043, 19015 Beautifu TOV IM_r14.indd 819041, 19042, 19043, 19015 Beautifu TOV IM_r14.indd 8 2021-04-07 10:51 AM2021-04-07 10:51 AM

9
NOTES ON THE PLUG
This appliance has a polarized plug (one blade is wider
than the other). To reduce the risk of electric shock,
thisplug will t in a polarized outlet only one way. If the
plug does not t fully into the outlet, reverse the plug.
If it still does not t, contact a qualied electrician.
Donot modify the plug in any way.
NOTES ON THE CORD
a) A short power-supply cord (or detachable power-supply
cord) is to be provided to reduce risks resulting from
becoming entangled in or tripping over a longer cord.
b) Longer detachable power-supply cords or extension cords
are available and may be used if care is exercised in
their use.
c) If a long detachable power-supply cord or extension
cord is used:
1) The marked electrical rating of the detachable
power-supply cord or extension cord should be at least
as great as the electrical rating of the appliance;
2) If the appliance is of the grounded type, the extension
cord should be a grounding- type 3-wire cord; and
3) The longer cord should be arranged so that it will
not drape over the counter top or table top where it can
be pulled on by children or tripped over.
19041, 19042, 19043, 19015 Beautifu TOV IM_r14.indd 919041, 19042, 19043, 19015 Beautifu TOV IM_r14.indd 9 2021-04-07 10:51 AM2021-04-07 10:51 AM

10
PLASTICIZER WARNING
CAUTION: To prevent Plasticizers from migrating to the
nish of the counter top or table top or other furniture,
place NON-PLASTIC coasters or place mats between the
appliance and the nish of the counter top or table top.
Failure to do so may cause the nish to darken; permanent
blemishes may occur, or stains can appear.
ELECTRIC POWER
If the electrical circuit is overloaded with other
appliances, your appliance may not operate properly.
It should be operated on a separate electrical circuit
from other appliances.
19041, 19042, 19043, 19015 Beautifu TOV IM_r14.indd 1019041, 19042, 19043, 19015 Beautifu TOV IM_r14.indd 10 2021-04-07 10:51 AM2021-04-07 10:51 AM

Section 2
Instructions
2
19041, 19042, 19043, 19015 Beautifu TOV IM_r14.indd 1119041, 19042, 19043, 19015 Beautifu TOV IM_r14.indd 11 2021-04-07 10:51 AM2021-04-07 10:51 AM
12
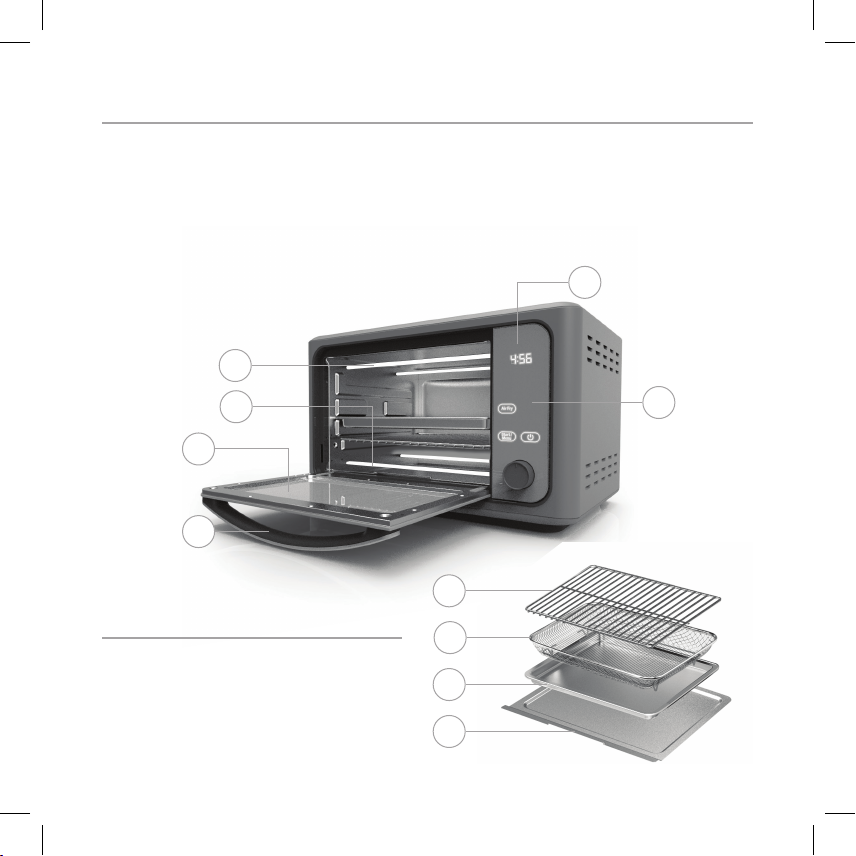
Getting To Know Your Digital Air Fryer Toaster Oven
Product may vary slightly from illustration
1. Door Handle
2. Glass Door
3. Lower Heating Elements
4. Upper Heating Elements
5. Touch-Activated Display Control Panel
6. Digital TIME/TEMP Display
7. Crumb Tray (not shown)
8. Convection Fan (not shown)
9. Polarized Plug (not shown)
1
4
2
36
5
Accessories
1. Wire Rack
1. Air Fryer/Dehydrator Basket
2. Bake/Broil Pan
4. Crumb Tray
2
1
3
4
19041, 19042, 19043, 19015 Beautifu TOV IM_r14.indd 1219041, 19042, 19043, 19015 Beautifu TOV IM_r14.indd 12 2021-04-07 10:51 AM2021-04-07 10:51 AM

13
Touch-Activated Display Control Panel
A screen that only shows up when you need it.
The button and any FUNCTION will illuminate
when active and vanish when not in use. Besides
11 preset functions with precision TIME / TEMP
control, this Beautiful Digital Air Fryer Toaster
Oven offers an adjustable-speed convection fan. No
need to hover in the kitchen. When TIME expires, the
Toaster Oven turns OFF automatically.
1.
2. Digital TIME/TEMP Display
3. TIME / TEMP Buttons
4. TIME/TEMP Control Dial
5. AIR FRY Button
6. BROIL Button
7. BAKE Button
8. TOAST/BAGEL Button
9. START/MENU Button
10. WARM
11. PIZZA
12. COOKIES
13. SLOW COOK
14. REHEAT
15. DEHYDRATE
19041, 19042, 19043, 19015 Beautifu TOV IM_r14.indd 1319041, 19042, 19043, 19015 Beautifu TOV IM_r14.indd 13 2021-04-07 10:51 AM2021-04-07 10:51 AM

14
• When the Toaster Oven is plugged in, a tone will sound, the control
panel will illuminate for 1 second. The button will illuminate
andthen pulse slowly on and off. 12:00 will be displayed, and “12” will
begin to ash. Use the control dial to adjust hours. After 5 seconds,
“00” minutes will ash. Use the control dial to adjust minutes.
• When is pressed, a tone will sound, and the control panel will
illuminate and remain active for 20 seconds.
• Press the to STOP any operation.
Control dial
• Turn the control dial to manually program the desired cook TIME
and/or TEMP.
• Turn the control dial to manually program SLOW COOK from LOW to HIGH.
• Turn the control dial knob right to increase the time and or temperature
settings
• Turn the control dial knob left to decrease the time and or temperature
setting.
• When AIR FRY is pressed, a tone will sound. 400°F TEMP and 25 minutes
TIME will alternate every 5 seconds on the display.
• Press TIME, then turn the control dial right to increase or left to
decrease AIR FRY TIME in 1 minute increments.
• Press TEMP, then turn the control dial right to increase or left to
reduce AIR FRY TEMP in 5 degree increments.
• Press and hold both TIME and TEMP buttons to adjust fan speed.
• Press START/MENU to begin operation.
• Press to stop AIR FRY and return to standby mode.
19041, 19042, 19043, 19015 Beautifu TOV IM_r14.indd 1419041, 19042, 19043, 19015 Beautifu TOV IM_r14.indd 14 2021-04-07 10:51 AM2021-04-07 10:51 AM

15
• When BROIL is pressed, a tone will sound. 30 minutes will appear on the
display.
• Press TIME, then turn the control dial right to increase or left to
decrease BROIL TIME in 1 minute increments.
• Press and hold both TIME and TEMP buttons to adjust fan speed.
• Press START/MENU to begin operation.
• Press to stop BROIL and return to standby mode.
• When BAKE is pressed, a tone will sound. 350°F TEMP and 30 minutes TIME
will alternate every 5 seconds on the display.
• Press TIME, then turn the control dial right to increase or left
decrease to BAKE TIME in 1 minute increments.
• Press TEMP, then turn the control dial right to increase or left reduce
to BAKE TEMP in 5 degree increments.
• Press and hold both TIME and TEMP buttons to adjust fan speed.
• Press START/MENU to begin operation.
• Press to stop BAKE and return to standby mode.
• When TOAST/BAGEL is pressed, a tone will sound and TOAST L4 (MEDIUM)
toast shade will be displayed.
• Press and hold the TOAST/BAGEL button to change to BAGEL L4 (MEDIUM)
toast shade.
• In either TOAST or BAGEL mode, turn the control dial right to increase or
left to decrease toast shade from L1 LIGHT to L7 DARK.
• Press START/MENU to begin operation.
• Press to stop TOAST/BAGEL and return to standby mode.
19041, 19042, 19043, 19015 Beautifu TOV IM_r14.indd 1519041, 19042, 19043, 19015 Beautifu TOV IM_r14.indd 15 2021-04-07 10:51 AM2021-04-07 10:51 AM

16
• Press the START/MENU button, both TIME and TEMP buttons will illuminate.
A tone will sound. 170 ºF will appear on the display.
• Press TIME, then turn the control dial right to increase or left to
reduce to BAKE TIME in 1 minute increments.
• Press TEMP, then turn the control dial right to increase or left to
reduce BAKE TEMP in 5 degree increments.
• Press START/MENU to begin operation.
• Press to stop WARM and return to standby mode.
• Press the START/MENU a tone will sound, both TIME and TEMP buttons will
illuminate. Turn the control dial until PIZZA is illuminated. A tone
will sound. 350°F will appear on the display.
• Press TIME, then turn the control dial right to increase or left to
decrease PIZZA TIME in 1 minute increments.
• Press TEMP, then turn the control dial right to increase or left to
reduce PIZZA TEMP in 5 degree increments.
• Press START/MENU to begin operation.
• Press to stop PIZZA and return to standby mode.
19041, 19042, 19043, 19015 Beautifu TOV IM_r14.indd 1619041, 19042, 19043, 19015 Beautifu TOV IM_r14.indd 16 2021-04-07 10:51 AM2021-04-07 10:51 AM

17
• Press the START/MENU button a tone will sound, both TIME and TEMP
buttons will illuminate. Turn the control dial until COOKIES is
illuminated. A tone will sound. 350°F will appear on the display.
• Press TIME, then turn the control dial right to increase or left to
decrease COOKIES TIME in 1 minute increments.
• Press TEMP, then turn the control dial right to increase or left to
reduce COOKIES TEMP in 5 degree increments.
• Press START/MENU to begin operation.
• Press to stop COOKIES and return to standby mode.
• Press the START/MENU button a tone will sound, both TIME and TEMP
buttons will illuminate. Turn the control dial until SLOW COOK is
illuminated. A tone will sound. HI will appear on the display.
• Press TIME, then turn the control dial right to increase or left to
decrease SLOW COOK TIME in 30 minute increments.
• Press TEMP, then turn the control dial right to to high setting.
• Press START/MENU to begin operation.
• Press to stop SLOW COOK and return to standby mode.
• Press the START/MENU button a tone will sound, both TIME and TEMP
buttons will illuminate. Turn the control dial until REHEAT is
illuminated. A tone will sound. 350°F will appear on the display.
• Press TIME, then turn the control dial right to increase or left to
decrease REHEAT TIME in 1 minute increments.
• Press TEMP, then turn the control dial right to increase or left to
reduce REHEAT TEMP in 5 degree increments.
• Press START/MENU to begin operation.
• Press to stop REHEAT and return to standby mode.
19041, 19042, 19043, 19015 Beautifu TOV IM_r14.indd 1719041, 19042, 19043, 19015 Beautifu TOV IM_r14.indd 17 2021-04-07 10:51 AM2021-04-07 10:51 AM

18
• Press the START/MENU a tone will sound, both TIME and TEMP buttons will
illuminate. Turn the control dial until DEHYDRATE is illuminated. A tone
will sound. 120°F will appear on the display.
• Press TIME, then turn the control dial right to increase or left to
decrease DEHYDRATETIME in 30 minutes increments.
• Press TEMP, then turn the control dial right to increase or left to
reduce DEHYDRATETEMP in 5 degree increments.
• Press START/MENU to begin operation.
• Press to stop DEHYDRATE and return to standby mode.
Shelf Positions
NOTE: Certain foods may require different shelf positions depending on the
recipe, size, amount of food to be cooked and personal taste. Use the following
information as a guide only.
1. There are 3 height positions that the air fryer/dehydrator basket, wire
rack or the bake/broil pan may be inserted.
2. Use the upper shelf position for BROIL.
3. The center shelf position is commonly used for AIR FRY, TOAST, BAGEL,
PIZZA, COOKIES and DEHYDRATE.
4. Use the lower shelf position for BAKE, ROAST, REHEAT and WARM.
WARNING: Never set the bake/broil pan directly onto the lower heating elements.
Weight/Size Restrictions
1. This Toaster Oven can cook up to a 4 lbs. chicken or turkey
and up to a 5 lbs. roast.
2. We suggest that you periodically check cooking progress with a meat
thermometer.
19041, 19042, 19043, 19015 Beautifu TOV IM_r14.indd 1819041, 19042, 19043, 19015 Beautifu TOV IM_r14.indd 18 2021-04-07 10:51 AM2021-04-07 10:51 AM
This manual suits for next models
3
Table of contents
Languages:


