beaux meubles BL 03 User manual

ASSEMBLY INSTRUCTIONS
NOTICE DE MONTAGE
INSTRUCCIONES DE MONTAJE
1
COD BR: BL 03
COD US: 29AMC

V : MAY/20
3
QR Code guide
Guide de QR Code
Guía de códigos QR
Summary
Resumen
Résumé
Introduction
Introduction
Introducción
Before starting
Avant de commencer
Antes de comenzar
Avoid accidents
Éviter les accidents
Evitar accidentes
Dimensions and tools
Dimensions et outils
Dimensiones y herramientas
Identifying parts
Identification des pièces
Identificación de las piezas
Hardware included in box
Accessoires inclus dans la boîte
Accesorios incluidos en la caja
Furniture assembly
Montage de meuble
Montaje del mueble
8
7
6
2

Scan QR codes to help with assembly steps.
You can access the whole playlist scanning this QR code
Some parts may have just pre-drilled holes, then use an
electric screwdriver to improve assembly.
Introduction
Introduction
Introducción
Read this manual and follow the steps in order to keep the guarantee and also for the
perfect fit.
Lisez ce manuel et suivez les étapes afin de conserver la garantie et aussi pour un ajustement
parfait.
Lea este manual y siga los pasos para que el producto no pierda la garantía y también para el ajuste
perfecto.
Certaines pièces peuvent seulement avoir un pré-perçage, utilisez un
tournevis électrique pour améliorer l'assemblage.
Algumas partes pueden tener solo pre-huecos, utilice un destornillador
para mejorar el armado.
Important
Important
Importante
Scannez les codes QR pour vous aider avec les étapes d'assemblage.
Vous pouvez accéder à toute la playlist en scannant ce code QR.
Utilice los códigos QR para ayudar en los pasos de armado.
Usted puede chequear la lista completa de vídeos utilizando esto código QR
Unboxing
Déballage
Desempaque
Cleaning pieces
Nettoyage de pièces
Limpieza de las piezas
Organizing hardware
Organizer le matériel
Organizando los herrajes
Feet assembly
Assemblage des pieds
Montaje de los pies
Fixing to the wall
Fixation au mur
Fijación a la pared
3

Scannez pour regarder la vidéo
SCAN TO WATCH THE VIDEO
Scanea para ver el vídeo
Before starting
Avant de commencer
Antes de comenzar
Avant de commencer l'assemblage, préparez l'environnement en le laissant complètement
propre et avec un bon espace pour commencer le travail.
Prepare the room before starting the assembly, leaving it completely clean
and the area in good condition to start the work.
Antes de comenzar el montaje preparar el ambiente, dejándolo completamente limpio y
con bueno espacio para comenzar el trabajo.
Utilisez le carton de l'emballage pour séparer et
soutenir les pièces retirées des boîtes
Use the cardboard of the packaging to
separate and support the parts removed
from the boxes.
Utilice el cartón de la embalaje para
separary apoyan las piezaz desmontadas
de las cajas.
Couvrir la zone d'assemblage avec une couverture
ou un tapis pour éviter d'endommager les pièces
pendant le processus d'assemblage.
Cover the assembly area with a blanket
or carpet to avoid damaging the parts
during the assembly process.
Cubrir la zona de ensamble con una manta o
alfombra. De este modo, se evitan daños
en las piezas durante el proceso de montaje.
Avoid accidents
Éviter les accidents
Evitar accidentes
produit, etc ...
Nous vous demandons de respecter scrupuleusement les consignes de montage telles que: la fixation
du produit au mur, placement de la colle dans des endroits spécifiques requis, le poids supporté par le
We request you to carefully observe the assembly instructions as: fixing the product on the wall,
adding glue in needed and specifics places, product weight limit, etc.
Pedimos que lea atentamente las instrucciones, principalmente las informaciones de fijación del
producto en la pared, colocación de pegamento en local específico y necesario, el peso soportado por
el producto etc...
No se suba ni se apoye en el mueble.
Ne grimpez pas et ne vous appuyez pas sur les meubles.
Do not climb or lean on the furniture.
4
X

5
All the furniture parts have been marked with a number. Before you start assembling, please
identify the numbered parts in relation to the assembly instructions. Once assembly is
completed, the numbers can be easily removed with a cloth slightly damped in alcohol.
Use alcohol only to remove part numbers.
Toutes les pièces mobiles ont été marquées par un nombre. Avant de commencer l'assemblage,
identifiez les pièces numéroté par rapport aux instructions de montage. Une fois l'assemblage
terminé, les chiffres peuvent être facilement enlevé avec un chiffon légèrement trempé dans l'alcool.
Utilisez de l'alcool uniquement pour supprimer les références.
Cleaning
Vettoyage
Limpieza
To improve assembly, use an eletronic screwdriver.
Pour faciliter l'assemblage, utilisez un tournevis électrique.
Para facilitar el armado, utilice un destornillador eléctrico.
Scanea para ver el vídeo
Scannez pour regarder la vidéo
SCAN TO WATCH THE VIDEO
USE ALCOHOL ONLY TO REMOVE PART NUMBERS
UTILISEZ DE L'ALCOOL UNIQUEMENT POUR SUPPRIMER LE NOMBRE DE PIÈCES
UTILICE ALCOHOL SOLAMENTE PARA ELIMINAR EL NUMERO DE LAS PIEZAS
Todos las piezas del mueble fueron marcadas con un número. Antes de empezar el montaje,
identifique las piezas numeradas en relación con las instrucciones de montaje. Una vez que se
completa el armado, los números se pueden quitar fácilmente con un paño ligeramente empapado
Chiffon légèrement humecté d'eau, puis chiffon sec, ne pas utiliser de produits chimiques ou abrasifs.
Do not use chemicals or abrasives.
Solamente utilizar un paño húmedo y después un paño seco, no utilice productos químicos o abrasivos.
You can clean the product with slightly dampened cloth followed by a dry cloth.
en alcohol. Use alcohol solo para eliminar números de las piezas.
Dimensions and tools
Dimensions et outils
Dimensiones y herramientas
Dimensions:
Dimensiones:
L: 615 A: 1820 P: 290 mm
Dimensions:
W: 24.41 H: 71.85 D: 12.2 inches
L: 615 A: 1820 P: 290 mm

PIÈCE DESCRIPTION QUANT.
COD BR: BL 03
COD US: 29AMC
6
PIEZA DESCRIPCIÓN CANTIDAD
PART DESCRIPTION QTY
CÔTÉ
ÉTAGÈRE
CÔTE MAJEURE
COSTA MENOR
PORTE
PIED DE PAGE
6
4
2
2
1
2
002
003
004
005
006
007
SIDE
SHELF
LONGER BACK
LOWER BACK
DOOR
BASEBOARD
002
003
004
005
006
007
002
003
004
005
006
007
LATERAL
ESTANTE
REVÉS MAYOR
REVÉS MENOR
PUERTA
RODOPIE
6
4
2
2
1
2
6
4
2
2
1
2

Scannez pour regarder la vidéo
SCAN TO WATCH THE VIDEO
Scanea para ver el vídeo
ACCESORIOS INCLUÍDOS EN LA CAJA 01
ACCESSOIRES INCLUS DANS LA BOÎTE 01
HARDWARE INCLUDED IN BOX 01
HOLE TAPA x 48
STICKER x 48
TAPAS PLÁSTICAS x 48
CRAIE x 01
CHALK x 01
TIZA x 01
EF 000248 x 1
EF 000016 X 1
EF 000246 X 1 EF 000529 X 1
PIEDS RONDS x 4
ROUND FEET x 4
PIES REDONDOS x 4
POIGNÉE x 2
HANDLE x 2
MANIJA x 2
PROFIL PLASTIQUE x 1
PLASTIC PROFILE x 1
PERFIL PLASTICO x 1
7
EF 000266 X 24 EF 000033 x 24
EF 000132 x 24
EF 000061 X 02 EF 000168 X 94
EF 000106 x 24 EF 000113 x 04
EF 000027 X 4
EF 000043 X 4

STEP 1 / ÉTAPE 1 / PASO 1
8
A=12 KG - 26.5LB B=9KG - 19.8LB
A
B
B
B
B
Insérez la quincaillerie EF 000033 dans le pré-perçage des pièces 03.
Insert hardware EF 000033 at pre-drilled holes in pieces 03.
Añade el herraje EF 000033 en los huecos ya marcados en
las piezas 03.
EF 000033

STEP 2 / ÉTAPE 2 / PASO 2
Scannez pour regarder la vidéo
SCAN TO WATCH THE VIDEO
Scanea para ver el vídeo
STEP 3 / ÉTAPE 3 / PASO 3
Scannez pour regarder la vidéo
SCAN TO WATCH THE VIDEO
Scanea para ver el vídeo
STEP 4 / ÉTAPE 4 / PASO 4
EF 000027
Veuillez noter la position du matériel EF 000027.
Please, note hardware EF 000027 position.
Por favor, observe la posición del herraje EF000027. 9
Fixez le matériel EF 000027 à la pièce 02, à l'aide du matériel EF 000106.
Fix hardware EF 000027 at piece 02 using hardware EF 000106.
Fije el herraje EF 000027 en la pieza 02 utilizando el herraje EF 000106.
EF 000106
EF 000027
Fixez la poignée aux pièces 06 à l'aide du matériel EF 000113.
Sécurisez le matériel EF 000043 à l'aide du matériel EF 000106.
Fix the handle in pieces 06 using hardware EF 000113. Fix
hardware EF 000043 using hardware EF 000106.
Fije la manija en las piezas 06 utilizando el herraje EF 000113.
Fije el herraje EF 000043 utilizando el herraje EF 000106.
EF 000043EF 000113
EF 000043MANIJA
HANDLE
POIGNÉE
EF 000043
EF 000106
Insérez le matériel EF 000266 dans les trous de pré-perçage du
pièces 03. Utilisez le matériel EF 000132 pour joindre les pièces 02 et 03.
Insert hardware EF 000266 at pre-drilled holes in pieces 03.
Use hardware EF 000132 to connect pieces 02 and 03 .
Añade el herraje EF 000266 en los huecos ya marcados en las
piezas 03. Utilice el herraje EF 000132 para fijar las piezas 02 y 03.

STEP 5 / ÉTAPE 5 / PASO 5
Scannez pour regarder la vidéo
SCAN TO WATCH THE VIDEO
Scanea para ver el vídeo
STEP 6 / ÉTAPE 6 / PASO 6
les fixer au mobilier.
STEP 7 / ÉTAPE 7 / PASO 7
Scannez pour regarder la vidéo
SCAN TO WATCH THE VIDEO
Scanea para ver el vídeo
Veuillez noter la position du matériel EF 000027.
Please, note hardware EF 000027 position.
Por favor, observe la posición del herraje EF000027.
10
Pour corriger la partie 07, utilisez le matériel EF 000061 et EF 000106.
Fixez les pieds ronds à l'aide du matériel EF 000168.
To fix piece 07, use hardwares EF 000061 and EF 000106. Fix the round
feet using hardware EF 000168.
Para fijar la pieza 07, utilice los herrajes EF 000061 y EF 000106. Fije los
pies redondos utilizando el herraje EF 000168.
Fixez les 06 pièces aux meubles assemblés.
Fix pieces 06 at the assembled furniture.
Fije las piezas 06 al mueble armado.
Fixez les pièces 04 au meuble à l'aide de la quincaillerie EF 000168.
Utilisez le profil en plastique pour joindre les 05 pièces, utilisez le matériel EF 000168 pour
Fix pieces 04 to the furniture using hardware EF 000168.
Use the plastic profile to join pieces 05, use hardware EF 000168 to fix them to the furniture.
Fije las piezas 04 al mueble utilizando el herraje EF 000168. Utilice el perfil plastico para unir
las piezas 05, utilice el herraje EF 000168 para fijarlas al mueble.
EF 000061
PROFIL PLASTIQUE
PLASTIC PROFILE
PERFIL PLASTICO
EF 000027

STEP 8 / ÉTAPE 8 / PASO 8
Scannez pour regarder la vidéo
SCAN TO WATCH THE VIDEO
Scanea para ver el vídeo
STEP 9 / ÉTAPE 9 / PASO 9
STEP 10 / ÉTAPE 10 / PASO 10
Utilisez la craie pour terminer le produit.
Use stickers to cover apparent screws.
Utilice los tapa huecos para cubrir los tornillos aparentes.
Hole tapa
Sticker
Tapas Plasticas
Utilisez les couvercles pour couvrir les vis exposées.
Use the chalk to give the final finish on the product.
Utilice la tiza para dar el acabado final al producto.
Craie
Chalk
Tiza
Utilisez le matériel EF 000246 et EF 000016 pour corriger
mobile sur le mur.
Use hardwares EF 000246 and EF 000016 for fixing the
furniture on the wall.
Utilice los herrajes EF000246 y EF000016 para fijar el
mueble en la pared.
EF 000248
Utilisez la vis EF 000248 pour fixer le matériel EF 000529
au mobile.
Use hardware EF 000248 to fix the hardware EF 000529 at
the furniture.
Utilice el herraje EF 000248 para fijar el herraje EF000529 al
mueble.
11
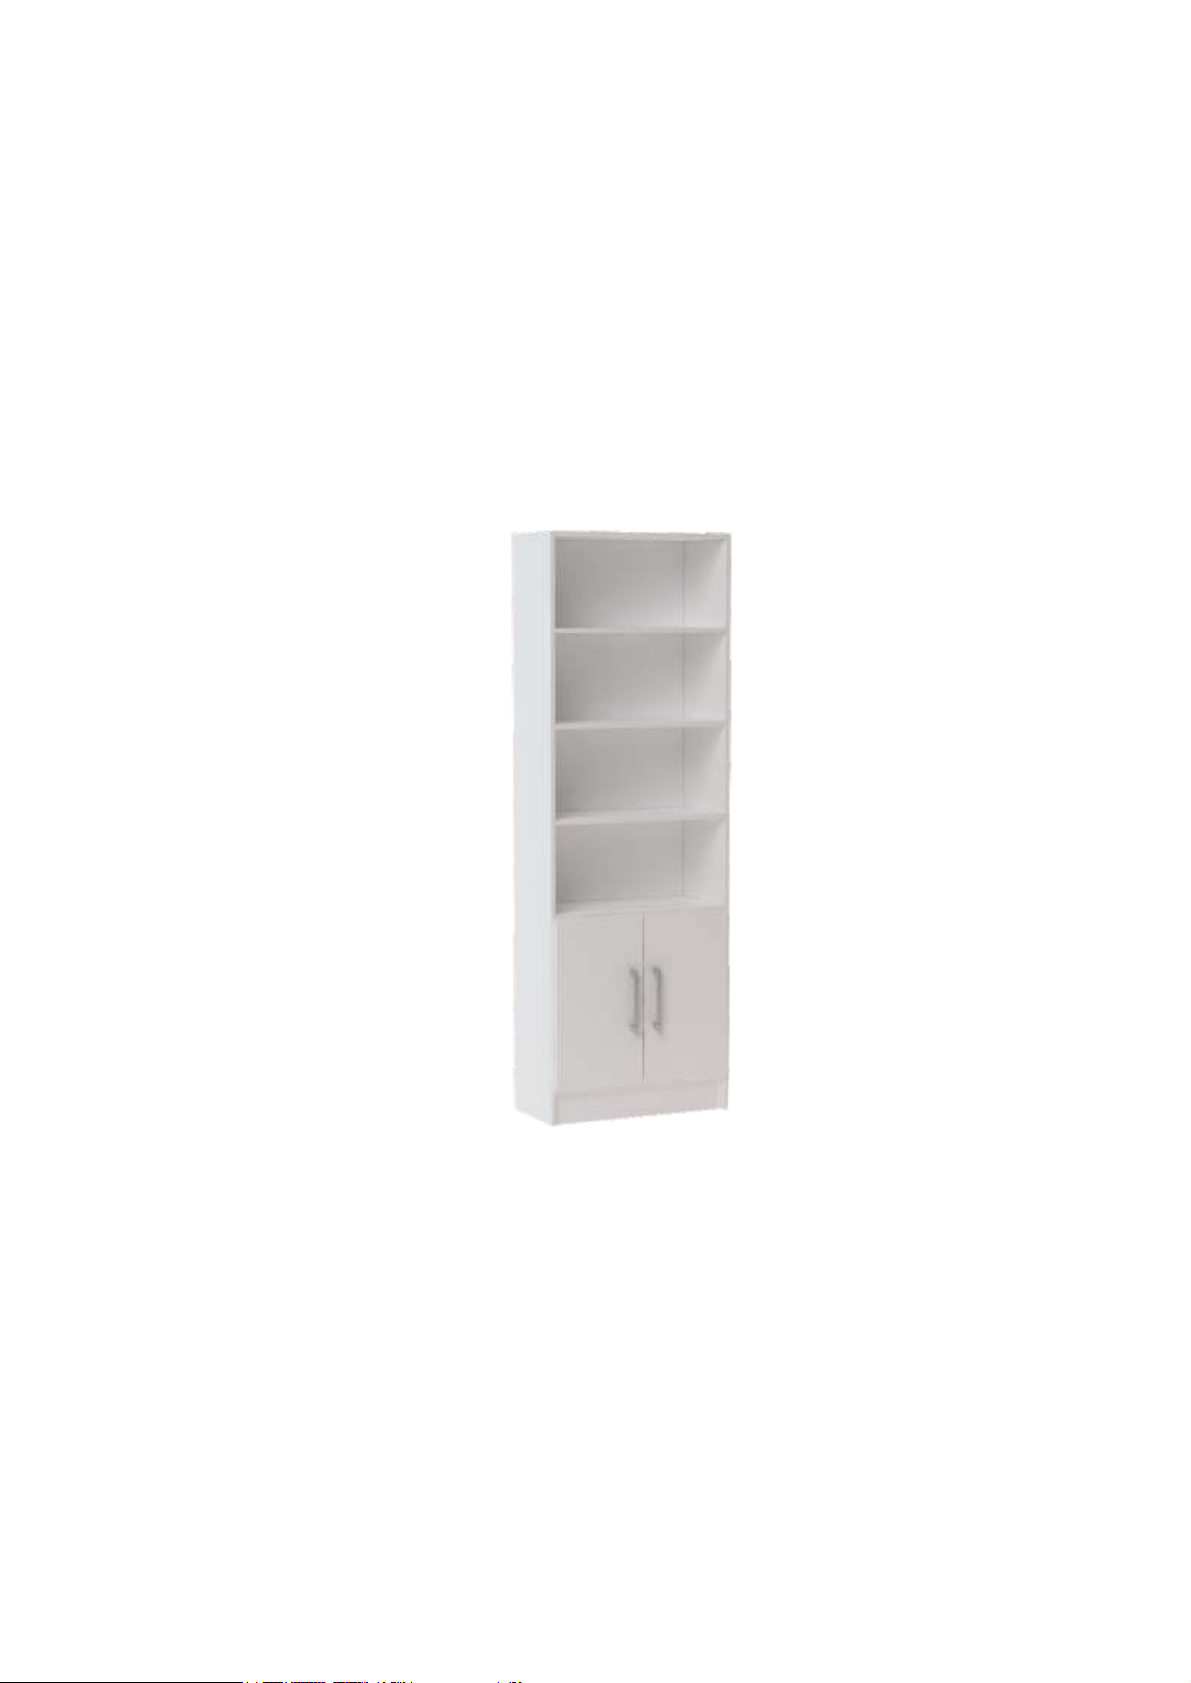
This manual suits for next models
1
Table of contents
Other beaux meubles Indoor Furnishing manuals

beaux meubles
beaux meubles BC 98 User manual

beaux meubles
beaux meubles BE 38 User manual

beaux meubles
beaux meubles BF 11 User manual

beaux meubles
beaux meubles BC 74 User manual

beaux meubles
beaux meubles BMU 58 User manual

beaux meubles
beaux meubles BC 85 User manual

beaux meubles
beaux meubles BHO 29 User manual
Popular Indoor Furnishing manuals by other brands

Happy Babies
Happy Babies HAPPY RN02 L Assembly instructions

Robern
Robern UPLIFT CABINET UC3627FPL Installation notes

Cooper Lighting
Cooper Lighting MCGRAW-EDISON 1183 Specification sheet

FIAM.
FIAM. LAKES LAK50 Product information

Carex
Carex B651 Assembly instructions

Belnick
Belnick BO-BS7002-1-GY-GG Assembly instructions