manuals.online logo
Brands
  1. Home
  2. •
  3. Brands
  4. •
  5. beaux meubles
  6. •
  7. Indoor Furnishing
  8. •
  9. beaux meubles BE 38 User manual

beaux meubles BE 38 User manual

ASSEMBLY INSTRUCTIONS
NOTICE DE MONTAGE
INSTRUCCIONES DE MONTAJE
1
COD BR: BE 38, BMU 138
V : MAY/20
Summary
Resumen
Résumé
3
4
4
5
6
7
8
3
Introduction
Introduction
Introducción
Before starting
Avant de commencer
Antes de comenzar
Avoid accidents
Éviter les accidents
Evitar accidentes
Dimensions and tools
Dimensions et outils
Dimensiones y herramientas
Identifying parts
Identification des pièces
Identificación de las piezas
Hardware included in box
Accessoires inclus dans la boîte
IAccesorios incluidos en la caja
Furniture assembly
Montage de meuble
Montaje del mueble
QR Code guide
Guide de QR Code
Guía de códigos QR
2
Scan QR codes to help with assembly steps.
You can access the whole playlist scanning this QR code
Some parts may have just pre-drilled holes, then use an
electric screwdriver to improve assembly.
Introduction
Introduction
Introducción
Read this manual and follow the steps in order to keep the guarantee and also for the
perfect fit.
Lisez ce manuel et suivez les étapes afin de conserver la garantie et aussi pour un ajustement
parfait.
Lea este manual y siga los pasos para que el producto no pierda la garantía y también para el ajuste
perfecto.
Certaines pièces peuvent seulement avoir un pré-perçage, utilisez un
tournevis électrique pour améliorer l'assemblage.
Algumas partes pueden tener solo pre-huecos, utilice un destornillador
para mejorar el armado.
Important
Important
Importante
Scannez les codes QR pour vous aider avec les étapes d'assemblage.
Vous pouvez accéder à toute la playlist en scannant ce code QR.
Utilice los códigos QR para ayudar en los pasos de armado.
Usted puede chequear la lista completa de vídeos utilizando esto código QR
Unboxing
Déballage
Desempaque
Cleaning pieces
Nettoyage de pièces
Limpieza de las piezas
Organizing hardware
Organizer le matériel
Organizando los herrajes
3
Scanea para ver el vídeo
Scannez pour regarder la vidéo
SCAN TO WATCH THE VIDEO
Before starting
Avant de commencer
Antes de comenzar
Avant de commencer l'assemblage, préparez l'environnement en le laissant complètement
propre et avec un bon espace pour commencer le travail.
Prepare the room before starting the assembly, leaving it completely clean
and the area in good condition to start the work.
Antes de comenzar el montaje preparar el ambiente, dejándolo completamente limpio y
con bueno espacio para comenzar el trabajo.
Utilisez le carton de l'emballage pour séparer et
soutenir les pièces retirées des boîtes
Use the cardboard of the packaging to
separate and support the parts removed
from the boxes.
Utilice el cartón de la embalaje para
separary apoyan las piezaz desmontadas
de las cajas.
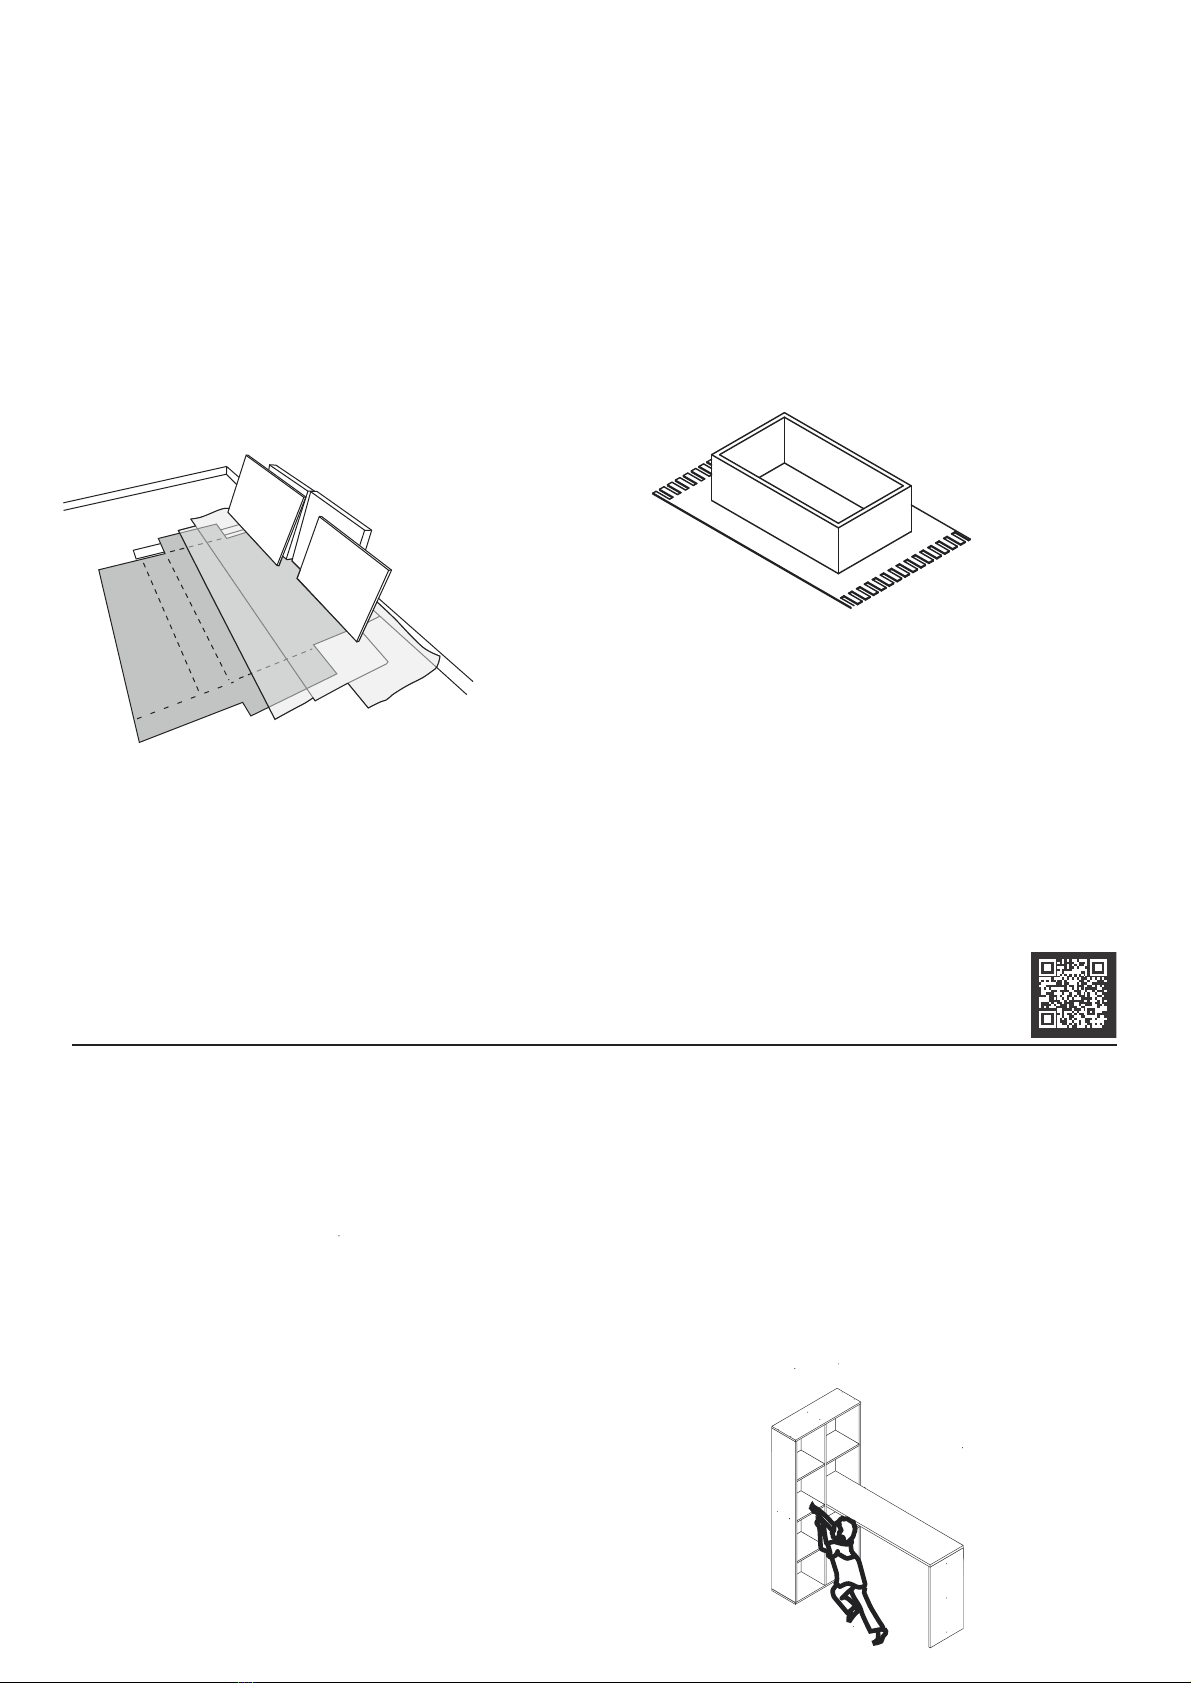
Couvrir la zone d'assemblage avec une couverture
ou un tapis pour éviter d'endommager les pièces
pendant le processus d'assemblage.
Cover the assembly area with a blanket
or carpet to avoid damaging the parts
during the assembly process.
Cubrir la zona de ensamble con una manta o
alfombra. De este modo, se evitan daños
en las piezas durante el proceso de montaje.
Avoid accidents
Éviter les accidents
Evitar accidentes
produit, etc ...
Nous vous demandons de respecter scrupuleusement les consignes de montage telles que: la fixation
du produit au mur, placement de la colle dans des endroits spécifiques requis, le poids supporté par le
We request you to carefully observe the assembly instructions as: fixing the product on the wall,
adding glue in needed and specifics places, product weight limit, etc.
Pedimos que lea atentamente las instrucciones, principalmente las informaciones de fijación del
producto en la pared, colocación de pegamento en local específico y necesario, el peso soportado por
el producto etc...
No se suba ni se apoye en el mueble.
Ne grimpez pas et ne vous appuyez pas sur les meubles.
Do not climb or lean on the furniture.
4
X
Scanea para ver el vídeo
Scannez pour regarder la vidéo
SCAN TO WATCH THE VIDEO
All the furniture parts have been marked with a number. Before you start assembling, please
identify the numbered parts in relation to the assembly instructions. Once assembly is
completed, the numbers can be easily removed with a cloth slightly damped in alcohol.
Use alcohol only to remove part numbers.
Toutes les pièces mobiles ont été marquées par un nombre. Avant de commencer l'assemblage,
identifiez les pièces numéroté par rapport aux instructions de montage. Une fois l'assemblage
terminé, les chires peuvent être facilement enlevé avec un chion légèrement trempé dans l'alcool.
Utilisez de l'alcool uniquement pour supprimer les références.
Todos las piezas del mueble fueron marcadas con un número. Antes de empezar el montaje,
identifique las piezas numeradas en relación con las instrucciones de montaje. Una vez que se
completa el armado, los números se pueden quitar fácilmente con un paño ligeramente empapado
Chion légèrement humecté d'eau, puis chion sec, ne pas utiliser de produits chimiques ou abrasifs.
Do not use chemicals or abrasives.
Solamente utilizar un paño húmedo y después un paño seco, no utilice productos químicos o abrasivos.
You can clean the product with slightly dampened cloth followed by a dry cloth.
en alcohol. Use alcohol solo para eliminar números de las piezas.
USE ALCOHOL ONLY TO REMOVE PART NUMBERS
UTILISEZ DE L'ALCOOL UNIQUEMENT POUR SUPPRIMER LE NOMBRE DE PIÈCES
UTILICE ALCOHOL SOLAMENTE PARA ELIMINAR EL NUMERO DE LAS PIEZAS
To improve assembly, use an eletronic screwdriver.
Pour faciliter l'assemblage, utilisez un tournevis électrique.
Para facilitar el armado, utilice un destornillador eléctrico.
Limpieza
Le nettoyage
Cleaning
5
Dimensions and tools
Dimensions et outils
Dimensiones y herramientas
Dimensions:
Dimensiones:
L: 1350 A: 1490 P: 690 mm
Dimensions:
W: 53.14 H: 58.66 D: 27.16 inches
L: 1350 A: 1490 P:690 mm
PIÈCE DESCRIPTION QUANT.
COD BR: BE 38, BMU 138
6
PIEZA DESCRIPCIÓN CANTIDAD
PART DESCRIPTION QTY
DIVISION
1
001
CÔTÉ DROIT / GAUCHE
2
002
LE PLUS PETIT CÔTÉ
1
003
PLUS GRANDE ÉTAGÈRE
2
004
PETITE ÉTAGÈRE
3
005
DESSUS DE LA TABLE
1
006
BASE TOP
2
007
PLATEAU
1
008
PARTITION 1
001
RIGHT/LEFT SIDE 2
002
LOWER SIDE 1
003
LONGER SHELF 2
004
LOWER SHELF 3
005
TABLE TOP 1
006
TOP/BASE 2
007
DETAIL 1
008
PARTICIÓN 1
001
LATERAL DERECHA/IZQUIERDA 2
002
LATERAL MENOR 1
003
REPISA MAYOR 2
004
REPISA MENOR 3
005
TAPA TABLA 1
006
TAPA/ BASE 2
007
DETALLE 1
008
01
02
03
06
07
07
08
04
04
05
05
05
02
Garantia (exclusivo para o Brasil/exclusivo de Brasil/exclusive to Brazil):
A garantia dos produtos fabricados pela BRV Móveis, abrange eventuais defeitos-vícios de fabricação, no prazo
estabelecido pelo código de Defesa do Consumidor, em seu artigo 26.II. o qual prevê a garantia de 90 (noventa) dias.
Pegamento/Glue
EF 000094 X 2
EF 000168 X 8
EF 000216 X 2
PIEDS RONDS x 8
ROUND FEET x 8
PIES REDONDOS x 8
HOLE TAPA x 21
STICKER x 21
TAPAS PLÁSTICAS x 21
CRAIE x 1
CHALK x 1
TIZA x 1
7
HARDWARE INCLUDED IN BOX - ACCESSOIRES INCLUS DANS LA BOÎTE - ACCESORIOS INCLUÍDOS EN LA CAJA
EF 000132 x 21
EF 000008 X 1
EF 000033 x 24
EF 000247 x 6
EF 000248 x 7
EF 000681 x 3
STEP 1 / ÉTAPE 1 / PASO 1
Insérez le matériel EF 000033 dans les pièces 01, 02 et 05.
Insert hardware EF 000033 into pieces 01, 02 and 05.
Añade el herraje EF 000033 en las piezas 01, 02 e 05.
8
A= 3KG - 6.61LB
A
A
A
AA
A
A
B
B= 10KG - 22LB
05
05
05
02
02 01
EF 000008
STEP 2 / ÉTAPE 2 / PASO 2
STEP 3 / ÉTAPE 3 / PASO 3
STEP 4 / ÉTAPE 4 / PASO 4
Insérer les raccords EF 000033 et EF 000247 dans les parties 04 et 06.
Insert hardwares EF 000033 and EF 000247 into pieces 04 and 06.
Añade los herrajes EF 000033 y EF 000247 en las piezas 04 e 06.
EF 000247
EF 000094
Fixez le matériel EF 000094 à la pièce 06.
Attach hardware EF 000094 into piece 06 .
Fije el herraje EF 000094 en la pieza 06.
9
04
04
06
06
Utilisez la colle avant de connecter les pièces 01, 04 et 06.
Utilisez le matériel EF 000132 pourréparer la pièce 01.
Use the glue before connecting pieces 01, 04 and 06.
06
04
04
01
Use hardware EF 000132 to fix piece 01.
Utilice el pegamento antes de juntar las piezas 01, 04 y 06.
Utilice el herraje EF 000132 para fijar la pieza 01.
Option 1 / Option 1 / Opción 1
Table to the right
Table à droite
Tabla a la derecha
EF 000008
EF 000008
EF 000008
STEP 5 / ÉTAPE 5 / PASO 5
STEP 6 / ÉTAPE 6 / PASO 6
STEP 7 / ÉTAPE 7 / PASO 7
10
06
04
04
01
01
04
04
05
05
05
06
Connectez les pièces 05 à la pièce assemblée à l'étape précédente.
Connect pieces 05 to the part assembled in the previous step.
Junte las piezas 05 a la parte armada en el paso anterior
06
02
02
Connectez les pièces 02 à la pièce assemblée à l'étape précédente à l'aide du
matériel EF 000132.
Connect pieces 02 to the part assembled in the previous step using
using hardware EF 000132.
Junte las piezas 02 a la parte armada en el paso anterior utilizando el
herraje EF 000132.
Utilisez la colle avant de connecter les pièces 01, 04 et 06.
Utilisez le matériel EF 000132 pourréparer la pièce 01.
Use the glue before connecting pieces 01, 04 and 06.
Use hardware EF 000132 to fix piece 01.
Utilice el pegamento antes de juntar las piezas 01, 04 y 06.
Utilice el herraje EF 000132 para fijar la pieza 01.
Opção 2 / Option 2 / Opción 2
Table to the left
Table à gauche
Tabla a la izquierda EF 000008
STEP 8 / ÉTAPE 8 / PASO 8
STEP 9 / ÉTAPE 9 / PASO 9
STEP 10 / ÉTAPE 10 / PASO 10
01
02
02
07
07
Connectez les pièces 07 à la pièce assemblée à l'étape précédente à l'aide du
matériel EF 000132. Fixez les pieds ronds à l'aide du matériel EF 000168.
Connect pieces 07 to the part assembled in the previous step using
using hardware EF 000132. Fix the round feet using hardware EF 000168.
Junte las piezas 07 a la parte armada en el paso anterior utilizando el
herraje EF 000132. Fije los pies redondos utilizando el herraje EF 000168.
PIEDS RONDS
ROUND FEET
PIES REDONDOS
Connectez les pièces 07 et 08 à l'aide du matériel EF 000132. Fixez les pieds
rond en utilisant le matériel EF 000168.
Connect pieces 07 and 08 using hardware EF 000132. Fix the round feet
using hardware EF 000168.
Junte las piezas 07 y 08 utilizando el herraje EF 000132. Fije los pies
redondos utilizando el herraje EF 000168.
08
03
PES RONDS
ROUND FEET
PIES REDONDOS
Connectez les pièces assemblées aux étapes 8 et 9 à l'aide du matériel EF 000248
et EF 000681, insérez le matériel EF 000216 et tournez pour serrer.
Connect parts assembled on steps 8 and 9 using hardware EF 000248 and
EF 000681, insert hardware EF 000216 and turn to tighten.
Junte las partes armadas en los pasos 8 y 9 utilizando los herrajes EF 000248 y
EF 000681, añade el herraje EF 000216 y gire para apretar.
EF 000248
EF 000681
STEP 11 / ÉTAPE 11 / PASO 11
STEP 12 / ÉTAPE 12 / PASO 12
Use the EF 000248 screw to secure the EF 000529 hardware to the cabinet.
Use the fittings EF 000246 and EF 000016 to fix the furniture on the wall.
13 13 13
Utilisez la vis EF 000248 pour fixer le matériel EF 000529 à l'armoire.
Utilisez les ferrures EF 000246 et EF 000016 pour fixer le meuble au mur.
Use el tornillo EF 000248 para asegurar el hardware EF 000529 al gabinete.
Use los accesorios EF 000246 y EF 000016 para fijar los muebles en la pared.
Utilisez les couvercles pour couvrir les vis exposées.
Use stickers to cover apparent screws.
Utilice los tapa huecos para cubrir los tornillos aparentes.
Tiza
Utilisez la craie pour terminer le produit.
Use the chalk to give the final finish on the product.
Utilice la tiza para dar el acabado final al producto.
12
Craie
Tapas Plasticas
Hole Tapa
Sticker

This manual suits for next models

1

Other beaux meubles Indoor Furnishing manuals

beaux meubles BF 11 User manual

beaux meubles

beaux meubles BF 11 User manual

beaux meubles BL 03 User manual

beaux meubles

beaux meubles BL 03 User manual

beaux meubles BC 98 User manual

beaux meubles

beaux meubles BC 98 User manual

beaux meubles BC 74 User manual

beaux meubles

beaux meubles BC 74 User manual

beaux meubles BMU 58 User manual

beaux meubles

beaux meubles BMU 58 User manual

beaux meubles BC 85 User manual

beaux meubles

beaux meubles BC 85 User manual

beaux meubles BHO 29 User manual

beaux meubles

beaux meubles BHO 29 User manual

Popular Indoor Furnishing manuals by other brands

Southern Enterprises HO6532 Assembly instructions

Southern Enterprises

Southern Enterprises HO6532 Assembly instructions

Teknion Navigate End Cover-Metal Installation guides

Teknion

Teknion Navigate End Cover-Metal Installation guides

fantastic furniture MILFORD quick start guide

fantastic furniture

fantastic furniture MILFORD quick start guide

AREBOS AR-HE-SLR07 user manual

AREBOS

AREBOS AR-HE-SLR07 user manual

Courtyard A211019300 quick guide

Courtyard

Courtyard A211019300 quick guide

Tech Craft AWC5036 Assembly instruction

Tech Craft

Tech Craft AWC5036 Assembly instruction

Trixie 49925 Assembling Instruction

Trixie

Trixie 49925 Assembling Instruction

Living Spaces 305-S362-532 Assembly instructions

Living Spaces

Living Spaces 305-S362-532 Assembly instructions

FANCII LANA instruction manual

FANCII

FANCII LANA instruction manual

CorLiving TBR-300-B manual

CorLiving

CorLiving TBR-300-B manual

Manhattan Comfort GRANVILLE DR-500 manual

Manhattan Comfort

Manhattan Comfort GRANVILLE DR-500 manual

OSP Home Furnishings EAG1787 quick start guide

OSP Home Furnishings

OSP Home Furnishings EAG1787 quick start guide

MAISONS DU MONDE NAXOS 175054 manual

MAISONS DU MONDE

MAISONS DU MONDE NAXOS 175054 manual

DORMEO Lumi OFD-LUM552-BLK quick guide

DORMEO

DORMEO Lumi OFD-LUM552-BLK quick guide

aspenhome Counter Height Side Chair I256-6643S Assembly instructions

aspenhome

aspenhome Counter Height Side Chair I256-6643S Assembly instructions

VITRA CDS Assembly instructions

VITRA

VITRA CDS Assembly instructions

Koala KIRRIBILLI manual

Koala

Koala KIRRIBILLI manual

ROVO SUMO 8020 S7 Assembly

ROVO

ROVO SUMO 8020 S7 Assembly

manuals.online logo
manuals.online logoBrands
  • About & Mission
  • Contact us
  • Privacy Policy
  • Terms and Conditions

Copyright 2025 Manuals.Online. All Rights Reserved.