BeeWi BWA211 User manual

- 11N Wireless USB Adapter -
User’s guide
ENGLISH
FRANCAIS
DEUTSCH
ITALIANO
ESPANOL
PORTUGUES
2
14
26
38
50
62

Thank you for purchasing the BWA211 wireless USB adapter from
BEEWI. Please read the following instructions to learn how to configure
and use more effectively your wireless USB adapter.
BEEWI is a registered trademark. Other trademarks mentioned herewith
are owned by their proprietors. All other product or service names are the
property of their respective owners.
The use of wireless devices and their accessories may be prohibited or
restricted in certain areas. Always obey the laws and regulations on the
use of these products.
This product is covered by a 2-year product warranty which is valid from
the date of purchase. Please visit our website www.bee-wi.com for more
© VOXLAND, 2009.
European Union Directives Conformance Statement
Hereby, VOXLAND declares that this product is in compliance with:
• The essential requirements and other relevant provisions of Directive
1999/5/EC
• All other relevant EU Directives
You can view your product’s Declaration of Conformity (DoC) to Directive
1999/5/EC (to R&TTE Directive) at www.bee-wi.com.
Introduction
Thank you for purchasing the BWA211 wireless USB adapter
from BEEWI. Please read the following instructions to learn
how to configure and use more effectively your wireless USB
adapter.

Package Contents
Chapter 1 : Installation
Caring for the environment by recycling
When you see this symbol on a product, do not dispose the product with
household waste. Do not dispose of electrical devices or accessories with
your household waste. In some countries or regions, collection systems are
set up to handle electrical and electronic waste items. Contact your regional
authorities for more details.
The following steps on Setup Wizard are based on Windows XP as exam-
ple. Screen shots are in English.
1. Please insert the Wireless USB Adapter into the USB port of your computer.
- One W311U 11N Wireless USB Adapter - One CD-ROM
2. “Found New Hardware” system dialogue appears; select “Cancel” to
use the included Setup Wi-
zard for fast installation or
“Next” to install manually.
3. Insert the included CD-ROM
into the CD-ROM drive of your
computer. The welcome screen
will automatically appear (if
not, double click the “Setup.
exe” icon).
ENGLISH

6. Click "Finish"
to complete the install
4. Click “Enter” to start the installation. Follow the instructions in the installation
windows to complete the installation.
5. During the installation, the following window may appear. Click “Conti-
nue Anyway” to continue. There is no security threat to your computer.
Use the BWA211 Wireless USB Adapter management software to confi-
gure the device. If it does not appear, select “Start”—“All Programs”
—“BEEWI”—“BWA211”, or click the shortcut on your PC’s desktop.
Note: You can also use the Windows internal wireless application to confi-
gure the device
There are two client utility applications: Station mode (client mode, default
access) and AP mode (server mode).
2.1 Station Mode
2.1.1 Station Mode Topology
In this mode, BWA211 serves
as a client to receive the wireless
signals to access the Internet.
Chapter 2: Client Utility Interface

2.1.2 Status
The Network Status
window shows details
on wireless adapter and
wireless network status,
including SSID, Authen-
tication type, Encryption
Type, IP address, subnet
mask and gateway.
2.1.3 Site Survey The Site Survey is used
to scan the available wi-
reless network around,
showing the wireless
network’s signal strength
and other information
which provides basis
for you to access which
ENGLISH
wireless network.
Connect: select one
entry in the wireless
network list and click
the button to connect the
device with the selected
network.Refresh: rescan
the wireless network
around.

2.1.4 Profile Management
This window saves the
general wireless para-
meters for different pro-
files, which is used to
fast connect the wireless
network you need.
UP/DOWN: To change
the prole’s sequence in
the list.
Connect: To activate
one profile.
New: To create a new profile and configure the site status and security setting.
Modify: To modify one existing profile.
Delete: To delete one existing profile
Site Status: chose infras-
tructure mode to connect
to an internet box.
Security Setting: chose the
security setting used by the
internet box.
ENGLISH
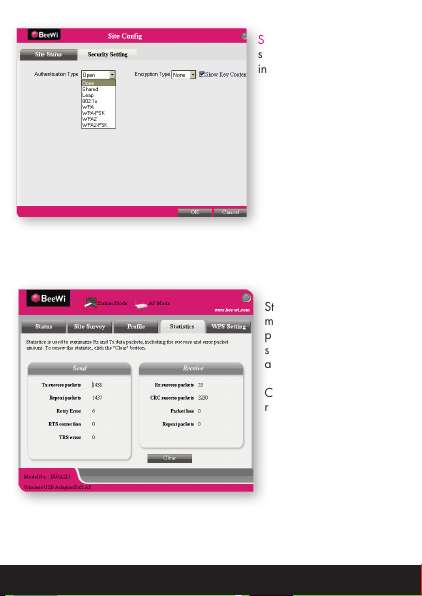
2.1.5 Statistics
Statistics is used to sum-
marize Rx and Tx data
packets, including the
success and error packet
amount.
Clear: click this button to
renew the statistics.
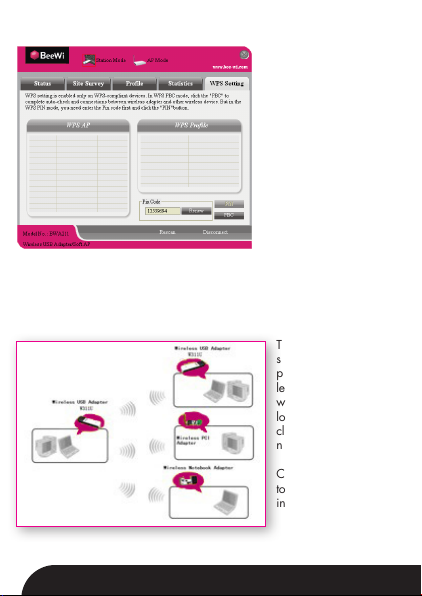
2.1.6 WPS Setting WPS setting is enabled
only on WPS-compliant
devices.
PIN Enter the Pin code
and click the “PIN” to
automatically connect the
wireless adapter with wi-
reless devices around.
PBC Click the “PBC” to
complete auto-check and
connections between wi-
reless adapter and other
wireless device.
Refresh: to update the Pin
code.
Rescan: to rescan the WPS-compliant wireless network around.
Connect: click this button to connect the WPS wireless network.
Disconnect: to disconnect the connected wireless network.
2.2 AP Mode
2.2.1 AP Mode Topology The device also can
serve as an access
point to transmit wire-
less signals and create
wireless network, al-
lowing other wireless
clients to access the
network.
Click the AP Mode icon
to enter the AP Mode
interface.

2.2.2 Basic Setting This window is used to
configure the AP’s basic
para- meters, including
SSID, Wireless Mode and
Channel.
SSID: Wireless network’s
ID name scanned by wire-
less adapter.
Wireless Mode: 802.11b
/ 802.11g / 802.11b/g
mixed.
Channel: 1~11 channels
provided. Restore Default:
to restore the set parame-
ters to default factory de-
fault settings. Apply: to make the changes made take effect.
2.2.3 Security Setting This window is used to confi-
gure the wireless network’s
security authentication, provi-
ding WEP, WPA-PSK, WPA2-
PSK, and WPA-PSK/WPA2-
PSK encryption methods.
WEP:10/26 bits Hex or
5/13 ASCII support.
WPA-PSK:8~32 bits ASCII
support.WPA2-PSK:8~32
bits ASCII support.WPA-PSK/
WPA2-PSK:8~32 bits ASCII
support.
Note:1. Hex characters: 0~9 and A~F characters.
2. ASCII characters: any characters.
ENGLISH

2.2.4 Access Control Access Control is based
on the MAC address to
decide that the specified
client connects to the wi-
reless network, or disables
it to access the wireless
network
Filter Policy:
Disabled: to disable the
filter function.
All Permitted: to permit all
clients in the list to access
the wireless network.
All Blocked: to refuse all
clients in the list to access
the wireless network. MAC Address to input the client’s MAC address to
implement the corresponding filter policy. For example: b0000a8cd702.
Add: to add the entered MAC address into the list.
Delete: to delete one existing MAC address in the list.
Remove All: to delete all clients’ MAC address in the list.
Apply: to make the changes made take effect.
2.2.5 About This window display de-
tails about software ver-

Appendix One: Acronyms and Terms
ENGLISH
WLAN Wireless Local Area Network
802.11 A family of specifications developed by the IEEE for WLAN techno-
logy.
802.11a Up to 54 Mbps transmission in 5 GHz UNI radio band.
802.11b Up to 11 Mbps transmission in the 2.4 GHz ISM radio band - use
DSSS modulation.
802.11g Up to 54 Mbps transmission in the 2.4 GHz ISM radio band. 802.11b
uses OFDM modulation, backward compatible with 802.11b.
Ad-Hoc A group of computers connected as an independent WLAN.
AES Advanced Encryption Standard
BSSID Basic Service Set ID
DHCP Dynamic Host Configuration Protocol
DSSS Direct Sequence Spread Spectrum. DSSS is one of two types of spread
spectrum radio. The other is frequency-hopping spread spectrum
(FHSS).
QoS Quality of Service
OFDM Orthogonal Frequency Division Multiplexing
RADIUS Remote Authentication Dial In User Service
RTS Request to Send
SSID Service Set Identier. A 32-character unique identier attached to the
header of packets sent over a WLAN that acts as a password when a
mobile device tries to connect to the BSS.
TCP/IP Transmission Control Protocol/Internet Protocol
TKIP Temporal Key Integrity Protocol
WDS Wireless Distribution System
WEP Wired Equivalent Privacy: WLAN security protocol dened in IEEE
802.11 standard.
WPA Wi-Fi Protected Access
WPA2 Wi-Fi Protected Access 2
WPA2-PSK Wi-Fi Protected Access 2, Pre-shared Keys
WPA-PSK Wi-Fi Protected Access, Pre-shared Keys

sion and wireless adapter
Standard IEEE802.11g, 802.11b,
802.11n
Port USB2.0
Frequency Range 2.4GHz
Transmission Rate
130Mbps, 117Mbps,
104Mbps, 78Mbps, 52Mbps,
39Mbps, 26Mbps, 13Mbps,
65Mbps, 58.5Mbps, 52Mbps,
39Mbps, 26Mbps, 19.5Mbps,
13Mbps, 6.5Mbps, 54 Mbps,
48 Mbps, 36 Mbps, 24 Mbps,
18 Mbps, 12 Mbps, 9 Mbps, 6
Mbps, 11 Mbps, 5.5 Mbps, 2
Mbps, 1 Mbps
Transmission Power Max. 15dbm
Modulation Method OFDM, CCK
Working Temper. 0°C - 40°C
Storage Temper. -40°C - 70°C
Working Humidity 10° - 90° - RH non-condensing
Appendix Two: Product Specification

ENGLISH

BEEWI est une marque déposée. Les autres marques mentionnées ci-après
appartiennent à leurs propriétaires. Tout autre nom de produit ou de ser-
vice utilisé est la propriété de son détenteur respectif.
L’utilisation d’appareils sans fil et de ses accessoires peuvent être interdite
dans certains endroits. Toujours respecter les réglementations et lois en
vigueur.
Ce produit est couvert par une garantie de deux ans s’appliquant à comp-
ter de la date d’achat du matériel. Veuillez visiter notre site web
www.bee-wi.com pour plus d’information.
Support technique : suppor[email protected].
© VOXLAND, 2009.
Déclaration de conformité aux directives de l’Union Européenne
VOXLAND déclare que ce produit est en conformité avec :
• Les dispositions essentielles ainsi que toutes provisions afférentes de la
directive 1999/5/EC
• Toutes autres Directives de l’Union Européenne afférentes
Vous pouvez visualiser la Déclaration de Conformité (DoC) à la directive
1999/5/EC (à la Directive R&TTE) sur le site www.bee-wi.com.
Protection de l'environnement par le recyclage
Lorsqu'un produit arbore ce symbole, ne le jetez pas dans votre poubelle.
Ne jetez aucun appareil ou accessoire électrique dans votre poubelle.
Introduction
Merci d’avoir choisi l’adaptateur USB sans fil BWA211 de
BEEWI. Veuillez lire les instructions suivantes afin de
configurer et utiliser au mieux votre adaptateur USB sans fil.

Contenus
Chaptitre 1 : Installation
Des systèmes de collecte permettant de traiter les déchets électriques et
électroniques sont progressivement mis en place.
Renseignez-vous localement pour plus d'informations.
Les étapes suivantes du logiciel d’installation sont bases sur Windows XP.
Les écrans sont en anglais.
1. Insérer l’adaptateur USB sans l dans le port USB de l’ordinateur
- Un adaptateur USB W311U 11N - CD-ROM
2. La fenêtre “Nouveau materiel trouvé” s’afche; Choisir “Annuler” pour
utiliser le logiciel d’installation rapide ou “Suivant” pour une installation
manuelle. 3. Insérer le CDROM inclus
dans le lecteur de l’ordina-
teur. Une fenêtre de bienve-
nue s’afchera automatique-
ment (si ce n’est pas le cas,
lancer le fichier “Setup.exe”
en double-cliquant dessus)
4. Cliquer sur “Entrer” pour
démarrer l’installation. Sui-
vre les instructions sur les
écrans d’installation pour
achever l’installation.
FRANCAIS

5. Durant l’installation,
la fenêtre suivante peut
apparaître. Cliquer sur
« Continuer » pour pas-
ser cette étape. Il n’y a
aucun r pour votre ordi-
nateur.
6. Cliquer “Terminer”
pour finir l’installation.
Utiliser l’utilitaire de contrôle de l’adaptateur USB sans fil pour configurer
la connexion au réseau. Si le logiciel ne s’ouvre pas automatiquement,
l’ouvrir à partir des programmes “BEEWI”—“BWA211”, ou cliquer sur le
raccourcis de votre bureau.
Note: on peut aussi utiliser l’utilitaire Windows de conguration réseau
pour configurer la connexion.
Il y a 2 modes de configuration l’utilitaire de contrôle de l’adaptateur USB
sans l : le mode Station (mode client mode, accès par défaut) et mode
AP (mode serveur).
2.1 Mode Station
2.1.1 Topologie du mode Station
Dans ce mode l’adaptateur
USB sans fil sert de client pour
se connecter à l’internet via un
routeur.
Chapitre 2: Client Utility Interface

2.1.2 Etat La fenêtre d’état du
réseau afche des in-
formations concernant
l’adaptateur sans fil et le
réseau sans l, y inclus
le SSID, le type d’authen-
tification, le type de
cryptage, l’adresse IP, la
masque de sous-réseau
et la passerelle.
2.1.3 Recherche de sites La recherché de sites
est utilisée pour scanner
les réseaux sans l dis-
ponibles aux alentours,
en affichant la force du
signal et d’autres infor-
mations qui facilitant
la sélection et l’accès à
un réseau. Connecter
: sélectionner un SSID
dans la liste de réseaux
et cliquer le bouton pour
connecter l’adapta-
teur sans l au réseau
choisi.
Rafraîchir : re-scanner
les réseaux disponibles.
FRANCAIS

2.1.4 Gestion du profil Cette fenêtre conserve
la liste des réseaux sur
lesquels une connexion
a été établie avec leurs
paramètres an de fa-
ciliter la reconnexion
ultérieure.
HAUT/BAS : pour chan-
ger la séquence des
profils dans la liste.
Connecter : pour active
un profil particulier.
Nouveau : pour créer
un nouveau profil et
congurer l’état du site
et les paramètres de sécurité.
Modifier : pour modifier un profil existant.
Effacer : pour effacer un profil existant.
Etat du site : choisir le
mode infrastructure pour
se connecter à un routeur
internet.

Réglage de sécurité : choi-
sir le type de sécurité utilisé
par le routeur internet.
FRANCAIS
2.1.5 Statistiques Les statistiques afchent
le volume de paquets de
données Rx et Tx, y inclus
le volume de parquets trans-
mis avec success ou erreur.
Effacer : cliquer pour renou-
veler les statistiques.

2.1.6 Réglage WPS Le réglage WPS n’est active
que pour les appareils com-
patible WPS.
PIN Entrer le code PIN
et cliquer sur “PIN” pour
connecter automatiquement
l’adaptateur sans fil à tout
appareil sans l à portée.
PBC Cliquer “PBC” pour
réaliser le vérication auto-
matique et la connexion en-
tre l’adaptateur sans fil et un
autre appareil sans fil.
Rafraîchir : pour mettre à
jour le code PIN.
Re-scan : pour détecter de nouveau les réseaux sans l WPS à portée.
Connecter: cliquer ce bouton pour se connecter à un réseau sans l WPS.
Déconnecter : pour se déconnecter du réseau sans l.
2.2 Mode AP (Point d’Accès)
2.2.1. Topologie du mode AP L’adaptateur peut aussi
server de point d’accès
pour créer un réseau
sans fil et premettre à
d’autres clients sans fil
d’accéder au réseau.
Cliquer sur l’icône
“Mode AP” pour entrer
sur l’utilitaire de contrôle
en mode AP.
Table of contents
Languages:
Other BeeWi Adapter manuals


Popular Adapter manuals by other brands


Aria
Aria Myricom ARC 10G Series Installation and configuration guide

Allnet
Allnet ALL-WA0150N Quick installation guide

Allied Telesis
Allied Telesis AT-2916LX10/LC-901 installation guide

Quatech
Quatech DSC-300 user manual

MantelMount
MantelMount SBK00 installation instructions

Fujitsu
Fujitsu MB2198-169-E Operation manual


