BeeWi BWZ200 User manual

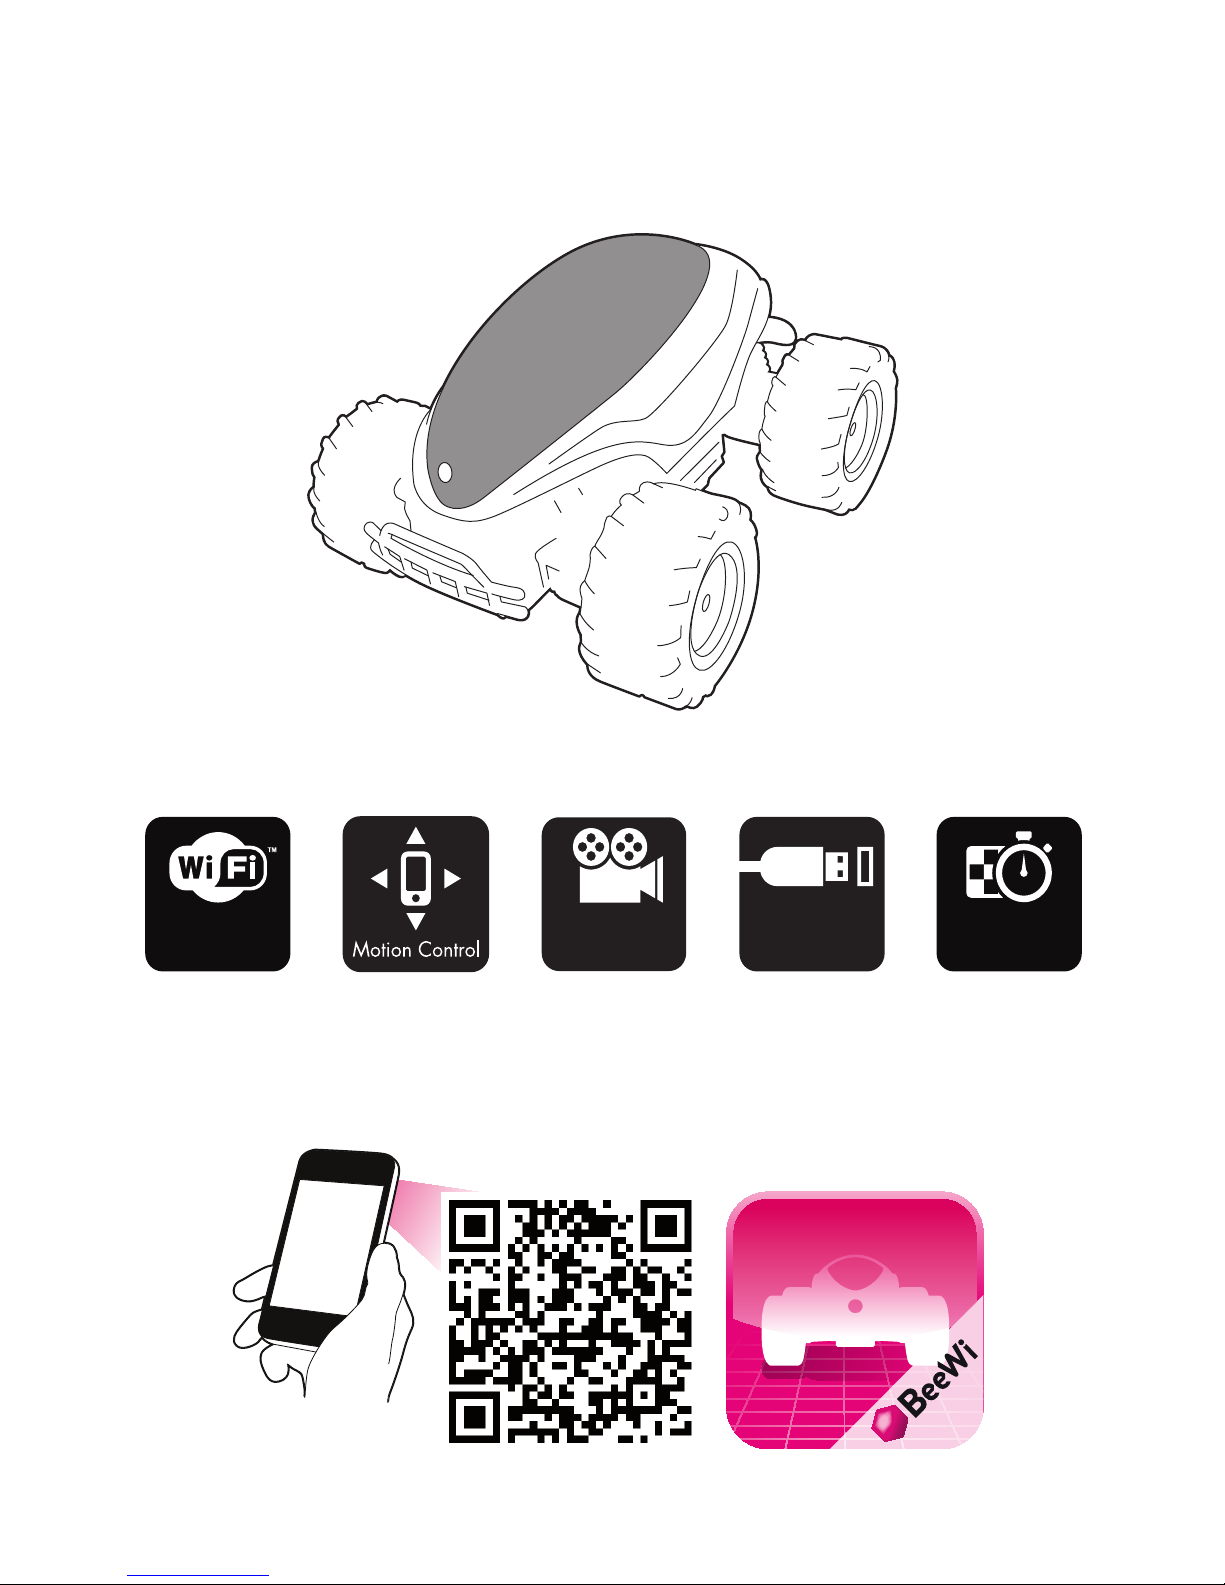
WIFI CAMERA BUGGY
BWZ200
USER GUIDE
Super Fast
Motor
30 meter
range VGA
Camera Universal
USB Charge Super Fast
Motor
SCARA BEE
APPLICATION

User’s guide
4
10
16
22
28
34
40
46
52
58
64
70
ENGLISH
FRANCAIS
DEUTSCH
ITALIANO
ESPAÑOL
PORTUGUES
NEDERLANDS
ROMÂN
Pусский
日本語
中文
4
INTRODUCTION
The WiFi Buggy can be controlled directly from your Smartphone or Tablet using the specific
BeeWi BuggyPad application available and Apple AppStore or Google PlayStore. The
WiFi Buggy works as a regular RC Toy with left/right and forward/backward proportional
directions. The application provided allows for both touch screen and motion control,
offering a funnier, richer and more user friendly experience.
The WiFi Buggy works as an ADHOC WiFi peripheral and it can be used with all latest
iOS and Android devices supporting WiFi in conjunction with the specific BuggyPad app.
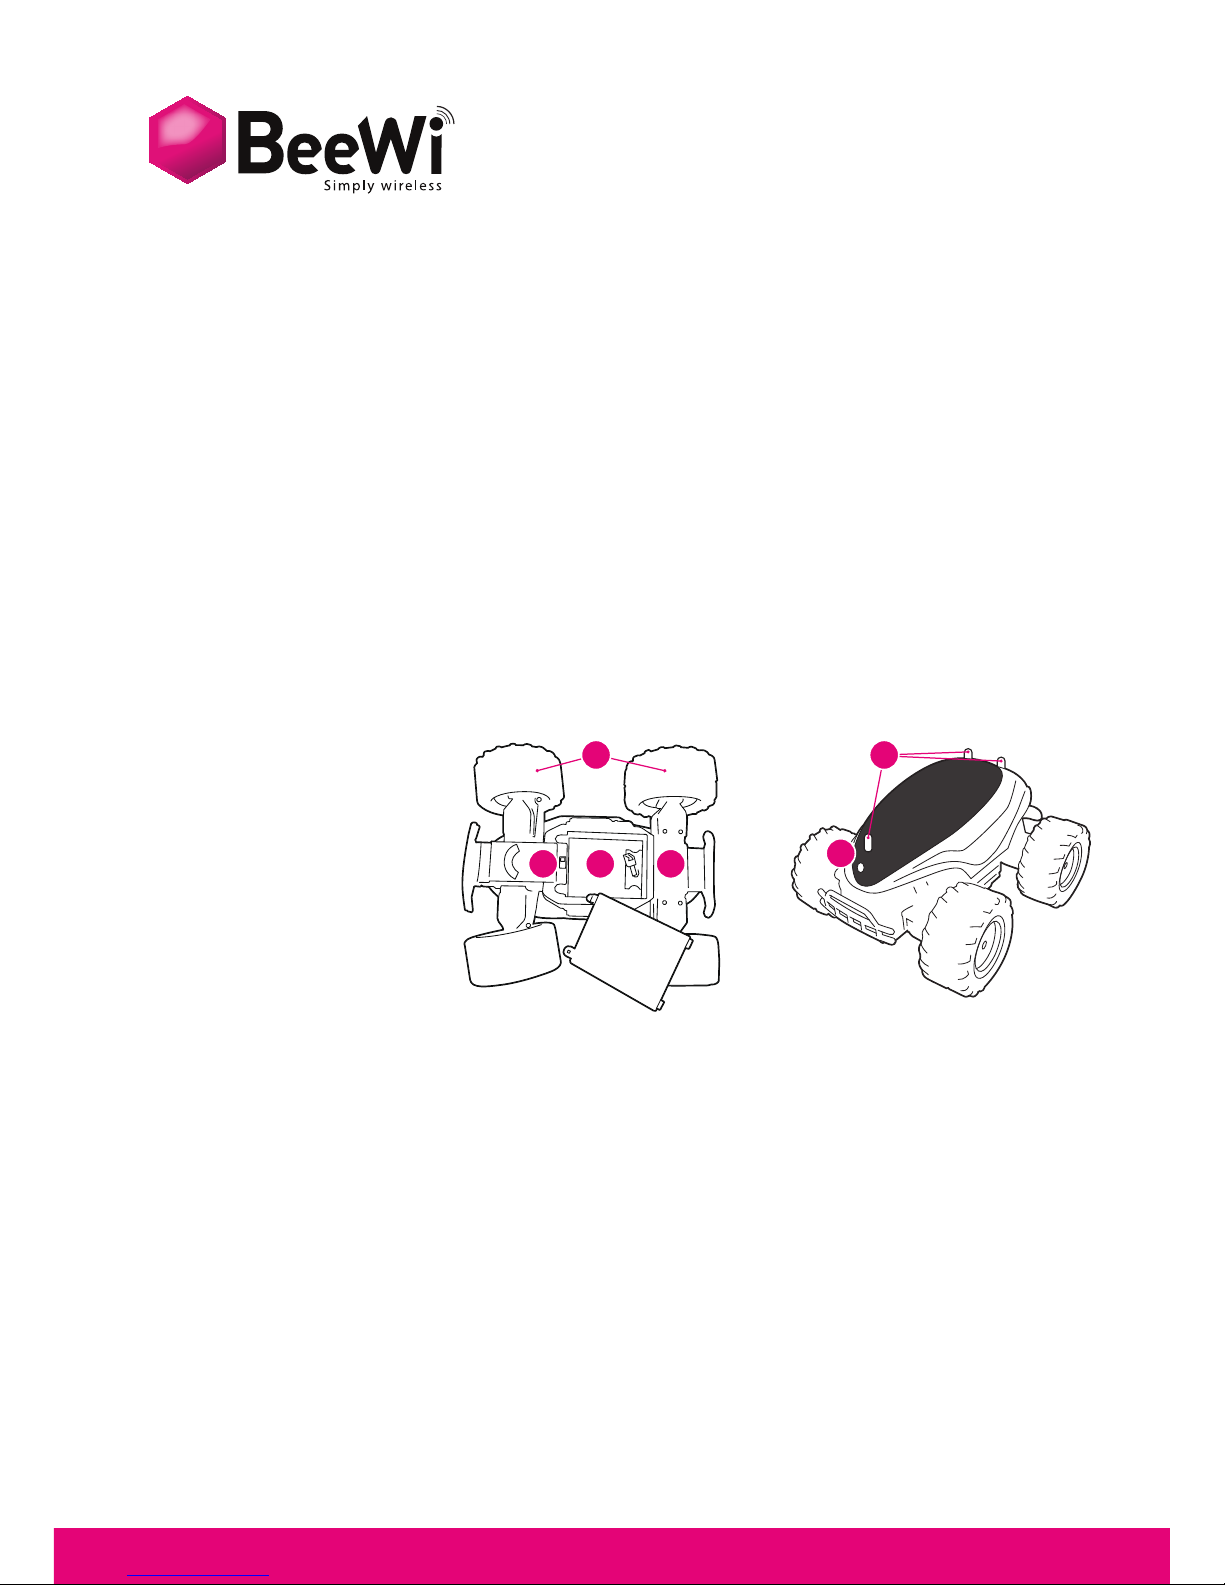
1. PRODUCT DESCRIPTION
1.1. Product Outlook
1. Chassis
2. Wheels
3. On/Off Button
4. Battery Slot
5. Body / Body attaches
6. Camera hole
1.2. Pack Content
- WiFi Buggy
- Battery Pack
- USB Charging Cable
- Quick Start Guide
1.3. Main Features
- Ultra Fast, High Speed Monster Truck / Buggy
- Independent robust and efficient suspensions for outdoor crossing
- Fully Controlled by a Smartphone using WiFi Radio
- Operating range up to 30 meters
- VGA Camera with live streaming and recording function
- Easy and expert proportional commands for a better user experience
- Motion or Touch control commands
- NiMH rechargeable battery, up to 20 minutes use time
- Battery Meter
- Standard USB charge, less than 2 hours recharging time
Thank you for purchasing the WiFi Buggy from BEEWI. Please read the following
instructions to learn how to configure and use more effectively your product.
ENGLISH
ON OFF
16
3 4
2 5
5
1.4. Product Specifications
ENGLISH
WiFi specifications :
WiFi STANDARD IEEE 802.11b/g
FREQUENCY RANGE 2.4 ~ 2.4835 GHz
POWER Max 15.20 dBm
DATA RATE Up to 54 Mbps
RADIO RANGE Up to 30 m / 100 feet
BATTERY NIMH, 7.2V, 500 mAH
TYPICAL USE TIME Up to 20 minutes continuous
CHARGE TIME Up to 2 Hours
SERVO CONTROLS Proportional, Forward/Backward and Left/
Right steering
DIMENSIONS L 23 x W 20 x H 13.5 cm
WEIGHT 600 g
Camera Specifications :
SIZE OF SENSOR 1/4 inch, CMOS Digital Image Sensor
NUMBER OF PIXELS VGA (648H*488V pixels)
OUTPUT DATA FORMAT YUV
OPTICAL FILTER Infrared cut-off filter
FOCAL LENGTH, FNO. f=3.0mm, F=2.8
FIELD OF VIEW (D) 65.°
DISTORSION <1%
FOCUS RANGE 30 cm to Infinity
FRAME RATE Max 30 fps for VGA

6
ENGLISH
2. INITIAL SETTINGS
2.1. Battery installation
Make sure the battery has been completely charge before the first use or any further use
after long storing.
- Remove the battery from the battery slot
- Connect the battery to the end of the USB charging cable
- Connect the USB charging cable to any USB charger (PC or ACDC Adapter)
During the charging process, the USB charger light will turn on. The light will turn off when
the battery is fully charged.
2.2 BuggyPad Installation
Go to the app store and look for “BeeWi BuggyPad” app. Follow the Smartphone on-
screen indications to download and install the app. Once the application has been
successfully installed, you can launch it directly. Insure the Buggy has been connected
prior to start the application.
3. USING THE BUGGY
3.1. Connection
It is necessary to connect the Buggy over WiFi prior to launch the app. Turn on the buggy,
go to the WiFi menu of your smartphone and look for the WiFi device “BeeWi BWZ200
XXXX” where “XXXX” are the last 4 character of the MAC address. Once it has been
selected, it will connect automatically without password.
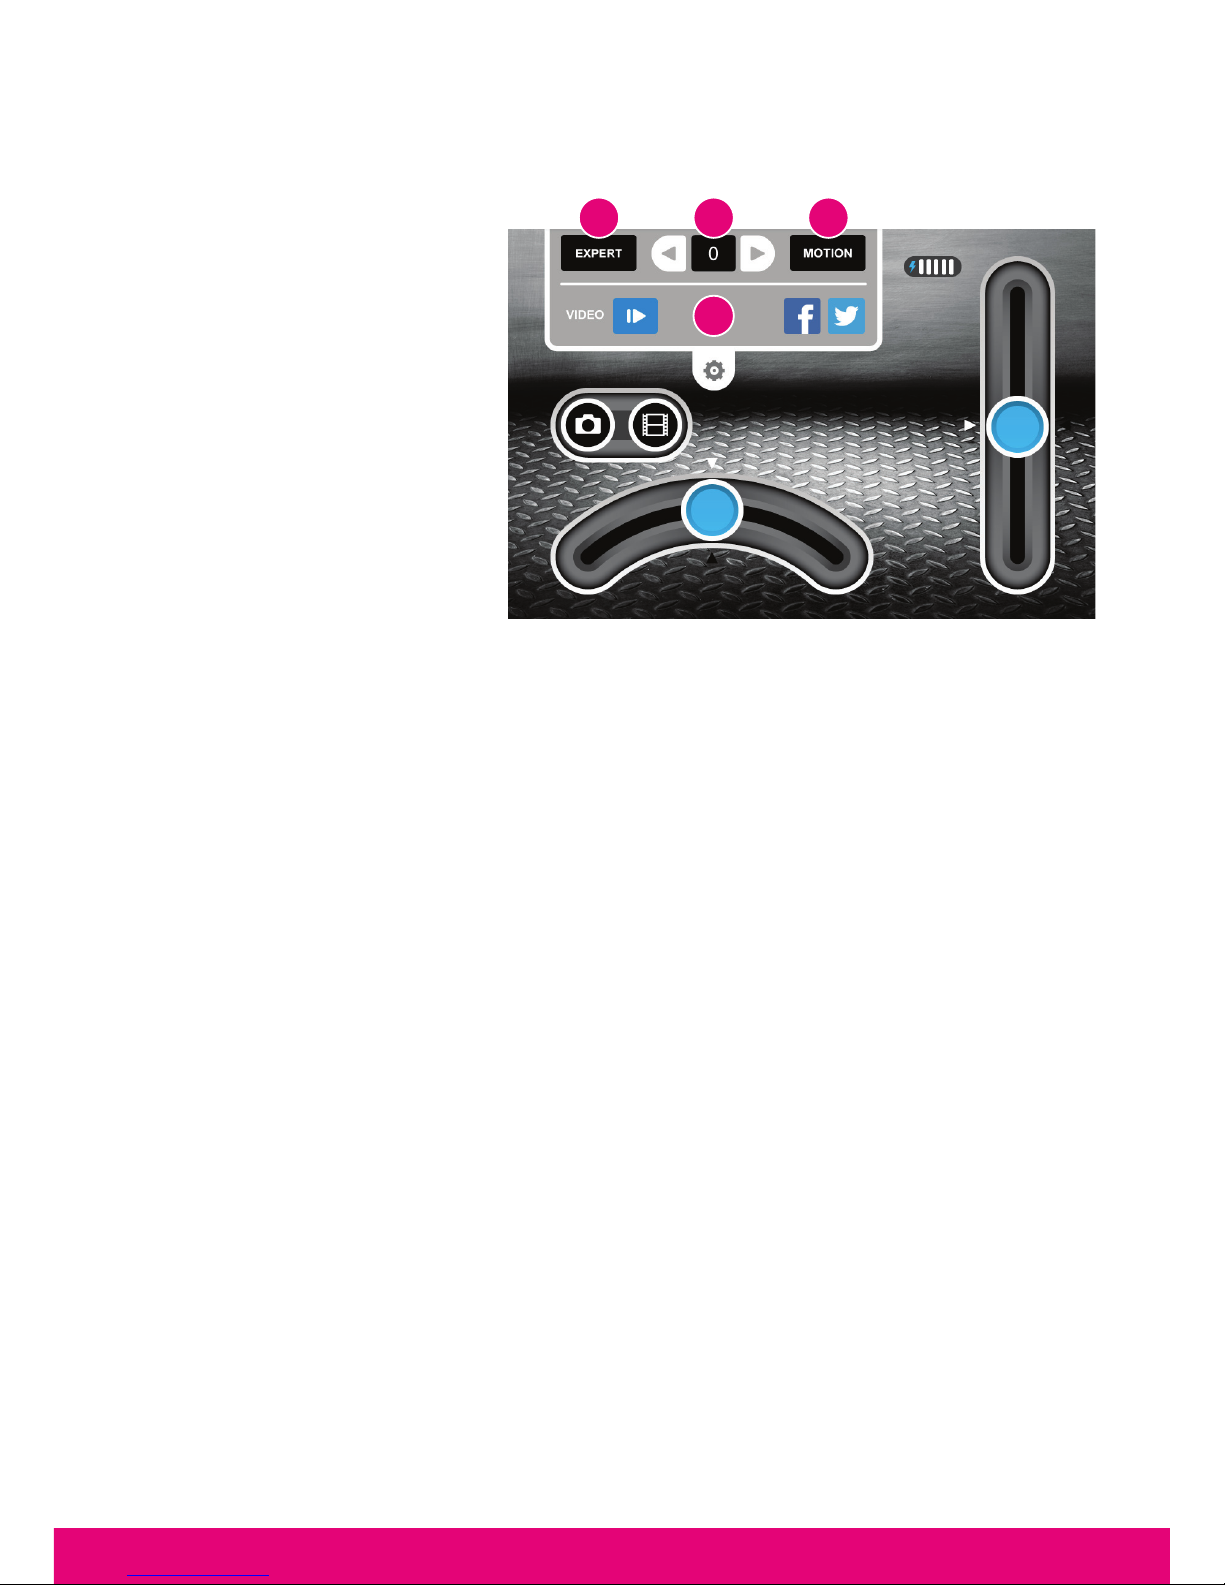
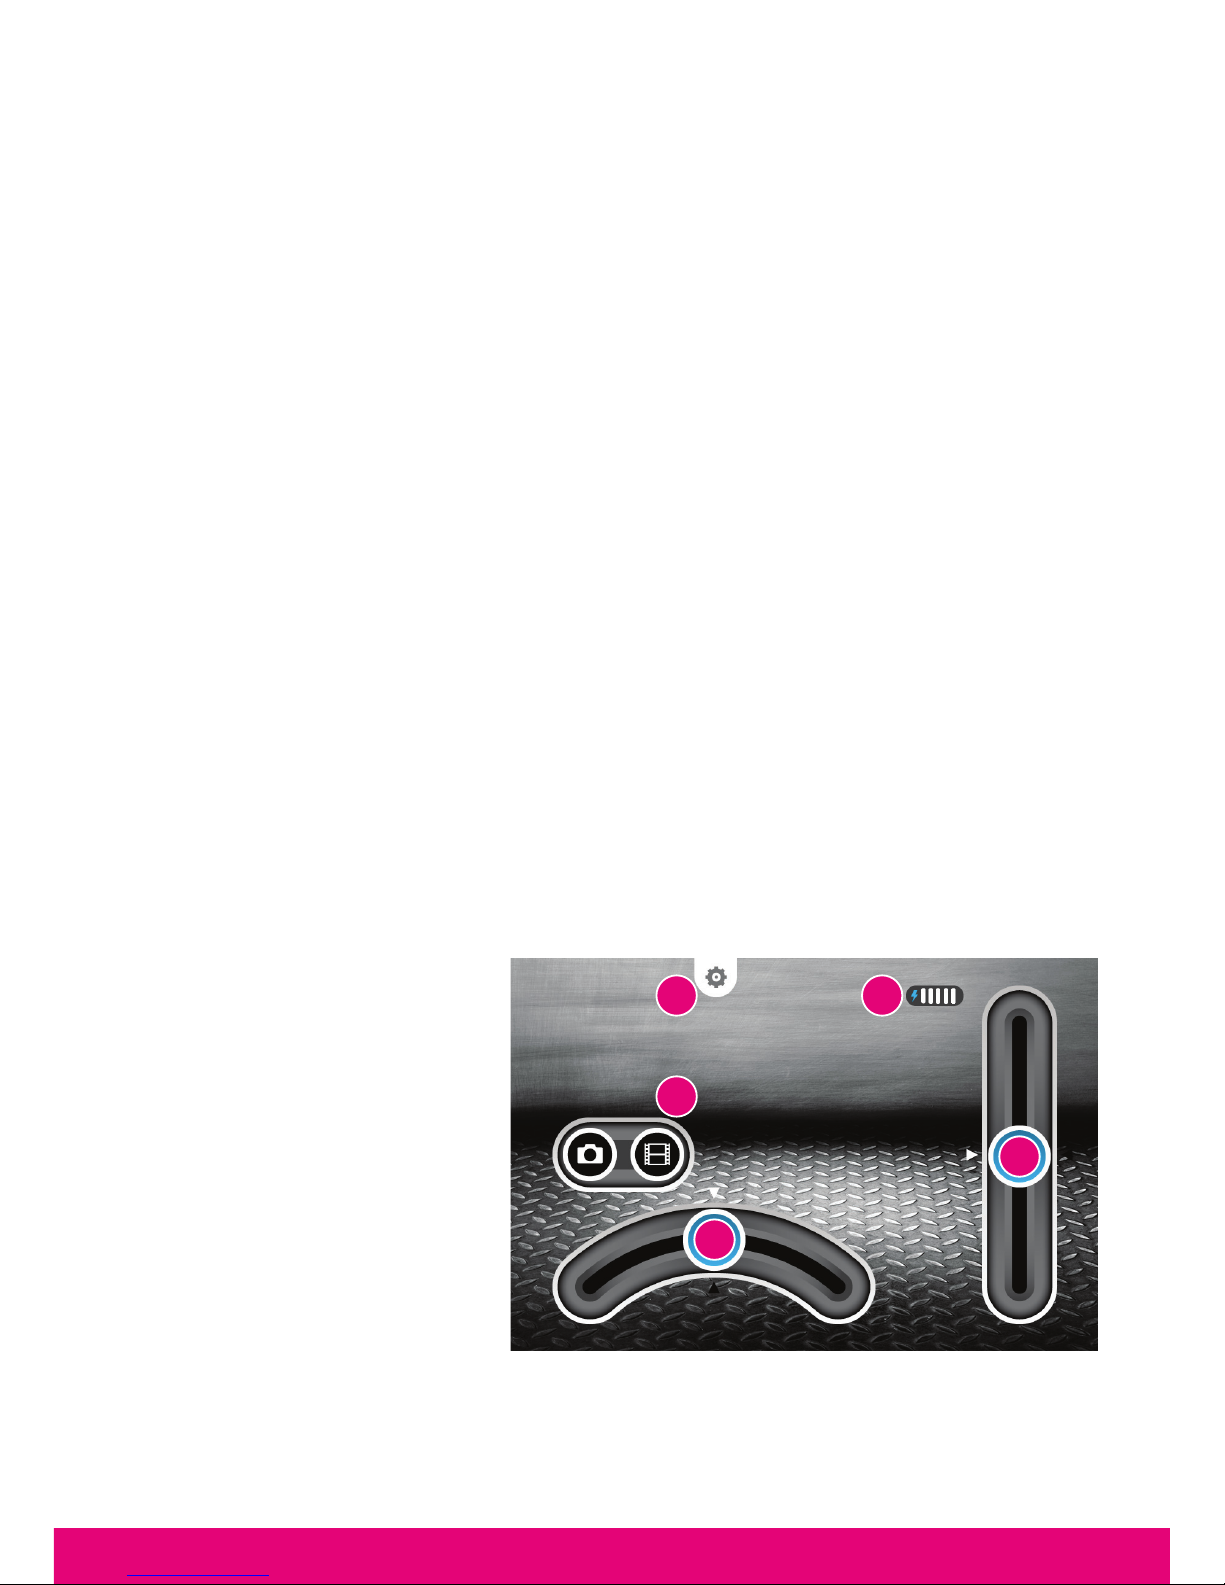
3.2. User Interface
Launch the BuggyPad application. After showing briefly the launch screen, the app will
show you the main screen below with the camera picture on the background:
1. Battery Meter (1 to 5 bars)
2. Settings scroll bar (iOS only)
3. Photo/Video Button
4. Left/Right direction
5. Forward/Backward direction
Note: on the Android app, the
settings are accessible using
the option button on your
Smartphone
12
3
4
5
7
ENGLISH
3.3. Settings
When you slide down the settings bar, you can access to various optional controls
1. Mode: Expert or Easy
2. Trim: to adjust the direction
3. Control: Motion or Touch
4. Video: Play/Pause or Share
By default the control is
MOTION, the mode is EASY
and the trimmer is set to “0”.
3.4. Operations
Adjust the direction using the TRIM buttons before using the Buggy. To do so, gently tilt the
Smartphone upward until the Buggy engine turns on. Then use the TRIM button to adjust
the direction in straight line and make sure there is no drift on the left or the right. Once
the direction is properly trimmed, you can start to use the product. It is recommended to
use the Easy mode with smoother and lower speed commands to start with.
In Motion control the commands are the following:
- To move forward, tilt the Smartphone forward
- To move backward, tilt the Smartphone towards himself
- To turn left, turn the Smartphone leftwards
- To turn right, turn the Smartphone rightwards
In Touch control, the commands are the following:
- To move forward, slide the engine bar up
- To move backward, slide the engine bar down
- To turn left, slide the direction bar left
- To turn right, slide the direction bar right
3.5. Video recording
You can use the camera to simply view real time images, and shoot pictures or videos.
To shoot a picture, just press the photo camera icon. It will turn red when shooting the
picture.
To SHOOT a video, just press the video camera icon. It will turn red as long as the video
is being recorded.
To PLAY the latest recorded video, press the Play/Pause button in the settings bar.
You can also share it using the SHARE button.
Note: pictures and videos will automatically be saved in the Smartphone memory to be
accessed later on.
2
4
1 3

8
ENGLISH
4. MAINTENANCE & CAUTIONS
Warning!
- Please read carefully the complete manual before using the product and strictly follow the
instructions.
- This product is not suitable for children under 14 years old.
- This product is not suitable for children under 3 years – risks of small parts breaking off and
potential choking hazard.
- Stay away from the product when it is turned on. Do not come closer or touch the rotating
parts.
- Do not disassemble or rework the product as this may cause damage and void the warranty.
- Please keep this information for future reference.
Use and maintenance
- Use only the charging cable supplied with the product, excluding any other USB cable.
- If the vehicle does not respond, move closer to the vehicle and try again.
- If the vehicle loses power and moves slower, it may be necessary to replace the batteries
and to check the wheel mechanism for lint, thread, hair or dust.
- To avoid damages, never drive the vehicle on a wet floor, on sand, or in mud, rain or snow.
- Do not expose the vehicle to extreme temperatures.
- To protect the vehicle's wheel mechanism from lint, thread, hair, and dust particles, you
can use a small brush, tweezers or tie a small bit of cloth to the tip of a toothpick, etc., and
wipe off.
- Always keep vehicle clean, use a dampened cloth to wipe off, and then wipe all the water
off with a dry cloth. Never use chemicals to clean the product.
- Avoid holding the wheels when rotating, this will cause the electronic components to short
circuit, overheat and cause malfunction.
- Long period of play time can generate high heat level which causes wear and tear. To
extend product life, it is suggested to allow 10 minutes of cool down period after long period
of operation.
Damages not covered by the standard Warranty:
- Damages that are caused by a improper use of the toy (shocks, falls…)
- Damages resulting from any non-compliance with manufacturer instructions
(power supply ...)
- Cosmetic damages (scratches, ...)
- Components and parts which require regular renewal: batteries, power supply...
- Damages to the toy after an intervention by any person not authorized by BeeWi
9
ENGLISH
European Union Directives Conformance Statement
Hereby, VOXLAND declares that this product is in compliance with:
• The essential requirements and other relevant provisions of Directive 1999/5/EC
• All other relevant EU Directives
You can view your product’s Declaration of Conformity (DoC) to Directive 1999/5/EC (to
R&TTE Directive) at
www.bee-wi.com.
Caring for the environment by recycling
Do not dispose of electrical devices or accessories with your household waste.
In some countries or regions, collection systems are set up to handle electrical and elec-
tronic waste items. Contact your regional authorities for more details.
Federal Communications Commission
This equipment has been tested and found to comply with the limits for a Class B digital
device, pursuant to Part 15 of the FCC Rules. These limits are designed to provide rea-
sonable protection against harmful interference in a residential installation. This equip-
ment generates, uses and can radiate radio frequency energy and, if not installed and used
in accordance with the instructions, may cause harmful interference to radio communications.
However, there is no guarantee that interference will not occur in a particular installation.
If this equipment does cause harmful interference to radio or television reception, which can
be determined by turning the equipment off and on, the user is encouraged to try to correct
the interference by one or more of the following measures:
• Reorient or relocate the receiving antenna.
• Increase the separation between the equipment and receiver.
• Consult the dealer or an experienced radio/TV technician for help.
Canada Compliance Statement
This device complies with Industry Canada license-exempt RSS standard(s). Operation is
subject to the following two conditions: (1) this device may not cause interference, and (2)
this device must accept any interference, including interference that may cause undesired
operation of the device. This Class B digital apparatus complies with Canadian ICES-003
Copyright and other legal information
BEEWI is a registered trademark. Other trademarks mentioned herewith are owned by their
proprietors. All other product or service names are the property of their respective owners.
The use of wireless devices and their accessories may be prohibited or restricted in certain
areas. Always obey the laws and regulations on the use of these products.
This product is covered by a 2-year product warranty which is valid from the date of pur-
chase. Users are not permitted to make changes or modify the device in any way. Changes
or modifications not expressly approved by the party responsible for compliance will void
the user’s warranty.
Please visit our website www.bee-wi.com for more information.
© VOXLAND CS90234 13311 Marseille Cedex 14 France.

10
FRANÇAIS
INTRODUCTION
Le Buggy WIFI peut être contrôlé directement par votre Smartphone en utilisant l’application
spécifique BeeWi BuggyPad disponible sur Apple AppStore et Google PlayStore. Le Buggy
WIFI fonctionne comme une véhicule télécommandé conventionnel avec commandes
proportionnelles de directions avant/arrière et gauche/droite. L’application permet
à la fois le contrôle tactile avec boutons virtuels et le contrôle par mouvement utilisant
l’accéléromètre pour une expérience encore plus amusante, plus riche, et plus pratique.
Le Buggy WIFI fonctionne comme un périphérique WIFI avec connexion ADHOC et peut
être utilisé avec tous les appareils iOS et Android supportant le WIFI conjointement avec
l’appli BuggyPad.
1. DESCRIPTION
1.1. Vue du produit
1. Châssis
2. Roues
3. Bouton On/Off
4. Emplacement de la
batterie
5. Coque / Attaches
6. Caméra
1.2. Contenu du pack
- WiFi Buggy
- Battery Pack
- USB Charging Cable
- Quick Start Guide
1.3. Caractéristiques principales
- Buggy, type Monster Truck ultra rapide
- Suspensions indépendantes et robustes pour utilisation en extérieur
- Contrôle intégral via un Smartphone utilisant la radio WIFI
- Rayon de fonctionnement de 30 mètres
- Caméra VGA avec image instantanée et fonction d’enregistrement
- Commandes proportionnelles avec modes facile et expert pour une meilleure
expérience
- Contrôles par mouvement ou commandes tactiles
Merci d’avoir choisi le Buggy WIFI de BEEWI. Veuillez lire les instructions suivantes afin
de configurer et utiliser au mieux votre appareil.
ON OFF
16
3 4
2 5

11
FRANÇAIS
- Batterie rechargeable NiMH, jusqu’à 20 minutes d’utilisation
- Indicateur du niveau de batterie
- Charge standard USB de moins de 2 heures
1.4. Specifications
Specifications WiFi :
STANDARD IEEE 802.11b/g
FREQUENCES 2.4 ~ 2.4835 GHz
PUISSANCE Max 15.20 dBm
DEBIT Jusqu’à 54 Mbps
PORTEE Jusqu’à 30 m
BATTERIE NIMH, 7,2V, 500 mAH
TEMPS D’UTILISATION Jusqu’à 20 minutes en continu
TEMPS DE CHARGE Jusqu’à 2 heures
CONTROLES SERVO Proportionnels, directions avant/arrière et
gauche/droite
DIMENSIONS L 23 x l 20 x H 13.5 cm
POIDS 600 g
Specifications Vidéo :
CAPTEUR 1/4 pouce, CMOS Digital Image Sensor
DEFINITION VGA (648H*488V pixels)
FORMAT DE DONNEES YUV
FILTRE OPTIQUE Filtre de coupure infrarouge
LONGUEUR FOCALE, FNO. f=3.0mm, F=2.8
CHAMPS DEVISION (D) 65.°
DISTORTION <1%
MISE AU POINT 30 cm à l’infini
FREQUENCE D’IMAGE 30 images par sec. max
12
FRANÇAIS
2. REGLAGES INITIAUX
2.1. Charge de la batterie
S’assurer que la batterie a été pleinement charge van tune première utilisation ou toute
utilisation après un stockage prolongé.
- Retirer la batterie du compartiment batterie
- Connecter la batterie au câble USB
- Connecter le câble USB à tout chargeur type USB (PC ou bloc d’alimentation)
Durant la charge, la diode du câble USB s’allume en rouge. A la fin de la charge la diode
s’éteint pour signifier que la batterie est pleinement chargée.
2.2. Installation de BuggyPad
Aller sur la boutique d’applications et rechercher l’appli “BeeWi BuggyPad”. Suivre
les indications sur l’écran de votre Smartphone pour télécharger et installer l’appli. Si
l’application a été installée avec succès, vous pourrez la lancer automatiquement.
S’assurer que le Buggy a bien été connecté avant de lancer l’appli.
3. UTILISATION DU BUGGY
3.1. Connexion
Il est nécessaire de connecter le Buggy en WIFI avant de lancer l’application. Allumer
le Buggy, aller sur le menu WIFI du Smartphone et rechercher l’appareil WIFI « BeeWi
BWZ200 XXXX » où « XXXX » sont les 4 derniers caractères de l’adresse MAC. Suite à la
sélection, il se connecte automatiquement sans mot de passe.
3.2. Interface utilisateur
Lancer l’application BuggyPad. Après avoir affiché brièvement l’écran de lancement,
l’appli affiche l’écran principal avec l’image de la camera en arrière plan.
1. Indicateur de batterie
(5 niveaux)
2. Barre des réglages
(iOS seulement)
3. Bouton Photo/Vidéo
4. Direction gauche/droite
5. Direction avant/arrière
Note: sur l’appli Android les
réglages sont accessibles en
appuyant sur le bouton d’option
du Smartphone.
12
3
4
5

13
FRANÇAIS
3.3. Réglages
Lorsque la barre des réglages est déployée, il est possible d’accéder à un certain
nombre de contrôles.
1. MODE: EXPERT (expert) ou
EASY (facile)
2. TRIM: pour ajuster la
direction
3.CONTROL:MOTION
(mouvement) ou TOUCH (tactile)
4. VIDEO: lecture ou partage
Par défaut, le contrôle est
MOTION (mouvement), le mode
est EASY (facile) et le trimmer
est centre sur “0”.
3.4. Commandes
Ajuster la direction avec les boutons de TRIM avant l’utilisation. Pour ce faire, incliner
le Smartphone vers l’avant pour démarrer doucement en marche avant, puis utiliser les
boutons TRIM pour ajuster la direction en ligne droite et s’assurer qu’il n’y a pas de dérive
vers la gauche ou la droite. Lorsque la direction est équilibrée, vous pouvez utiliser le
Buggy. Il est recommandé de commencer en mode EASY (facile) avec vitesse réduite.
Pour le contrôle par mouvement (MOTION), les commandes sont les suivantes :
- Pour aller en avant, incliner le Smartphone vers l’avant
- Pour aller en arrière, incliner le Smartphone vers soi
- Pour tourner à gauche, incliner le Smartphone vers la gauche
- Pour tourner à droite, incliner le Smartphone vers la droite
Pour le contrôle tactile :
- Pour aller en avant, pousser la barre d’accélération vers le haut
- Pour aller en arrière, tirer la barre d’accélération vers le bas
- Pour tourner à gauche, glisser la barre de direction vers la gauche
- Pour tourner à droite, glisser la barre de direction vers la droite
3.5. Enregistrement vidéo
On peut utiliser la caméra pour simplement visualiser l’image en temps réel, prendre des
photos ou enregistrer des vidéos.
Pour prendre une photo, presser l’icône appareil photo. Le bouton passe en rouge et une
vue réduite de la photo s’affiche momentanément.
Pour enregistrer une vidéo, presser l’cône de caméra vidéo. Le bouton s’allume en rouge
tant que l’enregistrement est en cours.
Pour lire la dernière vidéo, utiliser le bouton de lecture dans la barre de réglage. Vous
pouvez aussi partager la vidéo instantanément en utilisant le bouton de partage.
Note : les photos et vidéos sont automatiquement enregistrées dans la mémoire du
Smartphone pour être accessible par la suite.
2
4
1 3

14
FRANÇAIS
4. MAINTENANCE & CAUTIONS
Attention!
- Lire attentivement le manuel complet et suivre strictement les instructions qui sont données
avant utilisation.
- Ce produit n’est pas destiné aux enfants de moins de 14 ans.
- Ce produit ne convient pas aux enfants de moins de 36 mois – risques de casse et
d’étouffement par ingestion de petites pièces.
- Garder ses distances lorsque le produit est en marche. Ne pas s’approcher trop près ou
toucher les parties en rotation.
- Ne pas démonter ou réparer le produit car cela peut causer des dommages et annuler la
garantie.
- Merci de conserver cette information pour référence.
Utilisation et maintenance
- N’utiliser que le câble de charge USB fourni avec le produit, à l’exclusion de tout autre
câble.
- Si le véhicule ne répond pas, se rapprocher à moins de 30 mètres pour rétablir la connexion.
- Si le véhicule perd de la puissance et se déplace plus lentement, il est peut-être nécessaire
de charger la batterie et de vérifier que le mécanisme des roues est propre.
- Pour éviter tout dommage, ne pas utiliser le véhicule sur un sol mouillé, sur du sable ou de
la boue, sous la pluie ou la neige.
- Ne pas exposer le véhicule à des températures extrêmes.
- Pour protéger le mécanisme des roues de la poussière, nettoyer celui-ci avec une petite
brosse, une pince à épiler ou un petit morceau de tissus.
- Pour garder toujours le véhicule propre, le nettoyer avec un chiffon légèrement humide puis
un chiffon sec pour retirer toute trace d’eau. Ne jamais utiliser de détergent.
- Ne pas bloquer les roues en tournant car cela peut créer des courts-circuits, une surchauffe
er des dysfonctionnements.
- De longues périodes d’utilisation peuvent augmenter la température ceci créant une usure
prématurée. Pour prolonger la durée de vie du produit, il est recommandé de le laisser
reposer toutes les 10 minutes.
Avertissement concernant la garantie des jouets
Dommages non couvert par la garantie standard :
- Dommages ayant pour origine une mauvaise utilisation du jouet (choc, chute, chaleur,
utilisation erronée)
- Dommages consécutifs à un non-respect des instructions du fabricant
- Dommages esthétiques (rayures, éraflures...)
- Eléments ou pièces d’usure dont le renouvellement régulier est nécessaire : piles, batterie,
alimentation...
- Dommages subis suie à une intervention effectuée par toute autre personne que celle
agréée par BeeWi

15
FRANÇAIS
Déclaration de conformité aux directives de l’Union Européenne
VOXLAND déclare que ce produit est en conformité avec :
• Les dispositions essentielles ainsi que toutes provisions afférentes de la directive
1999/5/EC
• Toutes autres Directives de l’Union Européenne afférentes
Vous pouvez visualiser la Déclaration de Conformité (DoC) à la directive 1999/5/EC (à
la Directive R&TTE) sur le site www.bee-wi.com.
Protection de l’environnement par le recyclage
Ne jetez aucun appareil ou accessoire électrique dans votre poubelle.
Des systèmes de collecte permettant de traiter les déchets électriques et électroniques
sont progressivement mis en place. Renseignez-vous localement pour plus d’informations.
Déclaration de conformité Canada
Cet appareil est conforme aux normes CNR exemptes de licence d’Industrie Canada. Le
fonctionnement est soumis aux deux conditions suivantes: (1) cet appareil ne doit pas
provoquer d’interférence et (2) cet appareil doit accepter toute interférence, y compris
celles susceptibles de provoquer un fonctionnement non souhaité de l’appareil.
Cet appareil numérique de la classe B est conforme à la norme NMB-003 du Canada.
Copyright et autres informations
BEEWI est une marque déposée. Les autres marques mentionnées ci-après appartiennent
à leurs propriétaires. Les autres noms de produit ou de service utilisés sont la propriété
de leurs détenteurs respectifs.
L’utilisation d’appareils sans fil et de ses accessoires peuvent être interdite dans certains
endroits. Toujours respecter les réglementations et lois en vigueur.
Ce produit est couvert par une garantie de deux ans s’appliquant à compter de la date
d’achat du matériel. Les utilisateurs n’ont pas l’autorisation de faire quelque change-
ment ou modification que ce soit. Tout changement ou modification non expressément
approuvé annule la garantie.
Veuillez visiter notre site web www.bee-wi.com pour plus d’information.
© VOXLAND Les Rizeries 208 Bld de Plombières CS90234
13311 Marseille Cedex 14 France.

16
DEUTSCH
EINLEITUNG
Der WIFI Buggy kann direkt über Ihr Smartphone gesteuert werden, indem die spezifische
Applikation BeeWi BuggyPad benutzen, die auf Apple AppStore und Google PlayStore
zur Verfügung steht. Der WIFI Buggy funktioniert wie ein herkömmliches ferngesteuertes
Fahrzeug mit proportionaler Steuerung für Vorwärts-/Rückwärts- und Links-/Rechtslauf.
Die Applikation ermöglicht die taktile Steuerung mit virtuellen Tasten sowie die mobile
Steuerung, indem der Beschleunigungsmesser benutzt wird für eine Erfahrung, die noch
mehr Spaß bereitet, interessanter und praktischer ist.
Der WIFI Buggy funktioniert wie ein WIFI-Gerät mit ADHOC Anschluss und kann mit
allen iOS und Android Geräten benutzt werden, die WIFI zusammen mit der BuggyPad
Applikation benutzen.
1. PRODUKTBESCHREIBUNG
1.1. Produktansicht
1. Gestell
2. Räder
3. "ON/OFF"-Taste
4. Platz der Batterie
5. Gehäuse / Befestigungen
des Gehäuses
6. Kamera
1.2. Inhalt des Packs
- WiFi Buggy
- Batteriepack
- USB Ladekabel
- Vereinfachte Bedienungsanleitung
1.3. Wesentliche Merkmale
- Buggy, Typ super schneller Monster Truck
- Unabhängige und robuste Stossdämpfer für Nutzung im Freien
- Integrale Steuerung über ein Smartphone mit Hilfe des WIFI-Radios
- Betriebsradius 30 Meter
- VGA-Kamera mit Snapshot-Image und Speicherfunktion
- Proportionale Steuerung mit leichtem und Expertenmodus für eine bessere Erfahrung
- Mobile oder taktile Steuerung
Wir freuen uns, dass Sie sich für den WIFI Buggy von BEEWI entschieden haben. Bitte lesen
Sie sich die folgenden Anweisungen durch, um Ihr Gerät bestmöglich zu konfigurieren und
zu benutzen.
ON OFF
16
3 4
2 5

17
DEUTSCH
- Aufladbare NiMH-Batterie, bis zu 20 Minuten Gebrauch
- Anzeige des Batterieniveaus
- Standard-USB-Laden in weniger als 2 Stunden
1.4. Spezifikationen
Specifications WiFi :
STANDARD IEEE 802.11b/g
FREQUENZEN 2.4 ~ 2.4835 GHz
LEISTUNG Max 15.20 dBm
RATE Bis zu 54 Mbps
TRAGWEITE Bis zu 30 m
BATTERIE NIMH, 7,2V, 500 mAH
NUTZUNGSDAUER Bis zu 20 Minuten im Dauerbetrieb
LADEZEIT Bis zu 2 Stunden
SERVOSTEUERUNGEN Proportional, Vorwärts-/Rückwärtslauf und
Links-/Rechtslauf
ABMESSUNGEN L 23 x B 20 x H 13.5 cm
GEWICHT 600 g
Specifications Vidéo :
SENSOR 1/4 Zoll, CMOS Digital Image Sensor
DEFINITION VGA (648H*488V Pixel)
DATENFORMAT YUV
OPTISCHER FILTER Infrarotfilter
FOKALE LÄNGE, FNO. f=3.0mm, F=2.8
SICHTFELD (D) 65.°
DISTORTION <1%
EINSTELLUNG 30 cm bis unendlich
BILDFREQUENZ 30 Bilder pro Sek. max.

18
DEUTSCH
2. GRUNDEINSTELLUNGEN
2.1. Aufladung der Batterie
Sich vergewissern, dass die Batterie vor dem ersten Gebrauch oder nach einer längeren
Lagerung voll aufgeladen worden ist.
- Die Batterie aus dem Batteriefach nehmen
- Die Batterie an das USB-Kabel anschließen
- Das USB-Kabel an irgendein Ladegerät Typ USB (PC oder Versorgungsblock) anschließen
Während des Aufladens leuchtet die Diode des USB-Kabels rot auf. Wenn das Aufladen
beendet ist, erlischt die Diode um anzuzeigen, dass die Batterie voll aufgeladen ist.
2.2. Installation von BuggyPad
Begeben Sie sich in den App-Store und suchen Sie die Applikation “BeeWi BuggyPad”.
Befolgen Sie die Anweisungen auf dem Bildschirm Ihres Smartphones, um die Applikation
hochzuladen und zu installieren. Falls die Applikation erfolgreich installiert worden ist,
können Sie sie automatisch starten. Vergewissern Sie sich, dass der Buggy angeschlossen
worden ist, bevor Sie die Applikation starten.
3. NUTZUNG DES BUGGYS
3.1. Anschluss
Der Buggy muss in WIFI angeschlossen werden, bevor die Applikation gestartet wird.
Schalten Sie den Buggy an, begeben Sie sich in das WIFI-Menü des Smartphones und
suchen Sie das WIFI-Gerät "BeeWi BWZ200 XXXX", wobei "XXXX" den 4 letzten Zeichen
der MAC-Adresse entspricht. Nach der Auswahl schließt er sich automatisch ohne Passwort
an.
3.2. Benutzerschnittstelle
Starten Sie die BuggyPad Applikation. Nachdem der Startbildschirm kurz angezeigt wurde,
zeigt die Applikation den Hauptbildschirm mit dem Bild der Kamera im Hintergrund.
1. Batterieanzeiger (5 Niveaus)
2. Einstellleiste (nur iOS)
3. Foto/Video-Taste
4. Links-/Rechtslauf
5. Vorwärts-/Rückwärtslauf
Anmerkung: auf der Android-
Applikation kommt man zu den
Einstellungen, indem man auf die
Optionstaste des Smartphones
drückt.
12
3
4
5

19
DEUTSCH
3.3. Einstellungen
Wenn die Einstellleiste eingesetzt wird, ist es möglich, zu einer bestimmten Anzahl von
Steuerungen zu gelangen.
1. MODUS: EXPERT (Experte)
oder EASY (leicht)
2. TRIM: um den Kurs
auszurichten
3. CONTROL: MOTION
(Bewegung) oder TOUCH
(taktil)
4. VIDEO: Wiedergabe oder
gemeinsame Nutzung
Standardmäßig ist die Steuerung
MOTION (Bewegung), der
Modus EASY (leicht) und der
Trimmer auf “0” zentriert.
3.4. Steuerungen
Richten Sie den Lauf mit den TRIM-Tasten vor dem Gebrauch aus. Neigen Sie dafür das
Smartphone nach vorne, um den Buggy langsam vorwärts zu bewegen und benutzen Sie
dann die TRIM-Tasten, um die Richtung geradlinig abzugleichen und sich zu vergewissern,
dass es kein Abdriften nach links oder rechts gibt. Wenn die Richtung ausgeglichen
ist, können Sie den Buggy benutzen. Es wird empfohlen, im EASY (leicht) Modus mit
langsamer Geschwindigkeit zu beginnen.
Für die mobile Steuerung (MOTION) gibt es folgende Möglichkeiten:
- Neigen Sie das Smartphone nach vorne, um sich vorwärts zu bewegen
- Neigen Sie das Smartphone zu sich, um sich rückwärts zu bewegen
- Um nach links zu drehen, neigen Sie das Smartphone nach links
- Nach rechts zu drehen, neigen Sie das Smartphone nach rechts
Für die taktile Steuerung:
- Drücken Sie die Beschleunigungsleiste nach oben für die Vorwärtsbewegung
- Ziehen Sie die Beschleunigungsleiste nach unten für die Rückwärtsbewegung
- Um nach links zu drehen, schieben Sie die Steuerungsleiste nach links
- Um nach rechts zu drehen, schieben Sie die Steuerungsleiste nach rechts
3.5. Videoaufnahme
Man kann die Kamera benutzen, um einfach das Bild in Echtzeit zu visualisieren, Fotos zu
machen oder Videos aufzunehmen.
Um ein Foto zu machen, drücken Sie auf die Ikone Fotoapparat. Die Taste geht auf rot über
und eine reduzierte Ansicht des Fotos erscheint für einen Augenblick.
Um ein Video aufzunehmen, drücken Sie auf die Videokamera-Ikone. Die Taste leuchtet rot
auf, solange die Aufnahme läuft.
Um sich das letzte Video anzusehen, benutzen Sie die Wiedergabe-Taste in der Einstellleiste.
Sie können das Video auch sofort teilen, indem Sie die Sharing-Taste benutzen.
Anmerkung: die Fotos und Videos werden automatisch im Speicher des Smartphones
gespeichert, um im Anschluss zugänglich zu sein.
2
4
1 3

20
DEUTSCH
4. VORSICHTSMASSNAHMEN UND PFLEGE
Achtung!
- Lesen Sie sich vor dem Gebrauch aufmerksam das komplette Handbuch durch und
befolgen Sie genau die dort gegebenen Anweisungen.
- Dieses Produkt ist nicht für Kinder unter 14 Jahren bestimmt.
- Dieses Produkt ist nicht für Kinder unter 36 Monaten geeignet – Bruch- und Erstickungsrisiko
durch verschluckte Kleinteile.
- Halten Sie Abstand, wenn das Gerät in Betrieb ist. Gehen Sie nicht zu nah heran und
berühren Sie keine in Bewegung befindlichen Teile.
- Demontieren oder reparieren Sie das Produkt nicht selbst, da dies Schäden an dem Gerät
hervorrufen kann und zum Erlöschen der Garantie führt.
- Verwahren Sie diese Informationen bitte zum Nachschlagen auf.
Gebrauch und Pflege
- Verwenden Sie ausschließlich das mit dem Produkt mitgelieferte Ladekabel und benutzen
Sie keine anderen USB-Kabel.
- Falls das Fahrzeug nicht reagiert, nähern Sie sich ihm mindestens auf 30 Metern, um die
Verbindung herzustellen.
- Falls das Fahrzeug an Leistung verliert und sich langsamer fortbewegt, ist es vielleicht
erforderlich, die Batterie aufzuladen und zu überprüfen, ob der Radmechanismus sauber
ist.
- Um Beschädigungen zu verhindern, benutzen Sie das Fahrzeug nicht auf einem nassen
Boden, auf Sand oder Schlamm, im Regen oder Schnee.
- Setzen Sie das Fahrzeug keinen extremen Temperaturen aus.
- Um den Radmechanismus vor Staub zu schützen, reinigen Sie ihn mit einer kleinen Bürste,
einer Pinzette oder einem kleinen Stück Stoff.
- Damit das Fahrzeug immer sauber bleibt, reinigen Sie es mit einem leicht angefeuchteten
Tuch und anschließend mit einem trockenen Tuch, um jegliche Wasserspuren zu entfernen.
Benutzen Sie niemals Scheuermittel.
- Blockieren Sie die Räder nicht beim Drehen, da dies zu einem Kursschluss, einer
Überhitzung und zu Fehlfunktionen führen kann.
- Bei längerer Nutzung hintereinander kann ein Temperaturanstieg erfolgen, der zu einer
vorzeitigen Abnutzung führt. Um die Lebensdauer des Produkts zu verlängern, wird
empfohlen, alle 10 Minuten eine Pause beim Gebrauch zu machen.
Folgende Schäden werden nicht von der Standard-Garantie abgedeckt
- Beschädigungen aufgrund einer unsachgemäßen Nutzung des Spielzeugs (Stoss, Sturz,
Hitze, falsche Nutzung)
- Auf die Nichteinhaltung der Anweisungen des Herstellers zurückzuführende Schäden
- Rein optische Beeinträchtigungen (Kratzer, Schrammen...)
- Elemente und Verschleißteile, die in regelmäßigen Zeitabständen ausgetauscht werden
müssen: Batterien, Akku, Stromversorgung...
- Beschädigungen aufgrund des Eingriffs einer Person, die nicht durch BeeWi zugelassen ist
Other manuals for BWZ200
1
Table of contents
Languages:
Other BeeWi Toy manuals


Popular Toy manuals by other brands

Italeri
Italeri M3 Half Track Assembly instructions

Fisher-Price
Fisher-Price 71923 instructions

Viessmann
Viessmann 4021 Operation manual

Hasbro
Hasbro STAR WARS DARTH VADER VOICE CHANGER 85260 quick start guide

Mattel
Mattel Hot WHEELS TRICK TRACKS ROCKIN'RAMPAGE instructions

FMS
FMS FMM032RRED T28 Trojan operating manual

Power Wheels
Power Wheels L2170 owner's manual

Dancing Wings Hobby
Dancing Wings Hobby S21 Fieseler Fi 156 Storch V2.0 instruction manual

KidKraft
KidKraft 65823 Assembly instructions

Seagull Models
Seagull Models Piper Cub Assembly manual

KidKraft
KidKraft Alexa 2-in-1 Kitchen & Market manual

FGA
FGA Little Moppet LMFT-09 Guide


