BeeWi BBZ352 User manual

BLUETOOTH INTERACTIVE HELICOPTER
USER GUIDE

BBZ352
APPLICATION

User’s guide
4
12
20
28
36
44
52
60
68
76
84
92
ENGLISH
FRANCAIS
DEUTSCH
ITALIANO
ESPAÑOL
PORTUGUES
NEDERLANDS
БЪЛГАРСКИ
ROMÂN
PУССКИЙ
日本語
中文
4
The Bluetooth Interactive Helicopter can be controlled directly from your iPhone or iPad using the
specific BeeWi HeliPad 2.0 application available on AppStore. The Bluetooth Interactive Helicopter
works as a regular RC Helicopter with throttle, left/right and forward/backward directions. The
application provided allows for both touch screen and motion control, offering a funnier, richer and
more user friendly experience.
The Interactive Helicopter is Bluetooth 3.0 compliant and it is compatible with all Bluetooth compliant
iOS devices using Wireless iAp protocol such as iPod touch (G3 and above), iPhone (3G and
above) and iPad.
1. PRODUCT DESCRIPTION
1.1. Package Content
- Bluetooth Interactive Helicopter
- USB Charging Cable
- Smart Target (requires 3 AAA batteries not included)
- Quick Start Guide
1.2. Main Features
- Use your SmartPhone to fly this helicopter and hit the Target!
- 3 Channels, dual rotor structure and gyroscope
- Maximum range 15 meters, Typical 10 meters
- Shooting range 3 meters typical
- Rechargeable battery, up to 8 minutes use time
- Standard USB charge
- BeeWi HeliPad 2.0 application compatible with iOS devices, iPod Touch, iPhone and iPad
- Intuitive motion control using mobile’s motion sensor or touch-screen button interface
- 2 control modes: easy and expert
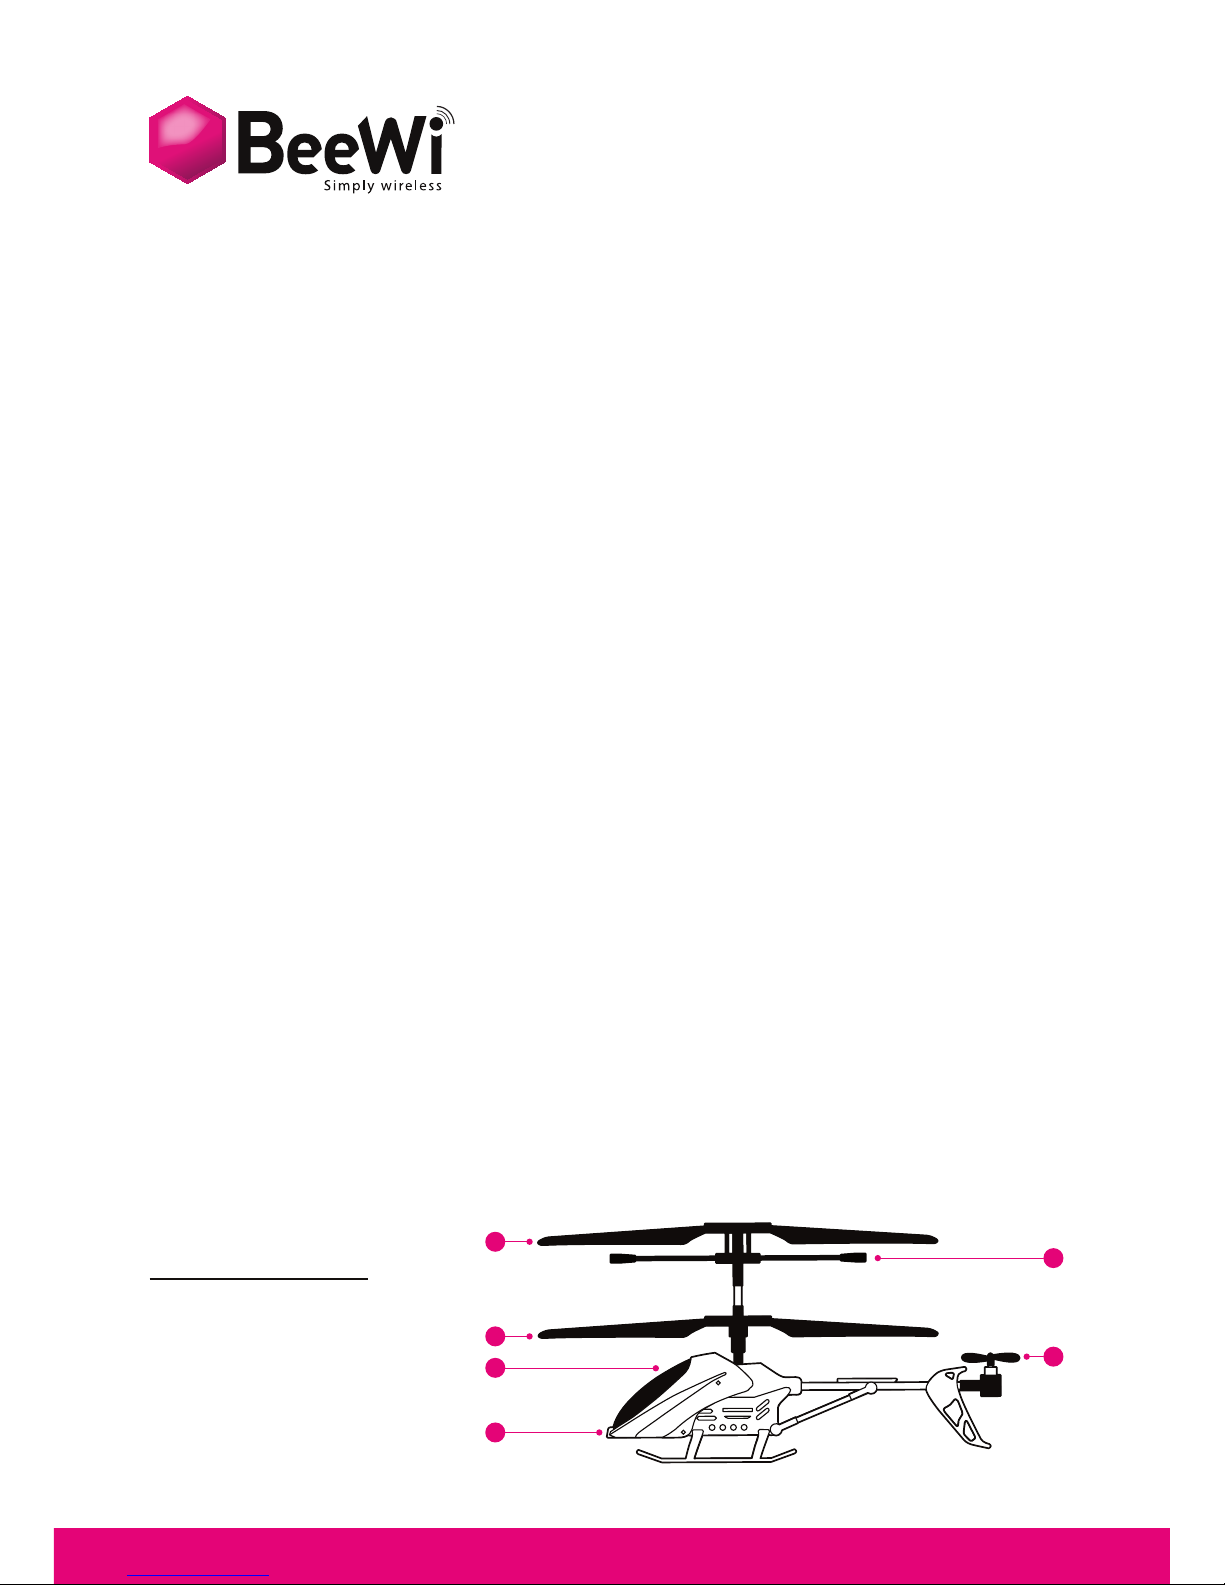
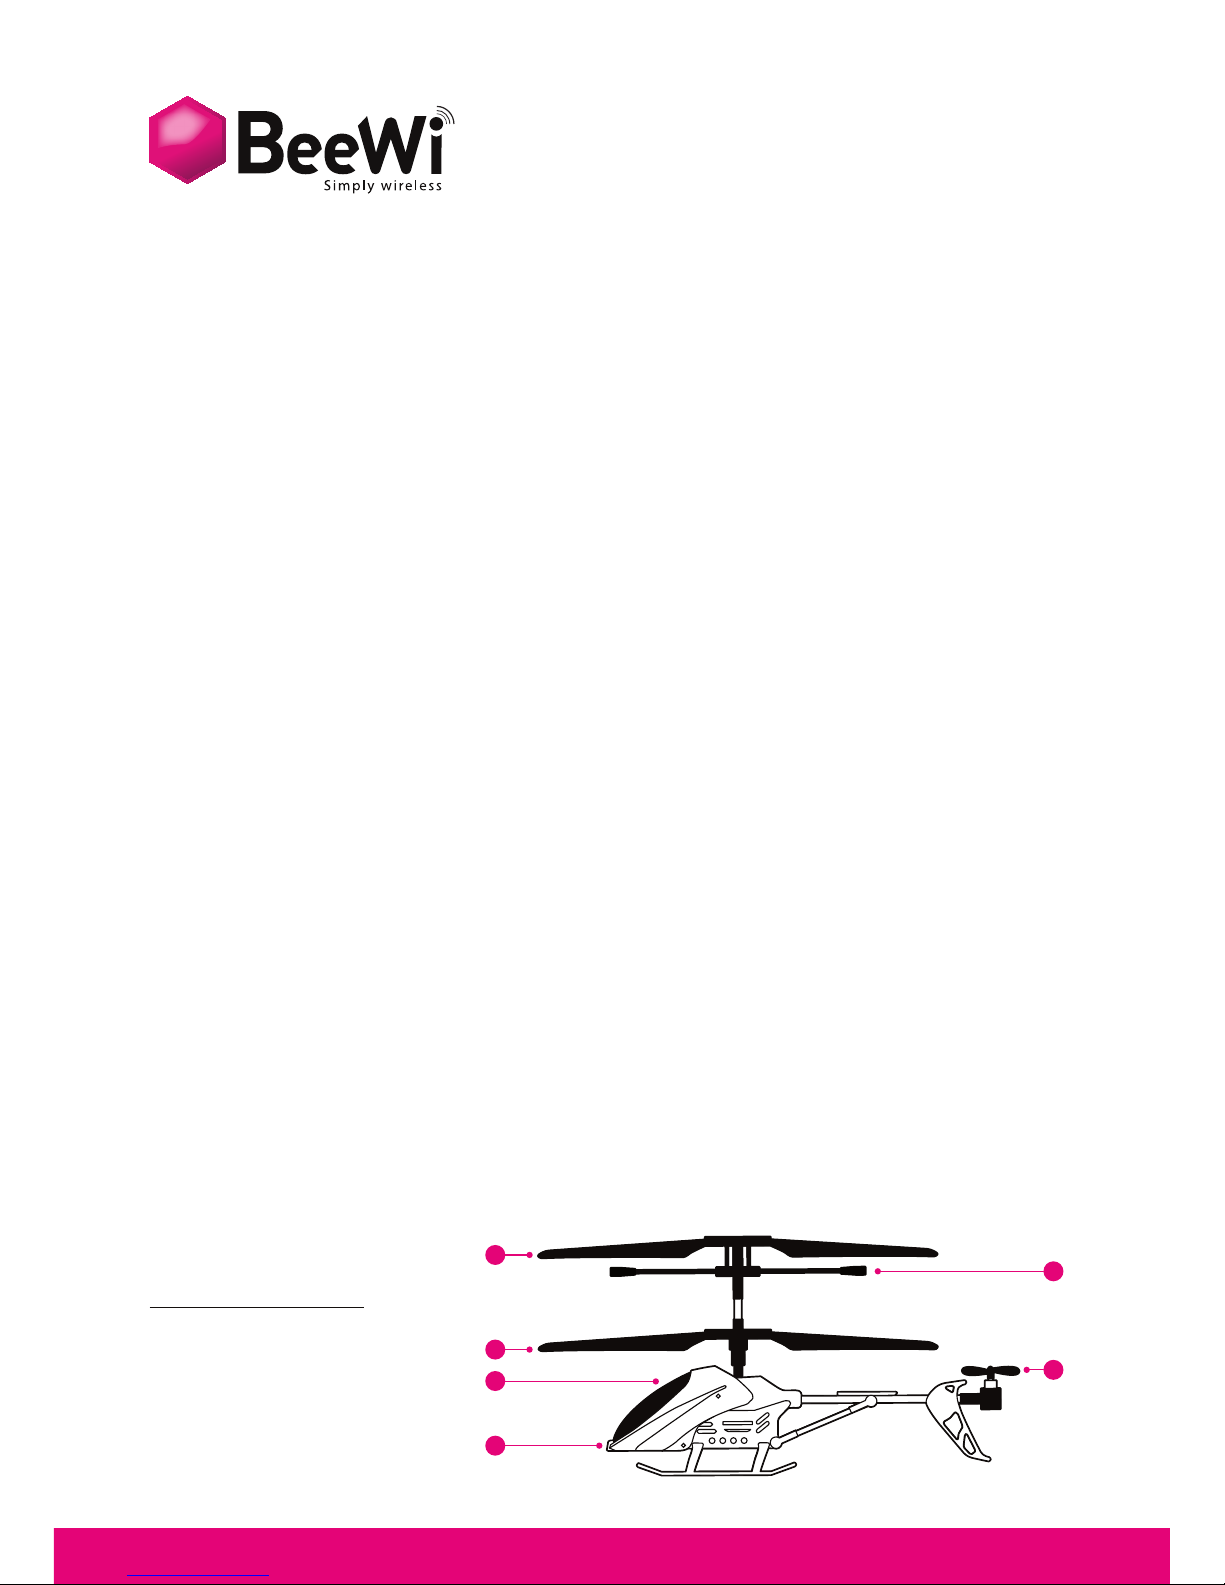
1.3. Product Outlook
Interactive Helicopter
1. Main blades (2)
2. Tail blade
3. Stabilizer
4. Fire/Transmission LED
5. Reception LED
INTRODUCTION
Thank you for purchasing the Bluetooth Interactive Helicopter from BEEWI. Please read
the following instructions to learn how to configure and use more effectively your product.
ENGLISH
1
1
5
4
2
3
1
2
3

5
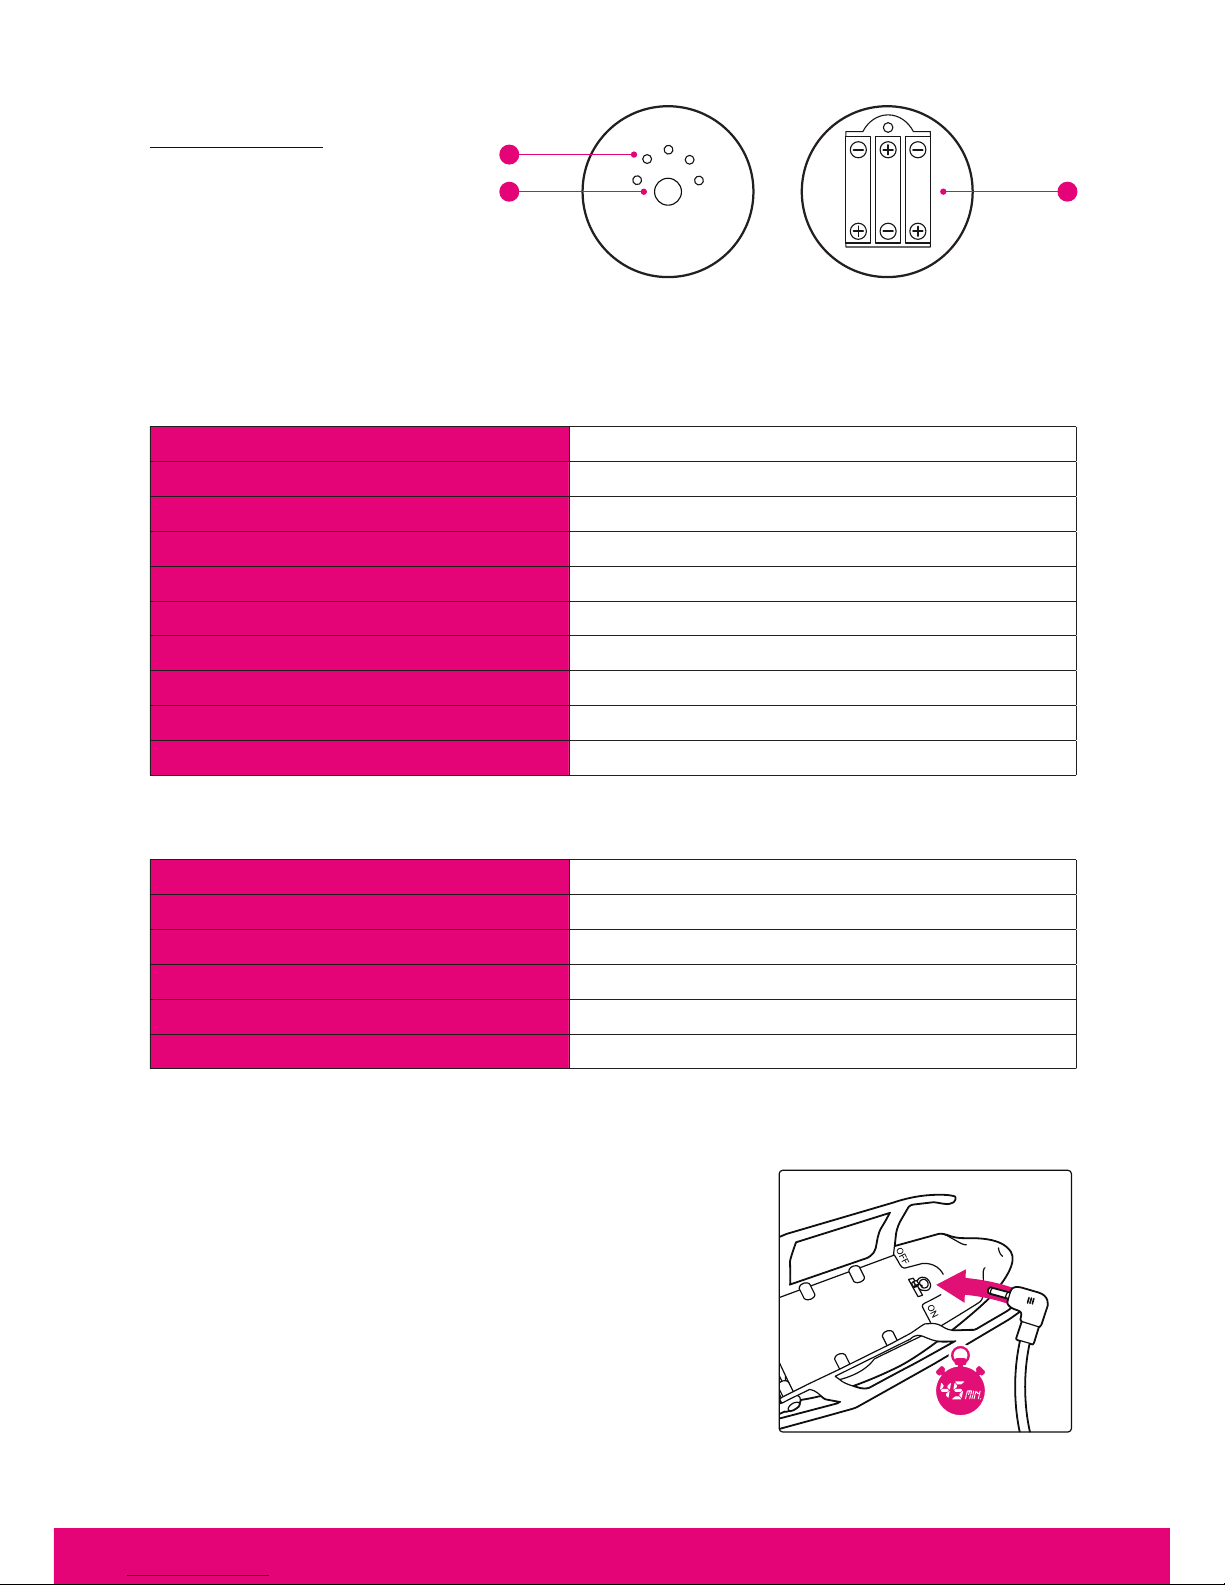
Smart Target
1. Power On/Off button
2. Lives indicator LEDs
3. 3 x AAA batteries slot
1.4. Product Specification
Helicopter Specifications
Target Specifications
2. INITIAL SETTINGS
2.1. Battery Charge
- Make sure the Helicopter is switched OFF
- Plug the USB cable into the USB port on your PC: the
light at the USB charger end is lightening.
- Connect the USB cable end to the charging socket
located underneath the helicopter. Do not force, the
cable end should connect smoothly.
- During the charging process, the USB charger light
will turn off; if the light turns on again, it means the
helicopter is fully charged.
ENGLISH
1
1
5
4
2
3
1
2
3
BLUETOOTH CHIP Bluetooth 3.0
BLUETOOTH RANGE Class 2, up to 10 m
PROTOCOL Wireless iAp, SPP
BATTERY Lithium Polymer 180 mAH
TYPICAL USE TIME Up to 8 minutes continuous
CHARGE TIME Up to 40 minutes
SERVO CONTROLS 3 channels + gyroscope
IR SENSORS 1 TX (3 m range), 1 RX
DIMENSIONS L 200 mm x H100 mm x W140 mm
WEIGHT 45 g
IR SENSORS 1 TX, 1 RX
TX RANGE Minimum 3 m
TX RADIUS +/- 30°
BATTERY 3 X AAA cells (not included)
DIMENSIONS D 76 mm x H 30 mm
WEIGHT 40 g

6
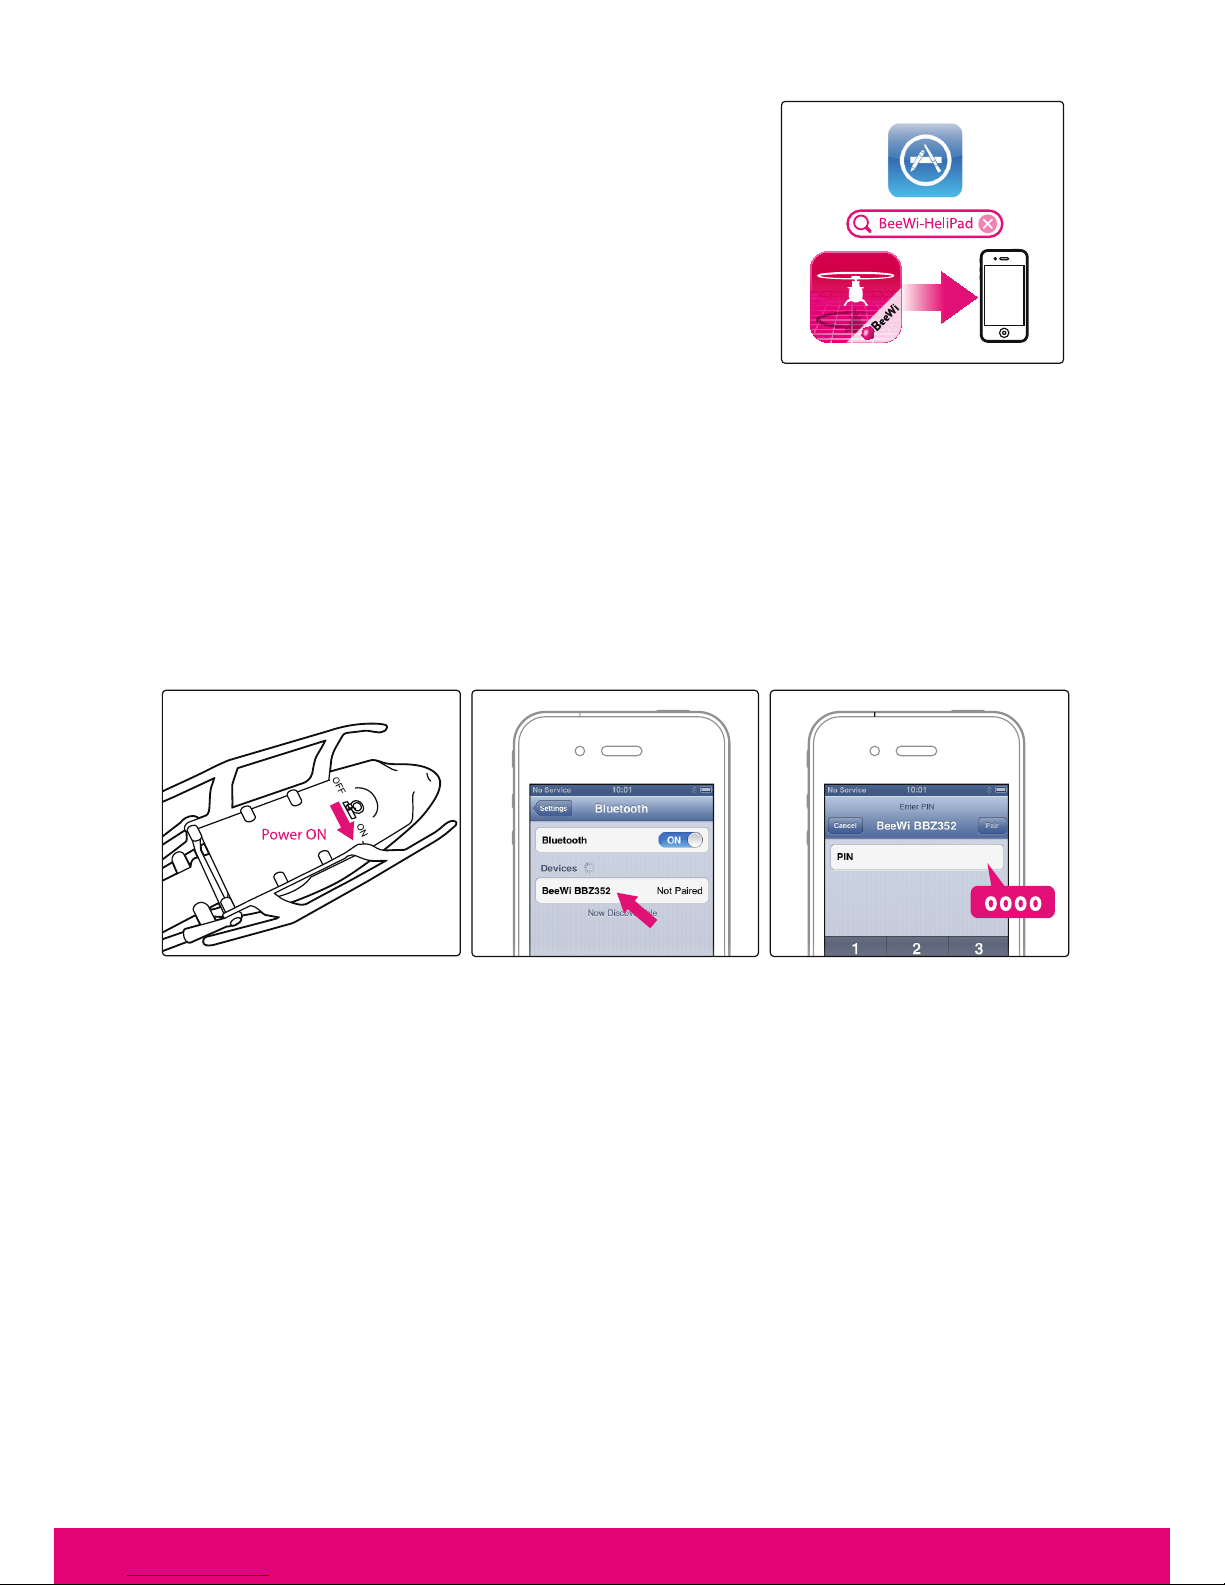
2.2. BeeWi HeliPad Installation
Go to iTunes and look for “BeeWi-HeliPad” app. Fol-
low the on-screen indications to download and install
the app. Once the application has been successfully
installed, you can launch it directly. Insure the Helicop-
ter has been paired and connected prior to start the
application.
2.3. Pairing
To pair the Helicopter with your device, refer to the pairing procedures in your mobile
phone user manual and follow the instructions below:
- Power on the Helicopter to turn the unit in pairing mode (wait 30 seconds)
- In the iPhone Bluetooth menu, search for devices, select the device name “BeeWi BBZ352”
to pair and connect it. When prompted, enter the pass key “0000”.
3. USING THE HELICOPTER
3.1. Connection
If it has been previously paired, the Helicopter will automatically connect to the iPhone
when it is powered on. If this is not the case, you can also go to the iPhone Bluetooth menu
and select the “BeeWi BBZ352” device in your device list. Once the status is “Connected”,
close the Bluetooth menu and get back to the main screen.
If you are using 2 different helicopters with the same device, always make sure there is
only one connected at a time or the application will malfunction.
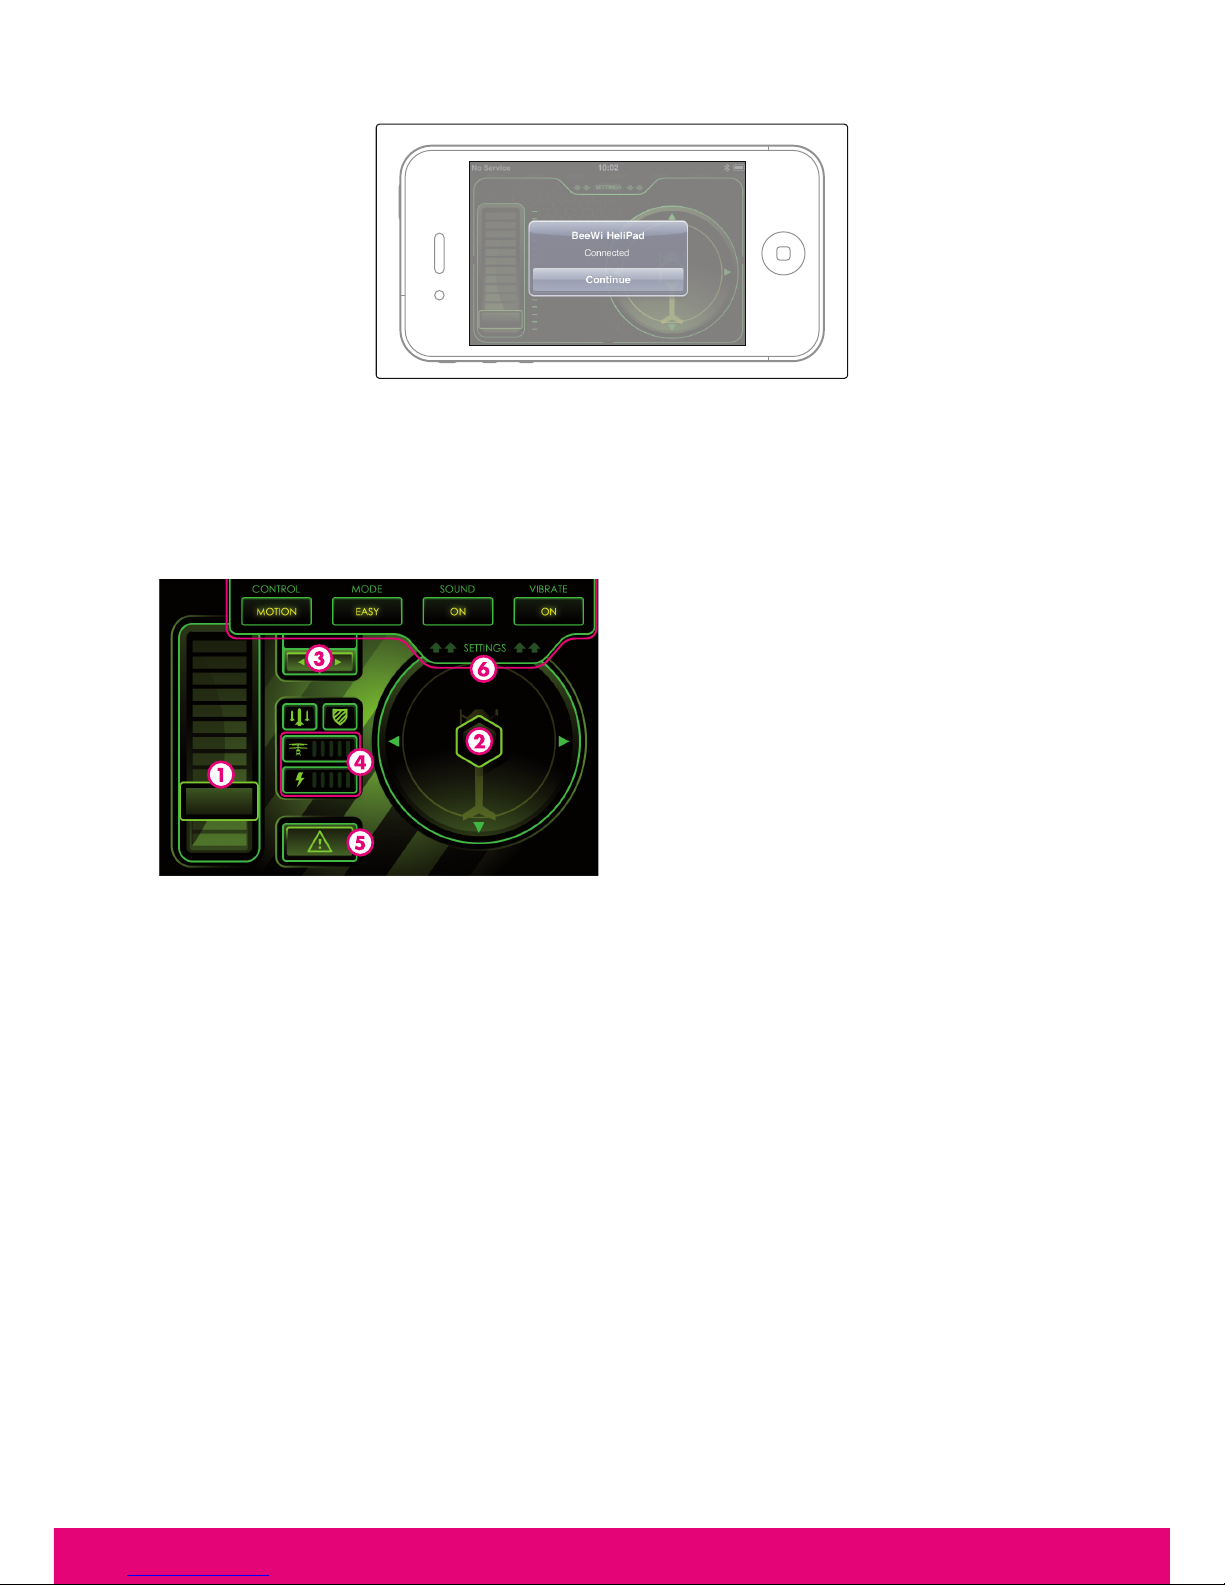
3.2. User Interface
Upon connection, the BeeWi HeliPad application will open automatically. If it is not the
case, you can always launch it from the phone app screen.
ENGLISH
7
The Helicopter will be connected automatically and the control screen below displayed. By
default the control is MOTION and the trimmer is set to “0”.
1. Gas throttle
2. Direction wheel (only touch mode)
3. Trimmer
4. Status control: lives bar and battery meter
5. Emergency Stop
6. Settings bar
3.3. Operation
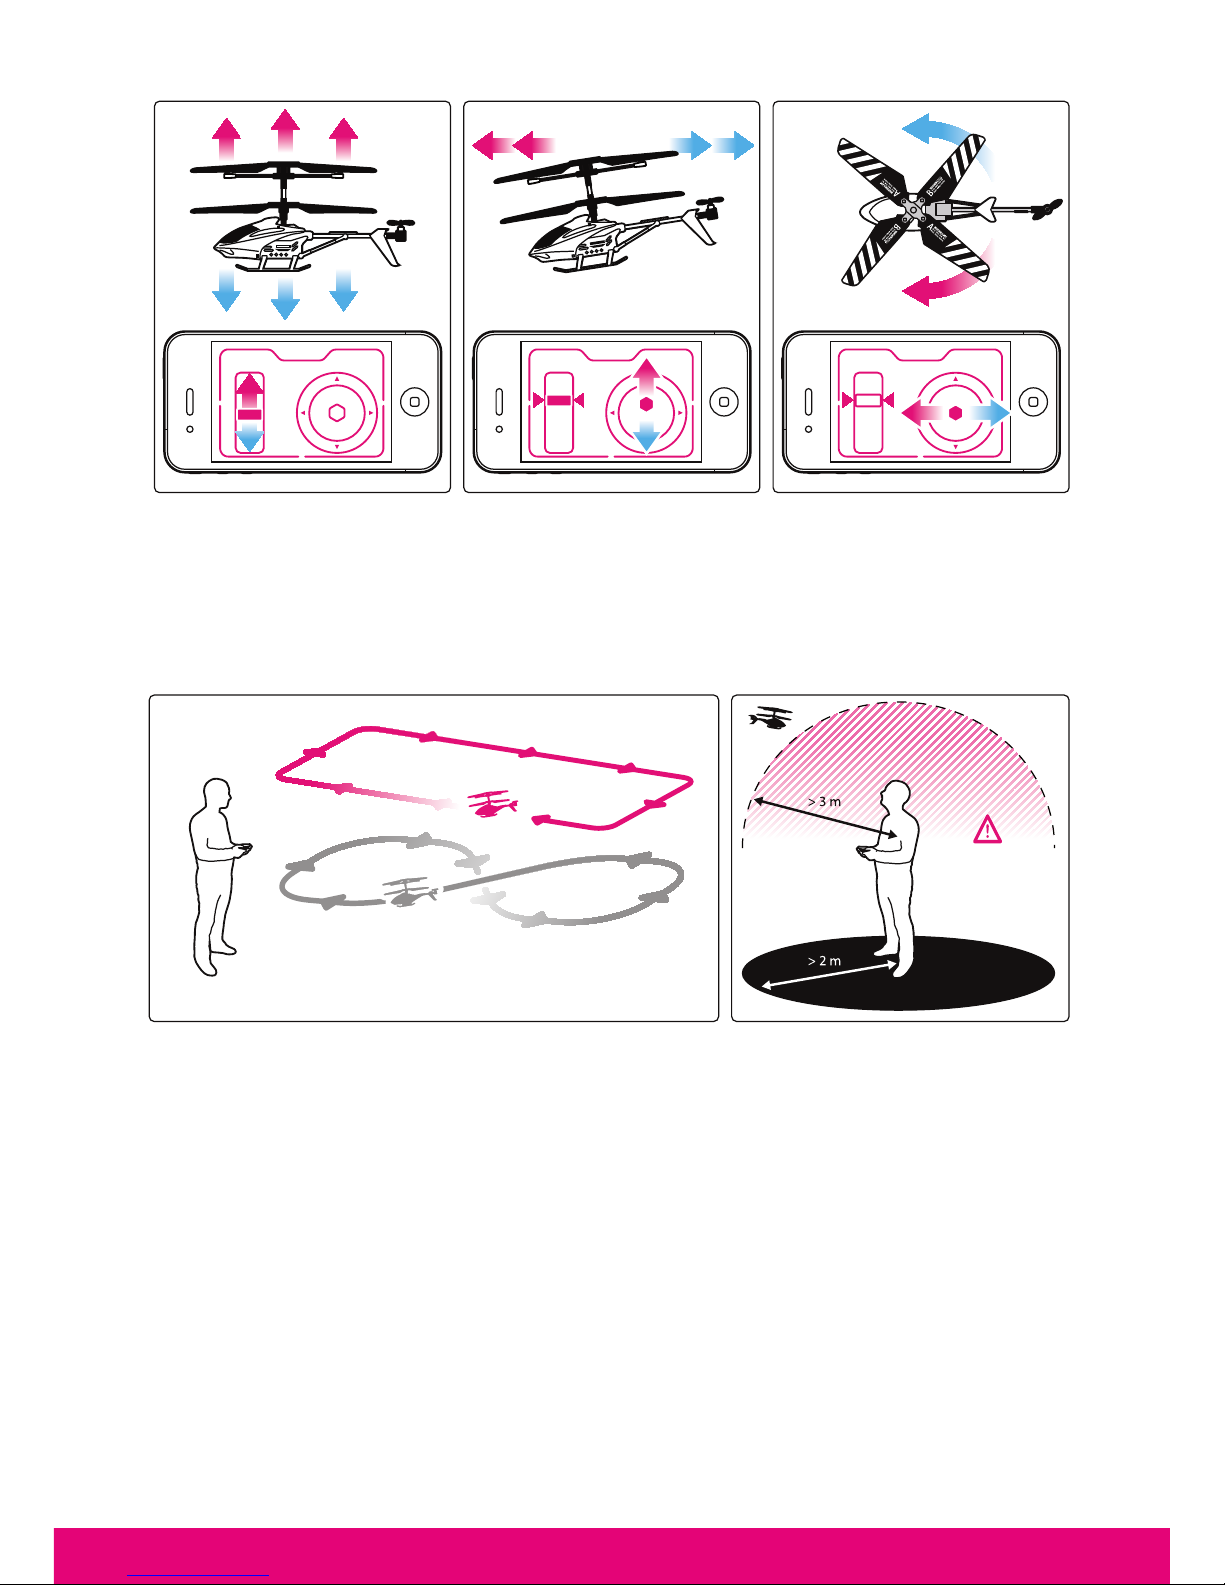
Gently push the throttle until the Helicopter engine turns on. Then keep the Helicopter on
the ground and try the direction commands to learn how to fly:
- To move forward, move the mobile device downwards
- To move backward, move the mobile device upwards
- To turn left, turn the mobile device leftwards
- To turn right, turn the mobile device rightwards
If the helicopter is drifting during the initial trial on the ground, it may be necessary to
adjust the direction trimmer using the Trim > key if the helicopter is drifting on the left, or
Trim < key if it is drifting on the right.
You can also simply use the buttons on the screen to control the Helicopter. To do so,
open the Menu bar using the Menu key of the phone, and tap on Touch/Motion key. A
confirmation message will appear on your screen. The controls are described below:
ENGLISH
8
When you feel confident with the direction commands, you can start to fly your Helicopter.
Softly push the throttle until your Helicopter is taking off. Try to maintain it at a steady
height using the throttle before using the direction commands. Once you are confident
with the throttle control, you can state to use all commands and train yourself with the
following circuits.
3.4. Configuration
The configuration menu can be accessed by sliding down the SETTINGS bar on the top.
There are 3 different options listed in the Settings:
- CONTROLS: to select either MOTION or TOUCH control modes.
- MODE : to select either EASY (slower/smoother commands) or EXPERT
- SOUND : to enable or disable the ambiance sounds
- VIBRATE : to enable or disable the vibration effects
The default settings are MOTION, EASY, SOUND ON and VIBRATE ON but your preferred
settings will be saved.
ENGLISH
9
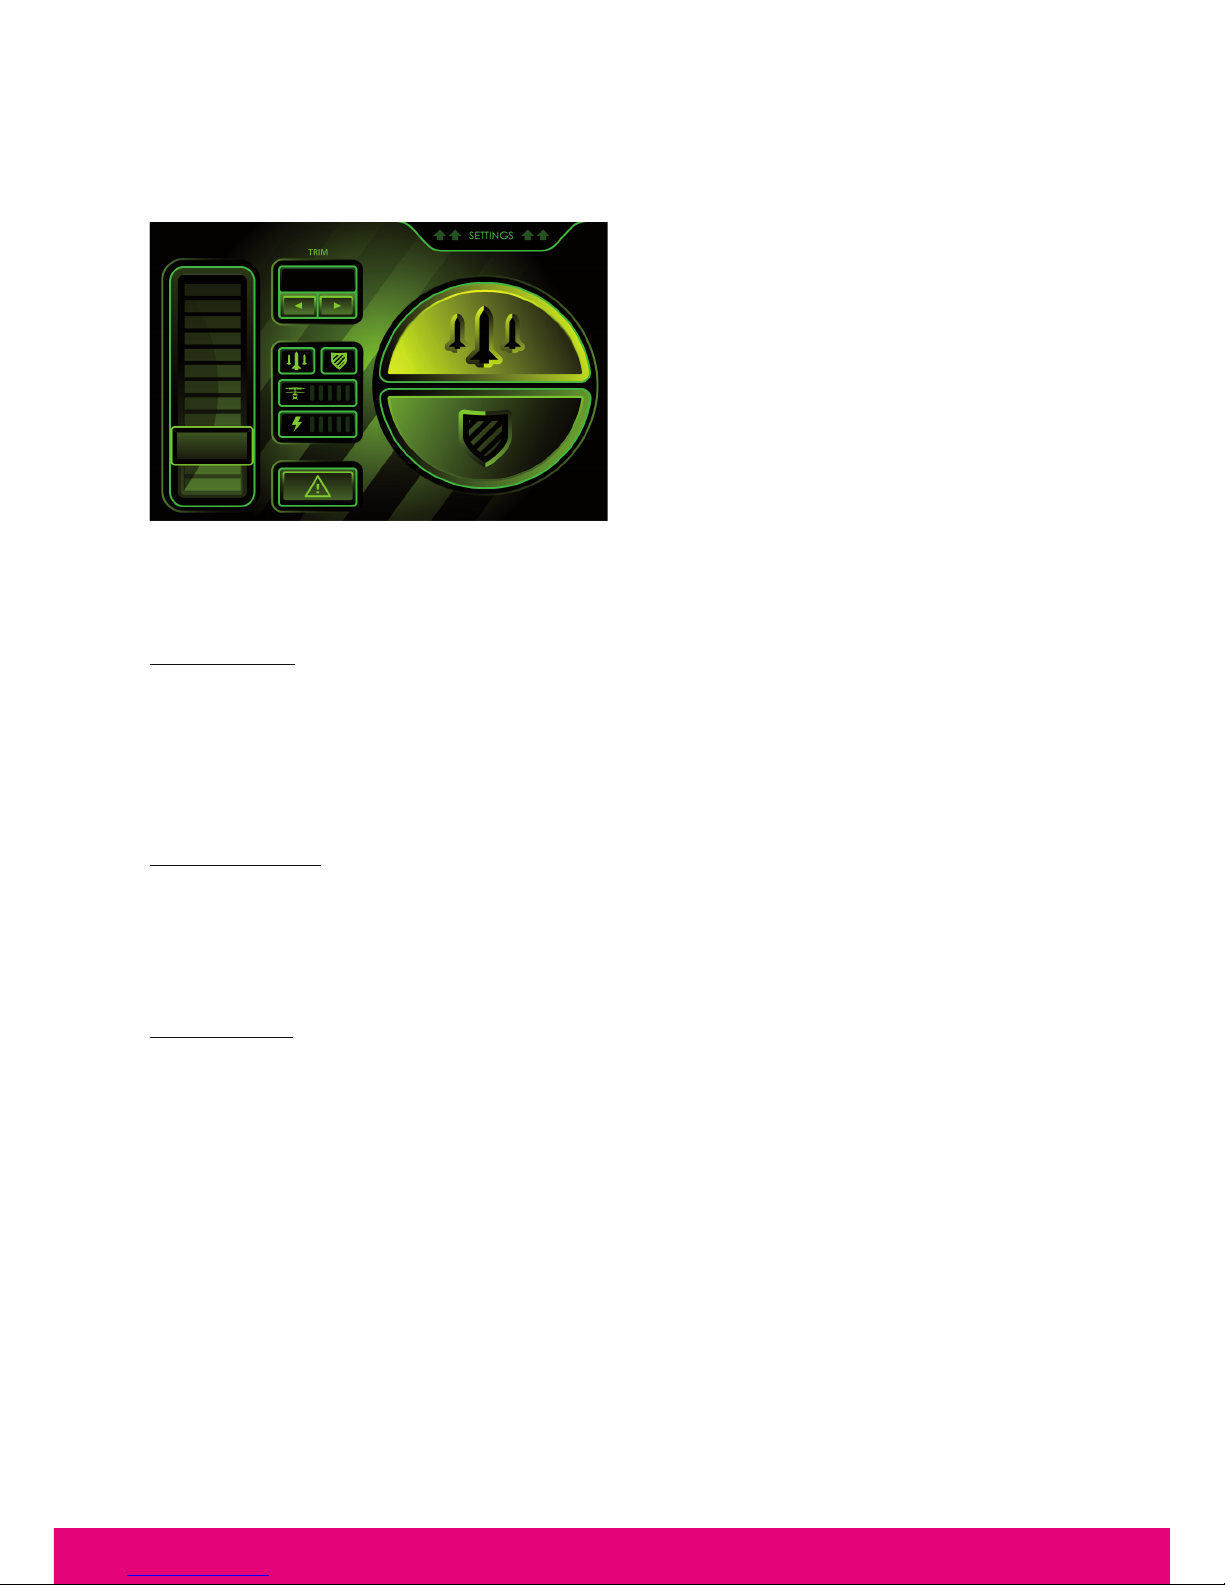
4. COMBAT FUNCTIONS
4.1. Interactive Helicopter Combat functions You can use the combat functions in motion
or touch control mode.
In motion control mode, the combat functions
are accessible with large Fire and Shield
buttons on the right side of the screen.
In touch control mode, the combat functions
are emulated by flipping the mobile device
forward to fire or backward to shield.
When hit the Helicopter will make a half
turn on the left and the screen will display
different screens and bomb sounds
depending on the shield being raised or
not.
The 5 bars 10 live counter will be decrement by one in case the shield was not raised.
4.2. Smart Target functions
Power on/off:
Just press the center button to power on or off the target.
The target will also automatically turn off in the following circumstances:
o Life count is “0”
o The target is not used for 8 minutes
o The batteries are low
Difficulty settings
The target comes with 5 preset difficulty levels. The default level is Level 3 (intermediate).
You can select one of the difficulty levels when turning on the target with a long press. The
actual level is then displayed on the 5 LED indicators. Just release the power button when
you reach the required difficulty level.
Use the target
Like the Helicopter, the target is starting with 10 lives. It will randomly alternatively shoot
and raise the shield. Shoots are shown with a beep and a red light. Shield mode is shown
with the red light on.
Any time the target is hit, a double beep will be heard and one of the 5 lives LED will either
blink or turn off depending on the previous state.
ENGLISH

10
5. CAUTIONS & MAINTENANCE
WARNING!
• Please read carefully the complete manual before ying and strictly follow the instructions
given.
• This product is not suitable for children under 14 years old.
• This product is not suitable for children under 3 years old – risks of small parts breaking
off and potential choking hazard.
• Stay away from the product when it is turned on. Do not come closer or touch the
rotating parts.
• Do not disassemble or rework the product as this may cause damage and void the
warranty.
USE AND MAINTENANCE
• During the rst few ights, try to keep the helicopter very close to the ground to learn
how to use it and land safely in case you lose control
• For better performance this model uses only one stabilizer hook – do not try to add
another one.
• Use only the charging cable supplied with the helicopter, excluding any other USB cable.
• Do not operate the product with people or obstacles around.
• Do not operate the product outdoor in windy or bad weather conditions.
• Use the product with care and avoid throwing, crashing or twisting it.
• In case of a crash, the helicopter will automatically disconnect to avoid further damage
• Do not leave the product near sources of heat or in wet environment conditions for a
long time.
DAMAGES NOT COVERED BY STANDARD WARRANTY
Damages not covered by the standard Warranty:
• Damages that are caused by a improper use of the toy (shocks, falls…)
• Damages resulting from any non-compliance with manufacturer instructions (power
supply ...)
• Cosmetic damages (scratches, ...)
• Components and parts which require regular renewal: batteries, power supply...
Damages to the toy after an intervention by any person not authorized by BeeWi
ENGLISH

11
European Union Directives Conformance Statement
Hereby, VOXLAND declares that this product is in compliance with:
• The essential requirements and other relevant provisions of Directive 1999/5/EC
• All other relevant EU Directives
You can view your product’s Declaration of Conformity (DoC) to Directive 1999/5/EC (to
R&TTE Directive) at www.bee-wi.com.
Federal Communications Commission
This device complies with Part 15 of the FCC rules and with RSS-210 of Industry
Canada.
Operation is subjected to the following two conditions:
1) This device may not cause harmful interference, and,
2) This device must accept any interference received, including interference that may
cause undesired operation.
Caring for the environment by recycling
Do not dispose of electrical devices or accessories with your household waste.
In some countries or regions, collection systems are set up to handle electrical and
electronic waste items. Contact your regional authorities for more details.
Copyright and other legal information
iPad®, iPhone®, and iPod touch® are trademarks of Apple Inc. registered in the U.S. and
other countries.
BEEWI is a registered trademark. Other trademarks mentioned herewith are owned by
their proprietors. All other product or service names are the property of their respective
owners.
The use of wireless devices and their accessories may be prohibited or restricted in certain
areas. Always obey the laws and regulations on the use of these products.
This product is covered by a 2-year product warranty which is valid from the date of
purchase. Users are not permitted to make changes or modify the device in any way.
Changes or modifications not expressly approved by the party responsible for compliance
will void the user’s warranty. Please visit our website www.bee-wi.com for more information.
© VOXLAND, 2012. BP 70119 – 13307 Marseille Cedex 14.
ENGLISH
12
L’hélicoptère interactif peut être contrôlé directement par votre iPhone ou iPad en utilisant
l’application spécifique BeeWi HeliPad 2.0 sur AppStore. L’hélicoptère Bluetooth fonctionne
comme un hélicoptère télécommandé conventionnel avec commandes de gaz et directions avant/
arrière et gauche/droite. L’application permet à la fois le contrôle par des boutons virtuels sur
l’interface tactile et en utilisant le capteur de mouvement pour une expérience encore plus riche,
plus amusante et plus facile pour l’utilisateur.
L’hélicoptère interactif est conforme à la norme Bluetooth 3.0 et il est compatible avec les appareils
iOS Bluetooth utilisant le protocole Wireless iAp tels que iPod Touch (G3 ou +), iPhone (3G ou +)
and iPad.
1. DESCRIPTION DU PRODUIT
1.1. Contenu du pack
- Hélicoptère télécommandé Bluetooth
- Câble de charge USB
- Cible Intelligente (requiert 3 piles AAA non incluses)
- Guide d’utilisation rapide
1.2. Principales caractéristiques
- Utilisez votre Smartphone pour piloter cet hélicoptère et toucher la cible !
- Haute maniabilité et stabilité : 3 canaux, structure double rotor et gyroscope incorporé
- Portée maximum jusqu’à 15 mètres, typique 10 mètres
- Portée de tir 3 mètre environ
- Batterie rechargeable, jusqu’à 8 minutes d’autonomie en continu
- Charge USB standard
- Application BeeWi HeliPad compatible avec les appareils iOS, iPod Touch, iPhone and iPad
- Commandes intuitive utilisant le capteur d’orientation et l’interface tactile du mobile
- 2 modes de contrôle : normal et expert
1.3. Présentation du produit
Hélicoptère interactif
1. Palles (2)
2. Hélice arrière
3. Balancier
4. Diode d’émission/tir
5. Diode de réception
INTRODUCTION
Merci d’avoir choisi l’hélicoptère interactif Bluetooth de BEEWI. Veuillez lire les instructions
suivantes afin de configurer et utiliser au mieux votre appareil.
1
1
5
4
2
3
1
2
3
FRANÇAIS
13
Cible intelligente
1. Bouton d’allumage/extinction
2. Diodes de vie lumineuses
3. Casier de piles 3 x AAA
1.4. Spécification
Spécifications de l’hélicoptère
Spécifications de la cible
2. CONFIGURATION INITIALE
2.1. Charge de la batterie
- S’assurer que l’hélicoptère est éteint
- Brancher le câble USB sur le PC ; l’indicateur lumineux
est allumé.
- Brancher l’autre extrémité du câble USB dans la prise
située sous l’hélicoptère. Ne pas forcer, la connexion se
fait en douceur.
- Durant la charge, l’indicateur lumineux s’éteint ; s’il
s’allume à nouveau, cela signifie que la batterie est
chargée.
ENGLISH
1
1
5
4
2
3
1
2
3
TECHNOLOGIE Bluetooth 3.0
PORTÉE Class 2, 10 m maximum
PROTOCOLE Apple Wireless iAp, SPP
BATTERIE Lithium Polymère 180 mAH
AUTONOMIE Jusqu’à 8 minutes en continu
TEMPS DE CHARGE Jusqu’à 40 minutes
SERVO-CONTRÔLES 3 canaux + gyroscope
DIODES INFRAROUGES 1 émission (portée 3 m), 1 réception
DIMENSIONS L 200 mm x H100 mm x W140 mm
POIDS 45 g
CAPTEURS INFRAROUGE 1 TX, 1 RX
PORTÉE D’ÉMISSION Minimum 3 m
ANGLE D’ÉMISSION +/- 30°
ALIMENTATION 3 X AAA cells (not included)
DIMENSIONS D 76 mm x H 30 mm
POIDS 40 g
14
2.2. Installation de l’application BeeWi HeliPad
Aller sur AppStore et rechercher l’application « BeeWi-
HeliPad ». Suivre les indications pour télécharger et
installer l’application.
Une fois l’application installée, vous pouvez la
lancer directement. S’assurer que l’hélicoptère a été
préalablement apparié et connecté au mobile avant
utilisation.
2.3. Appairage
Pour apparier l’hélicoptère télécommandé Bluetooth avec un appareil mobile, se référer à
la procédure d’appairage dans le manuel du mobile et suivre les instructions ci-dessous :
- Allumer l’hélicoptère pour le placer en mode visible (attendre 30 secondes)
- Dans le menu Bluetooth du mobile, rechercher les appareils Bluetooth, sélectionner
l’appareil “BeeWi BBZ352” affiché sur l’écran et entrer le code « 0000 » lorsqu’il est
demandé afin d’ajouter l’appareil à la liste des appareils appariés.
3. UTILISATION DE L’HELICOPTERE
3.1. Connexion
Si l’hélicoptère a été préalablement apparié, il se connecte automatiquement sur votre
iPhone à la mise en marche. Si ce n’est pas le cas, vous pouvez la connecter manuellement
dans le menu Bluetooth de l’iPhone, en sélectionnant l’appareil “BeeWi BBZ351” dans
la liste des appareils. Dès que le statut apparaît “Connecté”, fermer le menu Bluetooth et
retourner sur l’écran principal.
Si plusieurs hélicoptères sont utilisées sur le même appareil, s’assurer qu’il n’y a en qu’un
seul de connecté au lancement de l’application afin d’éviter tout disfonctionnement.
3.2. Interface utilisateur
A la connexion, l’application BeeWi HeliPad s’ouvre automatiquement. Si ce n’est pas le
cas, la lancer à partir de l’écran d’applications.
FRANÇAIS

15
L’hélicoptère se connecte automatiquement et l’écran affiche l’ensemble des contrôles. Par
défaut le contrôle est effectué en utilisant le capteur de mouvement MOTION et le réglage
de direction (trimmer) est à zéro.
1. Manette des gaz
2. Direction (mode tactile uniquement)
3. Trimmer
4. Statuts: niveau des vies et batterie
5. Arrêt d’urgence
6. Barre de réglage
3.3. Utilisation
Pousser doucement les gaz jusqu’à ce que l’hélicoptère se mette en marche. Puis conserver
l’hélicoptère au sol afin de tester les commandes et apprendre à voler :
- Pour avancer, exercer une rotation du mobile vers le bas
- Pour reculer, exercer une rotation inverse du mobile vers le haut
- Pour tourner à gauche, incliner le mobile vers la gauche
- Pour tourner à droite, incliner le mobile vers la droite
Si l’hélicoptère dérive vers la gauche ou la droite lors de cet essai sur le sol, ajuster la
direction avec le trimmer en utilisant la touche Trim > pour une dérive sur la gauche et Trim
< pour une dérive sur la droite.
On peut aussi utiliser les boutons sur l’écran pour commander l’hélicoptère. Pour ce faire,
afficher la barre de menu en utilisant la touche Menu du mobile et activer la touche
Tactile/Mouvement pour commuter les 2 modes. Un message de confirmation apparaît
indiquant le mode actif. Les commandes sont décrites ci-dessous :
FRANÇAIS

16
Une fois les commandes de direction acquises, vous pouvez faire voler votre hélicoptère.
Pousser doucement la commande de gaz jusqu’à ce que l’hélicoptère s’envole et essayer
de le maintenir à une altitude stable. Une fois la commande de gaz bien maitrisée, vous
pouvez commencer à utiliser l’ensemble des commandes et vous entrainer à suivre les
circuits suivants.
3.4. Configuration
Le menu de configuration est accessible en faisant glisser la barre de réglage en haut de
l’écran. Il y a 3 fonctions proposées sur la barre de réglage :
- CONTROL: pour choisir les modes mouvement MOTION ou tactile TOUCH.
- MODE : pour choisir le mode EASY (commandes 2 fois moins rapides) ou EXPERT
- SOUND : pour activer ou désactiver les sons d’ambiance
- VIBRATE : pour activer ou désactiver les vibrations
Les réglages par défaut sont MOTION, EASY, SOUND ON et VIBRATE ON mais vos
préférences seront automatiquement sauvegardées.
FRANÇAIS

17
4. FONCTIONS DE COMBAT
4.1. Fonctions de combat de l’hélicoptère interactif
Vous pouvez utiliser les fonctions de combat
en mode MOTION ou TOUCH.
- En mode MOTION, les fonctions de combat
sont représentées par 2 larges touches pour
le tir et le bouclier de protection à la droite
de l’écran.
- En mode TOUCH, les fonctions de combat
sont actives en basculant l’appareil vers
l’avant pour le tir ou le ramenant vers soi
pour activer le bouclier de protection.
Lorsque l’hélicoptère est atteint, il effectue
un demi tour vers la gauche et l’écran affiche un fond bleu ou rouge accompagné d’un son
de bombe plus ou moins assourdi si le bouclier de protection est levé ou pas.
La barre des vies est décrémentée d’une vie dans le cas où le bouclier de protection n’est
pas actif.
4.2. Fonctions de la cible intelligente
Allumage/Extinction:
presser le bouton au centre de la cible.La cible s’éteindra aussi automatiquement dans les
cas suivants :
o Le compte de vie est à zéro (cible détruite)
o La cible n’a pas été utilisée pendant 8 minutes
o Les piles sont faibles
Réglage de la difficulté
La cible propose 5 niveaux de difficulties. Par défaut la cible démarre toujours au niveau
3 intermédiaire. Vous pouvez sélectionner un autre niveau de difficulté en pressant
longuement le bouton central à l’allumage. Les niveaux s’affichent l’in après l’autre sur les
5 LED. Relâchez le bouton lorsque le niveau désiré est atteint.
Fonctionnement de la cible
Comme l’hélicoptère, la cible démarre avec 10 vies. Elle tire et se protège alternativement
de manière aléatoire. Les tirs effectués sont identifiés par un flash rouge et un bip court. Le
bouclier de protection est identifié par une lumière rouge prolongée.
Chaque fois que la cible est atteinte, un double bip se fait entendre et l’une des diodes de
vie s’éteint ou se met à clignoter en fonction de l’état précédent.
FRANÇAIS

18
5. MAINTENANCE ET PRECAUTIONS D’USAGE
ATTENTION:
• Merci de lire attentivement le manuel complet et de suivre strictement les instructions qui
vous sont données avant le vol.
• Ce produit n’est pas destiné aux enfants de moins de 14 ans.
• Ce produit ne convient pas aux enfants de moins de 36 mois – risques de casse et
d’étouffement par ingestion de petites pièces.
• Garder ses distances lorsque le produit est en marche. Ne pas s’approcher trop près ou
toucher les parties en rotation.
• Ne pas démonter ou réparer le produit car cela peut causer des dommages et annuler
la garantie.
UTILISATION ET ENTRETIEN :
• Durant les premiers essais, garder l’hélicoptère près du sol an d’apprendre à l’utiliser
et atterrir doucement dans le cas d’une perte de contrôle.
• Pour une meilleure performance ce modèle ne requiert qu’une accroche de balancier –
ne pas essayer d’en ajouter une autre.
• N’utiliser que le câble de charge fourni avec l’hélicoptère à l’exclusion de tout autre
câble USB.
• Ne pas utiliser le produit dans un endroit rempli de personnes ou d’obstacles.
• Ne pas utiliser le produit en extérieur en cas de vent et de mauvaises conditions
météorologiques.
• Utiliser le produit avec soin et éviter de le jeter, de l’écraser ou de le déformer.
• Dans le cas d’un crash, l’hélicoptère se déconnecte automatiquement pour éviter tout
dommage
• Ne pas laisser le produit près d’une source de chaleur ou dans un environnement
humide pour une longue période.
DOMMAGES NON COUVERT PAR LA GARANTIE STANDARD
Dommages non couvert par la garantie standard :
• Les dommages ayant pour origine une cause externe à la bonne utilisation du jouet
(choc, chute, mauvaise utilisation...)
• Les dommages consécutifs à un non-respect des instructions du fabricant (alimentation
électrique...)
• Les dommages esthétiques (rayures, éraures...)
• Les éléments ou pièces d’usure dont le renouvellement régulier est nécessaire : piles,
batterie, alimentation...
Les dommages subis par le jouet après une intervention effectuée par toute autre personne
que celle agréée par BeeWi
FRANÇAIS

19
Déclaration de conformité aux directives de l’Union Européenne
VOXLAND déclare que ce produit est en conformité avec :
• Les dispositions essentielles ainsi que toutes provisions afférentes de la directive
1999/5/EC
• Toutes autres Directives de l’Union Européenne afférentes
Vous pouvez visualiser la Déclaration de Conformité (DoC) à la directive 1999/5/EC (à
la Directive R&TTE) sur le site www.bee-wi.com.
Protection de l'environnement par le recyclage
Lorsqu'un produit arbore ce symbole, ne le jetez pas dans votre poubelle.
Des systèmes de collecte permettant de traiter les déchets électriques et électroniques
sont progressivement mis en place.
Renseignez-vous localement pour plus d'informations.
Commission Fédérale des Communications
Cet appareil est conforme à la partie 15 du règlement FCC et à la norme RSS-210
d’Industrie Canada.
Son fonctionnement est soumis aux conditions suivantes:
1) Cet appareil ne doit causer aucune interférence néfaste, et
2) Cet appareil doit être à même d’accepter toutes les interférences générées, y compris
celles pouvant causer un dysfonctionnement.
Copyright et autres informations
iPad®, iPhone®, and iPod touch® are trademarks of Apple Inc. registered in the U.S. and
other countries.
BEEWI est une marque déposée. Les autres marques mentionnées ci-après appartiennent
à leurs propriétaires. Les autres noms de produit ou de service utilisés sont la propriété de
leurs détenteurs respectifs.
L’utilisation d’appareils sans fil et de ses accessoires peuvent être interdite dans certains
endroits. Toujours respecter les réglementations et lois en vigueur.
Ce produit est couvert par une garantie de deux ans s’appliquant à compter de la date
d’achat du matériel. Les utilisateurs n’ont pas l’autorisation de faire quelque changement
ou modification que ce soit. Tout changement ou modification non expressément approuvé
annule la garantie.
Veuillez visiter notre site web www.bee-wi.com pour plus d’information.
FRANÇAIS
© VOXLAND, 2012. BP 70119 – 13307 Marseille Cedex 14.

20
Der ferngesteuerte Hubschrauber BBZ351 kann direkt über Ihr iPhone oder iPad
gesteuert werden. Verwenden Sie dazu die spezielle, im AppStore erhältliche BeeWi
HeliPad 2.0 Anwendung. Der Bluetooth Hubschrauber funktioniert wie ein herkömmlicher
ferngesteuerter Hubschrauber mit Gashebeln und Vorwärts/Rückwärts- sowie Links/
Rechts-Steuerung. Mit dieser Anwendung kann die Steuerung entweder über die virtuellen
Tasten auf der Touch-Benutzeroberfläche oder über den Bewegungssensor erfolgen, um
die Erfahrung noch intensiver, lustiger und benutzerfreundlicher zu gestalten.
Der ferngesteuerte Hubschrauber entspricht der Bluetooth 3.0 Norm und ist kompatibel mit
iOS Bluetooth Geräten, die Wireless iAp Protokolle wie iPod Touch (G3 und +), iPhone
(3G und+) und iPad unterstützen.
1. PRODUKTBESCHREIBUNG
1.1. Inhalt des Packs
- Ferngesteuerter Bluetooth Hubschrauber
- USB Ladekabel
- Intelligentes Ziel (Betrieb erfordert 3 nicht mitgelieferte AAA Batterien)
- Kurzanleitung
1.2. Wesentliche Merkmale
- Benutzen Sie Ihr Smartphone zur Steuerung dieses Hubschraubers und zum Abschießen des Ziels!
- Hohe Manövrierfähigkeit und Stabilität: 3 Kanäle, Doppelrotor-Struktur und integriertes Gyroskop
- Maximale Reichweite bis zu 15 Meter, normalerweise 10 Meter
- Schussweite ungefähr 3 Meter
- Wiederaufladbare Batterie, bis zu 8 Minuten Autonomie im Dauerbetrieb
- Aufladung USB Standard
- BeeWi HeliPad Anwendung, kompatibel mit den Geräten iOS, iPod Touch, iPhone und iPad
- Intuitive Steuerung mit Hilfe des Orientierungssensors und der Touch-Benutzeroberfläche des
Mobiltelefons
- 2 Steuermodi: Normal und Experte
EINLEITUNG
Wir freuen uns, dass Sie sich für den ferngesteuerten Bluetooth Hubschrauber von BEEWI
entschieden haben. Bitte lesen Sie sich die folgenden Anweisungen durch, um Ihr Gerät
bestmöglich zu konfigurieren und zu benutzen.
DEUTSCH
Table of contents
Languages:
Other BeeWi Toy manuals


