Beflexx BF1000-24 User manual

The powerful and most compact central vacuum solution for
your caravan, motorhome, boat, truck and much more!
BEFLEXX BF1000-24
TO THE OWNER:
Read the owners manual #6050 thoroughly to ensure
the most efcient use of your BEFLEXX®system.
THIS APPLIANCE IS FOR RV USE.
PLUG AND PLAY
MANUAL

Please be sure this users installation manual
is left with the power unit or customer when
installation is completed.
Operating & Maintenance Instruction Manual
SOLD BY ________________________________
DATE OF PURCHASE _______________________
PLACE OF PURCHASE _______________________
SERIAL NUMBER __________________________
RECORD THIS INFORMATION FOR
FUTURE REFERENCES
BEFLEXX BF1000-24
CONTENTS
Important Safeguards 3How To Use 6
General Information 4Accessories 7
Electrical Circuit 4Warranty 8
Installation 5
2

3
IMPORTANT SAFEGUARDS
When using an electronic appliance, basic safety precautions should always be followed, including those listed below.
READ ALL INSTRUCTIONS BEFORE USING THIS CENTRAL VACUUM SYSTEM.
WARNING
!
To reduce the risk of re, electirc shock or injury:
• This vacuum cleaner is intended for dry pick up only. Do not use on wet surfaces or pick up any liquids, hot
debris, or any ammable items that would cause harm to the vacuum cleaner.
• Do not pull or carry by cord, use cord as a handle, close door on cord, or pull cord around sharp edges or
corners. Do not run appliance over cord. Keep cord away from heated surfaces.
• Do not allow vacuum to be used as a toy. Close supervision is necessary when this vacuum is used by
or near children.
• Use this vacuum only for its intended use as described in this manual. (Use of attachments not
recommended by manufacturer may cause re, electric shock, injury or damage to system components.)
• Mount unit at least 8 inches from the oor, celling or corner sidewall too insure adequate
ventilation for motor.
• Never operate this vacuum if it has a damaged cord, if it is not working properly, or if it has been
dropped or damaged. Return to authorized dealer/distributor for repair.
• Do not put any object into openings. Do not use with any opening blocked. Keep free of dust, lint, hair
and anything that may reduce air ow/suction. Lack of air ow will cause the motor to overheat.
• This vacuum cleaner creates suction. Keep hair, face, ngers, all body parts and loose clothing away
from any openings.
• Never operate without dust bag and/or lter in place.
• Turn off all controls before unplugging. Unplug from outlet before servicing.
• Never handle cord or power unit with wet hands.
• Use extra care when cleaning on stairs.
• Do not locate the power unit in a high temperature area or where it is inaccessible.
• Do not use extension cords or outlets with inadequate current carry capacity.
• Do not pick up anything that is burning or smoking, such as cigarettes, matches or hot ashes.
• Do not use on wet surfaces.
• Do not vacuum drywall dust or baking our as it may cause damage to your vacuum.
• This appliance is not intended for use by persons, (including children), with reduced physical, sensory, or
mental capabilities, or lack of experience and knowledge, unless they have been given supervision or
instruction concerning use of the appliance by a person responsible for their safety.
• The machine must not be used if it is faulty.
• Unplug electrical appliances before vacuuming them.
• Do not pick up ammable or combustible liquids such as gasoline, or use in areas where they
may be present.
• Make sure to connect the vacuum to a fused electrical network on board of your RV or truck.
• When expected not to use the vacuum for a couple days make sure to unplug the power cord.
SAVE THESE INSTRUCTIONS

www.Beflexx.com
Type nr: 100024
Sr nr: 112600100
24 V max 20 amp
Figure 1.
GENERAL INFORMATION
The BEFLEXX BF1000-24 central vacuum system is designed for dry pick up of household dirt and dust and is not intended
to pick up liquids. Avoid picking up hard or sharp objects with this vacuum to prevent damages or clogs to hoses.
WARNING: THIS CENTRAL VACUUM SYSTEM IS INTENDED FOR HOUSEHOLD (RV) USE ONLY.
Service Information
The instructions in this manual serve as a guide to routine
maintenance. For additional information, contact your local
authorized dealer/distributor.
Rating Plate
The model and serial number are indicated on the rating
plate located on the side of the vacuum. For prompt and
complete service information, always refer to these numbers
when inquiring about service. Refer to Figure 1.
• Make sure that your vacuum is connected to a fused electrical network on board of your RV or truck.
• Check with a qualied electrician or service person if you are in doubt as to whether your electrical circuit has
adequate current carry capacity.
• Do not use your vacuum without electrical fuse in place.
WARNING
!
ELECTRICAL CIRCUIT
BEFLEXX BF1000-24
This vacuum is for use on a circuit having a nominal rating at 24 volts and is provided with a specic cord to permit connection
to a proper electrical circuit. The vacuum puts out 480 Watts of power, which results in a current of 20 Amps. Make sure the
vacuum is connected to an electrical circuit with adequate current carry capacity.
4

1
2
3
INSTALLATION
Installation of Power Unit
Power Unit Location
The power unit sits or hangs on the mounting bracket which is
screwed to the oor or wall. The power unit must be mounted
within 8” (20cm) of an electrical outlet. When mounted
vertical the bottom screws of the mounting bracket should be
about 12” (31 cm) up from the oor. Mount unit at least 8” (20 cm)
from the ceiling or corner sidewall to insure adequate ventilation
for motor. Be sure the electrical circuit abourd your RV or truck
agrees with the voltage on the Rating Plate.
TIP: To cover with the vacuum hose as much area as possible, choose a wall
or surface that is centrally located and within 40” (100 cm) of an electrical outlet.
4x
Srew Mounting
Bracket
Figure 1.
• Do not block exhaust. Lack of
ventilation will cause the motor
to overheat.
• Do not locate power unit in a high
temperature area.
• Do not mount power unit upside down.
(orange cover pointing down)
WARNING
!
Install Power Unit
Once the bracket is mounted, you can now bring the power unit in
place. Be sure the power unit will be located at least 8” (20 cm) from the ceiling or any adjacent walls. The exhaust should
never be obstructed. Check to be sure you will be able to occasionally remove the top cover, replace the dust bag or motor lter
and inspect the power unit. Refer to Figure 2.
Figure 2.
Floor mount Wall mount
Install Inlet Valve
Strip the low-voltage wires. Connect the wires
to the inlet valve (refer to Figure 3). Connect
the other end of the wires to the spring-loaded
connectors on the side of the power unit.
Plugging the hose into an inlet valve completes a
low-voltage electrical circuit which automatically
activates the power unit. To turn off the vacuum,
unplug the hose from the inlet.
Install Intake
Flexible tube is provided to connect power unit
with inlet valve. Cut the tube to desired length.
Do not glue the connection to the power unit in
case you wish to remove at a future date.
Inlet valve
Figure 3.
TIP: Usa a hollow drill of 2,4” (60 mm) in diameter to install the inlet valve.
Fixate provided exible
tube and low-voltage
wire to wall using
supplied strap mounts
and cable ties.
3x
Srew Strap
Mount
• Make sure to connect the vacuum to an electrical circuit
with adequate current carry capacity.
• When expected not to use the vacuum for a couple days
make sure to unplug the power cord.
WARNING
!
5

Upholstery Tool
#9243
The upholstery tool with slip-on
brush is convenient when cleaning
walls, furniture, curtains, or
mattresses. It can be used with or
without the slip-on brush
6
HOW TO USE
Connecting and disconnecting the hose
Plugging the hose into an inlet valve completes a low-voltage electrical circuit which activates a relay and turns on the
vacuum cleaner. To turn off the unit, unplug the hose from the inlet valve.When unplugging the hose, hold the inlet cover
open for a few seconds to allow suction to decrease and protect the inner seal. An obstruction in the inlet valve may cause
the power unit to continue to run after the hose has been removed from the inlet. To shut down the power unit, check all the
inlet valves and remove obstructions.
How to change the dust bag
BEFLEXX Dust Bag HEPA Style with part number #9281 is the correct replacement dust bag. Open the top cover (orange) on
the vacuum cleaner by pushing the latch upward. Remove full dust bag and discard. Replace a new dust bag all the way over
the ange. When closing the top cover tuck in left and right corners of the bag, so the cover is properly sealed and the latch
clicks into place.
To change motor lter
BEFLEXX Motor Filter with part numer #9284 is the correct replacement part. Open the top cover (orange) on the vacuum
cleaner by pushing the latch upward. Remove dirty motor lter. Replace a new motor lter correctly. Motor lter is to be
changed after the use of 5 dust bags.
If motor suddenly stops
The most common cause is a clogged hose. Disconnect vacuum hose from inlet valve, hold one end high up in the air and drop
a quarter or similar object into the hose. If the quarter gets stuck the hose is clogged.Try to unclog the hose with a long stick
or see below ‘’cleaning the hose‘’.
The bag is overlled or ne dust has clogged the bag.
The vacuum cleaning tools are clogged.
Vacuuming large amounts of dust other than household dirt, such as dry-wall or ne wood dust can block the bags pores
fast, even If the bag is fairly new.
The motor lter is dirty and should be replaced.
If power unit is installed in an air tight compartment and the exhausting air cannot escape, the motor can overheat and will
shut off automatically until it cooled down and will restart automatically.
Cleaning the stretch hose
The stretch hose, besides all its’ conveniences, has a tendency to get clogged, especially if you have pets.
Lift the hose up on both ends and dispense some liquid detergent into both ends.
with a garden hose, holding both ends still up, ll ¾ with water.
shake hose up and down, let detergent loosen the dirt.
stretch the hose as far as you can (2 people required) and wash the dirt out with full pressure of the garden hose. Repeat
if necessary.
hang hose up, let hose drain and dry completely, it might take 24 hvours.
1
2
3
DO NOT CLEAN THE DIRTY FILTER BY VACUUMING, OR WACHING IN MILD SOAP OR WASHING MACHINE.
4
•
•
•
•
•
•
5
•
•
•
•
•
• This vacuum cleaner is intended for dry pick up only. Do not use on wet surfaces or pick up any liquids, hot
debris, or any ammable items that would cause harm to the vacuum cleaner.
• Do not pick up ammable or combustible liquids such as gasoline, or use in areas where they may be present.
• Never operate this vacuum if it has a damaged cord, if it is not working properly, or if it has been dropped or
damaged. Return to authorized dealer/distributor for repair.
WARNING
!
ACCESSORIES
7
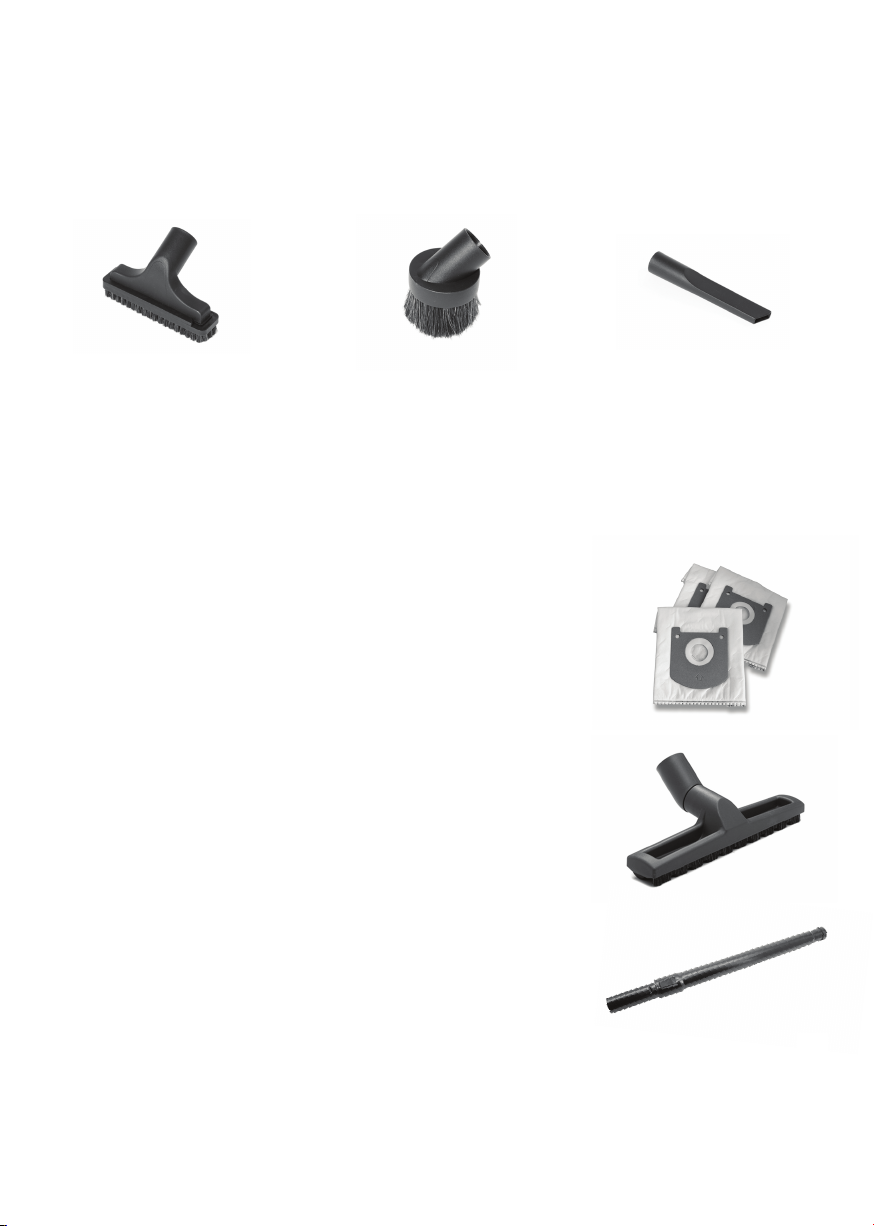
Telescopic Wand Aluminum #9250
This is an all aluminum, 23 ⅔” telescoping wand for use with the Hard Floor Tool. It
extends to a length of approximately 39”.
Upholstery Tool
#9243
The upholstery tool with slip-on
brush is convenient when cleaning
walls, furniture, curtains, or
mattresses. It can be used with or
without the slip-on brush
Dust Brush
#9242
The round dusting brush makes
dusting quick and easy. It can be
used for furniture, counters, wall,
decorations, window, areas, lamp
shades, or wherever dusting is
needed.
Dust Bag HEPA #9281
Easy to replace HEPA type dust bag with 5 layer ber ltration. Captures 99,7% of all
microscopic particles. Note:All power units come with 3 dust bags.
Hard Floor Tool #9245
Offering gentle, yet highly efcient dust and dirt pick up. The Hard Floor Tool is ideal for
polished wood, slate, stone and marble oor surfaces.
Crevice Tool
#9241
The crevice tool is ideal for
thight spaces and corners,
such as in the kitchen and
beneath/around cabinets. It
is designed for narrow
spaces, crevices, along edges
or other hard-to-clean areas.

LIMITED WARRANTY
LIMITS AND EXCLUSIONS
BEFLEXX®will repair the power unit with new or rebuilt parts, free of charge for two (2) years from the date of original purchase
in the event of defect in materials or workmanship. No cash refunds. Excluded are the following items that require normal
replacement: Disposable dust bags, motor lter, vacuum cleaner tools and vacuum hoses. This warranty is extended only to the
original purchaser. A purchase receipt or other proof of date of original purchase will be required before warranty performance is
rendered.
You must return your warranty card or register on our website in order to be covered under these provisions.
This warranty only covers failures due to defects in materials or workmanship which occurs during normal use and does not cover
damage which occurs in shipment or failure which are caused by products not supplied by BEFLEXX®, or failures which result from
accident, misuse, abuse, neglect, mishandling, misapplication, alteration, modication, or commercial use such as hotel, ofce,
restaurant, or rental use of the product, or service by anyone other than an authorized service centre or damage that is attributable
to acts of God. There are no expressed warranties except as listed above.
BEFLEXX®shall not be liable for incidental or consequential damages resulting from the use of this product, or arising out of any
breach of this warranty. All expressed and implied warranties, including the warranties of merchantability and tness for a particular
purpose, are limited to the applicable warranty period set forth above.
Some states do not allow the exclusion or limitation of incidental or consequential damages or limitations on how long an implied
warranty last, so the above exclusions or limitations may not apply to you.This warranty gives you specic legal rights that vary from
state to state. If a problem with this product develops during or after the warranty period, you may contact your dealer. If the
problem is not handled to your satisfaction, than write to the customer service centre at the company address.
Note: Be sure to specify model and serial numbers when writing for information or replacement parts.
NETHERLANDS
De Scheper 254
5688 HP Oirschot
www.beexx.com
© 2015 BEFLEXX®#6050-V1
Table of contents


