Beko DWC4540W User manual

User’s Manual
Dishwasher DWC4540W

User’s Manual
Dishwasher
Welcome
Dear customer
Congratulatons on your choce of a Beko qualty dshwasher whch has been
desgned to gve you lastng servce.
Please read these nstructons before nstallng the dshwasher and usng t for
the frst tme. The nformaton contaned heren s provded to avod accdental
rsks and/or damage to your applance
Make sure you understand the controls pror to usng your applance. The
dshwasher must only be used for t’s ntended purpose, .e. the washng of
dshes n the home. Falure to observe these nstructons may nvaldate your
rght to free servce durng the guarantee perod.
Please keep these nstructons n a safe place for your future reference
If you have any questons, or f you are not sure about any nformaton
contaned n ths booklet please contact us - detals are on the back cover.
Beko Customer Servce
Notes
Due to the qualty control processes durng producton, there may be
some water left n your machne. Ths does not cause any damage.
Preparation before use
It is recommended that the dishwasher is operated on the Eco
programme with prewash before loading with dishes.

User’s Manual
Dishwasher DWC4540W

User’s Manual
Dishwasher
Welcome
Dear customer
Congratulatons on your choce of a Beko qualty dshwasher whch has been
desgned to gve you lastng servce.
Please read these nstructons before nstallng the dshwasher and usng t for
the frst tme. The nformaton contaned heren s provded to avod accdental
rsks and/or damage to your applance
Make sure you understand the controls pror to usng your applance. The
dshwasher must only be used for t’s ntended purpose, .e. the washng of
dshes n the home. Falure to observe these nstructons may nvaldate your
rght to free servce durng the guarantee perod.
Please keep these nstructons n a safe place for your future reference
If you have any questons, or f you are not sure about any nformaton
contaned n ths booklet please contact us - detals are on the back cover.
Beko Customer Servce
Notes
Due to the qualty control processes durng producton, there may be
some water left n your machne. Ths does not cause any damage.
Preparation before use
It is recommended that the dishwasher is operated on the Eco
programme with prewash before loading with dishes.

TABLE OF CONTENTS
1 Know your dshwasher
/ specfcaton 3
2 Warnng and safety
nformaton 5
Electrcal Safety 5
Chldren’s Safety 5
General 5
Recyclng 6
What should not be washed n your
dshwasher 6
3 Before frst use 7
Electrcal requrements 7
4 Installaton 7
Warnng 8
Ths applance must be earthed 8
Important 8
Fttng a derent plug 8
Water nlet hose connecton 9
Dran Hose Connecton 9
5 How to use 11
Water hardness & regeneraton
settngs 11
Water Hardness Level Adjustment
Table 12
Detergent use 13
Fllng detergent dspenser 15
Rnse ad 16
Loadng the dshwasher 17
Foldng plate support rods 18
Upper basket heght adjustment
(unloaded) 18
6 Operatng the dshwasher 19
7 How to clean your
machne 20
Hot Ar Dryng 19
Upper spray arm 21
Lower spray arm 21
8 Before callng servce
/ Trouble shootng 22

3GB
1
Know your dshwasher / specfcaton

4GB
Specfcaton
Load Capacity : 10 Place settngs
Height : 850 mm
Width : 448 mm
Depth : 598 mm
Depth/Heght(without worktop) : 570 mm / 820 mm
Net weight : 40 kg
Supply voltage : 220-240 V ~ 50 Hz
Fuse currrent : 10 A
Total power : 1800-2100 W
Heater power : 1800 W
Pump powers : 90/30 W
Diameter of plates for :
Upper basket : 25 cm max.
Lower basket : 31 cm max.
Because we continually strive to improve our products, we may
change our specications and designs without prior notice.
Note for Testng Insttutes
The necessary nformaton for performance testng wll be provded upon
request. The request can be done by e-mal through:
dshwasher@standardloadng.com
Please do not forget to wrte the model code ,stock code and seral number
nformaton of the applance besdes your contact nformaton n the e-mal.
The model code, stock code and seral number nformaton can be found on the
ratng label, whch s placed on the sde of the door.

5GB
2Warnng and safety nformaton
Electrcal Safety
The dshwasher should only be
operated on the voltage specfed.
For electrcal safety, only earthed
plugs and sockets should be used.
Always use the fused plug provded
wth the applance. The user s
responsble for meetng these basc
safety requrements. The lfe of your
machne and your safety depend on
you usng an electrcal nstallaton
complant to standards.
Do not use an extenson cable.
When dsconnectng your machne
from the mans supply, always pull
from the plug. Never pull the cord
tself.
Chldren’s Safety
Never allow your chldren to play wth
your dshwasher.
Dshwasher detergents contan
rrtants and abrasves. These
ngredents mght have caustc
eects n the eyes, mouth and throat.
They can be extremely dangerous f
swallowed. Avod contact wth skn
and eyes. Check that the detergent
receptacle s empty after completon
of the wash cycle.
Keep detergents out of chldren’s
reach and do not put detergent n the
machne untl rght before you start
the washng programme.
The water n your dshwasher s not
sutable for drnkng, for ths reason
do not allow your chldren near your
machne when the front door s open.
Never allow your chldren to play on or
st onto the front door when the front
door s open.
After unpackng your machne, keep
the packng materal out of chldren’s
reach.
Warnng !
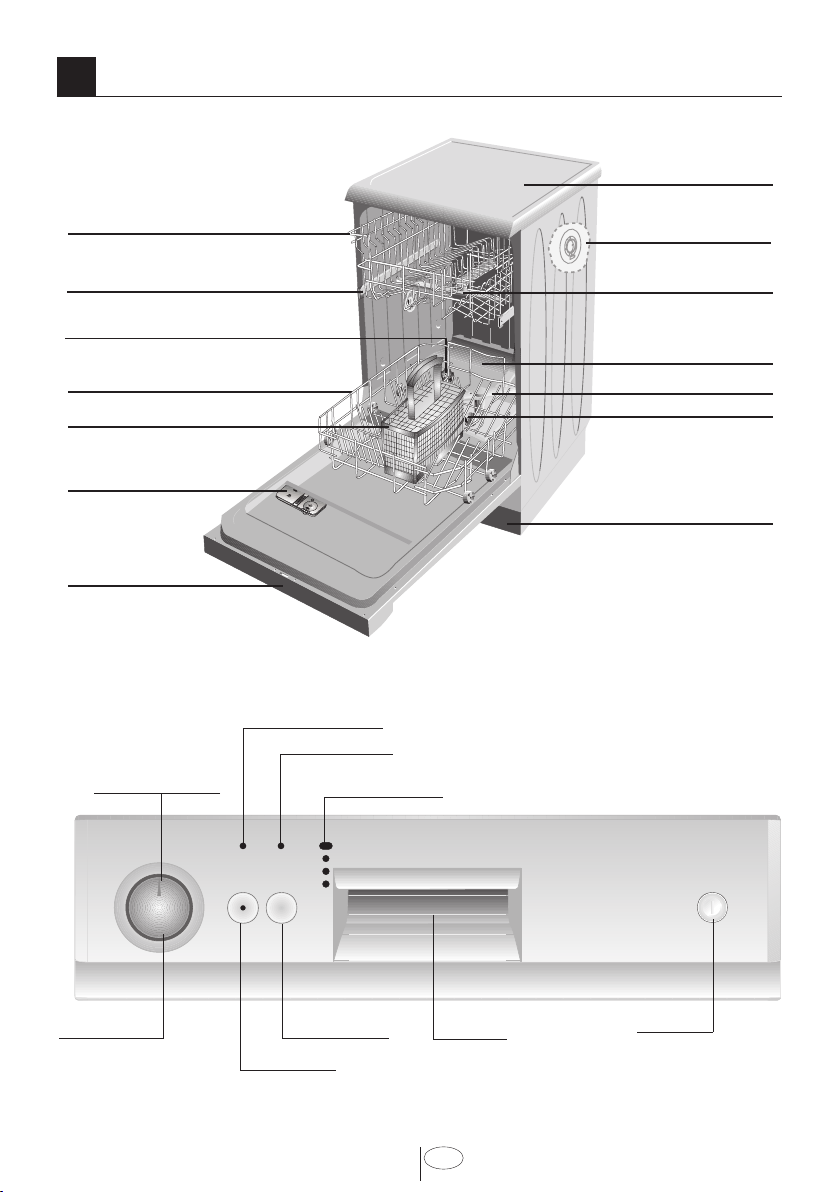
Long cutlery, such as ladles and
long knves, etc must be placed
horzontally on top of the full
cutlery basket or on the racks to
prevent accdental njury.
General
Ths dshwasher has been desgned to
clean your drty dshes at home.
Never use chemcal solvents n your
machne; ths may lead to exploson
rsk.
Never use materals other than
specally produced softenng salts n
the salt dspenser of your machne.
Never use materals other than
specally produced detergents and
rnse-ads n the detergent and rnse
ad dspensers of your machne.
Please dspose of the packagng
materal and old applances carefully.
Please ensure old machnes do not
become a threat to chld safety. It s
known that chldren lock themselves
n unused machnes. To avod such a
problem t s advsed that you cut the
mans cable o and break the door
latch so t does not lock.
The door of your machne s desgned
to support the weght of a full basket

6GB
when the lower basket s pulled all the
way out. Never place any other load
on the door, otherwse the machne
may tp over.
After usng the dshwasher always
close the door as an open door can be
a hazard.
Do not open the door whlst the
applance s n operaton.
Recyclng
Please help us to protect our
envronment. Packng materals
and some parts of your machne are
produced usng recyclable materals.
These materals are marked up wth
recyclng symbol and materal type
nformaton (>PE<, >PS<, >POM< …).
These raw materals should not be
mxed wth general refuse and should
be gven to recyclng centers.
We suggest you contact your local
authorty for dsposal nformaton and
facltes avalable.
Ths product bears the
selectve sortng symbol
for waste electrcal and
electronc equpment
(WEEE).
Ths means that ths
product must be handled pursuant
to European Drectve 2002/96/EC
n order to be recycled or dsmantled
to mnmze ts mpact on the
envronment. For further nformaton,
please contact your local or regonal
authortes.
Electronc products not ncluded
n the selectve sortng process
are potentally dangerous for the
envronment and human health
due to the presence of hazardous
substances.
What should not be washed
n your dshwasher
Do not wash tems soled wth
cgarette ash, candle, pant wax,
dyes, chemcals etc. snce these may
damage your machne
Do not wash forks, knves and spoons
wth wooden or bone handles, tems
stuck together wth adhesves,
plastc tems not resstant to hgh
temperatures. Copper, tn tems and
alumnum ware n your dshwasher.
As wth hand washng, some “on-
glaze” decorated chna, alumnum or
slver have a tendency to dscolour or
fade. Also, certan types of glassware
and crystals may lose ther shne and
become opaque n tme.
A chemcal reacton can occur
between slver cutlery and stanless
steel cutlery. As a precauton, do not
wash together.
Iron and cast ron objects can rust and
stan other tems.
Pay specal attenton to whether
or not the tem you wash n the
dshwasher s dshwasher-proof.
If n doubt, contact the manufacturer
of the tem.
Do not overload your dshwasher or
do not load tems other than those
mentoned n ths manual.

7GB
After unpackng your dshwasher,
check the machne aganst any
possble transportaton damage.
Never nstall and use damaged
machnes. If your machne s damaged
contact your retaler. Always have
your machne nstalled by qualfed
electrcan/plumber to ensure correct
nstallaton.
Any repars and mantenance work
on ths dshwasher should be carred
out by authorsed servce sta only.
Unauthorised repairs are not only
dangerous, but also lead to the
cancellaton of your warranty.
If your dshwasher has an Internal
Lghtng; ncase of a defect broken
lamps can be changed by an
authorzed servce techncan.
Make sure the electrcty and water
connectons of your dshwasher are
n complance wth the nstructons
for assembly as stated n the relevant
part of ths booklet.
It is recommended that the
dishwasher is operated without
dishes for very rst wash for
hygiene reasons.
Before the frst wash, add 1 lt of
water to the salt contaner of
your machne.
3Before frst use 4
When decdng on where to nstall
your new dshwasher, ensure that the
poston of your dshwasher makes
t easy and quck for you to place the
dshes n the dshwasher and also to
take them out and store away after
the dshwashng s completed.
Avod placng the dshwasher where
the ambent temperature s lkely to
fall below. 5 degrees C. (41° F)
When postonng your applance,
take care not to damage your oorng,
ppes wall coverngs etc. Do not move
the applance by pullng by the door or
handle
Installaton
Electrcal requrements
Before you nsert the plug nto
the wall socket make sure that the
voltage and the frequency shown n
the ratng label corresponds to your
electrcty supply.
We recommend that ths applance be
connected to the mans supply va a
sutable swtched and fused socket n
a readly accessble poston.
If the supply cord or the mans lead
s damaged please do not replace
t yourself. The supply cord or the
mans lead must be replaced by a
Beko Authorsed Servce Agent or a
smlarly qualfed person.

8GB
3. Connect the brown (lve) wre to
the termnal n the plug marked ‘L’
or coloured red.
Wth the alternatve plugs a 13A fuse
must be ftted ether n the plug or
adaptor or n the man fuse box. If n
doubt contact a qualfed electrcan.
Warnng
Ths applance must be
earthed
If the ftted moulded plug s not
sutable for your socket, then the plug
should be cut o and an approprate
plug ftted.
Destroy the old plug, whch s cut
o as a plug wth a bared cord could
cause a shock hazard f nserted nto a
socket elsewhere n the house.
The moulded plug on ths applance
ncorporates a 13A fuse. Should the
fuse need to be replaced an ASTA
approved BS1362 fuse of the same
ratng must be used. Do not forget to
reft the fuse cover. In the event of
losng the fuse cover, the plug must
not be used untl a replacement fuse
cover has been ftted. Colour of the
replacement fuse cover must be the
same colour as that vsble on the
pn face of the plug. Fuse covers are
avalable from any good electrcal
store.
Important
Fttng a derent plug
As the colours of the wres n the
mans lead of ths applance may
not correspond wth the coloured
markngs dentfyng the termnals on
your plug, proceed as follows:
1. Connect the green - yellow or
green (earth) wre to the termnal
n the plug marked ‘E’ or wth the
symbol or coloured green
and yellow or green.
2. Connect the blue (neutral) wre to
the termnal n the plug marked
‘N’ or coloured black.

9GB
Water nlet hose connecton
Make sure your plumbng s sutable
to nstall your new dshwasher. If n
doubt contact a qualfed plumber.
The applance must be connected
to the water mans usng the new
hose set suppled wth your new
dshwasher. Old hose sets must
not be re-used.
The water pressure comng from
the water mans supply must be a
mnmum of 0.3 and a maxmum of 10
bars.
Connect the straght end to your
water mans supply
1
Ensure plastc
flter and black rubber seal s n place.
Please turn on the tap and check for
leakages after connectng the hose.
We recommend the tap s turned o
when the machne s not beng used.
If you only have one cold water
feed (For example for your washng
machne) don’t worry, a Yadaptor
wll provde you wth the addtonal
cold water feed you need for your
dshwasher. Yadaptor s avalable
from most DIY stores.
Dran Hose Connecton
Ft the dranage hose of your machne
to the dranage ppe wthout bendng.
Secure your hose frmly to the waste
ppe to avod t comng o durng the
washng process.
The waste ppe must only be
connected nto the foul drans and not
surface water dranage system.
The hose should be placed between
50 cm and 110 cm from the oor level
and must not be extended otherwse
the machne may not empty the
waste water.

10 GB
Installaton of dshwasher
Remove all packagng before
postonng the machne.
See the followng dagram. Ensure
there s a clearance each sde of the
machne to allow slght sde ways
movement for servcng.
Note:
If there s already enough space, you
don’t need to remove the worktop to
nstall t under the counter.
Poston the machne next to a water
tap and a dran.
When nsertng the machne, ensure
that the water nlet and dran hoses
are not lnked or squashed.
Care must be taken to ensure that
the applance does not stand on the
electrcal supply cable.
Good levellng s essental for correct
closure and sealng of the door.

11 GB
Make sure your
dshwasher s
perfectly level usng
the adjustable feet.
When the applance
s correctly levelled,
the door wll not
catch on the nner
lner on ether sde
of the cabnet.
If the door does
not close correctly,
loosen or tghten
the adjustable feet,
untl the machne s
perfectly level.
Water hardness & regeneraton settngs
The dishwasher requires lime free water. Hard water leaves watermarks on
your dishes. Your dishwasher has a special water softening system to remove
the hardness of the tap water. Setting this system correctly will increase the
washing eectiveness.
To nd out the hardness level of water in your area, contact your local Water
Board or Determine water hardness level by the help of test strip provided.
If you move to a derent locaton, the level of water hardness wll
possbly be derent. It s essental to reset the water hardness n
order to obtan optmum washng ecency.
Test Strip
Let the water
flow from your
tap for 1 minute.
Remove the
test strip from
its packing.
Fill a glass with
tap water and
dip the test strip
into water for 1
second.
Take the test strip
out of the water and
shake it.
Hold for
1 minute.
Set the water hardness level of your dishwasher
according to the result shown by the test strip.
No Lime
Very low lime content
Low lime content
Medium lime content
High lime content
Very High lime content
Level 1
Level 2
Level 3
Level 4
Level 5
Level 6
5How to use

12 GB
To Adjust the Water Hardness;
1. Move the programme selection key to position 1 when the machine is turned
o.
2. Press Start/Pause/Cancel button.
3. Press On/O button while keeping the Start/Pause/Cancel button pressed
to turn the machine on. Do not release the Start/Pause/Cancel button until
“Water Hardness Level” set appears on the indicator of the machine (See. Water
Hardness Level Adjustment Table).
4. The default “Water Hardness Level” will remain lit on the panel of the
machine for about 5 seconds. Release the Start/Pause/Cancel button after the
default “Water Hardness Level” appears.
5. To adjust the new Water Hardness Level, move the programme selection key
to the position that is suitable for your water supply. (See. Water Hardness Level
Adjustment Table)
**Programme selection key rotates in 5 steps regardless of the number of the
programme contained on the machine.
6. Press “Start/Pause/Cancel” key once to store the level you have selected.
7. Press the On/O key to turn o your machine.
Water Hardness Level Adjustment Table
If the hardness level of the water that you use is above 80 °dF (French standard
for water hardness) or if you are using well water, then it is recommended to
use lter and water purication devices.
If the hardness level of the water that you use is below 8°dF (French standard
for water hardness), there is no need to use salt in your dishwasher. If this is the
case, “No Salt Warning Indicator” (if any) illuminates continuously on the panel
of your machine.
If the water hardness adjustment is set to level 1, the “No salt warning indicator”
will illuminate continuously although it is not necessary to use salt. If you
use salt under this condition, salt will not be consumed and the lamp will not
illuminate.

13 GB
Addng Dshwasher Salt
Only use specal pelletzed
dshwasher salt n your machne to
soften the hard water. Never use
other types of salts ncludng table
salt, anmal feedng salt, sea salt,
culnary salt. These types of salt do
not dssolve n water easly and wll
damage your applance beyond repar.
When you run the dshwasher, the
Water softener wll be full of water.
Therefore, addng softenng salt
should always be done mmedately
before you start the dshwasher.
Cauton: Only fll wth salt just before
startng one of the complete washng
programmes to prevent any grans of
salt causng corroson. Ensure 1lt of
water has been added. You can put
approxmately 2 kg softenng salt n
the Water softener.
To fll the contaner wth softenng
salt, remove the lower rack frst
and unscrew the cap of the water
softener turnng ant clockwse.
Usng the funnel provded wll make
fllng easer.
After you fll the contaner, screw
cap tghtly back nto place turnng
clockwse untl you hear a clck sound.
In case the lght of the salt ndcator s
stll on for a long tme after fllng wth
salt, mx the salty water nsde the
salt box usng a spoon.
Detergent use
Any brand of powder, gel and tablet
detergents that have been desgned
for household dshwashers, may be
used.
Keep detergents n a cool and dry
place and out of the reach of chldren.
Detergent must be added to the
contaner before each use.
Detergent overdose may cause
scratches on your dshes and there
may be traces of detergent left n
your machne.
Three types of detergent are
avalable
• Phosphate and contanng
chlorne.
• Phosphate contanng no chlorne
• Nether contanng phosphate nor
chlorne
New compact powders are generally
phosphate-free. As phosphates
have water softenng propertes,
we suggest you add salt to the salt
contaner even f the hardness of your
water s as low as a 6 clarke degrees.
In hard water areas f a phosphate
free detergent s used, whte marks
on the dshes and glasses may be
observed. It may be prevented by
ncreasng the amount of detergent.
Detergents wthout chlorne have
less bleachng eect. Coloured stans
may not be completely removed.
Ths may be prevented by ncreasng
the amount of detergent, usng
a programme wth a hgher wash
temperature or usng a detergent
wth chlorne.

14 GB
• If the detergent s n tablet form,
never place these n the nternal
secton or cutlery basket of
the dshwasher. Always place
the tablets n the detergent
dspenser of the detergent
holder.
Usng three-n-one detergent,
softenng salt and rnse ad.
• These detergents wll not gve
you the same dryng performance
that you can obtan by usng
separate detergent, salt and
rnse ad. To ncrease the dryng
performance:
• Put your applance’s rnse ad
settng at “1” and apply rnse ad.
When the rnse ad s used up,
add more rnse ad to the rnse ad
dspenser.
• If you use combned detergents
wth a rnse ad settng hgher
than 1, hand contact may leave
ranbow-coloured water stans on
the washed tems and nsde the
machne.
• If you use combned detergents
wthout addng salt, lme scale
may form especally on glasses.
To avod lme scale formaton:
• Put your applance’s water
softener settng at “1” and add
salt. When the salt s used up,
add more salt to the water
softener.
Usng two-n-one detergent:
detergent and softenng salt
• These detergents do not contan
rnse ad so you need to use the
rnse ad settng as descrbed n
the manual, makng sure that
there s rnse ad n the rnse
ad dspenser wth every wash
Warnng!
Two-n-one and three-n-one
detergents
You wll obtan the best results from
your dshwasher f you use separate
detergent, rnse ad and water-
softenng salt.
Detergent manufacturers also
produce combned detergents known
as ‘two-n-one’ and ‘three-n-one’.
Three-n-one: These products contan
detergent, rnse ad and water-
softenng salt.
Two-n-one: These products contan
detergent and ether rnse ad or
water-softenng salt.
In general, you wll obtan satsfactory
results from combned detergents
only under specfc usage condtons.
These detergents contan
predetermned amounts of rnse ad
and/or softenng salt. Ths means
that you cannot adjust the amount
of water-softenng salt and rnse ad
requred to sut the water hardness
level n your home.
You should bear the followng ponts
n mnd when usng such detergents:
• Be sure to check the
specfcatons of the product
you are usng and whether t s a
combned product or not.
• Follow the nstructons on
the packet when usng these
products.
• The use of these products at the
correct applance settngs wll
ensure economcal use of salt
and/or rnse ad.

15 GB
and that you refll the rnse ad
dspenser wth rnse ad every
tme t s empty.
Usng two-n-one detergent and
rnse ad
• These detergents wll not gve
you the same dryng performance
that you can obtan by usng
separate detergent, salt and
rnse ad. To ncrease the dryng
performance:
• Put your applance’s rnse ad
settng at “1” and apply rnse ad.
When the rnse ad s used up,
add more rnse ad to the rnse ad
dspenser.
• If you use combned detergents
wth a rnse ad settng hgher
than 1, hand contact may leave
ranbow-coloured water stans on
the washed tems and nsde the
machne.
• These detergents do not contan
softenng salt so you need to
use the softenng settng as
descrbed n the manual, makng
sure that there s salt n the water
softener wth every wash and
that you refll the water softener
wth salt every tme t s empty.
Important warnng
Should you encounter a problem that
has prevously never occured after
you start usng these detergents,
contact the detergent manufacturer
drectly. You wll fnd contact detals
on the packet.
If you stop usng ths knd of
detergent:
• Ensure that the salt and rnse ad
dspensers are full.
• Put the water hardness settng at
the hghest level and run a wash
cycle wth the applance empty.
• After washng whle empty,
return the water hardness
settng to the correct level for
your mans water hardness
shown n the manual.
• Put the rnse ad settng at the
correct level.
Fllng detergent dspenser
If the dshwasher s consderably full
and the dshes are relatvely drty, fll
the man contaner (A) up to 25cm
level. If the dshwasher s not qute
full and the dshes are only slghtly
soled, fll the man contaner (A) only
up to 15cm level.
If your dshes are kept unwashed for
a long tme and the food partcles are
stuck on the dshes also fll the small
contaner (B) up to 5cm. Dependng
on the degree of solng and the
water hardness n your area t may be
necessary to add more detergent.
Powder and gel detergents are
poured nto the dspenser.

16 GB
by turnng the rnse ad dspenser
regulator (C).
The dspenser regulator (C) may be
set between levels 1 and 6 (6 beng
the maxmum amount of rnse ad
usage). Your machne s pre-set at the
factory to level 4.
Accordng to the fnsh and dryng
results obtaned, adjust the dose of
rnse ad by means of the sx poston
selector. (Poston 1: mnmum dose,
Poston 6: maxmum dose.) Gradually
ncrease the dose f there are drops
of water or lme spots on the dshes
after washng. Reduce t f there are
stcky whtsh streaks on the dshes.
Fllng the rnse ad dspenser
Open the rnse ad dspenser ld by
pressng the button as shown n the
dagram.
Fll up wth rnse ad untl the
contaner s full to level of ’max’ mark .
Put the ld (E) on and ensure you hear
the clckng sound.
Remember to CLOSE the ld after
every refll.
Make sure you clean any rnse ad that
you mght have splled.
If you are usng tablet detergent read
the manufacturer’s recommendatons
on the packagng n order to
determne where the tablets should
be placed nsde the dshwasher
(detergent dspenser, cutlery basket,
etc.)
After you put n the detergent, shut
the contaner ld (D) and ensure you
hear the clckng sound.
Durng the wash programme the
detergent wll dspense automatcally
and the ld (D) wll reman open when
the programme fnshes.
Do not use detergent when usng the
pre-wash programme.
Detergent resdues
Regular use of low temperature
washes and/or short duraton
programmes can lead to undssolved
detergent resdue buld up. We
recommend to carry out a servce
wash at the hghest temperature
possble every 3 - 4 months wth the
dshwasher empty and wthout usng
detergent. It s not recommended to
carry t out wth auto programme.
Rnse ad
Use only rnse ad ntended for
household dshwashers.
The rnse ad s specally formulated
to be used n the dshwashers for
the preventon of watermarks and
scale on dshes and to ncrease the
ecency of the washng and dryng
processes. Therefore, make sure that
there s adequate amount of rnse
ad n the rnse ad dspenser of your
machne.
You can adjust the amount of rnse
ad used durng the wash programme

17 GB
Loadng the dshwasher
Loadng the dshwasher correctly
wll ncrease the washng,
dryng and energy performance
of your machne. Examne the
nformaton gven n ths secton
and the nformaton stated n
the Programme chart and quck
reference card gven wth the
manual.
Remove any large scraps of food
from the dshes before placng n
the dshwasher to avod cloggng
the flters.
There are three separate baskets,
n whch you can put your dshes.
Place large or heavly soled tems
n the lower basket, and small,
lght or delcate artcles n the
upper basket. Put forks, small and
medum sze knves and spoons n
the cutlery basket.
Place tall, narrow tems n the
mddle of the racks.
Long-stemmed glasses should
lean aganst the basket, the racks,
or the supports not aganst the
dshes.
When loadng your dshwasher
please ensure tall glasses (and/or
wne glasses) rest aganst the sdes
of the upper basket. Do not allow
tall glasses to rest aganst each
other snce they may be damaged
durng washng f not properly
supported.
Always arrange saucepans, cups
and glasses etc. upsde down.
You can fold the racks n the upper
basket when you need more space
for larger tems.
Table of contents
Other Beko Dishwasher manuals

Beko
Beko DFC04210W User manual

Beko
Beko DIS15020 User manual

Beko
Beko DIN39432 User manual

Beko
Beko DIS15R10 User manual

Beko
Beko DIN 5833 Extra User manual

Beko
Beko DIN48534 User manual

Beko
Beko SDVN Series User manual

Beko
Beko DFN39340X User manual

Beko
Beko BDIN16N30S User manual

Beko
Beko DWI645 User manual