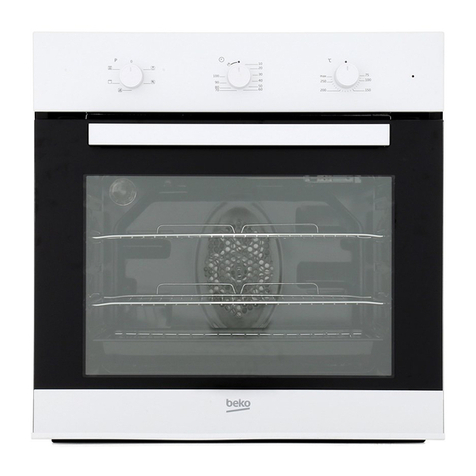
Beko OIE 25500 User manual

BUILT-IN OVEN OIE 25500
встраиваемый духовой шкаф

Please read this manual first.
D ar Custom r,
W would lik you to obtain b st p rformanc with your product that has b n
manufactur d in mod rn faciliti s and pass d through strict quality control
proc dur s.
Th r for , w advis you to r ad through this Us r Manual car fully b for using
your product and k p it for futur r f r nc . If you hand ov r th product to
som on ls , d liv r th Us r Manual as w ll.
The User Manual will help you use the product in a fast and safe way.
• R ad th Us r Manual b for installing and starting th product.
• You must strictly obs rv th saf ty instructions.
• K p this Us r Manual within asy r ach for futur r f r nc .
• Also r ad oth r docum nts suppli d with th product.
R m mb r that this Us r Manual may also b applicabl for s v ral oth r
mod ls.
Diff r nc s b tw n mod ls ar xplicitly id ntifi d in th manual.
Explanation of symbols
Throughout this Us r Manual th following symbols ar us d:
E Important information or us ful hints about usag .
Warning for hazardous situations with r gard to lif and prop rty.
Warning for l ctric shock.
¿iisWarning for risk of fir .
^Warning for hot surfac s.
C€
Arcelik A.^.
Karaaga? caddesi No:2-6
34445 SutIuce/lstanbul/ URKEY
Made in URKEY

Tabl of Cont nts
Q General information...................
Ov rvi w.............................................4
T chnical sp cifications
...................
5
Acc ssori s suppli d with th unit
.
5
0 Safety instructions
.......................
7
G n ral saf ty....................................7
Saf ty wh n working with l ctricity.8
Int nd d us
......................................
8
Saf ty for childr n
.............................
8
0 instaliation....................................9
B for installation
.............................
9
Installation and conn ction............10
Disposal............................................12
Disposing of packaging mat rial
..
12
Disposing of th old product
.........
12
Futur Transportation.....................13
Q Preparation
...............................
1
Tips for saving n rgy
....................
14
Initial op ration................................14
S tting th tim ................................14
First cl aning of th applianc
......
15
Initial h ating
...................................
15
^ How to op rat th ov n
.....
16
G n ral information on baking, roasting
and grilling
..................................
16
How to us th l ctric ov n
.........
16
Op rating mod s
.............................
18
How to op rat th ov n control unit20
How to us th program lock
.........
22
How to us th alarm clock............22
Cooking tim s tabl
........................
24
How to op rat th grill
..................
25
Cooking tim s tabl for grilling
.....
25
^ Maint nanc and car
..........
26
G n ral information
........................
26
Cl aning th control pan l
.............
26
Cl aning th ov n............................26
R moval of ov n door
....................
27
R placing th ov n lamp
................
27
QTroubl shooting................... 28
3 I EN

Q G n ral information
Ov rvi w
1Control panel 6 Shelf positions
2Wire shelf 7 Grill heating element
3 Tray 8 Lamp
Handle 9 Fan motor (behind steel plate)
5Door
P‘’c
1 2
1 Program selection knob
2 Digital timer 5
3 Temperature-time increase/decrease
button
Menu button
ON/OFF button
| EN

T chnical sp cifications
Voltage / frequency 220-2 0 V ~ 50 Hz
Total power consumption 2. kW
Fuse min. 16 A
Cable type / section H05W-FG
3 X 1,5 mm^
Cable length max. 2 m
External dimensions (height / width / depth) 595 mm/59 mm/567 mm
Installation dimensions (height / width / depth) **590 or 600 mm/560 mm/min. 550 mm
Main oven Multifunction ov n
Energy efficiency class^ A
Inner lamp 15/25 W
Grill power consumption 2.2 kW
Basics: Information on the energy label of electrical ovens is given in accordance with
the EN 5030 standard. Those values are determined under standard load with
bottom-top heater or fan assisted heating (if any) functions.
Energy efficiency class is determined in accordance with the following prioritization
depending on whether the relevant functions exist on the product or not. 1-Cooking
with eco-fan, 2- Turbo slow cooking, 3- Turbo cooking, - Fan assisted bottom/top
heating, 5-Top and bottom heating.
See. Installation, page 9._______________________________________________________
m T chnical sp cifications may b
chang d without prior notic to
improv th quaiity of th
product.
[il Figur s in this manuai ar
sch matic and may not xactiy
match your product.
m Vaiu s stat d on th product
lab is or in th docum ntation
accompanying it ar obtain d in
laboratory conditions in
accordanc with r i vant
standards. D p nding on
op rational and nvironm ntal
conditions of th product, th s
valu s may vary.
Acc ssori s suppli d with th
unit
m Acc ssori s suppli d can vary
d p nding on th product mod l.
All th acc ssori s d scrib d in
th us r manual may not xist on
your product.
Baking tray
Can b us d for pastri s, froz n foods
and big roasts.
5 I EN

Deep roasting tray
Can b us d for pastri s, big roasts,
foods with iiquid cont nt and during
griiiing as dripping pan.
Small baking tray
Can b us d for smaii portions. This
baking tray is piac d onto th wir
sh if.
Wire shelf
Can b us d for roasting and as
d posit for baking, roasting and
cass rol dish s.
It is r comm nd d for pastri s such as
cooki s and biscuits.
Proper positioning of the wire shelf
and tray on sliding shelves
Trays and wir sh iv s us d with th
siiding sh if (mod l d p ndant) must
b position d corr ctly with th inn r
dg s of th sh if piac d ov r th pins
on th sliding sh lf. This holds th
sh lf firmly in plac ".
6 I EN

Q Saf ty instructions
G n ral saf ty
• This product is not int nd d to b
us d by p rsons with physicai,
s nsory or m ntai disord rs or
uni arn d or in xp ri nc d p opi
(inciuding chiidr n) uni ss th y ar
att nd d by a p rson who wiii b
r sponsibi for th ir saf ty or who
wiii instruct th m accordingiy for
us of th product.
Chiidr n must b sup rvis d to
pr v nt th m from tamp ring with
th product.
• Conn ct th product to a
ground d outi t/iin prot ct d by
a fus of suitabi capacity as
stat d in th "T chnicai
sp cifications" tabi . Hav th
grounding instaiiation mad by a
quaiifi d i ctrician whii using th
product with or without a
transform r. Our company shaii
not b iiabi for any damag s that
wiii aris du to using th product
without a grounding instaiiation in
accordanc with th iocai
r guiations.
• Do not op rat th product if th
pow r cabi or piug is damag d.
Caii Authoris d S rvic Ag nt.
• Do not op rat th product if it is
d f ctiv or has any visibi
damag .
• Do not carry out any r pairs or
modifications on th product.
How v r, you may r m dy som
troubi s that do not r quir any
r pairs or modifications. S
Troubleshooting, page 28.
N v r wash down th product with
wat r! Th r is th risk of i ctric
shock!
N v r us th product wh n your
judg m nt or coordination is
impair d by th us of aicohoi
and/or drugs.
Product must b disconn ct d
from th mains during instaiiation,
maint nanc , ci aning and r pair
proc dur s.
instaiiation and r pair proc dur s
must aiways b p rform d by
Authoris d S rvic Ag nts.
Manufactur r shaii not b h id
r sponsibi for damag s arising
from proc dur s carri d out by
unauthoris d p rsons.
B car fu! wh n using aicohoiic
drinks in your dish s. Aicohoi
vaporat s at high t mp ratur s
and may caus fir sinc it can
ignit wh n it com s into contact
with hot surfac s.
Do not h at cios d tins and giass
jars in th ov n. Th pr ssur that
wouid bui!d-up in th jar may
caus it to burst out.
Do not piac any fiammabi
mat riais cios to th product as
th sid s b com hot during us .
Do not piac baking trays, dish s
or aiuminium foi! dir ctiy onto th
bottom of th ov n. Th h at
accumuiation might damag th
bottom of th ov n.
K p aii v ntiiation siots ci ar of
obstructions.
Product may b hot wh n it is in
us . N v r touch th hot burn rs.
7 I EN
inn r s ctions of th ov n, h at rs
and tc.
• Aiways us h at r sistant ov n
giov s wh n putting and r moving
dish s into/from th hot ov n.
• Do not us th product with front
door giass r mov d or crack d.
• R ar surfac of th ov n g ts hot
wh n it is in us . Mak sur that
th gas/ i ctricai conn ction do
not contact th r ar surfac ;
oth rwis , conn ctions can g t
damag d.
• Do not trap th mains cabi
b tw n th ov n door and fram
and do not rout it ov r th hot
surfac s. Oth rwis , cabl
insulation may m lt and caus fir
as a r sult of short circuit.
• Mak sur that th product is
switch d off aft r v ry us .
m Product must b install d by a
qualifi d p rson in accordanc
with th r gulations in forc .
Oth rwis , th warranty shall
b com void.
Saf ty wh n working with
l ctricity
• Any work on l ctric quipm nt
and syst ms may only b carri d
out by authoriz d qualifi d
p rsons.
• Ev n if th ov n is off, th cooling
fan continu s working for a whil
aft r turning off th ov n.
• In cas of any damag , switch off
th applianc and disconn ct it
from th mains supply by
r moving th fus or switching off
th circuit br ak r.
• Ensur that th fus rating is
corr ct.
Int nd d us
This product is d sign d for dom stic
us . Comm rcial us is not admissibl .
This product should not b us d for
warming th plat s und r th grill,
drying tow ls, dish cloths and tc. by
hanging th m on th handl s and for
h ating purpos s.
Th manufactur r shall not b liabl for
any damag caus d by improp r us
or handling rrors.
Th ov n can b us d for d frosting,
baking, roasting and grilling food.
Saf ty for childr n
• Acc ssibl parts of th applianc
will b com hot whilst th
applianc is in us and until th
applianc has cool d, childr n
should b k pt away.
• "CAUTION: Acc ssibl parts may
b hot wh n th grill is in us .
Young childr n should b k pt
away."
• Th packaging mat rials will b
dang rous for childr n. K p th
packaging mat rials away from
childr n. Pl as dispos of all
parts of th packaging according
to nvironm ntal standards.
• Wh n th door is op n, do not
load any h avy obj ct on it and do
not allow childr n to sit on it. It
may ov rturn or door hing s may
g t damag d.
8 I EN

^ Installation
B for installation
Th applianc is int nd d for
instaliation in comm rciaily avaiiabi
kitch n cabin ts. A saf ty distanc
must b i ft b tw n th appiianc
and th kitch n wails and furnitur .
S figur (vaiu s in mm).
• Surfac s, synth tic laminat s and
adh siv s us d must b h at
r sistant (100 °C minimum).
• Kitch n cabin ts must b s t i v l
and fix d.
• If th r is a draw r b n ath th
ov n, a sh lf must b install d
b tw n ov n and draw r.
9 I EN

Q] Mat rial damag !
Th door and/or handl must not
b us d for lifting or moving th
applianc .
r gulations.
Carry th applianc with at l ast
two p rsons.
10| EN

• Us th slots or wir handl s
locat d at both sid s to mov th
applianc .
[il If th applianc has wir handl s,
push th handl s back into th
sid walls aft r moving th
applianc .
Connection to the mains supply
Q] This appliance must be
earthed!
Our company shall not b h ld
r sponsibl for any damag
caus d by using th applianc
without an arth d sock t.
A Risk of l ctric shock, short
circuit or fir by unprof ssional
installation!
Th applianc may b conn ct d
to th mains supply only by an
authoriz d qualifi d p rson and
th applianc is only guarant d
aft r corr ct installation.
A Risk of l ctric shock, short
circuit or fir by damag of th
mains l ad!
Th mains l ad must not b
clamp d, b nt or trapp d or
com into contact with hot parts
of th applianc .
If th mains l ad is damag d, it
must b r plac d by a qualifi d
l ctrician.
• Th mains supply must
corr spond to th data sp cifi d
on th rating plat of th applianc .
Th rating plat can b s n wh n
th front door is op n d.
• Th applianc mains cabl must
corr spond to th sp cifications
and th pow r consumption: s
Technical specifications, page 5.
A Risk of l ctric shock!
B for starting any work on th
l ctrical installation, pl as
disconn ct th applianc from
th mains supply.
1. If no all-pol s paration from th
mains supply is possibl , a
s paration unit must b conn ct d
with a contact distanc of 3 mm
min. (fus s, lin saf ty switch s,
contactors) all pol s which should
b adjac nt to (but not abov ) th
cook r in accordanc with lEE
r gulations. Failur to obs rv this
instruction may r sult in op rational
probl ms and invalidation of th
applianc warranty.
Additional prot ction by a r sidual
curr nt circuit br ak r is
r comm nd d.
If a cabl without a plug is provid d
tog th r with your applianc ;
2. for mono-phase connection, tak
car to conn ct as b low:
• Brown cabl = L (Phas )
• Blu cabl = N (N utral)
11 I EN

• Gr n/y llow cabl must b i
conn ct d to ground (E) — lin .
Installation
1. Slid th ov n through th cabin t
Fix your ov n with th 2 scr ws and
wash rs as indicat d in th figur .
Final check
1. Conn ct th applianc to th mains
supply and switch on th mains
supply.
2. Ch ck function.
For equipment with a cooiing fan
Th Built-in cooling fan cools both th
built-in cabin t and th front of th
applianc .
[H Cooling fan continu s to run for
up to 20-30 minut s (approx.)
v n aft r th ov n is turn d off.
Disposal
Disposing of packaging mat rial
Packaging mat rials ar dang rous to
childr n. K p packaging mat rials in
a saf plac out of r ach of childr n.
Packaging mat riais of th product ar
manufactur d from r cyclabl
mat rials. Dispos of th m prop rly
and sort in accordanc with r cycl d
wast instructions. Do not dispos of
th m with normal dom stic wast .
Disposing of th old product
1 Fan
2 Control panel
3 Door
Dispos of th old product in an
nvironm ntally fri ndly mann r.
This quipm nt b ars th s l ctiv
sorting symbol for wast l ctrical and
l ctronic quipm nt (WEEE). This
m ans that this quipm nt must b
handl d pursuant to Europ an
Dir ctiv 2002/96/EC in ord r to b
r cycl d or dismantl d to minimiz its
impact on th nvironm nt. For furth r
information, pl as contact local or
r gional authoriti s.
El ctronic quipm nts not includ d in
th s l ctiv sorting proc ss ar
pot ntially dang rous for th
nvironm nt and human h alth du to
th pr s nc of hazardous substanc s.
12 I EN

R f r to your local d al r or solid
wast coll ction c ntr in your ar a to
l arn how to dispos of your product.
B for disposing of th product, cut
off th pow r cabl plug and mak th
door lock (if any) unusabl to avoid
dang rous conditions to childr n.
Futur Transportation
• K p th product's original carton
and transport th product in it.
Follow th instructions on th
carton. If you do not hav th
original carton, pack th product in
bubbl wrap or thick cardboard
and tap it s cur ly.
• To pr v nt th wir grill and tray
insid th ov n from damaging th
ov n door, plac a strip of
cardboard onto th insid of th
ov n door that lin s up with th
position of th trays. Tap th
ov n door to th sid walls.
• Do not us th door or handl to
lift or mov th product.
m Do not plac oth r it ms on th
top of th applianc . Th
applianc must b transport d
upright.
Ch ck th g n ral app aranc of
your product for any damag s
that might hav occurr d during
transportation.
13 I EN

Q Pr paration
Tips for saving n rgy
Th following Information will h lp you
to us your applianc in an cological
way, and to sav n rgy:
• Us dark colour d or nam l
coat d cookwar In th ov n sinc
th h at transmission will b b tt r.
• Whil cooking your dish s,
p rform a pr h ating op ration if it
is advis d in th us r manual or
cooking Instructions.
• Do not op n th door of th ov n
fr qu ntly during cooking.
• Try to cook mor th n on dish in
th ov n at th sam tim
wh n v r possibl . You can cook
by placing two cooking v ss ls
onto th wir grill.
• Cook mor than on dish on aft r
anoth r. Th ov n will alr ady b
hot.
• You can sav n rgy by switching
off your ov n a f w minut s b for
th nd of th cooking tim . Do
not op n th ov n door.
• D frost froz n dish s b for
cooking th m.
Initial op ration
B for first usag of your applianc ,
don't forg t to r mov th stick r on
th digital tim r scr n
Setting the time
12 11 10 13
1 3 5 6 7 8 9 2
1 Program selection knob 11 Keylock symbol
2Temperature-time 12 Current time display
increasing/decreasing knob 13 Menu button
3Function display 14 ON/OFF button
4Cooking time symbol
5Cooking end time symbol 1. After switching on the oven for the
6Alarm period symbol first time, adjust the time of the day
7Current time symbol by slightly twisting the button 2
8Inner oven temperature symbol towards + or -.
9Booster position
10 Temperature display
1 | EN

m If th curr nt tim is not s t, tim
s tting wili start incr asing up
from 12:00. Ciock icon '7' wiii
r main lit to indicat that th
curr nt tim has not b n s t.
This icon wiil disapp ar onc th
tim is s t.
Adjust the existing time
1. Activat th tim of th day symboi
'7' by pr ssing th button 13 twic
for th tim of th day.
2. Adjust th tim of th day by
slightiy twisting th button 2
towards + or -.
m Curr nt tim s ttings ar
canc ii d in cas of pow r
failur . It n ds to b r adjust d.
Tim of th day can not b
chang d if th ov n is op rating
in a function.
First cl aning of th applianc
m Th surfac may g t damag d by
som d t rg nts or cl aning
mat rials.
Do not us aggr ssiv
d t rg nts, cl aning
powd r/cr am or any sharp
obj cts.
1. R mov all packaging mat rials.
2. Wip th surfac s of th applianc
with a damp cloth or spong and
dry with a cloth.
Initial h ating
H at up th product for about 30
minut s and th n switch it off. Thus,
any production r sidu s or lay rs will
b burnt off and r mov d.
A Hot surfac s may caus burns!
Do not touch th hot surfac s of
th applianc . Us ov n glov s.
K p childr n away from th
applianc .
Electric oven
1.Tak all baking trays and th wir
grill out of th ov n.
2. Clos th ov n door.
3. S l ct Static position.
4. S l ct th high st grill pow r; S
How to use the electric oven,
page 1 .
5. Op rat th ov n about 30 minut s.
6. Turn off your ov n; S How to use
the electric oven, page 1
Grili oven
1Tak all baking trays and th wir
grill out of th ov n.
Clos th ov n door.
S l ct th high st grill pow r; s
How to operate the grill, page 25.
Op rat th ov n about 30 minut s.
Turn off your grill; s How to
operate the grill, page 25
m Sm ll and smok may mit
during first h ating. Ensur that
th room is w ll v ntilat d.
15 I EN

§ How to op rat th ov n
G n ral information on baking,
roasting and grilling
A Risk of scalding by hot st am!
Tak car wh n op ning th
ov n door as st am may scap .
Tips for baking
• Us non-stick coat d appropriat
m tal plat s or aluminum
contain rs or h at-r sistant
siiicon mouids.
• Mak b st us of th spac on th
rack.
• it is r comm nd d to piac th
baking mould in th middl of th
rack.
• S l ct th corr ct sh lf position
b for turning th ov n or griil on -
don’t mov ov n sh iv s wh n hot.
• K p th ov n door clos d.
Tips for roasting
• S asoning with l mon juic and
black p pp r will improv th
cooking p rformanc wh n
cooking a whol chick n, turk y or
a larg pi c of m at.
• M at with bon s tak s about 15 to
30 minut s long r b for it is
cook d than a roast of th sam
siz without bon s.
• You should calculat about 4 to 5
minut s cooking tim p r
c ntim t r h ight of th m at.
• L t m at r st in th ov n for about
10 minut s aft r th cooking tim .
Th juic is b tt r distribut d all
ov r th roast and do s not run
out wh n th m at is cut.
• Fish in a fir -r sistant dish should
b plac d on th rack at th
m dium or low r l v l.
Tips for grilling
Grilling is id al for cooking m at, fish
and poultry and will achi v a nic
brown surfac without it drying out too
much. Flat pi c s, m at sk w rs and
sausag s ar particularly suit d for
grilling as ar v g tabl s with a high
wat r cont nt such as tomato s and
onions.
• Distribut th pi c s to b grill d
on th wir sh lf.
• If th grilling is on th wir sh lf,
locat a dripping pan und r it in
ord r to coll ct th fat.
• Add som wat r in th dripping
pan for asy cl aning.
How to us th l ctric ov n
Turning the oven on
::oo w
ss««««
1 14 13
1 Program selection knob
2 Temperature-time increase/decrease
button
13 Menu button
1 ON/OFF button
1. Pr ss button 14 for about 1 s cond
to turn th ov n on.
Select temperature and operating
mode
Aft r turning th ov n on; nothing
app ars at th function display.
16| EN

r
10
m Ov n will switch off automaticaily
within 10 s conds if no ov n
s tting is mad on this scr n.
T mp ratur , cooking tim , cooking
nd tim and boost r can b s t in this
position.
1. Slightly turn th button no. 1 to l ft
or right so that th d sir d function;
2. You can adjust th d sir d
t mp ratur by slightly twisting th
button 2 towards + and
» Your ov n will r adily start op rating
in th d sir d function and will
incr as th inn r t mp ratur to th
s t t mp ratur .
» Activ h at rs and sugg st d tray
position app ar on th function display.
» If no t mp ratur s tting is mad
pr viously, th n th sugg st d
t mp ratur for th s l ct d function
is indicat d on th t mp ratur display.
Function tabl contains th functions
that can b us d as w ll as minimum
and maximum t mp ratur s that can
b s l ct d in th ov n.
1 Shelf position
2 Bottom heater
3 Function number
Cleaning position
5 Turbo fan
6 Turbo heater
7 Defrost position
8 Griii heater
9 Upper heater
10 Warm keeping
* Functions can vary depending on the
product model!
Function table:
Function Sugg st d
t mp ratur
rc)
T mp ratur
rang (°C)
Static 200 40-280
Static + fan 175 40-280
Griii 280 40-280
Low griii 280 40-280
Bottom heater 180 40-220
Warm keeping 60 40-100
Maximum tim that can b s t for
cooking p riod is limit d with 6
hours at positions apart from
k ping warm du to saf ty
r asons. In cas of pow r cut,
program will b canc l d.
R program is n d d.
17 I EN

m Whil making any adjustm nt,
r lat d symbols on th clock will
flash.
m
Tim of th day can not b
adjust d wh n th ov n is
op rating in any function or th
clock is s t to a s mi-automatic
or full automatic program.
Ev n if th ov n is off, ov n lamp
lights up wh n th ov n door is
op n d.
Switch off electric oven
Pr ss button 14 for about 2 s conds to
turn th ov n off.
)
Shelf positions (model dependant)
It is important to position th wir grill
on wir sh lf corr ctly. Th wir grill
must b plac d so that it will fit into
th op ning of th wir sh lf as
illustrat d in th figur .
Op rating mod s
Th ord r of op rating mod s shown
h r might d viat from th
arrang m nt on your applianc .
1. Top and bottom heat
r=^==
2.
3.
3r
Th foodstuffs ar h at d
simultan ously from th upp r and
low r part. Suitabl .g. for cak s,
cooki s and cass rol s in baking
moulds. Cook with on tray only.
Top and bottom heat with
convection air
I
--------------
3r I
Warm air h at d by th low r and
upp r h at rs is v nly distribut d
throughout th ov n v ry fast by
m ans of th fan. Cook with on
tray only.
Strong grill with convection air
r====
3r I
Warm air h at d by th larg grill
is distribut d v ry fast in th ov n
by m ans of th fan. It is suitabl
for grilling larg amount of m at.
• Put big or m dium-siz d
portions in corr ct sh lf
position und r th grill h at r
for grilling.
• S t th t mp ratur to
maximum l v l.
18 I EN

.
• Turn th food aft r half of th
grilling tim .
Surface grill
6.
r
f
r
r
r
L
5.
Th larg grill (und r th ov n roof)
is in op ration. Suitabl for grilling
iarg r quantiti s.
• Put big or m dium-siz d
portions in corr ct sh if
position und r th griii h at r
for griliing.
• S t th t mp ratur to
maximum l v i.
• Turn th food aft r half of th
grilling tim .
Grill-small
r
r-
r
r
r-
Th grill (und r th ov n roof) is in
op ration. Suitabl for grilling.
• Put small or m dium-siz d
portions in corr ct sh lf
position und r th grill h at r
for grilling.
• S t th t mp ratur to
maximum l v l.
• Turn th food aft r half of th
grilling tim .
7.
8.
Bottom heat
(
--------------
Only bottom h at is on. Is
particularly suitabl for dish s,
such as pizza, which ar r quir d
to b bak d from bottom.
Warm keeping
(---------------------
r
r
3r
r
r
sss
Can b us d for k ping food
warm at low t mp ratur and ov r
a long r p riod of tim .
Operating with fan
I
------
ar- I
Th ov n is not h at d. Only th
fan (in th r ar wall) is in op ration.
Froz n granular food is thaw d
slowly at room t mp ratur and
cook d food is cool d down.
Wh n th ov n door is op n d,
th fan motor will not run to k p
th hot air insid .
19 I EN

How to op rat th ov n control unit
1 12 11 10
1 3
1 Program selection knob
2 Temperature-time
increasing/decreasing knob
3 Function display
Cooking time symbol
5 Cooking end time symbol
6 Alarm period symbol
7 Current time symbol
8 Inner oven temperature symbol
9 Booster position
10 Temperature display
11 Keylock symbol
12 Current time display
13 Menu button
1 ON/OFF button
Switch on semi-automatic operation
In this op ration mod , you may adjust
th tim p riod during which th ov n
wiil op rat (cooking tim ). Ov n starts
to op rat aft r th s ttings ar mad
and runs at th s t t mp ratur
throughout th cooking tim . Ov n
turns off at th nd of th cooking tim .
1. Turn on th ov n by pr ssing and
hoiding button '1 '.
2. Adjust th d sir d op ration mod
(function) by slightiy twisting th
button '1' towards right or i ft hand.
8 9 2
3. Activat th cooking tim symboi
' ' by pr ssing th button '13' with
whil th ov n is op rating.
4. Adjust th cooking tim by slightly
twisting th button 2 towards "+" or
ll_ll
» Cooking tim symbol ' ' r mains lit
aft r adjusting th cooking tim .
5. Plac your dish in th ov n.
6. Adjust th cooking t mp ratur by
slightly twisting th button 2
towards "+" or
» Th ov n will b h at d up to th
pr s t t mp ratur and will maintain
this t mp ratur until th nd of th
cooking tim you s l ct d.
m All s gm nts of th inn r ov n
t mp ratur symbol (8) will turn
on wh n your ov n r ach s th
s t t mp ratur .
7. Aft r th cooking proc ss is
compl t d, "End" will b display d
and th alarm signal will sound.
8. To stop th alarm signal, pr ss
button no. '13' or '1 '.
» Alarm will b sil nc d, ov n will b
turn d off automatically and curr nt
tim will b display d on th scr n.
20| EN
Other manuals for OIE 25500
2
Table of contents
Languages:
Other Beko Oven manuals

Beko
Beko OIG 22102 User manual

Beko
Beko OUE 22320 User manual

Beko
Beko CSM 62010 D User manual

Beko
Beko BBVM17400BPS User manual

Beko
Beko CG 41001 S User manual

Beko
Beko CSG 52010 G User manual

Beko
Beko BBO6851PDX User manual

Beko
Beko OIM 22100 User manual

Beko
Beko BRDF21000X User manual

Beko
Beko BBIC12000XD User manual

Beko
Beko 4710 TBA User manual

Beko
Beko BBIS14300XCSE User manual

Beko
Beko CSG 52000 DW User manual

Beko
Beko BBCW13400DX User manual

Beko
Beko CSG 52120 G User manual

Beko
Beko OIM 27200 User manual

Beko
Beko CSS 53010 G User manual

Beko
Beko EDG6L33W User manual

Beko
Beko BDVC 563 A User manual

Beko
Beko OIM 39701 User manual