Beko SSE 26026 User manual


1
1
3
3
3
3
6
7
2
5
4
9
10
8
11
12
9


en en
1
Congratulations on your choice of our product which will certainly provide you with many years
of good service.
Safety comes first!
Please read this Instruction Manual carefully. It contains important information on how to use your
new appliance. If instructions are not adhered to, you may lose your right to service at no charge
during the warranty period. Please keep this manual in a safe place and pass it on to later users
if applicable.
• Do not connect your appliance to the power supply until all packing and transit protectors
have been removed.
• Leave to stand upright for at least 4 hours before switching on to allow the system to settle if
transported horizontally.
• This appliance must only be used for its intended purpose, i.e. the storing and freezing of
edible foodstuff.
• We do not recommend use of this appliance in an unheated, cold room e.g. garage,
conservatory, annex, shed, outdoors etc., see ‘Location’.
• On delivery, check to make sure that the product is not damaged and that all the parts and
accessories are in perfect condition.
• Do not operate a damaged appliance if in doubt, check with your dealer.
• Do not allow children to play with the appliance.
• Do not sit or stand on, or let the children sit or stand on the appliance or on the pull-out parts.
• Do not hang on the appliance door.
• Your appliance contains no fluoridated coolants (CFC/HFC), but isobutane
(R 600 a), a natural gas which is highly compatible with the environment.
(R 600 a) is easily flammable. Therefore, be sure that the cooling circuit is not damaged
either during transport or during operations.
In the event of damage;
• Avoid any open flame, sources of sparks and flammable substances.
• Immediately air the room in which the appliance is located.
• In case the coolant spraying out contacts you eyes it may cause eye injuries.
• The space in the room where the appliance is installed must not be smaller than 10 cubic
metres.
• Do not dispose of the appliance in a fire. Your appliance contains non CFC substances in
the insulation which are flammable.
• Please contact your local authority in your region for information on disposal methods and
facilities available.
Warning - Keep ventilation openings on the appliance enclosure or in the built-in structure,
clear of obstruction.
Warning - Do not use mechanical devices or other means to accelerate the defrosting
process, other than those recommended by the manufacturer.
Warning - Do not damage the refrigerant circuit.
Warning - Do not use electrical devices inside the food storage compartments of the
appliance, unless they are of the type recommended by the manufacturer.
• Avoid touching the metal condenser wiring on the backside of the appliance there is risk of
injury.
• In the event of a possible malfunction, disconnect the appliance from the power supply first.
• Prior to cleaning the appliance always unplug the appliance or switch off the circuit breaker. Do
not pull from the power cable. Pull from the plug.
• Repairs to the electrical equipment may only be made by qualified experts. If the power
cable is damaged, the manufacturer or customer service must replace it in order to avoid
danger.
• This appliance is not intended for use by persons (including children) with reduced physical,
sensory or mental capabilities, or lack of experience and knowledge, unless they have been given
supervision or instruction concerning use of the appliance by a person responsible for their safety.
• Children should be supervised to ensure that they do not play with the appliance.

en en
Transport instructions
The device should be transported only in
upright position.
The packing as supplied must be intact during
transportation.
After a transport in the horizontal position, the
device may only be taken into operation 4
hours after being stood up vertically again.
The appliance must be protected against rain,
moisture and other atmospheric influences.
The manufacturer assumes no liability if safety
instructions are disregarded.
Disposal
Make the appliance unusable immediately.
Pull out the mains plug and cut the power
cable. Remove or destroy snap or latch locks
before disposing of the appliance. In this
manner you prevent children from locking
themselves in and endangering their lives.
Appliance setup
• Do not operate your appliance in a room
where the temperature is likely to fall below
10 °C at night and/or especially in winter. At
lower temperatures the appliance may not
operate, resulting in a reduction in the storage
life of the food.
• The climate class rate of your appliance is
given on the rating label located inside the
appliance. It specifies the appropriate operating
ambient temperatures as explained below.
Climatic class Ambient temperatures
SN.......................+10 °C to 32 °C
N .........................+16 °C to 32 °C
ST .......................+18 °C to 38 °C
T..........................+18 °C to 43 °C
SN-ST.................+10 °C to 38 °C
SN-T ...................+10 °C to 43 °C
Location
Only place the device in dry rooms which can
be aired.
Avoid direct sunlight or direct heat sources
such as a stove or a heater.
If this cannot be avoided, the following
minimum distances should be maintained:
Electric stoves: 3,00 cm
Heater: 3,00 cm
Cooling devices: 2,50 cm
• Ensure sufficient air circulation for your
device.
• Make sure that sufficient room is provided
around the appliance to ensure free air
circulation.
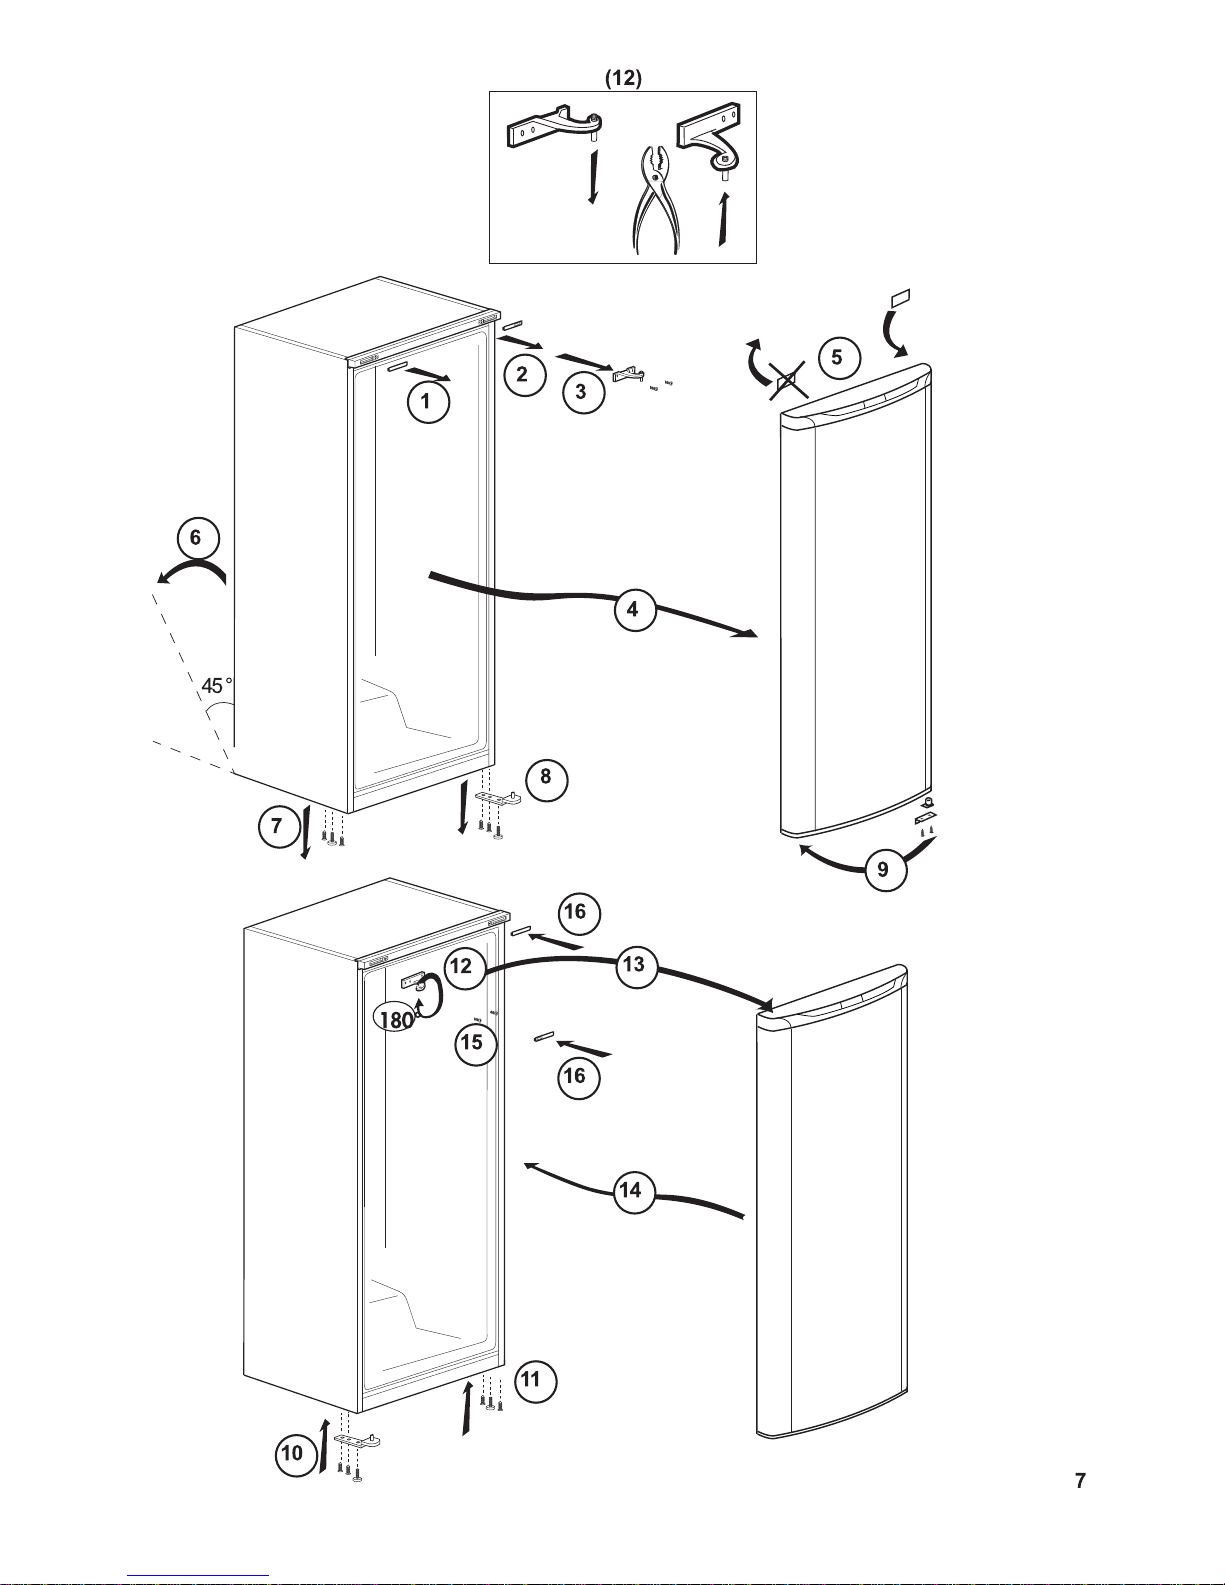
Fit the two plastic wall spacers supplied with
the appliance rotating 1/4 turn to the condenser
at the back of the appliance (Fig. 3).
• The device should be located on a smooth
surface. The two front feet can be adjusted as
required. To ensure that your appliance is
standing upright adjust the two front feet by
turning clockwise or counter-clockwise, until
the product is in firm contact with the floor.
Correct adjustment of feet avoids excessive
vibration and noise.
Electrical connections
Warning
This appliance must be grounded.
• Check whether the power type and voltage
your region corresponds to the one stated on
the rating label inside the appliance.
• The electrical safety of the appliance is only
assured when the grounding system in the
house is installed in accordance with
regulations.
• When placing the appliance, do not let the
power cable get stuck under it; otherwise the
cable will be damaged.
• Ensure that the plug remains readily
accessible. Do not use a multiple adapter bar
or an extension cable.
• The electrical specifications of your appliance
is given on the rating label located inside the
appliance.
• Route power cable to allow easy connection
and disconnection after installation.
· If the supply cord is damaged, it must be
replaced by the manufacturer, its service agent
or similarly qualified persons in order to avoid
a hazard.
• A contact separator should be used if the
power cable is not accessible. (for built-in
models)
2

en en
3
Warning
Below information about accessories are
supplied only for reference. Below accessories
may not be exactly same as the accessories
of your appliance.
Fig. 1
Get to know your device How to use the accessories
Bottle and can rack (Fig.6)
This accessory can be used for storing either
a bottle or 3 pieces of cans side by side.
Interior light
Thermostat knob
Movable shelves
Defrost water collection channel - Drain
tube
Crisper cover
Crisper
Adjustable front feet
Dairy compartment
Adjustable door shelves
Egg compartment
Bottle shelf
Bottle and can rack
1.
2.
3.
4.
5.
6.
7.
8.
9.
10.
11.
12.

en en
1 = Lowest cooling setting (Warmest setting)
5 = Highest cooling setting (Coldest setting)
(Or)
Min. = Lowest cooling setting
(Warmest setting)
Max. = Highest cooling setting
(Coldest setting)
The average temperature inside the fridge
should be around +5°C.
Please choose the setting according to the
desired temperature.
You can stop operation of your device by
adjusting the thermostat knob to “0” position.
Please note that there will be different
temperatures in the cooling area.
The coldest region is immediately above the
vegetable compartment.
The interior temperature also depends on
ambient temperature, the frequency with which
the door is opened and the amount of foods
kept inside.
Frequently opening the door causes the interior
temperature to rise.
For this reason, it is recommended to close
the door again as soon as possible after use.
Setting the operating
temperature
(Fig. 2)
The operating temperature is regulated by the
temperature control.
4
Warm Cold
1 2 3 4 5
(Or) Min. Max.
Prior to startup
Before you begin operating your device, the
following points should be re-checked for
safety:
• Is the device standing properly on the floor?
•Is there sufficient space for good air
circulation?
•Is the interior clean? (Also see the section
“Cleaning and care”)
• Set the thermostat knob half way between
1 and 5 or Min. and Max.
• Now connect the device to the mains.
The compressor is turned on; the interior light
comes on when the door is opened.
Do not place foodstuff into the refrigerator until
the temperature has reached the desired level.

en en
Cooling
Food storage
The fridge compartment is for the short-term
storage of fresh food and drinks.
Store milk products in the intended
compartment in the refrigerator.
Bottles can be stored in the bottle holder or
in the bottle shelf of the door.
Raw meat is best kept in a polyethylene bag
in the compartment at the very bottom of the
refrigerator.
Allow hot foods and beverages to cool to room
temperature prior to placing them in the
refrigerator.
Attention
Store concentrated alcohol only standing
upright and tightly closed.
Attention
Do not store explosive substances or
containers with flammable propellant gases
(canned cream, spray cans etc.) in the device.
There is a danger of explosion.
Defrosting of the device
The fridge compartment defrosts automatically.
The thawing water flows through the drain
channel into a collection container at the rear
of the device (Fig. 4).
During defrosting, water droplets form at the
back of the fridge due to the evaporator.
If not all of the drops run down, they may
freeze again after defrosting remove them
with a cloth soaked in warm water, but never
with a hard or sharp object.
Check the flow of the thawed water from time
to time.It may become plugged occasionally.
Clean it with a q-tip or similar (see the section
"Cleaning and care").
5
Replacing the interior light
bulb
(Fig. 5)
Should the light fail to work switch off at the
socket outlet and pull out the mains plug.
Follow the below instructions to check if the
light bulb has worked itself loose.
If the light still fails to work obtain a replacement
E14 screw cap type 15 Watt (Max) bulb from
your local electrical store and then fit it as
follows:
1. Switch off at the socket outlet and pull out
the mains plug. You may find it useful to
remove shelves for easy access.
2. Remove the light diffuser cover as shown
in figure (a-b).
3. Replace the burnt-out light bulb.
4. Reassemble the light diffuser cover as
shown in figure (c).
“Push firmly to ensure cover is fitted properly.”
5. Carefully dispose of the burnt-out light bulb
immediately.
"Replacement light bulb can easily be obtained
from a good local electrical or DIY store."

en en
Cleaning and care
Interior and Exterior Surfaces
Attention
Always unplug the power cable or switch
off the circuit breaker before cleaning.
Clean the exterior using lukewarm water and
a mild detergent.
Never use detergents, abrasive or acidic
agents.
Wipe the inside compartment dry.
Be careful to prevent water from getting into
contact with the electrical connections of the
temperature control or the interior light.
If the device is not going to be used for a long
period of time, switch it off and remove all food.
Clean the device and keep the door open.
To preserve the appearance of your device,
you can polish the exterior and the door
accessories with a silicone wax.
Clean the condenser at the back of the device
once a year using a brush or a vacuum cleaner.
Dust build-up leads to increased energy
consumption.
Inspect the door gasket at regular intervals.
Clean with water only, and wipe totally dry.
Cleaning of the accessories
Door shelves:
Remove all food from the door shelves.
Lift the cover of the shelf upwards and pull it
off sideward.
Remove the bottom of the door shelf by
pushing it upwards.
Collecting container (Pan):
Make sure that the pan at the back of the
device is always clean.
Gently release the snap of the pan from the
compressor by pushing it using a tool (like
screwdriver), so that the pan can be removed.
Lift the pan, clean it and wipe it dry.
Re-assemble in reverse order.
Crisper or Drawers:
To clean a drawer, pull it out as far as possible,
tilt it upwards and then pull it out completely.
Practical tips and notes
Cooling
• Clean fresh food and vegetables before
storing in the crisper bin.
• Always pack or wrap food, or put it in a
suitable container, before storing it in the
appliance.
• Wrap food which is not suitable for storage
at cold temperatures in polyethylene bags
(pineapple, melons, cucumbers, tomatoes
etc.).
• Food with strong odour or apt to acquire
odour should be wrapped in airtight or smell-
proof packaging material.
• Keep fresh food separate from cooked
food, to avoid bacteria contamination.
• Never keep fresh meat in the fridge for
more than 2 or 3 days.
• Remove any left-over canned food from
the can and store it in a suitable
container.
• Refer to the shelf life indicated on the
food packaging.
• Do not obstruct the air circulation inside
the device by covering the shelves.
• Never keep any dangerous or poisonous
substances inside your device.
• Always check food that has been stored
for a long period of time for its suitability for
consumption.
• Do not store fresh and cooked food
together in the same container.
• Close the door immediately after
opening, to avoid unnecessary energy
consumption.
• Do not use hard or sharp objects to
remove the ice build-up.
• Do not load hot food into your device.
6

en en
Examples of Use
White wine, beer and mineral water
Bananas
Fish or offal
Cheese
Melons
Raw meat and poultry
chill before use
do not store in a fridge
store in polyethylene bags only
use airtight containers or polyethylene
bags; for best results, take out from the
fridge an hour before consumption.
store only for a short period of time,
use airtight packaging/wrapping
do not store together with delicate
food such as cooked food or milk
Normal operating noises
Various functional noises are completely
normal due to the operation of the cooling
system of your appliance;
• Gurgling, hissing, boiling or bubbling noises
are caused by the refrigerant, circulating inside
the cooling system. These noises can still be
heard for a short period of time after the
compressor shuts off.
• Sudden, sharp cracking or popping noises
are caused by the expansion and contraction
of the inside walls or some components inside
the cabinets.
• Buzzing, whirring, pulsating or high-pitched
humming noises are caused by the
compressor. These noises are slightly louder
at the start-up of the compressor and reduce
when the appliance reaches the operating
temperatures.
7
Also to avoid disturbing vibrations and
noises make sure that;
• Your refrigerator is standing level on all four
feet.
• Your refrigerator is not in contact with the
walls, surrounding objects or kitchen cabinets
and furniture.
• Cans, bottles or dishes inside the refrigerator
are not touching and rattling against each
other.
• All shelves and bins are mounted correctly
inside the refrigerator cabinets and doors.

en en
What, if....
1- The device will not work, even though
it is switched on.
• Check if the mains plug is properly connected!
• Check if the mains supply is in order, or if a
fuse has been tripped!
• Check the temperature control for correct
setting!
2- There is a power failure.
Your freezer is suitable for the long-term
storage of frozen food that are available
commercially and also can be used to freeze
and store fresh food.
Do not open the door in case of a power failure.
For a rated appliance, frozen food in
the freezer compartment will not be affected
if the power failure lasts shorter than the
“Conservation Time From Failure (hours)”
mentioned in the rating label.
If the power failure is longer than the
“Conservation Time From Failure (hours)”,
then the food should be checked and either
consumed immediately or cooked and then
re-frozen.
3- The interior light does not work.
Check the power supply!
Check the installation of the light bulb! Unplug
the power supply before checking the light
bulb. (Also see the section “Replacing the
interior light”)
4- Other possible malfunctions
Not every malfunction is a case for our
customer service. Very often, you can easily
resolve the problem without requesting service.
Before requesting service, please check if the
malfunction has been caused by an operating
error. If this is the case, and a service has
been requested, a service charge will be levied
even if the device is still under guarantee.
If the problem persists please contact your
dealer or customer service.
Please have the type and serial number of
your device when calling. The rating label is
located inside.
8
This product bears the selective
sorting symbol for waste
electrical and electronic
equipment (WEEE).
This means that this product
must be handled pursuant to
European Directive 2002/96/EC
in order to be recycled or
dismantled to minimize its
impact on the environment. For
further information, please contact your local
or regional authorities.
Electronic products not included in the
selective sorting process are potentially
dangerous for the environment and human
heatlh due to the presence of hazardous
substances.
Recycling
Reversing the doors
Proceed in numerical order (Fig. 7).

Meaning of energy fiche (
Only for information purpose)
en
Noise
(dB(A) re 1 pW)
A
B
C
D
E
F
G
More efficient
Less efficient
Energy consumption kWh/year
(Based on standard test results for 24 h)
Actual comsumption will
depend on how the appliance is
used and where it is located
Fresh food volume l
Frozen food volume l
Manufacturer
Model
Energy
9
You may stick the energy fiche given in the polybag to the area above.
Chill compartment volume l

de de
1
Herzlichen Glückwunsch zum Kauf unseres Produktes, das Ihnen ganz sicher viele Jahre lang
gute Dienste leisten wird.
Wichtige Hinweise zu Ihrer Sicherheit!
Bitte lesen Sie diese Bedienungsanleitung aufmerksam durch. Sie enthält wichtige Informationen
zum Betrieb Ihres neuen Gerätes. Wenn Sie sich nicht an die Anweisungen halten, verlieren Sie
dadurch eventuell das Recht auf kostenlose Leistungen während der Garantiezeit. Bitte bewahren
Sie dieses Handbuch an einem sicheren Ort auf und geben es an zukünftige Benutzer des Gerätes
weiter.
• Schließen Sie Ihr Gerät nicht an die Stromversorgung an, solange nicht alle Verpackungsstoffe
und Transportsicherungen entfernt wurden.
• Wenn der Transport in waagerechter Lage durchgeführt wurde, lassen Sie das Gerät mindestens
4 Stunden aufrecht stehen, ehe Sie es einschalten, damit sich das Kühlsystem setzen kann.
• Dieses Gerät darf nur für seinen bestimmungsgemäßen Einsatzzweck verwendet werden: also
zum Lagern und Einfrieren von Lebensmitteln.
• Wir raten davon ab, dieses Gerät in unbeheizten, kalten Räumen zu betreiben, wie in Garagen,
Lagerräumen, Anbauten, Schuppen, Außenbereichen, und so weiter. Siehe „Aufstellungsort“.
• Achten Sie bei der Lieferung darauf, dass das Produkt nicht beschädigt ist und dass sich
sämtliche Teile und Zubehörteile in einwandfreiem Zustand befinden.
• Arbeiten Sie niemals mit einem beschädigten Gerät; falls irgendwelche Zweifel bestehen sollten,
fragen Sie beim Händler nach.
• Lassen Sie nicht zu, dass Kinder mit dem Gerät spielen.
• Setzen oder stellen Sie sich nicht selbst oder Kinder auf das Gerät oder auf ausziehbare Teile.
• Hängen Sie sich nicht an die Tür des Gerätes.
• Ihr Gerät enthält keine fluorierten Kühlmittel (FKCW/HFC), sondern Isobutan
(R 600 a), ein in der Natur vorkommendes, sehr umweltfreundliches Gas.
(R 600 a) ist leicht entflammbar. Achten Sie daher darauf, dass der Kühlkreislauf weder beim
Transport noch im Betrieb beschädigt wird.
Im Falle einer Beschädigung:
• Vermeiden Sie sämtliche offenen Flammen, Funken und entflammbare Substanzen.
• Lüften Sie den Raum, in dem das Gerät aufgestellt ist, sofort gut durch.
• Austretendes Kühlmittel kann Ihre Augen bei Kontakt verletzen.
• Der Raum, in dem Sie das Gerät aufstellen, darf nicht kleiner als 10 m_ sein.
• Entsorgen Sie das Gerät nicht durch Verbrennen. Die Isolierung Ihres Gerätes enthält brennbare
Substanzen (FCKW-frei).
• Ihre örtlichen Behörden informieren Sie über die verfügbaren Entsorgungsweisen und -
einrichtungen.
WARNUNG- Belüftungsöffnungen an Geräteum- und -einbauten dürfen nicht abgedeckt werden.
WARNUNG- Verwenden Sie außer den vom Hersteller empfohlenen, keine mechanischen
oder anderen Hilfsmittel zum Beschleunigen des Abtauvorgangs.
WARNUNG- Beschädigen Sie den Kühlkreislauf nicht.
WARNUNG- Verwenden Sie im Lebensmittelaufbewahrungsbereich Ihres Gerätes keinerlei
Elektrogeräte, sofern diese nicht vom Hersteller empfohlen werden.
• Vermeiden Sie es, die Metall-Kondensatorröhren an der Rückseite des Gerätes zu berühren;
es besteht Verletzungsgefahr.
• Im Falle einer Fehlfunktion ziehen Sie immer zuerst den Netzstecker oder schalten die Sicherung
aus.
• Vor der Reinigung des Gerätes ziehen Sie grundsätzlich den Netzstecker oder schalten die
entsprechende Sicherung aus. Ziehen Sie nicht am Stromkabel. Ziehen Sie immer nur am
Stecker.
• Reparaturen an Elektrogeräten dürfen nur von qualifizierten Fachleuten ausgeführt werden.
Falls das Stromkabel beschädigt sein sollte, muss es vom Hersteller oder vom Kundendienst
ersetzt werden, damit es nicht zu Gefährdungen kommen kann.
• Kinder, Personen mit beschränkten physischen und seelischen Fähigkeiten sowie Personen
mit unzureichender Erfahrung beim Umgang dürfen das Gerät nicht ohne Aufsicht und Anweisung
einer verantwortlichen Person benutzen.
• Sowohl beim Gebrauch als auch bei Ablagerung sind Massnahmen zu treffen, welche die
Verwendung des Gerätes als Spielzeug seitens Kindern verhindern.

de de
Transporthinweise
Das Gerät sollte nur in aufrechter Position
transportiert werden.
Die mitgelieferte Verpackung muss während
des gesamten Transports unbeschädigt
bleiben.
Falls das Gerät in horizontaler Lage
transportiert wird, darf es erst in Betrieb
genommen werden, nachdem es nach dem
Transport mindestens 4 Stunden aufrecht
gestanden hat.
Das Gerät muss vor Regen, Feuchtigkeit und
anderen atmosphärischen Einflüssen
geschützt werden.
Der Hersteller haftet nicht, wenn
Sicherheitshinweise nicht beachtet werden.
Entsorgung
Machen Sie das Gerät zunächst unbrauchbar.
Ziehen Sie den Netzstecker und schneiden
Sie das Stromkabel ab. Entfernen oder
zerstören Sie Schnappverschlüsse oder
Riegel, eher Sie das Gerät entsorgen. Auf
diese Weise verhindern Sie, dass sich Kinder
selbst einsperren und ihr Leben gefährden
können.
Aufstellung des Gerätes
• Betreiben Sie das Gerät nicht in Räumen,
in denen die Temperatur unter 10 °C abfallen
kann; dies gilt insbesondere nachts und im
Winter. In Umgebungen mit geringerer
Temperatur arbeitet das Gerät möglicherweise
nicht; dadurch wird die Haltbarkeit
eingelagerter Lebensmittel reduziert.
• Die Klimaklasse Ihres Gerätes ist auf dem
Typenschild im Inneren des Gerätes
angegeben. Die Klimaklasse gibt die
zulässigen Umgebungstemperaturen an, wie
nachstehend aufgeführt.
Klimaklasse Umgebungstemperaturen
SN.......................+10 °C bis 32 °C
N .........................+16 °C bis 32 °C
ST .......................+18 °C bis 38 °C
T..........................+18 °C bis 43 °C
SN-ST.................+10 °C bis 38 °C
SN-T ...................+10 °C bis 43 °C
Aufstellungsort
Stellen Sie das Gerät nur in trockenen Räumen
auf, die belüftet werden können.
Vermeiden Sie direkte Sonneneinstrahlung und
nahe Wärmequellen wie Herde und Heizungen.
Falls dies nicht vermieden werden kann, sollten
die folgenden Mindestabstände eingehalten
werden:
Elektroherde: 3,00 cm
Heizungen: 3,00 cm
Kühlgeräte: 2,50 cm
• Sorgen Sie für eine ausreichende Belüftung
des Gerätes.
• Achten Sie darauf, dass um das Gerät herum
genügend Raum ist, um eine ungehinderte
Luftzirkulation zu gewährleisten.
Bringen Sie die beiden mitgelieferten
Distanzstücke aus Kunststoff per Vierteldrehung
am Kondensator an der Rückseite des Gerätes
an (Abb. 3).
• Das Gerät sollte auf einer ebenen Oberfläche
aufgestellt werden. Die beiden Füße an der
Frontseite können nach Bedarf eingestellt werden.
Um sicherzustellen, dass das Gerät gerade
steht, drehen Sie die beiden Füße an der
Frontseite so lange im oder gegen den
Uhrzeigersinn, bis ein stabiler Bodenkontakt
gegeben ist. Die richtige Einstellung der Füße
verhindert übermäßige Vibrationen und
Geräusche.
Elektrischer Anschluss
Warnung
Dieses Gerät muss geerdet werden.
• Vergewissern Sie sich, dass Stromart und
Stromspannung am Aufstellungsort des Gerätes
mit den Angaben auf dem Typenschild im
Innenraum des Gerätes übereinstimmen.
• Die elektrische Sicherheit des Gerätes ist nur
dann gewährleistet, wenn das hausinterne
Erdungssystem ordnungsgemäß installiert wurde.
• Achten Sie beim Aufstellen des Gerätes darauf,
dass das Stomkabel nicht darunter eingeklemmt
wird; dies kann zu Schäden am Kabel führen.
• Sorgen Sie dafür, dass der Stecker stets
zugänglich bleibt. Verwenden Sie keine
Mehrfachsteckdosen oder Verlängerungskabel
• Die elektrischen Daten Ihres Gerätes finden
Sie auf dem Typenschild im Geräteinneren.
• Verlegen Sie das Stromkabel so, dass Sie es
nach der Installation des Gerätes problemlos
anschließen und trennen können.
• Falls das Stromkabel nicht zugänglich ist, sollten
Sie einen passenden Schalter (z. B. eine
abschaltbare Steckdose) zwischenschalten. (Bei
Einbaugeräten.)
2

de de
3
Lernen Sie Ihr neues Gerät
kennen
Warnung
Die nachstehenden Angaben über Zubehörteile
werden nur zur Kenntnisnahme erwähnt. Die
aufgeführten Zubehörteile müssen nicht exakt
mit den Zubehörteilen Ihres Gerätes
übereinstimmen.
Abb. 1
So verwenden Sie das
Zubehör
Flaschen- und Dosen-Ablage (Abb. 7)
Dieses Zubehörteil kann entweder eine Flasche
oder 3 Dosen nebeneinander aufnehmen.
Innenbeleuchtung
Thermostatknopf
Bewegliche Ablagen
Tauwasser-Sammelkanal - Abflusskanal
Gemüsefachabdeckung
Gemüselade
Einstellbare Füße an der Frontseite
Bereich für Milchprodukte
Einstellbare Türablagen
Eierhalter
Flaschenablage
Flaschen- und Dosen-Ablage
1.
2.
3.
4.
5.
6.
7.
8.
9.
10.
11.
12.

de de
1 = Schwächste Kühlung (wärmste Einstellung)
5 = Stärkste Kühlung (kälteste Einstellung)
(Oder)
Min. = Schwächste Kühlung
(wärmste Einstellung)
Max. = Stärkste Kühlung
(kälteste Einstellung)
Die Durchschnittstemperatur im Inneren des
Kühlschranks sollte bei etwa +5 °C liegen.
Bitte wählen Sie die der gewünschten
Temperatur entsprechende Einstellung.
Sie können den Betrieb des Gerätes
unterbrechen, indem Sie in den
Thermostatknopf auf die Position „0“ einstellen.
Bitte beachten Sie, dass im Kühlbereich
unterschiedliche Temperaturen herrschen.
Der kälteste Bereich befindet sich unmittelbar
über dem Gemüsefach.
Die Innentemperatur hängt auch von der
Umgebungstemperatur ab, außerdem davon,
wie oft die Tür geöffnet wird und wie viel
Lebensmittel im Inneren gelagert werden.
Beim häufigen Öffnen der Tür steigt die
Innentemperatur an.
Aus diesem Grund empfehlen wir, die Tür
möglichst schnell wieder zu schließen.
Einstellen der
Betriebstemperatur
(Abb. 2)
Die Betriebstemperatur wird über die
Temperatursteuerung reguliert.
4
Warm Kalt
1 2 3 4 5
(Oder) Min. Max.
Vor der ersten
Inbetriebnahme
Bevor Sie Ihr Gerät in Betrieb nehmen, sollten
Sie aus Sicherheitsgründen die folgenden
Punkte noch einmal kontrollieren:
• Steht das Gerät sicher und gerade auf dem
Boden?
• Ist ausreichend Platz für gute Luftzirkulation
vorhanden?
• Ist der Innenraum sauber? (Schauen Sie
dazu auch in den Abschnitt „Reinigung und
Pflege“.)
• Stellen Sie den Thermostatknopf auf die
Mitte zwischen den Markierungen 1 und 5
oder Min. und Max. ein.
• Schließen Sie das Gerät nun an die
Stromversorgung an.
Der Kompressor schaltet sich ein, beim Öffnen
der Tür leuchtet die Innenbeleuchtung auf.
Geben Sie noch keine Lebensmittel in das
Kühlgerät, solange die gewünschte
Temperatur noch nicht erreicht ist.

de de
Kühlen
Lagern von Lebensmitteln
Der Kühlbereich ist für die kurzfristige
Lagerung von frischen Lebensmitteln und
Getränken vorgesehen.
Lagern Sie Milchprodukte im dafür
vorgesehenen Bereich des Kühlschranks.
Flaschen können Sie im Flaschenhalter oder
in der Flaschenablage der Tür aufbewahren.
Rohes Fleisch geben Sie am besten in einen
Polyethylen-Beutel (PE) und lagern es im
untersten Bereich des Kühlschranks.
Lassen Sie heiße Speisen und Getränke
immer erst auf Raumtemperatur abkühlen,
bevor Sie diese in den Kühlschrank stellen.
Achtung
Lagern Sie hochprozentigen Alkohol nur
aufrecht stehend und fest verschlossen.
Attention
Lagern Sie keine explosiven Substanzen oder
Behälter mit brennbaren Treibgasen
(Sprühsahne, Sprühdosen, usw.) im Kühlgerät.
Es besteht Explosionsgefahr.
Abtauen des Gerätes
Der Kühlbereich taut automatisch ab. Das
Tauwasser fließt durch den Abflusskanal in einen
Sammelbehälter an der Rückseite des Gerätes
(Abb. 4).
Beim Abtauen bilden sich durch Verdunstung
Wassertröpfchen an der Rückwand des
Kühlschranks.
Falls nicht alle Tropfen nach unten ablaufen,
können sie nach dem Abtauen wieder gefrieren.
Entfernen Sie diese Rückstände mit einem mit
warmem Wasser getränkten Tuch, niemals mit
harten oder gar scharfen Gegenständen.
Kontrollieren Sie den Tauwasserfluss von Zeit
zu Zeit. Dieser kann gelegentlich zum Stocken
kommen. Reinigen Sie die Ablaufkanäle mit
einem Wattestäbchen oder etwas ähnlichem
(Lesen Sie dazu den Abschnitt „Reinigung und
Pflege“).
5
Austausch der
Innenbeleuchtungsglühbirne
(Abb. 5)
Wenn die Beleuchtung ausfällt, schalten Sie das
Gerät an der Steckdose ab und ziehen Sie den
Netzstecker. Folgen Sie den nachstehenden
Anweisungen und überprüfen Sie, ob die
Glühbirne vielleicht nur locker sitzt.
Funktioniert das Licht noch immer nicht, besorgen
Sie sich eine Ersatzglühbirne vom Typ E14 mit
Schraubfassung, Leistung 15 W, bei einem
Elektrofachgeschäft in Ihrer Nähe und setzen
Sie diese wie folgt ein:
1. Schalten Sie das Gerät an der Steckdose ab
und ziehen Sie den Netzstecker. Eventuell ist es
hilfreich, zuerst die Regale zu entfernen, um
leichteren Zugang zu haben.
2. Nehmen Sie den Diffusordeckel ab, wie in Fig.
(a-b) gezeigt.
3. Tauschen Sie die defekte Glühbirne aus.
4. Setzen Sie den Diffusordeckel wieder auf, wie
in Fig. (c) gezeigt.
"Drücken Sie ihn fest an, damit er sicher sitzt."
5. Entsorgen Sie die durchgebrannte Glühbirne
sofort.
"Eine Ersatzglühbirne erhalten Sie problemlos
in jedem Elektro- oder Heimwerkermarkt."

de de
Reinigung und Pflege
Innen- und Außenflächen
Achtung
Vor dem Reinigen des Gerätes ziehen Sie
immer den Netzstecker oder schalten die
Sicherung aus.
Reinigen Sie die Außenseite mit lauwarmen
Wasser und einem milden Reinigungsmittel.
Verwenden Sie niemals scharfe Reinigungsmittel,
Scheuermittel oder saure Reiniger.
Wischen Sie den Innenraum trocken.
Achten Sie darauf, dass kein Wasser an die
elektrischen Anschlüsse der
Temperatursteuerung oder der Innenbeleuchtung
gerät.
Falls Sie das Gerät längere Zeit nicht benutzen
sollten, schalten Sie es aus und nehmen sämtliche
Lebensmittel heraus. Reinigen Sie das Gerät und
lassen Sie die Tür offen stehen.
Um das Äußere des Gerätes ansprechend zu
erhalten, können Sie die Außenflächen und das
Tür-Zubehör mit Silikonwachs polieren.
Reinigen Sie den Kondensator an der Rückseite
des Gerätes einmal jährlich mit einer Bürste oder
einem Staubsauger. Staubansammlungen führen
zu höherem Energieverbrauch.
Überprüfen Sie die Türdichtungen in
regelmäßigen Abständen.
Reinigen Sie diese lediglich mit etwas Wasser
und wischen Sie sie danach gründlich trocknen.
Reinigung von Zubehörteilen
Türablagen:
Nehmen Sie sämtliche Nahrungsmittel aus den
Türablagen heraus.
Heben Sie die Abdeckung der Ablage an und
ziehen Sie diese zur Seite weg.
Nehmen Sie den Boden der Ablage heraus,
indem Sie diesen nach oben drücken.
Sammelbehälter (Pfanne):
Achten Sie darauf, dass die Pfanne an der
Rückwand des Gerätes immer sauber ist.
Lösen Sie den Schnappverschluss der Pfanne
vorsichtig vom Kompressor, indem Sie mit einem
Werkzeug (wie einem Schraubenzieher) sanft
dagegen drücken; auf diese Weise können Sie
die Pfanne herausnehmen.
Heben Sie die Pfanne an, reinigen Sie diese und
wischen Sie sie trocken.
Setzen Sie die Teile in umgekehrter Reihenfolge
wieder zusammen.
Gemüsefach oder Schubladen:
Zum Reinigen einer Schublade ziehen Sie diese
so weit wie möglich heraus, kippen sie nach oben
und ziehen sie dann komplett heraus.
Praktische Tipps und
Hinweise
Kühlen
• Säubern Sie frische Lebensmittel und Gemüse,
bevor Sie sie in das Gemüsefach legen.
• Bevor Sie Nahrungsmittel in den Kühlschrank
legen, wickeln Sie sie ein oder geben sie in einen
geeigneten Behälter.
• Geben Sie Nahrungsmittel, die sich nicht zur
Lagerung bei niedrigen Temperaturen eignen
(zum Beispiel Ananas, Melonen, Gurken,
Tomaten, usw.), zuvor in Polyethylenbeutel (PE).
• Stark riechende Lebensmittel oder Lebensmittel,
die leicht den Geruch anderer Lebensmittel
annehmen, sollten luft- und geruchsdicht verpackt
werden.
• Bewahren Sie frische Lebensmittel getrennt
von bereits zubereiteten Lebensmitteln auf, damit
sich keine Bakterien ausbreiten können.
• Bewahren Sie frisches Fleisch nicht länger als
zwei bis drei Tage im Kühlschrank auf.
• Holen Sie Reste von Lebensmitteln aus
Konserven aus der Dose heraus und geben Sie
diese in einen geeigneten Behälter.
• Beachten Sie das Mindesthaltbarkeitsdatum
auf der Verpackung des Lebensmittels.
• Achten Sie darauf, die Luftzirkulation im
Innenraum des Gerätes nicht zu behindern.
• Bewahren Sie niemals gefährliche oder gar
giftige Substanzen in Ihrem Kühlgerät auf.
• Überprüfen Sie Lebensmittel, die über eine
längere Zeit gelagert wurden, ob sie sich noch
zum Verzehr eignen.
• Bewahren Sie frische und bereits zubereitete
Lebensmittel nicht im selben Behälter auf.
• Um unnötigen Energieverbrauch zu vermeiden,
halten Sie die Tür nur so lange wie nötig geöffnet.
• Entfernen Sie Eisansammlungen niemals mit
harten oder scharfen Gegenständen.
• Geben Sie keine heißen Speisen in das
Kühlgerät.
6
Table of contents
Languages:
Other Beko Refrigerator manuals

Beko
Beko GNE V 222S User manual

Beko
Beko GN163241XBRN User manual

Beko
Beko BLSD3577 User manual

Beko
Beko RDNE390M21SX User manual

Beko
Beko RCNA406E40ZXB Instruction Manual

Beko
Beko CNG1672EB User manual

Beko
Beko RSSE265K20W User manual

Beko
Beko RSSE415M24W User manual

Beko
Beko CNP1601ES User manual

Beko
Beko RCSA420W Instruction Manual

Beko
Beko GNEV122X User manual

Beko
Beko GNE60120X User manual

Beko
Beko RCNE400E20XB User manual

Beko
Beko CNA29120S User manual

Beko
Beko RBI 2300 HCA - ANNEXE 713 User manual

Beko
Beko BFFD3620SS User manual

Beko
Beko ASGL142PX User manual

Beko
Beko 683721EB User manual

Beko
Beko RCNE560K40WN User manual

Beko
Beko CF 5015 APS User manual