Belanger 3068T User manual
LIGNE D’AIDE: 1 800 361-5960
DU LUNDI AU VENDREDI DE 8h à 16h30 H.N.E.
HELP LINE : 1 800 361-5960
MONDAY TO FRIDAY 8 AM to 4:30 PM E.S.T.
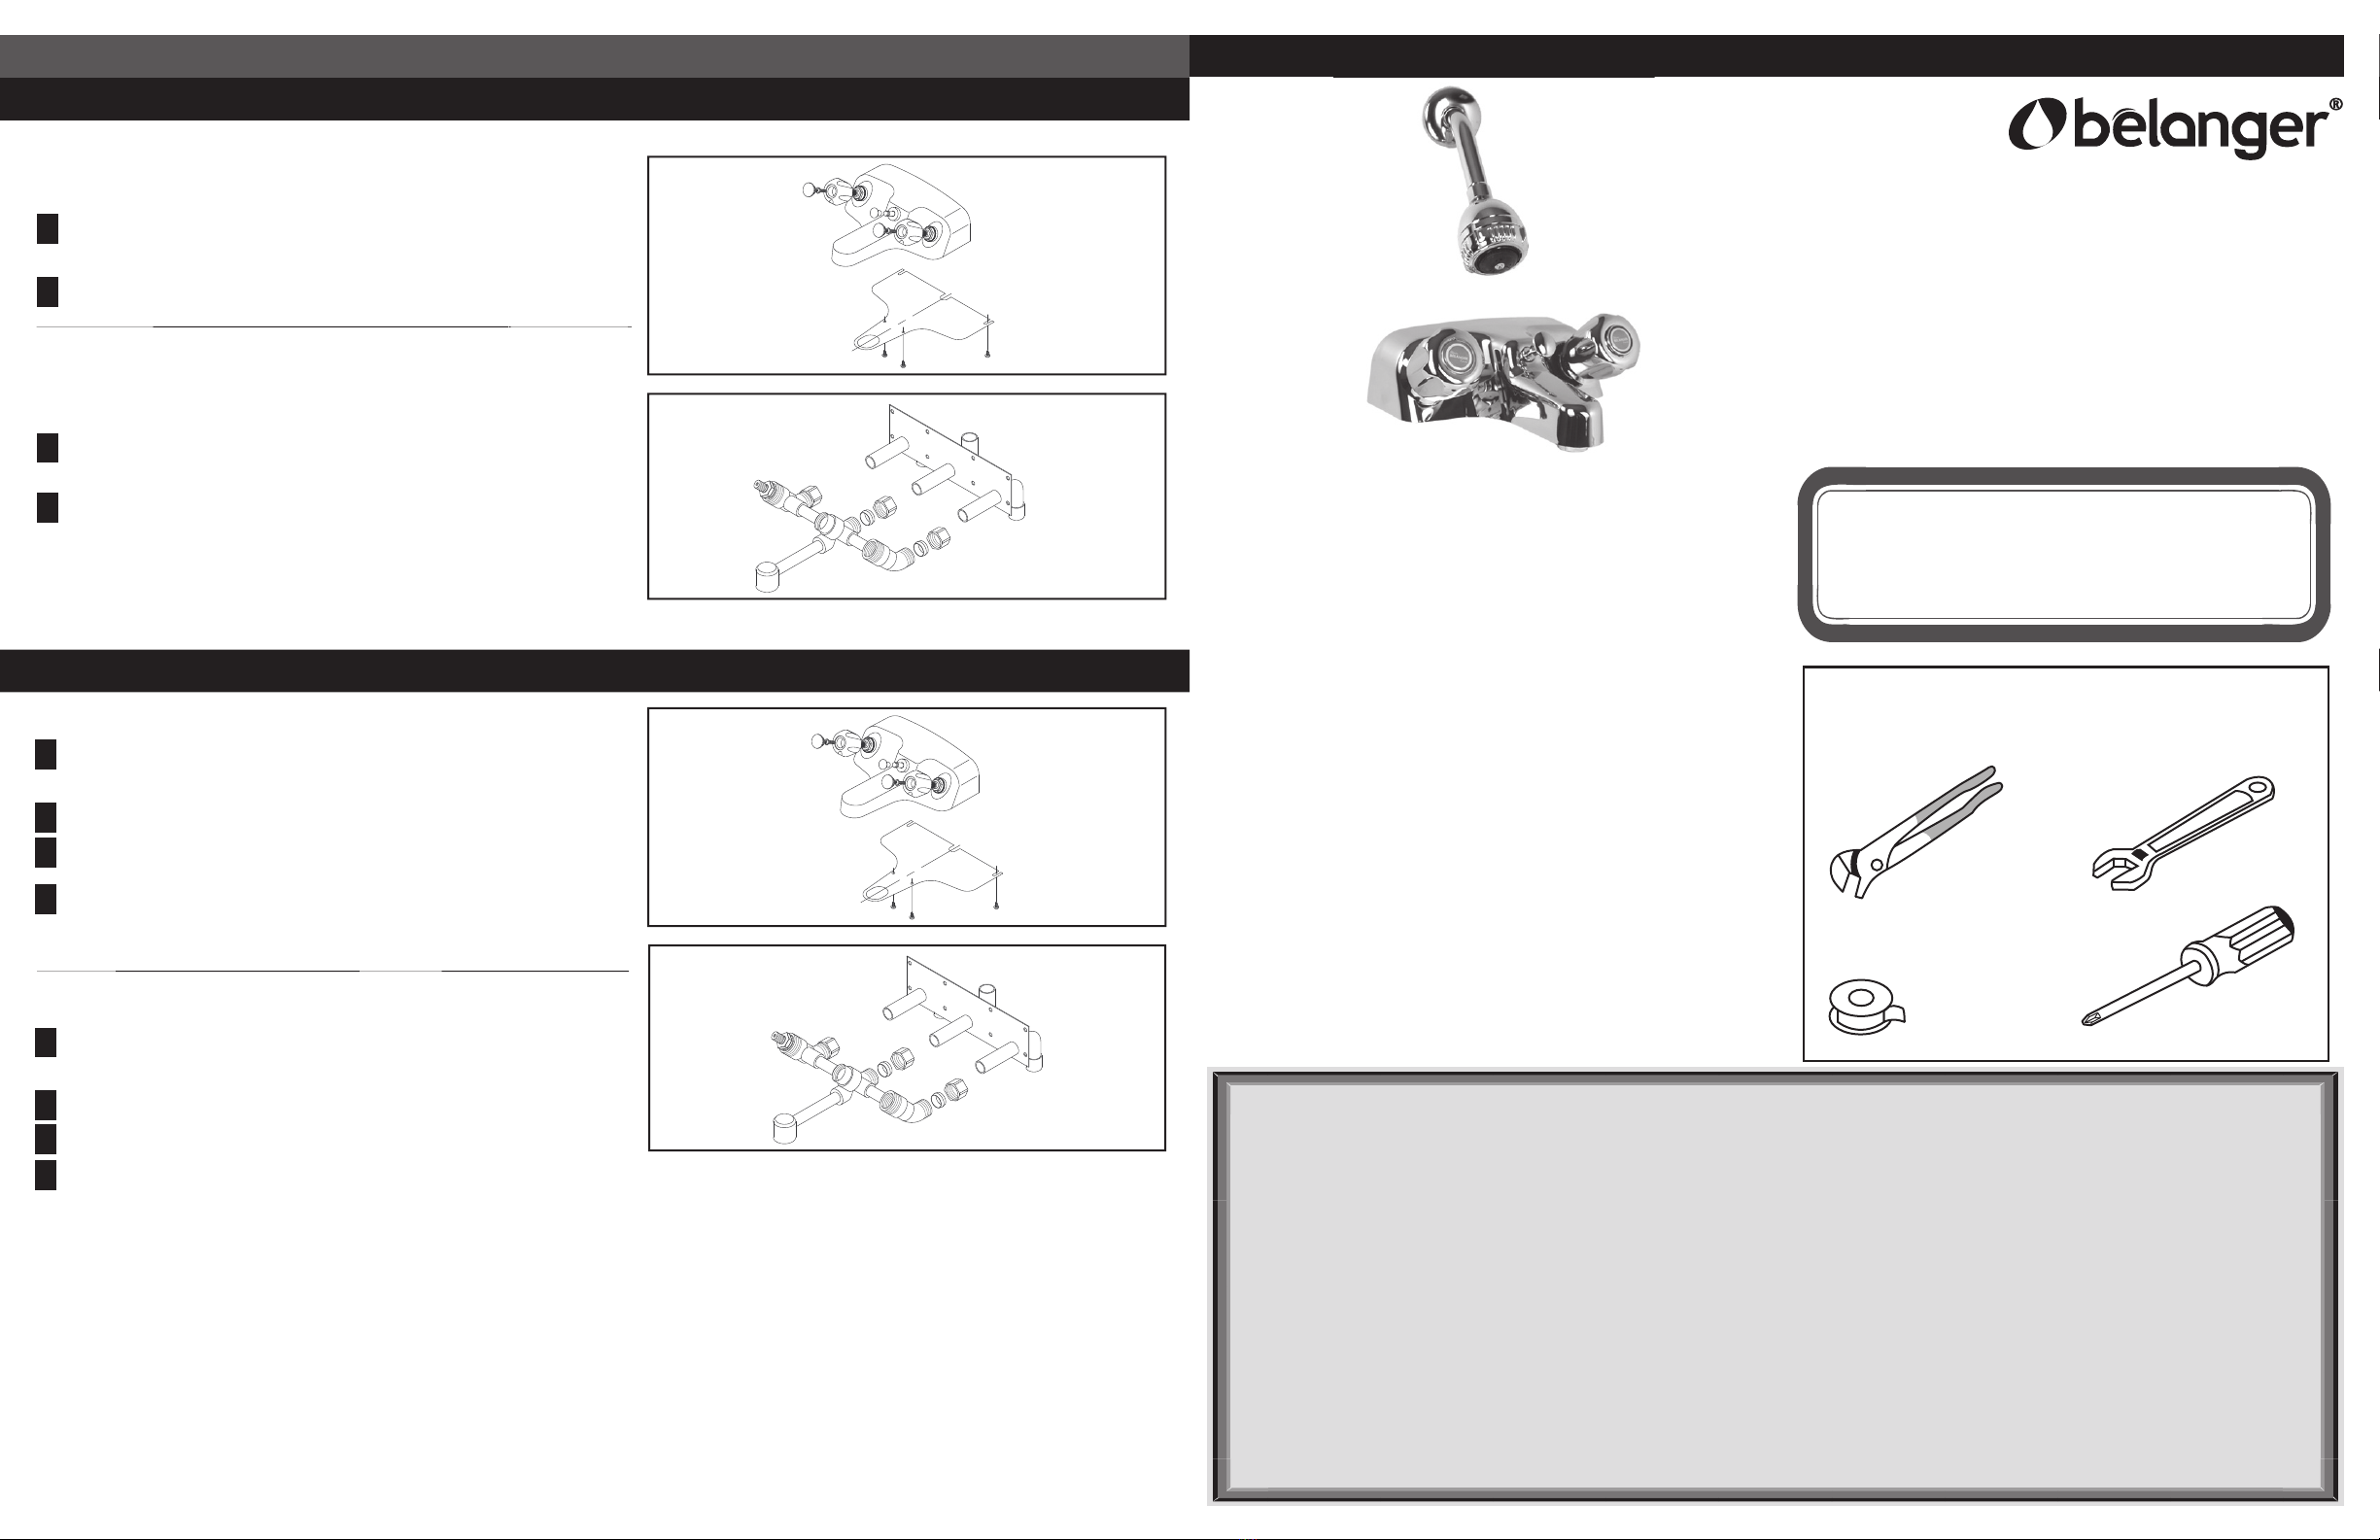
OUTILS RECOMMANDÉS
RECOMMENDED TOOLS
3068T
1
2
1
2
Ruban d’étanchéité
pour joints letés
Thread seal tape
Illustration A
Illustration B
1
2
3
4
1
2
3
4
Illustration C
Illustration D
GARANTIE À VIE LIMITÉE
Bélanger garantit que ce robinet ne fuira pas lors de son utilisation normale, et que ses pièces et
nis ne présentent aucun défaut de matériel ou de main-d’œuvre en usine. La période de garantie
sera: tant que l’acheteur d’origine demeurera propriétaire du robinet, et ce, seulement si ce robinet
est utilisé à des ns résidentielles, et de cinq (5) ans à compter de la date d’achat originale, si ce
robinet est utilisé à des ns industrielles, commerciales ou d’affaires.
Les dommages causés par une eau ou un air corrosif, un mauvais entretien du robinet (incluant
notamment l’utilisation de produits de nettoyage contenant des agents abrasifs, cires, alcool,
ammoniaque, eau de Javel, acides, des solvants ou autres produits chimiques corrosifs), rendra
cette garantie nulle et non-avenue.
Pour plus d’informations concernant la garantie veuillez visitez notre site web au
www.belanger-upt.com. Les recours en garantie peuvent être soumis en contactant Bélanger
sans frais au 1-800-361-5960, par courriel à [email protected]. Pour être valide,
la réclamation devra être accompagnée de l’original de la facture du premier acheteur du robinet.
CETTE GARANTIE NE COUVRE PAS:
1.Les frais de main-d’oeuvre pour l’enlèvement ou l’installation de toutes pièces défectueuses;
2.Les dommages aux pièces ou au robinet causés par l’abus ou la négligence et;
3.Les dommages accidentels ou consécutifs à un vice de fabrication de votre robinet Bélanger.
Dans certains secteurs, l’exclusion ou les limites de dommages accidentels ou consécutifs sont
interdites; par conséquent, la restriction pourrait ne pas s’appliquer dans votre cas.
6520 rue Abrams, Saint-Laurent (QC) Canada, H4S 1Y2
Téléphone sans frais 1 800 361-5960
Télécopieur sans frais 1 888 533-8313
LIMITED LIFETIME WARRANTY
Bélanger warrants that this faucet will not leak or drip during normal use, and that all parts and
nishes will be free from defects in material and workmanship. The duration of the Warranty shall
be: for as long as the original consumer purchaser owns the faucet, where this faucet is used for
residential purposes only, and for a period of ve (5) years from the original date of purchase,
where this faucet is purchased for non-residential purposes such as, industrial, commercial or
business usage.
Damages caused by aggressive air or water conditions; or improper care or maintenance (including,
the use of abrasive cleansers, waxes, alcohol, ammonia, bleach, acids, solvents or other harsh
chemicals), will render this warranty null and void.
For more information about our warranty visit our web site at www.belanger-upt.com. Warranty
claims may be submitted by contacting Bélanger toll-free at 1-800-361-5960, by e-mail at
clientinfo@belanger-upt.com. Warranty claims must be accompanied by an original sales
receipt or contract to be valid.
THIS WARRANTY DOES NOT COVER:
1.Labor charges or related cost for removing or installing any defective part;
2.Damage done to the parts or faucet which results from abuse or negligence and;
3.Incidental or consequential damages resulting from any defect in your Bélanger faucet.
In some areas, the exclusion or limitation of incidental or consequential damages is not allowed,
therefore the above limitations may not apply to you.
6520 Abrams street, Saint-Laurent (QC) Canada, H4S 1Y2
Toll free phone #: 1 800 361-5960
Toll free fax #: 1 888 533-8313
Merci d’avoir choisi un produit de marque Bélanger !
Nous tenons à vous assurer que vous avez fait un choix avisé en achetant un
robinet Bélanger. Les produits de première qualité Bélanger ont acquis une
réputation solide et sont conçus pour vous donner de nombreuses années de
service able et sans problèmes.
Nous vous recommandons de bien lire les instructions ainsi que les avertissements
et garantie avant de commencer l’installation de votre robinet. Si vous avez besoin
d’assistance quant à l’installation de votre robinet, de nos garanties ou pièces de
remplacement, veuillez contacter notre service à la clientèle en composant notre
numéro sans frais 1 800 361-5960
Thank you for choosing a Bélanger product !
We want you to know that you have made a wise choice by choosing a Bélanger
faucet. Our top quality products have earned a strong reputation and are designed
to give you many years of reliable and trouble-free use.
We strongly recommend that you read carefully the enclosed instruction sheet,
warnings and warranty before you begin the installation of your faucet. If you need
assistance for the installation, or require information about our warranty or replace-
ment parts, please contact our toll-free customer service help line at 1 800 361-5960.
IB3068T_v131220
Instructions d’installation
ROBINET DE BAIGNOIRE ET DOUCHE À INSTALLATION DE SURFACE /
SÉRIE 3068
Faucet installation instructions
FACEMOUNT BATHTUB AND SHOWER FAUCET /
3068 SERIES
Étape 2 Step 2
Étape 1 Step 1
Avant de commencer
Fermez la valve d’alimentation d’eau. Enlevez le vieux robinet et nettoyez la surface sur laquelle le
robinet sera installé.
Retrait de l’ancien corps du robinet
Retirez la plaque du dessous de l’ancien robinet en enlevant les 2 vis avant et en desserrant les
2 vis arrières. Retirer ensuite le couvercle de nition en suivant les étapes suivantes: Enlever les
index / Dévissez la vis de poignée et enlever les 2 poignées / Dévisser l’anneau de retenue des
2 poignées / Dévisser l’embout de l’inverseur / Retirer le couvercle (illus. A).
Dévissez les 3 noix à compression qui relient le corps du robinet aux tuyaux d’alimentation et à
la colonne de douche (illus. B).
Before you begin
Shut off the water supply valves of the existing faucet. Remove the old faucet and properly clean
surface on which faucet is to be installed.
Removal of the old faucet body
Remove the plate from under the body of the old faucet body by taking off the 2 front screws
and loosening the back screws. Then remove the cover by following these steps: Take off the
index / Remove the 2 handles by unscrewing the handle screw / Unscrew the retaining ring /
Unscrew the diverter cap / Take off the cover (illus. A).
Unscrew the 3 compression nuts connecting the faucet body to the water ways and the shower
outlet (illus. B).
Installation du corps du robinet
Retirez la plaque du dessous du robinet en enlevant les 2 vis avant et en desserrant les 2 vis
arrière. Retirez ensuite le couvercle de nition en suivant les étapes suivantes:
Enlever les index / Dévissez la vis de poignée et enlever les 2 poignées / Dévisser l’anneau de
retenue des 2 poignées / Dévisser l’embout de l’inverseur / Retirer le couvercle (illus. C).
Vissez les 3 noix aux 3 tuyaux, assurez-vous que les petites bagues à compression soient bien
en place, à l’intérieur des noix, puis serrez ces dernières à l’aide de l’outil approprié (illus. D).
Ouvrez l’alimentation d’eau a n de véri ez l’étanchéité des raccords. En cas de fuite, coupez
l’alimentation puis serrez les raccords d’un quart de tour avec l’outil approprié. Répétez au
besoin
Remettre en place le couvercle de nition en revissant les anneaux de retenue, les 2 poignées
et l’embout de l’inverseur. Remettez en place les index. Ensuite, réinstaller la plaque du dessous
en resserrant les 2 vis arrière et en replacant les 2 vis avant.
Votre robinet Bélanger est maintenant remplacé et prêt à utiliser !
Faucet body installation
Remove the plate from under the body by taking off the 2 front screws and loosening the back
screws. Then remove the nishing cover by following these steps:
Take off the index / Remove the 2 handles by unscrewing the handle screw / Unscrew the
retaining ring / Unscrew the diverter cap / Take off the cover (illus. C).
Screw the 3 nuts making sure that the compression rings inside are in place on the 3 copper
hoses and tighten with the appropriate tool (illus. D).
Open the water supply to verify that there are no leaks. In case of a leak, shut off the water sup-
ply and tighten connectors 1/4 turn by using the appropriate tool. Repeat if necessary.
Reinstall the cover by screwing the retaining rings, the 2 handles and the diverter cap. Put the
index in place. Then, reinstall the plate under the faucet by tightening the back screws and
screwing in the front ones.
Your Bélanger faucet is now changed and ready to use!
INSTALLATION DE REMPLACEMENT REPLACEMENT INSTALLATION

IMPORTANT
Veuillez vous informer des différentes règles du Code Canadien de plomberie et des exigences de votre localité avant l’installation.
Le Code Canadien de plomberie exige l’installation de têtes d’air afin d’amortir les coups dans la plomberie.
Take note of the different standards and rules your local and municipal plumbing codes have in effect before installing.
The Canadian Plumbing Code requires the installation of air chambers or surge arresting devices to eliminate water hammer.
MUR FINI
FINISHED WALL
PLANCHER
FLOOR
6 7/8”
(175 mm)
1 1/2”
(38 mm)
MAX
45”
(1143 mm)
MIN
48”
(1219 mm)
MAX
6’ 6”
(1981 mm)
NOMINAL
1/2” C
CONNECTIONS
3X
1
2
3
1
2
4
1
2
3
1
2
1
2
5
1
2
3
4
5
4
1
2
3
4
Illustration B
Illustration C Illustration D
Illustration E
Illustration F
1
2
Illustration G
1
2
4
56
9
7
12
11
15
8
10
13
14
Illustration A
traverse / cross piece
3
AVERTISSEMENTS WARNING
Étape 1 Step 1
Avant de commencer
Fermez la valve d’alimentation d’eau.
Installation de la partie brute (installation primaire) du robinet
Positionnez les conduits de laiton de la partie brute du robinet vis-à-vis les tuyaux d’alimentation
d’eau chaude et d’eau froide (voir l’illustration A pour les hauteurs standards), mettez à niveau
puis tracez le contour de la plaque de retenue sur le panneau de gypse. Mettez de côté la partie
brute et percez le panneau de gypse en suivant ce tracé (illus. B).
Remettre en place la partie brute vis-à-vis les tuyaux d’alimentation d’eau chaude et d’eau
froide et xer solidement la plaque de laiton à une traverse an de bien solidier l’installation à
la charpente (illus. C).
Mettez à niveau et soudez les conduits de laiton de la partie brute du robinet aux tuyaux
d’alimentation d’eau chaude, d’eau froide et de la colonne de douche.
Ouvrez l’eau an de vous assurez de l’étanchéité des soudures des conduits d’eau chaude et
d’eau froide. Refermer l’eau.
Coupez les 3 tuyaux de cuivre à l’aide d’un coupe-tuyau et jeter cette partie (illus. D). Assurez-
vous d’avoir 1 pouce de tuyau qui ressort du mur ni.
Étape 3 Step 3
Purge du système d’alimentation et vérication de l’étanchéité des raccordements
An de purger le système d’alimentation, ouvrir les valves d’eau chaude et d’eau froide à pleine ouverture puis ouvrir l’alimentation d’eau. La pression fera sortir tout élément indésirable
des conduits.
Vériez l’étanchéité des raccords. En cas de fuite, coupez l’alimentation puis serrez les raccords d’un quart de tour avec l’outil approprié. Répétez au besoin.
Votre robinet Bélanger est maintenant installé et prêt à utiliser !
Draining out the water ways and testing the connections for leaks
To drain the water ways, open the hot and cold water valves completely and turn on the water supply. The water pressure will push out the debris lodged in the water ways.
Verify that there are no leaks. In case of a leak, shut off the water supply and tighten connectors 1/4 turn by using the appropriate tool. Repeat if necessary.
Your Bélanger faucet is now installed and ready to use!
LISTE DES PIÈCES
1- Bride de bras de
douche
2- Bras de douche
3- Pomme de douche
4- Index
5- Vis de la poignée
6- Poignée
7- Embout de l’inverseur
8- Inverseur
9- Couvert de nition
10- Cartouche
11- Installation primaire
12- Voies d’alimentation
13- Bague à compression
14- Noix
15- Sous-plaque
PARTS LIST
1- Shower arm ange
2- Shower arm
3- Shower head
4- Index
5- Handle screw
6- Handle
7- Diverter end piece
8- Diverter
9- Finishing cover
10- Cartridge
11- Rough-in
12- Waterways
13- Compression ring
14- Nut
15- Under plate
Étape 2 Step 2
Installation du corps du robinet et de la pomme de douche
Retirez la plaque du dessous du robinet en enlevant les 2 vis avant et en desserrant les 2 vis
arrière. Retirez ensuite le couvercle de nition en suivant les étapes suivantes:
Enlever les index / Dévissez la vis de poignée et enlever les 2 poignées / Dévisser l’anneau de
retenue des 2 poignées / Dévisser l’embout de l’inverseur / Retirer le couvercle (illus. E).
Vissez les 3 noix aux 3 tuyaux, assurez-vous que les petites bagues à compression soient bien
en place, à l’intérieur des noix, puis serrez ces dernières à l’aide de l’outil approprié (illus. F).
Remettre en place le couvercle de nition en revissant les anneaux de retenue, les 2 poignées
et le embout de l’inverseur. Remettez en place les index. Ensuite, réinstaller la plaque du des-
sous en resserrant les 2 vis arrière et en replacant les 2 vis avant.
Assemblez le bras de douche, la bride et la tête de douche au raccord approprié (illus. G) en
utilisant du ruban d’étanchéité pour joints letés.
Vous devez vérier les normes du code de la plomberie en vigueur dans votre province avant
d’installer ce produit dans une construction neuve. Avant de débuter l’installation, assurez-
vous que l’épaisseur de votre mur ni (incluant la traverse) n’excède pas 1 ½ po.
Utilisez du ruban d’étanchéité pour les raccords letés
Note that you must verify the plumbing standards for new construction in your province before
installing this product. Before beginning the installation, you must make sure that the thick-
ness of the nished wall (including the cross-piece) does not exceed 1 ½”.
Use thread seal tape on threaded ttings
Before you begin
Shut off the water supply valves of the existing faucet.
Installation of the faucet rough-in
Align and level the rough-in with the copper pipes (see diagram A for height standards) and
trace the cut-out on the back side of the gypsum board by using the spacing plate as a guide.
Remove the rough-in and cut out the tracing from the gypsum board (illus. B).
Reinstall the rough-in on top of the hot & cold copper hoses and anchor the brass plate to a
cross-piece to solidify the installation to the frame (illus. C).
Level and weld the rough-in to the hot, cold and shower outlet copper hoses.
Verify that there are no leaks by slowly opening the hot & cold water. Shut off the water
once again.
Cut the 3 copper hoses and discard the cut pieces (illus. D). Make sure that you leave
1 inch of the copper hose protuding out of the nished wall.
Faucet body and shower head installation
Remove the plate from under the body by taking off the 2 front screws and loosening the back
screws. Then remove the nishing cover by following these steps:
Take off the index / Remove the 2 handles by unscrewing the handle screw / Unscrew the
retaining ring / Unscrew the diverter cap / Take off the cover (illus. E).
Screw the 3 nuts making sure that the compression rings inside are in place on the 3 copper
hoses and tighten with the appropriate tool (illus F).
Reinstall the cover by screwing the retaining rings, the 2 handles and the diverter cap. Put the
index in place. Then, reinstall the plate under the faucet by tightening the back screws and
screwing in the front ones.
Install the shower arm, ange and showerhead onto the appropriate tting (illus. G) using
thread seal tape.
INSTALLATION COMPLÈTE COMPLETE INSTALLATION
This manual suits for next models
1
Other Belanger Plumbing Product manuals

Belanger
Belanger H2flo B90-230 User manual

Belanger
Belanger essential Style NEX76CCP User manual

Belanger
Belanger QUA98CCP User manual

Belanger
Belanger 43CT User manual

Belanger
Belanger 4110CP2 User manual

Belanger
Belanger 4023 Series User manual

Belanger
Belanger H2Flo B92-002 User manual

Belanger
Belanger essential DEL43CCP User manual

Belanger
Belanger 3068 Series User manual

Belanger
Belanger 44DT User manual


