BELGACOM Belgafax 802 User manual

Belgafax 802
User Manual

2Belgacom Belgafax 802
EN
Dear Customer,
With the purchase of this device, you have chosen a quality
Belgacom product brand. Their device fulfils the most var-
ied requirements for private use or in your office and busi-
ness everyday.
Starter Cartridge
For printing purposes, your device utilises the most up-to-
date laser technology. A starter cartridge is provided with
the device. For this starter cartridge, you do not require
any Plug’n’Print card.
Telephone Book
You can store up to 200 entries in the telephone book of
your device. Your device can store 10 different groups with
up to 199 entries.
Broadcast Transmissions
With the broadcasting key (= Broadcasting) you can add
further numbers during the dialing process and send a
message quickly and simply to several recipients.
You can send fax messages in different resolutions to one
or more recipients or a group. You can also poll faxes and
prepare documents for polling.
Sending Fax Later
If you would like to make use of the lower telephone tariffs
or if the recipient can be reached at some specific time on-
ly, you can send the fax at a later time (= timer function).
Fax Templates
Five fax templates, which you can use, are stored in your
device. With these templates you can quickly create, for ex-
ample, a short fax note or an invitation.
Time Stamp
The device prints the date and the exact arrival time on
every incoming fax received. This allows you to document
the exact time at which you have received a fax transmis-
sion. A memory buffer in the device ensures that the cor-
rect date and time of reception will be maintained even af-
ter a power loss.
Select the resolution for text and photo in order to copy
documents with your machine. You can also create multi-
ple copies.
You can send SMS messages with your device.
If you want, your device can print Sudoku puzzles in four
different difficulty levels with solution.
PC Connection
You can connect the device to your computer (PC with
Microsoft Windows 2000 (SP¦3) · ME · XP · Vista), and
can use it as a laser printer. With Scan-to-PDF scan the
documents with your device and save them directly as PDF
files. With the TWAIN scanner driver you can access the
device and scan documents from any application which
supports this standard.
Telephone Book
Edit the telephone book entries of the device from the
computer. You can exchange existing entries between the
device and Microsoft Outlook or the address books of
Windows.
We hope you enjoy your machine and its many functions!
About this User Manual
With the installation guide on the following pages, you can
start using your machine quickly and easily. Detailed de-
scriptions can be found in the following sections of this
user manual.
Read the entire user manual carefully. Follow all safety in-
structions in order to ensure proper operation of your ma-
chine. The manufacturer accepts no liability if these in-
structions are not followed.
Symbols Used
Dangers
Tips
Warns about dangers for people, damage to the de-
vice or other objects as well as possible loss of data.
Injuries or damage can result from improper han-
dling.
This symbol designates tips that will help you to use
your device more effectively and easily.

General Safety Information 3
EN
1 General Safety Information
Introduction 3
Your device has been tested in conformity with standards
EN 60950-1 and IEC 60950-1 and should only be operat-
ed with telephone systems and power equipment that meet
these standards. The device was built exclusively for use in
the indicated sales region.
Introduction 2
Do not make any changes or settings that are not described
in this user manual.
Setting Up the Machine
The device should rest securely on a stabile, flat surface.
The device should rest securely on a stabile, flat surface. If
the device should fall, it can be damaged or can cause injury
to people, especially small children. Position all cables in
such a way that no one will stumble on them, thus avoiding
possible injuries to persons or damage to the device itself.
The distance between the device and other appliances or objects, must be at least 15 centimetres.
The distance between the device and other devices or ob-
jects must be at least 15 centimetres; this also applies to the
use of additional cordless telephones. Do not place the de-
vice in the vicinity of radios or televisions.
Lock the cover of the device completely into place
Lock the cover of the device completely into place when
opening the device. You could be injured if the cover falls
while you are working on the device.
Protect the device against direct sunlight
Protect the device against direct sunlight, heat, large temper-
ature fluctuations and moisture. Do not place the device in
the vicinity of heaters or air conditioners. Observe the infor-
mation on temperature and humidity in the technical data.
The device must have sufficient ventilation
The device must have sufficient ventilation and may not be
covered. Do not put your device in closed cabinets or box-
es. Do not place the machine on soft surfaces such as table-
cloths or carpets and do not cover the ventilation slits.
Otherwise, the device can overheat and catch on fire.
The area in which you operate the device must be adequately ventilated
The area in which you operate the device must be ade-
quately ventilated, especially if the device is used frequent-
ly. Set up your device in such a way that the flow of the ex-
haust air stream points away from the work station.
In the event that the device becomes too hot, or if you see smoke coming from the device
In the event that the device becomes too hot, or if you see
smoke coming from the device, you must immediately pull
the power cable out of the power socket. Have your device
examined by trained professionals at a technical service lo-
cation. To prevent the spread of fire, open flames should
be kept away from the device.
Do not plug in the device in moist rooms.
Do not plug in the device in moist rooms. Never touch the
mains cable, the mains connection or the telephone socket
with wet hands.
Do not allow liquids to enter into the device.
Do not allow liquids to enter into the device. Disconnect
the device from the power socket if liquids or foreign ob-
jects have entered the device and have your device exam-
ined by trained professionals at a technical service location.
Do not allow children to handle th e device without supervision.
Do not allow children to handle the device without super-
vision. The packing materials should be kept out of the
hands of children.
Magnetic telephone handset
The telephone handset of the device is magnetic. Caution,
small metallic objects (paper clips) may be retained if
placed near or on the telephone handset.
Power Supply
Check whether the mains voltage of your device
Check whether the mains voltage of your device (indicated
on the type label) matches the mains voltage available at
the setup location.
Use only the power and telephones cables supplied.
Use only the power and telephones cables supplied.
The device does not have an on/off button.
Set up your device so that the power socket is easily acces-
sible. The device does not have an on/off button. In an
emergency, disconnect your device from the power supply
by pulling the power plug.
Never touch the power or telephone cable if the insulation is damaged.
Never touch the power or telephone cable if the insulation
is damaged.
Disconnect your device from the power and telephone networks during an electrical storm.
Disconnect your device from the power and telephone net-
works during an electrical storm. If this is not possible, do
not use the device during an electrical storm.
Before cleaning the surface of your device, disconnect it from the power and telephone networks.
Before cleaning the surface of your device, disconnect it
from the power and telephone networks. Never use liquid,
gaseous or easily flammable cleansers (sprays, abrasives,
polishes, alcohol).
Only clean the display with a dry, soft cloth.
Only clean the display with a dry, soft cloth. If the display
breaks, a mildly corrosive liquid may escape. Avoid all con-
tact with your skin and eyes.
In the event of a power failure, your device will not function;
In the event of a power failure, your device will not func-
tion; saved data is retained.
Repairs
Display
Should disruptions occur, follow the instructions on the
display and on the error report.
Repairs
Do not make any repairs to the device yourself. Improper
maintenance can result in injuries or damage to the device.
Only have your device repaired by an authorised service centre.
Do not remove the type label from your device; this would
void the warranty.
Consumable Materials
Use only original consumable materials. These are availa-
ble from Belgacom. Other consumable materials could
damage the machine or shorten its service life.
Dispose of old consumable materials according to the
waste regulations of your country.
Toner Cartridge 1
Never open a toner cartridge. If toner dust is released into
the air, you should avoid allowing it to contact your skin
and eyes. Store both new and used cartridges in a place
where they will not come into the hands of children.
Caution when handling toner powder:
Caution when handling toner powder:
If you breathe in toner powder, go into the fresh air imme-
diately. Call a doctor immediately!
If you get toner powder in your eyes, rinse them with a lot
of water for at least 15 minutes. Call a doctor immediately!
If you have swallowed toner powder, drink small amounts
of water. Try NOT to vomit. Call a doctor immediately!
Paper Jam
In case of a paper jam, do not forcefully remove the paper,
but rather pull it gently out of the device and throw it away
carefully: It is possible that the toner may not be complete-
ly set on the print-out, and toner dust could be released
into the air. Do not inhale the released toner dust. Remove
the toner dust from clothing or objects with cold water;
hot water would only cause the toner to set.
Laser Safety
Laser Safety
Your device operates with laser beams. Only a qualified
service technician should open the device and carry out
service operations; otherwise there is a risk of eye injuries
resulting from both visible and invisible laser radiation.
Class 1 Laser Product
ÃClass 1 Laser Product
4Belgacom Belgafax 802
EN
2 Initial Operation
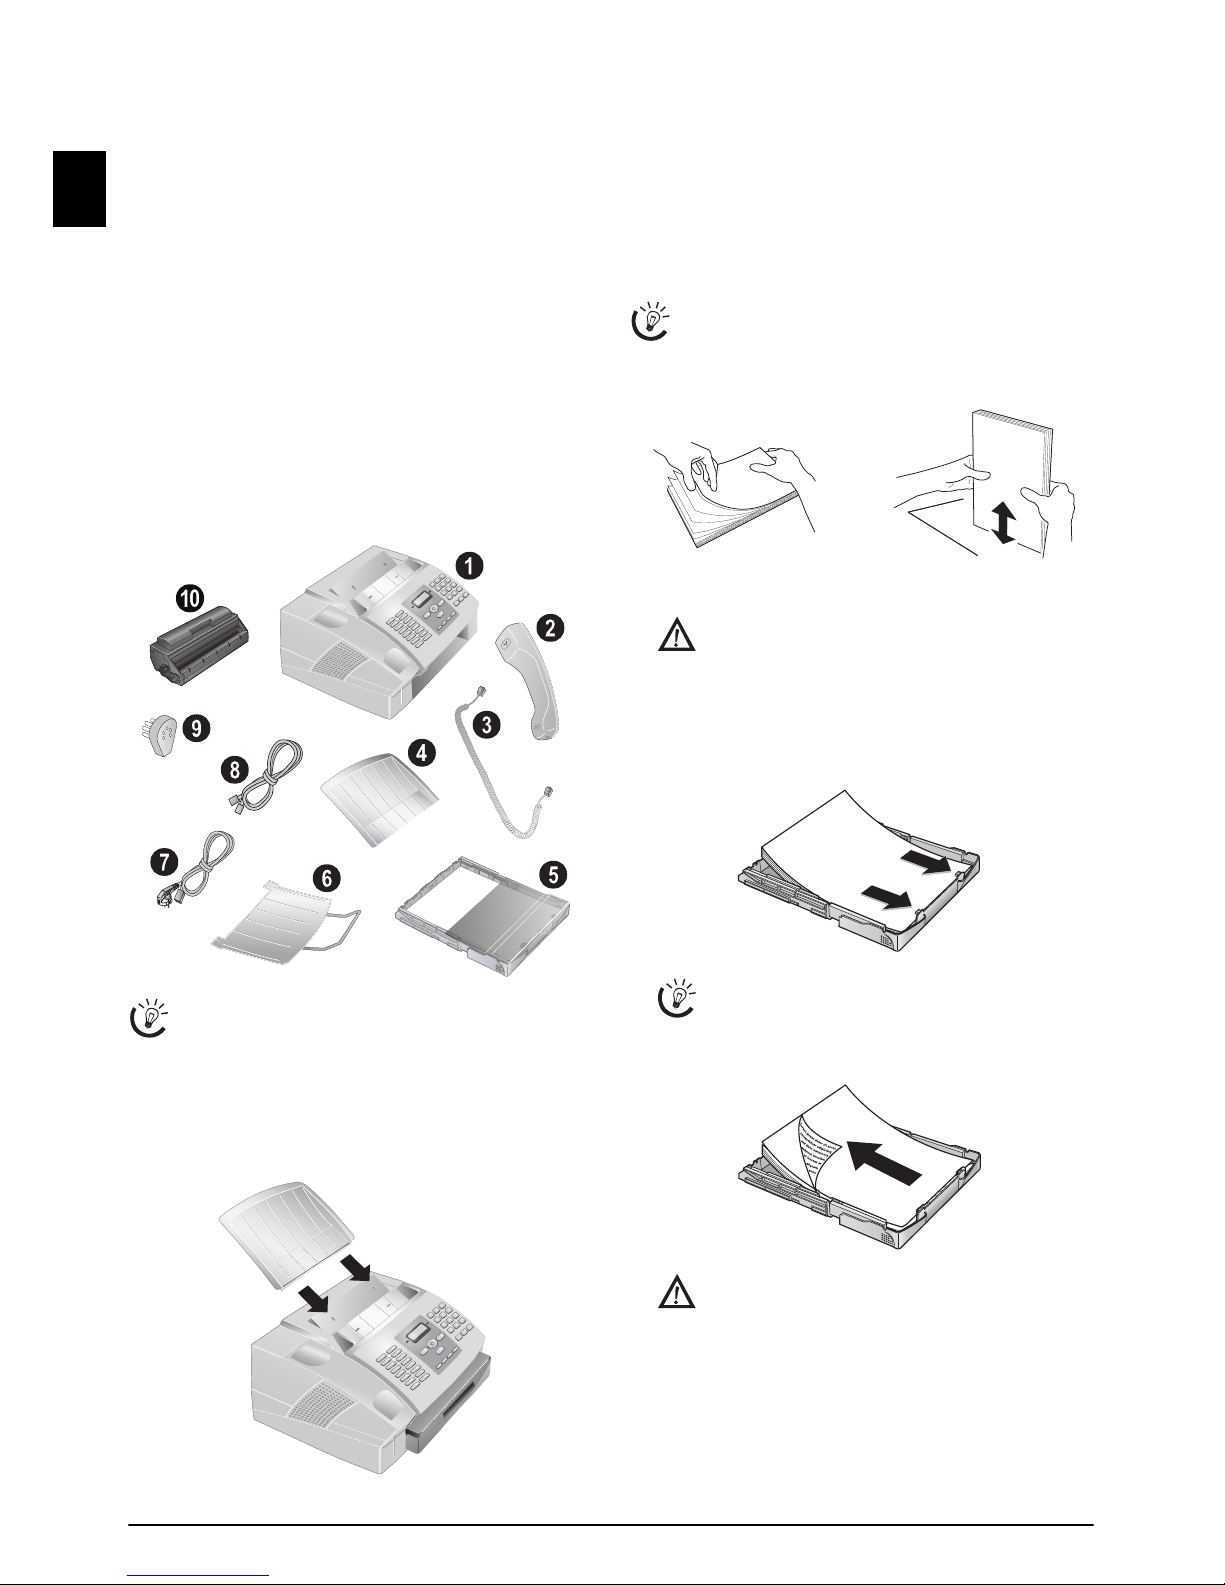
Packing Contents
1 Device
‚Device
2 Telephone receiver
ƒTelephone handset
3 Coiled cable for the telephone receiver
„Spiral cable for telephone handset
4 Document Support
…Document support
5 Paper Tray
†Paper tray
6 Document Outlet Tray
‡Document outlet tray
7 Mains cable with plug
ˆMains cable with plug
8 Telephone Cable
‰Telephone cord
9 Telephone plug
ŠTelephone plug
10 Starter cartridge
‹Starter cartridge
User Manual
User manual with installation guide (not depicted)
Installation-CD
Installation-CD (not depicted)
Verpackungsinhalt
Missing Package Contents
Attaching the Document Support
Attaching the Document Support
Insert the document support into the two openings in the
cover. The document support should snap securely into
place.
Dokumentenhalter anbringen
Loading Paper
Requirements
Before you can receive documents or make copies, you
must load paper into the device. Please use only appropri-
ate paper in standard format A4 · 210¦×¦297 millimetre
· preferably80¦g/m2. Follow the specifications in the tech-
nical data.
Loading Paper
Preparing Paper
1Remove the cover from the paper tray.
2Put in only as much paper as will fit under the raised
limit markers on the upper edge of the paper tray (see
also the drawings on the cover of the paper tray). You
can load up to 250 sheets.
If one of the parts is missing or damaged, please con-
tact Belgacom.
Separate the paper sheets by fanning them out, then
align them by tapping edge of the stack lightly
against a flat surface. This will prevent several sheets
of paper from being drawn in all at once.
Initial operation: Please remove the protective
cardboard from the paper tray before loading pa-
per and replacing the paper tray into the device.
If you would like to print on an input sheet (for
example, forms or stationery), place the input
sheet face down in the paper tray, with the top of
the page toward the rear.
Forms that have been printed out by a laser print-
er are not suitable for further printing. This can
lead to a paper jam.

Initial Operation 5
EN
3Press the paper down until the lever (A) snaps into
place at the rear of the paper tray.
4Place the cover back on the paper tray. Push the paper
tray into the device all the way to the stopping point.
Extending the Printout and Fax
Outlet Tray
Extending the Printout and Fax Outlet Tray
Pull the print-out and fax outlet tray out of the paper tray
cover.
Druckausgabe rausziehen
Attaching the Document Outlet
Tray
Attaching the Document Outlet Tray
Insert the document outlet tray into the two openings un-
der the operation panel.
Dokumentenausgabe anbringen
Connecting the Telephone Hand-
set
Connecting the Handset
Plug one end of the spiral cable into the socket on the tel-
ephone handset. Insert the other end into the socket desig-
nated with the )symbol.
Telefonhörer anschließen
Inserting Starter Cartridge
Plug’n’Print Card
Before you can receive documents, make copies, or print,
a toner cartridge must be inserted into the device. For this
reason, a starter cartridge is supplied with the device. The
toner level memory for this starter cartridge was set at the
factory. The starter cartridge need not be updated with a
Plug’n’Print card. For each additional toner cartridge that
you insert into your device, you must update the toner lev-
el memory with the Plug’n’Print card provided.
1Open the cover by taking hold of both document
guides and tipping the cover backward.
2Take the new toner cartridge from the package.
3Remove the black protective foil and other packaging
material, but do not yet remove the protective
strip from the cartridge.
4Shake the new toner cartridge back and forth several
times in order to distribute the toner evenly, thereby
improving the print quality.
Do not pull out the paper tray while the device is
in the process of printing. This can lead to a paper
jam.
Never open a toner cartridge. If toner dust is re-
leased into the air, you should avoid allowing it to
contact your skin and eyes. Do not inhale the re-
leased toner dust. Remove the toner dust from
clothing or objects with cold water; hot water
would only cause the toner to set.
Table of contents
Other BELGACOM Fax Machine manuals


