Beliani ANTIGUA C-3255 Installation instructions manual

Bathtub Mounting
Guide
Model: ANTIGUA (C-3255)
Dimensions: 1800*850*720 mm

Table of Contents
English (ENG)..................................................................................................................................3
Čeština (CZ)...................................................................................................................................18
Dansk (DK)....................................................................................................................................33
Nederlands (NL)...........................................................................................................................48
Suomi (FI)......................................................................................................................................63
Français (FR)................................................................................................................................. 78
Deutsch (DE).................................................................................................................................93
Magyar (HU)............................................................................................................................... 108
Italiano (IT)..................................................................................................................................123
Norsk (NO)..................................................................................................................................138
Polski (PL)................................................................................................................................... 153
Português (PT)........................................................................................................................... 168
Español (ES)................................................................................................................................184
Svenska (SE)............................................................................................................................... 199
Slovenčina (SK)...........................................................................................................................214
2

English (ENG)
Bathtub Assembly Instructions
Manufacturer and importer:
Beliani (International) GmbH, Haldenstrasse 5, 6340 Baar, Switzerland
Instructions for use:
Be sure to read this instruction manual carefully before installation.
Inspecting the goods upon delivery
Upon receipt, check the product for completeness and any damages. If damage is evident,
inform the seller immediately. We are not liable for damages occurring during or after
installation.
Raising/moving the tub
To lift or move the tub, grab it by the edges - never by the hoses or installation parts.
Laying circuits
Pipes must not be laid beneath the bathtub.
Protection against damage
Utilize appropriate protective covers to prevent damage to surfaces and blockages caused by
dirt or dust during the fitting process. Before commencing the installation/fitting, temporarily
cover sensitive components such as drains, nozzles, and the control panel with protective
covers.
Special precaution
When cleaning the tiles, ensure that ammonia or any similar aggressive cleaning agents do not
come into contact with the built-in components.
Electrical connection (230 V)
This task should only be undertaken by a qualified electrician. Ensure protection is provided
through a residual current circuit breaker (30 mA).
3

Safety regulations
During the installation of the bathtub, there are several simple steps to consider, to prevent
potential accidents. The installation should only be carried out by qualified technicians. The
bathtub must be connected to a voltage of 230 V AC at 50 Hz. The device must be powered
through a residual current device with a rated residual current not exceeding 30 mA.
Additionally, the electrical installation must be equipped with a circuit breaker to ensure the
all-pole disconnection from the power supply.
A voltage equalization connection must be established between the metal elements of the
bathtub, following the appropriate regulations in each country. Parts with live components,
except for those operating at a protective extra-low voltage not exceeding 12 V, must be
inaccessible to the person in the bathtub. Electrical components must be positioned or secured
in a way that prevents them from falling into the bathtub.
Water connection via water massage or overflow
As soon as the water inlet is below the tub's rim, a connection must be established with a safety
device in accordance with EN 1717 (Fluid category 5). For instance, this may involve employing a
DC safety device (e.g., a type 1 pipe-interrupter with a permanent connection to the atmosphere)
based on the specific installation requirements. This connection must be carried out exclusively
by a qualified specialist. These guidelines apply to the following scenarios:
A. All tubs that are filled through the overflow.
B. All tubs that are connected and filled through the nozzles of the water massage in
the existing T fitting.
In both cases, the connection must be made using reinforced elastic tubing capable of carrying
premixed hot and cold water.
Flow rate: maximum 20 litres/min (EN 200)
Overflow capacity: Minimum 36 litres/min (EN 274)
Drainage capacity: Minimum 48 litres/min (EN 274)
Permanent installation
Maintenance hatches should be provided with dimensions of at least 50 x 50 cm, ensuring
accessibility to technical components such as the pump, blower, valves, connection box, and
4

other connections. Preferably, employ removable side panels, but always prioritize rigid
elements.
Additionally, it is recommended to install 20 x 20 cm maintenance hatches for drainage/overflow,
ensuring proper noise insulation during installation.
For proper ventilation, the installation of a ventilation grill (not supplied) is absolutely necessary.
Depending on the bathtub model, position the ventilation grill in the wall lining near the units.
Inside the hatch, a ventilation grid (minimum 150 cm) can be fitted to supply air to the blower.
Alternatively, consider placing a maintenance hatch/ventilation grid in the adjacent room.
To optimize sound insulation, install the ventilation grid with soundproofing materials. It is also
acceptable to place the ventilation grid in the adjacent room, if suitable.
When space is limited:If there is insufficient room for a maintenance hatch, "surface mounting"
is recommended to allow for the complete disassembly of the bathtub when necessary. Ensure
that the drainage pipe, electrical connections, and, if applicable, the water supply line can be
disconnected through the ventilation opening. Seal the entire perimeter of the bathtub rim with
silicone (acetic acid-free).
The bathtub should be placed on a surface that supports the water (e.g.tiles) and with a slight
drop to the outside, so that, in case of a possible leak or water falling in, it will come out under
the skirting and not accumulate under the bathtub. The guarantee does not cover water damage
caused by poor installation. It is recommended not to completely surround the whirlpool bathtub
with tiles. The water pump, air pump and ozone disinfection require air circulation.
Water should not be poured directly into the shower holder during use. The guarantee does not
cover water damage caused by misuse.
The internal components of the bath must be easily accessible, otherwise, the warranty does not
cover access to the internal components in case of failure.
Checking for leakage
After connecting the water inlet and drain of the bathtub, it must be filled and checked for leaks.
Check the following functions using the control panel:
A. Air system
B. Water pump settings
Bathtub water temperature should not exceed 40 °C.
5

MODEL C-3255 1800*850*720 mm
6

Package contents
Use scissors to open the packaging;
Ensure that all parts are inside the
packaging.
Accessories box
1. 1x Drain
2. 1x Drain cover
Tools required for assembly
1. Spirit level
2. Sealant
3. Adjustable wrench
4. Screwdriver
5. PTFE tape
6. Tape measure
7

Preparation
Construction of the bathtub
Article
Description
Article
Description
1
Air Jets
2
Underwater LED Lights
3
Overflow
4
Control Button
8

Electrical parameters
Nominal voltage
Rated frequency
Max. Rated Power
Max. Rated Power
230 V
50 Hz
900 W
4.1 A
1. To be performed only by a qualified electrician. Ensure protection through an RCD (30 mA).
2. An electric leakage protection must be present in the power supply. Electrical cables must
be secured. The size of the electrical cable should not be less than 2.5 mm². The power
supply equipment must comply with national regulations.
3. Warning: When using electrical devices, you should take the following safety precautions.
4. Hazards: Risk of electric shock. Connect circuits only when protected by a GFCI (Ground Fault
Circuit Interrupter). A GFCI is not included, but we will provide you with all necessary
information about it. A GFCI is required by law.
9
10

11
12
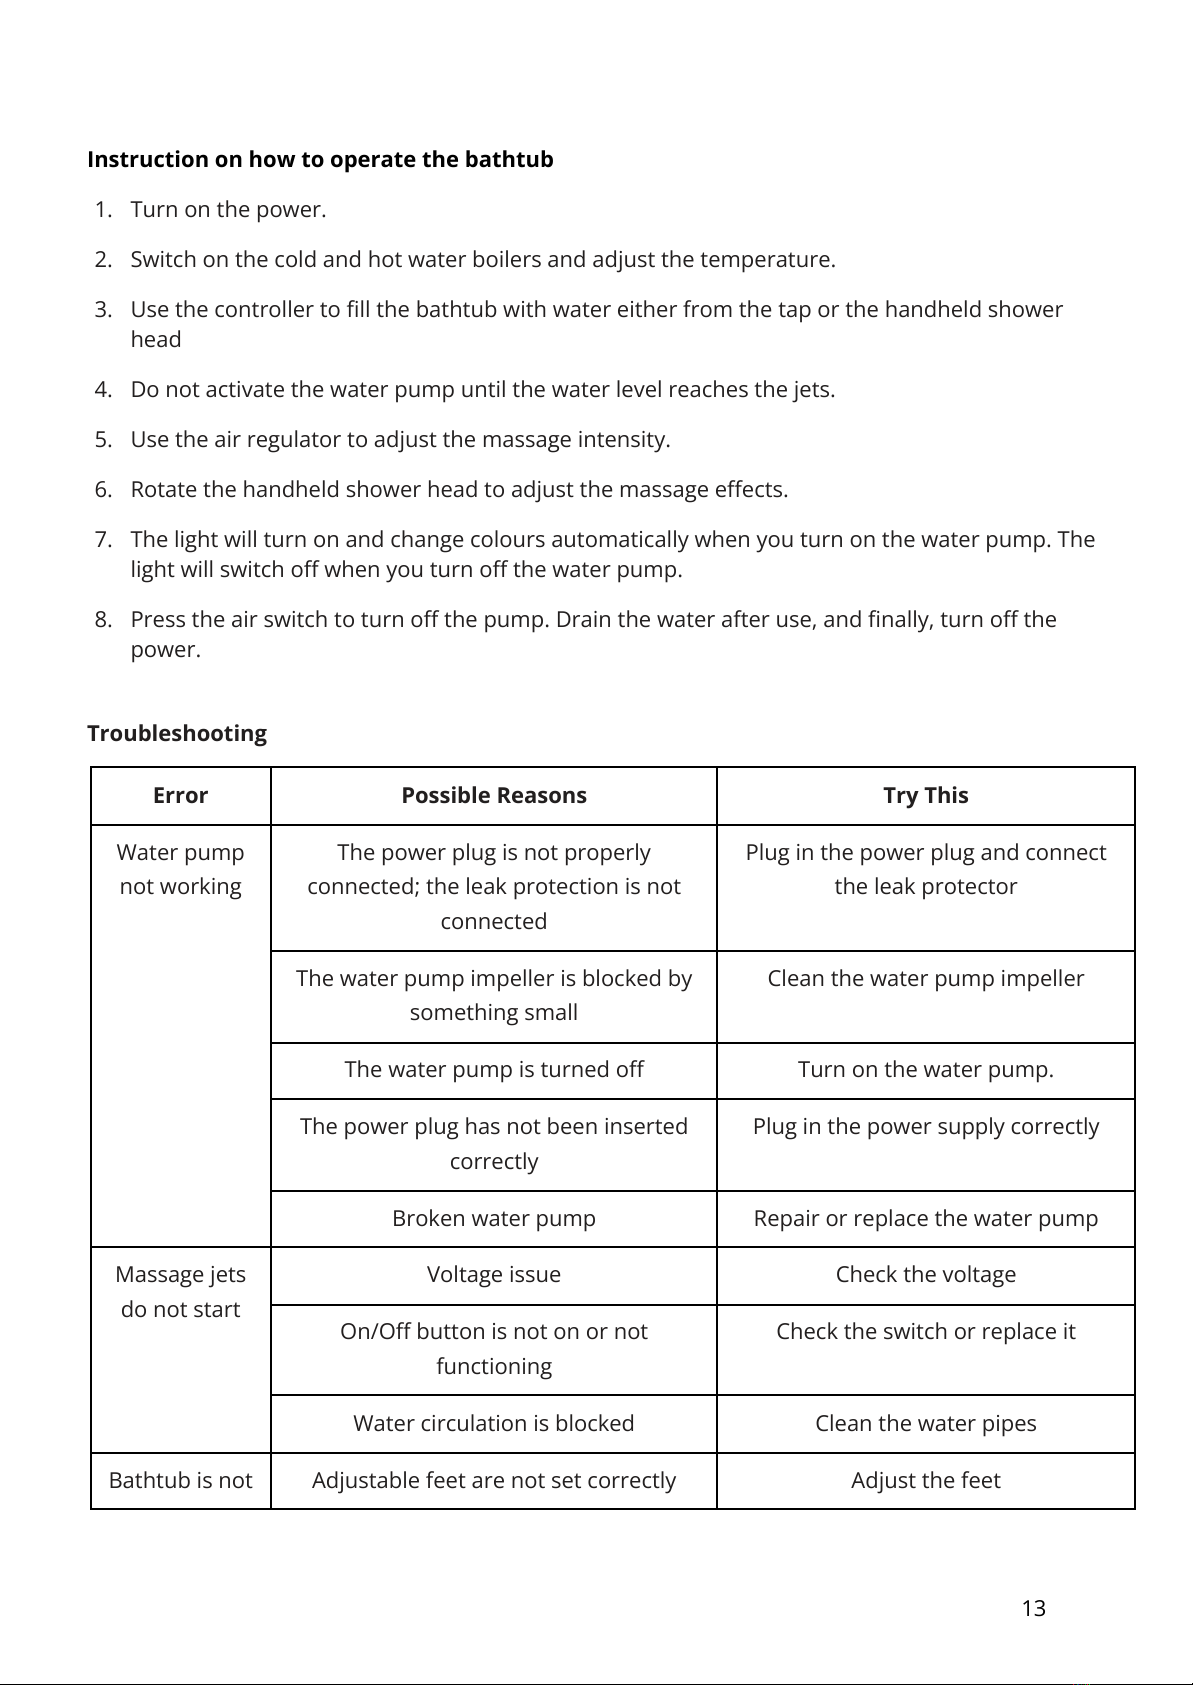
Instruction on how to operate the bathtub
1. Turn on the power.
2. Switch on the cold and hot water boilers and adjust the temperature.
3. Use the controller to fill the bathtub with water either from the tap or the handheld shower
head
4. Do not activate the water pump until the water level reaches the jets.
5. Use the air regulator to adjust the massage intensity.
6. Rotate the handheld shower head to adjust the massage effects.
7. The light will turn on and change colours automatically when you turn on the water pump. The
light will switch off when you turn off the water pump.
8. Press the air switch to turn off the pump. Drain the water after use, and finally, turn off the
power.
Troubleshooting
Error
Possible Reasons
Try This
Water pump
not working
The power plug is not properly
connected; the leak protection is not
connected
Plug in the power plug and connect
the leak protector
The water pump impeller is blocked by
something small
Clean the water pump impeller
The water pump is turned off
Turn on the water pump.
The power plug has not been inserted
correctly
Plug in the power supply correctly
Broken water pump
Repair or replace the water pump
Massage jets
do not start
Voltage issue
Check the voltage
On/Off button is not on or not
functioning
Check the switch or replace it
Water circulation is blocked
Clean the water pipes
Bathtub is not
Adjustable feet are not set correctly
Adjust the feet
13
level
Water overflow
Overflow drain is defective
Replace the overflow drain
Nuts are loose
Tighten the nuts
Connecting parts are not correctly
attached
Inspect the adhesive of the connecting
parts
Cleaning
1. Use a soft cloth for cleaning purposes, avoiding the use of strong detergents that contain
acetone or ammonia. It is strictly prohibited to disinfect using formic acid or formaldehyde.
2. If there is a scratch on the surface, utilise 2000-grit wet sandpaper to gently polish it.
Afterwards, proceed to polish it further using toothpaste and a soft cloth.
3. Limescale deposits can be removed using vinegar or lemon juice.
4. If the water circulation is blocked, unscrew the nozzles and pipes and clean them.
5. Frequent cleaning is not necessary for the gold-plated and silver-plated components.
6. Please refrain from striking the bathtub with hard objects. Additionally, please avoid direct
contact between the bathtub and hot items that exceed a temperature of 70 °C (e.g.,
cigarettes). Do not clean the bathtub with chemical substances that contain bleach.
7. Drain the water and unplug the power cord after use.
8. Cleaning the water massage system: Fill the bathtub with 40 °C hot water and add 2g of
detergent per litre. Let the massage system run for 5 minutes. Afterwards, stop it and drain the
water. Refill the bathtub with cold water and activate the massage system for 3 minutes. You
can now drain the water again, and your massage jets are cleaned.
Precautions
1. Installation should be carried out by a qualified plumbing installer. Please follow the
instructions provided in the manual.
2. Appropriate hoses should be acquired from local sources and connected by a specialist.
Under no circumstances should any connecting hoses provided by the seller be utilised.
14

3. When installing the product, the customer must ensure that the front panel is easily
accessible at all times for maintenance purposes and in the event that parts need
replacement.
4. The electrical components should comply with national safety standards. Install an earth
leakage circuit breaker for the power supply.
5. Do not run overheated water, and only activate the jets once the water level is above them.
6. The device operates at a rated voltage of 230V. Disconnect the power supply after use.
7. It is recommended not to stay in the bathtub for longer than 30 minutes.
8. Restart the device occasionally.
9. If the power cord is damaged, it must be replaced immediately.
10. Read the user manual carefully to avoid accidents and other damages.
General information on functionality and usage
Drain water after each bath. Never leave children unattended in the bathtub.
Whirlpool care instructions
The surface is easy to clean and maintain. The smooth surface hardly attracts dirt. Regular
maintenance: sponge, soft cloth, some antistatic cleaning agent. This way, the bathtub retains its
shine and becomes dirt-repellent. Avoid the use of abrasive or solvent-based cleaners that could
damage the surface of the tub. For stubborn dirt, use a liquid household cleaner such as
dishwashing detergent or soap solution (follow dilution instructions). Remove limescale stains with
a limescale remover. Always rinse thoroughly with plenty of clear water and polish with a cloth. Do
not use acidic cleaning agents or vinegar-based cleaners.
Damage
Scratched surfaces should be handled by a professional. Treat with solvent-free polishing paste. If
necessary, the surface can be first treated with wet sandpaper (n°800, followed by n°1200) before
polishing. Do not use any alcohol- or acetone-based solvents. Damages resulting from improper
user handling are not covered by our warranty.
Caution! When wet, the surface presents an increased risk of slipping. This is
particularly the case when using soaps, shampoos, bath oils, etc.
15

Subject to change
Beliani reserves the right to make changes or product modifications without notice.
Importer:
Beliani (International) GmbH Haldenstrasse 5 6340 Baar Switzerland
Declaration of Performance
1. Product Type Unique Identifier: Product Number at the bottom of page
2. Intended use: Whirlpool tubs for domestic use for personal hygiene (PH)
3. Importer: Beliani (International) GmbH, Haldenstrasse 5, 6340 Baar, Switzerland
Telephon +41 43 5082233
4. Authorized representative: ⁒
5. System of assessment and verification of constancy of performance: System 3
6. Declared services:
Essential properties:
The compliance of the designated product with the provisions of the directives is
proven in particular by full compliance with the following harmonized standards:
1. EN 12764:2004+A1:2008
2. EN 12764:2004+A1:2008
3. EN 12764:2004+A1:2008
7. Appropriate Technical Documentation or Specific Technical Documentation:
A. Report No: 704011739004-02 TÜV SÜD Product Service GmbH
The performance of the above product corresponds to the declared performances.
The importer named above is solely responsible for preparing the declaration of
performance in accordance with Regulation (EU) No. 305/2011.
16

Appendix
Article number
Article name
Power output
17589 MANTA
Bathtub with massage function
HE + CA + DA
17590 HUARAZ
Bathtub with massage function
HE + CA + DA
17591 BARRANCA
Bathtub with massage function
HE + CA + DA
17592 OYON
Bathtub with massage function
HE + CA + DA
17593, 19779 PUQUIO
Bathtub with massage function
HE + CA + DA
17594 TAHUA
Bathtub with massage function
HE + CA + DA
17901-17904 HAWES
Bathtub with massage function
HE + CA + DA
18773, 18784, 18785
TOCOA
Bathtub with massage function
HE + CA + DA
18786, 18787 BARACOA
Bathtub with massage function
HE + CA + DA
20595, 20596 NEVIS
Bathtub with massage function
HE + CA + DA
18788-18791 ARTEMISA
Bathtub with massage function
HE + CA + DA
18798-18801 BAYAMO
Bathtub with massage function
HE + CA + DA
20597, 20598 ANTIGUA
Bathtub with massage function
HE + CA + DA
18802, 18803 MARTINICA II
Bathtub with massage function
HE + CA + DA
20685, 20686 TALITA
Bathtub with massage function
HE + CA + DA
20697, 20688 CANTALLA
Bathtub with massage function
HE + CA + DA
Signed for the importer and on behalf of the manufacturer by:
Michael Widmer, Managing Director
9493 Mauren, 13.05.2020
17

Čeština (CZ)
Návod k montáži vany
Výrobce a dovozce:
Beliani (International) GmbH, Haldenstrasse 5, 6340 Baar, Švýcarsko
Návod k použití:
Před instalací si pečlivě přečtěte tyto pokyny k použití.
Kontrola zboží při dodání
Při převzetí zkontrolujte kompletnost produktu a případné poškození. Pokud jsou patrná
jakákoli poškození, neprodleně informujte prodejce. Nejsme odpovědní za poškození vzniklá
během nebo po instalaci.
Zvedání/přemisťování vany
Při zvedání nebo přemisťování vany ji uchopte za okraje - nikdy ne za hadice nebo instalační díly.
Pokládání potrubí
Potrubí se nesmí pokládat pod vanu.
Ochrana proti poškození
Použijte vhodné ochranné kryty, abyste zabránili poškození povrchů a ucpání způsobeného
nečistotami nebo prachem během montáže. Před zahájením instalace dočasně zakryjte citlivé
komponenty, jako jsou odtoky, trysky a ovládací panel, ochrannými kryty.
Zvláštní bezpečností opatření
Při čištění dlaždic se ujistěte, že amoniak nebo jakékoliv podobné agresivní čistící prostředky
nepřijdou do styku s vestavěnými komponenty.
Elektrické připojení (230 V)
Tento úkol by měl provádět pouze kvalifikovaný elektrikář. Ujistěte se, že je zajištěna ochrana
pomocí proudového chrániče (30 mA).
18

Bezpečnostní předpisy
Při instalaci vany je třeba dodržovat několik jednoduchých kroků, které zabrání případným
poruchám. Instalace by měla být prováděna pouze kvalifikovanými techniky. Vana musí být
připojena k napětí 230 V AC při 50 Hz. Zařízení musí být zapojeno přes proudový chránič se
zbytkovým proudem nepřesahujícím 30 mA. Navíc musí být elektrická instalace vybavena
jističem, který zajišťuje odpojení všech pólů od napájení.
Mezi kovovými částmi vany musí být zřízeno vyrovnávací spojení, a to v souladu s příslušnými
předpisy v každé zemi. Části s prvky pod napětím, s výjimkou těch pracujících s ochranným velmi
nízkým napětím nepřesahujícím 12 V, musí být pro osobu ve vaně nepřístupné. Elektrické
komponenty musí být umístěny nebo zajištěny tak, aby nemohly spadnout do vany.
Připojení vody pro vodní masáž nebo přepadový systém
Jakmile je přívod vody pod okrajem vany, musí být v souladu s normou EN 1717 (kapaliny
kategorie 5) vytvořeno spojení s bezpečnostním zařízením. Může jít o použití bezpečnostního
zařízení stejnosměrného proudu (např. přerušovače potrubí typu 1 s trvalým připojením k
atmosféře) na základě konkrétních požadavků na instalaci. Toto připojení musí být prováděno
výhradně kvalifikovaným specialistou. Tato pravidla platí pro následující scénáře:
A. Všechny vany, které jsou plněny přes přepad.
B. Všechny vany, které jsou připojeny a plněny přes trysky vodní masáže ve stávající T
armatuře.
V obou případech musí být připojení provedeno pomocí zesílené pružné hadice schopné vést
předem smíchanou teplou a studenou vodu.
Průtok: Maximálně 20 litrů/min (EN 200)
Kapacita přepadu: Minimálně 36 litrů/min (EN 274)
Kapacita odtoku: Minimálně 48 litrů/min (EN 274)
Trvalá instalace
Údržbové poklopy by měly mít rozměry minimálně 50 x 50 cm, aby byla zajištěna přístupnost k
technickým komponentům, jako jsou čerpadlo, ventilátor, ventily, připojovací skříňka a další
přípojky. Preferujte odnímatelné boční panely, ale vždy upřednostněte pevné prvky.
19

Dále je doporučeno nainstalovat údržbové poklopy pro odvodnění/přepad o rozměrech 20 x 20
cm, aby byla zajištěna správná izolace zvuku během instalace.
Pro správnou ventilaci je nezbytná instalace větrací mřížky (není dodávána). V závislosti na
modelu vany umístěte větrací mřížku do obložení stěny blízko jednotek. Uvnitř poklopu lze
umístit větrací mřížku (minimálně 150 cm) pro přívod vzduchu k ventilátoru. Alternativně zvažte
umístění údržbového poklopu/větrací mřížky v sousední místnosti.
Pro optimalizaci zvukové izolace instalujte větrací mřížku se zvukově izolačními materiály. Pokud
je to vhodné, lze větrací mřížku umístit i do sousední místnosti.
Při omezeném prostoru: Pokud není dostatek místa pro údržbový poklop, doporučuje se použít
"povrchovou montáž", která v případě potřeby umožní úplné rozebrání vany. Ujistěte se, že
odtoková potrubí, elektrická připojení a případně přívod vody lze odpojit skrz větrací otvor. Celý
obvod okraje vany utěsněte silikonem (bez obsahu kyseliny octové).
Vana by měla být umístěna na povrchu, který udržuje vodu (např. dlaždice) a s mírným spádem
směrem ven, aby v případě možného úniku nebo prosakování vody vytekla pod podlahovou
lištou a nahromadila se pod vanou. Záruka nekryje poškození způsobené špatnou instalací.
Doporučuje se neobklopovat zcela vířivou vanu dlaždicemi. Vodní čerpadlo, vzduchové čerpadlo
a ozonová dezinfekce vyžadují cirkulaci vzduchu.
Během používání by se voda neměla nalévat přímo do držáku sprchy. Záruka nekryje poškození
způsobené nesprávným používáním.
Vnitřní součásti vany musí být snadno přístupné, jinak se záruka nevztahuje na přístup k vnitřním
součástem v případě poruchy.
Kontrola těsnosti
Po připojení přívodu vody a odtoku vany je třeba ji napustit a zkontrolovat, zda těsní.
Zkontrolujte následující funkce pomocí ovládacího panelu:
1. Vzduchový systém
2. Nastavení vodního čerpadla
Teplota vody ve vaně by neměla překročit 40 °C.
20
Table of contents
Languages:
Other Beliani Bathtub manuals


Popular Bathtub manuals by other brands


Kohler
Kohler Escale K-11343-G Specification sheet

Fleurco
Fleurco Aria CRESCENT grande BCR7931 Installation and user guide

Fleurco
Fleurco CONCERTO petite BZCO5931 Installation and user guide

DURAVIT
DURAVIT 700001 Mounting instructions

DURAVIT
DURAVIT Vero Air 700418 Mounting instructions

Toto
Toto FBF794S#01DCP owner's manual

Porcelanosa
Porcelanosa SYSTEMPOOL KRION SLIM PRE-INSTALLATION AND INSTALLATION MANUAL

Signature Hardware
Signature Hardware HIBISCUS 948057-67-TD manual

Cristalplant
Cristalplant Spoon XL quick guide

Kohler
Kohler BIRTHDAY BATH installation instructions

DURAVIT
DURAVIT D-Code 700095 Mounting instructions

Kohler
Kohler K-1195-LA Roughing-In Guide