BELIMED WD 290 User manual

Operating Instructions
WD 290
Item Number: 10532-0150-EN
Version: 001-07/09

2/49
001 Operating Instructions WD290
10532 © Belimed
Index of contents
Index of contents
1 Introduction . . . . . . . . . . . . . . . . . . . . . . . . . . . . . . . . . . . . . . . . . . . 4
1.1 Before you read on . . . . . . . . . . . . . . . . . . . . . . . . . . . . . . . . . . . . . . 4
1.2 Target group . . . . . . . . . . . . . . . . . . . . . . . . . . . . . . . . . . . . . . . . . . . 4
1.3 Changes . . . . . . . . . . . . . . . . . . . . . . . . . . . . . . . . . . . . . . . . . . . . . . 4
1.4 Symbols and notices used . . . . . . . . . . . . . . . . . . . . . . . . . . . . . . . . 4
2 For your safety . . . . . . . . . . . . . . . . . . . . . . . . . . . . . . . . . . . . . . . . 5
2.1 Intended use . . . . . . . . . . . . . . . . . . . . . . . . . . . . . . . . . . . . . . . . . . . 5
2.2 Care responsibilities for dealing with the device . . . . . . . . . . . . . . . . 5
2.3 Instruction of personnel. . . . . . . . . . . . . . . . . . . . . . . . . . . . . . . . . . . 5
2.4 Safety instructions on the device . . . . . . . . . . . . . . . . . . . . . . . . . . . 5
2.5 Fields of application for the device . . . . . . . . . . . . . . . . . . . . . . . . . . 6
2.6 Process validation. . . . . . . . . . . . . . . . . . . . . . . . . . . . . . . . . . . . . . . 6
3 Device description . . . . . . . . . . . . . . . . . . . . . . . . . . . . . . . . . . . . . 7
3.1 Device loading side (LS) . . . . . . . . . . . . . . . . . . . . . . . . . . . . . . . . . . 7
3.2 Device unloading side (US) . . . . . . . . . . . . . . . . . . . . . . . . . . . . . . . 8
3.3 Operating unit on loading side (LS) . . . . . . . . . . . . . . . . . . . . . . . . . 9
3.3.1 Description of operating unit on loading side . . . . . . . . . . . . . . . . . . 9
3.4 Operating unit on unloading side (US) . . . . . . . . . . . . . . . . . . . . . . 11
3.4.1 Description of operating unit on unloading side . . . . . . . . . . . . . . . 11
3.5 Process status display . . . . . . . . . . . . . . . . . . . . . . . . . . . . . . . . . . 12
3.5.1 Process status display description . . . . . . . . . . . . . . . . . . . . . . . . . 12
3.6 Procedure for changing settings . . . . . . . . . . . . . . . . . . . . . . . . . . . 13
3.7 Alphanumeric entry . . . . . . . . . . . . . . . . . . . . . . . . . . . . . . . . . . . . . 14
3.7.1 Procedure for alphanumeric entry. . . . . . . . . . . . . . . . . . . . . . . . . . 14
3.7.2 Operating buttons . . . . . . . . . . . . . . . . . . . . . . . . . . . . . . . . . . . . . . 14
4 Pre-treatment of the medical devices . . . . . . . . . . . . . . . . . . . . . 16
4.1 Responsibility for pre-treatment . . . . . . . . . . . . . . . . . . . . . . . . . . . 16
4.1.1 SOP (Standard Operating Procedures) . . . . . . . . . . . . . . . . . . . . . 16
4.2 Preparation of the medical devices. . . . . . . . . . . . . . . . . . . . . . . . . 16
4.3 Pre-cleaning pre-treatment . . . . . . . . . . . . . . . . . . . . . . . . . . . . . . . 17
4.3.1 Impairment of subsequent cleaning . . . . . . . . . . . . . . . . . . . . . . . . 17
5 Preparation of the device . . . . . . . . . . . . . . . . . . . . . . . . . . . . . . . 18
6 User log-on . . . . . . . . . . . . . . . . . . . . . . . . . . . . . . . . . . . . . . . . . . 20
6.1 Log-on via operating unit . . . . . . . . . . . . . . . . . . . . . . . . . . . . . . . . 20
6.2 Log-on via barcode reader . . . . . . . . . . . . . . . . . . . . . . . . . . . . . . . 22
7 Automatic start and switch-off, Self-disinfection . . . . . . . . . . . 23
7.1 Automatic switch-off . . . . . . . . . . . . . . . . . . . . . . . . . . . . . . . . . . . . 23
7.1.1 Activating and setting the automatic switch-off function . . . . . . . . . 23
7.2 Automatic start . . . . . . . . . . . . . . . . . . . . . . . . . . . . . . . . . . . . . . . . 24
7.2.1 Activating and setting the automatic start function . . . . . . . . . . . . . 24
7.3 Self-Disinfection . . . . . . . . . . . . . . . . . . . . . . . . . . . . . . . . . . . . . . . 25
7.3.1 Why self-disinfection? . . . . . . . . . . . . . . . . . . . . . . . . . . . . . . . . . . . 25
7.3.2 Activating and setting the self-disinfection function . . . . . . . . . . . . 25

Index of contents
Operating Instructions WD290 001
3/49
© Belimed 10532
7.3.3 Starting self-disinfection . . . . . . . . . . . . . . . . . . . . . . . . . . . . . . . . . 26
8 Loading and identifying racks . . . . . . . . . . . . . . . . . . . . . . . . . . . 27
8.1 Loading racks . . . . . . . . . . . . . . . . . . . . . . . . . . . . . . . . . . . . . . . . . 27
8.2 Rack identification. . . . . . . . . . . . . . . . . . . . . . . . . . . . . . . . . . . . . . 27
8.2.1 Rack identification via operating unit . . . . . . . . . . . . . . . . . . . . . . . 27
8.2.2 Rack identification via barcode . . . . . . . . . . . . . . . . . . . . . . . . . . . . 27
9 Batch content identification. . . . . . . . . . . . . . . . . . . . . . . . . . . . . 28
9.1 Batch identification via barcode . . . . . . . . . . . . . . . . . . . . . . . . . . . 28
10 Loading . . . . . . . . . . . . . . . . . . . . . . . . . . . . . . . . . . . . . . . . . . . . . 29
10.1 Manual loading . . . . . . . . . . . . . . . . . . . . . . . . . . . . . . . . . . . . . . . . 29
10.2 Automatic loading and unloading (optional) . . . . . . . . . . . . . . . . . . 31
11 Washing and disinfection . . . . . . . . . . . . . . . . . . . . . . . . . . . . . . 32
11.1 General instructions . . . . . . . . . . . . . . . . . . . . . . . . . . . . . . . . . . . . 32
11.2 Washing, disinfecting and drying . . . . . . . . . . . . . . . . . . . . . . . . . . 32
12 Unloading . . . . . . . . . . . . . . . . . . . . . . . . . . . . . . . . . . . . . . . . . . . 35
13 Switching off the device. . . . . . . . . . . . . . . . . . . . . . . . . . . . . . . . 36
14 Daily maintenance and cleaning tasks . . . . . . . . . . . . . . . . . . . . 37
14.1 Maintenance in general. . . . . . . . . . . . . . . . . . . . . . . . . . . . . . . . . . 37
14.2 Maintaining the device . . . . . . . . . . . . . . . . . . . . . . . . . . . . . . . . . . 37
14.3 Maintenance of the lower wash arm . . . . . . . . . . . . . . . . . . . . . . . . 38
14.4 Maintenance of the upper wash arm. . . . . . . . . . . . . . . . . . . . . . . . 39
14.5 Cleaning fine screens and coarse screen. . . . . . . . . . . . . . . . . . . . 40
15 Device does not clean properly. . . . . . . . . . . . . . . . . . . . . . . . . . 41
15.1 Checking the device . . . . . . . . . . . . . . . . . . . . . . . . . . . . . . . . . . . . 41
15.2 Checking the dosing system . . . . . . . . . . . . . . . . . . . . . . . . . . . . . . 41
15.3 Checking rack loading. . . . . . . . . . . . . . . . . . . . . . . . . . . . . . . . . . . 41
16 Errors . . . . . . . . . . . . . . . . . . . . . . . . . . . . . . . . . . . . . . . . . . . . . . . 42
16.1 Error display without process termination . . . . . . . . . . . . . . . . . . . . 42
16.2 Error display with process termination . . . . . . . . . . . . . . . . . . . . . . 43
16.3 Device will not operate . . . . . . . . . . . . . . . . . . . . . . . . . . . . . . . . . . 43
17 Options . . . . . . . . . . . . . . . . . . . . . . . . . . . . . . . . . . . . . . . . . . . . . 44
17.1 Independent Process Data management IPD . . . . . . . . . . . . . . . . 44
17.2 Built-in printer US / LS . . . . . . . . . . . . . . . . . . . . . . . . . . . . . . . . . . 44
17.2.1 Function . . . . . . . . . . . . . . . . . . . . . . . . . . . . . . . . . . . . . . . . . . . . . 44
17.2.2 Replacing the paper roll . . . . . . . . . . . . . . . . . . . . . . . . . . . . . . . . . 44
18 Conformity and certifications . . . . . . . . . . . . . . . . . . . . . . . . . . . 45
19 Glossary. . . . . . . . . . . . . . . . . . . . . . . . . . . . . . . . . . . . . . . . . . . . . 46
20 Organisation Belimed AG . . . . . . . . . . . . . . . . . . . . . . . . . . . . . . 48
20.1 Manufacturer. . . . . . . . . . . . . . . . . . . . . . . . . . . . . . . . . . . . . . . . . . 48
20.2 Subsidiaries, Customer Service . . . . . . . . . . . . . . . . . . . . . . . . . . . 48
21 Notes . . . . . . . . . . . . . . . . . . . . . . . . . . . . . . . . . . . . . . . . . . . . . . . 49

4/49
001 Operating Instructions WD290
10532 © Belimed
Introduction
1 Introduction
1.1 Before you read on
Your product meets high standards and is easy to operate. Nevertheless, please
take time to read these instructions carefully. You will become familiarised with
your product and be able to use it to its best.
1.2 Target group
These instructions are a component of the product and are intended for the fol-
lowing personnel:
They must be accessible for this group of persons!
1.3 Changes
The text, graphics and data correspond to the technical status of the product at
the time of going to print. Changes due to further development may occur.
Language original for this document is German (DE)
1.4 Symbols and notices used
The following symbols and occupational safety alerts used throughout the docu-
mentation are important to avoid harm to health and life.
Installation instructions Installer; Operating company; Technical support
Operating instructions Operator; Operating company; Technical support
Technical manual Operating company; Technical support
Danger
Indicates a hazard with high risk which, if not avoided, causes death or seri-
ous injury.
Warning
Indicates a hazard with medium risk which, if not avoided, can cause death or
serious injury.
Caution
Indicates a hazard with low risk which, if not avoided, can cause minor or
moderate injury.
Note
Operating tips and useful information on the best possible utilization.

For your safety
Operating Instructions WD290 001
5/49
© Belimed 10532
2 For your safety
We affirm with the EC Declaration of Conformity and the CE mark that this prod-
uct complies with the basic health and safety requirements in accordance with
Directive 93/42/EEC Annex II (see Chap. 18 "Conformity and certifications").
Hazards may still arise from the product if it is used incorrectly by inadequately
trained personnel or not as intended.
2.1 Intended use
This product is exclusively approved for the uses stated in the instructions.
Namely for central sterilisation, substerilisation in surgery, in hospitals and in lab-
oratories. All other applications are considered as non-intended use.
2.2 Care responsibilities for dealing with the device
• Only use original racks, spare parts and accessories
•Load racks as intended (see Chap. 8 "Loading and identifying racks")
•Daily maintenance work on the device must be performed regularly and ac-
cording to instructions (see Chap. 14 "Daily maintenance and cleaning
tasks")
•Validation of the program parameters must be performed regularly (see
Chap. 2.6 "Process validation")
•Installation, deinstallation, maintenance or modification must only be
performed by persons authorised by Belimed
2.3 Instruction of personnel
This product must only be used, maintained and repaired by authorised, trained
and briefed personnel. This assumes that these instructions are read and under-
stood.
Responsibilities and competencies in operation, servicing and maintenance
must be clearly defined and observed.
2.4 Safety instructions on the device
Warning"Dangerous voltage"
Warning"Hot surface"
Warning"Caustic substances"
Follow safety instructions of the dosage media manufacturer!

6/49
001 Operating Instructions WD290
10532 © Belimed
For your safety
2.5 Fields of application for the device
Cleaning and reconditioning of:
• Surgical instruments
• Minimally invasive instruments
• Instruments for anaesthesia and intensive care
• Baby bottles and teats
• Containers
• OT Shoes
• Laboratory instruments used in research and production
• Rigid endoscopes
• Eye instruments
• Neurosurgery
2.6 Process validation
The aim of process validation is to achieve a high level of safety in the recondi-
tioning of medical devices in order to afford the operators and patients the great-
est possible protection.
Process validation consists of:
a) Type testing / factory testing
b) Process validation consisting of:
• IQ (Installation Qualification)
• OQ (Operational Qualification)
• PQ (Performance Qualification)
c) Routine testing / Annual requalification
Warning
No single-use products may be reconditioned! Always adhere to the instruc-
tions of the medical device manufacturer!
Note
Further information on process validation may be obtained from Belimed
Customer Service.
Caution
Validation must only be carried out by authorised persons!
Devices must only be operated with processes validated in accordance with
regulations! Only use components (items to be washed, racks, programs and
dosage media) which have been validated together.
The safety of operators and patients may be compromised if the devices
used are not validated in accordance with the regulations.
Device description
Operating Instructions WD290 001
7/49
© Belimed 10532
3 Device description
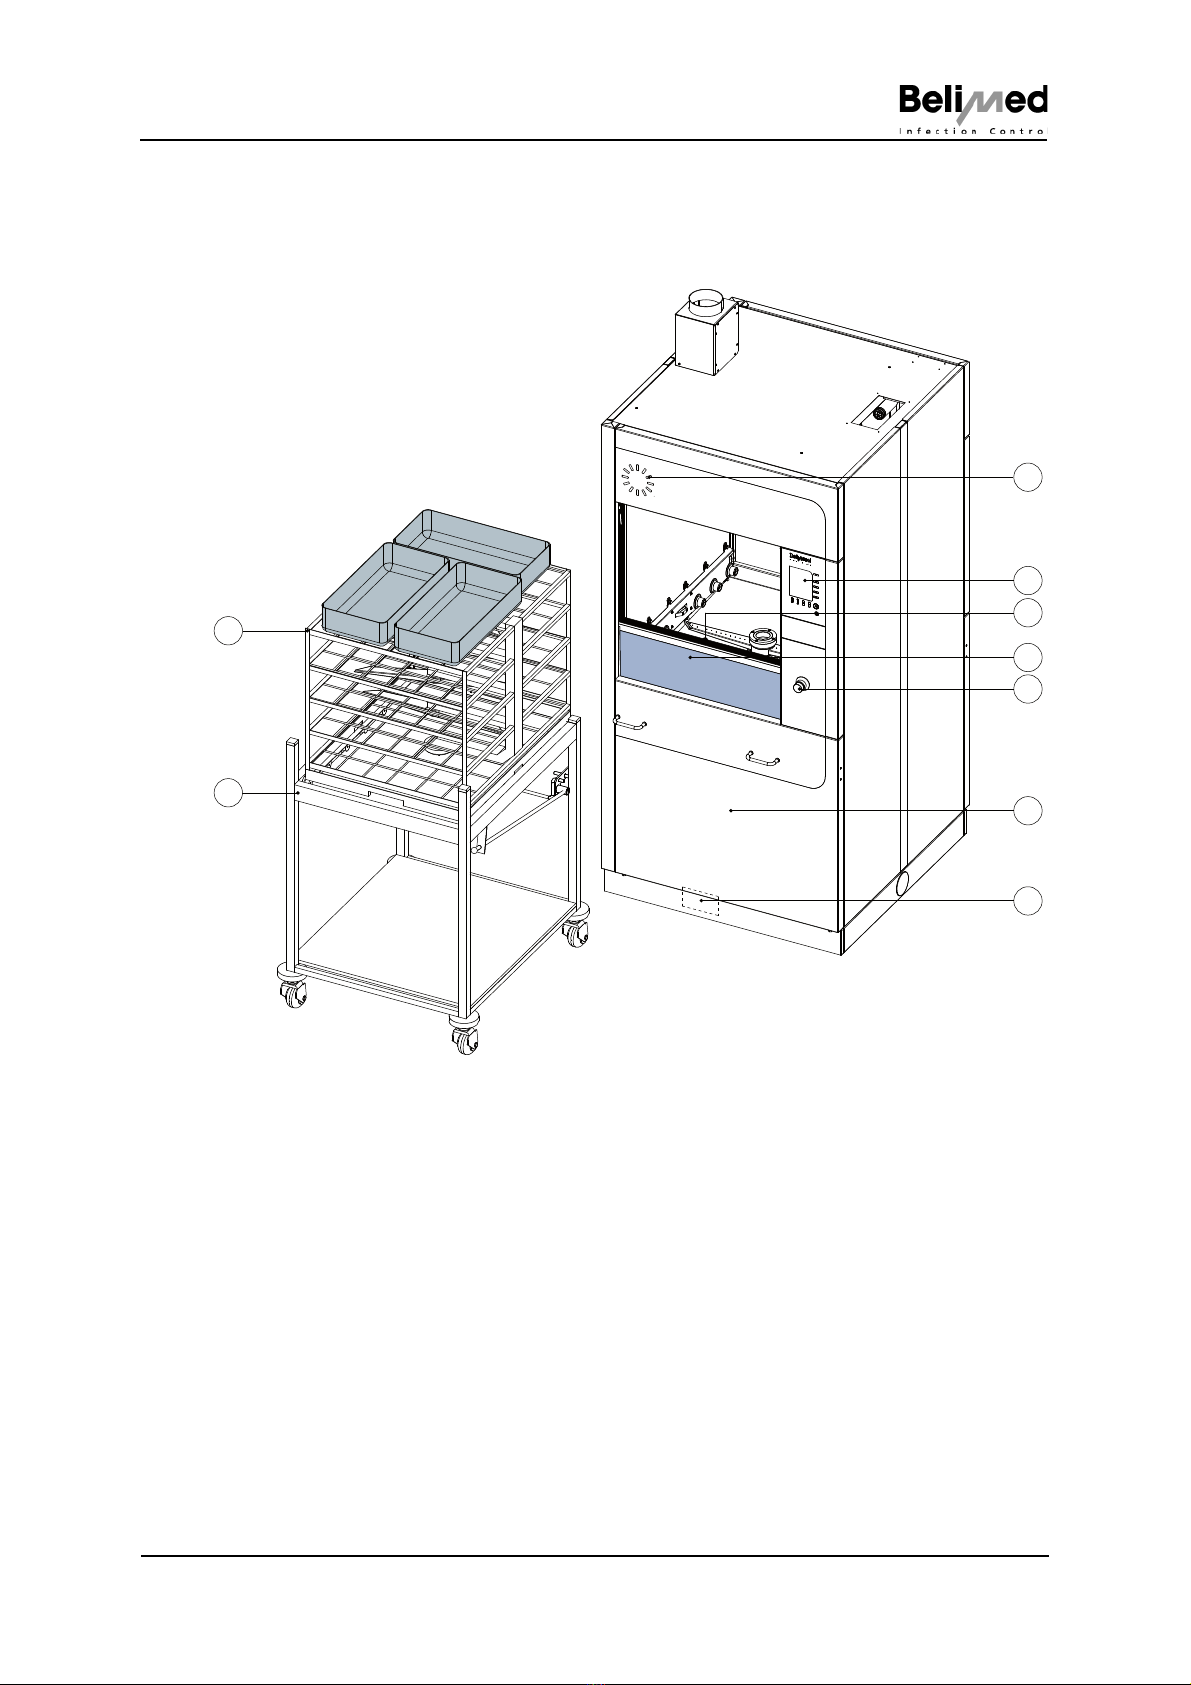
3.1 Device loading side (LS)
1 Process status display
2 Operating unit
3 Safety switch actuator
4 Washing chamber door
5 Emergency Stop
6 Lower front panel
7 Location of power rating plate
8 Transfer cart
9 Rack
Fig 496
9
8
3
5
6
2
4
7
1
8/49
001 Operating Instructions WD290
10532 © Belimed
Device description
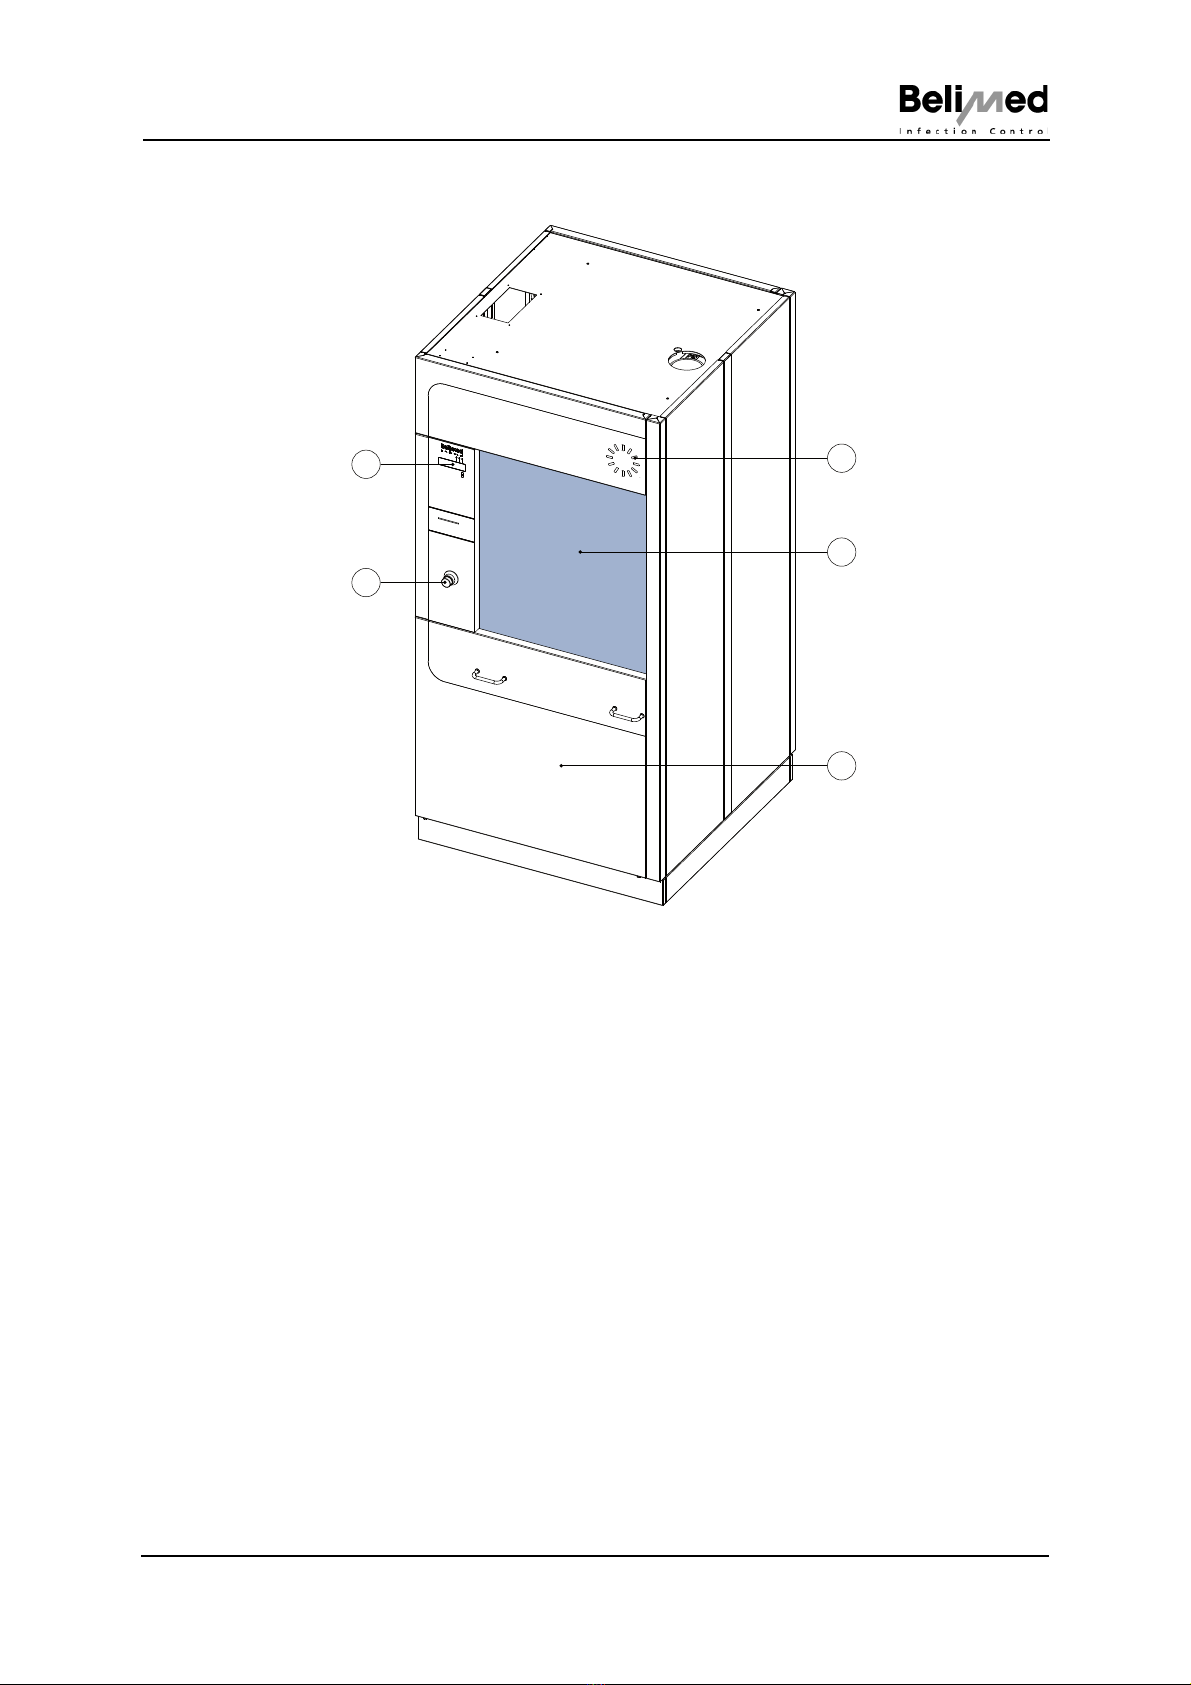
3.2 Device unloading side (US)
1 Process status display
2 Washing chamber door
3 Lower front panel
4 Emergency Stop
5 Operating unit
1
5
3
2
Fig 497
4
Device description
Operating Instructions WD290 001
9/49
© Belimed 10532
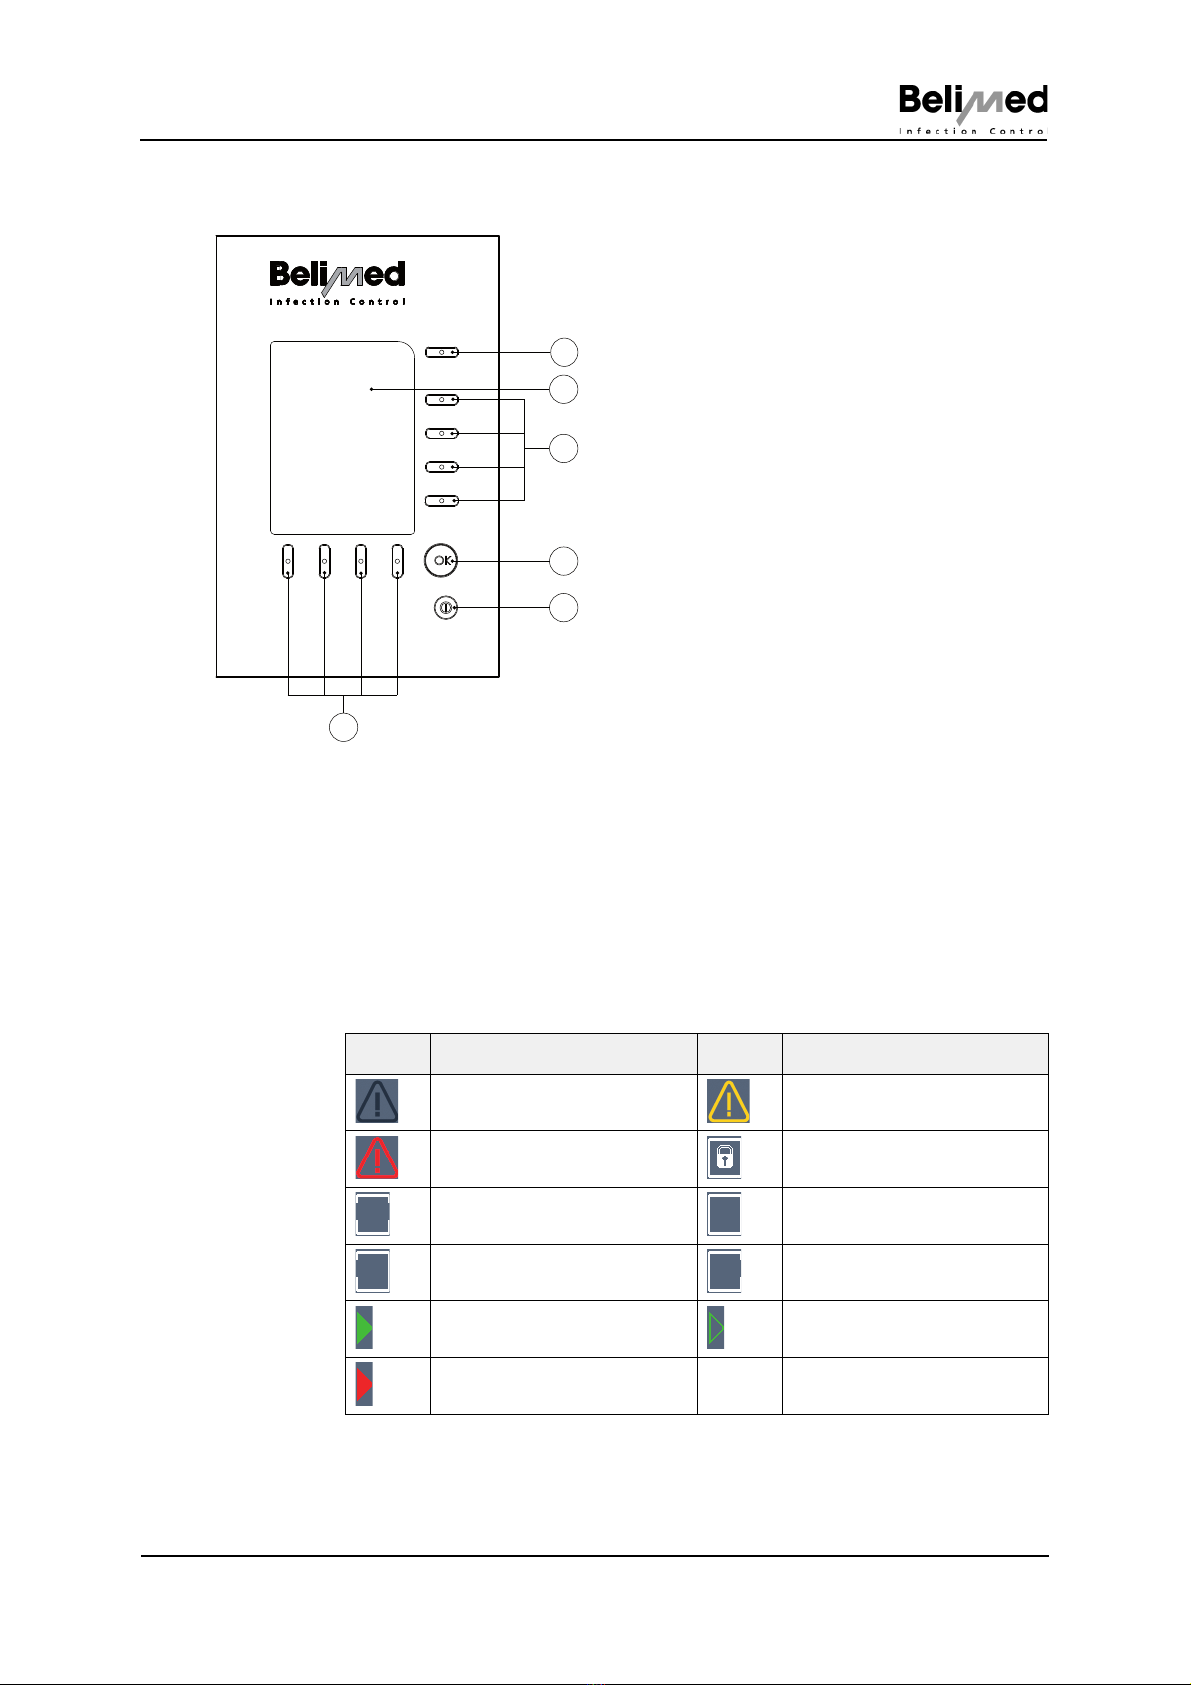
3.3 Operating unit on loading side (LS)
3.3.1 Description of operating unit on loading side
Status bar
The status bar draws attention to certain settings and events by means of icons
and data. The status bar is device-dependent and in each case has the same
content on all screens.
Status bar icons
1) Menu button
2) Display
– Displays the
status bar, communication bar,
activity bar, selection options
3) Selection buttons
4) Confirmation button <OK>
5) On/Off button
6) Activity buttons
1
3
4
Fig 499
5
2
6
Symbol Description Symbol Description
Message inactive Warning active
Error active Doors locked
Doors open Doors closed
Door on loading side open Door on unloading side open
Automatic system active Automatic system inactive
Automatic system error
10/49
001 Operating Instructions WD290
10532 © Belimed
Device description
Communication bar
The communication bar comprises an icon for the scroll wheel and a two-line text
display. The scroll wheel icon indicates, whether the operating unit is displaying
the "Home screen" or the "Information screen" .
Communication bar icons
Activity bar
The respective function options of the activity buttons are shown in the activity
bar. For screens with several pages, the respective page number and total num-
ber of pages is additionally displayed in the activity bar.
Activity bar icons
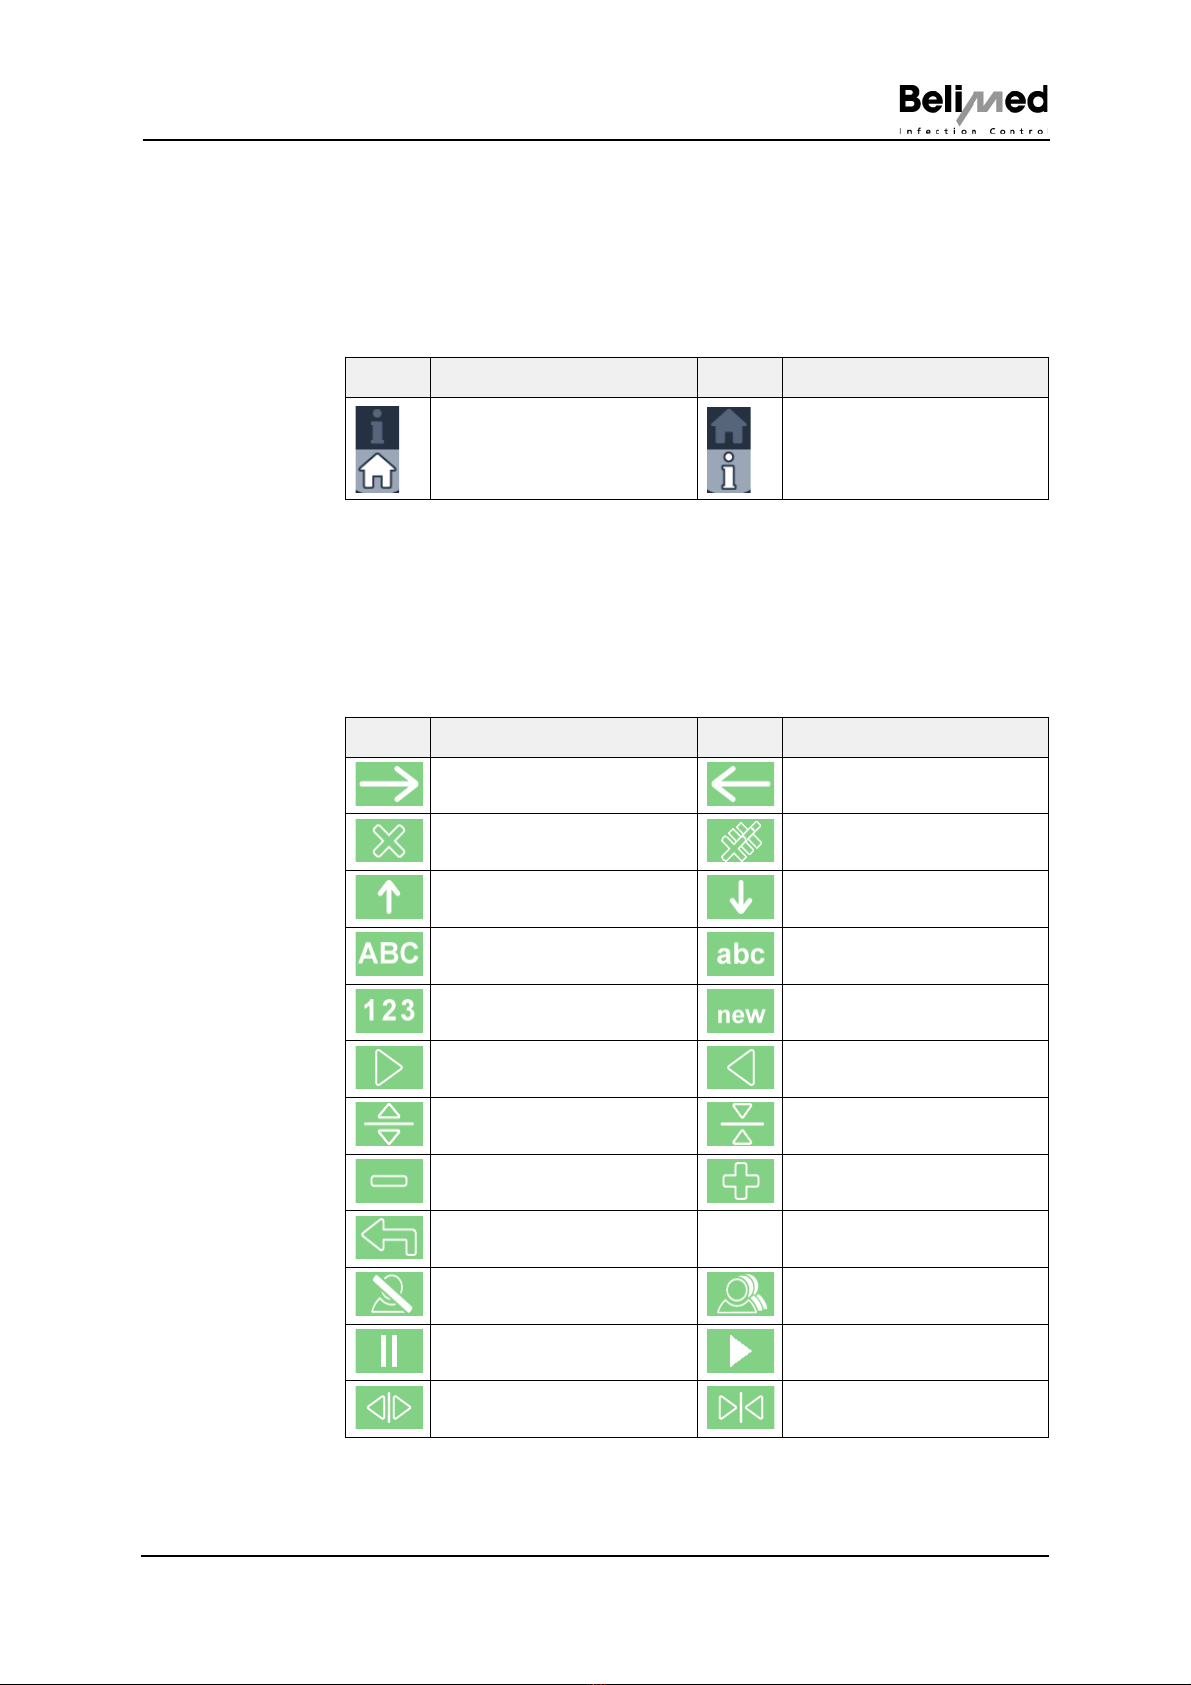
Symbol Description Symbol Description
Scroll wheel Home Scroll wheel Info
Symbol Description Symbol Description
Cursor forward Cursor back
Delete Delete all
Cursor up Cursor down
Capital letters Lower case letters
Numbers New
Page forward Page back
Open door Close door
Value minus (smaller) Value plus (larger)
Back
No user logged on New user
Program pause Program start
Deactivate door contact
pressure
Activate door contact pres-
sure

Device description
Operating Instructions WD290 001
11/49
© Belimed 10532
3.4 Operating unit on unloading side (US)
3.4.1 Description of operating unit on unloading side
Status bar
The status bar draws attention to certain settings and events by means of icons
and data.
Status bar icons
1) LED Displays
– a) LED Red flashes - Warning active;
LED Red lights permanently - error ac-
tive
– b) LED Green lights permanently -
Program cycle active
– c)LED Green lights permanently -
Doors locked
2) Display
– Displays the
Status bar, activity bar
3) Activity button
1
Fig 500
3
2
abc
Symbol Description Symbol Description
Automatic system active Automatic system inactive
Doors locked
Doors open Doors closed
Door on loading side open Door on unloading side open
12/49
001 Operating Instructions WD290
10532 © Belimed
Device description
Activity bar
The respective function option of the activity button is shown in the activity bar.
The options available depend on the respective machine status of the device.
Activity bar icons
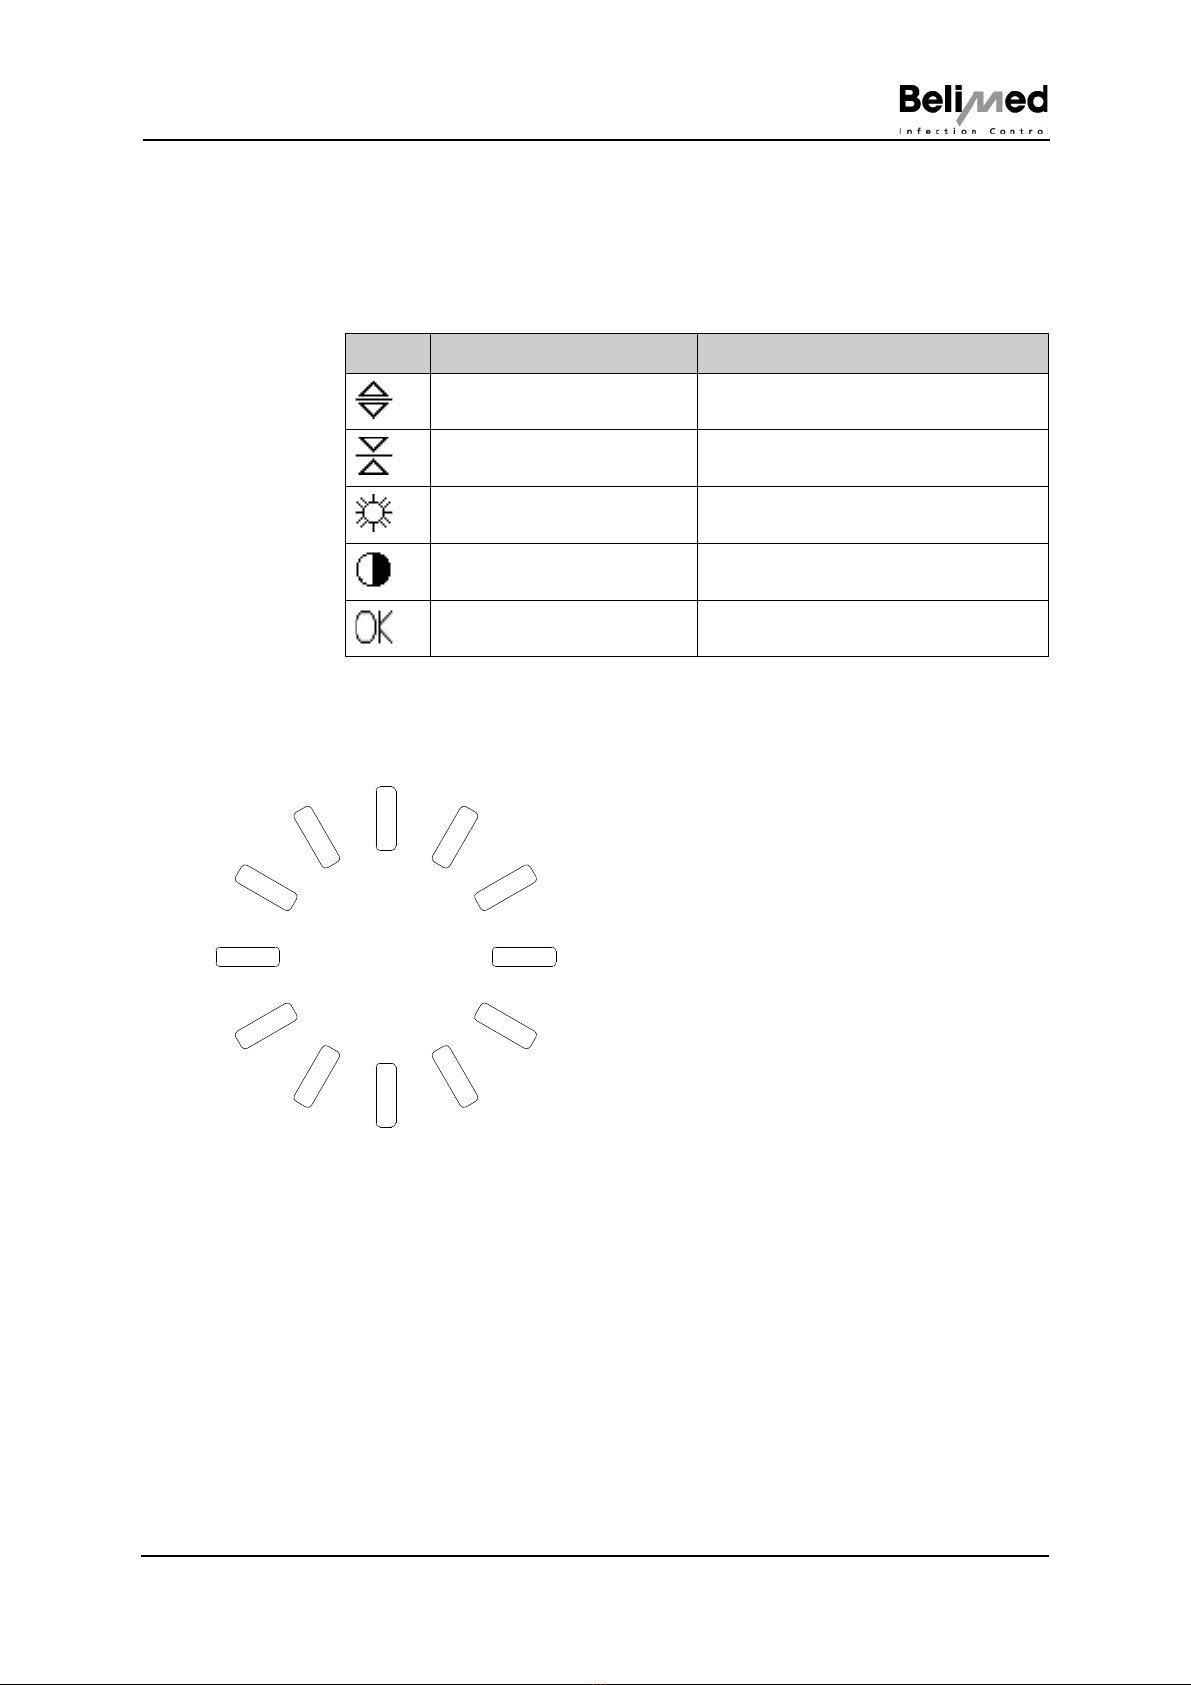
3.5 Process status display
3.5.1 Process status display description
Process status display
The process status display is located above the washing chamber door on the
loading side and the unloading side. The process status display shows the cur-
rent operating status of the device.
Symbol Description When displayed
Open door Program completed correctly, door
ready to open
Close door Door ready to close
Brightness and background
illumination setting
User setting, display settings for
unloading side
Contrast setting User setting, display settings for
unloading side
Confirmation of display set-
tings
User setting, display settings for
unloading side
•Display starting position
– All LEDs = Dark (no display)
•Program in Progress-Display
– see description
•Error display
– All LEDs = Red, flashing
•Process interruption display
– All LEDs = Red, flashing
*= 1. LED
Fig 576
*

Device description
Operating Instructions WD290 001
13/49
© Belimed 10532
Display while program is in progress:
• If the remaining run time is more than 55 min, a running light which rotates
clockwise is displayed.
• If the remaining run time is between 50 and 55 min, the first LED lights up.
Every 5 min, a further LED lights up.
• At the end of the program, all 12 LEDs flash.
• The LEDs are turned off when the door is opened or in the event of an error.
3.6 Procedure for changing settings
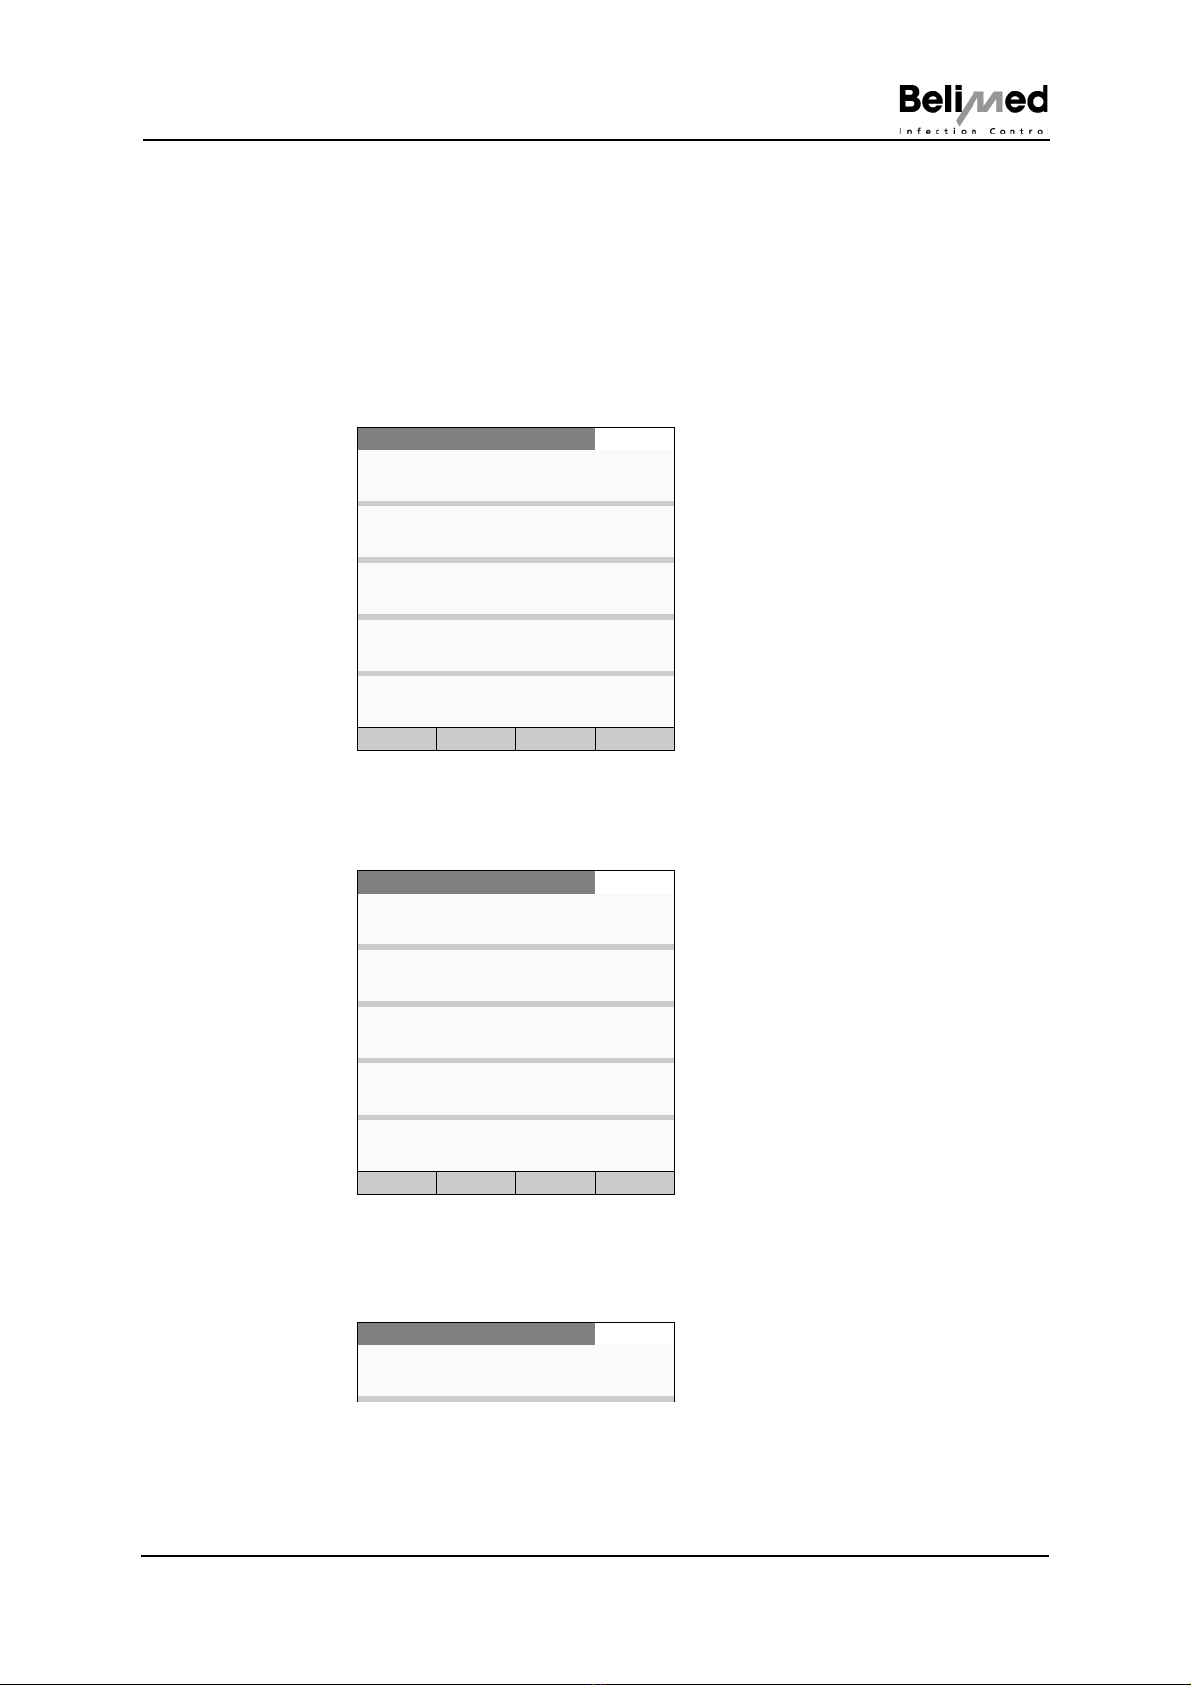
Example - Setting the date:
Select date display
The current cursor position is lighted up
Select value to be modified using the activity button
Increase value using activity button , or decrease with
After setting all values, confirm settings with <OK> -Button
O
Settings
Operating language
German
Date
09.02.2009
Weekday
Monday
Time
07:15
O

14/49
001 Operating Instructions WD290
10532 © Belimed
Device description
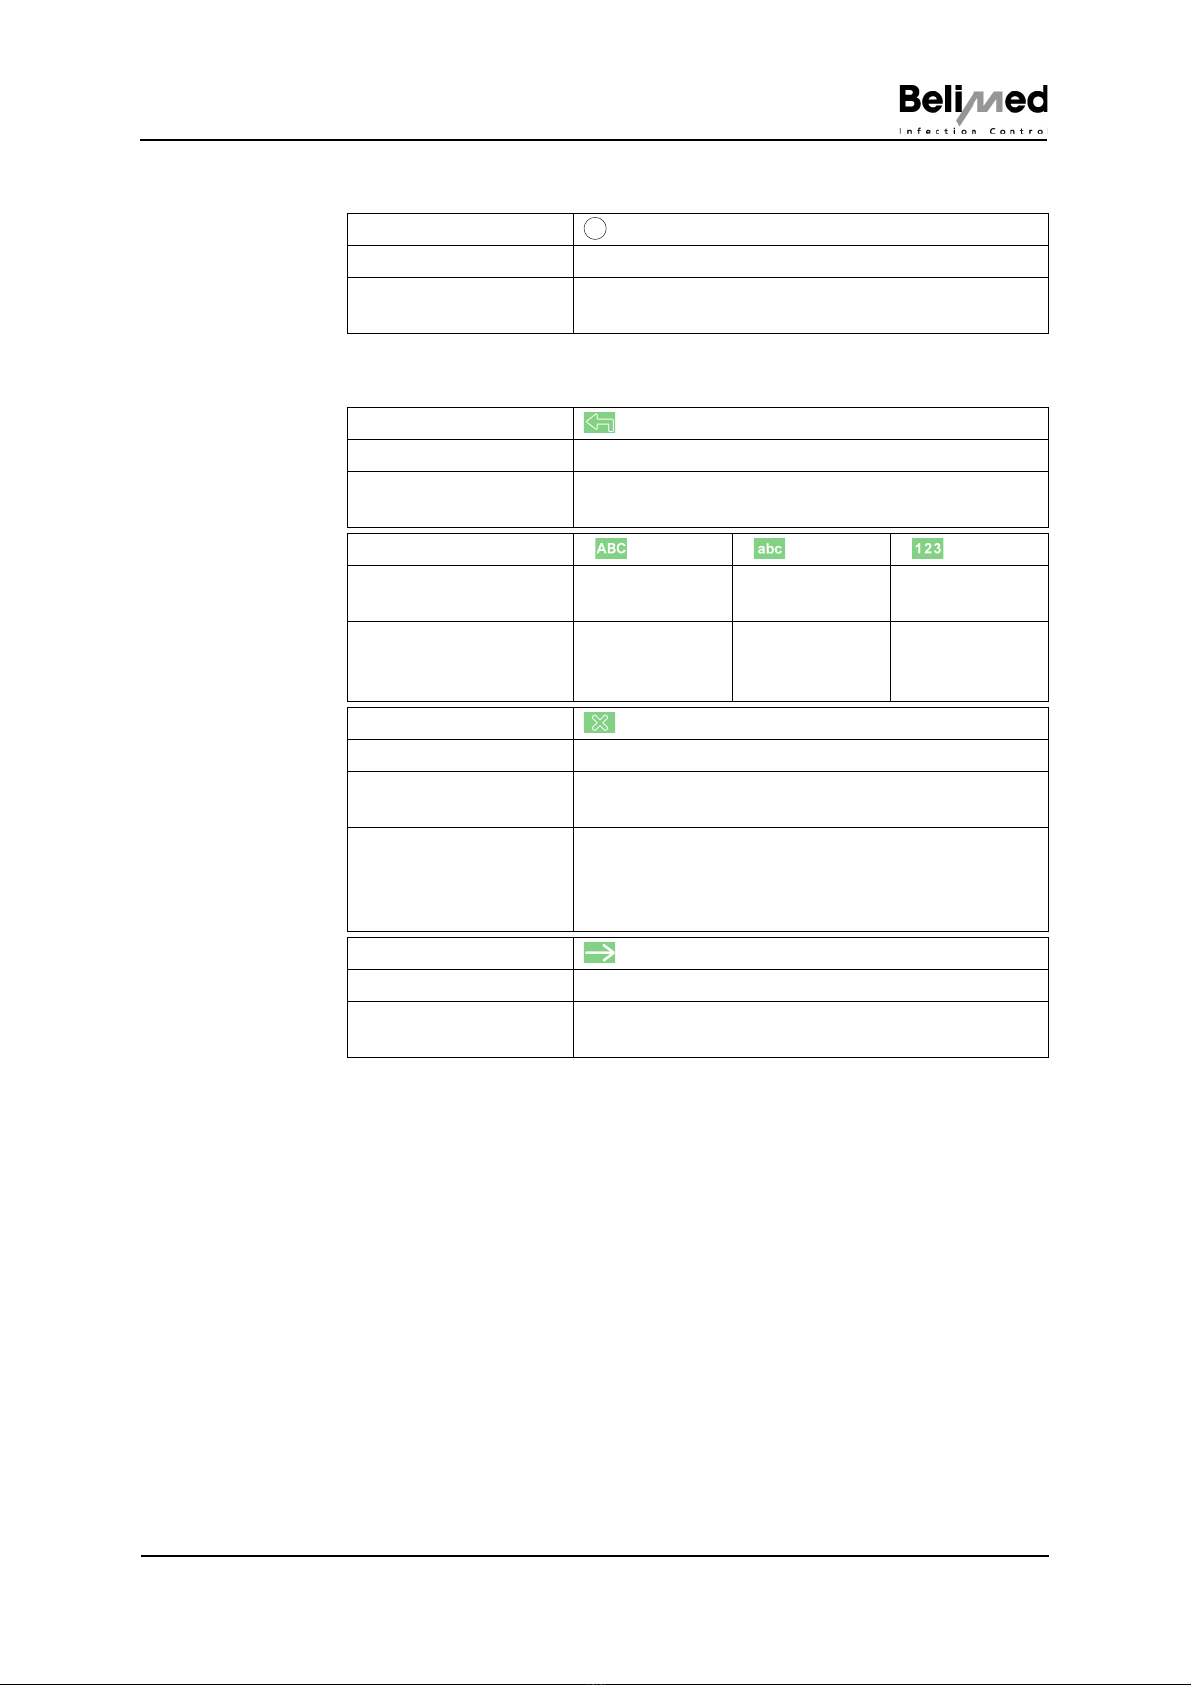
3.7 Alphanumeric entry
The alphanumeric entry screen consists of three separate screens.
1st screen = Capital letters
2nd screen = Lower case letters
3rd screen = Numbers
To change screens, press activity button > > .
Example - Capital letters:
3.7.1 Procedure for alphanumeric entry
If a text is to be edited, or if entry of a user password is required, the screen
switches to alphanumeric entry, and the text to be edited is copied into the line.
The cursor is positioned after the last character.
The initial screen is always the entry screen with capital letters. The line is de-
fined according to the screen that was selected before.
Only one character is edited at a time. The cursor position is indicated by the
background of the character flashing, the background alternating between white
and light green.
By pressing the <OK> -Button, the edited text is saved and the display reverts to
the original screen.
3.7.2 Operating buttons
Selection buttons
The characters of the respective line can be selected using the selection buttons.
Pressing for the first time selects the first character of the line. Pressing again
causes the cursor to jump to the next character on the right. After the last char-
acter, the cursor returns to the first character again.
O
XXX
XXX
A B C D E F G
H I J K L M N
O P Q R S T U
V W X Y Z _ -
S a m p l e t e x t
Device description
Operating Instructions WD290 001
15/49
© Belimed 10532
Confirmation button
Activity buttons
Icon:
Icon description: Confirmation button
Function when acti-
vated:
Display reverts to original screen; the edited text is
saved
Icon:
Icon description: Back
Function when acti-
vated:
Display reverts to original screen; the edited text is
not saved
Icon: > > > > > >
Icon description: Capital letters Lower case let-
ters
Numbers
Function when acti-
vated:
Screen switches
to capital letters
Screen switches
to lower case
letters
Screen switches
to numbers
Icon:
Icon description: Delete
Function when acti-
vated:
Deletes character at cursor position; cursor stays at
this position
Special function: For password entry (depending on activated option),
it is possible to log on the user under "No Identifica-
tion"; Display <NIdent>; when a character is
entered, the function switches to "Delete" -activity
Icon:
Icon description: Cursor forward
Function when acti-
vated:
Cursor moves forward one position
OK
16/49
001 Operating Instructions WD290
10532 © Belimed
Pre-treatment of the medical devices
4 Pre-treatment of the medical devices
4.1 Responsibility for pre-treatment
The operating company is responsible for pre-treatment of medical devices. The
best possible washing results are only to be achieved with correct pre-treatment
according to instructions.
4.1.1 SOP (Standard Operating Procedures)
The contents of the following criteria and specifications must be defined:
• Product responsibility
• Transport routes and disposal time (time for soiling to dry in)
• Type of soiling (blood, ointments, bone meal...)
• Material properties and compatibility of the items to be washed (risk groups
acc. to RKI Ordinance)
• Consideration of all operating instructions and reconditioning regulations for
medical devices
• Necessary knowledge of the medical devices to be reconditioned
• Maintenance plan and regular inspections
Belimed recommends producing work instructions which describe the procedure
within a working process.
4.2 Preparation of the medical devices
All inner and outer surfaces must be accessible for cleaning (open valves, taps,
articulated instruments...). Special attention should be given to the lumina. Dis-
assemble MIS or other complex instruments according to the manufacturer's
specifications.
Caution
Always observe the manufacturer's specifications for the medical device to
be treated!
Caution
Not all medical devices are suitable for mechanical reconditioning (see Chap.
2.5 "Fields of application for the device")

Pre-treatment of the medical devices
Operating Instructions WD290 001
17/49
© Belimed 10532
4.3 Pre-cleaning pre-treatment
Remove coarse soiling immediately after use. Dried-on blood or tissue reduces
the effectiveness of cleaning.
4.3.1 Impairment of subsequent cleaning
Various treatments fix proteins and may contribute to preserving prion infectiosi-
ty.
The following pre-treatment methods may cause impairments in subsequent
washing:
• Pouring antiseptic solutions on the items to be rinsed
• Pre-treatment with aldehydic disinfectants
• Pre-treatment with alcohol solutions
• Aldehyde and alcohol vapours
Note
We recommend cold rinsing of the pre-treated washing utensils prior to
mechanical cleaning and disinfection.
Caution
Excessive foam can prevent pressure building up in the cleaning system and
therefore impair optimal contact between the cleaning agent and the items to
be washed.

18/49
001 Operating Instructions WD290
10532 © Belimed
Preparation of the device
5 Preparation of the device
Open utility supply
Check the quantity of dosage media (see Chap. 16 "Errors")
Switch the device on with button (see Chap 3.3 "Operating unit on loading
side (LS)"). The start screen appears on the operating unit
Table 1: Start screen
Press the menu button (see Fig. 686). The menu screen is displayed
1 Menu
2 Menu button
3 Operating mode
Warning
Only operate the device if it is in a technically faultless condition! Damaged or
defective components must immediately be reported to technical support.
After a prolonged period without using the device (approx. 1 week), the
device must be prepared in accordance with the specifications for daily main-
tenance work (see Chap. 14 "Daily maintenance and cleaning tasks").
Program
P01
Program Name
P02
Program Name
P03
Program Name
P04
Program Name
O O
I
1
2
3
Fig 686

Preparation of the device
Operating Instructions WD290 001
19/49
© Belimed 10532
Table 2: Menu screen
Menu displays:
•Log on
(see Chap. 6 "User log-on")
•Automatic start / Autom. switch-off / Self-disinfection
(see Chap. 7 "Automatic start and switch-off, Self-disinfection")
•Machine information
e.g. machine type, machine name, machine number, ...
•Messages, Errors
Messages: Rectify error (see Chap. 16 "Errors")
Alerts: Notify technical support
•Settings
e.g. operating language, date, time, ...
•Cleaning the screen
•User Management
•Measurements
Menu
Log on
Automatic start / Autom. switch-off
/ Self-disinfection
Machine information
Messages, Errors
O O O
Menu
Settings
Cleaning the screen
User Management
Measurements
O O O
20/49
001 Operating Instructions WD290
10532 © Belimed
User log-on
6 User log-on
The user must log on each time before using the device. The log-on data are for-
warded to the printer or the digital documentation system and assigned to the re-
spective batch.
Log-on data are entered via the operating unit or via barcode reader.
6.1 Log-on via operating unit
After switching on the device, a program can be selected.
Select program. The background of the selected program is displayed in a
light shade
Confirm selection by pressing <OK> -Button. User log-on appears
Select list. The display for user password entry appears
Enter user password via operating unit
Display:
Program
P01
Program Name
P02
Program Name
P03
Program Name
P04
Program Name
O O
O
Log on
User 01
User 02
User 03
User 04
O O
O
User password
*****
Other manuals for WD 290
3
This manual suits for next models
1
Table of contents
Other BELIMED Washer manuals


Popular Washer manuals by other brands


Siemens
Siemens WM14E462GB series Instruction manual and installation instructions

Electrolux
Electrolux EW8F2848IB user manual

AEG
AEG OKO LAVAMAT 635 operating instructions

Bosch
Bosch WFMC5301UC - 500 Plus Series Nexxt Washer 4 cu.... Energy guide

Indesit
Indesit WMG 622 Instructions for use

Bosch
Bosch WGA2540XGC User manual and installation instructions


