Belkin F1PP000GN-SK - Wi-Fi Phone For Skype Wireless... User manual

Table of Contents
1. Introduction . . . . . . . . . . . . . . . . . . . . . . . . . . . . . . . . . . . . . 1
Package Checklist . . . . . . . . . . . . . . . . . . . . . . . . . . . . . . . . 1
Hardware Description . . . . . . . . . . . . . . . . . . . . . . . . . . . . . . 1
AC Power Charger . . . . . . . . . . . . . . . . . . . . . . . . . . . . . . . . 2
2. Installing the Battery. . . . . . . . . . . . . . . . . . . . . . . . . . . . . . 3
3. Charging the Battery . . . . . . . . . . . . . . . . . . . . . . . . . . . . . . 4
4. Powering On the Phone . . . . . . . . . . . . . . . . . . . . . . . . . . . . 5
5. Getting Started . . . . . . . . . . . . . . . . . . . . . . . . . . . . . . . . . . 6
6. Contacts . . . . . . . . . . . . . . . . . . . . . . . . . . . . . . . . . . . . . . . 15
7. Make and Receive Calls . . . . . . . . . . . . . . . . . . . . . . . . . . . 20
8. Connect to Networks . . . . . . . . . . . . . . . . . . . . . . . . . . . . . 28
9. Personal Settings . . . . . . . . . . . . . . . . . . . . . . . . . . . . . . . 33
10. General Settings . . . . . . . . . . . . . . . . . . . . . . . . . . . . . . . . 38
11. Appendix A: Specifications. . . . . . . . . . . . . . . . . . . . . . . . . 43
12. Compliances. . . . . . . . . . . . . . . . . . . . . . . . . . . . . . . . . . . . 45
Table of Contents

2
Introduction
1
2
1
The Wi-Fi Phone for Skype (the phone) enables you to use your normal
Skype account to make Skype calls without using a computer. This
affords you complete mobility, allowing you to talk from any location
from which you have an Internet connection through an access point.
Package Checklist
The phone package includes these items:
• One Wi-Fi Phone for Skype (F1PP000GN-SK)
• One Lithium-Ion Battery
• One AC Power Charger
• Quick Start Guide
• User Guide CD
Hardware Description
Before preparing the phone for use, first become familiar with its main
keys, buttons, and other hardware features.
Volume Button
Navigation Key
Left Soft Key
Send Key
Charge Port
USB/Power
Right Soft Key
End/Power Key
Headset Jack

2
11
12
13
Introduction
2
2
1
3
4
5
6
7
8
9
10
section
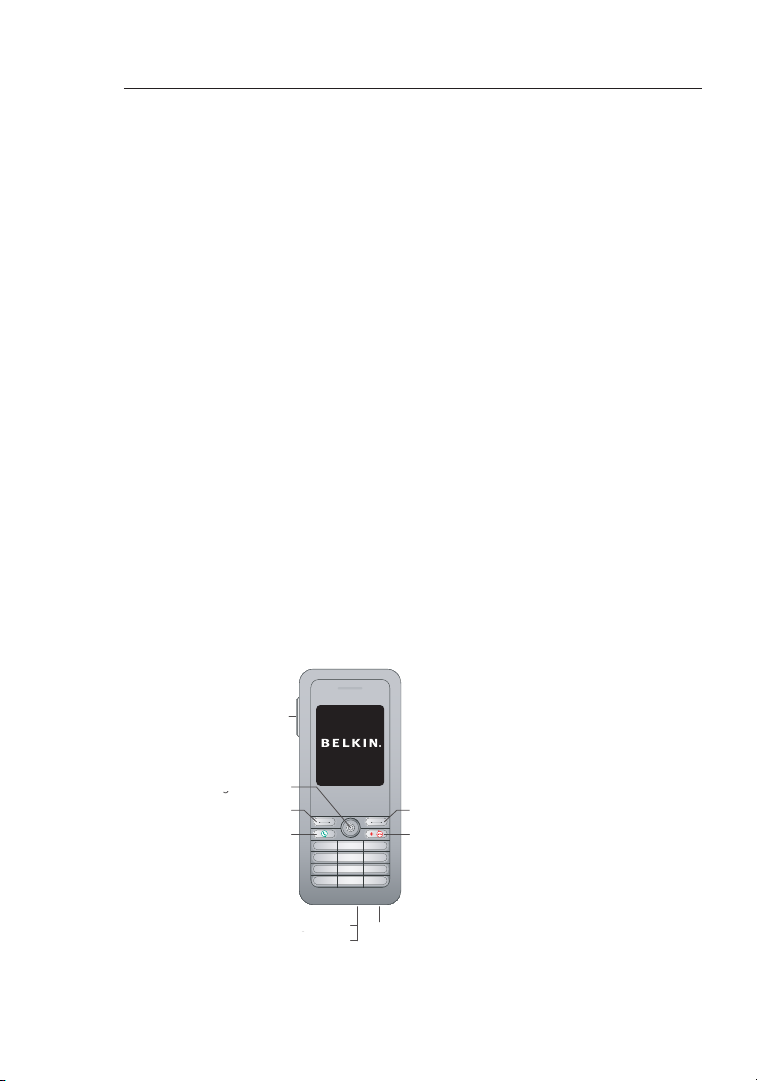
1. Navigation Key—Four-direction user-interface navigation key.
2. Right Soft Key—Selects the option at the bottom right corner of
the screen.
3. End/Power Key—Ends an active call.
• In OFF mode, turns the power on when held more than 2
seconds.
• In ON mode, turns the phone off when held for more than 4
seconds.
• In ON, press for two seconds to access the power-key menu.
4. Headset Jack—Jack for a headset connection.
5. USB/Power Charge Port—Power-charger connection for charging
the battery.
6. Alphanumeric Keypad—Includes 0–9, A–Z, *, and # keys.
• The [a/A *] key selects upper- or lowercase characters, numbers,
or hexadecimal characters.
• The [ 1 ] key selects common punctuation marks during text
input.
• The [ # ] key selects special characters and symbols during text
input.
7. Send Key—Calls a selected contact.
8. Left Soft Key—Selects the option at the bottom left corner of the
screen.
9. Volume Button—Adjusts volume of the speaker.
10. Keypad Lock—The phone keypad can be locked by pressing the
left soft key together with the [a/A*] key. Pressing the two keys
again unlocks the keypad.
AC Power Charger
The phone charges its installed battery when connected to the AC
power charger, when the charger is connected to a power source
such as a wall outlet. The power charger automatically adjusts to any
voltage between 100–240 volts at 50 or 60 hertz. No voltage-range
settings are required.

After unpacking the phone, install and charge the battery pack before
turning on the phone.
1. Remove Battery-Compartment Cover—Place the phone face
down. Push and slide down the battery-compartment cover until it
becomes free.
2. Install Battery—Place the battery into the compartment. Be sure
the text label on the battery is facing out and the battery’s three
metal contacts point to the top of the phone.
3. Replace Battery-Compartment Cover—Slide the battery-compartment
cover back onto the phone until it clicks firmly into place.
Notes:
• Use only the lithium-ion battery pack supplied with the phone.
• Do not try to install any other battery.
• To obtain replacement batteries, please purchase replacement lithium-
ion battery model: NP-60, used for digital cameras/camcorders made
by Fujifilm®, Pentax®, and Panasonic®.
3
Installing the Battery
Cover
Battery
Power Port

1. Connect the AC Power Charger—Lift up the rubber cover on the
mini-USB charger port and connect the power charger to the port.
Then, plug the charger into an AC electrical outlet.
2. Fully Charge Battery—For first-time use, allow three hours to fully
charge the battery before turning on the phone.
3. Disconnect the Power Charger—When the battery is fully
charged, remove the power charger from the phone and push down
the charger port’s rubber cover.
Notes:
• The power charger automatically adjusts to any voltage between
100–240 volts at 50 or 60 hertz.
• When you next have to charge the phone’s battery, you do not have
to power off the phone. Just connect the charger as described above
and wait until the LCD display indicates the battery is fully charged.
4
11
12
Charging the Battery
4
section
2
1
3
4
5
6
7
8
9
10
2

5
Powering On the Phone
Push and hold “End/Power” for more than two seconds to power on
the phone. The LCD display turns on showing the Belkin logo. Allow
30 seconds for the phone to start up. Go to the “Getting Started”
section to learn how to set up a Wi-Fi-network connection and start
using the phone.
5 6

11
12
13
Getting Started
6
section
2
1
3
4
5
6
7
8
9
10
The phone requires a wireless connection to a Wi-Fi access point in
order to make Skype calls.
You can configure the phone to connect to specific wireless networks
or search for “open” networks. Wireless-network information is stored
in the phone’s memory as “Preferred Networks”. These are searched
for each time the phone is powered on.
When powering on the phone for the first time, there are no Preferred
Networks in the phone’s memory. You need to select a wireless
network and sign in to your Skype account before you can start
making calls.
You must complete the following steps the first time you use your phone.
1. Select a language.
2. Read and accept the Skype Agreement.
Be sure to scroll down and read the entire
agreement before accepting.
6
4
1. Getting Started
1.1 First-Time Startup

87
Getting Started
87
Getting Started
After you have selected a language and accepted the Skype
agreement, your phone searches for available networks. This also
occurs whenever you power on the phone.
1. The Phone scans for available wireless networks.
2. Select a network.
Notes:
• If a network requires a security key, the phone prompts you for the key.
• Use the *a/A button to change to lowercase, uppercase, or numeric
entry when entering a network key.
• The access-key information is stored in the phone’s memory as a
“Preferred Network” and will be used the next time the phone is
powered on.
• Normally, you need to be within 300 feet (90m) of the wireless
access point to connect successfully.
1.2 Connect to a Network

8
11
12
13
Getting Started
8
section
2
1
3
4
5
6
7
8
9
10
After you have successfully accessed a wireless network, you can
sign in to Skype. If you do not have an existing Skype account, then:
1. Create a new account.
2. Create a Skype name.
3. Create a password.
4. Sign in.
Notes:
• Use the *a/A button to change to lowercase, uppercase, or numeric
entry when entering your Skype name and password.
• Skype names can be 6–30 characters. You can use any mix of
upper- and lowercase characters, numbers, and punctuation
marks. You cannot use spaces or start your name with a number
or punctuation mark. If the name is already in use, you will be
prompted to try another name.
1.3 Create a New Skype Account

109
Getting Started
109
Getting Started
When you have a Skype account, you can sign in to Skype.
1. Sign in to Skype.
2. Enter your Skype name.
3. Enter your password.
Notes:
• Use the *a/A button to change to lowercase, uppercase, or numeric
entry when entering your password.
• You can choose to automatically sign in with your Skype name and
password on subsequent sign-ins.
• On initial startup, it may take a few minutes to upload a large
Contact list.
1.4 Sign In to Skype
• Passwords can be 4–20 characters. You can use any mix of upper-
and lowercase characters, numbers, and punctuation marks. You
cannot use spaces, start your name with a number or punctuation
mark, or use your Skype name as a password.

10
11
12
13
Getting Started
10
section
2
1
3
4
5
6
7
8
9
10
After you have created your Skype account, you can call other people
with Skype accounts for free. Skype also offers additional features,
including:
SkypeOutTM SkypeOut allows you to place calls to
traditional landline and mobile phones.
SkypeInTM SkypeIn is a subscription feature that provides
you with a traditional phone number for
receiving Skype calls on your phone from
traditional landlines and mobile phones.
Skype
VoicemailTM
Skype VoicemailTM allows you to send and
receive voicemail messages and record a
greeting.
All of these features are available at www.skype.com.
1.5 Skype Features

1211
Getting Started
1211
Getting Started
The phone’s LCD display provides various status indicators and
access to the menu-based interface. The illustration below shows the
main screen and its elements.
1.6 LCD Display
Left Soft Key Action
Skype Credit
Skype Online Status
Wireless-Signal Status
Current Time
Right Soft Key Action
Battery Status
Notifications

12
11
12
13
Getting Started
12
section
2
1
3
4
5
6
7
8
9
10
Wireless-Signal
Status Indicates the strength of the wireless-network signal.
No detectable signal
Weak wireless signal
Good wireless signal
Strong wireless signal
Battery Status Indicates the status of the battery.
Low level
Partially charged
Fully charged
Charging
Notifications Displays notification icons.
Missed call
New voicemail
Authorization request
Silent mode is active
Keypad locked
Skype credit is close to expiry
Headset attached
Skype Online
Status Indicates your current Skype online status.
Online
Offline (not signed in)
Do not Disturb. Indicates you are busy.
Skype Me. Available for calls from anyone.
Invisible. Still online, but unseen by others.
Current Time The currently set time.
Skype Credit Your current Skype-credit balance.
Left Soft Key
Action The action that happens when you press the left soft key.
Typically, the left soft key selects the current menu item
or confirms a setting. From the main screen, it provides
access to the user menu.
Right Soft Key
Action The action that happens when you press the right soft
key. Typically, the right soft key cancels the last action or
returns to the previous screen. From the main screen, it
provides access to your list of contacts once signed in.

1413
Getting Started
1413
Getting Started
The main menu provides easy access to all of your Skype and phone
settings. The menus are easy to navigate using the 4-way navigation
key. Just move the navigation key up or down to highlight a menu
item, then push down on the key to select the item.
The following table outlines the main-menu items.
Connect
(Shown when not
connected to a network)
Allows you to connect to a network.
Sign In
(Shown when not
connected to a network)
Allows you to sign in to Skype.
Contacts Lists your contacts and their current
Skype status once you are signed in.
History Lists your missed calls, incoming
and outgoing calls, voicemail, and
authorizations.
Status Displays your Skype connection
status.
Add contact Adds a Skype or SkypeOut number to
your Contact list.
Services Sets up Skype credit, SkypeIn, and
voicemail.
Settings Provides access to Skype, wireless
network, and phone settings that can
be viewed or changed.
1.7 Main Menu

14
11
12
13
Getting Started
14
section
2
1
3
4
5
6
7
8
9
10
Access the power-key menu by pressing “End/Power” for more than
two seconds and then releasing it. Be sure not to press the key for
more than four seconds—this immediately switches the phone OFF.
The items listed in the power-key menu depend on your current
network connection and Skype sign-in status. If you are not
connected to a network and not signed in to Skype, only a few menu
items are displayed. If you are connected and signed in, all of the
items are displayed.
The following table outlines the main-menu items.
Connect and Sign In
(Shown when not
connected to a network)
Allows you to connect to a network
and sign in to Skype.
Switch off Powers off the phone.
Silent Sets the ringtone volume to off.
My Profile Allows you to change your Skype-
profile information.
Sign In/Out Signs in or out of Skype.
Network Details Displays wireless-network-connection
information.
Find/View Networks Displays a list of detected wireless
networks.
1.8 Power-Key Menu

1615
Contacts
1615
Contacts
Your Contact list displays all of the names to which you can make
calls. If you have an existing Skype account, your Contact list is
automatically downloaded when you sign in. If you are new to Skype
and have just created an account, your Contact list will be empty.
You will need to add contacts to your list.
Skype protects the privacy of users by requiring authorization on
names that you wish to add to your Contact list. When you add a
name to your list, an authorization request is sent to the user. The
user can accept or deny the request. When a request is accepted,
you can see when the contact is online and make calls to him or her.
You can also view his or her personal-profile details.
2. Contacts

16
11
12
13
Contacts
16
section
2
1
3
4
5
6
7
8
9
10
To add a Skype contact, select “Menu”, then:
1. Select “Add Contact”.
2. Select “Skype”.
3. Enter the Skype name or full name.
4. Select “OK”.
Note:
• After you select “OK” in step 4, an authorization request is sent
to the contact. When it has been sent, a confirmation message is
displayed. The name is added to your Contact list, but is grayed
out, pending authorization by the contact.
2.1 Add a Skype Contact

17
Contacts
To add a SkypeOut contact, select “Menu”, then:
1. Select “Add Contact”.
2. Select “SkypeOut number”.
3. Enter contact’s name.
4. Enter full phone number.
5. The number is added to your contact list.
2.2 Add a SkypeOut Contact

11
12
13
Contacts
18
section
2
1
3
4
5
6
7
8
9
10
To search for contacts, select “Menu”, then:
1. Select “Search”.
2. Enter the Skype name or full name.
3. Select a name.
4. Select “Options” then select “Add to Contacts”.
2.3 Search for Contacts
Notes:
• SkypeOut allows you to make calls to traditional landline and mobile
phones. Go to www.skype.com to learn more about SkypeOut.
• SkypeOut numbers (even local numbers) must be entered in the
following format: “00” + “country code” + “area code” + “number”.
You can also use “+” or “011” before the country code. For
example: “+1 555 555 1234”.
• Use the *a/A button to change to lowercase, uppercase, or numeric
entry when entering a contact name and phone number.
Other manuals for F1PP000GN-SK - Wi-Fi Phone For Skype Wireless...
1
This manual suits for next models
1
Table of contents
Languages:
Other Belkin Cordless Telephone manuals