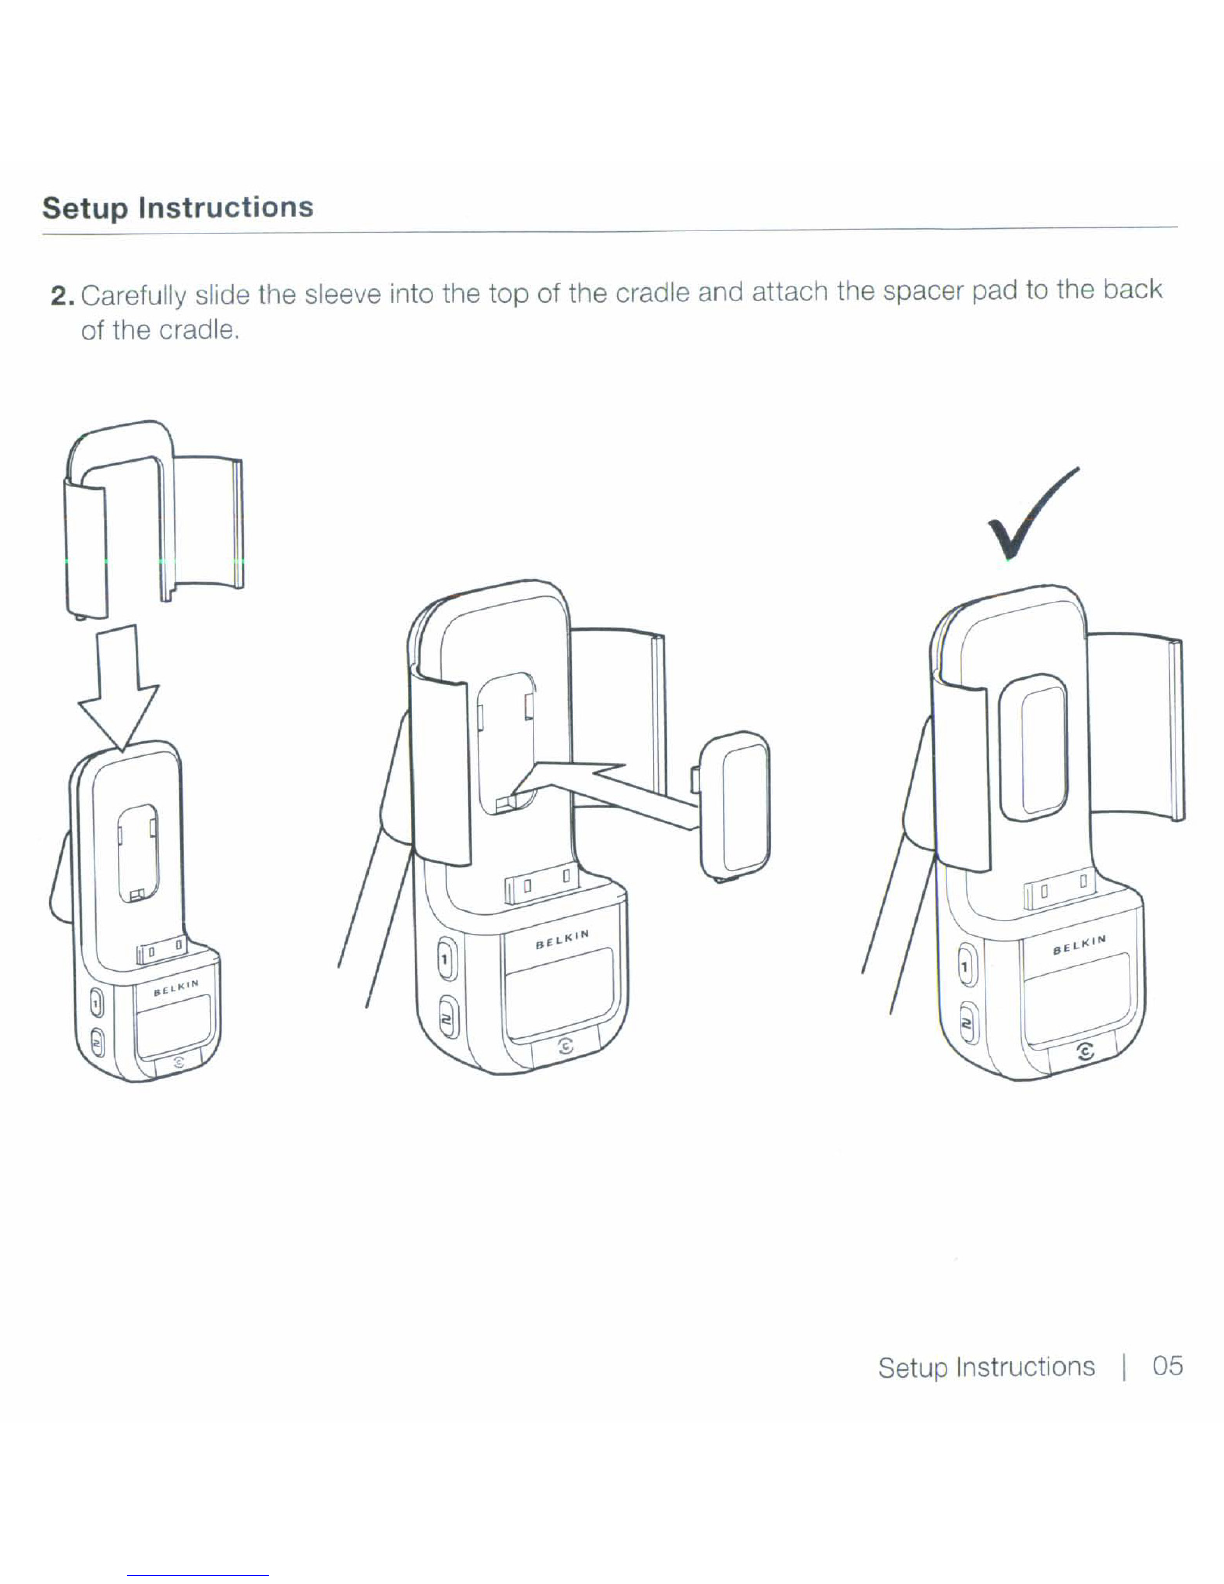
Belkin TuneBase FM User manual

User Manual
•

Introduction
Your TuneBase
FM
can be used to charge, hold, power, and play your iPod as you drive. This
User Manual explains
how
you can use your TuneBase
FM
to get the
most
from your iPod,
virtually anywhere you go.
iPod Models You Can Use with Your TuneBase FM
Your TuneBase
FM
can be used with the following iPod models:
IiPod Version
of
Firmware
iPod touch 1.1.3
iPod nano 3rd generation
(video)
1.1
iPod classic 1.1.1
iPod nano 2nd generation 1.1.3
iPod with video 1.2.3 and above
iPod nano 1st generation: 1
.3.1
and above
iPod with color display 1
.2.1
and above
iPod 4
th
generation 3.1.1 and above
IiPod mini 1
.4.1
and above
Note: iPod
3'd
generation
is
not supported.
To
check the firmware version of your iPod, select "Settings" and then select "About".
Your version
is
listed under "Version".
If
your firmware
is
out of date, you can use iTunes to
automatically update your iPod. See http://www.apple.com/ipod/download.
Introduction I
01

What's in
the
Box
TuneBase
FM
Adapter Sleeves
Spacer
Pads
/
c:I
=
~
tv
0-
lIT
--all
BEl-KIN
(J
\.
\:
:;;
- / j
/"
r0
Fit Ring
What's
In
the Box I02

Setup Instructions
Your TuneBase
FM
for iPod includes seven adapter sleeves and five spacer pads for
all
supported iPod models,
1. Select the correct sleeve and pad for your model of iPod from the chart below,
iPod Model Capacity Sleeve Pad
'"
•
iPod
touch 8GB/16GB/32GB
•
~
iPod
nano
3rd generation 4GB/8GB
@
(video)
B80GB
iPod
classic
@160GB
iPodtouch
nano3rdgen
iPod classic
iPod classic
none
o
B
@
iPod
nano
2nd generation 2GB/4GB/8GB none
Setup Instructions I03

Setup Instructions
iPod Model
iPod
with video
iPod nano
1st generation
iPod with
color display
Capacity
30GB
60GB/80GB
1
GB/2GB/4GB
20GB/30GB
40GB/60GB
Sleeve
iPod photo
iPod photo
Pad
o
none
D
o
•20GB ( )
iPod
4th generation
40GB
()D
o
iPod mini 1st
generation
4GB/6GB
none D
Setup
Instructions
I
04

Setup Instructions
2.
Carefully slide the sleeve into the
top
of
the cradle and attach the spacer pad
to
the back
of the cradle,
Setup Instructions I05

Setup Instructions
(0)
(6)
(A)
3.
Turn
down your stereo volume.
4. Connect your TuneBase
FM
to the cigarette lighter adapter
or
power outlet
In
your vehicle.
The
LED
on yourTuneBase
FM
indicates proper connection.
Warning:
Be careful when rotating the connector
in
the cigarette lighter adapter or power
outlet.
If
you experience resistance, unplug the connector and reinsert
It
in
the desired
position. Failure to
do
so may damage the cigarette lighter adapter or power outlet.
Note: Cigarette lighter adapters vary
in
size
in
different vehicles.
In
some cases, the fit can be
improved by pressing the collar (included with yourTuneBase
FM)
into the power outlet before
inserting the connector. However, the collar will not usually be needed.
A.
Be
sure to position the ring securely around the metal contact to ensure
proper electrical connection.
B. Power source (cigarette lighter adapter or power outlet)
C.
Fit
ring
D. Connector
5. Bend the flexible neck to your desired position.
6. Carefully slide your iPod into the cradle at the
top
of your TuneBase
FM.
The
iPod
will
power on if the vehicle's battery
is
on.
Warning:
To
avoid damaging your iPod, please remove your
iPod from your TuneBase FM's cradle before disconnecting
your TuneBase
FM
from the power outlet.
Note:
Your iPod will automatically pause if your TuneBase
FM
IS
removed from the cigarette lighter
or
if the vehicle
is
turned off.
Setup Instructions I
06

Basic
Controls
Using Your TuneBase
FM
Your TuneBase
FM
will automatically turn on when your iPod
is
connected and power
is
available, and
It
will automatically turn off when your iPod
is
removed or if power
becomes unavailable.
Using ClearScan to Find
the
Best FM Frequency (recommended)
Your TuneBase
FM
uses ClearScan technology to scan for the clearest
FM
frequencies
in
your area.
If
you hear any interference:
1. Press the "ClearScan" button.
luneBase
f-M
Will
display the words
..
tune to followed
by aclear frequency.
It
will then start transmitting
on
this new frequency.
2.
Tune
the stereo to the frequency on your TuneBase
FM
display.
3.
If
you hear interference on the new frequency,
just press the "ClearScan" button again and
tune your stereo to the new frequency.
Note:
If
you immediately press the ClearScan
button when you turn on your TuneBase
FM,
it may take up to 30 seconds for ClearScan to
locate the best frequency.
Basic Controls I07

Using
the
TuneBase
FM
Manually
Selecting
an
FM
Frequency
If
you want to use aspecific frequency, you can manually select
it
on your TuneBase
FM.
1.
Tune
your stereo
to
afrequency with aweak signal.
If
possible, try to find afrequency that
is
not broadcasting aradio station.
To
identify the best available frequencies
in
your area,
visit www.belkin.com/mybestfm.
2. Press the +or -button
on
your TuneBase
FM
to select the same frequency. Pressing
and holding either button will provide faster tuning.
Storing
a
Preset
Frequency
When you find aclear
FM
frequency, you can store
It
for later
use.
You
can store
two
radio
frequencies
uSing
the 1and 2preset buttons.
1.
If
you are not currently
on
the frequency you want to store, use the +or -buttons to
select the frequency.
2. Press and hold the 1or 2preset button for
two
seconds.
You
will hear abeep when the
new frequency
is
programmed.
Selecting
a
Preset
Frequency
Press the 1or 2preset button. Your TuneBase
FM
Will
change
to
the preset frequency.
Using
the
Audio-Out
Jack
and
a
Cassette
Adapter
Your TuneBase
FM
is
equipped with a3.5mm audio-out jack.
If
you cannot find aclear
FM
frequency, you can connect the 3.5mm audio-out jack on your TuneBase
FM
directly to
your stereo
(if
line-in
is
available) or to acassette adapter. Note: When making this type of
connection, TuneBase
FM
and your car stereo should be turned off
to
eliminate possible
damage caused by electrostatic discharge
(ESD).
Using the TuneBase FM I08

Using
the
TuneBase FM
Using the PRO Setting to Improve
Performance
When you connect your iPod, your TuneBase
FM
will automatically adjust the volume for your
iPod model. Although the default volume setting will be ideal for most conditions, you may
be able to improve the audio performance of your TuneBase
FM
by
using the
PRO
setting.
Professional
FM
stations use dynamic compression to make musIc louder and fuller while
limiting distortion.
You
can use the three
PRO
se
tings
on
your TuneBase
FM
to add dynamic
compression to your audio:
Nu,mal -No change to the audio. This setting
works
well
with all types of audio.
PRO 1 - Increases the average volume
of
the audio. ThiS
setting works well with most types of
mUSIC.
PRO 2 - Increases the average volume even further. ThiS
setting works well with qUieter musIc.
but
It
may cause
distortion with louder musIc.
pr~
Increases the average volume and transmits
In
mono
(Instead
of
stereo). This setting works well for
podcasts and auolo books.
It
can also be used to Improve
reception
If
you
are not receiving aclear signal from your
TuneBase FM.
Your TuneBase
FM
displays the current
PRO
setting. Pressing the "PRO" button changes the
setting
as
follows:
NORMAL---+~
pr01
--
....
~
pro
2
--
....
~
pro~
tI
Listening to
Mono
Recordings
Your TuneBase
FM
transmits
in
stereo, but you can transmit
In
mono if needed.
We
suggest
that you switch to mono transmission
if
your stereo
is
not receiving aclear signal from your
TuneBase
FM
or if you
are
listening to amono recording such
as
apodcast or audio book.
To
switch to mono transmission, press the "PRO" button until the
pro~
setting appears.
The
PRO
button settings are
as
follows:
NORMAL-
.....
~
pr01
--
....
~
pro
2
--
....
~
pro~
t1
Using
the
TuneBase FM I09

Troubleshooting
You
can quickly solve most problems with your TuneBase
FM
by following the advice
in
this section.
NUT
METAL WASHER
FRICTION WASHER
FUSE
FIG.A
CONTACT
_____
SPRING
INOT
PICTUREDI
To
replace the fuse, you will need to remove
the front of the cigarette lighter adapter.
The front of the cigarette lighter adapter
is spring-loaded. Remove it slowly and
carefully using pliers so that
it
does not get
lost. Purchase anew fuse at
an
auto supply
store. Please refer to
Fig.
Afor correct order
of assembly.
Be
sure to tighten the nut firmly
with pliers.
Your iPod
is
not charging.
Solution
•Make sure your TuneBase
FM
is
correctly connected to the power outlet.
The green indicator light on your TuneBase FM's cigarette lighter adapter should be lit
at
all
times.
•Check
to
see that the iPod
is
pushed
all
the way into the cradle.
•Make sure the power outlet
is
receiving power. Some vehicles do not provide power to
the power outlet unless the vehicle
is
in
ignition mode or the engine
is
running.
•
If
none of these solutions solves the problem, the fuse
in
your TuneBase
FM
might be
burned out. Carefully follow the steps below to replace the fuse.
Use aclean,
level
surface to disassemble
your TuneBase
FM
so that components do
not get lost.
Do
not attempt to change the
fuse
in
avehicle.
Troubleshooting I
10

Troubleshooting
FIG. C
cut~
D
@
FIG. B
cut~
~
cut
•Some power outlets will not fit
all
four protrusions of the collar.
In
order
to Improve the fit of the cigarette lighter adapter
in
the power outlet
of the vehicle, you can cut the collar to
size.
You
can use sCissors to
carefully cut
as
many protrusions
as
you need. Cut the protrusions
from one side to the other, and try to fit your TuneBase
FM
into the
power outlet after each cut.
(Fig.
C).
Your TuneBase FM
and
iPod
are
in
the
way of your vehicle's controls.
Solution
•Use the flexible gooseneck and the articulation behind the docking
cradle to position your TuneBase
FM
away from your vehicle's
controls.
Try
to position the gooseneck
in
as
close to an upright
position
in
relation to the adapter
as
possible
(Fig.
B).
Your TuneBase
FM
rotates
out
of
position around
the
center of
the
power
outlet.
Solution 1
•Be sure
to
solidly attach your TuneBase FM's cigarette lighter
adapter
to
the power outlet. Test the stability
by
pushing
it
sideways before driving.
Solution 2
•
In
some vehicles, the power outlet IS wider than
the
cigarette lighter
adapter.
You
may notice a
Wiggle
in
your TuneBase
FM
when you push
it.
In
that case, fit the provided collar around your TuneBase FM's
cigarette lighter adapter. Then, attach the cigarette lighter adapter to
the power outlet. Slide the collar into the power outlet, making sure
that
all
four protrusions securely fit into the power outlet.
Solution 3
Troubleshooting
11

Troubleshooting
Your TuneBase
FM
connects firmly to the power outlet, but it still rotates.
Solution
•Check to
see
if
the
power
outlet
rotates
in
its
socket.
If
so,
please
consult
your
vehicle's
manufacturer.
You
cannot insert the cigarette lighter adapter into the power outlet.
Solution
•
The
cigarette
lighter
adapter's
friction
washer
may
need
to
be
centered.
Carefully
follow
the
steps below
to
center the
friction
washer.
•
Use
a
clean,
level
surface
to
disassemble your
TuneBase
FM
so
that components do
not
get
lost.
Do
not attempt to center
the
washer
in
a
vehicle.
•
To
center
the
washer,
you
will
need
to
loosen
the
nut
on
the front
of
the
cigarette
lighter
adapter.
Use
pliers
to
slightly
loosen
the
nut.
It
is
not necessary
to
remove
it.
Move
the
friction
washer
back
into
centered position.
Use
pliers
to tighten
the
nut
firmly.
The
rubber
washer remained
in
the
power
outlet
when you
removed your TuneBase FM.
Solution
•
This
is
rare,
but
if it
occurs
you
can
remove
the
rubber washer
from
the
power outlet
and
place
it
back
on
the
cigarette
lighter
adapter.
•Disconnect the vehicle's battery. Any attempt to remove the washer without
disconnecting the battery may result
in
physical harm to
you
or damage to
the vehicle.
•
Use
pliers
to
carefully
remove
the
friction
washer
from
the
power
outlet.
Place
the
friction washer
back
on
the
cigarette lighter
adapter.
Then,
reconnect
the
vehicle's
battery.
Troubleshooting I
12

Information
Safety
Warnings
Your TuneBase
FM
requires full concentration and both hands to install. Do not
attempt
to
connect
your
TuneBase
FM
while
driving. Make sure your TuneBase
FM
fits securely and firmly into the power outlet
before driving. After installation, make sure your TuneBase
FM
does not freely rotate
in
the power outlet.
Do
not
attempt
to
adjust
or
retrieve
an
unsecured
TuneBase
FM
or
iPod
while
driving. Adjust your
TuneBase
FM
so that your TuneBase
FM
and iPod do not interfere with any of the operating controls of the
vehicle.
Do
not
insert
any
objects
other
than
the
cigarette
lighter
adapter
into the
power
outlet
without
disconnecting
the
battery
of
the
vehicle
first. Failure
to
observe
this
safety
warning
can
result in
injury
or
property
damage.
Belkin does not assume any responsibility for personal Injury or property damage incurred due to hazardous
driving
as
aresult of interaction with the TuneBase
FM,
the iPod, or the vehicle's power outlet.
FCC
Statement
Declaration
of
Conformity
with
FCC
Rules
for
Electromagnetic
Compatibility
We,
Belkin International, Inc., of
501
West Walnut Street, Compton, CA 90220, declare under our sole
responsibility that the product:
F8Z176
to which this declaration relates, complies with Part
15
of the
FCC
Rules. Operation is subject to the following
two
conditions:
(1)
this device may not cause harmful interference, and
(2)
this device must accept any
interference received, including interference that may cause undesired operation.
Belkin International, Inc
..
is not responsible for any interference caused by unauthorized modifications to this
equipment. Such modifications could void the user's authority to operate this equipment.
ICES
This Class 8digital apparatus complies with Canadian ICES-003.
IC
This Class 8digital apparatus complies with Canada RSS-210.
~ON10117
Information
13

Belkin International, Inc. Three-Year
Product
Warranty
What
this
warranty
covers.
Belkin Intemational, Inc. ("Belkin") warrants to the original purchaser of this Belkm product that the
product shall
be
free of defects in des'9n, assembly, matenal,
or
workmanship.
What
the
period
of
coverage
is.
Belkin warrants the Belkin
product
for three years.
What
will
we
do
to
correct
problems?
Belkin will repair
or
replace. at Its option, any defective product free of charge (except for
shipping charges for the product). Belkin reserves the right to discontinue any of its products without notice, and disclaims any limited
warranty to repair
or
replace any
such
discontinued products.
In
the event that Belkin is unable to repair or replace the product (for
example, because
it
has been discontinued), Belkin will offer either arefund
or
acredit toward the purchase of another product from
Belkin.com in an amount equal to the purchase price of the
product
as eVidenced on the original purchase receipt as discounted by
its natural use.
What
is
not
covered
by
this
warranty?
All
above warranties are null and void if the Belkin product is not
provded
to Belkin for
inspection
upon
Belkin's request at the sale expense of the purchaser,
or
if Belkin determines that the Belkin product has been
Improperly Installed, altered
In
any
way,
or tampered
With.
rhe
~elkln
Product Warranty
does
not protect against acts
01
God such as
flood, lightning, earthquake. war, vandalism, theft, normal-use wear and tear, erosion, depletion, obsolescence, abuse, damage
due
to
low voltage disturbances
(i.e.
brownouts or sags), non-authorized program,
or
system equIPment modification
or
alteration.
How
to get
service.
To
get service for your Belkin product you must take the following steps:
1.
Contact
Belkin Intemational, Inc.,
at
501
W.
Walnut St..
Compton
CA
90220, Attn: Customer Service,
or
call
(800)-223-5546, within
15
days of the Occurrence. Be prepared to provide the following information:
a.
The part number of the Belkin product.
b. Where you purchased the product.
c.
When
you purchased the product.
d.
Copy
of
original receipt.
2.
Your Belkin Customer Service Representative will then Instruct you on
how
to forward your receIPt and Belkin product and
how
to proceed with your claim.
Belkin reserves the right to review the damaged Belkin product. All
costs
of shIPping the Belkin product to Belkin for inspection shall
be
bome
solely by the purchaser.
If
Belkin determines.
in
Its sale discretion, that
It
is impractical to ship the damaged equIPment
to Belkin, Belkin may designate, in its sole discretion, an equipment repair facility to inspect and estimate the
cost
to repalr such
equipment. The cost.
If
any, of shipping the equipment to and from such repair facility and
of
such estimate shall
be
bome
solely by
the purchaser. Damaged equipment must remain available for inspection until the claim is finalized. Whenever claims are settled.
Belkin reserves the right to
be
subrogated underany existing insurance policies the purchaser may have.
How
state
law
relates
to
the
warranty.
THIS WARRANTY CONTAINS THE SOLE WARRANTY OF BELKIN. THERE ARE NO
OTHER WARRANTIES, EXPRESSED OR, EXCEPT
AS
REQUIRED BY LAW, IMPLIED, INCLUDING THE IMPLIED WARRANTY OR
CONDITION OF
QUAILITY,
MERCHANTABILITY
OR
FrTNESS
FOR APARTICULAR PURPOSE, AND SUCH IMPLIED WARRANTIES,
IF
ANY, ARE LIMITED
IN
DURATION TO THE TERM
OF
THIS WARRANTY.
Some states
do
not allow limitations on
how
long an implied warranty lasts,
so
the above limitations may not apply to you.
IN
NO EVENT SHALL BELKIN BE LIABLE
FOR
INCIDENTAL, SPECIAL, DIRECT, INDIRECT, CONSEQUENTIAIL OR MULTIPLE
DAMAGES SUCH AS, BUT NOT LIMITED
TO,
LOST BUSINESS OR PROFITS ARISING OUT OF THE SALE OR USE OF ANY BELKIN
PRODUCT, EVEN
IF
ADVISED OF THE POSSIBILITY OF SUCH DAMAGES.
This warranty gives you specific legal rights, and you may also have othernghts, which may vary from state to state. Some states
do
not allow the exclusion or limitallan of InCidental, consequential,
or
other damages, so the above limitations may not apply to you.
Warranty
14

F8Z176
BEL
KIN"
www.belkin.com
Belkin
Tech
Support
US:
800-223-5546, ext. 2263
310-898-1100, ext. 2263
UK: 0845 607 77 87
Australia: 1800 235 546
New Zealand: 0800 235 546
Singapore: 65 64857620
Europe: www.belkJn.com/support
Belkin International, Inc.
501
West Walnut Street
Los Angeles,
CA
90220, USA
310-898- 100
310-898-1111
fax
Belkin Ltd.
Express Business Park, Shipton Way
Rushden, NN10 6GL, United Kingdom
+44
(0)
1933 35 2000
+44
(0)
1933
31
2000
fax
Belkin B.v.
Boeing Avenue 333
1119
PH
Schiphol-Rijk, The Netherlands
+31
(0)
20 654 7300
+31
(0)
20 654 7349 fax
Belkin Ltd.
4Pioneer Avenue
Tuggerah Business Park
Tuggerah, NSW 2259, Australia
+61
(0)
24350 4600
+61
(0)
24350 4700
fax
©2008 Belkin International, Inc.
All
rights reserved.
All
trade names are registered trademarks of respective manufacturers listed
IPod and iTunes are trademarks of Apple Inc., registered in the U.S. and other countries.
Licensed Under U.S. Patent No. 6,591,085
P75526-D

Quick
Start
Guide

Capacity· Usepad: Capacity' Use pad'
Customizing
TuneBase
FM
for
your
iPod
8GB
1[8
iPod5th
60GB
18
Ii
16GB
generation
80GB
romlITW.
32GB
(videol
[j]~m[!]
~
i
00
fa
~
OrtTI(fmmID
f8
iPod4th
40GB
8
generation
60GB
20GB
tEl
30GB
1.
Identify
your
iPod. 2. Select correct sleeve for your iPod. Sleeves 3. Slide sleeve
into
open
4.
Choose correct
5.
Snap pad
6.
Test-fit iPod.
iPod mini does
not
use sleeve. are marked in
front
with
compatible iPod. slot in TuneBase
FM
pad
for
your iPod.
iPodmini
4GB
[8
into
place.
until
it
latches in. (iPod nano,
6GB
skip
to
step
6).

Car Installation
1.
Remove iPod and
insertTuneBase
FM
into
power
outlet.
2. Insert iPod
into
TuneBase
FM.
3.
CLEARSCAN
(Automatic
frequency
selection)
Press
"ClearScan': TuneBase
FM
displays
the
best frequency.
4.
Match
frequency
on
car stereo. 5. Play music. 6.
To
select your
own
station for
transmission (optional),
find
a
frequency
without
astation on it.
A
good
frequencywill be between
otherstations, with a
lot
of
static.
7. Match station using
up
and
down
buttons.

P75560-C
BELKIN®
www.belkin.com
Belkin Tech Support
US:
800-223-5546, ext. 2263
310-898-1100, ext. 2263
UK:
0845 607
77
87
Australia:
1800235546
NewZealand: 0800235 546
Singapore:
65
64857620
Europe:
www.belkin.com/support
©2008 Belkin International, Inc. All rights reserved.
All trade names are registered trademarks
of
respective manufacturers listed.
iPod
is
atrademark
of
Apple Inc., registered in
the
U.S.
and
other
countries.
Licensed Under
U.S.
Patent No. 6,591,085
F8Z176-XXX
Other manuals for TuneBase FM
2
Table of contents
Other Belkin MP3 Player Accessories manuals