Bell Phones Excursion 35828A User manual
Excursion ®35828A
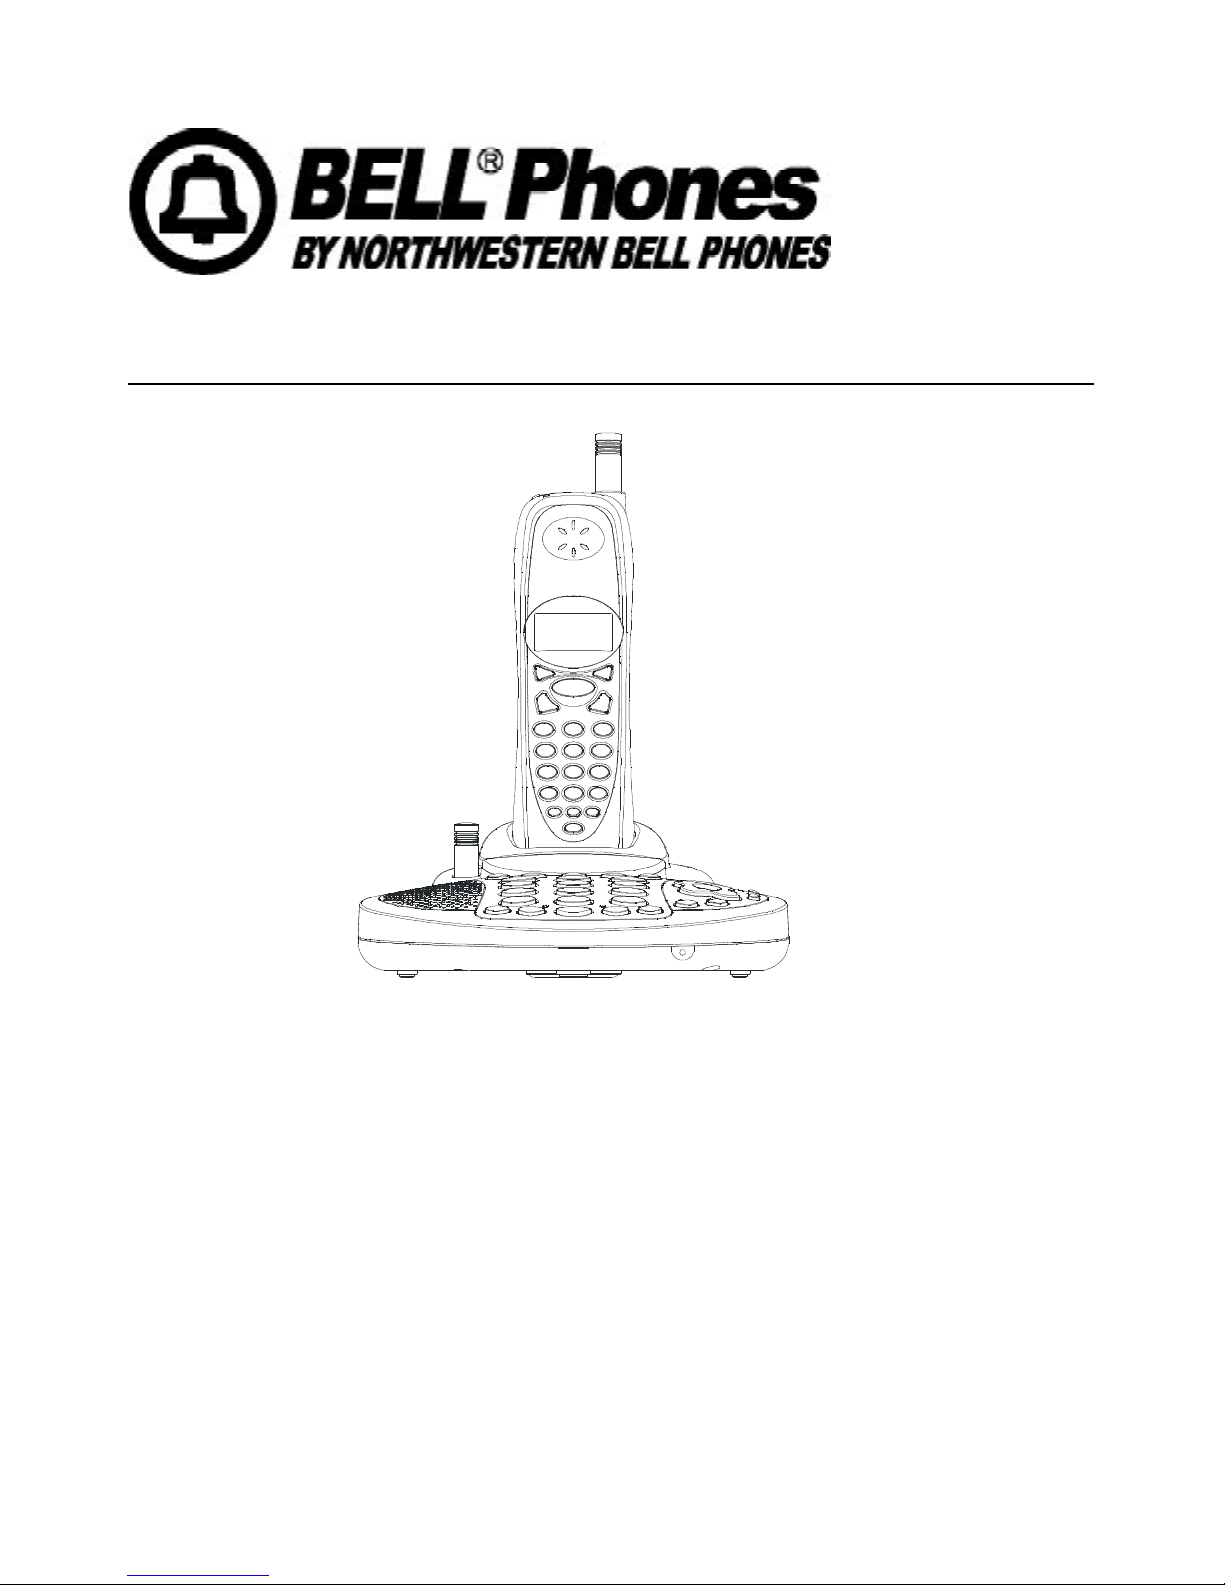
CongratulationsonyourselectionoftheExcursion®35828A
model from Northwestern Bell Phones. This quality 5.8GHz
2 lines digital speakerphone cordless telephone with Caller
ID on Call Waiting and digital answerer, like all Genuine
BELL®products, has been designed to give you many years
of continuous service and represents the best value for your
money. This phone is built on the state-of-the-art Frequency
Hopping Digital Spread Spectrum radio communication
technology for high quality voice communication and high
level of conversation privacy. It requires little maintenance
and is easy to setup and operate.

IMPORTANT SERVICE INFORMATION
Read this manual before attempting to setup or use this instrument. It contains important
information regarding safe installation and use. Keep this manual for future reference.Also
save the carton, packing and proof of purchase to simplify and accelerate any needed
action.Ifyouneedassistanceorservice,call(800)888-8990between8:00a.m.and4:30p.m.
Pacific Standard Time, Monday through Friday. You can also visit our web site at:
http://www.nwbphones.com for technical support and information on our other products.
WARNING
To prevent fire or shock hazard, do not expose this product to rain or any type of excess
moisture. If accidentally dropped into water, the adapter should immediately be unplugged
from the wall along with the telephone line cord.
CAUTION
To maintain compliance with the FCC’s RF exposure guidelines, place the base unit at
least 20cm from nearby persons.
Before you can use your cordless telephone, the handset must be charged for at least 12
hours.
THIS SYMBOL IS INTENDED TO ALERT THE USER OF THE PRESENCE OF IMPORTANT
OPERATING AND MAINTENANCE (SERVICING) INSTRUCTIONS IN THE OWNER’S
MANUAL.
This device complies with Part 15 of the FCC Rules. Operation is subject to the
following two conditions: (1) this device may not cause harmful interference, and (2)
this device must accept any interference received, including interference that may
cause undesired operation.
1

CARTON CONTENTS
HANDSET x1 BASE UNIT
RECHARGEABLE BELT CLIP x1
Ni-MH BATTERY PACK x1
ADAPTER 4CONDUCTORS LONG
(DC9V, 850mA) LINE CORD x 2
USER’S MANUAL WARRANTY CARD ACCESSORY ORDER FORM
2

SAVE THESE INSTRUCTIONS
IMPORTANT SAFETY INSTRUCTIONS
When using your telephone equipment, basic safety precautions should always be followed
to reduce the risk of fire, electric shock, and injury to persons, including the following:
1. Read and understand all instructions.
2. Keep base unit at least 20cm distance apart from nearby person.
3. Follow all warnings and instructions marked on the product.
4. Unplug this product from the wall outlet before cleaning. Do not use liquid cleaners or
aerosol cleaners. Use a damp cloth for cleaning.
5. Do not use this product near water, for example, near a bathtub, washbowl, kitchen
sink, laundry tub, in a wet basement or near a swimming pool.
6. Do not place this product on an unstable cart, stand, or table. The product may fall,
causing serious damage to the product.
7. Slots and openings in the cabinet at the back or bottom are provided for ventilation, to
protect it from overheating. These openings should never be blocked or covered. The
openings should never be blocked by placing the product on the bed, sofa, rug, or
other similar surface. This product should never be placed near or over a radiator or
heat register. This product should not be placed in a built-in installation unless proper
ventilation is provided.
8. This product should be operated only from the type of power source indicated on the
marking label. If you are not sure of the type of power supply to your home, consult
your dealer or local power company.
9. Do not allow anything to rest on the power cord. Do not locate this product where the
cord will be abused by persons walking on it.
10. Do not overload wall outlets and extension cords as this can result in the risk of fire or
electric shock.
11. Never push objects of any kind into this product through cabinet slots as they may
touch dangerous voltage points or short out parts that could result in a risk of fire or
electric shock. Never spill liquid of any kind on the product.
12. To reduce the risk of electric shock, do not disassemble this product, but take it to a
qualified service contractor when some service or repair work is required. Opening or
removing covers may expose you to dangerous voltages or other risks. Incorrect
reassembly can cause electric shock when the appliance is subsequently used.
13. Unplugthisproductfromthewalloutletandreferservicingtoqualifiedservice personnel
under the following conditions:
A. When the power supply cord or plug is damaged or frayed.
B. If liquid has been spilled into the product.
C. If the product has been exposed to rain or water.
D. If the product does not operate normally by following the operating instructions.
Adjust only those controls that are covered by the operating instructions. Improper
adjustments of other controls may result in damage and will often require extensive
work by a qualified technician to restore the product to normal operation.
E. If the product has been dropped or the cabinet has been damaged.
F. If the product exhibits a distinctive change in performance.
14. Avoid using a telephone (other than a cordless type) during an electrical storm. There
maybe a remote risk of electric shock from lightning.
15. Do not use the telephone to report a gas leak in the vicinity of the leak.
3

SAVE THESE INSTRUCTIONS
BATTERY SAFETY INSTRUCTIONS
CAUTION:
To reduce the risk of fire or injury to persons, read and follow these instructions:
1. Use only the following type and size of handset battery pack:
Cordless Telephone Battery Pack: DC3.6V, 850mAh, Ni-MH Battery Pack
2. Do not dispose of the battery in a fire. The cell may explode. Check with local codes
for possible special disposal instructions.
3. Do not open or mutilate the battery. Released electrolyte is corrosive and may cause
damage to the eyes or skin. It may be toxic if swallowed.
4. Exercise care in handling the battery in order not to short the battery with conducting
material such as rings, bracelets and keys. The battery or conductor may overheat
and cause burns.
5. Recharge only the battery provided with or identified for use with this product. The
battery may leak corrosive electrolyte or explode if it is not the correct type.
6. Do not attempt to rejuvenate the battery provided with or identified for use with this
product by heating them. Sudden release of the battery electrolyte may occur causing
burns or irritation to eyes or skin.
7. When inserting the batteries into this product, the proper polarity or direction must be
observed. Reverse insertion of batteries can cause charging that may result in leakage
or explosion.
8. Remove the batteries from this product if the product will not be used for a long period
of time (several months or more) since during this time the battery could leak in the
product.
9. Discard “dead”batteries as soon as possible since “dead”batteries are more likely
to leak in a product.
10. Do not store this product, or the battery provided with or identified for use with this
product, in high-temperature areas. Batteries that are stored in a freezer or refrigerator
for the purpose of extending shelf life should be stabilized at room temperature prior
to use after cold storage.
11. Disconnect telephone lines before installing batteries.
SAVE THESE INSTRUCTIONS
INSTALLATION PRECAUTIONS
1. Never install telephone wiring during a lightning storm.
2. Never install telephone jacks in wet locations unless the jack is specifically designed
for wet locations.
3. Never touch uninsulated telephone wires or terminals unless the telephone line has
been disconnected at the network interface.
4. Use caution when installing or modifying telephone lines.
4

FCC NOTICE
The FCC requires that you be advised of certain requirements involving the use of this telephone.
1. This telephone is Hearing Aid Compatible.
2. On the bottom of this equipment is a label that contains, among other information, a product identifier
in the form US:AAAEQ##TXXXX. You must, upon request, provide this information to your telephone
company. The digits represented by ## in the product identifier indicate the Ringer Equivalency Number
(REN) for this equipment. The REN is useful in determining the number of devices you may connect
to your telephone line and still have all of these devices ring when your telephone number is called.
In most (but not all) areas, the sum of the RENs of all devices connected to one line should not
exceed 5. To be certain of the number of devices you may connect to your line as determined by the
REN, contact your local telephone company.
3. This equipment complies with 47C FR Part 68 of the FCC rules. On the bottom of this equipment is a
label that contains, among other information, the FCC registration number and Ringer Equivalence
Number (REN) for this equipment. If requested, provide this information to your telephone company.
4. The REN is useful to determine the quantity of devices you may connect to your telephone line and
still have all of those devices ring when your number is called. In most, but not all areas, the sum of
the RENs of all devices should not exceed five (5.0). To be certain of the number of devices that you
may connect to your line, as determined by the REN, you should call your local telephone company to
determine the maximum REN for your calling area.
5. Privacy of communications may not be ensured when using this phone.
6. If your telephone causes harm to the telephone network, the telephone company may discontinue
your service temporarily. If possible, they will notify you in advance. But if advance notice is not
practical, you will be notified as soon as possible. You will be advised of your right to file a complaint
with the FCC.
7. Your telephone company may make changes to its facilities, equipment, operations or procedures
that could affect the proper operation of your equipment. If they do, you will be given advance notice
so as to give you an opportunity to maintain uninterrupted service.
8. If you experience trouble with the telephone, please contact VTC Service & Manufacturing Co., Inc. at
(800) 888-8990 or write to: VTC Customer Service, 16988 Gale Ave., City of Industry, CA 91745 for
repair/warranty information. The telephone company may ask you to disconnect this equipment from
the network until the problem has been corrected or you are sure that the equipment is not
malfunctioning.
9. This equipment may not be used on coin service provided by the telephone company. Connection to
party line service is subject to state tariffs.(Contact your state public utility commission or corporation
commission for information).
10. WARNING: Changes or modifications to this unit not expressly approved by the party responsible for
compliance could void the user’s authority to operate the equipment.
NOTE: This equipment has been tested and found, complies with the limits for a class B digital
device,pursuant to Part 15 of the FCC Rules.These limits are designed toprovide reasonable protection
against harmful interference in residential installation. This equipment generates, uses and can radiate
radio frequency energy. If not installed and used in accordance with the instruction, may cause harmful
interference to radio communications. However, there is no guarantee that interference will not occur
in a particular installation. If this equipment does cause harmful interference to radio or television
reception, which can be determined by turning the equipment off and on, the user is encouraged to try
to correct the interference by one or more of the following measure:
•Increase the separation between the equipment and receiver.
•Connect the equipment into an outlet on a circuit different from that to which the receiver needed.
•Consult the dealer of an experienced radio / TV technician for help.
11. USOC jack type is RJ11C, RJ14C and the compatible jack is Part 68 compliance.
12. If your home has specially wired alarm equipment connected to the telephone line, ensure the installation
of this cordless phone does not disable your alarm equipment. If you have questions about what will
disable alarm equipment, consult your telephone company or a qulified installer.
5

TABLE OF CONTENTS
IMPORTANT SERVICE INFORMATION................................................................................................................................................................1
CARTON CONTENTS..........................................................................................................................................................................................2
IMPORTANT SAFETY INSTRUCTIONS............................................................................................................................................................... 3
BATTERYSAFETY INSTRUCTIONS....................................................................................................................................................................4
INSTALLATION PRECAUTIONS.......................................................................................................................................................................... 4
FCC NOTICE...................................................................................................................................................................................................... 5
DESCRIPTION....................................................................................................................................................................................................7
MOUNTING POSITION........................................................................................................................................................................................9
BELTCLIP INSTRUCTION.................................................................................................................................................................................10
CONNECTING THE HEADSET...........................................................................................................................................................................10
POWER INSTALLATION....................................................................................................................................................................................11
INITIAL SETUP..................................................................................................................................................................................................12
PHONE SETUP OPERATION.............................................................................................................................................................................12
MENU LANGUAGE....................................................................................................................................................................................12
RINGER VOLUME.....................................................................................................................................................................................12
RINGER TONE..........................................................................................................................................................................................13
AREA CODE.............................................................................................................................................................................................13
REGISTERING A HANDSET (handset only)................................................................................................................................................13
DEREGISTERING A HANDSET (base only)................................................................................................................................................13
TONE/PULSE (base only)..........................................................................................................................................................................14
EDIT USERNAME (handset only)...............................................................................................................................................................14
TAD RING COUNT (base only)...................................................................................................................................................................14
TAD DAY/TIME (base only)........................................................................................................................................................................14
TAD PIN SETUP (base only)......................................................................................................................................................................15
DELETE VMWI (base only)........................................................................................................................................................................15
LOAD DEFAULT........................................................................................................................................................................................ 15
TELEPHONE OPERATION............................................................................................................................................................................................15
CALL STATUS DISPLAY............................................................................................................................................................................ 16
TO PLACE ACALL ...................................................................................................................................................................................16
TO PLACE ANOTHER CALL DURING ACALL ...........................................................................................................................................16
TO RECEIVE ACALL ............................................................................................................................................................................... 16
TO RECEIVE ACALL ON ANOTHER LINE DURING ACALL .................................................................................................................... 16
LAST NUMBER REDIAL ...........................................................................................................................................................................17
PAGING BETWEEN EXTENSIONS .....................................................................................................................................................................17
INTERCOM WITH OTHER EXTENSION .......................................................................................................................................................... 17
RING ON INTERCOM...........................................................................................................................................................................................17
QUICK TRANSFER CALL TO OTHER EXTENSION .......................................................................................................................................... 17
TRANSFER CALL AFTER INTERCOM ...............................................................................................................................................................17
CONFERENCE WITH TWO LINE ........................................................................................................................................................................18
TWO EXTENSIONS CONFERENCE WITH ONE LINE .......................................................................................................................................18
MIXED MODE DIALING (Temporary Pulse to Tone Dialing)................................................................................................................................ 18
PAUSE FUNCTION...............................................................................................................................................................................................18
FLASH FUNCTION...............................................................................................................................................................................................19
OUT OF RANGE WARNING.................................................................................................................................................................................19
LOW BATTERY WARNING...................................................................................................................................................................................19
TELEPHONE KEYPAD CHARACTERS................................................................................................................................................................19
PHONEBOOK OPERATION..........................................................................................................................................................................................19
SAVING IN THE PHONEBOOK............................................................................................................................................................................19
VIEWING THE PHONEBOOK.............................................................................................................................................................................. 20
EDITING NAME AND NUMBER IN THE PHONEBOOK.......................................................................................................................................20
PLACING CALLS FROM THE PHONEBOOK...................................................................................................................................................... 20
DELETING A STORED NUMBER IN THE PHONEBOOK....................................................................................................................................20
CALLER ID OPERATION.............................................................................................................................................................................................. 21
INTRODUCTION TO CALLER ID ON CALL WAITING.........................................................................................................................................21
RECEIVING NEW CALL.......................................................................................................................................................................................22
VIEWING THE CALLER ID LIST...........................................................................................................................................................................22
CALLER ID DISPLAY............................................................................................................................................................................................ 22
CALL WAITING.....................................................................................................................................................................................................23
MESSAGE WAITING............................................................................................................................................................................................24
PLACING A CALL FROM THE CALLER LIST.......................................................................................................................................................24
SAVING NUMBER FROM CALLER LIST TO PHONEBOOK............................................................................................................................... 24
SELECTIVE DELETING IN THE CALLER LIST....................................................................................................................................................25
DELETING ALL RECORDS IN THE CALLER LIST...............................................................................................................................................25
ANSWERER OPERATION............................................................................................................................................................................................25
SETTING THE DAY/TIME STAMP........................................................................................................................................................................25
RECORDING YOUR OUTGOING MESSAGE...................................................................................................................................................... 25
CHECKING YOUR OUTGOING MESSAGE.........................................................................................................................................................26
RESTORE TO DEFAULT OGM............................................................................................................................................................................ 26
TURNING THE ANSWERER ON/OFF..................................................................................................................................................................26
SETTING THE RING COUNT...............................................................................................................................................................................26
SETTING REMOTE PIN CODE............................................................................................................................................................................27
RECORDING A MEMO.........................................................................................................................................................................................27
PLAYING OF MESSAGE/MEMO..........................................................................................................................................................................27
HANDSET REMOTE MODE.................................................................................................................................................................................27
LINE REMOTE MODE..........................................................................................................................................................................................28
INCOMING CALL SCREENING............................................................................................................................................................................28
WHEN THE MEMORY IS FULL............................................................................................................................................................................29
IMPROVING CORDLESS RECEPTION........................................................................................................................................................................29
MAINTENANCE.............................................................................................................................................................................................................29
TROUBLESHOOTING...................................................................................................................................................................................................29
TECHNICAL INFORMATION.........................................................................................................................................................................................31
6
DESCRIPTION
LOCATION OF CONTROLS AND FUNCTION
(Figure 1)
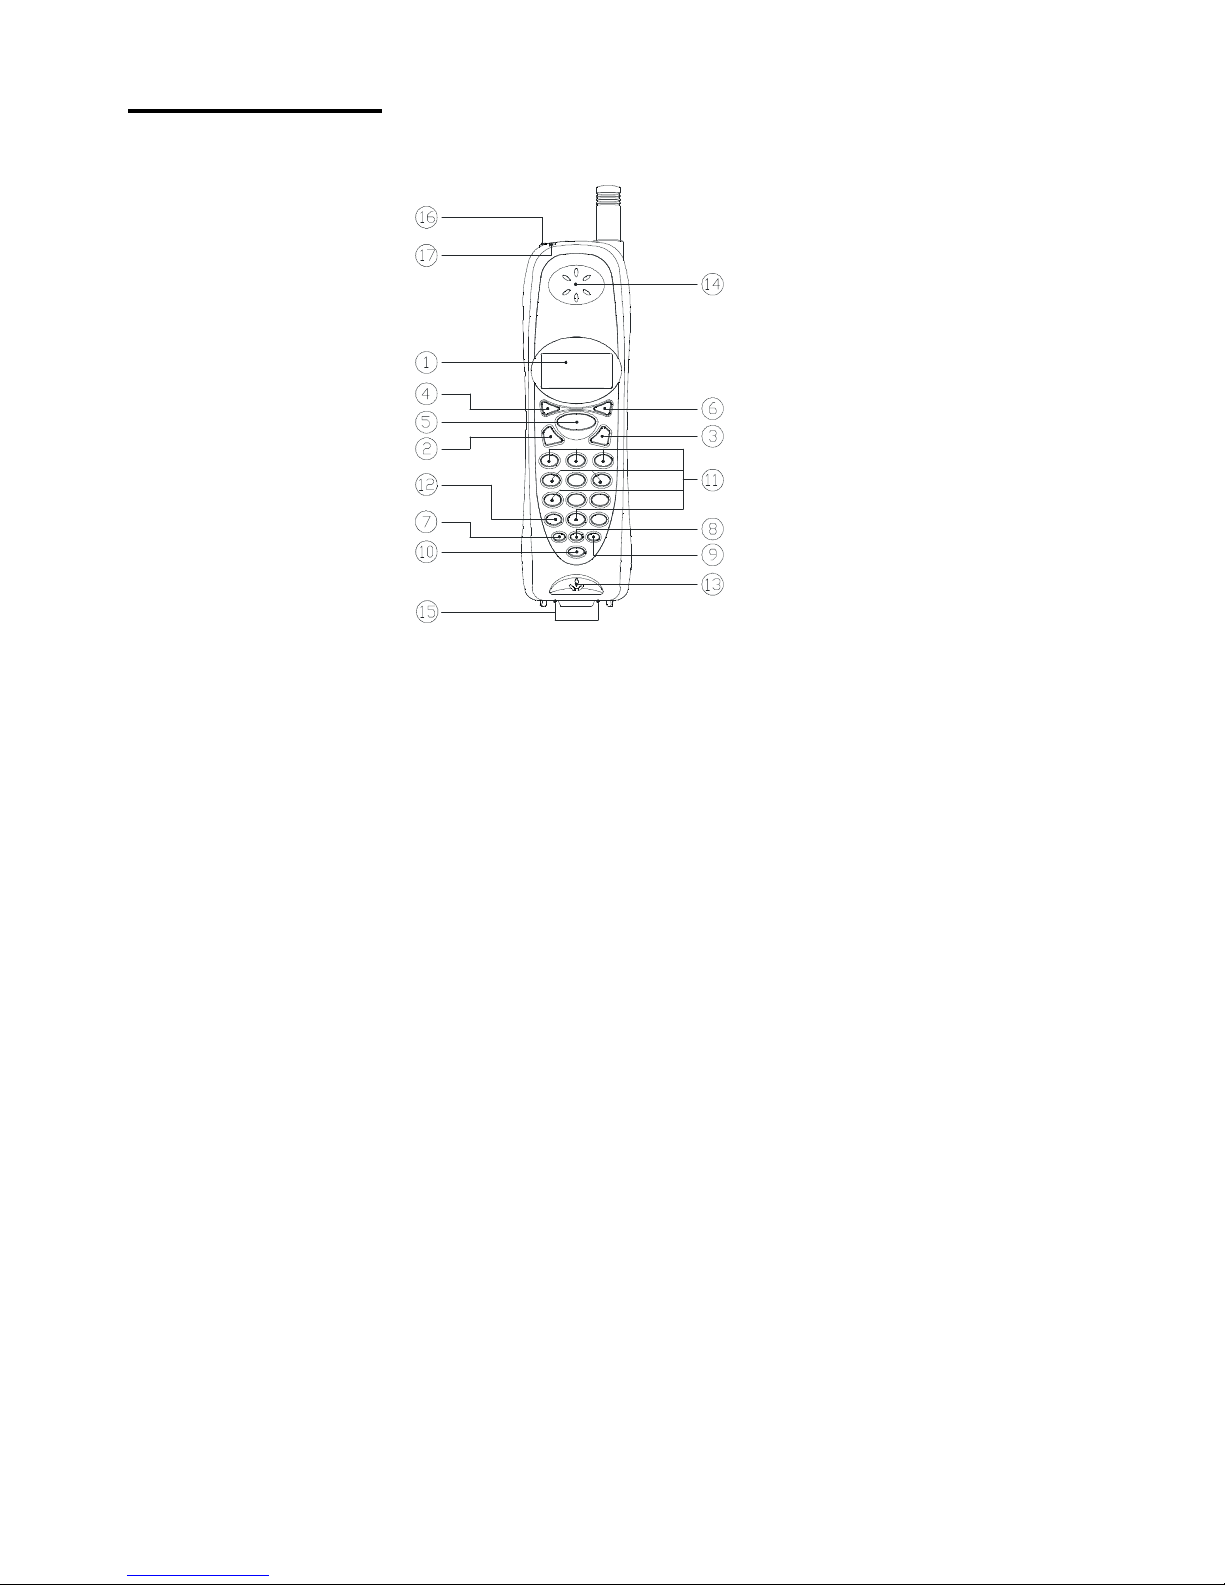
HANDSET CONTROLS
1. LCD Display: Shows call and line information, phone status, prompts and Phonebook
items.
2. L1 Button/L1-In-Use LED Indicator: Press this button to answer a line1 incoming
call, place a line1 call or end a line1 call; Under this button, there is a dual color LED
indicator, the Red LED blinks when you have new line1 CID message(s) or during
line1 ringing/paging/on hold, and turn on steadily for line1 Talk mode; the Green LED
blinks to indicate message waiting in line1 voice mailbox.
3. L2 Button/L2-In-Use LED Indicator: Press this button to answer a line2 incoming
call, place a line2 call or end a line2 call; Under this button, there is a dual color LED
indicator, the Red LED blinks when you have new line2 CID message(s) or during
line2 ringing/paging/on hold, and turn on steadily for line2 Talk mode; the Green LED
blinks to indicate message waiting in line2 voice mailbox.
4. Int./Format Button: Press this button to page other handset or change caller ID
(CID) number format on screen.
5. Up/Down Button: Press this button for menu/ caller ID list/ phonebook navigation, or
change receiver volume.
6. Menu/Hold Button: Press this button to access phone setup options menu or hold
the line.
7. Mute/Del.: Press this button to temporarily disable the microphone during Talk /
Intercom / Conference mode or to delete record/character.
8. Redial/Pause: Press this button to redial the last number you have dialed, or to insert
pause while dialing.
9. Mem./Back: Press this button to go into phonebook mode or to go back to previous
menu during menu mode.
10. Flash/Remote: Press this button during off hook mode to send a timed line break to
phone line to access custom calling features such as Call Waiting or three-way calling
provided by your local phone company, or to remote telephone answering device
(TAD) during Standby mode, or to perform call screen when TAD is taking message.
11. TAD Remote Buttons: Used during TAD remote mode, to playback message, skip to
next, back to previous, erase message, turn line1 or line2 TAD off on, and play the
voice menu.
7
12. Ring Off Button: Press this button during ringing to temporarily disable the ringer, or
set both line1 and line2 ringer to off if pressed during Standby mode.
13. Microphone: Used for speaking with callers.
14. Receiver: Allows you to hear calls.
15. Charge Contacts: Used for charging the handset battery.
16. Headset Jack: A jack located on the top of the handset used for connecting your
headset to enjoy a hands-free communication.
17. Ring LED Indicator: It blinks during line1 or line2 ringing.
12435678
910 11 12 13 14 15 16 17 18 19 20 21 22
Bottom View Top View
(Figure 2)
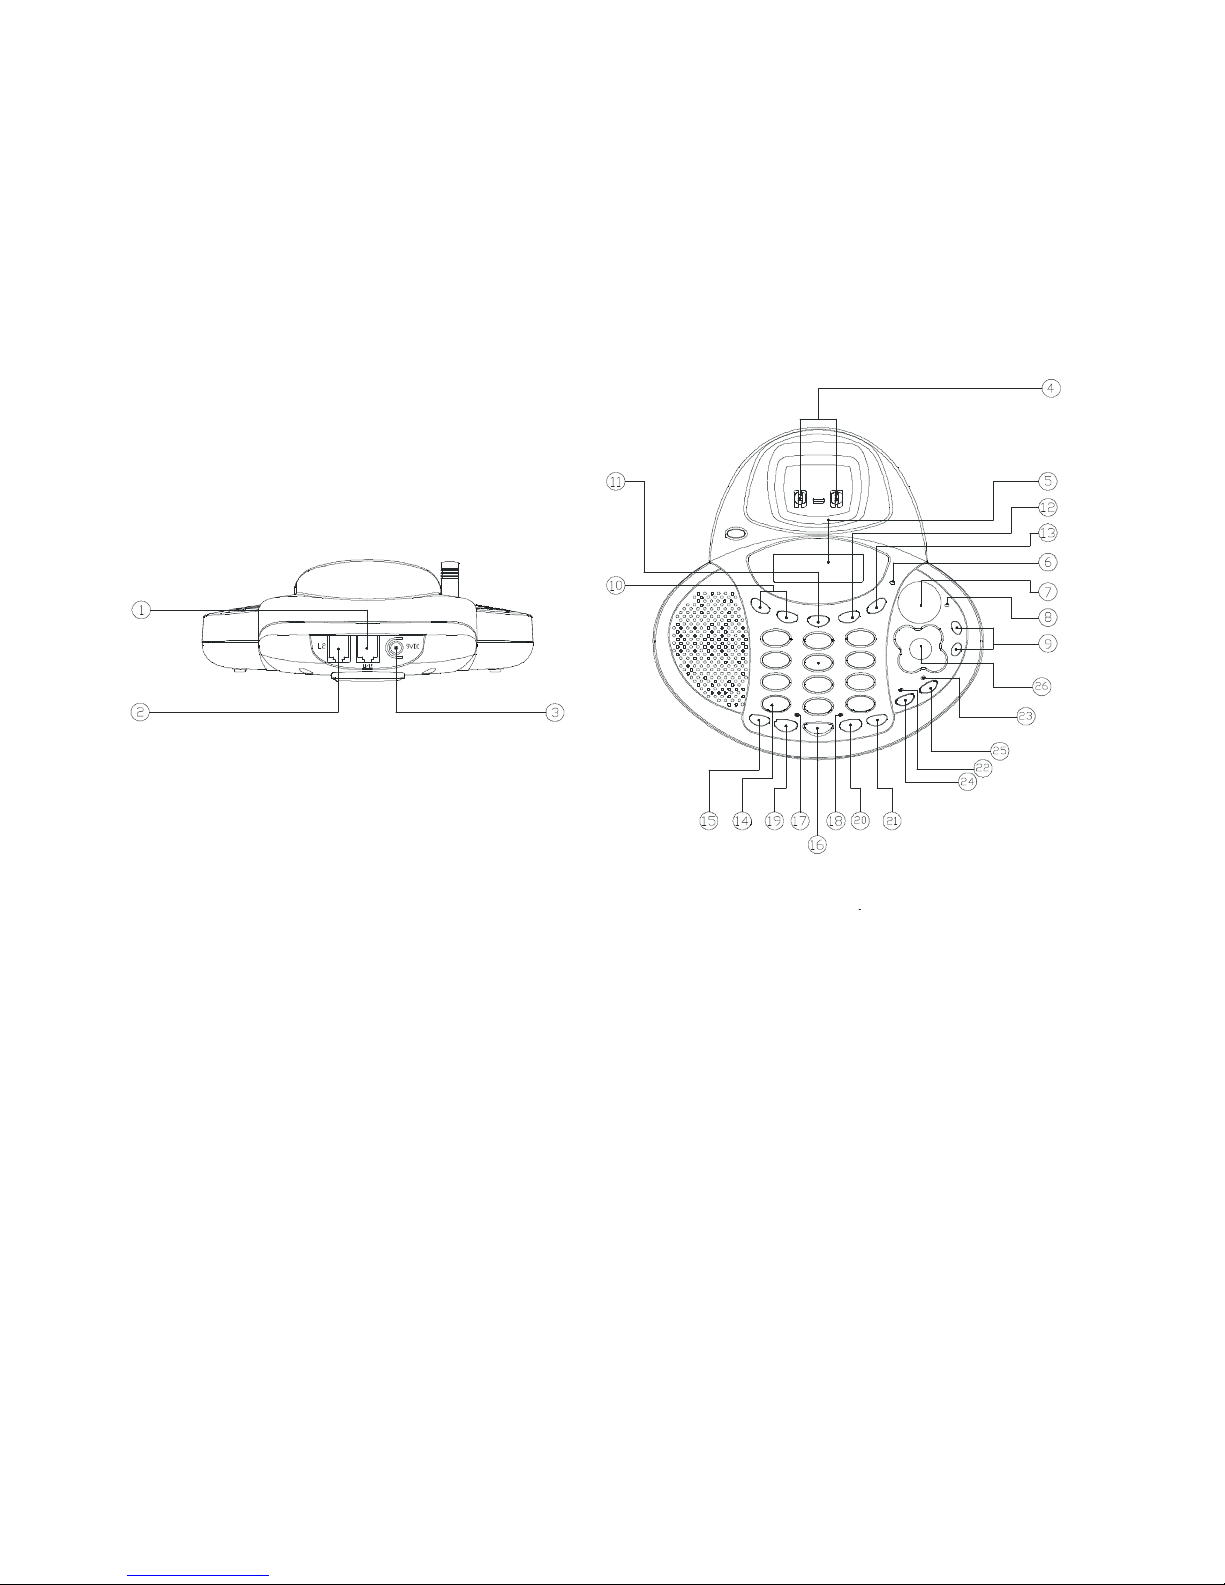
BASE UNIT CONTROLS
1. L1/L2 Telephone Line Jack:Accepts4conductors 2lineslinecord tomakeconnection
with 4conductors 2lines modular type telephone outlet for both lines, or ordinary
2conductors 1line modular type telephone outlet for line1 only.
2. L2 Telephone Line Jack: Accepts 2conductors 1lines line cord to make connection
with 2conductors 1lines modular type telephone outlet for line2.
3. 9VDCAdapter Jack:A jack located on the bottom ofthe base unit used for connecting
the adapter to the base unit.
4. Charge Terminals: Used for charging the handset battery.
5. LCD Display: Shows call information, phone status, prompts and Phonebook items.
6. Charge LED Indicator: Light up steadily when the handset is being charged on the
base.
7. Dual 7segment LED Indicator: Shows the number of new message(s) and/or total
message(s) stored for both lines.
8. New TAD Msg LED Indicator: It blinks to indicate there is new message(s) stored in
the TAD for both lines.
9. Vol.+/- Buttons: Allows you to increase or decrease the speaker volume during TAD
mode, Talk / Intercom / Conference mode.
10. Up/Down Button: Press this button for menu/ caller ID list/ phonebook navigation, or
change speaker volume.
8

11. Int./Format/Prog. Button: Press this button to page handset or change CID number
format on screen, or when you are registering a new handset to the base.
12. Mem./Back: Press this button to go into phonebook mode or to go back to previous
menu during menu mode.
13. Mute/Del.: Press this button to temporarily disable the microphone during Talk /
Intercom / Conference mode or to delete record/character.
14. Ring Off Button: Press this button during ringing to temporarily disable the ringer, or
set line1 and line2 ringer to off if pressed during Standby mode.
15. Redial/Pause: Press this button to redial the last number you have dialed, or to insert
pause while dialing.
16. Menu/Hold Button: Press this button to access phone setup options menu or hold
the line.
17. L1-In-Use LED Indicator: This is a dual color LED indicator, the Red LED blinks
when you have new line1 CID message(s) or during line1 ringing/paging/on hold/
branch phone in use, and turn on steadily for line1 Talk mode; the Green LED blinks
to indicate message waiting in line1 voice mailbox.
18. L2-In-Use LED Indicator: This is a dual color LED indicator, the Red LED blinks
when you have new line2 CID message(s) or during line2 ringing/paging/on hold/
branch phone in use, and turn on steadily for line2 Talk mode; the Green LED blinks
to indicate message waiting in line2 voice mailbox.
19. L1 Button: Press this button to answer a line1 incoming call, place a line1 call or end
a line1 call.
20. L2 Button: Press this button to answer a line2 incoming call, place a line2 call or end
a line2 call.
21. Flash Button: Press this button during off hook mode to send a timed line break to
phone line to access custom calling features such as Call Waiting or three-way calling
provided by your local phone company.
22. L1 Ans. On/Off LED Indicator: It turn on steadily during line1 TAD answer on mode.
23. L2 Ans. On/Off LED Indicator: It turn on steadily during line2 TAD answer on mode.
24. L1 Ans. On/Off Button: Press this button to switch the line1 TAD to answer on/off
mode.
25. L2 Ans. On/Off Button: Press this button to switch the line2 TAD to answer on/off
mode.
26. TAD Operation Buttons: Press these buttons to operate the answerer to playback
message, skip to next message, repeat current message, back to previous message,
erase current message, erase all old message(s), record line1 or line2 welcome
message and record memo. message.
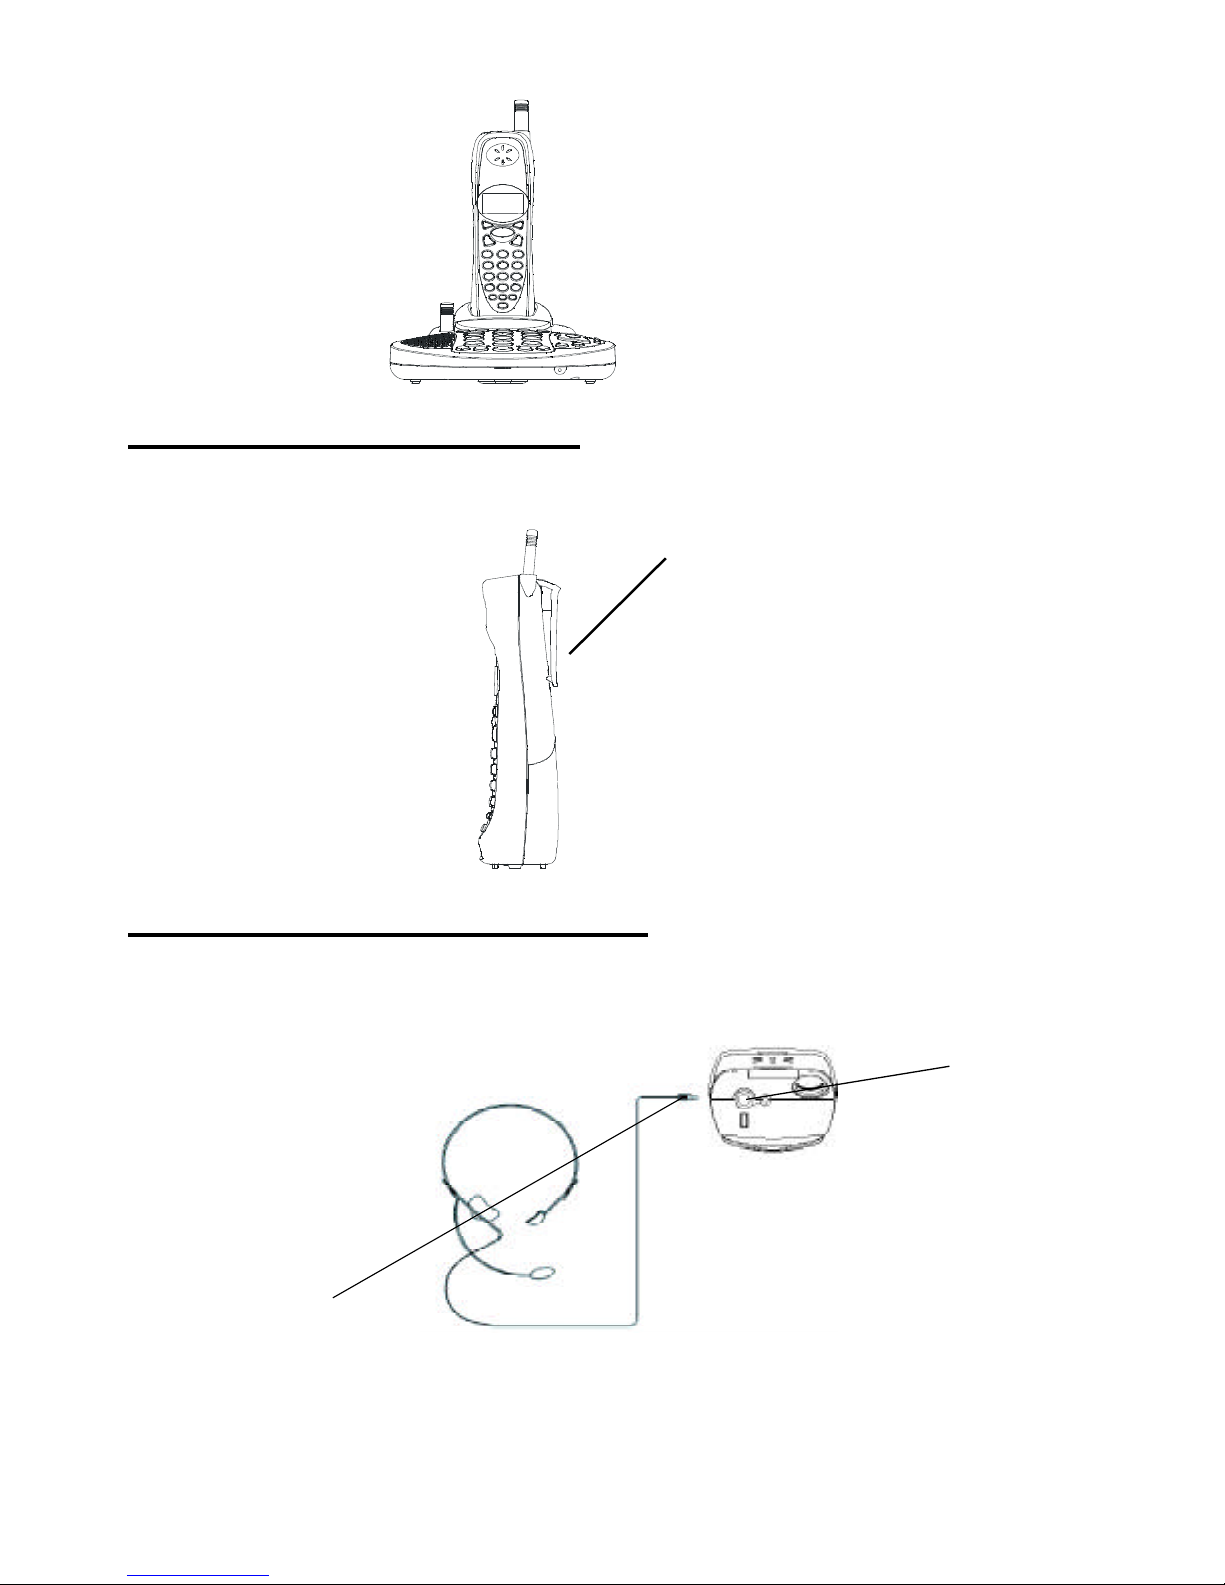
MOUNTING POSITION
DESKTOP USE:
If you have a 4 conductors dual line telephone wall jack, use the bundled telephone line to
connect the L1/L2 line jack to the dual line wall jack, the 2lines connection is completed.
If you have 2 seperated single line telephone wall jack, use the bundled telephone lines to
connect the corresponding L1/L2 line jack and L2 line jack to the 2 seperated wall jacks,
then the 2lines connection is completed.
9
(Figure 3)
BELT CLIP INSTRUCTION
Remove the belt clip cover and clamp the belt clip to the back of the handset as shown in
Figure 4.
Belt Clip
(Figure 4)
CONNECTING THE HEADSET
For hands free conversation, a headset (not included) is connected to the headset jack as
shown in Figure 5. The handset receiver and microphone are disabled when the headset is
connected.
Headset Jack
Headset Plug
(2.5 mm) (Figure 5)
Press the L1 or L2 button to answer or place a call of corresponding line using the headset.
Refer to the manufacturer’s headset manual for more details.
You can purchase a suitable headset through service center or retailer shop.
For servicing or replacement, please contact us for suitable headset.
10
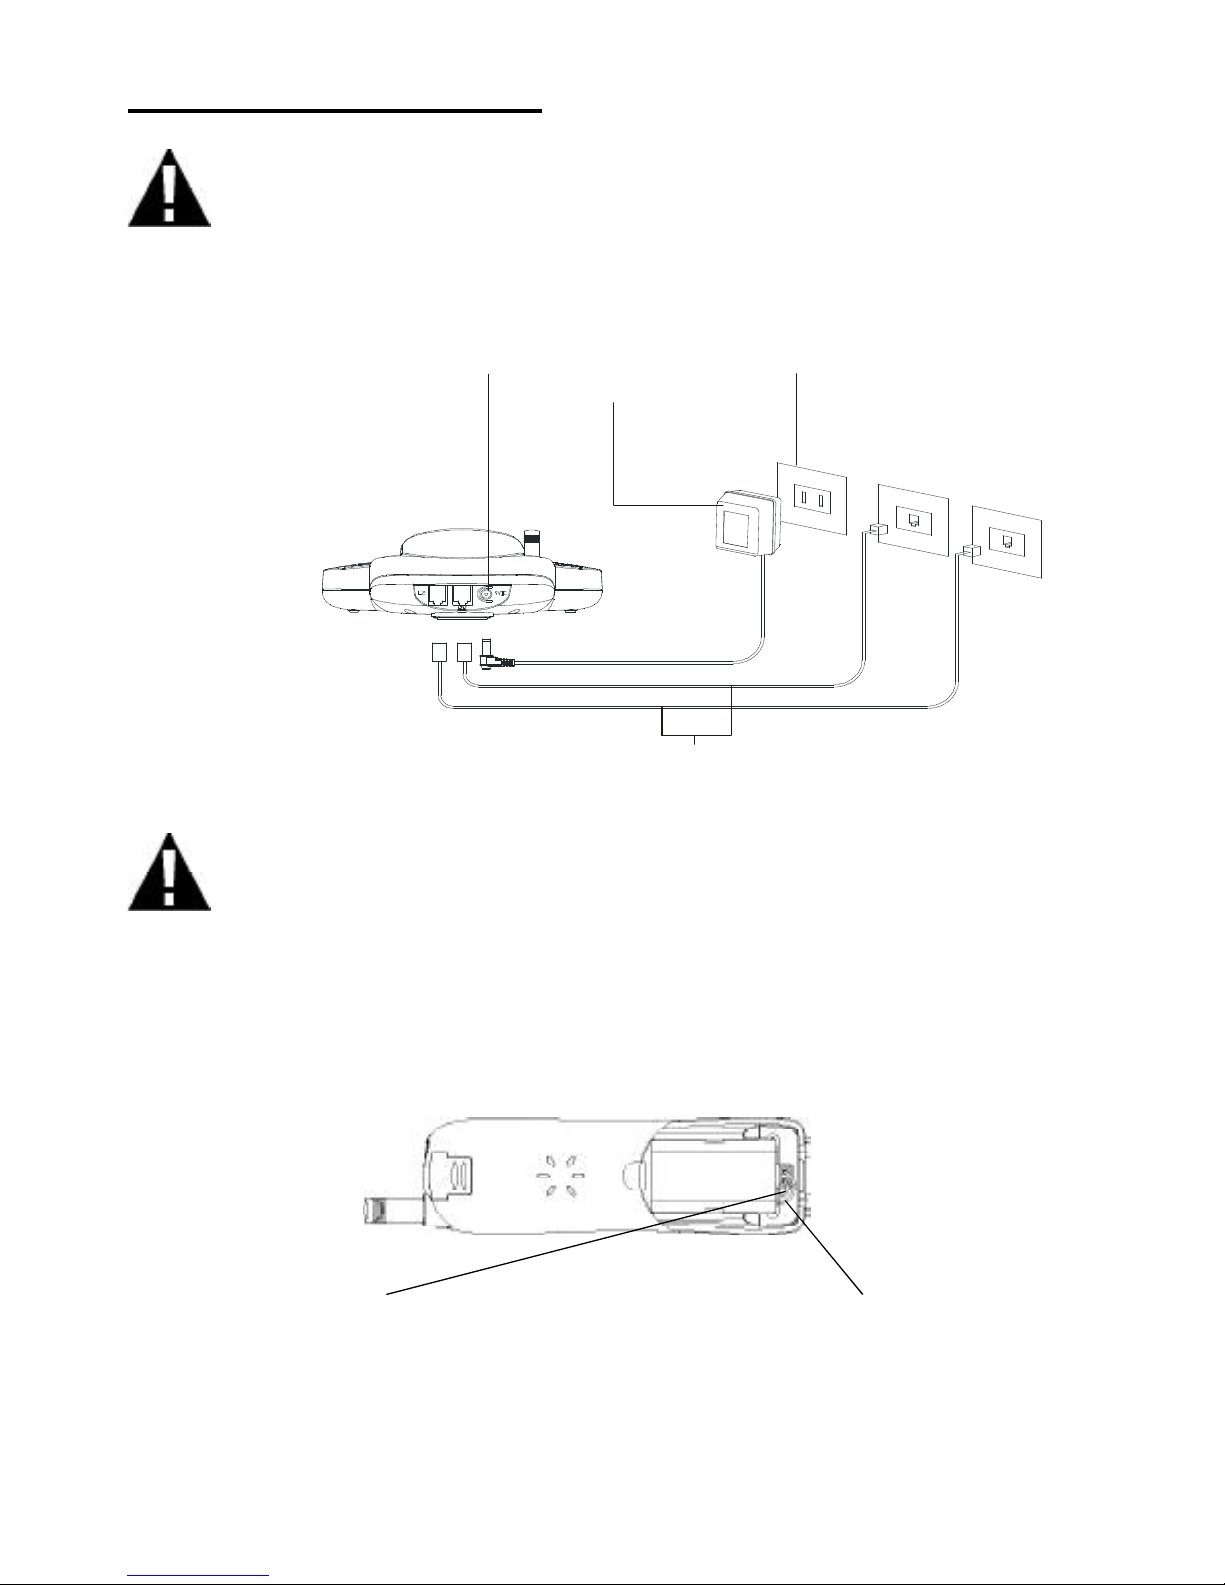
POWER INSTALLATION
BASE UNIT POWER CONNECTION
CAUTION:
You must use a Class 2 Power Source 9VDC 850mA. The plug must correctly fit the base
unit’s adapter jack.
1. Plug the adapter into a standard AC outlet.
2. Insert the small plug into the adapter jack on the rear of the base as shown in Figure
6.
9V Adapter Jack A/C Wall Outlet
Telephone Line Cord 9VDC Adapter
(Figure 6)
HANDSET BATTERY INSTALLATION
CAUTION:
Use only the Nickel Metal Hydride (Ni-MH) battery type included with this unit. Use of other
battery types may cause injuries or damage. Ensure to insert the correct battery polarity as
shown on the battery compartment during the battery installation.
1. Remove the battery compartment cover of the handset by pressing the top of the
cover and sliding it down.
2. Connect the rechargeable Ni-MH battery as shown on Figure 7.
RED WIRE BLACK WIRE
(Figure 7)
3. Insert the Ni-MH battery into the battery compartment of the handset.
4. Slide the battery compartment cover firmly in its closed position
11
A/C Wall Outlet
9V DC Adapter
9V Adapter Jack
Telephone Line Cord

INITIAL SETUP
Before you can use your cordless telephone, the handset must be charged for at least 12
hours.
PHONE SETUP OPERATION
This unit contains the following special setup options in the setup menu, which is brought
upby pressing the MENU button duringStandby mode. Most of the setup optionsin handset
and base are the same while only some of them are different as they only appear in handset
or in base setup menu:
MENU LANGUAGE
RINGER VOLUME
RINGER TONE
AREA CODE
REGISTRATION (handset only)
EDIT USERNAME (handset only)
TONE/PULSE (base only)
TAD RING COUNT (base only)
TAD DAY/TIME (base only)
TAD PIN SETUP (base only)
DELETE VMWI (base only)
DEREGISTRATION (base only)
LOAD DEFAULT
MENU LANGUAGE
This telephone offers English, Spanish and French languages for your convenience.
1. During Standby mode, press MENU button;
2. Press MENU button;
3. Press UP or DOWN button to select the language you desire (English is the preset
language);
4. Press MENU button to save the setting;
5. Press BACK button to go back to Standby mode.
RINGER VOLUME
This telephone offers each line 4 ringer options for user to select, they are level high,
medium, low, off.
1. During Standby mode, press MENU button;
2. Press DOWN button until “RINGER VOLUME”option is pointed by the pointer;
3. Press MENU button;
4. Press UP or DOWN button to select the line1 ringer volume level you desire;
5. Press MENU button to advance to line2 setting;
6. Press UP or DOWN button to select the line2 ringer volume level you desire;
7. Press MENU button to save the setting;
8. Press BACK button to go back to Standby mode.
NOTE: When ringer off is selected, all incoming call alert will be silent. You can also
engage line1 and line2 ringer off by one touch, press and hold the */Ring off button during
Standby mode, screen will prompt “L1,L2 RINGER ARE OFF!”. You can also turn
ringer off temporarily during ringing, press once the */Ring Off button to turn ringer silent.
12

RINGER TONE
This telephone offers each line 5 ringer tones for user to select.
1. During Standby mode, press MENU button;
2. Press DOWN button until “RINGER TONE”option is pointed by the pointer;
3. Press MENU button;
4. Press UP or DOWN button to select the line1 ringer tone (1-5) you desire;
5. Press MENU button to advance to line2 setting;
6. Press UP or DOWN button to select the line2 ringer tone (1-5) you desire;
7. Press MENU button to save the setting;
8. Press BACK button to go back to Standby mode.
NOTE: once a ringer tone (1~5) is selected on either of the lines, the same ringer tone will
be skipped automatically on another line during selection.
AREA CODE
This telephone allows you to input your local area code of each line, during CID list review
mode, LAC will be hidden in default display mode of the matched LAC case.
1. During Standby mode, press MENU button;
2. Press DOWN button until “AREA CODE”option is pointed by the pointer;
3. Press MENU button;
4. Press 3 digits local area code;
5. Press MENU button to advance to line2 setting;
6. Press 3 digits local area code;
7. Press MENU button to save the setting;
8. Press BACK button to go back to Standby mode.
REGISTERING A HANDSET (applicable to handset only)
If your handset is not registered to a base unit, or you found problem when making
communication with the base unit, you can register the handset to your base once more
unconditionally.
1. During Standby mode, press MENU button on the handset;
2. Press DOWN button until “REGISTRATION”option is pointed by the pointer;
3. Press MENU button to select registration option;
4. Press MENU button to select registration of own handset;
5. Press MENU button to confirm;
6. Press and hold base unit PROG button until handset beeps;
7. Press numeric keypad to enter username by multi-tap input (max. 15characters);
8. Press MENU button to save the input.
NOTE: for the operation of multi-tap input, please refer to Telephone Keypad Characters
section for more detail.
NOTE:if you found communication problem with the base in more than one handset, please
try to deregister all handsets using the following procedures and register those handsets
one by one using the procedure described in REGISTERING A HANDSE section above.
DEREGISTERING ALL HANDSETS
1. Press and hold the PROG button until Charge LED blinks slowly (like registration);
2. Release button and then press and hold the PROG button again until Charge LED
blinks quickly;
3. Release button and press once quickly the PROG button again, when all deregistration
procedures are completed, base will show “ALL HANDSETS DEREGISTERED”
and handsets will show “REGISTER HANDSET?”.
DEREGISTERING A HANDSET (applicable to base unit only)
If you want to move a handset to work with another 35828A base, you can deregister the
handset from current base and then register to another base unit.
13

1. During Standby mode, press MENU button on the base unit;
2. Press DOWN button until “DEREGISTRATION”option is pointed by the pointer;
3. Press MENU button;
4. Press UP or DOWN button to select the target deregistration handset you desire;
5. Press MENU button to select deregistration option;
6. Press MENU button again to confirm;
7. When deregistration is completed, handset will show “REGISTER HANDSET?”
TONE/PULSE (applicable to base unit only)
This telephone allows you to dial digits using the tone signaling mode or the old pulse
signaling mode.
1. During Standby mode, press MENU button on the base unit;
2. Press DOWN button until “TONE/PULSE”option is pointed by the pointer;
3. Press MENU button;
4. Press UP or DOWN button to select the dial signaling mode you desire (Tone is the
preset mode);
5. Press MENU button to save the setting;
6. Press BACK button to go back to Standby mode.
EDIT USERNAME (applicable to handset only)
This telephone allows you to input your username which to be displayed during Standby
mode and paging.
1. During Standby mode, press MENU button;
2. Press DOWN button until “EDIT USERNAME”option is pointed by the pointer;
3. Press MENU button;
4. Press numeric keypad to enter username by multi-tap input (max. 15characters);
5. Press MENU button to save the input;
6. Press BACK button to go back to Standby mode.
NOTE: for the operation of multi-tap input, please refer to Telephone Keypad Characters
section for more detail.
TAD RING COUNT (applicable to base unit only)
This TAD offers each line 3 ring count options for user to select, they are 3 rings, 5 rings, TS
(TOLL SAVE).
1. During Standby mode, press MENU button on the base unit;
2. Press DOWN button until “TAD RING COUNT”option is pointed by the pointer;
3. Press MENU button;
4. Press UP or DOWN button to select your desired line1 no. of rings to answer call by
TAD (TOLL SAVE is the preset option);
5. Press MENU button to advance to line2 setting;
6. Press UP or DOWN button to select your desired line2 no. of rings to answer call by
TAD (TOLL SAVE is the preset option);
5. Press MENU button to save the setting;
6. Press BACK button to go back to Standby mode.
NOTE: When TOLL SAVE option is selected, the TAD will answer the call after 3 rings if
there is new message(s) stored while it will answer the call after 5 rings if there is no new
message stored.
TAD DAY/TIME (applicable to base unit only)
This TAD allows you to set the day and time running in the unit and this information is
stamp to the voice message recorded.
1. During Standby mode, press MENU button on the base unit;
2. Press DOWN button until “TAD DAY/TIME”option is pointed by the pointer;
14

3. Press MENU button;
4. Press UP or DOWN button to select the day of week and then press MENU to confirm;
5. Press numeric keypad to enter time in 12hour format;
6. Press UP or DOWN button to select AM/PM;
7. Press MENU button to save the setting;
8. Press BACK button to go back to Standby mode.
NOTE: if day/time is not set, the LCD lower row will blink and dual 7segment LED digit will
show “CL”, and no day/time stamp for those message(s) recorded during day/time is not
set. You must input the day/time again if A/C power interruption is occurred.
TAD PIN SETUP (applicable to base unit only)
This TAD allows you to input your desired TAD remote PIN code. This PIN code is used
when call in to operate the TAD from a remote phone.
1. During Standby mode, press MENU button on the base unit;
2. Press DOWN button until “TAD PIN SETUP”option is pointed by the pointer;
3. Press MENU button;
4. Press 3 digits new PIN code (Preset PIN code is 777);
5. Press MENU button to save the setting;
6. Press BACK button to go back to Standby mode.
DELETE VMWI (applicable to base unit only)
This telephone allows you to force the both lines’VMWI indicator to off (stop blinking only,
not to turn off VMWI feature) if desired.
1. During Standby mode, press MENU button on the base unit;
2. Press DOWN button until “DELETE VMWI”option is pointed by the pointer;
3. Press MENU button to confirm;
4. The screen show “LINE1 & LINE2 VMWI DELETED!”and the VMWI indicators
will stop blinking immediately;
5. Press BACK button to go back to Standby mode.
LOAD DEFAULT
This telephone allows you to restore the phone setup options back to factory default. The
Load Default action will cause Menu Language back to English, both lines’Ringer Volume
back to Medium, Line1 Ringer Tone back to Tone 1, Line2 Ringer Tone back to Tone 2, both
lines’Area Code erased, handset ear piece volume back to Vol.2, base speakerphone
volume back to Vol.4, Tone/Pulse mode back to Tone, both lines’TAD ring count back to
Toll Save, TAD PIN back to 777, both lines’TAD status back to Answer On.
1. During Standby mode, press MENU button;
2. Press UP button;
3. Press MENU button;
4. Press UP button to select YES;
5. Press MENU button to confirm Load Default;
6. Press BACK button to go back to Standby mode.
TELEPHONE OPERATION
This telephone is having a general display timeout of 60 seconds, information like menu
items, caller ID, phonebook items, caller log, etc. will be displayed for this period, one can
press the BACK button to cancel the display before this timeout.
NOTE: same procedure about call handling is applicable to both handset and base unless
specified.
15

CALL STATUS DISPLAY
At the LCD lower row, the call duration timer is shown at the left while the volume is shown
at the right, the call status of both lines are displayed at the middle of the lower row.
“L1”indicates line1 is in normal conversation mode;
“L2”indicates line2 is in normal conversation mode;
“H1”indicates line1 is on hold;
“H2”indicates line2 is on hold;
“M1”indicates line1 conversation is in mute mode;
“M2”indicates line2 conversation is in mute mode;
“C1C2”indicates line1 and line2 are connected to 2 lines conference mode;
TO PLACE A CALL
1. To make line1 call, press the L1 button. The call timer starts to count. “L1”is shown
on the LCD to indicate the call status. Base unit L1-IN-USE LED indicator will light
up.
2. Listen for a dial tone and dial the telephone number.
3. When finished with your call, press the L1 button again (or place the handset on the
base/charge cradle to engage auto-standby feature).
TO PLACE ANOTHER CALL DURING A CALL
1. When having a conversation on line1, you may make a call on line2, press the HOLD
button to put line1 call on hold,“H1”is shown on the LCD to indicate the call status.
L1-IN-USE LED indicator will blink to indicate hold status. Press the L2 button to get
line2 dial tone, “H1L2”is shown on the LCD to indicate the call status.
2. Dial the telephone number and make your conversation on line2 while keeping line1
on hold.
3. Now you can switch between lines, press the HOLD button to put line2 on hold, then
press L1 button to back to line1 conversation, “L1H2”is shown on the LCD. (to
switch line, one may press HOLD to put the current line on hold then the opposite line
button to connect to that conversation)
4. When finished with your current call, say line1 is currently connected, press the L1
button to end line1. To end the line2 call, press HOLD or L2 button to back to line2
conversation, then you can press L2 button to end line2.
TO RECEIVE A CALL
1. When line1 rings, press the L1 button to answer the call (or you can pick up the
handset from the base/charge cradle to let auto-answer feature works for you) and
start your conversation. “L1”is shown on the LCD to indicate the call status.
2. To end your conversation, press the L1 button again. The L1-IN-USE LED indicator
will turn off.
NOTE: If you are expecting incoming calls, you will hear the ring tone on handset or base
only if their respective ringer volume setting of that line is NOT set to OFF mode. There is
always fast blinking at the L1-IN-USE/L2-IN-USE LED respectively indicating the ringing.
TO RECEIVE A CALL ON ANOTHER LINE DURING A CALL
1. During line1 conversation, if a line2 call comes in, short beep alert will be heard at
receiver, you may press HOLD button to put line1 call on hold and then press L2
button to answer the line2 call. “H1L2”is shown on the LCD to indicate the call
status.
2. To switch between lines or end your conversation(s), please refer to step 3 and 4 of
“TO PLACE ANOTHER CALL DURING A CALL”section for details respectively.
16

LAST NUMBER REDIAL
1. If you get a busy tone on line1, press L1 button to hang up.
2. Press the L1 button again and listen for a dial tone.
3. Press the REDIAL button. This will automatically redial the last telephone number
you called (Redial can store up to 32 digits).
4. When finished with your call, press the L1 button on handset or place the handset on
the base/charge cradle (or the L1 button again for base unit case). The L1-IN-USE
LED indicator will turn off.
PAGING BETWEEN EXTENSIONS
1. Press INT button on the extension unit.
2. Press digit button 0~8 to input destination extension number (extension 0 is the base
unit, extension 1~8 is the handsets).
3. Destination extension unit beeps, and will show the paging source extension
information like name or extension number. The page signal will last for 2minutes
and then stops.
NOTE: Paging can be done during Standby mode or Call is on hold. But page to a busy
handset will fail.
INTERCOM WITH OTHER EXTENSION
1. Perform the step 1 and 2 of “PAGING BETWEEN EXTENSIONS”section to start
paging. Destination extension unit beeps.
2. If user, on the destination extension, presses the INT button during paging, it will
bring both units into Intercom mode.
3. When finish with the Intercom, press INT button on either source or destination
extension will end the Intercom mode.
RING ON INTERCOM
1. During Intercom mode, if there comes an incoming call on line1, caller ID will display
on the screen (top right corner of the LCD shows the line of call).
2. Short beep alert will be heard.
3. User on either source or destination extension can press the L1 button to end the
Intercom mode and take the call on line1. (If either source or destination extension is
replaced onto cradle, the Intercom mode will be ended and the unit starts ringing)
QUICK TRANSFER CALL TO OTHER EXTENSION
1. During one line is in conversation while another line is on hold, you can quick transfer
any line to other extension by press the INT button followed by destination extension
number and then the target line button (L1 for transfering line1, L2 for transfering
line2)
2. If destination extension user press the corresponding line button, the call will be
transferred to this extension. Otherwise after 30seconds it will ring back the source
handset for 30seconds.
3. During 1extension 2lines conference mode, you can quick transfer both lines
conference to other extension by using step 1 and 2, either L1 or L2 key will result in
transferring the conference call to the destination extension.
TRANSFER CALL AFTER INTERCOM
1.During one line is in conversation while another line is on hold, you can establish
intercom mode by pressing the INT button followed by destination extension number.
Press the INT button on the destination extension to answer the Intercom call and
start the intercom conversation.
2. After the intercom, press the target line button on the source extension (L1 for
transfering line1, L2 for transfering line2) to transfer the target line to this intercom
connected extension.
17

3. During 1extension 2lines conference mode, you establish the intercom with a
destination extension using step 1 and 2, after the intercom, either L1 or L2 key will
result in transferring the conference call to the destination extension.
CONFERENCE WITH TWO LINE
1. During line1 conversation, press the HOLD button to put line1 on hold, then press L2
button to get line2, “H1L2”is shown on the LCD to indicate the call status. Dial your
telephone number on line2, and starts your line2 conversation.
2. Press the HOLD button to put line2 on hold too, “H1H2”is shown on the LCD. Now
both lines are on hold, other than pressing L1 or L2 button to back to desired line
conversation, you may press CONF button to join both lines to conference mode,
“C1C2”is shown on the LCD to indicate the 2lines conference.
3. During 1extension 2lines conference mode, you can press HOLD to put both lines on
hold, then press L1 button to go back to line1 conversation while keeping line2 on
hold; Or you can press L1 button directly to go back to line1 conversation while
dropping line2.
4. During 1extension 2lines conference mode, you can invite one more extension to join
the conference. Press INT button and then the destination extension number, when
the destination extension answers the page then Intercom mode is engaged, you
may press the CONF button on the source extension to engage the 2extensions
2lines conference mode, the extensions information is shown on upper row of the
LCD while the lines’information is shown on the lower row.
5. During 2extensions 2lines conference mode, any extension can quit the conference
by pressing the L1 or L2 button, the conference then reduced to 1extension 2lines
conference mode.
TWO EXTENSIONS CONFERENCE WITH ONE LINE
1. During a call, you establish the Intercom mode to another extension, while keeping
the call on hold, using the procedure described in “INTERCOM WITH OTHER
EXTENSION”section.
2. During the Intercom mode, you can press the CONF button on the source extension
to join conference the source, destination extension and the line, the extension
information is shown on upper row of the LCD while the line information is shown on
the lower row.
3. Either source or destination extension can quit this conference by pressing
corresponding L1 or L2 button.
4. During 2extensions 1line conference, you can invite one more external line to form
the 2extensions 2lines conference. If you are using line1 in your conference, press
theHOLDbuttonto put line1 on hold and then L2 button to get line2, dial your telephone
number in line2, press the HOLD button to put line2 on hold, and then press CONF
button to form the 2extensions 2lines conference mode.
MIXED MODE DIALING (Temporary Pulse to Tone Dialing)
•If you only have pulse (rotary dialing) service in your area and want to access Tone
services (Phone banking service, etc.), ensure that the signaling mode setting in the
base unit phone setup menu is set to Pulse mode.
•Press the */TONE button once to switch from Pulse to Tone dialing temporarily, Pulse
dialing mode resumes when the call is ended.
PAUSE FUNCTION
•In some cases, such as PBX or long distance service, a pause may be needed in the
dialing sequence. Pressing the PAUSE button inserts a three-second delay between
dialed numbers.
18
FLASH FUNCTION
•Used to access custom calling features such as Call Waiting or Three-Way Calling
provided by your local phone company. Flash can also be used to restore a dial tone
to make a new call.
OUT OF RANGE WARNING
•Thehandsetandbaseunit communicate up to a certain maximum range. The distance
can be affected by weather, power lines, or even other cordless telephones.
•If you far away from the base unit, the handset will show “OUT OF RANGE”on the
LCDdisplay to warn you that bit error rate istoohighforpropercommunication between
the handset and the base unit.
•When you hear no voice and see the“OUT OF RANGE”display, you should move
closer to the base unit. Otherwise, the call will automatically cut off after 30 seconds.
LOW BATTERY WARNING
•When the handset battery voltage level is low, the handset LCD display shows
“BATTERY LOW!”.
•Return the handset on the base cradle or charge cradle for charging.
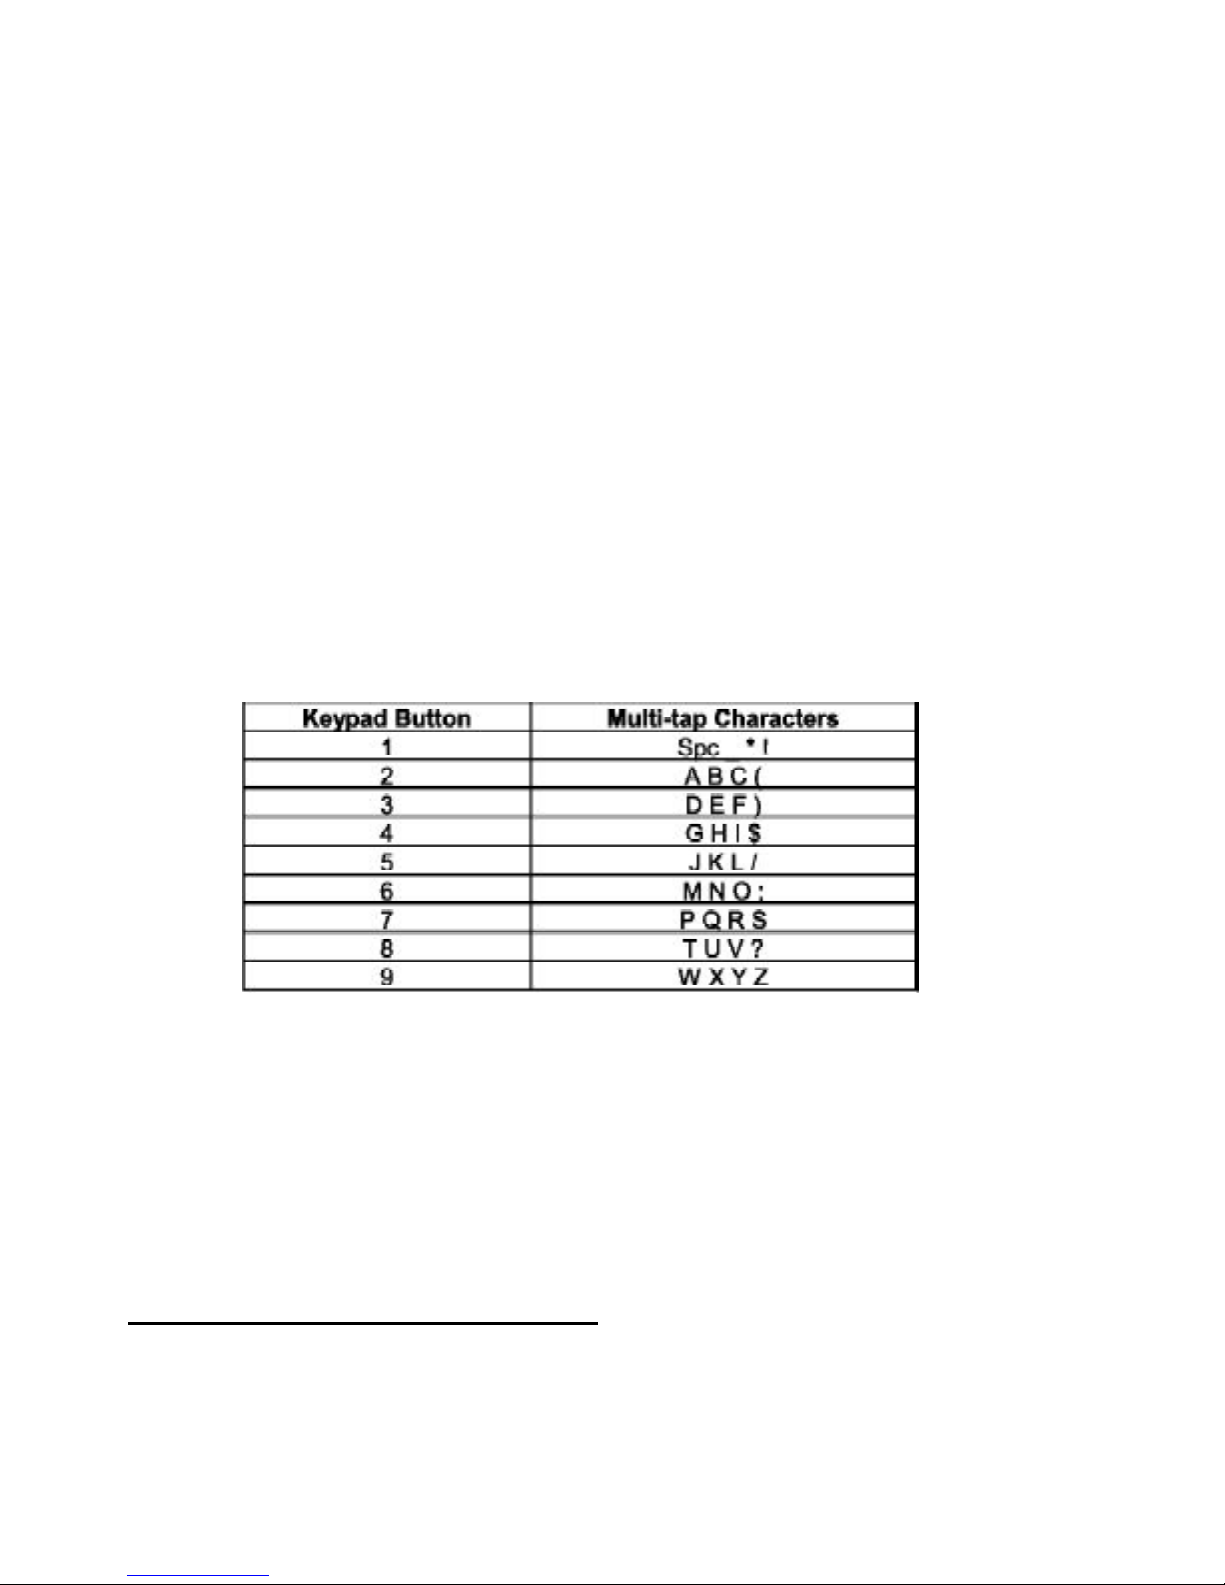
TELEPHONE KEYPAD CHARACTERS
The TELEPHONE KEYPAD buttons (0~9) are used to enter characters using multi-tap
input when entering names. Press the appropriate KEYPAD button consecutively to get
the following characters.
Multi-tap example: If you want to enter the character “C”, press the KEYPAD button ‚,
the first character displayed will be “A”. Press the button ‚again within 1 second to
display “B”, and press again within 1 second to display the letter “C”. To enter the next
character, press the appropriate button. If, however, the next character is on the same
button as the previous character, you will need to wait for 2 second until the cursor shifts. If
you want to change any character, you can go backward by pressing DEL button to erase
the inputted characters one by one.
PHONEBOOK OPERATION
SAVING IN THE PHONEBOOK
All phonebook operation is the same on handset and base unit, the phonebook memories
are independently stored in their own non-volatile memories.
1. Press the MEM button.
2. Press UP/DOWN button to select location, or enter 2 numeric digits to select location
directly (01~20 on base unit, 01~30 on handset).
19
Table of contents
Other Bell Phones Cordless Telephone manuals


