Bellini BCA64GK User manual

USER MANUAL
Ceramic Hob
Model No. BCA64GK
V2 July 2022
GSM Retail Australia Pty Ltd ABN: 53 007 582 475Lt
For Warranty and technical queries: Australia 1300 373 199
For Warranty and technical queries: New Zealand 0800 764 912
www.belliniappliances.com.au

Thank you.
Thank you for choosing Bellini Appliances.
Bellini appliances carry a 3 year in home warranty, be sure to
retain your user manual and receipt.
For all warranty and technical queries please phone:
Australia 1300 373 199
New Zealand 0800 764 912
GSM Retail Australia Pty Ltd ABN: 53 007 582 475
For Warranty and technical queries: Australia 1300 373 199
For Warranty and technical queries: New Zealand 0800 764 912
www.belliniappliances.com.au

Contents
Safety instructions …………….............................. 4 - 6
Installation ……………………............................... 6 - 10
Description of the Ceramic Hob surface layout ... 10 - 13
Using the ceramic hob ………………………......... 13 - 17
Hob guidelines …………………………………....... 17 - 18
Maintenance and cleaning ………………………… 18 - 19
Environmental note ………………………………… 20
3

Safety instructions
This User Instruction Manual contains important information, including safety &
installation points, which will enable you to get the most out of your appliance.
Please keep it in a safe place so it is easily available for future reference; for you or
any person not familiar with the operation of the appliance.
Caution!
Do not use the ceramic hob until you
have read this instruction manual.
The ceramic hob is intended for
household use only.
The appliance becomes hot during
operation. Take care not to touch the
hot surface.
Always keep children away from the
ceramic hob.
While in operation, direct contact with
the ceramic hob may cause burns!
Ensure small items of household
equipment, including connection
leads, do not touch the hob as the
insulation material of this equipment is
usually not resistant to high
temperatures.
Do not leave the ceramic hob
unattended when frying. Oils and fats
may catch fire due to overheating or
boiling over.
Do not switch on the hob until a pan
has been placed on it.
Do not put pans weighing over 25kg
on the hob.
Do not use the ceramic hob in the
event of a technical fault. Any faults
must be fixed by an appropriately
qualified and authorised person.
In the event of any incident caused by
a technical fault, disconnect the power
and report the fault to the service
centre to be repaired.
The rules and provisions contained in
this instruction manual should be
strictly observed. Do not allow
anybody who is not familiar with the
contents of this instruction manual to
operate the ceramic hob.
The ceramic hob should not be
cleaned using steam cleaning
equipment.
IMPORTANT: The adjacent furniture
or housing and all materials used in
the installation must be able to
withstand a minimum temperature of
95°C above the ambient temperature
of the room it is located in, whilst in
use.
Any damage caused by the appliance
being installed in contravention of this
temperature limit, or by placing
adjacent cabinet materials closer than
4mm to the appliance, will be the
liability of the owner.
Child Safety
We strongly recommend that
babies and young children are
prevented from being near to the
appliance and not allowed to touch
the appliance at any time.
If it is necessary for younger family
members to be in the kitchen,
please ensure that they are kept
under close supervision at all times.
4
General Safety
This appliance is not intended for
use by persons (including children)
with reduced physical, sensory or
mental capabilities, or lack of
experience and knowledge, unless
they have been given supervision
or instruction concerning use of the
appliance by a person responsible
for their safety.
Children should be supervised to
ensure that they do not play with
the appliance.
NEVER try to extinguish a fire with
water, switch off the appliance and
then cover flame e.g. with a lid or a
fire blanket.
WARNING: Danger of fire - do not
store items on the cooking
surfaces.
Means for disconnection must be
incorporated in the fixed wiring in
accordance with the wiring rules.
Do not allow electrical fittings or
cables to come into contact with
areas on the appliance that get hot.
Do not use the appliance to heat
the room it is located in or to dry
clothing.
Do not install the appliance next to
curtains or soft furnishings.
If the supply cord is damaged, it
must be replaced by the
manufacturer, its service agent or
similarly qualified persons in order
to avoid a hazard.
The appliance is not intended to be
operated by means of an external
timer or separate remote-control
system.
Power cord can’t be accessible
after installation.
This product can be worked but not
through outside timer and remote
control.
Warning: If the surface is cracked,
switch off the appliance to avoid the
possibility of electric shock, for hob
surfaces of glass, ceramic or similar
material which protect live parts.
Warning: a steam cleaner is not to
be used.
CAUTION: The cooking process has
to be supervised. A short term
cooking process has to be
supervised continuously.
WARNING: Unattended cooking on
a hob with fat or oil can be
dangerous and may result in a fire.
This appliance should be connected
to a circuit which incorporates an
isolating switch which can be
accessible by the user after
installation providing full
disconnection from the power
supply. The disconnection may be
achieved by incorporating a switch
in the fixed wiring in accordance
with the wiring rules.
Warning: Before obtaining access to
terminals, all supply circuits must be
disconnected.
WARNING: Use only hob guards
designed by the manufacturer of the
cooking appliance or indicated by
the manufacturer of the appliance in
the instructions for use as suitable
or hob guards incorporated in the
appliance. The use of inappropriate
guards can cause accidents.
WARNING: The appliance and its
accessible parts become hot during
use.
5
Care should be taken to avoid
touching heating elements.
If a stationary cooktop is not
provided with a supply cord and a
plug or by other means of
disconnection from the supply
having an air gap contact the
separation in all active (phase)
conductors, the instructions shall
state that such means for
disconnection shall be incorporated
in the fixed wiring according to the
wiring rules.
Installation
IMPORTANT: The appliance must be installed by a qualified technician
according to the current local regulations and in compliance with the
manufacturer's instructions.
Electrical connection
Before connecting the appliance, make sure that the supply voltage marked on
the Rating Plate corresponds with your mains supply voltage.
WARNING: THIS APPLIANCE MUST BE EARTHED.
The kitchen area should be dry and aired and equipped with efficient ventilation.
When installing the ceramic, easy access to all control elements should be ensured.
This is a Y-type design built-in ceramic, which means that its back wall and
one side wall can be placed next to a high piece of furniture or a wall. Coating
or veneer used on fitted furniture must be applied with a heat-resistant
adhesive (min. 95°C).This prevents surface deformation or detachment coating.
The cooktop should be installed according to the manufacturer’s instructions.
Installation of ceramic hob:
Make an opening with the dimensions given in
the diagram for the hob to be mounted on the
worktop.
Check seal for perfect fit and overall cover.
Lower the ceramic hob into place and align
correctly.
Using a standard screwdriver, tighten the
tension clamps evenly starting at the centre and
moving diagonal, until the built-in rim is tight on
the worktop.
6

Preparing the unit for a built-in appliance
WARNING
The appliance can be installed on a work surface with a thickness of between 30
and 40 mm and rear of the appliance should be ≥40mm away from the wall and
kept ≥100mm away from the side of the work surface.
Carry out all cutting of the unit and work surface then carefully remove shavings
or sawdust before inserting the appliances.
To ensure a correct ventilation of the hob, please comply with the dimensions
shows in figures.
Always refer to the manufacturer for specific instructions.
Make sure the surface is level and square and that no part interferes with the space
required for installation.
Prepare the cut as indicated (see installation dimensions).
Installing the hob
7
Remove the material and envelope of documents from the packaging.
Before proceeding with installation, read the work instructions carefully.
Step.1
Put a towel or cloth on the work surface. Place the hob face
down on the protected surface.
Step.2
Apply the strip seal, supplied with the hob, which is for sealing it
onto the work surface.
Do not use silicone. Apply the seal to the edge of the bottom of
the hob, leaving about 3mm from the edge of the glass.
Apply the seal all around the circumference.
Cut any excess and bring the two ends of the seal together so
they match.
Step.3
Fix the brackets (4 pcs) on the front side and rear side by screw. Put the hob in the
cut-out cabinet, and make it centered. Ensure that the front edge of the hob is parallel
to the side edge of the work surface.
IMPORTANT: You must observe the ventilation requirements
shown in the drawing opposite.
IMPORTANT: There are ventilation holes around the outside
of the hob. YOU MUST ensure that these holes are not
blocked by the work top, when you put the hob into position
(see drawing opposite).
IMPORTANT: Do not use a silicon sealant to seal the
appliance against the aperture. This will make it difficult to
remove the hob from the aperture in future, particularly if it
needs to be serviced.
Carefully turn the hob back over and then gently lower it into
the aperture hole that you have cut out.
8
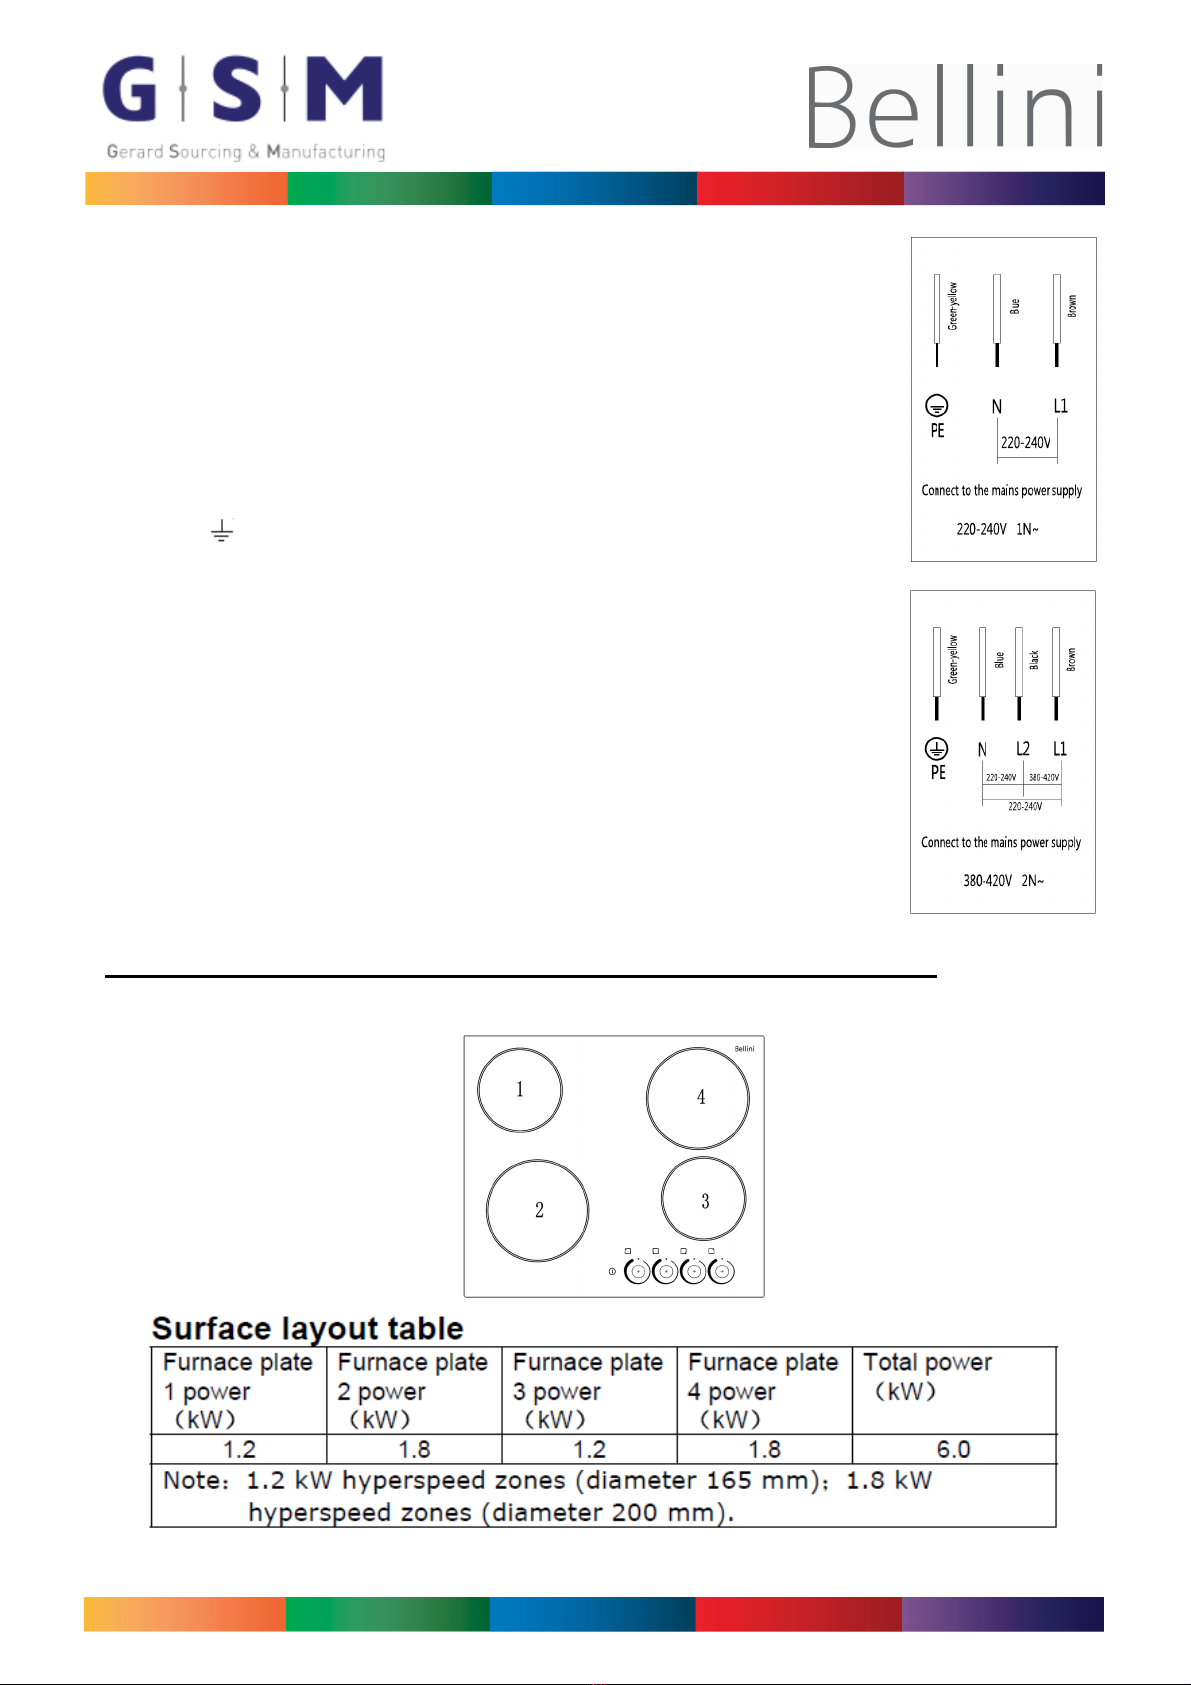
Fitting guidelines
The ceramic hob is manufactured to work with two-phase alternating
current (400V2N~50Hz). The voltage rating of the ceramic hob heating
elements is 230V. Adapting the ceramic hob to operate with one-phase
current is possible by appropriate bridging in the connection box
according to the connection diagram below. The connection diagram is
also found on the cover of the connection box. Remember that the
connection wire should match the connection type and the power
rating of the ceramic hob.
The connection cable must be secured in a strain-relief clamp.
Warning!
Remember to connect the safety circuit to the connection box terminal marked with
The electricity supply for the ceramic hob must have a safety switch which enables the
power to be cut off in case of emergency. The distance between the working contacts of
the safety switch must be at least 3mm. Before connecting the ceramic hob to the power
supply it is important to read the information on the data plate and the connection
diagram.
Wires for each ceramic cooktop
model
Adaptive voltage range and wires The wiring diagram
220-240
1N~ 50-60Hz
380-420
2N~ 50-60Hz KADO K 1/5
BCA64GK H05VV-F 3G2.5 H05VV-F 4G2.5
2
1
9
-The cable connections must be in accordance with the diagram located on the bottom of the hob.
-The cable type must be connected to the corresponding power supply terminal box.
-You should use a good quality screwdriver to carefully, fully tighten all of the terminal screws.
-If when the hob is first switched on, only two of the zones work, you should recheck that the
terminal screws are all fully tightened. This should be done before contacting the Customer Care
Department.
-IMPORTANT: The appliance must NOT be connected to the mains supply by means of a 13A
plug and socket.
-This appliance must be wired into a 30A double pole switched fused spur outlet, having 3 mm
contact separation and placed in an easily accessible position adjacent to the appliance. It should
not be located above the appliance and no more than 1.25m away from it.
-The cable can be looped if necessary, but make sure that is not kinked or trapped when the hob
is in position. Care must be taken to avoid the cable being in contact with hot parts of the
appliance.
Replacing the mains supply cable
If the mains supply cable is damaged, then it must be replaced
appropriately.
The mains supply cable should be replaced in accordance with the
following instructions:
Switch the appliance off at the control switch.
Open the terminal block on the underside of the hob.
Unscrew the terminal screws fixing the cable.
The “green-yellow” earth wire must be connected to the terminal
marked . It must be about 10 mm longer than the live and neutral
wires.
The “blue” neutral wire must be connected to the terminal marked
with letter (N)
- the live wire (L1) must be connected to the terminal marked with
letter (L1)(220-240V 1N~).
The “blue” neutral wire must be connected to the terminal marked
with letter (N)
- the live wire L1 must be connected to the terminal marked with
letter (L1), the live wire L2 must be connected to the terminal
marked with letter (L2) (380-420V 2N~).
10
Description of the Ceramic hob surface layout
4 zone ceramic hob schematic diagram
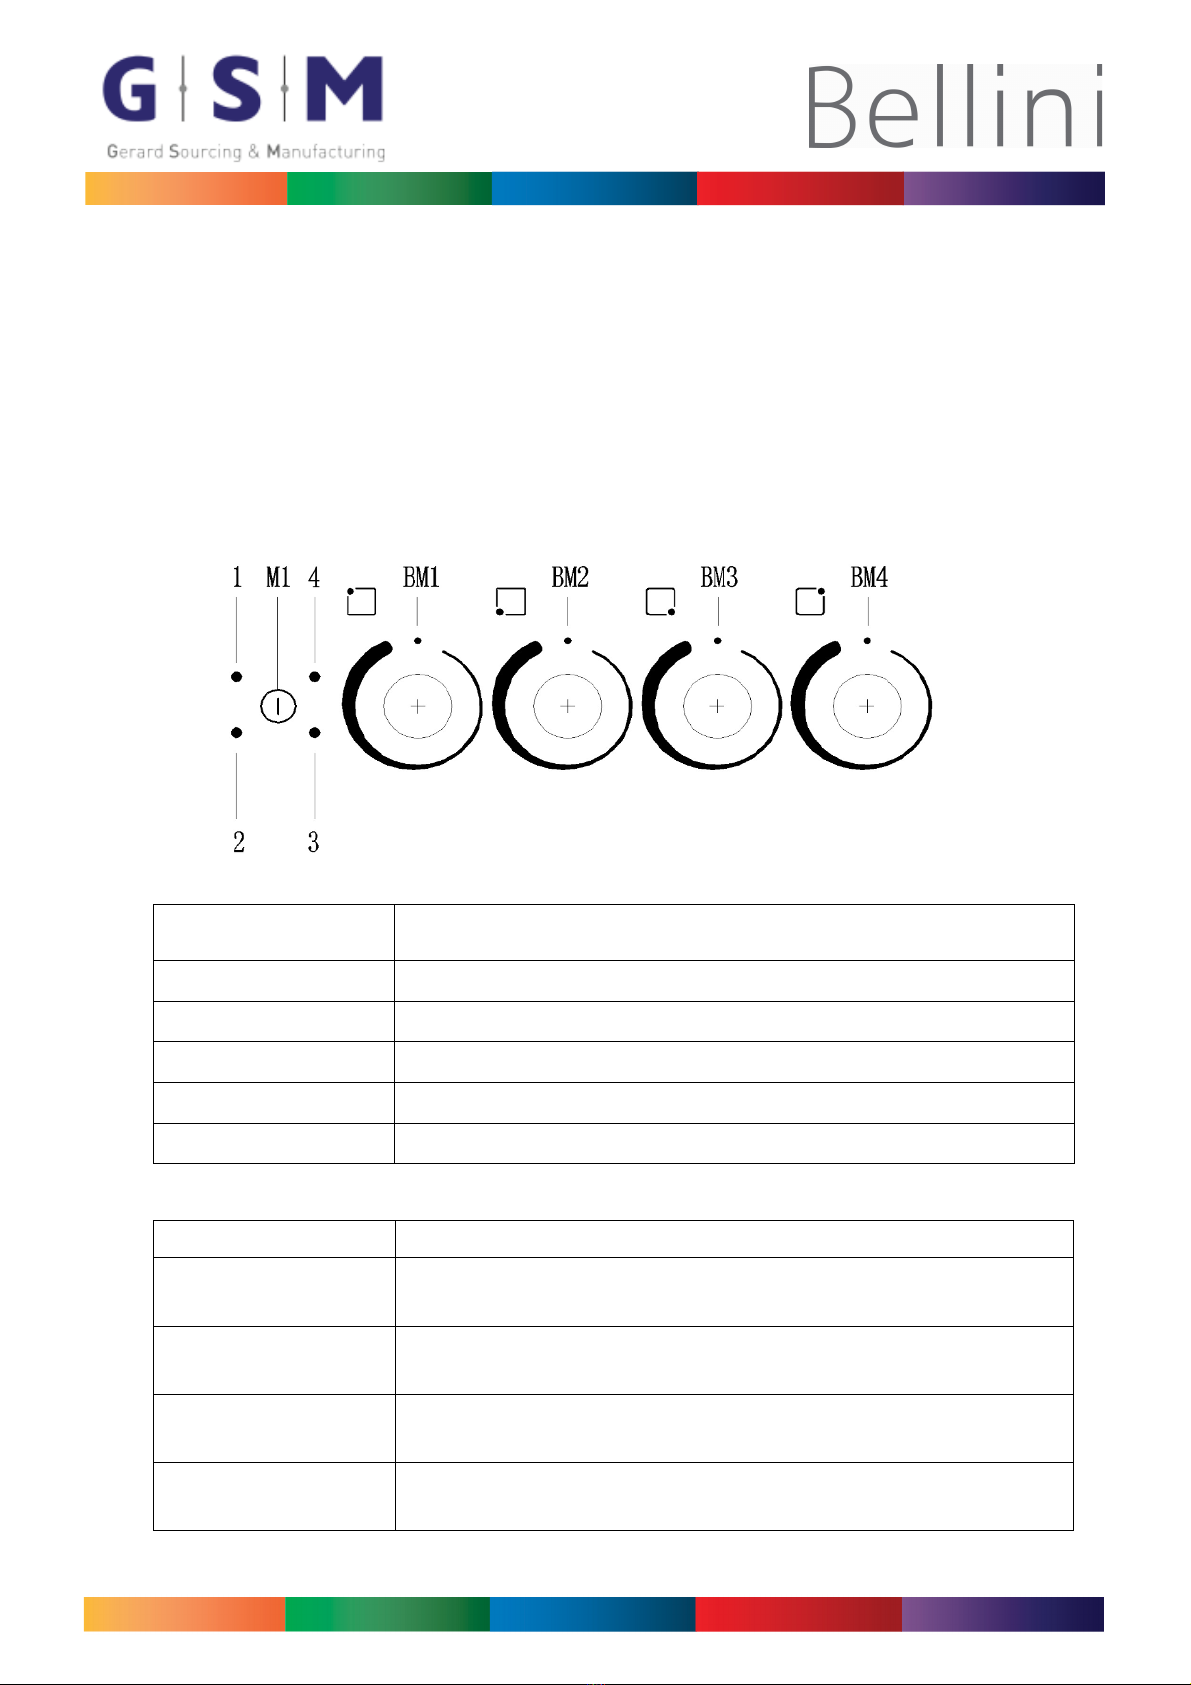
Display and control mode
1.1 Display mode
üCooking zone working indicator: the corresponding indicator light displays when
the cooking zone is working;
üCooking zone residual heat indicator: the corresponding indicator flashes when the
cooking zone stops working (once every 1 second);
üThe whole hob standby mode indicator: all cooking zone indicator lights alternately
turn on and off.
1.2
Control panel
2.1 Control panel layout:
Power Button &
Programming Knob Function
M1 Power button: press and hold for 3s to turn on / off
BM1 NO.1 cooking zone power level selecting
BM2 NO.2 cooking zone power level selecting
BM3 NO.3 cooking zone power level selecting
BM4 NO.4 cooking zone power level selecting
12
2.2 Icon description is indicated:
Indicator light Function
1 NO.1 cooking zone indicator light: indicates the working
status of this zone, high temperature warning, etc
2 NO.2 cooking zone indicator light: indicates the working
status of this zone, high temperature warning, etc
3 NO.3 cooking zone indicator light: indicates the working
status of this zone, high temperature warning, etc
4 NO.4 cooking zone indicator light: indicates the working
status of this zone, high temperature warning, etc
Using the ceramic hob
Before first use
IMPORTANT: You should clean the ceramic hob surface (see “Maintenance
and cleaning” section).
üYou should switch on one cooking zone at a time, for 5 minutes at the maximum
setting. This will help to eliminate any new smell that exists and evaporate any
humidity that has formed on the heating elements during transit.
üDo not immediately use more than one zone to burn.
üYou must place a saucepan half full with cold water on the cooking zone when you
burn.
Operation instruction
1. Power On
üAfter the appliance is powered on, all of the indicator lights on the display screen
will light up for 2s, then the appliance goes into shutdown mode.
üShutdown status: All the display are turned off except for the indicator light on the
heated cooking zone. At this time, only the power button “ ” can be long pressed
to operate, and the operations of other programming knobs are invalid.
13
NOTED: Description for each kind of blinking indicator light
üPower on: After the appliance is powered on, all of the indicator lights on the
display screen will light up for 2s, then the appliance goes into shutdown mode.
üStandby mode: Under shutdown status, press and hold “ ” button for 3s, all
cooking zone indicator lights will alternately turn on and off. The hob will enter
standby mode.
üHigh temperature warning: Press and hold power button “ ” manually for 3s until
hob switches off, the whole appliance will stop heating. If the indicator light
corresponding to the burner stops blinking, it indicates that the heating furnace
surface is still at a high temperature.
2. Standby mode
üUnder shutdown status, press and hold " " button for 3s, all cooking zone
indicator lights alternately turn on and off. The hob will enter standby mode.
üUnder standby mode, if no cooking zone has heating operation, the appliance will
go into shutdown status automatically after 1 minute.

3. Heating control
üUnder standby mode, you can set the power level by the corresponding
programming knobs. In the process of adjusting the power level, clockwise rotation
can increase the power level from 0 to 15 (maximum), and then rotate back to “0”
for a cycle; Counter clockwise rotation can be adjusted from 15 to 1 power levels,
and then rotate back to “0” for a cycle.
üWhen the hob is in heating status, press and hold “ ” power button for 3s to
switch off, all the cooking zones stop heating. The indicator light of the previously
heated cooking zone blinks, indicating that the surface of the corresponding
cooking zone is in high temperature state, that is high temperature warning.
üWhen one of the cooking zones needs to stop heating, the cooking zone can be
selected through the corresponding programming knob, turn the programming knob
to adjust the power level to "0" that turns off this cooking zone. At this time, other
cooking zones heating is not affected.
4. Power level adjustment
üYou can select the appropriate output power level by rotating the programming
knob of the corresponding cooking zone.
üThe power level is divided into 16 levels, including the shutdown level (0 level). For
the programming knob, rotate clockwise to increase the power level and
anticlockwise rotation to decrease the power level. When rotating anticlockwise, if
the power level is "0" at the beginning, you will rotate the 15 and then decrease the
gear successively.
üWhen the power level of any cooking zone is set to 0, the power output of the zone
will be stopped automatically.
üIf one of the burners has been heated, and when the power level of all the cooking
zones is 0, the appliance will automatically enter the shutdown status after 1 minute
without effectively programming knob operation.
14
5. Shutdown
üUnder standby mode or heating mode, press and hold " " button for 3s, the
appliance will go into shutdown mode.
6. Default timing
üAll the cooking zones have a default timing function. The relationship of
default timing and power level is referred to in the table below;

üWhen all the default timing is reached, the cooking zones will switch off automatically
and enter into standby mode.
7. Protection function
üHigh temperature protection:
The electronic temperature sensor on the control panel will transmit the real time
temperature to the chip of the control panel. The control sensor starts protection
when the electronic temperature sensor gauges the current temperature is higher
than a certain value, to reduce the heating level of the cooking zone currently, and
resumes the heating level after the temperature drops.
üResidual heat protection:
When the whole appliance stops heating, the indicator lights of the relative cooking
zone will display, indicating that the cooking surface temperature is too high, to
avoid getting burnt do not touch the surface.
üAs long as the cooking zone has heated before, the indicator light will display for 35
minutes continually after the hob turns off.
15
8. PCB board fault codes and solutions
When a PCB board failure occurs, the indicator light on the display panel of the
cooking zone will show the failure mode, and all the cooking zones that are being
heated stop heating, and automatically return to the shutdown state after 1 minute. For
the cooking zones that have been working, their indicator light will continue to display,
slowly blinking once every second, indicating that the cooking surface temperature is
too high. When the fault is indicated, please refer to the scheme in the following table
to solve.
How to use the hot plate
Put the pot in the center of the heating zone, turn the knob clockwise and anticlockwise
to turn on the hob.
High temperature indication light:
When the glass plate is too hot, the high temperature indication light will light up, don’t
touch the glass plate until the indication light goes out.
Shut down: after using, please turn the knob to “OFF”, the hob will stop heating.
Caution!
ØEnsure the heating plate is clean-a soiled zone does not transfer all of the heat.
ØProtect the plate against corrosion.
ØSwitch off the plate against corrosion.
ØDo not leave pans with dishes containing fats and oils unattended on the
switched-on plate; hot fat can spontaneously catch fire.
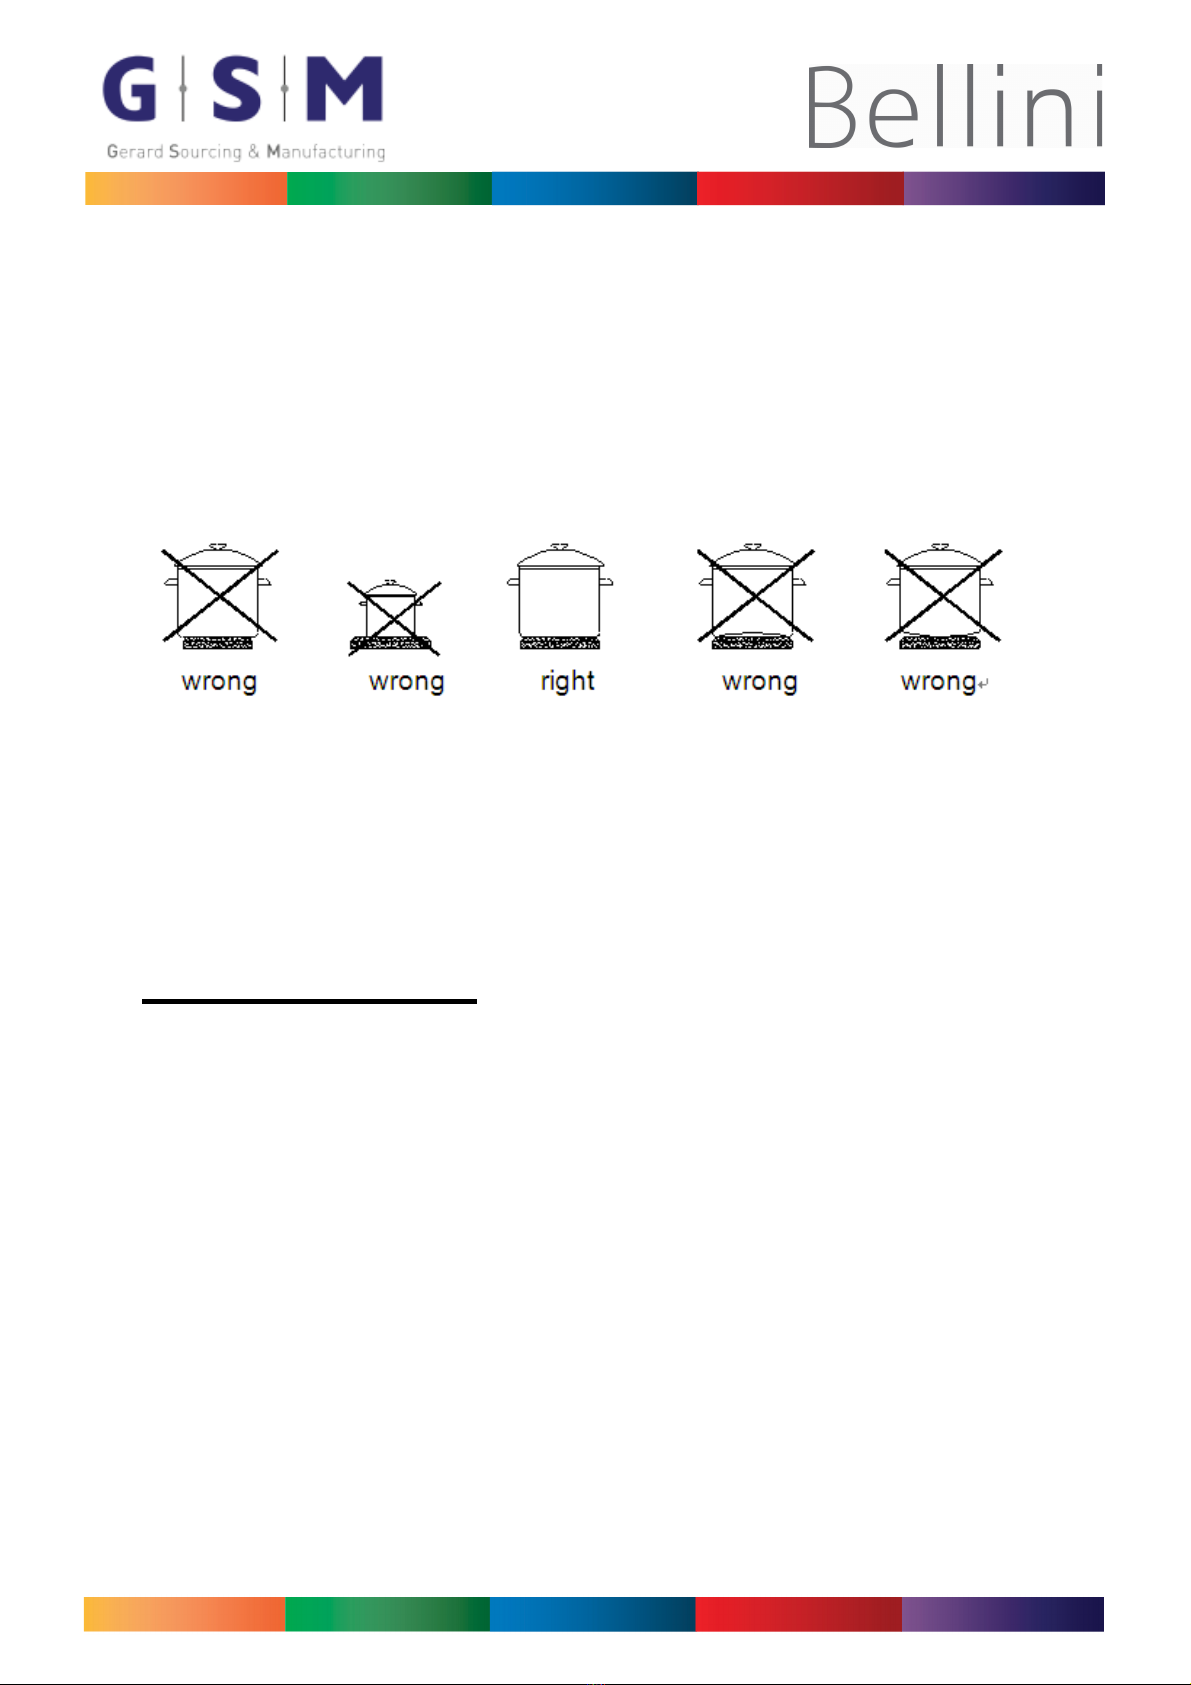
Hob guidelines
²The first few times the hob top is used, it may give off an acrid, burning smell. This
smell will disappear completely with repeated use.
²The worktop is fitted with cooking areas of different diameter and power.
²The positions where the heat will radiate from are clearly marked on the hob top.
The saucepans must be positioned exactly on these zones for efficient heating to
occur. Pans should have the same diameter as the cooking zone that they are being
used on.
²You should not use saucepans with rough bottoms, as this can scratch the ceramic
surface.
²Before use, make sure that the bottoms of the saucepans are clean and dry.
²When cold, the bottom of the pans should be slightly concave, as they expand when
hot and lie flat on the surface of the hob. This will allow the heat to transfer more
easily.
²The best thickness for the bottom of the pans is 2 – 3 mm of enamel steel and 4
– 6 mm for stainless steel with sandwich type bottoms.
17

If these rules are not followed, then there will be a great loss of heat and energy.
Heat not absorbed by the saucepan, will spread to the hob, frame and surrounding
cabinets.
Preferably cover pans with a lid to permit cooking at a lower heat.
Always cook vegetables and potatoes, etc. in as little water to reduce cooking times.
Food or liquid that have high sugar content may damage the hob top if it comes into
contact with the ceramic hob surface. Any spillages should be wiped up immediately,
however this may not prevent the hob surface from becoming damaged.
IMPORTANT: The ceramic hob surface is tough; however it is not unbreakable and
can be damaged. Especially if pointed or hard objects are allowed to fall on it with
some force.
Maintenance and cleaning
Cleaning operations must only be carried out when the hob is cool.
The appliance should be disconnected from your mains supply before
commencing any cleaning process.
Cleaning the ceramic hob top
Any residues that are left on the hob top surface from cleaning agents will
damage it. You should remove any residues with warm water mixed with a
dash of washing up liquid.
Abrasive cleaners or sharp objects will damage the hob surface; you should
clean it using warm water mixed with a dash of washing up liquid.
You may find it easier to clean some deposits whilst the hob surface is still
warm. However you should take care not to burn yourself if cleaning the hob
surface when it is still warm.
After each use
Wipe the appliance over with a damp cloth.
Dry the appliance by rubbing the surface with a clean cloth.
18

Cleaning table
Type of deposit
Remove
immediately?
Remove when
the appliance
has cooled
down?
What should I use
to remove the
deposit?
Sugar or food/liquid
containing sugar
Yes
No
Ceramic hob scraper
Tin foil or plastic
Yes
No
Ceramic hob scraper
Fat splashes
No
Yes
Ceramic hob cleaner
Metallic
discolouration
No
Yes
Ceramic hob cleaner
Water splashes or
water rings
No
Yes
Ceramic hob cleaner
Important!
The surface of the hob should only be cleaned with warm water and a small
amount of washing up liquid.
Caution!
Ensure the heating plate is clean-a soiled zone does not transfer all of the heat.
Protect the hob against corrosion.
Switch off the hob against corrosion.
Do not leave pans with dishes containing fats and oils unattended on the switched-
on plate; hot fat can spontaneously catch fire.
IMPORTANT: If your appliance does not appear to be operating correctly,
please contact the dealer.
DO NOT ATTEMPT TO REPAIR THE APPLIANCE YOURSELF.
Please note that if an engineer is asked to attend whilst the product is under guarantee
and finds that the problem is not the result of an appliance fault, then you may be
liable for the cost of the call out charge.
The appliance must be accessible for the engineer to perform any necessary repair. If
your appliance is installed in such a way that an engineer is concerned that damage
will be caused to the appliance or your kitchen, then they will not complete a repair.
19
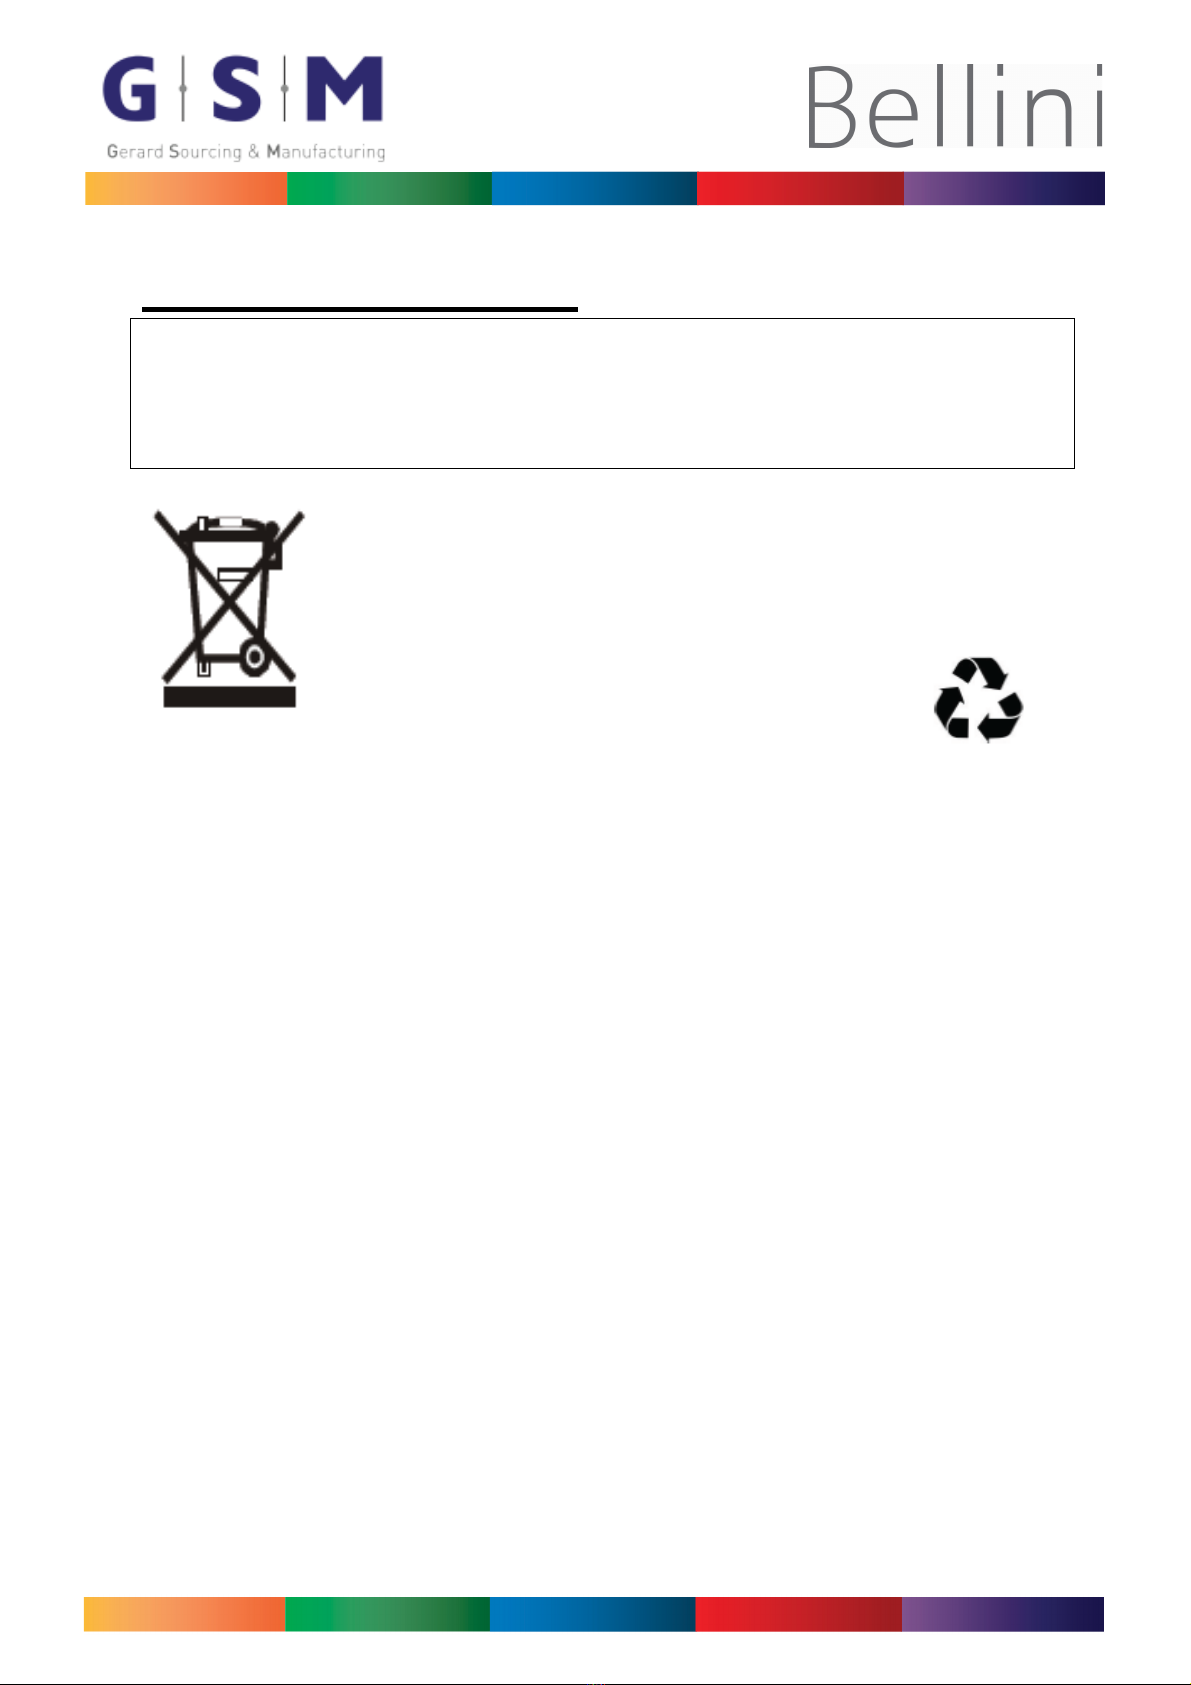
Environmental note
Note: Before discarding an old appliance, switch
off and disconnect it from
the power supply. Cut off and render any plug
s
useless. Cut the cable off
directly behind the appliance to prevent misuse. This should be undertaken
by a competent person.
This product must not be disposed together with domestic waste.
This product has to be disposed at an authorised place for recycling
of electrical and electronic appliances. By collecting and recycling
waste, you help save natural resources, and make sure the product
is disposed in an environmental friendly and healthy way.
20

WARRANTY
1.1
In this warranty:
1.1.1
Australian Consumer Law means the law as set out in Schedule 2 of the Competition and
Consumer Act 2010;
1.1.2
Company means GSM Retail Australia Pty Ltd ABN 53 007 682 475 of 142-144 Fullarton Road, Rose
Park SA 5067. Telephone 1300 373 199. Email admin@gsmretailgroup.com
1.1.3
Consumer means a “consumer” as that term is defined in Section 3 of the Australian Consumer
Law as the original purchaser of a Bellini product;
1.1.4
Consumer Guarantees means the guarantees under the Australian Consumer Law;
1.1.5
You means the Consumer.
1.2
Nothing in this warranty affects any person’s rights under the Australian Consumer Law. The benefits to
any Consumer under this warranty are in addition to the rights and remedies available under any
Consumer Guarantees.
1.3
Subject to the other clauses of this warranty, the Company warrants to the Consumer that the Bellini
product will be free of manufacturing defects and will perform to the Company’s specifications.
1.4
The benefit of this warranty extends only to the Consumer as original purchaser of a Bellini product which
is installed in a domestic household area.
*The in Home warranty does not apply to Commercial and or industrial usage. *Please See 1.7.7 for additional
information
1.5
This warranty commences on the date of purchase of the Bellini product by the Consumer and
continues for the benefit only of the Consumer until the expiry of three (3) year (Warranty Period).
1.6
If within the Warranty Period a manufacturing defect is discovered in the Bellini product or it fails to perform
to the Company’s specifications as a result of some defect in materials, components or workmanship
(Defect) then the Company will, at its option, repair the Bellini product or supply a replacement Bellini
product free of charge. A replacement Bellini product may differ from the original product purchased by the
Consumer.
1.7
This warranty will not apply to any Bellini product:
1.7.1
Installed by any person other than a qualified tradesperson; or
1.7.2
Subjected to misuse, neglect, negligence or accidental damage; or
1.7.3
Operated in any way contrary to any operating or maintenance instructions; or
1.7.4
Improperly handled, installed or maintained; or
1.7.5
Altered or modified prior to or after installation; or
1.7.6
Damaged directly or indirectly by power surges, electrical storm damage or connection to incorrect
power supply
1.7.7
Industrial and or Commercial usage is inclusive of staff areas in office/ shop environments, hotel/
motel or other similar accommodation or rental type properties including Bed and Breakfast
establishments.
The Australian Consumer Law requires the inclusion of the following
statement with this warranty:
Our goods come with guaranteed that cannot be excluded under the Australian Consumer Law. You are entitled to a
replacement or refund for a major failure and for compensation for any other reasonably foreseeable loss or damage.
You are also entitled to have the goods repaired or replaced if the goods fail to be of acceptable quality and the failure
does not amount to a major failure.
1.8
You must provide proof of your purchase of the Bellini product and the date of purchase in order to obtain
the benefit of this warranty.
1.9
If you live outside the service area of the Company or one of its service agents, this warranty does not
cover the cost of transport of the Bellini product for service nor the service agent’s traveling costs to and
from your home.
1.10
If you are required to transport the Bellini product to the Company or its service agent, you must ensure it is
safely disconnected by a qualified tradesman and securely packed and insured. The Company does not
accept any responsibility for loss or damage of the Bellini product prior to it being received by the Company or
its service agent.
1.11
You will be responsible for all costs of returning a Bellini product to the Company and for redelivery of the
Bellini product by the Company (whether it is the original or a repaired and/or a replacement Bellini product)
and for any other expenses you incur in claiming under this warranty.
1.12
The Company or its service agent will examine any Bellini product and if the Company determines that it is
defective through no fault of the Owner and is otherwise undamaged, the Company will repair or replace the
Bellini product in accordance with this warranty.
DO NOT SEND IN THIS WARRANTY
Fill out the following details and file with your purchase invoice for safe keeping.
RETAIN & FILE WITH YOUR RECEIPT
Your Purchase Receipt/Invoice is proof of date of purchase. If you are unable to establish the date of purchase, or if
the fault is not covered by this warranty, or if the product is found to be in working order, you will be required to bear
all service call charges.
GSM Retail Australia Pty Ltd reserves the right to discontinue items, modify designs and change specifications
without incurring obligation.
Whilst every effort is made to ensure that descriptions, specifications and other information in this publication is
correct, no warranty is given in respect thereof and the company shall not be liable for any errors therein.
Purchased from:
Co. Name:
Address:
Date of Purchase:
Serial number:
NOTE: Consistent with our continuing product development policy, improvements may have been made which
render the contents of this packaging slightly different to that shown.
For Warranty and technical queries: Australia 1300 373 199
: New Zealand 0800 764 912
Table of contents
Other Bellini Hob manuals


Popular Hob manuals by other brands

Smeg
Smeg SI1M4744D Translation of the original instructions

Philco
Philco PHD 60 IP owner's manual

Electrolux
Electrolux EHO 600 Operating and assembly instructions

Hotpoint
Hotpoint CRM 641 D C operating instructions

ELICA
ELICA NikolaTesla FIT 60 Instruction on mounting and use

NEFF
NEFF T58 S2 Series user manual


cecotec
cecotec BOLERO SQUAD V 2001 instruction manual

Franke
Franke MARIS Series Installation and user manual

Küppersbusch
Küppersbusch EWI 457.1 Instructions for use and installation instructions

AGA
AGA TC/DC Users instructions & cooking guide

Baumatic
Baumatic BHC605 instruction manual

Leonard
Leonard LES6001F user manual